

Packer is an open-source VM image creation tool from Hashicorp. It helps you automate the process of Virtual machine image creation on the cloud and on-prem virtualized environments.
To put it simply, whatever manual steps you perform to create a Virtual machine image can be automated through a simple Packer config template. You declare the state of the VM image you need, and Packer builds it for you.
Packer Use Cases
The following are the main use cases for Packer.
- Golden Image Creation: With packer, you can template the configurations required for a golden VM image that can be used across organizations.
- Monthly VM Patching: You can integrate Packer into your monthly VM image patching pipeline.
- Immutable Infrastructure: If you want to create an immutable infrastructure using VM images as a deployable artifact, you can use Packer in your CI/CD pipeline.
Basically, all the above use cases are part of the CI pipelines or IaaC code pipelines where every Packer template is version controlled. Even the packer template development or update should go through all the CI tests before getting deployed in a project environment.
Packer Tutorial For Beginners
In this Packer beginner tutorial, you will learn the following.
- The basic building blocks of Packer.
- Packer Workflow
- Installing Packer
- Understanding Packer HCL template.
- Creating an AWS AMI using Packer
Let's get started with the Packer setup.
Install Packer
You can have Packer installed on your local workstation or on a cloud instance. In the actual project, the Packer installation would be part of the Jenkins agent or any tooling which is part of the CI/CD process.
~/.aws/credentials. It is not mandatory to have a credentials file. You can pass the AWS credentials using the packer variable declaration as well.Step 1: Download the latest Packer executable from the Packer downloads page. https://www.packer.io/downloads.html. It is available for Windows, Linux, and other Unix platforms.
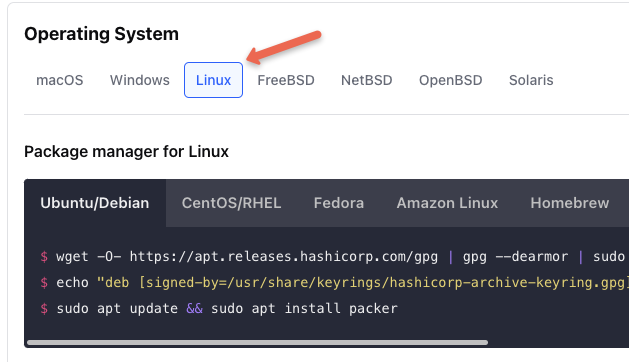
For Linux, you can install Packer from the respective package managers or you can get the download link from the download button and download it using wget.
For example, In Ubuntu
wget -O- https://apt.releases.hashicorp.com/gpg | gpg --dearmor | sudo tee /usr/share/keyrings/hashicorp-archive-keyring.gpg
echo "deb [signed-by=/usr/share/keyrings/hashicorp-archive-keyring.gpg] https://apt.releases.hashicorp.com $(lsb_release -cs) main" | sudo tee /etc/apt/sources.list.d/hashicorp.list
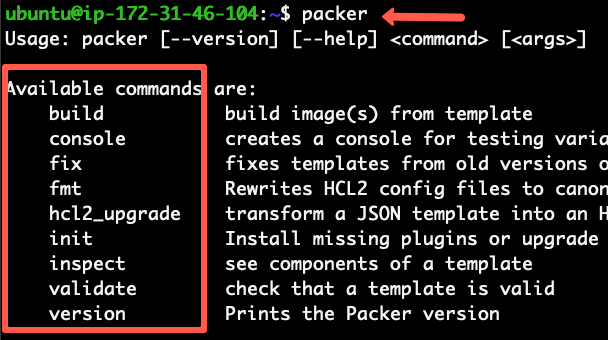
sudo apt update && sudo apt install packerStep 2: Verify packer installation by executing the packer command.
packer versionYou should see the output as shown below.
Building VM Image (AWS AMI) Using Packer
Building a VM image using Packer is a simple process. The workflow is somewhat similar to building VMs using Vagrant
Take a look at the following high-level Packer workflow diagram.
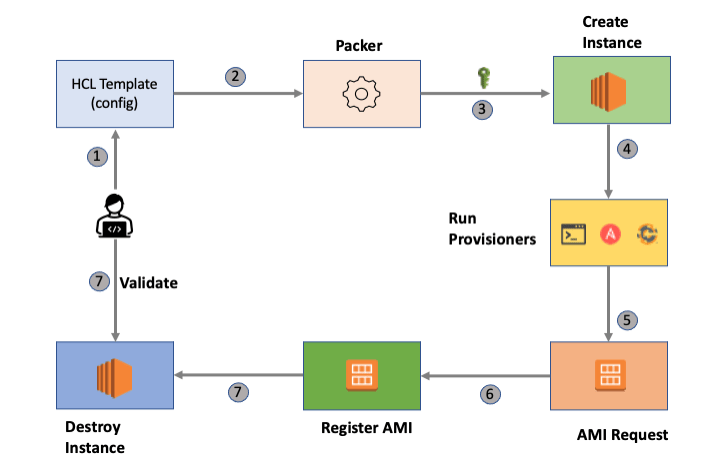
Let's break down the process.
- Declare all the required VM configurations in an HCL (Hashicorp configuration language) or a JSON file. Let's call it the Packer template.
- To build the VM image, execute Packer with the Packer template..
- Packer authenticates the remote cloud provider and launches a server. If you execute Packer from a cloud environment, it leverages the cloud service account for authentication.
- Packer takes a remote connection to the server (SSH or Winrm).
- Then it configures the server based on the provisioner you specified in the Packer template (Shell script, Ansible, Chef, etc).
- Registers the AMI
- Deletes the running instance.
Packer Template Reference
All the code used in this article is hosted on a Packer Template Github repository. You can clone or fork it to keep it as a reference. Or you can use the template directly from the packer-aws-shell folder
git clone https://github.com/techiescamp/packer-templatesPlease feel free to contribute to the repo with more templates.
Packer HCL Template Explained
v1.7 Packer uses HCL format templates. JSON support is also there. But it's recommended to change to HCL format as the newly developed features will not be added to the JSON-based template. If your exiting project or organization users JSON templates, you can convert them to HCL templates. See Upgrading JSON to HCL for more information.Let's have a look at the HCL Packer template in detail.
Here is the high-level packer template structure.
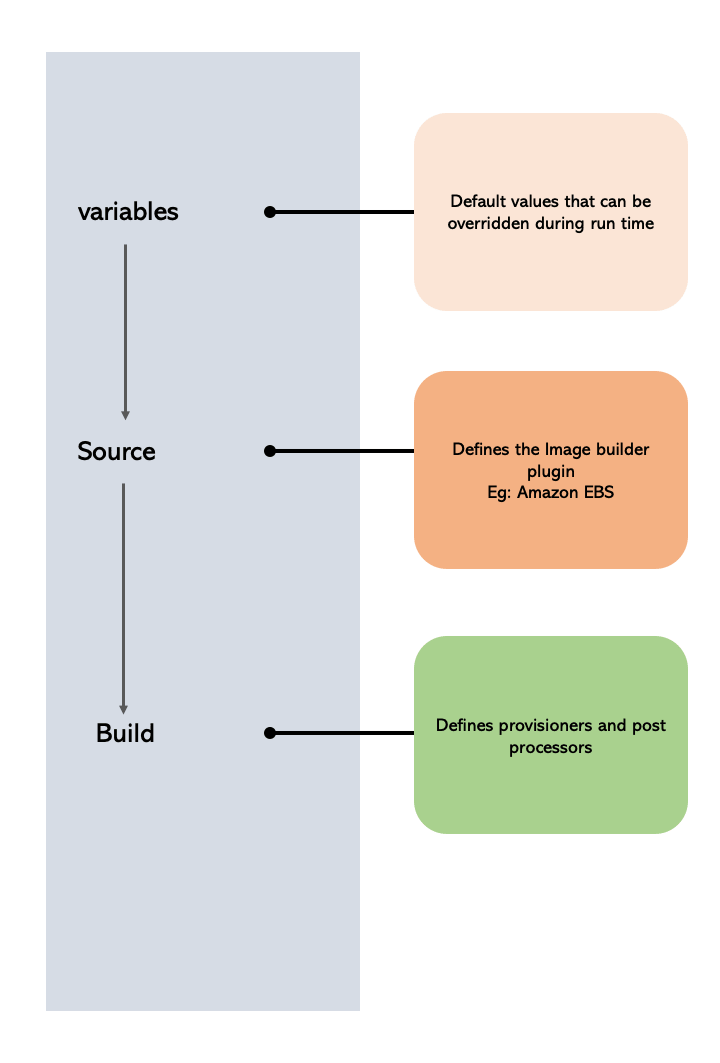
An HCL template has a few blocks. Let's understand each block with sample configuration before we create the AMI with Packer
Variables
Using the variable block, you can declare the default Packer parameters as variables. The declared variables can be overridden from the command line during the packer build process.
You can make use of packer variables for dynamic configuration when used with CI tools like Jenkins.
Let’s understand different scenarios for variable usage.
Using Variable Within Template
The variables block holds all the default variables within a template. An example is shown below.
variable "ami_id" {
  type    = string
  default = "ami-6f68cf0f"
}
The declared variables can be accessed in other parts of the template using "${var.app_name}" syntax. An example is shown below.
source_ami = "${var.ami_id}"Using Environment Variables in Templates
Packer lets you use the system environment variables. First, you need to declare the environment variables in the variable section to use them in the other parts of the template.
Let's say, you want to use the SCRIPT_PATH environment variable that holds the path to a shell script that has to be used in the shell provisioner. You can declare that variable as shown below.
variable "script_path" {
  default = env("SCRIPT_PATH")
}
Then, you can use the script_path variable in the provisioned block like shown below.
provisioner "shell" {
    script = "${var.script_path}/demo-script.sh"
  }
Using Command Line Variables
All the variables declared in the variable block can be overridden during the Packer run time using -var a flag followed by the variable value.
For example,
packer build -var 'app_name=httpd' ami.pkr.hclami.pkr.hcl is the packer template file.Using an HCL file
You can also use an HCL file to eternalize all the variables in the template. Let's say we have a variable file named vars.packer.hcl, you can add the variables as shown below.
app_name = "httpd"
ami_id   = "ami-6f68cf0f"
And during the packer build, you can pass this file as shown below.
packer build -var-file="vars.packer.hcl"Using a JSON File
You can also list all the variables in a JSON file and pass it during the packer build as shown below.
packer build -var-file=variables.json ami.pkr.hcllocals
Locals are also variables, but they cannot be overridden. It is scoped within the Packer template.
locals {
    app_name = "httpd"
}
You can interpolate a variable with a local as shown below.
locals {
  ami_name = "${var.app_name}-prodcution"
}
If you want to pass any sensitive information in a variable, you can convert it to a local value and then mark it as sensitive. This way, the value won't be printed anywhere in the Packer build logs.
local "secret_key" {
  key = "${var.secret_key}"
  sensitive  = true
}
Source
Packer works on the concept of the builder plugin. For every cloud provider, there are specific builder plugins that interact with the Cloud provider API to create the images.
In this block, we mention the builder plugin details. For example, if you want to build AWS AMI, you can specify amazon-ebs as a builder plugin. You have to provide all the mandatory parameters associated with the amazon-ebs builder plugin.
Also, In the following code block, you can see that we are calling ${var.ami_id} declared in the variable block.
Check the official builder plugin documentation to know about the list of supported builders.
source "amazon-ebs" "httpd" {
  ami_name      = "PACKER-DEMO-${local.app_name}"
  instance_type = "t2.micro"
  region        = "eu-west-1"
  source_ami    = "${var.ami_id}"
  ssh_username  = "ec2-user"
  tags = {
    Env  = "DEMO"
    Name = "PACKER-DEMO-${var.app_name}"
  }
}
build
In this block, we declare all the provisioners and post-processor.
build {
  sources = ["source.amazon-ebs.httpd"]

  provisioner "shell" {
    script = "script.sh"
  }
}
Provisioner
The provisioner block is part of the build block. Here you can mention how you want to configure the VM image. You can run shell scripts, Ansible playbooks, Check cookbooks, etc. See the provisioners page for all the supported provisioners.
The script or ansible-playbook should be present in the folder where you have the Packer template.
provisioner "shell" {
    script = "script.sh"
  }
Also, there is a file provisioner using which you can copy files from the packer machine to the AMI.
For example,
provisioner "file"{
  source = "/build/artifact/code.jar"
  destination = "/app/code.jar"
}
Post-Processor
Post-Processor is not a mandatory block. In this block, we can specify what to do after creating the Image. For example, you can execute a local shell script to create a file with all the image details.
post-processor "shell-local" {
    inline = ["echo foo"]
  }
Also, you can use the manifest post-processor to get the AMI details in the manifest.json file.
  post-processor "manifest" {
    output     = "manifest.json"
    strip_path = true
  }
Creating AWS AMI Using Packer HCL Template
Now let's see how to create an AMI using the Packer HCL template.
Here is what the template does.
- Packer deploys an ec2 RHEL instance based on AMI id
ami-01e78c5619c5e68b4in theeu-west-1region. - Executes the shell script on the RHEL instance from the
script.shscript provided in the template directory - Registers the AMI with the name given in the template.
- Deletes the running machine.
Let's get our hands dirty with a practical example.
Step 1: Create a folder named "packer-vm".
mkdir packer-vmStep 2: Inside the packer-vm folder, create a file named "vm.pkr.hcl" and copy the following HCL template.
variable "ami_id" {
  type    = string
  default = "ami-01e78c5619c5e68b4"
}

variable "app_name" {
  type    = string
  default = "httpd"
}

locals {
    app_name = "httpd"
}

source "amazon-ebs" "httpd" {
  ami_name      = "PACKER-DEMO-${local.app_name}"
  instance_type = "t2.micro"
  region        = "us-west-2"
  source_ami    = "${var.ami_id}"
  ssh_username  = "ec2-user"
  tags = {
    Env  = "DEMO"
    Name = "PACKER-DEMO-${var.app_name}"
  }
}

build {
  sources = ["source.amazon-ebs.httpd"]

  provisioner "shell" {
    script = "script/script.sh"
  }

  post-processor "shell-local" {
    inline = ["echo foo"]
  }
}
Step 3: Create a folder named script inside the packer-vm folder and cd into the script directory.
mkdir script && cd scriptStep 3: Create a file name script.sh and copy the following shell script to it. It just updates the yum repo and installs httpd. Here, you can add all the shell scripts that you want to get executed during the AMI creation.
#!/bin/bash
sudo yum -y update
sudo yum install -y httpd
Step 4: [Very Important] Now that we have all the required files, let's understand the required packer authentication.
If you are running Packer on your workstation for debugging or testing purposes, you need the AWS access and secret keys for Packer to interact with AWS services. Make sure you have the AWS access keys set on the file ~/.aws/credentials.
Alternatively, you can pass AWS keys in the source block, as shown below. It is not a recommended practice. Accidently you might commit this to a source code repo.
source "amazon-ebs" "example" {
  access_key = "ASDFASDFASDFJQWEKONNOASDF"
  secret_key = "SDFQ324876134HJKLASDBJKASDJFHBAJSDFJKHASKDG"
}
If you are running Packer from an AWS ec2 instance, make sure you add an IAM role with permissions to interact with AWS ec2 services. I have added the required IAM policy JSON in Github. See Packer IAM policy JSON
Step 5: Now let's validate the Packer HCL template before we build it. Validation is very important in the CI process.
packer validate vm.pkr.hclStep 6: Run the packer build using the following command.
packer build vm.pkr.hclThe above command runs for almost 3 - 5 minutes.
If you check your AMI list, you should see an AMI named PACKER-DEMO-httpd.
Debugging Packer Build
There are situations where you might need to debug a packer build.
The -debug flag lets you debug the AMI build.
For example,
packer build -debug vm.pkr.hclWhen you run packer in debug mode, You need to approve each packer step manually as shown in the image below.
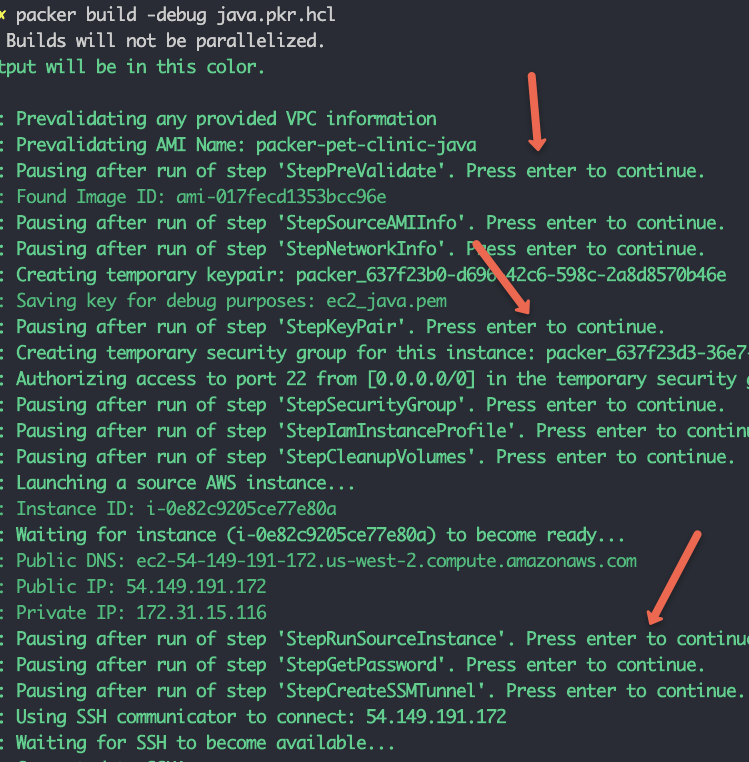
Also, You can ssh into the ec2 instance created by Packer using the temporary ssh key or the ssh key pair provided in the packer config.
If you don't specify the ssh key in the packer configuration, it creates a temporary ssh key and places it in the same folder where you run the packer command.
So that you can use the IP address and temporary ssh key to log in to the packer VM to debug the issues.
If you want to see how packer works in real world setup, you can checkout the following DevOps project video where I have used Packer with Terraform.
Packer Build Logs
Another way to debug the packer build is through packer detailed logs.
To get the build logs, you need to set the following environment variable before running the packer build command.
export PACKER_LOG=1
export PACKER_LOG_PATH="/path/to/packer.log"
Replace /path/to/packer.log with the required log path. if you just specify packer.log, packer creates the log file in the folder where the Packer command is getting executed.
To persist this environment variable, add it to the $HOME/.bashrc file or add it as s script in /etc/profile.d folder.
Unit Testing Packer Templates
Packer templates should be treated as any other Infrastructure as code that involves testing.
You can write Packer tests using Check Inspec.
When implementing packer in production workflows, ensure you write the necessary tests as part of your CI/CD pipeline.
Check out this repo for packer inspec reference.
Packer Possible Errors
You might get the following ssh error when working on AWS-based AMIs. A possible cause of the issue is the support for ed25519 ssh key type for the temporary ssh key. To rectify this issue, you need to upgrade Packer to the latest version that supports ed25519.
amazon-ebs: Error waiting for SSH: Packer experienced an authentication error when trying to connect via SSH. This can happen if your username/password are wrong. You may want to double-check your credentials as part of your debugging process.Few Packer Tips
Tip 1: You can capture the output of the image ID in the manifest.json file. You can then parse the JSON file to get the exact image ID.
Tip 2: Use the -debug flag to log in to the server created by Packer for troubleshooting rather than running the packer build every time you have a change in provisioning scripts.
Conclusion
In this packer tutorial for beginners, I have covered the basics of image creation using Packer.
There are more customizations you can do in your Paker templates when it comes to a real-time project.
Again, it depends on what you want to achieve using packer.
You might be using Jenkins for image build pipelines or maybe custom utilities.
Either way, drop a comment and let me know how you manage images in your project.
Also, it is one of the devops tools that every devops engineer should know. I have explained this in my devops engineer skills guide.