

In this blog post, I have covered the step-by-step guide to setting up a kubernetes cluster using Kubeadm with one control plane node and two worker nodes.
Kubeadm is an excellent tool to set up a working kubernetes cluster in less time. It does all the heavy lifting in terms of setting up all kubernetes cluster components. Also, it follows all the configuration best practices for a kubernetes cluster.
What is Kubeadm?
Kubeadm is a tool to set up a minimum viable Kubernetes cluster without much complex configuration. Also, Kubeadm makes the whole process easy by running a series of prechecks to ensure that the server has all the essential components and configs to run Kubernetes.
It is developed and maintained by the official Kubernetes community. There are other options like minikube, kind, etc., that are pretty easy to set up. Those are good options with minimum hardware requirements if you are deploying and testing applications on Kubernetes.
But if you want to play around with the cluster components or test utilities that are part of cluster administration, Kubeadm is the best option. Also, you can create a production-like cluster locally on a workstation for development and testing purposes.
Kubeadm Setup Prerequisites
Following are the prerequisites for Kubeadm Kubernetes cluster setup.
- Minimum two Ubuntu nodes [One control plane node and one worker node]. You can have more worker nodes as per your requirement.
- The control plane node should have a minimum of 2 vCPU and 2GB RAM.
- For the worker nodes, a minimum of 1vCPU and 2 GB RAM is recommended.
- 10.X.X.X/X network range with static IPs for control plane node and worker nodes. We will be using the 192.x.x.x series as the pod network range that will be used by the Calico network plugin. Make sure the Node IP range and pod IP range don't overlap.
registry.k8s.io to pull the required images.Kubeadm Port Requirements
Please refer to the following image and make sure all the ports are allowed for the control plane node and the worker nodes. If you are setting up the kubeadm cluster cloud servers, ensure you allow the ports in the firewall configuration.
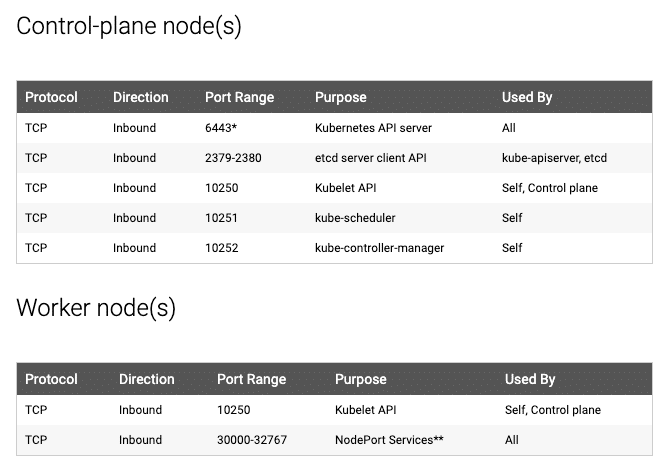
Additionally, Calico, requires specific UDP ports for inter-node and pod communication. So enable all UDP traffic between the cluster nodes.
If UDP traffic is blocked, DNS queries from pods will fail, leading to errors like connection timed out, and Calico-based networking may also break, causing pod communication issues.
If you are using vagrant-based Ubuntu VMs, the firewall will be disabled by default. So you don't have to do any firewall configurations.
Kubeadm for Kubernetes Certification Exams
If you are preparing for Kubernetes certifications like CKA, CKAD, or CKS, you can use the local kubeadm clusters to practice for the certification exam. In fact, kubeadm itself is part of the CKA and CKS exam. For CKA you might be asked to bootstrap a cluster using Kubeadm. For CKS, you have to upgrade the cluster using kubeadm.
If you use Vagrant-based VMs on your workstation, you can start and stop the cluster whenever you need. By having the local Kubeadm clusters, you can play around with all the cluster configurations and learn to troubleshoot different components in the cluster.
Check out our CKA course and practice test bundle (use code DCUBE30 to get 30% OFF).
We explain concepts using illustrations, hands-on exercises, real-world examples, and provide dedicated discord based user support.
Vagrantfile, Kubeadm Scripts & Manifests
Also, all the commands used in this guide for control plane and worker nodes config are hosted in GitHub. You can clone the repository for reference.
git clone https://github.com/techiescamp/kubeadm-scriptsThis guide intends to make you understand each config required for the Kubeadm setup. If you don't want to run the commands one by one, you can run the script file directly.
If you are using Vagrant to set up the Kubernetes cluster, you can make use of my Vagrantfile. It launches 3 VMs. A self-explanatory basic Vagrantfile. If you are new to Vagrant, check the Vagrant tutorial.
If you are a Terraform and AWS user, you can make use of the Terraform script present under the Terraform folder to spin up ec2 instances.
Also, I have created a video demo of the whole kubeadm setup. You can refer to it during the setup.
Kubernetes Cluster Setup Using Kubeadm
The following are the high-level steps involved in setting up a kubeadm-based Kubernetes cluster.
- Install container runtime on all nodes. We will be using CRI-O
- Install Kubeadm, Kubelet, and kubectl on all the nodes.
- Initiate Kubeadm control plane configuration on the control plane node.
- Save the node join command with the token.
- Install the Calico network plugin (operator).
- Join the worker node to the control plane node using the join command.
- Validate all cluster components and nodes.
- Install Kubernetes Metrics Server
- Deploy a sample app and validate the app
All the steps given in this guide are referenced from the official Kubernetes documentation and related GitHub project pages.
If you want to understand every cluster component in detail, refer to the comprehensive Kubernetes Architecture.
Now let's get started with the setup.
Step 1: Enable iptables Bridged Traffic on all the Nodes
Execute the following commands on all the nodes for IPtables to see bridged traffic. Here we are tweaking some kernel parameters and setting them using sysctl.
# Keeps the swap off during reboot
(crontab -l 2>/dev/null; echo "@reboot /sbin/swapoff -a") | crontab - || true
sudo apt-get update -y

# Create the .conf file to load the modules at bootup
cat <<EOF | sudo tee /etc/modules-load.d/k8s.conf
overlay
br_netfilter
EOF

sudo modprobe overlay
sudo modprobe br_netfilter

# Sysctl params required by setup, params persist across reboots
cat <<EOF | sudo tee /etc/sysctl.d/k8s.conf
net.bridge.bridge-nf-call-iptables  = 1
net.bridge.bridge-nf-call-ip6tables = 1
net.ipv4.ip_forward                 = 1
EOF

# Apply sysctl params without reboot
sudo sysctl --system
Step 2: Disable swap on all the Nodes
For kubeadm to work properly, you need to disable swap on all the nodes using the following command.
sudo swapoff -a
(crontab -l 2>/dev/null; echo "@reboot /sbin/swapoff -a") | crontab - || true
The fstab entry will make sure the swap is off on system reboots.
You can also, control swap errors using the kubeadm parameter --ignore-preflight-errors Swap we will look at it in the latter part.
Step 3: Install CRI-O Runtime On All The Nodes
The basic requirement for a Kubernetes cluster is a container runtime. You can have any one of the following container runtimes.
- CRI-O
- containerd
- Docker Engine (using cri-dockerd)
We will be using CRI-O instead of containerd for this setup.
Execute the following commands on all the nodes to install required dependencies and the latest version of CRI-O and crictl.
CRIO_VERSION="v1.36"
KUBERNETES_VERSION="v1.36"

# Install CRI-O Runtime
sudo apt-get update -y
sudo apt-get install -y software-properties-common curl apt-transport-https ca-certificates

sudo install -m 0755 -d /etc/apt/keyrings

# Add CRI-O apt repository
curl -fsSL https://download.opensuse.org/repositories/isv:/cri-o:/stable:/$CRIO_VERSION/deb/Release.key |
    gpg --dearmor -o /etc/apt/keyrings/cri-o-apt-keyring.gpg

echo "deb [signed-by=/etc/apt/keyrings/cri-o-apt-keyring.gpg] https://download.opensuse.org/repositories/isv:/cri-o:/stable:/$CRIO_VERSION/deb/ /" |
    tee /etc/apt/sources.list.d/cri-o.list

sudo apt-get update -y
sudo apt-get install -y cri-o

sudo systemctl daemon-reload
sudo systemctl enable crio --now
sudo systemctl start crio.service
Step 4: Install & Configure Crictl to use CRI-O
Download and install Crictl on all nodes and configure it to use the CRI-O runtime.
CRICTL_VERSION="v1.36.0"

# Install crictl
curl -LO "https://github.com/kubernetes-sigs/cri-tools/releases/download/${CRICTL_VERSION}/crictl-${CRICTL_VERSION}-linux-${CRICTL_ARCH}.tar.gz"
sudo tar zxvf "crictl-${CRICTL_VERSION}-linux-${CRICTL_ARCH}.tar.gz" -C /usr/local/bin
rm -f "crictl-${CRICTL_VERSION}-linux-${CRICTL_ARCH}.tar.gz"

# Configure crictl to use CRI-O socket
cat <<EOF | sudo tee /etc/crictl.yaml
runtime-endpoint: unix:///run/crio/crio.sock
image-endpoint: unix:///run/crio/crio.sock
timeout: 10
debug: false
EOF
Now you will also have crictl available in your nodes.
crictl is a CLI utility to interact with the containers created by the container runtime.
Step 5: Install Kubeadm & Kubelet & Kubectl on all Nodes
Download the GPG key for the Kubernetes APT repository on all the nodes.
# Add Kubernetes apt repository
curl -fsSL https://pkgs.k8s.io/core:/stable:/$KUBERNETES_VERSION/deb/Release.key |
    gpg --dearmor -o /etc/apt/keyrings/kubernetes-apt-keyring.gpg

echo "deb [signed-by=/etc/apt/keyrings/kubernetes-apt-keyring.gpg] https://pkgs.k8s.io/core:/stable:/$KUBERNETES_VERSION/deb/ /" |
    tee /etc/apt/sources.list.d/kubernetes.list
Update apt repo
sudo apt-get update -yYou can use the following commands to find the latest versions. Install the first version in 1.35 so that you can practice the cluster upgrade task.
apt-cache madison kubeadm | tacSpecify the version as shown below. Here I am using 1.36.0-1.1
KUBERNETES_INSTALL_VERSION="1.36.0-1.1"

sudo apt-get install -y kubelet="$KUBERNETES_INSTALL_VERSION" kubectl="$KUBERNETES_INSTALL_VERSION" kubeadm="$KUBERNETES_INSTALL_VERSION"
Or, to install the latest version from the repo use the following command without specifying any version.
sudo apt-get install -y kubelet kubeadm kubectlAdd hold to the packages to prevent upgrades.
sudo apt-mark hold kubelet kubeadm kubectlNow we have all the required utilities and tools for configuring Kubernetes components using kubeadm.
Add the node IP to KUBELET_EXTRA_ARGS.
sudo apt-get install -y jq

local_ip="$(ip --json addr show eth0 | jq -r '.[0].addr_info[] | select(.family == "inet") | .local')"

cat > /etc/default/kubelet << EOF

KUBELET_EXTRA_ARGS=--node-ip=$local_ip

EOF
Step 6: Create the Kubeadm Config
Now that we have the nodes ready with all the utilities for kubernetes, we will initialize the control plane using a kubeadm config file. We will be using the Kubernetes version v1.36
Here, you need to consider two options.
- ControlPlane Node with Private IP: If you have nodes with only private IP addresses, the API server would be accessed over the private IP of the ControlPlane node.
- ControlPlane With Public IP: If you are setting up Kubeadm cluster on Cloud platforms and you need ControlPlane API server access over the Public IP of the master node server.
Without a static IP, the public IP may change if the VM is restarted or shut down, which can cause connectivity issues and prevent the cluster from functioning as expected.
Lets create the Kubeadm Config.
vi kubeadm.configIn the following YAML, replace 192.168.201.10 with your control plane node's private IP in advertiseAddress.
- For cloud VMs with a public IP we discussed earlier, update the
controlPlaneEndpointwith the Public IP - If you don't need public access, use the private IP in
controlPlaneEndpointinstead.
apiVersion: kubeadm.k8s.io/v1beta4
kind: InitConfiguration
localAPIEndpoint:
  advertiseAddress: "192.168.249.201"
  bindPort: 6443
nodeRegistration:
  name: "controlplane"

---
apiVersion: kubeadm.k8s.io/v1beta4
kind: ClusterConfiguration
kubernetesVersion: "v1.36.0"
controlPlaneEndpoint: "192.168.249.201:6443"
apiServer:
  extraArgs:
    - name: "enable-admission-plugins"
      value: "NodeRestriction"
    - name: "audit-log-path"
      value: "/var/log/kubernetes/audit.log"
controllerManager:
  extraArgs:
    - name: "node-cidr-mask-size"
      value: "24"
scheduler:
  extraArgs:
    - name: "leader-elect"
      value: "true"
networking:
  podSubnet: "10.244.0.0/16"
  serviceSubnet: "10.96.0.0/12"
  dnsDomain: "cluster.local"

---
apiVersion: kubelet.config.k8s.io/v1beta1
kind: KubeletConfiguration
cgroupDriver: "systemd"
syncFrequency: "1m"

---
apiVersion: kubeproxy.config.k8s.io/v1alpha1
kind: KubeProxyConfiguration
mode: "ipvs"
conntrack:
  maxPerCore: 32768
  min: 131072
  tcpCloseWaitTimeout: "1h"
  tcpEstablishedTimeout: "24h"
Step 7: Initialize Kubeadm On Controlplane Node
Now, lets initialize the cluster.
sudo kubeadm init --config=kubeadm.configOn a successful kubeadm initialization, you should get an output with kubeconfig file location and the join command with the token as shown below. Copy that and save it to the file. we will need it for joining the worker node to the master.
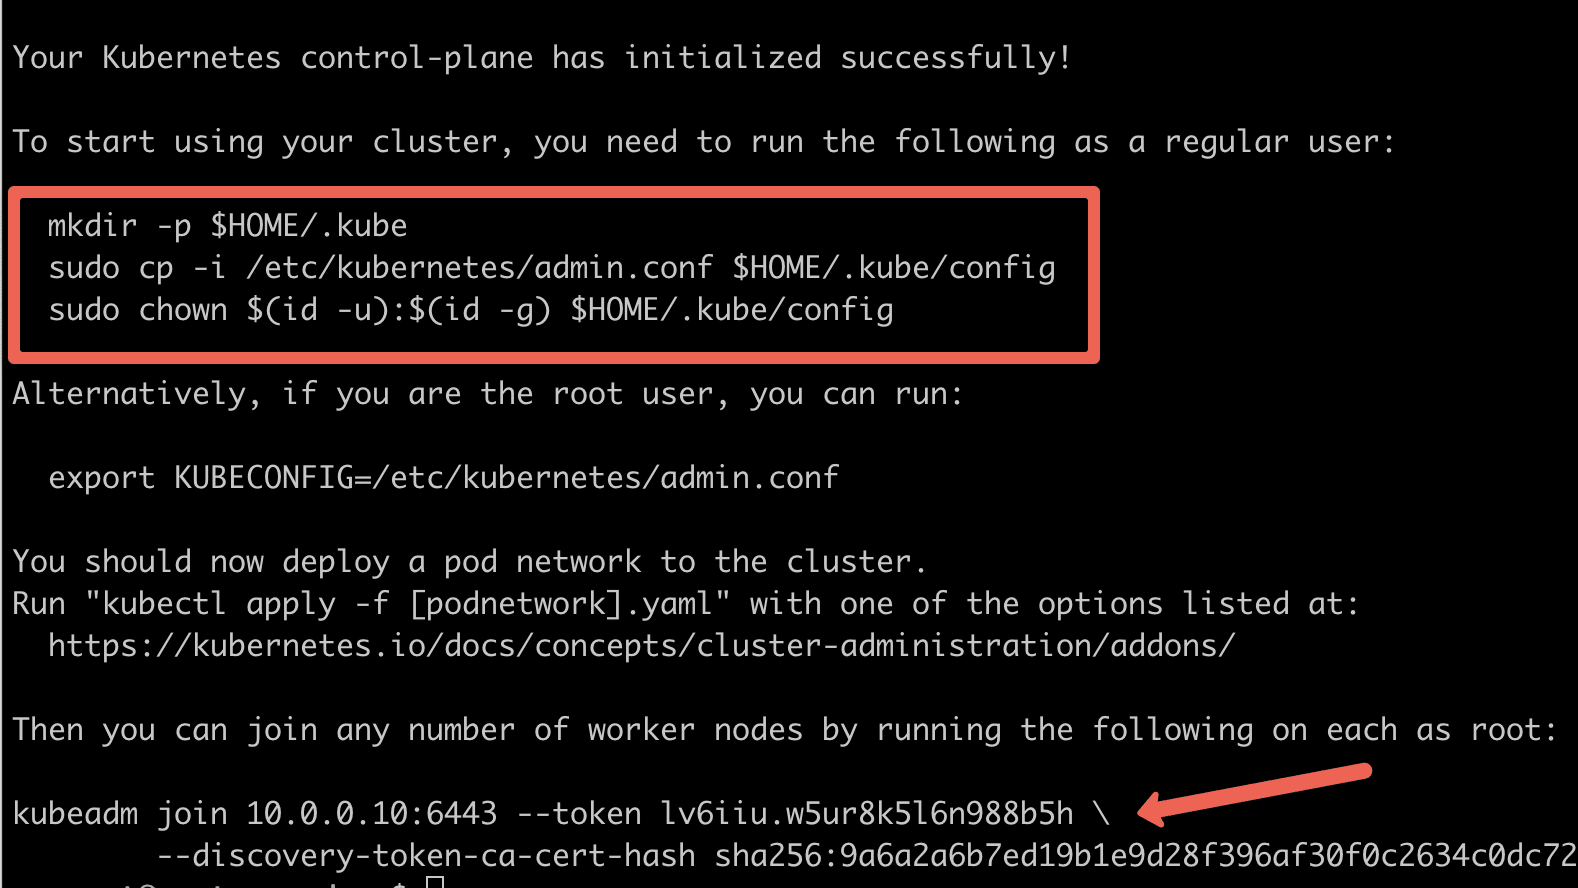
Use the following commands from the output to create the kubeconfig in the control plane so that you can use kubectl to interact with the cluster API.
mkdir -p $HOME/.kube
sudo cp -i /etc/kubernetes/admin.conf $HOME/.kube/config
sudo chown $(id -u):$(id -g) $HOME/.kube/config
Now, verify the kubeconfig by executing the following kubectl command to list all the pods in the kube-system namespace.
$ kubectl get po -n kube-systemYou should see the following output. You will see the two Coredns pods in a pending state. It is the expected behavior. Once we install the network plugin, it will be in a running state.
$ kubectl get po -n kube-system

NAME                                   READY   STATUS    RESTARTS   AGE
coredns-668d6bf9bc-6tpcr               0/1     Pending   0          15m
coredns-668d6bf9bc-gwzql               0/1     Pending   0          15m
etcd-controlplane                      1/1     Running   0          15m
kube-apiserver-controlplane            1/1     Running   0          15m
kube-controller-manager-controlplane   1/1     Running   0          15m
kube-proxy-xpbjr                       1/1     Running   0          15m
kube-scheduler-controlplane            1/1     Running   0          15m
You can verify all the cluster component health statuses using the following command.
kubectl get --raw='/readyz?verbose'You can get the cluster info using the following command.
kubectl cluster-info By default, apps won't get scheduled on the control plane node. If you want to use the control plane node for scheduling apps, taint the master node.
kubectl taint nodes --all node-role.kubernetes.io/control-plane-Step 8: Join Worker Nodes To Kubernetes Control Plane
We have set up cri-o, kubelet, and kubeadm utilities on the worker nodes as well.
Now, let's join the worker node to the Control Plane node using the Kubeadm join command you have got in the output while setting up the master node.
If you missed copying the join command, execute the following command in the master node to recreate the token with the join command.
kubeadm token create --print-join-commandHere is what the command looks like. Use sudo if you running as a normal user. This command performs the TLS bootstrapping for the nodes.
sudo kubeadm join 10.128.0.37:6443 --token j4eice.33vgvgyf5cxw4u8i \
    --discovery-token-ca-cert-hash sha256:37f94469b58bcc8f26a4aa44441fb17196a585b37288f85e22475b00c36f1c61
On successful execution, you will see the output saying, "This node has joined the cluster".
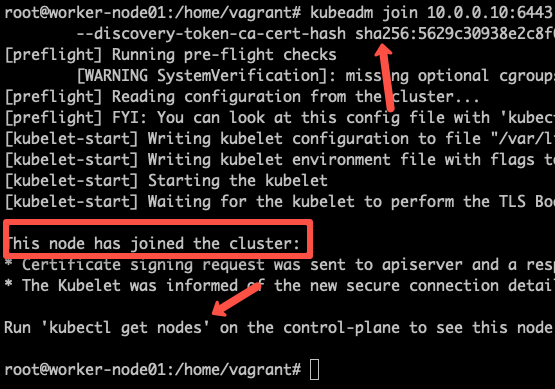
You can further add more nodes with the same join command.
Now execute the kubectl command from the control-plane node to check if the node is added to the master.
kubectl get nodesExample output,
root@controlplane:~# kubectl get nodes

NAME           STATUS     ROLES           AGE   VERSION
controlplane   NotReady   control-plane   28m   v1.36.0
node01         NotReady   <none>          39s   v1.36.0
node02         NotReady   <none>          33s   v1.36.0
You can see that the nodes are in a NotReady state because a Network Plugin (CNI) has not been installed in the cluster yet.
Kubernetes requires the CNI for pod networking. Without it, the nodes cannot communicate properly, which is why they are in a NotReady state.
The node status will change to Ready once we install and configure a Network Plugin in the cluster.
Also, in the above output, the ROLE is <none> for the worker nodes.
You can add a label to the worker node using the following command. Replace node01 with the hostname of the worker node you want to label.
kubectl label node node01 node-role.kubernetes.io/worker=workerStep 9: Install Calico Network Plugin for Pod Networking
Kubeadm does not configure any network plugin. You need to install a network plugin of your choice for kubernetes pod networking and enable network policy.
I am using the Calico network plugin for this setup.
kubeconfig file. Either from the master of your workstation with the connectivity to the kubernetes API.Follow the steps to configure Calico Operator.
Step 1: Install the Tigera Operator and Custom Resources
Execute the following commands to install the Calico network plugin operator and CRD's on the cluster.
kubectl create -f https://raw.githubusercontent.com/projectcalico/calico/v3.31.3/manifests/operator-crds.yaml
kubectl create -f https://raw.githubusercontent.com/projectcalico/calico/v3.31.3/manifests/tigera-operator.yaml
The above command installs the Tigera operator and related Custom Resource Definitions (CRDs) in your Kubernetes cluster.
The Tigera operator is responsible for managing the installation and lifecycle of Calico, which is a CNI (Container Network Interface) plugin used for pod networking and network policies.
Step 2: Download the Calico Custom Resource
Use the following command to download the Calico custom resource.
curl -O https://raw.githubusercontent.com/projectcalico/calico/v3.31.3/manifests/custom-resources.yamlThis will download the custom-resources.yaml file to your local machine, but it won't apply it to the cluster.
So why do you need to download and edit the custom resource for pod networking?
Because the custom resource defines how Calico should be configured in your cluster.
In our case, we need to adjust the IP pools to match our Pod network settings that we used in the Kubeadm config.
Step 3: Get the cluster CIDR range
To get the cluster CIDR range, run the following command.
kubectl -n kube-system get pod -l component=kube-controller-manager -o yaml | grep -i cluster-cidrYou should get 10.244.0.0/16 as the output because that value was used in the kubeadm.config during cluster initialization.
Step 4: Customize custom-resources.yaml
Open the custom-resources.yaml file and change the default CIDR from 192.168.0.0/16 to 10.244.0.0/16, which is the value specified in your kubeadm configuration. You should also see this same value in the previous output.
Verifying the CIDR ensures that the pod network is correctly configured for your cluster.
Open the custom-resources.yaml
vi custom-resources.yamlFind the section with cidr: 192.168.0.0/16 and replace it with cidr: 10.244.0.0/16
Here’s how the updated section should look after replacing cidr: 192.168.0.0/16 with cidr: 10.244.0.0/16
apiVersion: operator.tigera.io/v1
kind: Installation
metadata:
  name: default
spec:
  # Configures Calico networking.
  calicoNetwork:
    ipPools:
    - name: default-ipv4-ippool
      blockSize: 26
      cidr: 10.244.0.0/16
      encapsulation: VXLANCrossSubnet
      natOutgoing: Enabled
      nodeSelector: all()
Step 5: Deploy the custom resource
After updating the custom-resources.yaml file with the correct pod CIDR, apply it to the cluster to complete the Calico setup.
Run the following command:
kubectl apply -f custom-resources.yamlNow, when you check the pod status, you should see all the pods, including Calico and CoreDNS, in a Running state.
kubectl get po -AIt may take a few minutes for all the pods to reach the running state.
Also, if you check the node status, you will see that all the nodes are now in a Ready state.
Before installing the CNI, the nodes were in a NotReady state.
Run the following command to verify:
kubectl get noStep 10: Setup Kubernetes Metrics Server
Kubeadm doesn't install metrics server component during its initialization. We have to install it separately.
To verify this, if you run the top command, you will see the Metrics API not available error.
root@controlplane:~# kubectl top nodes

error: Metrics API not available
To install the metrics server, execute the following metric server manifest file.
kubectl apply -f https://raw.githubusercontent.com/techiescamp/cka-certification-guide/refs/heads/main/lab-setup/manifests/metrics-server/metrics-server.yamlThis manifest is taken from the official metrics server repo. I have added the --kubelet-insecure-tls flag to the container to make it work in the local setup and hosted it separately. Or else, you will get the following error.
because it doesn't contain any IP SANs" nodeOnce the metrics server objects are deployed, it takes a minute for you to see the node and pod metrics using the top command.
kubectl top nodesYou should be able to view the node metrics as shown below.
root@controlplane:~# kubectl top nodes

NAME           CPU(cores)   CPU(%)   MEMORY(bytes)   MEMORY(%)
controlplane   107m         5%       1083Mi          58%
node01         76m          3%       639Mi           34%
node02         28m          1%       732Mi           39%
You can also view the pod CPU and memory metrics using the following command.
kubectl top pod -n kube-systemStep 11: Deploy A Sample Nginx Application
Now that we have all the components to make the cluster and applications work, let's deploy a sample Nginx application and see if we can access it over a NodePort
Create an Nginx deployment. Execute the following directly on the command line. It deploys the pod in the default namespace.
cat <<EOF | kubectl apply -f -
apiVersion: apps/v1
kind: Deployment
metadata:
  name: nginx-deployment
spec:
  selector:
    matchLabels:
      app: nginx
  replicas: 2
  template:
    metadata:
      labels:
        app: nginx
    spec:
      containers:
      - name: nginx
        image: nginx:latest
        ports:
        - containerPort: 80
EOF
Expose the Nginx deployment on a NodePort 32000
cat <<EOF | kubectl apply -f -
apiVersion: v1
kind: Service
metadata:
  name: nginx-service
spec:
  selector:
    app: nginx
  type: NodePort
  ports:
    - port: 80
      targetPort: 80
      nodePort: 32000
EOF
Check the pod status using the following command.
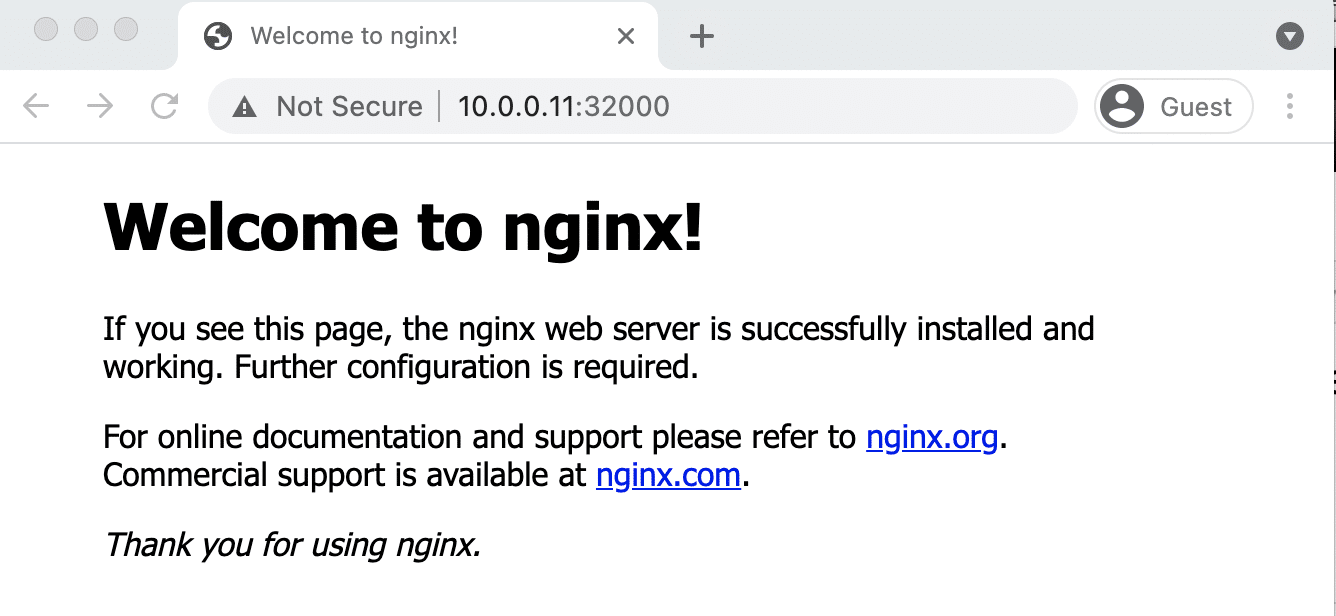
kubectl get podsOnce the deployment is up, you should be able to access the Nginx home page on the allocated NodePort.
For example,
Step 12: Add Kubeadm Config to Workstation
If you prefer to connect the Kubeadm cluster using kubectl from your workstation, you can merge the kubeadm admin.conf with your existing kubeconfig file.
Follow the steps given below for the configuration.
Step 1: Copy the contents of admin.conf from the control plane node and save it in a file named kubeadm-config.yaml in your workstation.
Step 2: Take a backup of the existing kubeconfig.
cp ~/.kube/config ~/.kube/config.bakStep 3: Merge the default config with kubeadm-config.yaml and export it to KUBECONFIG variable
export KUBECONFIG=~/.kube/config:/path/to/kubeadm-config.yamlStep 4: Merger the configs to a file
kubectl config view --flatten > ~/.kube/merged_config.yamlStep 5: Replace the old config with the new config
mv ~/.kube/merged_config.yaml ~/.kube/configStep 6: List all the contexts
kubectl config get-contexts -o nameStep 7: Set the current context to the kubeadm cluster.
kubectl config use-context <cluster-name-here>Now, you should be able to connect to the Kubeadm cluster from your local workstation kubectl utility.
Step 13: Validate the Cluster
Lets do a final validation of the cluster.
Run the following command to verify access to the API server.
$ kubectl cluster-info

Kubernetes control plane is running at https://192.168.249.201:6443
CoreDNS is running at https://192.168.249.201:6443/api/v1/namespaces/kube-system/services/kube-dns:dns/proxy

To further debug and diagnose cluster problems, use 'kubectl cluster-info dump'.
Next, we will test the CoreDNS DNS resolution.
To check if CoreDNS can resolve internal Kubernetes services, lets deploy a dnsutils pod.
$ kubectl apply  -f https://raw.githubusercontent.com/techiescamp/cka-certification-guide/refs/heads/main/lab-setup/manifests/utilities/dnsutils.yaml

$ kubectl get pods dnsutils
Execute the following nslookup command.
Expected output: Resolves to the cluster IP (10.96.0.1).
kubectl exec -i -t dnsutils -- nslookup kubernetes.default
Server:         10.96.0.10
Address:        10.96.0.10#53

Name:   kubernetes.default.svc.cluster.local
Address: 10.96.0.1
To check if the cluster can resolve external domains, execute:
$ kubectl exec -i -t dnsutils -- nslookup google.com

Server:         10.96.0.10
Address:        10.96.0.10#53

Name:   google.com.localdomain
Address: 142.250.195.238
Name:   google.com.localdomain
Address: 142.250.195.238
Cleanup dnutils pod.
kubectl delete -f https://raw.githubusercontent.com/techiescamp/cka-certification-guide/refs/heads/main/lab-setup/manifests/utilities/dnsutils.yamlPossible Kubeadm Issues
The following are the possible issues you might encounter in the kubeadm setup.
- Pod Out of memory and CPU: The master node should have a minimum of 2vCPU and 2 GB memory.
- Nodes cannot connect to Master: Check the firewall between nodes and make sure all the nodes can talk to each other on the required kubernetes ports.
- Calico Pod Restarts: Sometimes, if you use the same IP range for the node and pod network, Calico pods may not work as expected. So make sure the node and pod IP ranges don't overlap. Overlapping IP addresses could result in issues for other applications running on the cluster as well.
For other pod errors, check out the kubernetes pod troubleshooting guide.
If your server doesn't have a minimum of 2 vCPU, you will get the following error.
[ERROR NumCPU]: the number of available CPUs 1 is less than the required 2If you use a public IP with --apiserver-advertise-address parameter, you will have failed master node components with the following error. To rectify this error, use --control-plane-endpoint parameter with the public IP address.
kubelet-check] Initial timeout of 40s passed.


Unfortunately, an error has occurred:
        timed out waiting for the condition

This error is likely caused by:
        - The kubelet is not running
        - The kubelet is unhealthy due to a misconfiguration of the node in some way (required cgroups disabled)

If you are on a systemd-powered system, you can try to troubleshoot the error with the following commands:
        - 'systemctl status kubelet'
        - 'journalctl -xeu kubelet'
You will get the following error in worker nodes when you try to join a worker node with a new token after the master node reset. To rectify this error, reset the worker node using the command kubeadm reset.
[ERROR FileAvailable--etc-kubernetes-kubelet.conf]: /etc/kubernetes/kubelet.conf already exists
        [ERROR Port-10250]: Port 10250 is in use
        [ERROR FileAvailable--etc-kubernetes-pki-ca.crt]: /etc/kubernetes/pki/ca.crt already exists
Kubernetes Cluster Important Configurations
Following are the important Kubernetes cluster configurations you should know.
| Configuration | Location |
|---|---|
| Static Pods Location (etcd, api-server, controller manager and scheduler) | /etc/kubernetes/manifests |
| TLS Certificates location (kubernetes-ca, etcd-ca and kubernetes-front-proxy-ca) | /etc/kubernetes/pki |
| Admin Kubeconfig File | /etc/kubernetes/admin.conf |
| Kubelet configuration | /var/lib/kubelet/config.yaml |
There are configurations that are part of Kubernetes feature gates. If you want to use the features that are part of feature gates, you need to enable them during the Kubeadm initialization using a kubeadm configuration file.
You can refer to enabling feature gates in Kubeadm blog to understand more.
Upgrading Kubeadm Cluster
Using Kubeadm, you can upgrade the kubernetes cluster to the same version patch or a new version.
Kubeadm upgrade doesn't introduce any downtime if you upgrade one node at a time.
To do hands-on, please refer to my step-by-step guide on Kubeadm cluster upgrade
Backing Up ETCD Data
etcd backup is one the key task in real world projects and for CKA certification.
You can follow the etcd backup guide to learn how to perform etcd backup and restore.
Setup Prometheus Monitoring
As a next step, you can try setting up the Prometheus monitoring stack on the Kubeadm cluster.
I have published a detailed guide for the setup. Refer to prometheus on Kubernetes guide for step-by-step guides. The stack contains, prometheus, alert manager, kube state metrics and Grafana.
How Does Kubeadm Work?
Here is how the Kubeadm setup works.
When you initialize a Kubernetes cluster using Kubeadm, it does the following.
- When you initialize kubeadm, first it runs all the preflight checks to validate the system state and it downloads all the required cluster container images from the registry.k8s.io container registry.
- It then generates required TLS certificates and stores them in the /etc/kubernetes/pki folder.
- Next, it generates all the kubeconfig files for the cluster components in the /etc/kubernetes folder.
- Then it starts the kubelet service generates the static pod manifests for all the cluster components and saves it in the /etc/kubernetes/manifests folder.
- Next, it starts all the control plane components from the static pod manifests.
- Then it installs core DNS and Kubeproxy components
- Finally, it generates the node bootstrap token.
- Worker nodes use this token to join the control plane.
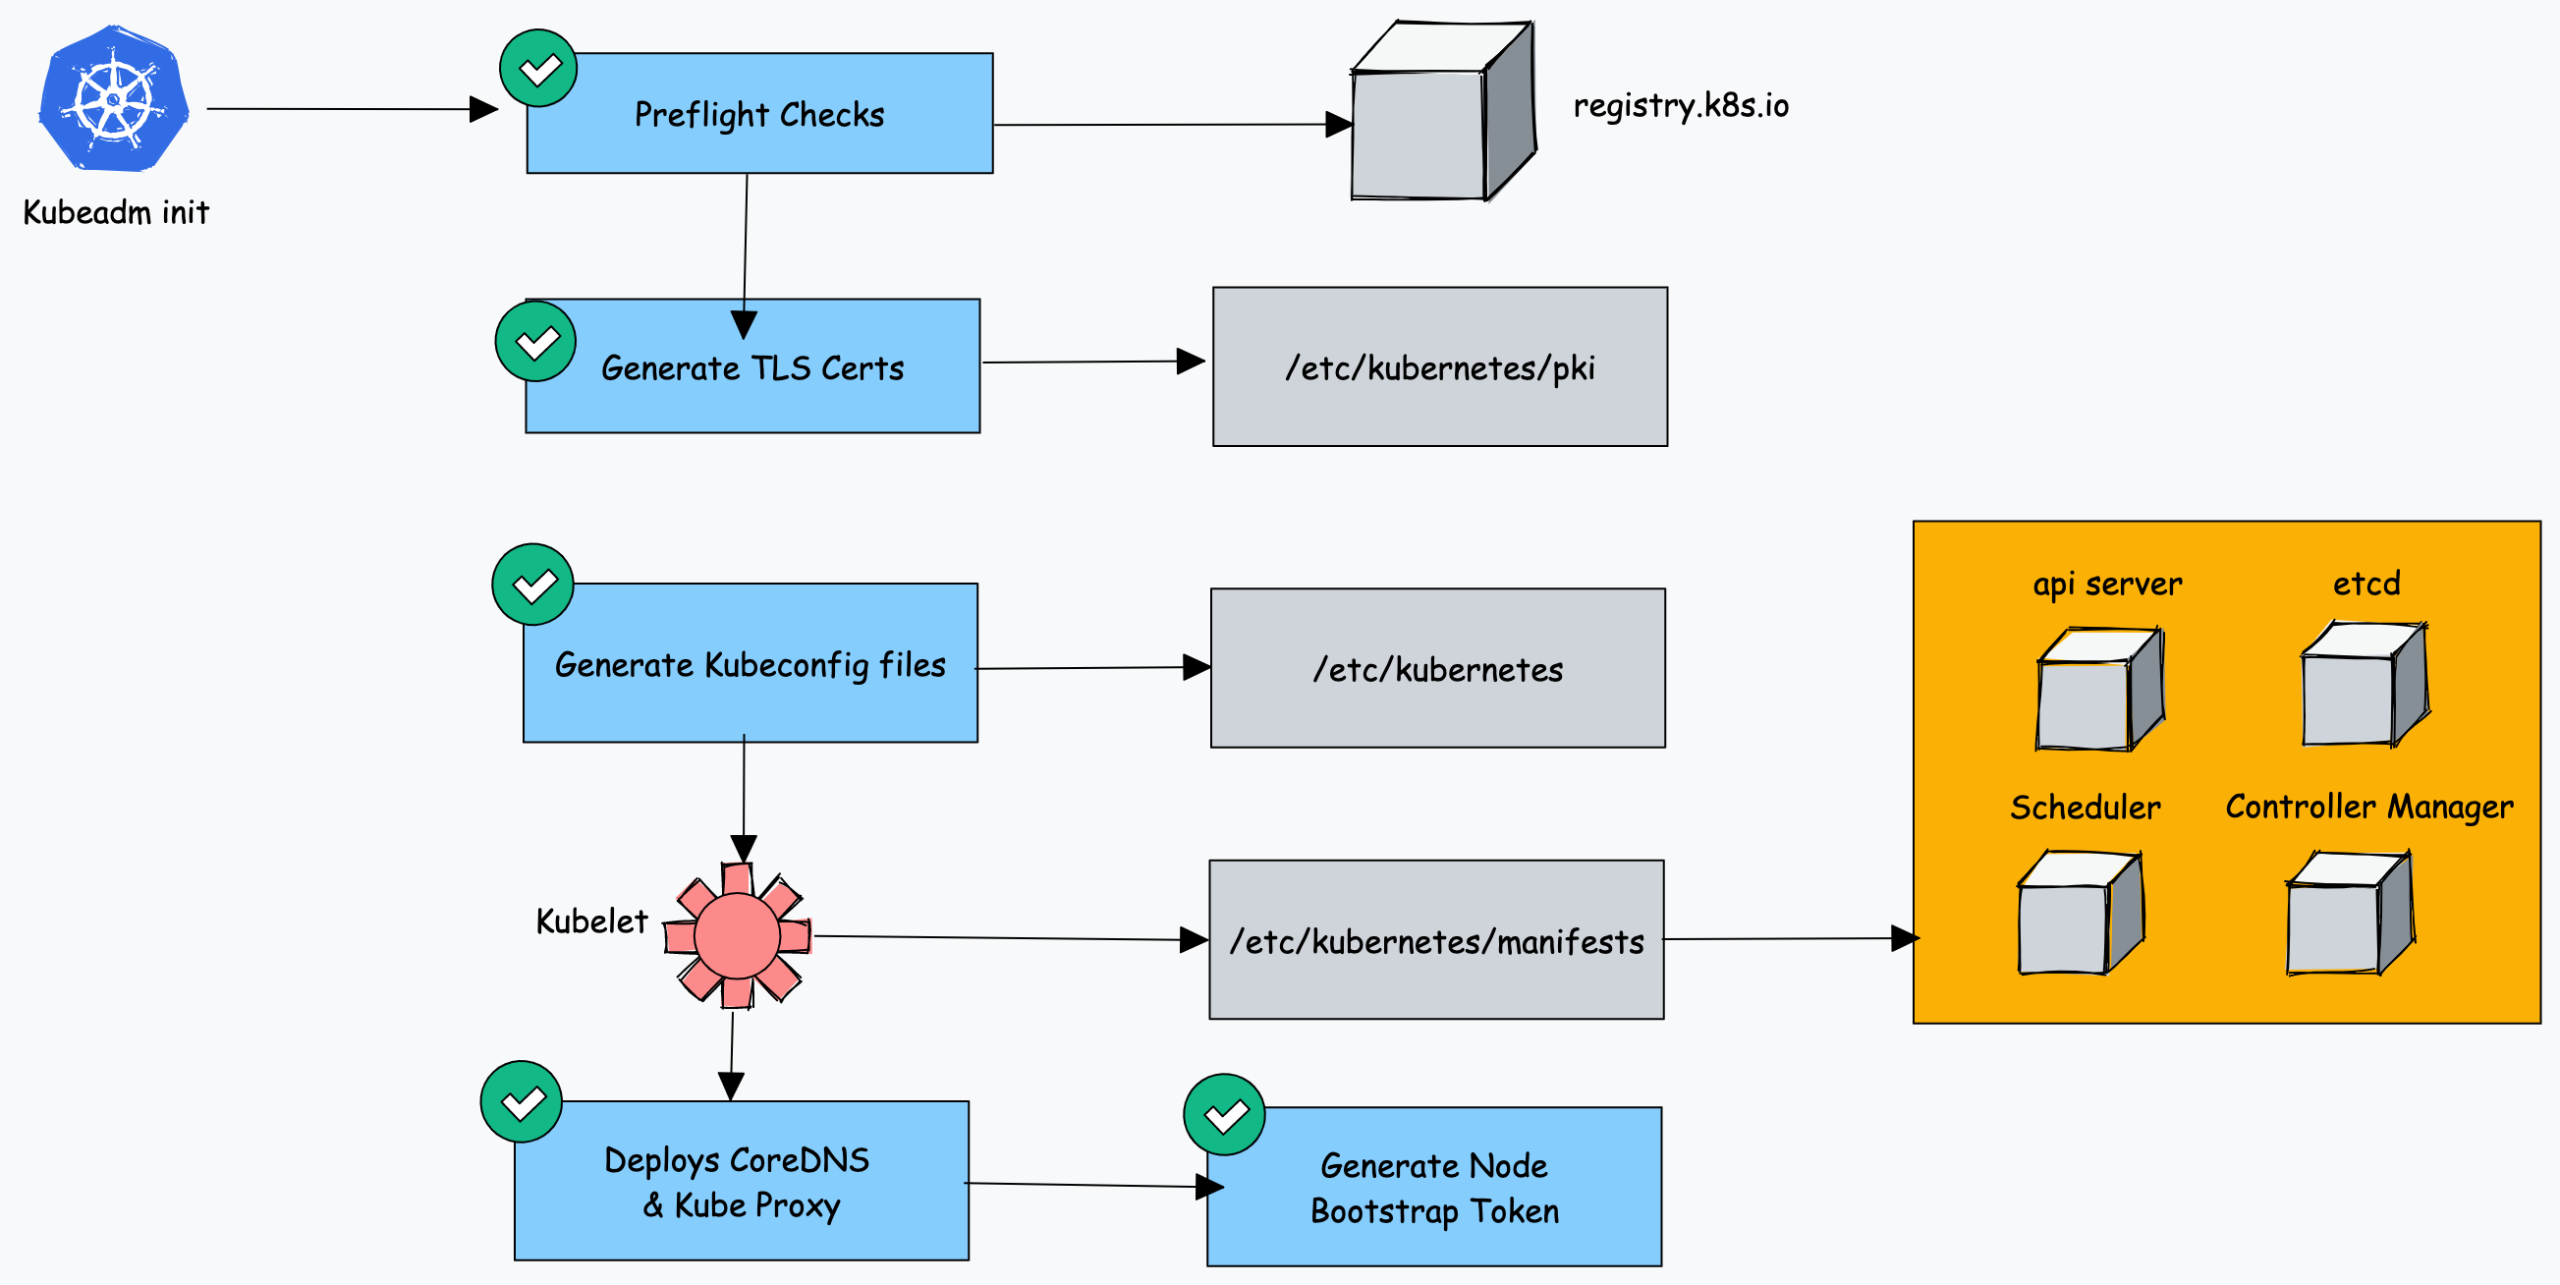
As you can see all the key cluster configurations will be present under the /etc/kubernetes folder.
Kubeadm FAQs
How to use Custom CA Certificates With Kubeadm?
By default, kubeadm creates its own CA certificates. However, if you wish to use custom CA certificates, they should be placed in the /etc/kubernetes/pki folder. When kubeadm is run, it will make use of existing certificates if they are found, and will not overwrite them.
How to generate the Kubeadm Join command?
You can use kubeadm token create --print-join-command command to generate the join command.
Conclusion
In this post, we learned to install Kubernetes step by step using kubeadm.
As a DevOps engineer, it is good to have an understanding of the Kubernetes cluster components. With companies using managed Kubernetes services, we miss learning the basic building blocks of kubernetes.
This Kubeadm setup is good for learning and playing around with kubernetes.
Also, there are many other Kubeadm configs that I did not cover in this guide as it is out of the scope of this guide. Please refer to the official Kubeadm documentation. By having the whole cluster setup in VMs, you can learn all the cluster components configs and troubleshoot the cluster on component failures.
Also, with Vagrant, you can create simple automation to bring up and tear down Kubernetes clusters on-demand in your local workstation. Check out my guide on automated kubernetes vagrant setup using kubeadm.
If you are learning kubernetes, check out the comprehensive Kubernetes tutorial for beginners.