

In this blog, I explain the steps to enable feature gates in a Kubeadm cluster. Feature gates in Kubernetes let you enable alpha/beta features in your Kubernetes cluster.
For example, in Kubernetes Version 1.28, you can only enable a feature named "SidecarContainers" using the Feature Gate. You can check out all the available feature gates from here.
Enable Feature Gates in Kubeadm
Feature gates need to be enabled when you initialize the Kubeadm cluster.
The default kubeadm init command has a limitation in terms of enabling feature gates because there is only a limited set of feature gates supported by Kubeadm.
To enable feature gates that are not supported by kubeadm init, you need to initialize the kubeadm cluster using the kubeadm configuration file.
I assume you have minimum two nodes to test this setup. One master and one worker node.
Install CRIO, Kubeadm, Kubelet and kubectl
I assume you have at least two nodes to test this setup: one master and one worker node.
First, you need to install the latest versions of container runtime, kubeadm, kubelet, and kubectl on all the nodes.
Note: For detailed information on setting up Kubeadm, please read the Kubeadm Cluster Setup Guide.
You can save the following as common.sh script. This script needs to be executed on master and worker node.
Replace 1.28.2-1.1 with the required kubernetes version.
#!/bin/bash
# Common setup for all servers (Control Plane and Nodes)

set -euxo pipefail

# Variable Declaration

KUBERNETES_VERSION="1.28.2-1.1"

# disable swap
sudo swapoff -a

# keeps the swaf off during reboot
(crontab -l 2>/dev/null; echo "@reboot /sbin/swapoff -a") | crontab - || true
sudo apt-get update -y


# Install CRI-O Runtime

OS="xUbuntu_22.04"

VERSION="1.28"

# Create the .conf file to load the modules at bootup
cat <<EOF | sudo tee /etc/modules-load.d/k8s.conf
overlay
br_netfilter
EOF

sudo modprobe overlay
sudo modprobe br_netfilter

# sysctl params required by setup, params persist across reboots
cat <<EOF | sudo tee /etc/sysctl.d/k8s.conf
net.bridge.bridge-nf-call-iptables  = 1
net.bridge.bridge-nf-call-ip6tables = 1
net.ipv4.ip_forward                 = 1
EOF

# Apply sysctl params without reboot
sudo sysctl --system

cat <<EOF | sudo tee /etc/apt/sources.list.d/devel:kubic:libcontainers:stable.list
deb https://download.opensuse.org/repositories/devel:/kubic:/libcontainers:/stable/$OS/ /
EOF
cat <<EOF | sudo tee /etc/apt/sources.list.d/devel:kubic:libcontainers:stable:cri-o:$VERSION.list
deb http://download.opensuse.org/repositories/devel:/kubic:/libcontainers:/stable:/cri-o:/$VERSION/$OS/ /
EOF

curl -L https://download.opensuse.org/repositories/devel:kubic:libcontainers:stable:cri-o:$VERSION/$OS/Release.key | sudo apt-key --keyring /etc/apt/trusted.gpg.d/libcontainers.gpg add -
curl -L https://download.opensuse.org/repositories/devel:/kubic:/libcontainers:/stable/$OS/Release.key | sudo apt-key --keyring /etc/apt/trusted.gpg.d/libcontainers.gpg add -

sudo apt-get update
sudo apt-get install cri-o cri-o-runc -y

sudo systemctl daemon-reload
sudo systemctl enable crio --now

echo "CRI runtime installed susccessfully"

# Install kubelet, kubectl and Kubeadm

sudo apt-get update -y
sudo apt-get install -y apt-transport-https ca-certificates curl
sudo curl -fsSLo /usr/share/keyrings/kubernetes-archive-keyring.gpg https://dl.k8s.io/apt/doc/apt-key.gpg

echo "deb [signed-by=/usr/share/keyrings/kubernetes-archive-keyring.gpg] https://apt.kubernetes.io/ kubernetes-xenial main" | sudo tee /etc/apt/sources.list.d/kubernetes.list
sudo apt-get update -y
sudo apt-get install -y kubelet="$KUBERNETES_VERSION" kubectl="$KUBERNETES_VERSION" kubeadm="$KUBERNETES_VERSION"
sudo apt-get update -y
sudo apt-mark hold kubelet kubeadm kubectl

sudo apt-get install -y jq

local_ip="$(ip --json addr show eth0 | jq -r '.[0].addr_info[] | select(.family == "inet") | .local')"
cat > /etc/default/kubelet << EOF
KUBELET_EXTRA_ARGS=--node-ip=$local_ip
EOF
Kubeadm Config With Feature Gates
First, you need to ensure that the feature gate is supported by the Kubernetes version installed using Kubeadm.
Here is an example Kubeadm config file where we've added the feature-gates option to the apiServer, controllerManager, scheduler, and KubeletConfiguration as extra arguments.
Replace the parameters in bold with those that match your requirements and save the config as kubeadm.config on the control plane node.
apiVersion: kubeadm.k8s.io/v1beta3
kind: ClusterConfiguration
controlPlaneEndpoint: "35.92.162.218:6443"
networking:
  podSubnet: 192.168.0.0/16
apiServer:
  extraArgs:
    feature-gates: "SidecarContainers=true"
controllerManager:
  extraArgs:
    feature-gates: "SidecarContainers=true"
scheduler:
  extraArgs:
    feature-gates: "SidecarContainers=true"
---
apiVersion: kubelet.config.k8s.io/v1beta1
kind: KubeletConfiguration
featureGates:
  SidecarContainers: true
---
apiVersion: kubeadm.k8s.io/v1beta3
kind: InitConfiguration
nodeRegistration:
  name: "controlplane"
  ignorePreflightErrors:
  - Swap
You can enable multiple feature gates to the feature-gates parameter.
Initialize Kubeadm With Feature gates
Once you have the Kubeadm Configuration, you can deploy the cluster with Feature gates using the following command.
Ensure you are executing this in the Kubernetes control plane node.
kubeadm init --config=kubeadm.configThis will initialize the cluster with functionalities added through the feature gates.
You can validate if the feature gates are enabled by checking the Kuberentes cluster configurations.
For example, open the kube-apiserver.yaml manifest YAML present inside /etc/kubernetes/manifests/ you will find the --feature-gates=SidecarContainers=true flag under spec as highlighted in the image below.

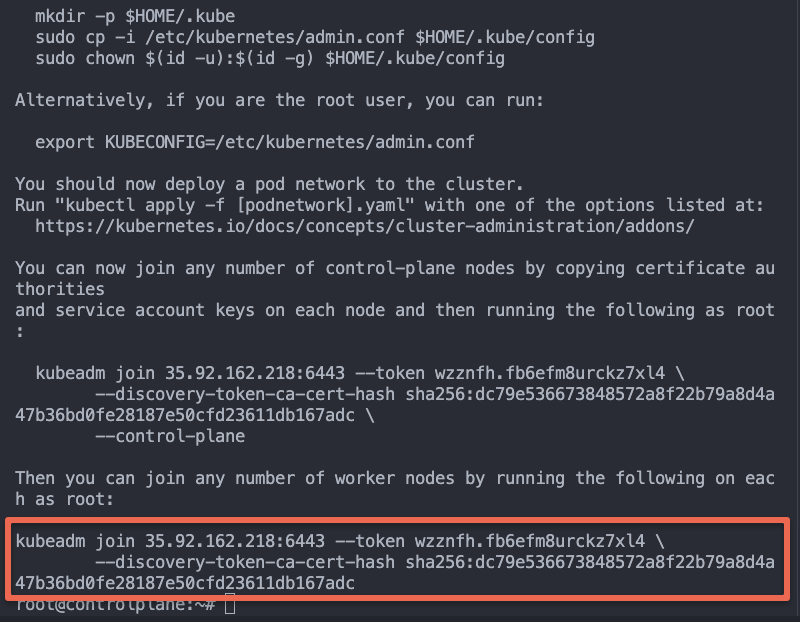
Join Worker Nodes
Once the initialization is done, you can join the worker nodes to the control plane using the join command.
Conclusion
By enabling feature gates, you can test features added to the latest Kubernetes versions.
If you encounter any issues during the setup, feel free to drop a comment below, and we'll take a look.
If you are starting your kubernetes journey, check out our 40+ Kubernetes tutorials.