How to Setup Kubernetes Cluster on Vagrant VMs

Setup Kubernetes Cluster on Vagrant

In this Kubernetes tutorial, I have covered the step-by-step guide to set up the Kubernetes cluster on Vagrant. It is a multinode kubernetes setup using kubeadm.

Vagrant is a great utility to set up Virtual machines on your local workstation. I pretty much use Vagrant for most of my testing and learning purposes. If you are new to Vagrant, see my beginners vagrant guide

This guide primarily focuses on the Kubernetes automated setup using Vagrantfile and shell scripts.

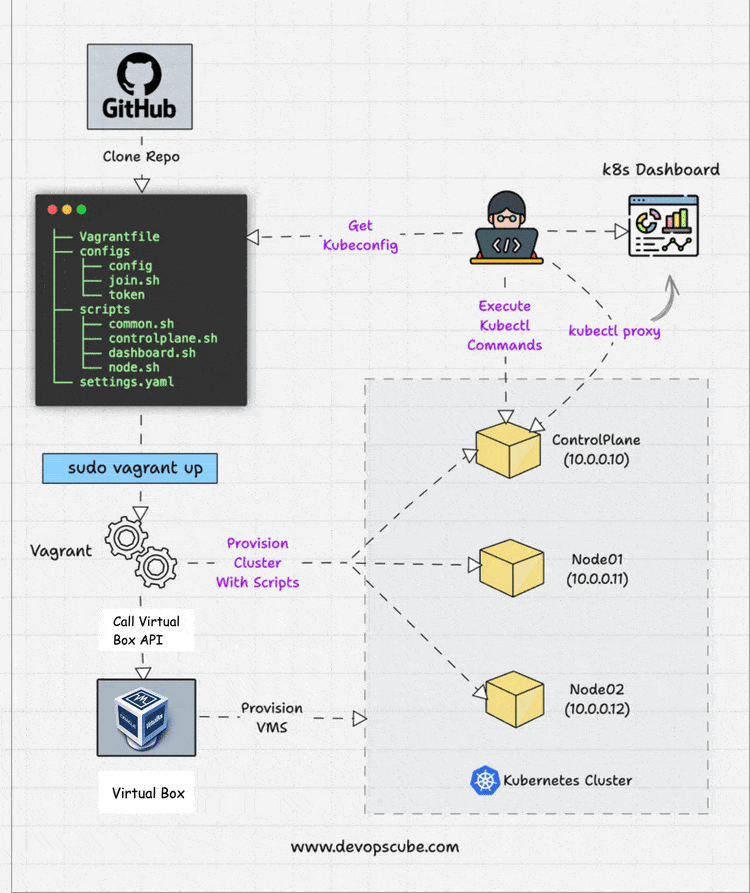
Automated Kubernetes Cluster Setup on Vagrant

I have written a basic Vagrantfile and scripts so that anyone can understand and make changes as per their requirements.

Here is the summary of the setup.

  1. A single vagrant up command will create three VMs and configures all essential kubernetes components and configuration using Kubeadm.
  2. Calico Network Plugin, Metrics server, and Kubernetes dashboard get installed as part of the setup.
  3. The kubeconfig file gets added to all the nodes in the cluster so that you can execute kubectl commands from any node.
  4. The kubeconfig file and the kubernetes dashboard access token get added to the configs folder where you have the Vagrantfile. You can use the kubeconfig file to connect the cluster from your workstation.
  5. You can shut down the VMs when not in use and start them again whenever needed. All the cluster configurations remain intact without any issues. The nodes get connected automatically to the master during the startup.
  6. You can delete all the VMs in one command and recreate the setup with a vagrant up command any time you need.

Here is a high-level overview of the setup.

Vagrant kubernetes setup architecture

CKA/CKAD/CKS Certification Practice Environment

If you are preparing for any of the Kubernetes certifications, you need a cluster to practice all the exam scenarios.

You can use these Vagrant scripts to set up your local practice environment.

Specifically, for CKA Certification, you can expect Kubeadm-related exam questions like bootstrapping and upgrading the kubernetes cluster using kubeadm. You can check out the following guides.

  1. Kubernetes cluster bootstrapping using Kubeadm
  2. Upgrading Kubernetes cluster using kubeadm

The setup script deploys the latest version of kubernetes that is required for Kubernetes certification exams.

Important Note: If you are preparing for CKA/CKAD/CKS certification, make use of the CKA/CKAD/CKS Voucher Codes before the price increases.

Kubernetes-Kubeadm Vagrant Github Repository

The Kubeadm Vagrantfile and scripts are hosted on the Vagrant Kubernetes Github repository.

Clone the repository to follow along with the guide.

git clone https://github.com/techiescamp/vagrant-kubeadm-kubernetes

Prerequisite For MAC Users

If you have upgraded MAC to OS Monterey, you might face issues with Vagrant for creating private networks. This means Vagrant won’t be able to create a network other than the 198 series.

To resolve the issue, one /etc/vbox/networks.conf and add the following.

* 0.0.0.0/0 ::/0

Setup Kubernetes Cluster on Vagrant

Note: You need a minimum of 16 Gig RAM workstation to run this setup without any issues.

Follow the steps given below to spin up the cluster and validate all the Kubernetes cluster configurations.

Step 1: To create the cluster, first cd into the cloned directory.

cd vagrant-kubeadm-kubernetes

Step 2: Execute the vagrant command. It will spin up three nodes. One control plane (master) and two worker nodes. Kubernetes installation and configuration happen through the shell script present in the scripts folder.

vagrant up

Note: If you are running it for the first time, Vagrant will first download the ubuntu box mentioned in the Vagrantfile. This is a one-time download.

Step 3: Log in to the master node to verify the cluster configurations.
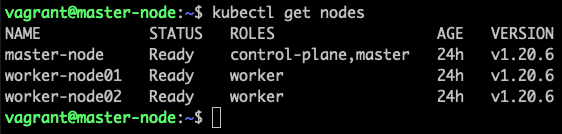
vagrant ssh master

Step 4: List all the cluster nodes to ensure the worker nodes are connected to the master and in a ready state.

kubectl top nodes

You should see the output as shown below.

kubeadm vagrant check nodes

Step 5: List all the pods in kube-system namespace and ensure it is in a running state.

kubectl get po -n kube-system
kubeadm vagrant verify kube-system pods

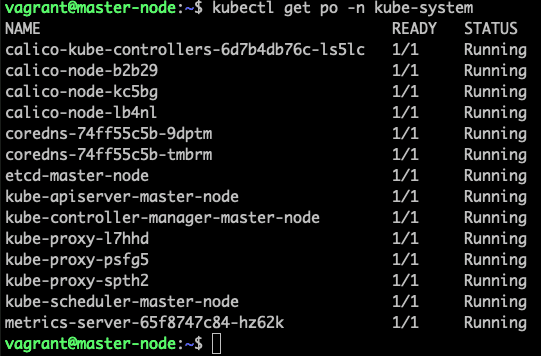
Step 6: Deploy a sample Nginx app and see if you can access it over the nodePort.

kubectl apply -f https://raw.githubusercontent.com/scriptcamp/kubeadm-scripts/main/manifests/sample-app.yaml

You should be able to access Nginx on any of the node’s IPs on port 32000. For example, http://10.0.0.11:32000

kubeadm vagrant access application on nodeport.

That’s it! You can start deploying and testing other applications.

To shut down the Kubernetes VMs, execute the halt command.

vagrant halt

Whenever you need the cluster, just execute the following.

vagrant up

To destroy the VMs,

vagrant destroy

Note: If you want applications to persist data on each cluster or pod restart, make sure you use the persistent volume type “local” attached to a nodeSelector.

Access Kubernetes Cluster From Workstation Terminal

Once Vagrant execution is successful, you will see a configs folder with a few files (config, join.sh, and token) inside the cloned repo. These are generated during the run time.

Copy the config file to your $HOME/.kube folder if you want to interact with the cluster from your workstation terminal. You should have kubectl installed on your workstation.

For example, I did the following on my Mac keeping vagrant-kubeadm-kubernetes folder as the current directory.

mkdir -p $HOME/.kube
cp configs/config $HOME/.kube

Alternatively, you can set a Kubeconfig env variable as shown below. Make sure you execute the command from the vagrant-kubeadm-kubernetes folder where you have the Vagrantfile.

export KUBECONFIG=$(PWD)/configs/config

Once you copy the kubeconfig (config) file to your local $HOME/.kube directory you can run the kubectl command against the cluster

Verify the config by listing the cluster nodes.

kubectl get nodes

To access the kubernetes dashboard, run kubectl proxy to access the Kubernetes dashboard.

kubectl proxy

The token file inside the configs folder contains the sign-in token for the kubernetes dashboard. If you want to use the kubernetes dashboard, use the token and log in from the following URL

http://localhost:8001/api/v1/namespaces/kubernetes-dashboard/services/https:kubernetes-dashboard:/proxy/#/login
Vagrant kubernetes dashboard.

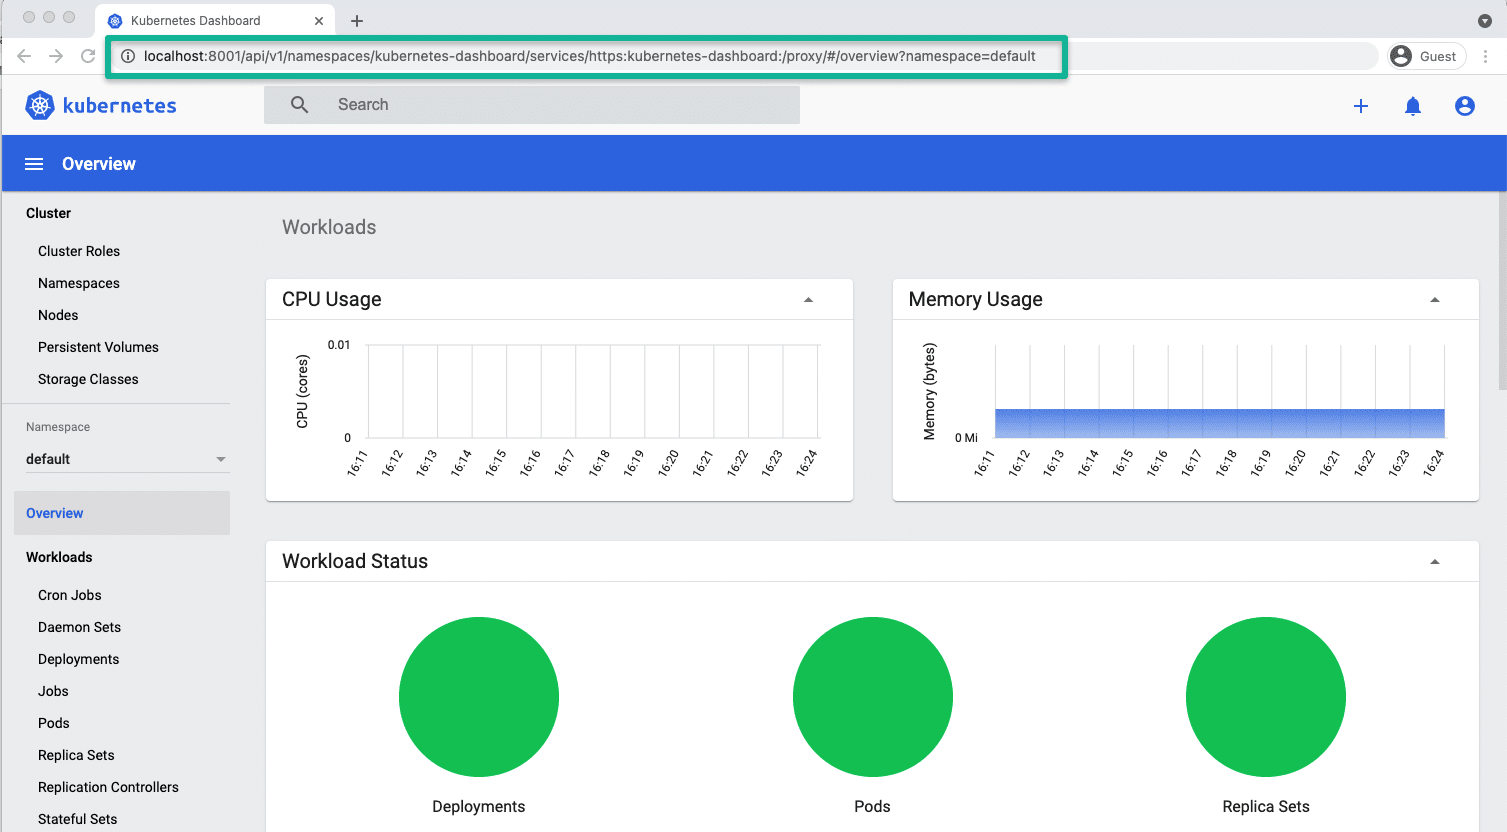
Kubeadm Vagrantfile & Scripts Explanation

Here is the file tree for the Vagrant repo.

├── Vagrantfile
├── configs
│   ├── config
│   ├── join.sh
│   └── token
└── scripts
    ├── common.sh
    ├── master.sh
    └── node.sh

The configs folder and files get generated only after the first run.

As I explained earlier, the config file contains the config, token, and join.sh file.

In the previous section, I have already explained config and token. The join.sh file has the worker node join command with the token created during kubeadm master node initialization.

Since all the nodes share the folder containing the Vagrantfile, the worker nodes can read the join.sh file and join the master automatically during the first run. It is a one-time task.

If you log in to any node and access the /vagrant folder, you will see Vagrantfile and scripts as it is shared between the VMs.

Let’s have a look at the Vagrantfile

NUM_WORKER_NODES=2
IP_NW="10.0.0."
IP_START=10

Vagrant.configure("2") do |config|
  config.vm.provision "shell", env: {"IP_NW" => IP_NW, "IP_START" => IP_START}, inline: <<-SHELL
      apt-get update -y
      echo "$IP_NW$((IP_START)) master-node" >> /etc/hosts
      echo "$IP_NW$((IP_START+1)) worker-node01" >> /etc/hosts
      echo "$IP_NW$((IP_START+2)) worker-node02" >> /etc/hosts
  SHELL

  config.vm.box = "bento/ubuntu-22.04"
  config.vm.box_check_update = true

  config.vm.define "master" do |master|
    # master.vm.box = "bento/ubuntu-18.04"
    master.vm.hostname = "master-node"
    master.vm.network "private_network", ip: IP_NW + "#{IP_START}"
    master.vm.provider "virtualbox" do |vb|
        vb.memory = 4048
        vb.cpus = 2
    end
    master.vm.provision "shell", path: "scripts/common.sh"
    master.vm.provision "shell", path: "scripts/master.sh"
  end

  (1..NUM_WORKER_NODES).each do |i|

  config.vm.define "node0#{i}" do |node|
    node.vm.hostname = "worker-node0#{i}"
    node.vm.network "private_network", ip: IP_NW + "#{IP_START + i}"
    node.vm.provider "virtualbox" do |vb|
        vb.memory = 2048
        vb.cpus = 1
    end
    node.vm.provision "shell", path: "scripts/common.sh"
    node.vm.provision "shell", path: "scripts/node.sh"
  end

  end
end 

As you can see, I have added the following IPs for nodes, and it is added to the host’s file entry of all the nodes with its hostname with a common shell block that gets executed on all the VMs.

  1. 10.0.0.10 (master)
  2. 10.0.0.11 (node01)
  3. 10.0.0.11 (node02)

Also, the worker node block is in a loop. So if you want more than two worker nodes or have only one worker node, you need to replace 2 with the desired number in the loop declaration in the NUM_WORKER_NODES variable. If you add more nodes, ensure you add the IP to the host’s file entry.

For example, for 3 worker nodes, you need to have,

NUM_WORKER_NODES=3

master.sh, node.sh and common.sh Scripts

The three shell scripts get called as provisioners during the Vagrant run to configure the cluster.

  1. common.sh: – A self-explanatory list of commands which configures and installs specific version of cri-o runtime, kubeadm, kubectl, and kubelet on all the nodes. Also, disables swap.
  2. master.sh: – contains commands to initialize master, install the calico plugin, metrics server, and kubernetes dashboard. Also, copies the kube-config, join.sh, and token files to the configs directory.
  3. node.sh:- reads the join.sh command from the configs shared folder and join the master node. Also, copied the kubeconfig file to /home/vagrant/.kube location to execute kubectl commands.

common.sh installs kubernetes version 1.20.6-00 to have the same cluster version for CKA/CKAD and CKS preparation. If you would like the latest version, remove the version number from the command.

Video Documentation For Vagrant Setup

I have documented the whole process in a YouTube video. Check out the video if you want to see the live setup.

Note: You might see a version change in the video as I update the document with latest versions. However, the process remains the same. Ensure you use the latest scripts from the Github repo.

Conclusion

It is good to have a Local kubernetes cluster setup that you can spin up and tear down whenever you need without spending much time.

To set up the kubernetes cluster on Vagrant, all you have to do is, clone the repo and run the vagrant up command.

Moreover, if you are a DevOps engineer and work on the Kubernetes cluster, you can have a production-like setup locally for development and testing.

If you want to have a simple single-node Kubernetes setup, you can try minikube. Here is a minikube tutorial for beginners.

You can add more tools and utilities like helm, ingress controller, Prometheus, etc to the existing script and customize it as per your requirements.

Please feel free to contribute to the repo with enhancements!

52 comments
  1. Have just followed this and spun up cluster on windows. Cluster working perfectly.
    Looking forward to testing out some local deployments.
    Great article. Thanks

  2. hi,
    I have been using the vagrant project for a few weeks and everything has been going great but now I am getting this error when launching vagrant up:
    master: Err:8 https://packages.cloud.google.com/apt kubernetes-xenial Release
    master: 404 Not Found [IP: 142.250.185.14 443]
    ….
    checking the common.sh script I have seen in line 73:
    curl -fsSL https://packages.cloud.google.com/apt/doc/apt-key.gpg | sudo gpg –yes –dearmor -o /usr/share/keyrings/kubernetes-archive-keyring.gpg
    ….
    Should the url be replaced by another one? thanks!

  3. Hi, trying this on my mac mini (the last intel one). It’s the i7 with 32GB of RAM so should handle things fine. I’m running macos Ventura and so I created the file /etc/vbox/networks.conf and added the entry you suggested.

    I get the following error though. Any ideas?

    master: ++ ip –json a s
    master: ++ jq -r ‘.[] | if .ifname == “eth1” then .addr_info[] | if .family == “inet” then .local else empty end else empty end’
    master: + local_ip=10.0.0.10
    master: + cat
    ==> master: Running provisioner: shell…
    master: Running: /var/folders/8w/dfk5h5dj5tzcsn16sqmsmsch0000gn/T/vagrant-shell20240222-49659-2eq5lo.sh
    master: ++ hostname -s
    master: + NODENAME=master-node
    master: + sudo kubeadm config images pull
    master: I0222 19:24:34.171142 5384 version.go:256] remote version is much newer: v1.29.2; falling back to: stable-1.28
    The SSH connection was unexpectedly closed by the remote end. This
    usually indicates that SSH within the guest machine was unable to
    properly start up. Please boot the VM in GUI mode to check whether
    it is booting properly.

  4. Hi Bibin, sweet post 🙂

    I ran into one tiny issue with the KUBECONFIG export line. The upper case PWD is something that apparently works on mac but not on linux. Switching to lower case should work on both.

  5. Hi Bob, i encountered this error while trying to run “sudo apt update” on the three machines. Despite that i have created the public keys.

    Err:2 https://packages.cloud.google.com/apt kubernetes-xenial InRelease
    The following signatures couldn’t be verified because the public key is not available: NO_PUBKEY B53DC80D13EDEF05
    Ign:5 http://us.archive.ubuntu.com/ubuntu impish-backports InRelease
    Ign:6 http://us.archive.ubuntu.com/ubuntu impish-security InRelease
    Err:7 http://us.archive.ubuntu.com/ubuntu impish Release
    404 Not Found [IP: 91.189.91.83 80]Err:8 http://us.archive.ubuntu.com/ubuntu impish-updates Release
    404 Not Found [IP: 91.189.91.83 80]
    Err:9 http://us.archive.ubuntu.com/ubuntu impish-backports Release
    404 Not Found [IP: 91.189.91.83 80]
    Err:10 http://us.archive.ubuntu.com/ubuntu impish-security Release
    404 Not Found [IP: 91.189.91.83 80]
    Reading package lists… Done
    W: GPG error: https://packages.cloud.google.com/apt kubernetes-xenial InRelease: The following signatures couldn’t be verified because the public key is not available: NO_PUBKEY B53DC80D13EDEF05
    E: The repository ‘https://apt.kubernetes.io kubernetes-xenial InRelease’ is not signed.
    N: Updating from such a repository can’t be done securely, and is therefore disabled by default.
    N: See apt-secure(8) manpage for repository creation and user configuration details.
    E: The repository ‘http://us.archive.ubuntu.com/ubuntu impish Release’ no longer has a Release file.
    N: Updating from such a repository can’t be done securely, and is therefore disabled by default.
    N: See apt-secure(8) manpage for repository creation and user configuration details.
    E: The repository ‘http://us.archive.ubuntu.com/ubuntu impish-updates Release’ no longer has a Release file.
    N: Updating from such a repository can’t be done securely, and is therefore disabled by default.
    N: See apt-secure(8) manpage for repository creation and user configuration details.
    E: The repository ‘http://us.archive.ubuntu.com/ubuntu impish-backports Release’ no longer has a Release file.
    N: Updating from such a repository can’t be done securely, and is therefore disabled by default.
    N: See apt-secure(8) manpage for repository creation and user configuration details.
    E: The repository ‘http://us.archive.ubuntu.com/ubuntu impish-security Release’ no longer has a Release file.
    N: Updating from such a repository can’t be done securely, and is therefore disabled by default.
    N: See apt-secure(8) manpage for repository creation and user configuration details.

    You can send your mail address for us to talk better. Thank you for the article. It has helped me alot

  6. Hi Bipin getting the bellow error while doing Vagrant up, maybe in newer version of Vagrant they changed some policy or something do you know any way around it
    Bringing machine ‘master’ up with ‘virtualbox’ provider…
    Bringing machine ‘node01’ up with ‘virtualbox’ provider…
    ==> master: Importing base box ‘bento/ubuntu-22.04’…
    ==> master: Matching MAC address for NAT networking…
    ==> master: Checking if box ‘bento/ubuntu-22.04’ version ‘202309.08.0’ is up to date…
    ==> master: Setting the name of the VM: vagrant-kubeadm-kubernetes_master_1701363871537_64676
    ==> master: Clearing any previously set network interfaces…
    The IP address configured for the host-only network is not within the
    allowed ranges. Please update the address used to be within the allowed
    ranges and run the command again.

    Address: 10.0.0.10
    Ranges: 192.168.56.0/21

    Valid ranges can be modified in the /etc/vbox/networks.conf file. For
    more information including valid format see:

    https://www.virtualbox.org/manual/ch06.html#network_hostonly

  7. Hello Bibin,
    Thank you for creating this document.
    I am facing the below issue while running the vagrant:-
    node01: + sudo -i -u vagrant kubectl apply -f $’https://raw.githubusercontent.com/kubernetes/dashboard/v2.7.0\r/aio/deploy/recommended.yaml’
    node01: error: the URL passed to filename “https://raw.githubusercontent.com/kubernetes/dashboard/v2.7.0\r/aio/deploy/recommended.yaml” is not valid: parse “https://raw.githubusercontent.com/kubernetes/dashboard/v2.7.0\r/aio/deploy/recommended.yaml”: net/url: invalid control character in URL
    The SSH command responded with a non-zero exit status. Vagrant
    assumes that this means the command failed. The output for this command
    should be in the log above. Please read the output to determine what
    went wrong.
    Can you please help me out on this ?

    1. cd ~/vagrant-kubeadm-kubernetes/scripts
      vi dashboard.sh and modify the following line as follows:

      sudo -i -u vagrant kubectl apply -f “https://raw.githubusercontent.com/kubernetes/dashboard/v2.7.0/aio/deploy/recommended.yaml”
      #sudo -i -u vagrant kubectl apply -f “https://raw.githubusercontent.com/kubernetes/dashboard/v${DASHBOARD_VERSION}/aio/deploy/recommended.yaml

  8. I got to use
    kubectl proxy –address=’0.0.0.0′

    otherwise I was getting “The connection was reset” when attempting go get to the dashboard from the windows vagrant host

  9. Hi, I got an error, can you please suggest me about this issue (I am using vagrant in windows).
    node01: + sudo -i -u vagrant kubectl apply -f $’https://raw.githubusercontent.com/kubernetes/dashboard/v2.7.0\r/aio/deploy/recommended.yaml’
    node01: error: the URL passed to filename “https://raw.githubusercontent.com/kubernetes/dashboard/v2.7.0\r/aio/deploy/recommended.yaml” is not valid: parse “https://raw.githubusercontent.com/kubernetes/dashboard/v2.7.0\r/aio/deploy/recommended.yaml”: net/url: invalid control character in URL
    The SSH command responded with a non-zero exit status. Vagrant
    assumes that this means the command failed. The output for this command
    should be in the log above. Please read the output to determine what
    went wrong.

    1. For anyone else get this error as I did as well, ‘carriage return’ is being slipped into the output, but that’s most likely because I was editing the script in my Windows 11 box using VSCode. It can be fixed with:

      on line 9 of dashboard.sh, use ‘tr’ to delete the carriage return:
      DASHBOARD_VERSION=$(grep -E ‘^\s*dashboard:’ /vagrant/settings.yaml | sed -E ‘s/[^:]+: *//’ | tr -d ‘\r’)

      — OR —
      line 56 just replace ${DASHBOARD_VERSION} with the version you want (in this case I used 2.7.0)

    1. It is good to have. You can also try it on a lesser-capacity laptop. You might face performance issues.

  10. what if 1 of the nodes fails to deploy,
    NAME STATUS ROLES AGE VERSION
    master-node Ready control-plane 18m v1.26.1
    worker-node01 Ready worker 7m12s v1.26.1

    Is there way of just running to build worker-node02

  11. Hi Bibin, This is quite interesting and easy to understand!
    I am using MAC M1 with 13.1 , There is no VirtualBox for arm64. I am new to Mac OS.
    when I update vm.provider as VMware desktop instead VirtualBox but end up with error below,

    ==> master: Starting the VMware VM…
    An error occurred while executing `vmrun`, a utility for controlling
    VMware machines. The command and output are below:

    Command: [“start”, “/Users/username/vagrant-vm/k8s/vagrant-kubeadm-kubernetes/.vagrant/machines/master/vmware_desktop/354bdf9b-d439-49bf-a5ea-bc3370a85c29/ubuntu-22.04-amd64.vmx”, “nogui”, {:notify=>[:stdout, :stderr], :timeout=>45}]

    Stdout: 2023-01-29T20:49:19.877| ServiceImpl_Opener: PID 2245
    Error: The operation was canceled

  12. I have setup very well with this article, on Ubuntu -22.04,
    I was able to execute all the commands with kubectl,
    But once rebooted the Master node I’m not able to see the kube components(api-server,ectd,controller-manager,scheduler) running , and kubelet service is not starting.. ..
    How to resolve and retrieve all my services back to up and running? Please guide me.

  13. Hi Bibin,
    Great article – and works very well apart from I am getting a problem with metrics-server:
    metrics-server-6f4b687cf7-cdmxh 0/1 Running 0 6s
    metrics-server-99c6c96cf-cgv55 0/1 Running 0 6s

    If I look at the ‘describe’
    Events:
    Type Reason Age From Message
    —- —— —- —- ——-
    Warning FailedScheduling 13m (x2 over 14m) default-scheduler 0/1 nodes are available: 1 node(s) had taint {node-role.kubernetes.io/master: }, that the pod didn’t tolerate.
    Warning FailedScheduling 12m default-scheduler 0/2 nodes are available: 1 node(s) had taint {node-role.kubernetes.io/master: }, that the pod didn’t tolerate, 1 node(s) had taint {node.kubernetes.io/not-ready: }, that the pod didn’t tolerate.
    Normal Scheduled 12m default-scheduler Successfully assigned kube-system/metrics-server-99c6c96cf-r6fgt to worker-node01
    Warning FailedCreatePodSandBox 12m kubelet Failed to create pod sandbox: rpc error: code = Unknown desc = failed to create pod network sandbox k8s_metrics-server-99c6c96cf-r6fgt_kube-system_4328d938-bf6b-4e20-9c34-729925b7b69a_0(79e4f2072e9954a1116adfa2309c5062c62d2e04ceac04a21962926fd08f6a05): error adding pod kube-system_metrics-server-99c6c96cf-r6fgt to CNI network “k8s-pod-network”: plugin type=”calico” failed (add): stat /var/lib/calico/nodename: no such file or directory: check that the calico/node container is running and has mounted /var/lib/calico/
    Normal Pulling 11m kubelet Pulling image “k8s.gcr.io/metrics-server/metrics-server:v0.6.1”
    Normal Pulled 11m kubelet Successfully pulled image “k8s.gcr.io/metrics-server/metrics-server:v0.6.1” in 5.099566559s
    Normal Created 11m kubelet Created container metrics-server
    Normal Started 11m kubelet Started container metrics-server
    Warning Unhealthy 11m kubelet Readiness probe failed: Get “https://192.168.87.193:4443/readyz”: dial tcp 192.168.87.193:4443: connect: connection refused
    Warning Unhealthy 2m1s (x69 over 11m) kubelet Readiness probe failed: HTTP probe failed with statuscode: 500
    And from the logs:
    vagrant@master-node:~$ kubectl logs -n kube-system metrics-server-99c6c96cf-r6fgt
    I0513 13:25:49.693148 1 serving.go:342] Generated self-signed cert (/tmp/apiserver.crt, /tmp/apiserver.key)
    I0513 13:25:50.278639 1 secure_serving.go:266] Serving securely on [::]:4443
    I0513 13:25:50.278732 1 requestheader_controller.go:169] Starting RequestHeaderAuthRequestController
    I0513 13:25:50.278761 1 shared_informer.go:240] Waiting for caches to sync for RequestHeaderAuthRequestController
    I0513 13:25:50.278806 1 dynamic_serving_content.go:131] “Starting controller” name=”serving-cert::/tmp/apiserver.crt::/tmp/apiserver.key”
    I0513 13:25:50.293451 1 tlsconfig.go:240] “Starting DynamicServingCertificateController”
    W0513 13:25:50.297896 1 shared_informer.go:372] The sharedIndexInformer has started, run more than once is not allowed
    I0513 13:25:50.298042 1 configmap_cafile_content.go:201] “Starting controller” name=”client-ca::kube-system::extension-apiserver-authentication::client-ca-file”
    I0513 13:25:50.298081 1 shared_informer.go:240] Waiting for caches to sync for client-ca::kube-system::extension-apiserver-authentication::client-ca-file
    I0513 13:25:50.298114 1 configmap_cafile_content.go:201] “Starting controller” name=”client-ca::kube-system::extension-apiserver-authentication::requestheader-client-ca-file”
    I0513 13:25:50.298135 1 shared_informer.go:240] Waiting for caches to sync for client-ca::kube-system::extension-apiserver-authentication::requestheader-client-ca-file
    I0513 13:25:50.302764 1 server.go:187] “Failed probe” probe=”metric-storage-ready” err=”no metrics to serve”
    E0513 13:25:50.317229 1 scraper.go:140] “Failed to scrape node” err=”request failed, status: \”403 Forbidden\”” node=”worker-node01″
    E0513 13:25:50.321260 1 scraper.go:140] “Failed to scrape node” err=”request failed, status: \”403 Forbidden\”” node=”master-node”
    I0513 13:25:50.379644 1 shared_informer.go:247] Caches are synced for RequestHeaderAuthRequestController
    I0513 13:25:50.398280 1 shared_informer.go:247] Caches are synced for client-ca::kube-system::extension-apiserver-authentication::requestheader-client-ca-file
    I0513 13:25:50.398379 1 shared_informer.go:247] Caches are synced for client-ca::kube-system::extension-apiserver-authentication::client-ca-file
    I0513 13:25:50.535018 1 server.go:187] “Failed probe” probe=”metric-storage-ready” err=”no metrics to serve”

    I am on macOS Catalina, so there shouldn’t be too many issues with networking config. Vagrant is version: 2.2.19
    Tried the following, but no success:
    https://lifesaver.codes/answer/metrics-server-unable-to-authenticate-to-apiserver-278

  14. Hello Bibin, really good job with the article and the repo. It works fine in Ubuntu 20.04 by the way, just needed to fix the network issue in virtualbox.

  15. Thanks Bibin for the wonderful article. I tried to follow the given steps and ended up haning with some credential challenges. It asking to set credential for SMB shared folder . Not quite user which credential suppose to use to overcome the challenges.
    can you help me with more lights, please?

    master: Vagrant insecure key detected. Vagrant will automatically replace
    master: this with a newly generated keypair for better security.
    master:
    master: Inserting generated public key within guest…
    master: Removing insecure key from the guest if it’s present…
    master: Key inserted! Disconnecting and reconnecting using new SSH key…
    ==> master: Machine booted and ready!
    ==> master: Preparing SMB shared folders…
    master: You will be asked for the username and password to use for the SMB
    master: folders shortly. Please use the proper username/password of your
    master: account.
    master:
    master: Username (user[@domain]):

      1. Thanks for the lead.
        I have overcome the issue by disbaling tthe folder sync .
        Have added following line to fix the issue.

        config.vm.synced_folder “.”, “/vagrant”, disabled: true

        Hope this helps to someone if they faced same issue.

  16. I have the same problem as Rajeshwar Mahenderkar, same error messages. But I’m using pop os(ubuntu based).

    I can see the master vm is running, and I can open Virtual Box to interact with it. The VM booted but vagrant can not communicate with it.

    I guess it’s becuase the network setting with the new version of Virtual Box.(/etc/vbox/networks).

    1. Glad it helped Brad. 🙂

      And thank you so much for adding the information about Virtualbox, Even I faced the network issue when I updated my MAC. I will update the information in the blog as well.

  17. facing below error
    kubectl get node
    The connection to the server localhost:8080 was refused – did you specify the right host or port?

  18. What happen to this when running vagrant up?

    An error occurred while downloading the remote file. The error
    message, if any, is reproduced below. Please fix this error and try
    again.

    SSL certificate problem: certificate has expired
    More details here: https://curl.haxx.se/docs/sslcerts.html

    curl failed to verify the legitimacy of the server and therefore could not
    establish a secure connection to it. To learn more about this situation and
    how to fix it, please visit the web page mentioned above.

    1. Hi Christian,

      Are you using a corporate network? If yes, there is a possibility of proxy blocking the connections. Try to download the base vagrant image separately and then use vagrant up.

      You can also try the –insecure flag with vagrant up.

  19. First of all, great job. love it. Two questions.
    Can you do one for ansible/Vagrant/kubernetes?
    Is your setup compatible with ubuntu 20.04?

    thank you

    1. Hi Sunday,

      Ansible + Vagrant + Kubernetes is in pipeline.

      I haven’t tested on ubuntu 20.04. But it should work without any issues.

  20. Hi Bibin,

    Thanks for all the great blogs on K8S deployments and configs!
    It would be really helpful if you can share vagrant file setting up K8S using centos.

  21. Hi Bibin.. This is really quite interesting. 🙂
    I’m running this on my mac.

    I have an application which uses services defined with LoadBalancer types, not node port. If i want to use the LoadBalancer types and services, do i need to modify or add anything so that the service using LoadBalancer type gets a network IP from my local lan – so presuming i need a bridged interface in vagrant for each worker node?

  22. Timed out while waiting for the machine to boot. This means that
    Vagrant was unable to communicate with the guest machine within
    the configured (“config.vm.boot_timeout” value) time period.

    If you look above, you should be able to see the error(s) that
    Vagrant had when attempting to connect to the machine. These errors
    are usually good hints as to what may be wrong.

    If you’re using a custom box, make sure that networking is properly
    working and you’re able to connect to the machine. It is a common
    problem that networking isn’t setup properly in these boxes.
    Verify that authentication configurations are also setup properly,
    as well.

    If the box appears to be booting properly, you may want to increase
    the timeout (“config.vm.boot_timeout”) value.

    c:\Program Files\Kubernetes\Minikube\vagrant-kubeadm-kubernetes>

    1. Hi Rajeshwar,

      Looks like a Vagrant – Virtual box issue. Are you able to deploy normal VMS using Vagrant?

    1. Hi Marc,

      You don’t need any credentials for this. Just follow the tutorial and you will have a running kubernetes cluster..Ensure that you have Vagrant setup configured and have 16 Gig ram in your workstation.. Let me know if you need more information.

Leave a Reply

Your email address will not be published. Required fields are marked *

You May Also Like