

In this Kubernetes Minikube tutorial, I will go through the required steps for a beginner to install Minikube and get started with all the configuration involved.
We have converted everything from installation, and configuration to deploying local development clusters with every configuration you need to deploy and test applications.
About Minikube
Minikube is a lightweight Kubernetes cluster setup you can use to develop and test applications on Kubernetes. You can create single and multi-node clusters with Minikube.
If you want to set up a Kubernetes cluster in your workstation, Minikube is one of the simplest ways to do it. Also, with add-ons, you can extend it for advanced features.
In this guide, we will look at the following.
Minikube Prerequisites
The following are the prerequisites for Minikube to work properly.
- 2 CPUs or more
- 2GB of free memory
- 20GB of free disk space
- A good Internet connection
- Container or virtual machine manager, such as Docker, Hyperkit, Hyper-V, KVM, Parallels, Podman, VirtualBox, or VMWare. Ensure you install any of the tools before you start with Minikube installation.
MAC M1/M2 users can use Docker Desktop or qemu emulator as virtual box have issue with ARM64 processors.
Install MiniKube
Minikube installation is very simple. You just need to download the package. It is a single binary that is executable and that is all you need.
First, go to https://minikube.sigs.k8s.io/docs/start/ and select the appropriate OS and other OS-specific parameters. You will get the installation commands for the specific OS as shown below.
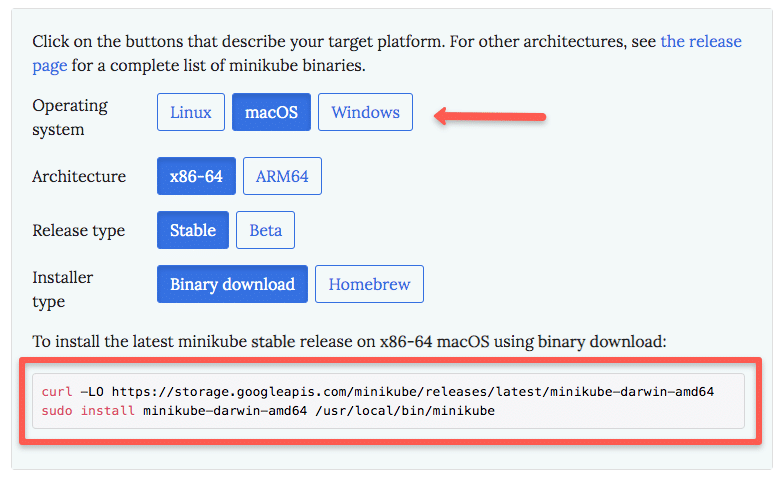
For example, if you have selected MAC binary download, the installation of Minikube is as simple as,
curl -LO https://storage.googleapis.com/minikube/releases/latest/minikube-darwin-amd64
sudo install minikube-darwin-amd64 /usr/local/bin/minikube
Verify installation by checking the minikube version.
minikube versionStart Minikube With Virtualbox/Qemu/Docker
I personally prefer Virtualbox because I use it for other testing purposes using Vagrant.
If you use the Docker driver, Nodeport will not work properly.
You can install Virtualbox and start minikube with the Virtualbox driver. There will not be any issue with NodePort services if you use the Virtualbox driver.
minikube start --driver=virtualboxFor Docker users,
minikube start -p dev --container-runtime=docker --vm=trueFor Qemu users.
minikube start --driver=qemuHere we are specifically mentioning --driver=virtualbox because, by default, it picks the Docker driver if Docker is installed on your system. If you don't have Docker and only Virtualbox, minikube picks the Virtualbox driver by default.
If you want to install a specific kubernetes version, use the version flag as shown below.
minikube start --kubernetes-version=1.31.0 --driver=virtualboxIf you are running for the first time, Minikube will download the base VM image to deploy kubernetes on Virtualbox. It will take a couple of minutes for minikube to start. On successful execution, you will see the following messages.

To verify, execute the following status command.
minikube statusYou should see the following output.
minikube
type: Control Plane
host: Running
kubelet: Running
apiserver: Running
kubeconfig: Configured
You can have multiple minikube clusters using profiles. I have covered profiles towards the end of the article.
Minikube Reference Manifests
All the Kubernetes manifests used in this guide are hosted on Github. You can clone the repo and use it or directly deploy it using the URL given in the guide below.
git clone https://github.com/techiescamp/minikubeDeploy Application on Minikube
First, let's deploy a sample Nginx app. Here is what that manifest contains.
- A configmap with custom nginx html
- Nginx deployment
- Service with 32000 nodeport
Let's deploy the manifest using the direct git raw URL. It gets deployed in the default namespace.
kubectl apply -f https://raw.githubusercontent.com/scriptcamp/minikube/main/nginx.yamlGet the deployment status
kubectl get deploymentsGet the service. You should be able to see the nginx-service
kubectl get serviceGetting Minikube IP & Service Endpoints
To get the node IP of minikube, execute the following command. You can use the IP to access nodePorts.
minikube ipFor example,
http://192.168.99.100:32000You can also get the service endpoint directly using the following minikube command.
minikube service listTo get the URL of a specific service,
minikube service --url <service-name>Access Nodeport on Minikube
With minikube, you can get the service endpoint with the NodePort directly using the service name. Execute the following command to get the full-service URL with the assigned NodePort. Here nginx-service is the service name of nginx
minikube service nginx-service --urlCreate Persistent Volume on Minikube
You can create Persistent volume in your minikube cluster. If any of the applications need persistent volume, you can use the host path type.
Here is an example.
apiVersion: v1
kind: PersistentVolume
metadata:
  name: pv0001
spec:
  accessModes:
    - ReadWriteOnce
  capacity:
    storage: 5Gi
  hostPath:
    path: /data/pv0001/
You can try creating a persistent volume using the GitHub manifest directly.
kubectl apply -f https://github.com/scriptcamp/minikube/edit/main/pv.yamlkubectl get pvCreate Dynamic Volumes on Minikube
When you install Minikube, a default storage class named standard is created for dynamic provisioning. Dynamic volume provisioning is primarily required when you deploy Statefulset apps.
Minikube uses provisioner:k8s.io/minikube-hostpath provisioner for the dynamic persistent volume. Which actually creates a mount under the hostpath.
Here is a PVC manifest example that you can use with minikube.
kind: PersistentVolumeClaim
apiVersion: v1
metadata:
  name: dynamic-volume
spec:
  accessModes:
    - ReadWriteOnce
  resources:
    requests:
      storage: 1Gi
Let's try creating the PVC using the manifest directly from the Github file.
kubectl apply -f https://raw.githubusercontent.com/scriptcamp/minikube/main/pvc.yamlList the pvc
kubectl get pvcYou can check the kubernetes postgreSQL statefulset guide to deploy Statefulsets on Minikube.
Minikube Addons
There are some advanced Kubernetes features that are available as minikube addons. For example, the Kubernetes dashboard & metrics server do not come default with the Minikube installation. But it is available as a minikube addon. Also, if you want to add a custom docker registry to minikube, you have to install the registry-creds addon and configure it.
By default, only the storage class add-ons get installed.
You can list all the available add-ons using the following command.
minikube addons list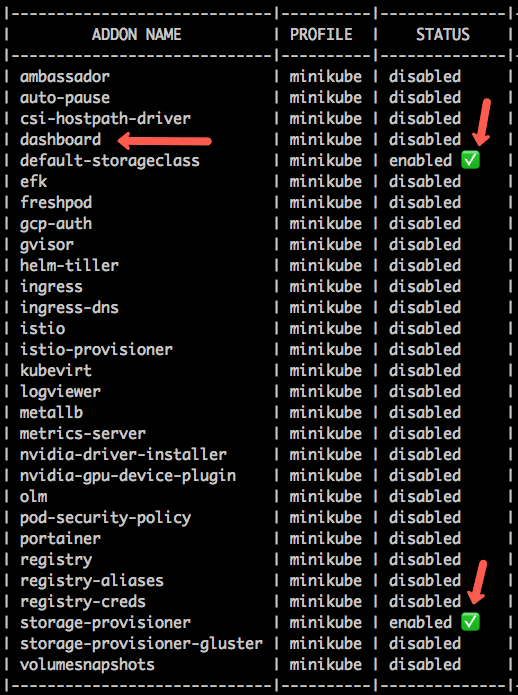
You can enable an addon from the list using the enable flag.
For example, I am going to enable two add-ons. Kubernetes dashboard and the kubernetes metrics server.
minikube addons enable dashboard
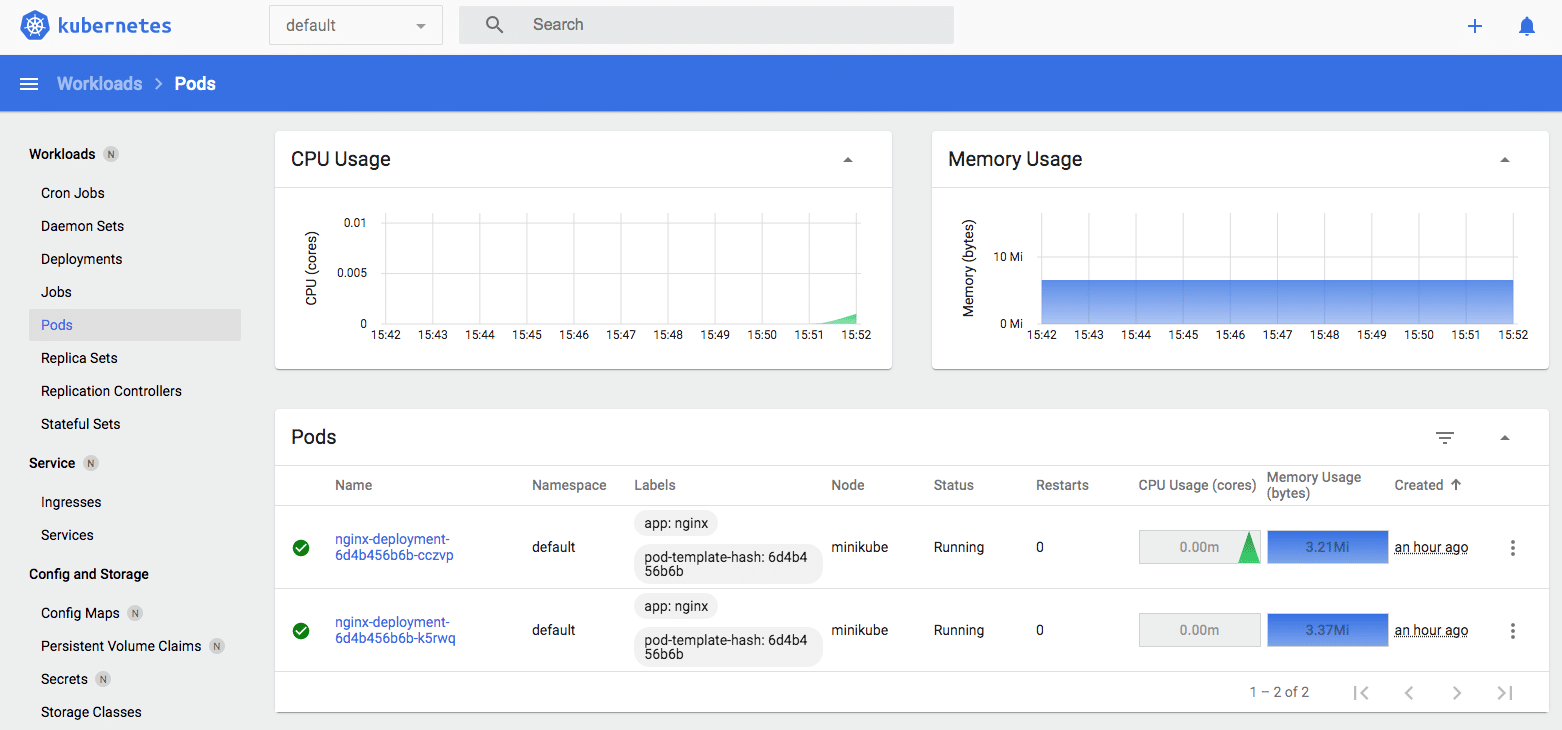
minikube addons enable metrics-serverAccess Minikube Kubernetes Dashboard
Once the dashboard addon is enabled you can access the Kubernetes dashboard using the minikube command.
The following command will open the Kubernetes dashboard directly in the browser.
minikube dashboardIf you just want the dashboard URL, execute the following command. It will start the proxy and displays the Kubernetes dashboard URL in the output.
minikube dashboard --url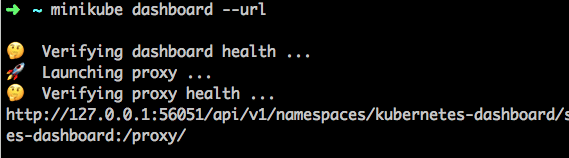
You can access the dashboard from the browser as shown below.
Minikube Custom CPU & Memory
By default, Minukube assigns 2 vCPU and 2048 memory. Oftentimes we need extra CPU and memory than the default values set by minikube. To override default CPU and memory limits, you can explicitly specify the custom CPU and memory limits as shown below.
minikube start --driver=virtualbox --memory 3000 --cpus 2If you want to change the CPU and memory of the existing minikube, execute the following commands with custom CPU and memory values.
minikube stop minikube config set memory 2500 minikube config set cpus 2 minikube start
Running Multiple Minikube Clusters using Profiles
You can have multiple minikube cluster instances in your workstation using minikube profiles. For example, you might want to run two different versions of the Kubernetes cluster in your stations.
To create a cluster with a profile, you just need to create the clusters with a profile flag and a profile name.
For example, the following command creates a minikube cluster with the profile name dev.
minikube start -p devYou can list all the profiles using the list command.
minikube profile listYou should get an output with all the minikube profiles with information like node IP, driver, runtime, status, etc.

You can delete a minikube profile using the following command. It deletes all the configurations related to the profile.
minikube delete -p stageSwitch Between Minikube Profiles
If you have multiple active minikube profiles, you can switch between profiles or set the default profile using the minikube command.
For example, to switch to the dev profile, execute the following command. It automatically switched the kubectl context to the dev cluster.
minikube profile devTo determine the current profile, just run the following command.
minikube profileIf you don't set up a profile, you might get the following error.
Profile "minikube" not found. Run "minikube profile list" to view all profilesEither you can set the profile or pass the profile flag with all minikube commands.
For example,
minikube service list -p devRunning Multi-Node Minikube Cluster
You can run a multi-node cluster with Minkube. All you have to do is pass a --nodes flag with the required number of nodes.
For example, to start a 2-node minikube cluster,
minikube start --nodes 2 You can check the node status using the following command.
minikube statusAccess Minikube Nodes (SSH)
If you want to access the minikube node for checking Kubernetes configurations or for rebuffing purposes, you can ssh into the node using the following command.
minikube ssh To open any files inside the node, use sudo.
If you have multiple minikube nodes, you can use the specific node to ssh. First, you need to list the available nodes using kubectl.
kubectl get nodesThen use the node name as follows.
minikube ssh -n worker-01Upgrade Minikube
To upgrade Minikube, first check the version to be updated using the following command.
minikube update-checkIf there is a latest version available you can upgrade the version in the same way you installed it.
For MAC (Homebrew)
Update brew and upgrade minukube.
brew update
brew upgrade minikube
For Linux
curl -LO https://storage.googleapis.com/minikube/releases/latest/minikube-linux-amd64
sudo install minikube-linux-amd64 /usr/local/bin/minikube
Finally check the updated version using the following command.
minikube versionEnable Feature Gates in Minikube
If you want to try out alpha and beta features added to new Kubernetes versions, you can use the feature gates option with Minikube.
For example, there is a feature gate called SidecarContainers and to enable it, when you install Minikube
minikube start -p test --kubernetes-version=v1.31.0 --feature-gates=SidecarContainers=trueYou can check the list of all the available Feature Gates Here.
Minikube Alternatives
Following are some of the open-source minikube alternatives to have a local kubernetes setup. Do give it a try.
- Kind: https://kind.sigs.k8s.io/
- k3s: https://github.com/k3s-io/k3s
- Autok3s: https://github.com/cnrancher/autok3s
- K0s: https://github.com/k0sproject/k0s
- MicroK8s: https://github.com/ubuntu/microk8s
But only Minkube has support options to work with Hyperkit, Hyper-V, KVM, Parallels, Podman, VirtualBox, or VMWare.
Possible Errors
The following error primarly occurs in Mac systems. Instead of VMware based backend, you can use Docker Desktop.
Exiting due to DRV_UNSUPPORTED_OS: The driver 'vmware' is not supported on darwin/arm64Minikube FAQs
What is minikube used for?
Minikube is a local kubernetes setup primarily used for development and testing purposes. It is a lightweight setup that works with tools like Docker, Virtualbox, etc.
How do I view the minikube dashboard?
To access the minikube dashboard, you need to enable the minikube dashboard addon. Then you can access the dashboard from the browser using the minikube command.
How do I deploy an application in minikube?
You can deploy applications in minikube using kubectl like you deploy applications in any Kubernetes cluster.
Can Minikube have multiple clusters in a single workstation?
Yes. Using minikube profiles, you can run multiple instances of minikube cluster instances in a single workstation.
How to use a custom Docker registry with Minikube?
If you are on a corporate network, you might have to use a private docker registry with minikube. To use a custom private docker registry, you should install the registry-creds Minikube addon and configure the registry details.
Conclusion
In this kubernetes minikube tutorial, I have covered the minikube installation and configuration setup steps to deploy an application and access it.
I will keep updating this tutorial with the required functionalities of minikube that you can use for your local development and testing.
If you are preparing for Kubernetes Certifications, you can check out the Kubeadm cluster setup guide. It is a multi-node setup where you get a production-like experience.