

This article aims to explain each of the components required to deploy PostgreSQL statefulset cluster on Kubernetes. We will also discuss the highly available PostgreSQL cluster setup using pgpool and repmgr.
Towards the end of the article, we have added the guide to perform basic operations inside the PostgreSQL cluster using a client pod.
As a beginner, creating components one by one while understanding the steps involved is a great way to learn about Kubernetes and Postgres.
Going step by step ensures that you can focus on understanding the ‘why’ while learning the ‘how’.
Here is what you are going to learn in this comprehensive PostgreSQL deployment guide.
PostgreSQL Cluster Kubernetes Manifests
All the Kubernetes YAML manifests used in this guide are hosted on Github. Clone the repository for reference and implementation.
git clone https://github.com/scriptcamp/kubernetes-postgresql.gitWe have explained all the manifests required for PostgreSQL on Kubernetes. If you have trouble copying the manifests from the article, please clone and refer to the manifests directly.
We have categorized the manifest into three folders named client, pgpool and postgresql as shown below.
├── client
│   ├── client-pod.yaml
│   └── psql-client.yaml
├── pgpool
│   ├── nginx.yaml
│   ├── pgpool-deployment.yaml
│   ├── pgpool-secret.yaml
│   ├── pgpool-svc-nodeport.yaml
│   └── pgpool-svc.yaml
└── postgresql
    ├── postgres-configmap.yaml
    ├── postgres-headless-svc.yaml
    ├── postgres-secrets.yaml
    └── postgres-statefulset.yaml
If you wish to deploy the components in one go, cd into each directory and execute the following. Start with postgresql directory.
kubectl apply -f .Bitnami PostgreSQL Docker Image
This tutorial has used Bitnami docker images, this has been done intentionally. There are certain advantages you can get as a beginner by using a Bitnami image.
- Bitnami images are shipped with necessary components pre-installed. This lets us maintain our focus can understanding and becoming familiar with Kubernetes side of things in depth.
- Bitnami images are well tested and validated before being released. This helps us save time and overcome any problems we may face with newer versions or patches.
- Bitnami images are very well documented, you'll find a satisfactory explaination of each and every environment variable being used by the bitnami image. So a natural fit for beginners.
Above all, as a beginner - we should focus on understanding kubernetes components and avoid getting off our goal due to installing dozens of packages, finding documentation, etc.
Bitnami does just that for us.
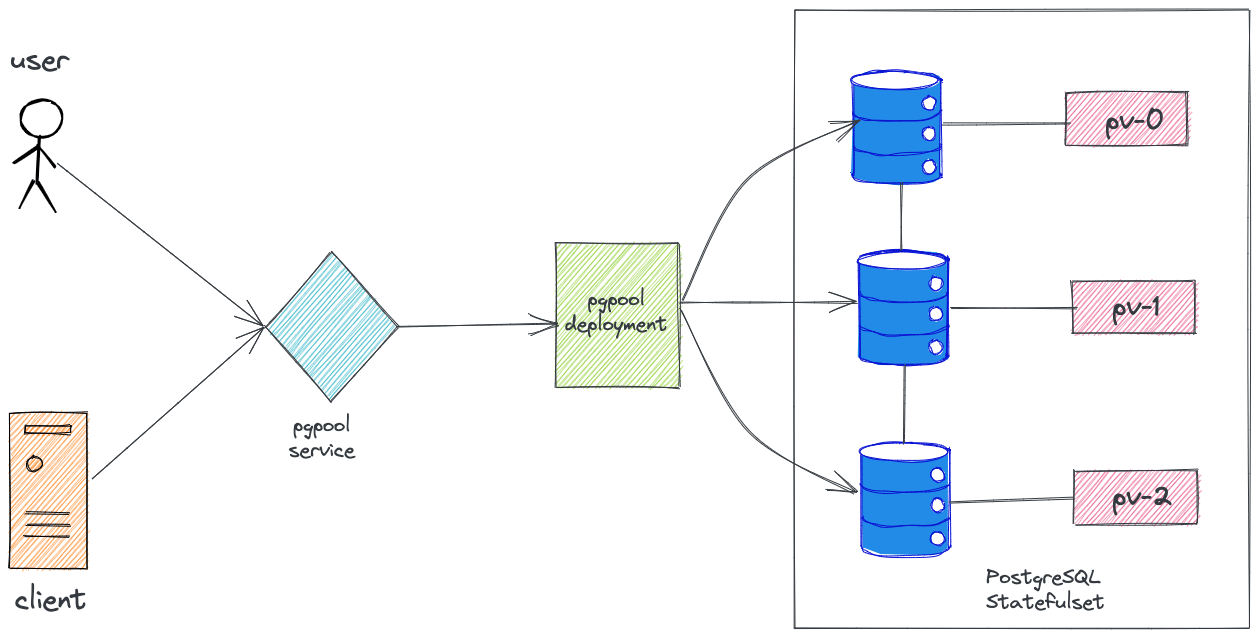
High Level Architecture
Create a Namespace
To deploy the PostgreSQL cluster, we will create a dedicated namespace named database.
kubectl create namespace databaseThe manifest files do not have the namespace added to them. So we will add the namespace while deploying each component. If you don't specify the namespace, it gets deployed in the default namespace.
Creating Postgres Server ConfigMaps
A ConfigMaps in Kubernetes lets us mount files on containers without the need to make changes to the Dockerfile or rebuilding the container image.
This feature is extremely helpful in cases where configurations have to be modified or created through files.
Postgres requires a script (pre-stop.sh) to be run whenever it is about to be stopped. We will mount this script into the pod using config maps.
Save the following manifest as postgres-configmap.yaml
apiVersion: v1
kind: ConfigMap
metadata:
  name: postgres-configmap
data:
  pre-stop.sh: |-
    #!/bin/bash
    set -o errexit
    set -o pipefail
    set -o nounset

    # Debug section
    exec 3>&1
    exec 4>&2

    # Load Libraries
    . /opt/bitnami/scripts/liblog.sh
    . /opt/bitnami/scripts/libpostgresql.sh
    . /opt/bitnami/scripts/librepmgr.sh

    # Auxiliary functions
    is_new_primary_ready() {
        return_value=1
        currenty_primary_node="$(repmgr_get_primary_node)"
        currenty_primary_host="$(echo $currenty_primary_node | awk '{print $1}')"

        info "$currenty_primary_host != $REPMGR_NODE_NETWORK_NAME"
        if [[ $(echo $currenty_primary_node | wc -w) -eq 2 ]] && [[ "$currenty_primary_host" != "$REPMGR_NODE_NETWORK_NAME" ]]; then
            info "New primary detected, leaving the cluster..."
            return_value=0
        else
            info "Waiting for a new primary to be available..."
        fi
        return $return_value
    }

    export MODULE="pre-stop-hook"

    if [[ "${BITNAMI_DEBUG}" == "true" ]]; then
        info "Bash debug is on"
    else
        info "Bash debug is off"
        exec 1>/dev/null
        exec 2>/dev/null
    fi

    # Load PostgreSQL & repmgr environment variables
    . /opt/bitnami/scripts/postgresql-env.sh

    postgresql_enable_nss_wrapper

    # Prepare env vars for managing roles
    primary_node="$(repmgr_get_primary_node)"
    primary_host="$(echo $primary_node | awk '{print $1}')"

    # Stop postgresql for graceful exit.
    postgresql_stop

    if [[ "$primary_host" == "$REPMGR_NODE_NETWORK_NAME" ]]; then
        info "Primary node need to wait for a new primary node before leaving the cluster"
        retry_while is_new_primary_ready 10 5
    else
        info "Standby node doesn't need to wait, leaving the cluster."
    fi
Create the configmap
kubectl apply -f postgres-configmap.yaml -n databaseIt's important to understand what the script is trying to do. Here is the overview:
- The script first checks what type of component is getting stopped i.e. master or follower.
- In case the master is getting stopped - the script delays the stoppage of the pod until a previous follower gets promoted to master.
- This is done to ensure high availabiliy i.e. atleast one master with write capabilities should exist.
Confusing? Don't worry. Just follow on. After reading the high availability section, the above points would become clear and make much more sense.
Be sure to go through the script and revisit the points.
Deploy PostgreSQL Services
Services in Kubernetes are the objects that pods use to communicate with each other. Services of type ClusterIP are usually used for inter-pod communication.
There are two types of ClusterIP services
- Headless Services
- Services
Normal Kubernetes services act as load balancers and follow round-robin logic to distribute loads. Headless services don’t act like load balancers. Also, normal services are assigned IPs by Kubernetes whereas Headless services are not.
In the case of Postgres servers, we require a headless service because it is a requirement for the PostgresSQL statefulset.
Save the following manifest as postgres-headless-svc.yaml.
apiVersion: v1
kind: Service
metadata:
  name: postgres-headless-svc
spec:
  type: ClusterIP
  clusterIP: None
  ports:
  - name: postgresql
    port: 5432
    targetPort: postgresql
    protocol: TCP
  selector:
    app: postgres
Create the service.
kubectl apply -f postgres-headless-svc.yaml -n databaseCreate PostgresSQL Server Secrets
Secrets in Kubernetes are the objects used for supplying sensitive information to containers. They are like ConfigMaps with the difference that data is store in a base 64 encoded format.
For the security of our PostgreSQL cluster, it is wise to restrict access to the database with a password. We will use Secrets to mount our desired passwords to the containers.
Note: In production use cases, a secrets management solution like hashicorp vault will be used to store and retrive secrets. You can refer to hashicorp vault setup guide on Kubernetes to understand more.
Save the following manifest as postgres-secrets.yaml. Please change the password with a secure password of your own.
apiVersion: v1
kind: Secret
metadata:
  name: postgres-secrets
data:
  postgresql-password: "V2JyVHBOM2c3cQ=="
  repmgr-password: "c1ZwYm90R2d4Nw=="
Create the Secret.
kubectl apply -f postgres-secrets.yaml -n databaseWhen the cluster is initialized, it creates certain users like postgres & repmgr in our case. The above passwords are for these users.
PostgreSQL StatefulSet
While deploying the PostgreSQL on Kubernetes, what object type should be used and why? Deployments or StatefulSets?
The answer is StatefulSet. Let's discuss!
StatefulSet is the Kubernetes object used to manage stateful applications. It’s preferred over deployments for this use case as it provides guarantees about the ordering and uniqueness of these Pods i.e. the management of volumes is better with stateful sets.
This section is critical to get a deeper understanding of the deployment logic. So read with full concentration!
As a beginner, it is important to understand why we want to deploy a Statefulset and not Deployments. After all, our focus is on understanding the ‘why’ along with learning the ‘how’.
Why do We Need PostgreSQL Statefulset?
Postgres is going to be a stateful application i.e. it stores data (like tables, users) inside a volume. If the data is stored in pod ephemeral storage, then the data will get erased once the pod restarts.
Also, Postgres may have to be scaled to more than one pod in caseload increases.
All these operations have to be done in such a way that data consistency is maintained across all the pods like postgres-0, postgres-1, postgres-2.
How can we achieve this in Kubernetes? Think and then read ahead!
Postgres implements continuous replication of data across all its pods. So when data is written on postgres-0 it gets replicated into postgres-1. postgres-2 replicates data from postgres-3. And so on…
Postgres is able to do this continuous replication using an open-source tool called RepMgr which comes built-in with Postgres docker image.
The thing to understand here is that postgres-1 needs to know where to look for postgres-0. Otherwise, How will the replication happen?
- How will it know from where to fetch data for the replication process?
- How will postgres-1 know where to look for postgres-0?
- How will postgres-2 know where to look for postgres-1?
Let’s try to answer these questions now.
In case of deployments & stateful sets, pods are always assigned a unique name that can be used to look for the pods.
In the case of deployments, pods are always assigned a unique name but this unique name changes after the pod are deleted & recreated. So it’s not useful to identify any pod.
Case of deployments: name of pod initially: postgres-bcr25qd41c-skxpe In the case of the stateful set – each pod is assigned a unique name and this unique name stays with it even if the pod is deleted & recreated.
Case of statefulsets: name of pod initially: postgres-0 That’s why we want to use a stateful set here i.e. so that we can reach any pod without any discrepancies.
Also, this unique ordering ensures that each pod is allocated the same underlying volume irrespective of pod restarts.
These concepts of Statefulset & deployments are not unique to Postgres deployments, if you explore – you’ll find that many popular Kubernetes tools use stateful sets.
Some examples are Hashicorp's Vault, Elasticsearch, and many more. All of them use Stateful Set and not deployments due to the same logic.
Deploy PostgreSQL StatefulSet
First, let’s create the Statefulset. I have added an explanation for the Postgres Statefulset as well towards the end of this section.
Save the following manifest as postgres-statefulset.yaml
apiVersion: apps/v1
kind: StatefulSet
metadata:
  name: postgres-sts
spec:
  serviceName: postgres-headless-svc
  replicas: 3
  selector:
    matchLabels:
      app: postgres
  template:
    metadata:
      labels:
        app: postgres
    spec:
      securityContext:
        fsGroup: 1001
      containers:
        - name: postgresql
          lifecycle:
            preStop:
              exec:
                command:
                  - /pre-stop.sh
          image: docker.io/bitnami/postgresql-repmgr:11.12.0-debian-10-r44
          imagePullPolicy: "IfNotPresent"
          securityContext:
            runAsUser: 1001
          # Auxiliary vars to populate environment variables
          env:
            - name: BITNAMI_DEBUG
              value: "false"
            # PostgreSQL configuration
            - name: POSTGRESQL_VOLUME_DIR
              value: "/bitnami/postgresql"
            - name: PGDATA
              value: "/bitnami/postgresql/data"
            - name: POSTGRES_USER
              value: "postgres"
            - name: POSTGRES_PASSWORD
              valueFrom:
                secretKeyRef:
                  name: postgres-secrets
                  key: postgresql-password
            - name: POSTGRES_DB
              value: "postgres"
            - name: POSTGRESQL_LOG_HOSTNAME
              value: "true"
            - name: POSTGRESQL_LOG_CONNECTIONS
              value: "false"
            - name: POSTGRESQL_LOG_DISCONNECTIONS
              value: "false"
            - name: POSTGRESQL_PGAUDIT_LOG_CATALOG
              value: "off"
            - name: POSTGRESQL_CLIENT_MIN_MESSAGES
              value: "error"
            - name: POSTGRESQL_SHARED_PRELOAD_LIBRARIES
              value: "pgaudit, repmgr"
            - name: POSTGRESQL_ENABLE_TLS
              value: "no"
            # Repmgr configuration
            - name: MY_POD_NAME
              valueFrom:
                fieldRef:
                  fieldPath: metadata.name
            - name: REPMGR_UPGRADE_EXTENSION
              value: "no"
            - name: REPMGR_PGHBA_TRUST_ALL
              value: "no"
            - name: REPMGR_MOUNTED_CONF_DIR
              value: "/bitnami/repmgr/conf"
            - name: REPMGR_NAMESPACE
              valueFrom:
                fieldRef:
                  fieldPath: metadata.namespace
            - name: REPMGR_PARTNER_NODES
              value: postgres-sts-0.postgres-headless-svc.$(REPMGR_NAMESPACE).svc.cluster.local,postgres-sts-1.postgres-headless-svc.$(REPMGR_NAMESPACE).svc.cluster.local,postgres-sts-2.postgres-headless-svc.$(REPMGR_NAMESPACE).svc.cluster.local
            - name: REPMGR_PRIMARY_HOST
              value: "postgres-sts-0.postgres-headless-svc.$(REPMGR_NAMESPACE).svc.cluster.local"
            - name: REPMGR_NODE_NAME
              value: "$(MY_POD_NAME)"
            - name: REPMGR_NODE_NETWORK_NAME
              value: "$(MY_POD_NAME).postgres-headless-svc.$(REPMGR_NAMESPACE).svc.cluster.local"
            - name: REPMGR_LOG_LEVEL
              value: "NOTICE"
            - name: REPMGR_CONNECT_TIMEOUT
              value: "5"
            - name: REPMGR_RECONNECT_ATTEMPTS
              value: "3"
            - name: REPMGR_RECONNECT_INTERVAL
              value: "5"
            - name: REPMGR_USERNAME
              value: "repmgr"
            - name: REPMGR_PASSWORD
              valueFrom:
                secretKeyRef:
                  name: postgres-secrets
                  key: repmgr-password
            - name: REPMGR_DATABASE
              value: "repmgr"
          ports:
            - name: postgresql
              containerPort: 5432
              protocol: TCP
          livenessProbe:
            exec:
              command:
                - bash
                - -ec
                - 'PGPASSWORD=$POSTGRES_PASSWORD psql -w -U "postgres" -d "postgres"  -h 127.0.0.1 -c "SELECT 1"'
            initialDelaySeconds: 30
            periodSeconds: 10
            timeoutSeconds: 5
            successThreshold: 1
            failureThreshold: 6
          readinessProbe:
            exec:
              command:
                - bash
                - -ec
                - 'PGPASSWORD=$POSTGRES_PASSWORD psql -w -U "postgres" -d "postgres"  -h 127.0.0.1 -c "SELECT 1"'
            initialDelaySeconds: 5
            periodSeconds: 10
            timeoutSeconds: 5
            successThreshold: 1
            failureThreshold: 6
          volumeMounts:
            - name: data
              mountPath: /bitnami/postgresql
            - name: hooks-scripts
              mountPath: /pre-stop.sh
              subPath: pre-stop.sh
      volumes:
        - name: hooks-scripts
          configMap:
            name: postgres-configmap
            defaultMode: 0755
  volumeClaimTemplates:
    - metadata:
        name: data
      spec:
        accessModes:
          - "ReadWriteOnce"
        resources:
          requests:
            storage: "1Gi"
Create the Statefulset.
kubectl apply -f postgres-statefulset.yaml -n databaseThe Statefulset YAML of the PostgreSQL server has components such as configmap mounts, security context, probes, etc. Let understand the key configurations.
Metadata as env vars: In Kubernetes, information like the name of pods, the namespace of the pods can be utilized as env var for the pod.
This is useful in cases where the env vars need to use pods metadata or some Kubernetes defined fields for the pods.
- name: MY_POD_NAME
  valueFrom:
    fieldRef:
      fieldPath: metadata.name
- name: REPMGR_PASSWORD
  valueFrom:
    secretKeyRef:
      name: postgres-secrets
Env vars injected through secrets: Sometimes the containers need to know the sensitive data in order to make use of it.
For e.g. in order to assign a password to the Postgres database, the required password must be supplied securely to the Postgres container.
 - name: POSTGRES_PASSWORD
   valueFrom:
     secretKeyRef:
       name: postgres-secrets
       key: postgresql-password
 - name: REPMGR_PASSWORD
   valueFrom:
     secretKeyRef:
       name: postgres-secrets
       key: repmgr-password
Probes: Probes ensure that the vault does not get stuck in a loop due to any bug and can be restarted automatically in case an unexpected error comes up.
  livenessProbe:
    exec:
      command:
        - bash
        - -ec
        - 'PGPASSWORD=$POSTGRES_PASSWORD psql -w -U "postgres" -d "postgres"  -h 127.0.0.1 -c "SELECT 1"'
    initialDelaySeconds: 30
    periodSeconds: 10
    timeoutSeconds: 5
    successThreshold: 1
    failureThreshold: 6
  readinessProbe:
    exec:
      command:
        - bash
        - -ec
        - 'PGPASSWORD=$POSTGRES_PASSWORD psql -w -U "postgres" -d "postgres"  -h 127.0.0.1 -c "SELECT 1"'
    initialDelaySeconds: 5
    periodSeconds: 10
    timeoutSeconds: 5
    successThreshold: 1
    failureThreshold: 6
Basic principle of the above probes
Here the command used is just going to the "postgres" database using the "postgres" user and running the "SELECT 1" query.
If the Postgres process is running correctly, then the query will have a successful exit code. Otherwise not.
That's how we can be sure that the probes can tell us if the process is running or the container needs to be restarted!
VolumeClaimTemplates: A template by which a stateful set can create volumes for replicas.
  volumeClaimTemplates:
    - metadata:
        name: data
      spec:
        accessModes:
          - "ReadWriteOnce"
        resources:
          requests:
            storage: "1Gi"
Let's go through the important env vars for the Postgres process now.
- POSTGRESQL_VOLUME_DIR: The directory where the Postgres process shall write its configuration files and data. This is the directory that we should mount with a PVC.
- PGDATA: The directory inside the main Postgres directory where the data directory should be created.
- POSTGRES_USER: The user that should be created automatically when the Postgres process starts.
- POSTGRES_PASSWORD: The password for the user created by default.
- POSTGRES_DB: The database which should be created when the Postgres process starts.
Let's discuss the RepMgr now.
RepMgr Inside PostgresSQL Servers
RepMgr is an open-source tool shipped with Postgres which serves two purposes: Replication & Failover.
- Replication: It replicates data from the primary server to all the replicas. This helps in reducing the load on the servers by distributing read & write queries.
- Failover: It can handle failovers in the cluster i.e. it can promote a read-only server to a primary server when required.
You can read about it more here: https://repmgr.org/
Let's go through the important env vars for repmgr setup.
- REPMGR_PARTNER_NODES: This expects a comma-separated list of all Postgres server addresses in the cluster. Including the primary server's address.
- REPMGR_PRIMARY_HOST: This expects the Postgres primary server's address.
- REPMGR_USERNAME: User to be created for the repmgr operations.
- REPMGR_PASSWORD: Password to be created for the repmgr operations.
- REPMGR_DATABASE: Database to be created for the repmgr operations.
Tip for using headless svc effectively
As you know, headless svc does not work as a load balancer and is used to address a group of pods together. There is another use case for headless services.
We can use it to get the address of individual pods. Let's take an e.g. to understand this. We have three pods running as part of the Postgres Statefulset.
| Pod name | Pod Address |
| postgres-sts-0 | 172.17.0.3 |
| postgres-sts-1 | 172.17.0.8 |
| postgres-sts-2 | 172.17.0.10 |
Pods and their addresses.
A headless svc "postgres-headless-svc" is pointed to these pods.
If you do a nslookup from a pod running inside the same namespace of your cluster, you'll be able to get the address of the above pods through the headless svc.
nslookup postgres-sts-0.postgres-headless-svc.database.svc.cluster.local

Server:		10.96.0.10
Address:	10.96.0.10#53

Name:	postgres-sts-0.postgres-headless-svc.default.svc.cluster.local
Address: 172.17.0.3
The above concept is used very commonly in Kubernetes, in fact, the env var REPMGR_PARTNER_NODES is using this.
Pg-Pool for Postgres
Pg pool is a middleware component that sits in front of the Postgres servers and acts as a gatekeeper to the cluster.
It mainly serves two purposes: Load balancing & Limiting the requests.
- Load Balancing: Pg pool takes connection requests and queries. It analyzes the query to decide where the query should be sent.
- Read-only queries can be handled by read-replicas. Write operations can only be handled by the primary server. In this way, it loads balances the cluster.
- Limits the requests: Like any other system, Postgres has a limit on no. of concurrent connections it can handle gracefully.
- Pg-pool limits the no. of connections it takes up and queues up the remaining. Thus, gracefully handling the overload.
Creating the pg-pool secrets
Save the following manifest as pgpool-secret.yaml
apiVersion: v1
kind: Secret
metadata:
  name: pgpool-secrets
data:
  admin-password: "SFRzaVZxYjdSZQ=="
Create the secret.
kubectl create -f pgpool-secret.yaml -n databaseCreating the pg-pool service
Save the following manifest as pgpool-svc.yaml
apiVersion: v1
kind: Service
metadata:
  name: pgpool-svc
spec:
  type: ClusterIP
  sessionAffinity: None
  ports:
    - name: postgresql
      port: 5432
      targetPort: postgresql
      protocol: TCP
      nodePort: null
  selector:
    app: pgpool
Create the service.
kubectl apply -f pgpool-svc.yaml -n databaseIf you wish to access the cluster from outside the kubernetes cluster, you need to deploy a NodePort service as well.
Save the following manifest as pgpool-svc-nodeport.yaml
apiVersion: v1
kind: Service
metadata:
  name: pgpool-svc-nodeport
spec:
  type: NodePort
  sessionAffinity: None
  ports:
    - name: postgresql
      port: 5432
      nodePort: 32000
      targetPort: postgresql
      protocol: TCP
  selector:
    app: pgpool
Create the service.
kubectl apply -f pgpool-svc-nodeport.yaml -n database
Deploy pgpool Deployment
Save the following manifest as pgpool-deployment.yaml
apiVersion: apps/v1
kind: Deployment
metadata:
  name: pgpool-deployment
spec:
  replicas: 1
  selector:
    matchLabels:
      app: pgpool
  template:
    metadata:
      labels:
        app: pgpool
    spec:
      securityContext:
        fsGroup: 1001
      containers:
        - name: pgpool
          image: docker.io/bitnami/pgpool:4.2.3-debian-10-r38
          imagePullPolicy: "IfNotPresent"
          securityContext:
            runAsUser: 1001
          env:
            - name: BITNAMI_DEBUG
              value: "false"
            - name: PGPOOL_BACKEND_NODES
              value: 0:postgres-sts-0.postgres-headless-svc:5432,1:postgres-sts-1.postgres-headless-svc:5432,2:postgres-sts-2.postgres-headless-svc:5432
            - name: PGPOOL_SR_CHECK_USER
              value: "repmgr"
            - name: PGPOOL_SR_CHECK_PASSWORD
              valueFrom:
                secretKeyRef:
                  name: postgres-secrets
                  key: repmgr-password
            - name: PGPOOL_SR_CHECK_DATABASE
              value: "postgres"
            - name: PGPOOL_ENABLE_LDAP
              value: "no"
            - name: PGPOOL_POSTGRES_USERNAME
              value: "postgres"
            - name: PGPOOL_POSTGRES_PASSWORD
              valueFrom:
                secretKeyRef:
                  name: postgres-secrets
                  key: postgresql-password
            - name: PGPOOL_ADMIN_USERNAME
              value: "admin"
            - name: PGPOOL_ADMIN_PASSWORD
              valueFrom:
                secretKeyRef:
                  name: pgpool-secrets
                  key: admin-password
            - name: PGPOOL_ENABLE_LOAD_BALANCING
              value: "yes"
            - name: PGPOOL_ENABLE_LOG_CONNECTIONS
              value: "no"
            - name: PGPOOL_ENABLE_LOG_HOSTNAME
              value: "yes"
            - name: PGPOOL_ENABLE_LOG_PER_NODE_STATEMENT
              value: "no"
            - name: PGPOOL_CHILD_LIFE_TIME
              value: ""
            - name: PGPOOL_ENABLE_TLS
              value: "no"
          ports:
            - name: postgresql
              containerPort: 5432
              protocol: TCP
          livenessProbe:
            exec:
              command:
                - /opt/bitnami/scripts/pgpool/healthcheck.sh
            initialDelaySeconds: 30
            periodSeconds: 10
            timeoutSeconds: 5
            successThreshold: 1
            failureThreshold: 5
          readinessProbe:
            exec:
              command:
                - bash
                - -ec
                - PGPASSWORD=${PGPOOL_POSTGRES_PASSWORD} psql -U "postgres" -d "postgres" -h /opt/bitnami/pgpool/tmp -tA -c "SELECT 1" >/dev/null
            initialDelaySeconds: 5
            periodSeconds: 5
            timeoutSeconds: 5
            successThreshold: 1
            failureThreshold: 5
Create the deployment.
kubectl apply -f pgpool-deployment.yaml -n databasePostgreSQL High Availability
The failover mechanism provided by RepMgr and the Load balancing provided by Pg-pool ensure that the Postgres cluster remains up for a long time.
The two mechanisms together ensure the high availability of the PostgreSQL cluster.
With pod anti-affinity configurations, you can instruct Kubernetes to deploy pods in different nodes. This ensures you don't have a single point of failure if a Kubernetes node goes down.
Pod anti-affinity requires Kubernetes nodes to be labeled with appropriate labels. You can even dedicate few nodes in the cluster for databases by labeling them. With node affinity, all the PostgreSQL pods get assigned to nodes with specific labels.
Connect to PostgreSQL Cluster From Client
Let's create a psql client pod. We will use it to connect & verify the cluster. Copy the manifest contents as psql-client.yaml
---
apiVersion: v1
kind: Pod
metadata:
  name: pg-client
spec:
  containers:
    - image: bitnami/postgresql:11.12.0-debian-10-r13
      name: postgresql
      env:
      - name: ALLOW_EMPTY_PASSWORD
        value: "yes"
Let's deploy the client.
kubectl apply -f psql-client.yaml -n databaseNow let's try to connect to the cluster.
Copy the password.
kubectl get secret postgres-secrets -n database -o jsonpath="{.data.postgresql-password}" | base64 --decodeExec & connect.
kubectl exec -it pg-client -n database -- /bin/bashWe will use the password and the pg-pool service endpoint pgpool-svc to connect to the cluster.
PGPASSWORD=WbrTpN3g7q psql -h pgpool-svc -p 5432 -U postgresFor connecting from outside the cluster.
PGPASSWORD=WbrTpN3g7q psql -h <IP ADDR> -p <NODEPORT ADDR of pgpool-svc-nodeport> -U postgres

//For minikube, IP ADDR can be found out by executing "minikube ip"
For example,
PGPASSWORD=WbrTpN3g7q psql -h 34.138.59.54 -p 32000 -U postgresTry some basic sample commands:
create database db1; \c db1; //to connect to new database create table test (id int primary key not null, value text not null); insert into test values (1, 'value1'); select * from test;
Verifying the PostgreSQL Replication
Command to verify if the replication is taking place.
//after connecting to the cluster using psql client.
select * from pg_stat_replication;
No. of entries you should see = No. of replicas of Postgres running minus 1.
Reason for "minus 1": Data is being replicated from the master to the follower. It's logically impossible for the Data to be replicated from the master to itself!
Verify the failover by deleting the pods randomly and seeing if the cluster becomes unresponsive or not. I assure you, it will continue to work without issues!
As an exercise, verify thoroughly! I always work on databases with the principle of - Trust but verify.
Sample logs of follower pod when the primary pod goes down: Note how the messages inform the user about a failover taking place!
NOTICE: promoting standby to primary
DETAIL: promoting server "postgres-sts-1" (ID: 1001) using "/opt/bitnami/postgresql/bin/pg_ctl -o "--config-file="/opt/bitnami/postgresql/conf/postgresql.conf" --external_pid_file="/opt/bitnami/postgresql/tmp/postgresql.pid" --hba_file="/opt/bitnami/postgresql/conf/pg_hba.conf"" -w -D '/bitnami/postgresql/data' promote"
2021-07-28 20:38:11.362 GMT [266] LOG:  received promote request
2021-07-28 20:38:11.370 GMT [266] LOG:  redo done at 0/8000028
2021-07-28 20:38:11.370 GMT [266] LOG:  last completed transaction was at log time 2021-07-28 20:36:57.642182+00
2021-07-28 20:38:11.698 GMT [266] LOG:  selected new timeline ID: 2
2021-07-28 20:38:12.494 GMT [266] LOG:  archive recovery complete
NOTICE: waiting up to 60 seconds (parameter "promote_check_timeout") for promotion to complete
DEBUG: get_recovery_type(): SELECT pg_catalog.pg_is_in_recovery()
INFO: standby promoted to primary after 0 second(s)
DEBUG: setting node 1001 as primary and marking existing primary as failed
DEBUG: begin_transaction()
DEBUG: commit_transaction()
2021-07-28 20:38:13.105 GMT [264] LOG:  database system is ready to accept connections
NOTICE: STANDBY PROMOTE successful
Measuring PostgreSQL Performance
As a beginner, let us discuss the things that should be kept in mind regarding Postgre's performance and metrics.
- Fine Tuning Configurations: Performance mainly depends on the configurations that have been set. For e.g. performance may take a hit at certain points in time due to increased workloads. Ensure that you have followed all the suggested performance optmizations.
- Optimized Queries: Another factor that impacts the performance is the types of queries that are dominant. If a lot of write operations are performed in a given time - then performance will go down. It also depends on the optimization of queries. The more optimized the queries - the better performance can be expected.
- Cluster Size: Resources also affect performance. Let's say - your cluster is made up of 3 pods. For some use cases - it may be sufficient. For many, it will not be enough.
- Monitor your Database Metrics & Analyse Logs: Monitor the data based for CPU spikes, number of connections, disk space etc..If you have Prometheus setup, you can use the PostgreSQL Prometheus exporter to get all the metrics.
- Other Factors: The workload itself depends on a variety of factors such as backup schedule, traffic spikes, etc.
Performance mainly depends on your use case and business commitments. This should be explored even more according to your use case!
Conclusion
That's all folks! We have covered the detailed guide on deploying the PostgreSQL statefulset on Kubernetes.
We have also discussed high availability and replication using pgpool and repmgr.
When it comes to production, careful consideration has to be done on persistent volume management, backup, high availability, and performance.