

This article aims to explain each of the Kubernetes vault components and step-by-step guides to set up a Vault server in Kubernetes. Towards the end of the article, we will also discuss how an application can make use of the vault with a simple demo.
As a beginner, creating components one by one while understanding the steps involved is a great way to learn about Kubernetes and Vault. Going step by step ensures that you can focus on understanding the 'why' while learning the 'how'.
Creating the Vault Server in Kubernetes
As you know, Kubernetes default secret object is just base64 encoded. You need a good secret management tool and workflow to manage secret storage and retrieval for production uses cases.
Hashicorp Vault is one of the best open-source secret management tools that has good integration with Kubernetes to store and retrieve secrets.
In this setup, you will learn the following.
[powerkit_toc title="Table of Contents" depth="1" min_count="4" min_characters="1000"]
Under each category, I have explained why the specific Kubernetes object is used for the vault deployment.
Vault Kubernetes Manifests
All the Kubernetes YAML manifests used in this guide are hosted on Github. Clone the repository for reference and implementation.
git clone https://github.com/techiescamp/kubernetes-vault.gitVault RBAC Setup
Before we get started with the setup, I would like to go through some of the basic Kubernetes objects we would be using in this vault setup.
- ClusterRoles: Kubernetes ClusterRoles are entities that have been assigned certain special permissions.
- ServiceAccounts: Kubernetes ServiceAccounts are identities assigned to entities such as pods to enable their interaction with the Kubernetes APIs using the role's permissions.
- ClusterRoleBindings: ClusterRoleBindings are entities that provide roles to accounts i.e. they grant permissions to service accounts.
Vault server requires certain extra Kubernetes permissions to do its operations. Therefore, a ClusterRole is required (with the appropriate permissions) to be assigned to a ServiceAccount via a ClusterRoleBinding.
Kubernetes by default has a ClusterRole created with the required permissions i.e. 'system:auth-delegator' so it's not required to be created again for this case. Service account and Role Binding are required to be created.
Let's create the required RBAC for Vault.
Save the following manifest as rbac.yaml
---
apiVersion: v1
kind: ServiceAccount
metadata:
  name: vault
  namespace: default

---
apiVersion: rbac.authorization.k8s.io/v1
kind: ClusterRoleBinding
metadata:
  name: vault-server-binding
roleRef:
  apiGroup: rbac.authorization.k8s.io
  kind: ClusterRole
  name: system:auth-delegator
subjects:
- kind: ServiceAccount
  name: vault
  namespace: default
Create the service account and ClusterRolebinding.
kubectl apply -f rbac.yamlCreating Vault ConfigMaps
A ConfigMaps in Kubernetes lets us mount files on containers without the need to make changes to the Dockerfile or rebuilding the container image.
This feature is extremely helpful in cases where configurations have to be modified or created through files.
Vault requires a configuration file with appropriate parameters to start its servers.
Save the following manifest as configmap.yaml
apiVersion: v1
kind: ConfigMap
metadata:
  name: vault-config
  namespace: default
data:
  extraconfig-from-values.hcl: |-
    disable_mlock = true
    ui = true

    listener "tcp" {
      tls_disable = 1
      address = "[::]:8200"
      cluster_address = "[::]:8201"
    }
    storage "file" {
      path = "/vault/data"
    }
Create the configmap
kubectl apply -f configmap.yaml
It's important to understand the idea behind the parameters inside the config map. Some of them are explained below. For a more exhaustive list of options: - refer to the official vault documentation.
- disable_mlock: Executing mlock syscall prevents memory from being swapped to
- disk: This option disables the server from executing the mlock syscall.
- ui: Enables the built-in web UI.
- listener: Configures how Vault is listening for API requests.
- storage: Configures the storage backend where Vault data is stored.
Deploy Vault Services
Services in Kubernetes are the objects that pods use to communicate with each other. ClusterIP type services are usually used for inter-pod communication.
There are two types of ClusterIP services
- Headless Services
- Services
Normal Kubernetes services act as load balancers and follow round-robin logic to distribute loads. Headless services don't act like load balancers.
Also, normal services are assigned IPs by Kubernetes whereas Headless services are not.
For the vault server, we will create a headless service for internal usage. It will be very useful when we scale the vault to multiple replicas.
A non-headless service will be created for UI as we want to load balance requests to the replicas when accessing the UI.
Vault exposes its UI at port 8200. We will use a non-headless service of type NodePort as we want to access this endpoint from outside Kubernetes Cluster.
Save the following manifest as services.yaml. It has both service and headless service definitions.
---
# Service for Vault Server
apiVersion: v1
kind: Service
metadata:
  name: vault
  namespace: default
  labels:
    app.kubernetes.io/name: vault
    app.kubernetes.io/instance: vault
  annotations:
spec:
  type: NodePort
  publishNotReadyAddresses: true
  ports:
    - name: http
      port: 8200
      targetPort: 8200
      nodePort: 32000
    - name: https-internal
      port: 8201
      targetPort: 8201
  selector:
    app.kubernetes.io/name: vault
    app.kubernetes.io/instance: vault
    component: server

---
# Headless Service
apiVersion: v1
kind: Service
metadata:
  name: vault-internal
  namespace: default
  labels:
    app.kubernetes.io/name: vault
    app.kubernetes.io/instance: vault
  annotations:
spec:
  clusterIP: None
  publishNotReadyAddresses: true
  ports:
    - name: "http"
      port: 8200
      targetPort: 8200
    - name: https-internal
      port: 8201
      targetPort: 8201
  selector:
    app.kubernetes.io/name: vault
    app.kubernetes.io/instance: vault
    component: server
Create the services.
kubectl apply -f services.yamlUnderstanding publishNotReadyAddresses:
It's a configuration option inside the headless services manifest file.
By default, Kubernetes includes pods under a service only when the pod is in the "ready" state.
The "publishNotReadyAddresses" option changes this behavior by including pods that may or may not be in the ready state. You can see the list of pods in the ready state by doing "kubectl get pods".
Need for Vault StatefulSet
StatefulSet is the Kubernetes object used to manage stateful applications.
It's preferred over deployments for this use case as it provides guarantees about the ordering and uniqueness of these Pods i.e. the management of volumes is better with stateful sets.
This section is critical to get a deeper understanding of the vault.
As a beginner, it is important to understand why we want to deploy a Statefulset and not Deployments. After all, our focus is on understanding the 'why' along with learning the 'how'.
Why do We Need Statefulset?
Vault is a stateful application i.e. it stores data (like configurations, secrets, metadata of vault operations) inside a volume. If the data is stored in memory, then the data will get erased once the pod restarts.
Also, Vault may have to be scaled to more than one pod in caseload increases.
All these operations have to be done in such a way that data consistency is maintained across vault pods like vault-0, vault-1, vault-2.
How can we achieve this in Kubernetes? Think and then read ahead!
Vault implements continuous replication of data across all its pods. So when data is written on vault-0 it gets replicated into vault-1. vault-2 replicates data from vault-3. And so on...
The thing to understand here is that vault-1 needs to know where to look for vault-0. Otherwise, How will the replication happen?
- How will it know from where to fetch data for the replication process?
- How will vault-1 know where to look for vault-0?
- How will vault-2 know where to look for vault-1?
Let's try to answer these questions now.
In case of deployments & stateful sets, pods are always assigned a unique name that can be used to look for the pods.
In the case of deployments, pods are always assigned a unique name but this unique name changes after the pod are deleted & recreated. So it's not useful to identify any pod.
Case of deployments:
name of pod initially: vault-7c6c5fd47c-fkvpf
name of pod after it gets deleted & recreated: vault-c5f7c6dfk4-7pfcv
Here, pod name got changed.
In the case of the stateful set - each pod is assigned a unique name and this unique name stays with it even if the pod is deleted & recreated.
Case of statefulsets:
name of pod initially: vault-0
name of pod after it gets deleted & recreated: vault-0
Here, pod name remained the same.
That's why we want to use a stateful set here i.e. so that we can reach any pod without any discrepancies.
Beyond Vault
These concepts of Statefulset & deployments are not unique to Vault, if you explore - you'll find that many popular Kubernetes tools such as Elasticsearch, Postgresql use stateful sets and not deployments due to the same logic.
Deploy Vault StatefulSet
First, let's create the Statefulset. I have added an explanation for the vault Statefulset as well.
Save the following manifest as statefulset.yaml
apiVersion: apps/v1
kind: StatefulSet
metadata:
  name: vault
  namespace: default
  labels:
    app.kubernetes.io/name: vault
    app.kubernetes.io/instance: vault
spec:
  serviceName: vault-internal
  replicas: 1
  selector:
    matchLabels:
      app.kubernetes.io/name: vault
      app.kubernetes.io/instance: vault
      component: server
  template:
    metadata:
      labels:
        app.kubernetes.io/name: vault
        app.kubernetes.io/instance: vault
        component: server
    spec:
      serviceAccountName: vault
      securityContext:
        runAsNonRoot: true
        runAsGroup: 1000
        runAsUser: 100
        fsGroup: 1000
      volumes:
        - name: config
          configMap:
            name: vault-config
        - name: home
          emptyDir: {}
      containers:
        - name: vault
          image: hashicorp/vault:1.18.0
          imagePullPolicy: IfNotPresent
          command:
          - "/bin/sh"
          - "-ec"
          args:
          - |
            cp /vault/config/extraconfig-from-values.hcl /tmp/storageconfig.hcl;
            [ -n "${HOST_IP}" ] && sed -Ei "s|HOST_IP|${HOST_IP?}|g" /tmp/storageconfig.hcl;
            [ -n "${POD_IP}" ] && sed -Ei "s|POD_IP|${POD_IP?}|g" /tmp/storageconfig.hcl;
            [ -n "${HOSTNAME}" ] && sed -Ei "s|HOSTNAME|${HOSTNAME?}|g" /tmp/storageconfig.hcl;
            [ -n "${API_ADDR}" ] && sed -Ei "s|API_ADDR|${API_ADDR?}|g" /tmp/storageconfig.hcl;
            [ -n "${TRANSIT_ADDR}" ] && sed -Ei "s|TRANSIT_ADDR|${TRANSIT_ADDR?}|g" /tmp/storageconfig.hcl;
            [ -n "${RAFT_ADDR}" ] && sed -Ei "s|RAFT_ADDR|${RAFT_ADDR?}|g" /tmp/storageconfig.hcl;
            /usr/local/bin/docker-entrypoint.sh vault server -config=/tmp/storageconfig.hcl
          securityContext:
            allowPrivilegeEscalation: false
          env:
            - name: HOSTNAME
              valueFrom:
                fieldRef:
                  fieldPath: metadata.name
            - name: VAULT_ADDR
              value: "http://127.0.0.1:8200"
            - name: VAULT_API_ADDR
              value: "http://$(POD_IP):8200"
            - name: SKIP_CHOWN
              value: "true"
            - name: SKIP_SETCAP
              value: "true"
            - name: VAULT_CLUSTER_ADDR
              value: "https://$(HOSTNAME).vault-internal:8201"
            - name: HOME
              value: "/home/vault"
          volumeMounts:
            - name: data
              mountPath: /vault/data
            - name: config
              mountPath: /vault/config
            - name: home
              mountPath: /home/vault
          ports:
            - containerPort: 8200
              name: http
            - containerPort: 8201
              name: https-internal
            - containerPort: 8202
              name: http-rep
          readinessProbe:
            exec:
              command: ["/bin/sh", "-ec", "vault status -tls-skip-verify"]
            failureThreshold: 2
            initialDelaySeconds: 5
            periodSeconds: 5
            successThreshold: 1
            timeoutSeconds: 3
  volumeClaimTemplates:
    - metadata:
        name: data
      spec:
        accessModes:
          - ReadWriteOnce
        resources:
          requests:
             storage: 1Gi
Create the Statefulset.
kubectl apply -f statefulset.yamlThe Statefulset YAML of the vault has a lot of components such as configmap mounts, security context, probes, etc.
Note: Vault remains in a non ready state of now. It needs to be unsealed to become in ready state. Feel free to skip to next section to unseal vault. For production use cases, auto unseal options should be used.
Let us dive deeper and understand what each part is doing.
Configurations: Vault's extra configuration file is being mounted at /vault/config/extraconfig-from-values.hcl and is then being copied to /tmp/storageconfig.hcl where it is used when the process starts.
cp /vault/config/extraconfig-from-values.hcl /tmp/storageconfig.hcl;
/usr/local/bin/docker-entrypoint.sh vault server -config=/tmp/storageconfig.hcl
ServiceAccount: Since we want the vault server to have the required permissions of 'system:auth-delegator'. A service account has been assigned to the pod.
serviceAccountName: vaultSecurityContext: Running pods with privileged processes pose a security risk. This is because running a process with root on a pod is identical to running a process with root on the host node.
Ideally, pods should be run keeping in mind isolation between containers and host nodes. Therefore, here pods have been instructed to run as non-root users.
securityContext:
    runAsNonRoot: true
    runAsGroup: 1000
    runAsUser: 100
    fsGroup: 1000
Probes: Probes ensure that the vault does not get stuck in a loop due to any bug and can be restarted automatically in case an unexpected error comes up.
readinessProbe:
    exec:
        command: ["/bin/sh", "-ec", "vault status -tls-skip-verify"]
    failureThreshold: 2
    initialDelaySeconds: 5
    periodSeconds: 5
    successThreshold: 1
    timeoutSeconds: 3
VolumeClaimTemplates: A template by which a stateful set can create volumes for replicas.
volumeClaimTemplates:
    - metadata:
        name: data
      spec:
        accessModes:
          - ReadWriteOnce
        resources:
          requests:
             storage: 1Gi
The vault setup is complete. The next step is to unseal and initialize the vault.
Unseal & Initialise Vault
Initialization is the process by which Vault's storage starts preparation to receive data.
Vault generates an in-memory master key and applies Shamir's secret sharing algorithm to disassemble that master key into multiple keys. These keys are called "unseal keys".
So to initialize the vault, first, we need to unseal the vault using the unseal keys.
Step 1: First, we are creating tokens and keys to start using the vault.
Note: Pleaset install jq if it is not installed on your system.
kubectl exec vault-0 -- vault operator init -key-shares=1 -key-threshold=1 -format=json > keys.json

VAULT_UNSEAL_KEY=$(cat keys.json | jq -r ".unseal_keys_b64[]")
echo $VAULT_UNSEAL_KEY

VAULT_ROOT_KEY=$(cat keys.json | jq -r ".root_token")
echo $VAULT_ROOT_KEY
Step 2: Unseal is the state at which the vault can construct keys that are required to decrypt the data stored inside it.
kubectl exec vault-0 -- vault operator unseal $VAULT_UNSEAL_KEYImportant Note: If the Vault pod restarts, it gets sealed autoamtically. You will need to unseal vault again using the above unseal command. Also, if you run more than one replicaset, you need to login to all pods and execute the unseal commands. For production use cases, there are auto-unseal options available.
Login & Access Vault UI
You can log in to Vault using UI and CLI.
Note: In production setup, vault UI and login will be secured using LDAP, okta or other secure mechanisms that follows standard security guidelines.
The following command will remotely execute the vault log command as we have the VAULT_ROOT_KEY set locally in the environment variable.
kubectl exec vault-0 -- vault login $VAULT_ROOT_KEYThe above command will display a token. Save the token as you will need it to log in to the vault UI.
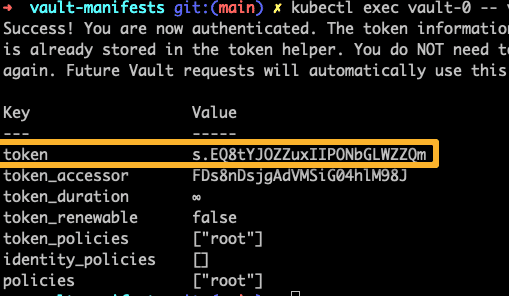
As we have created a service on nodeport 32000, we will be able to access the Vault UI using any of the Node IPs on port 32000. You can use the saved token to log in to the UI.
For example,
http://33.143.55.228:32000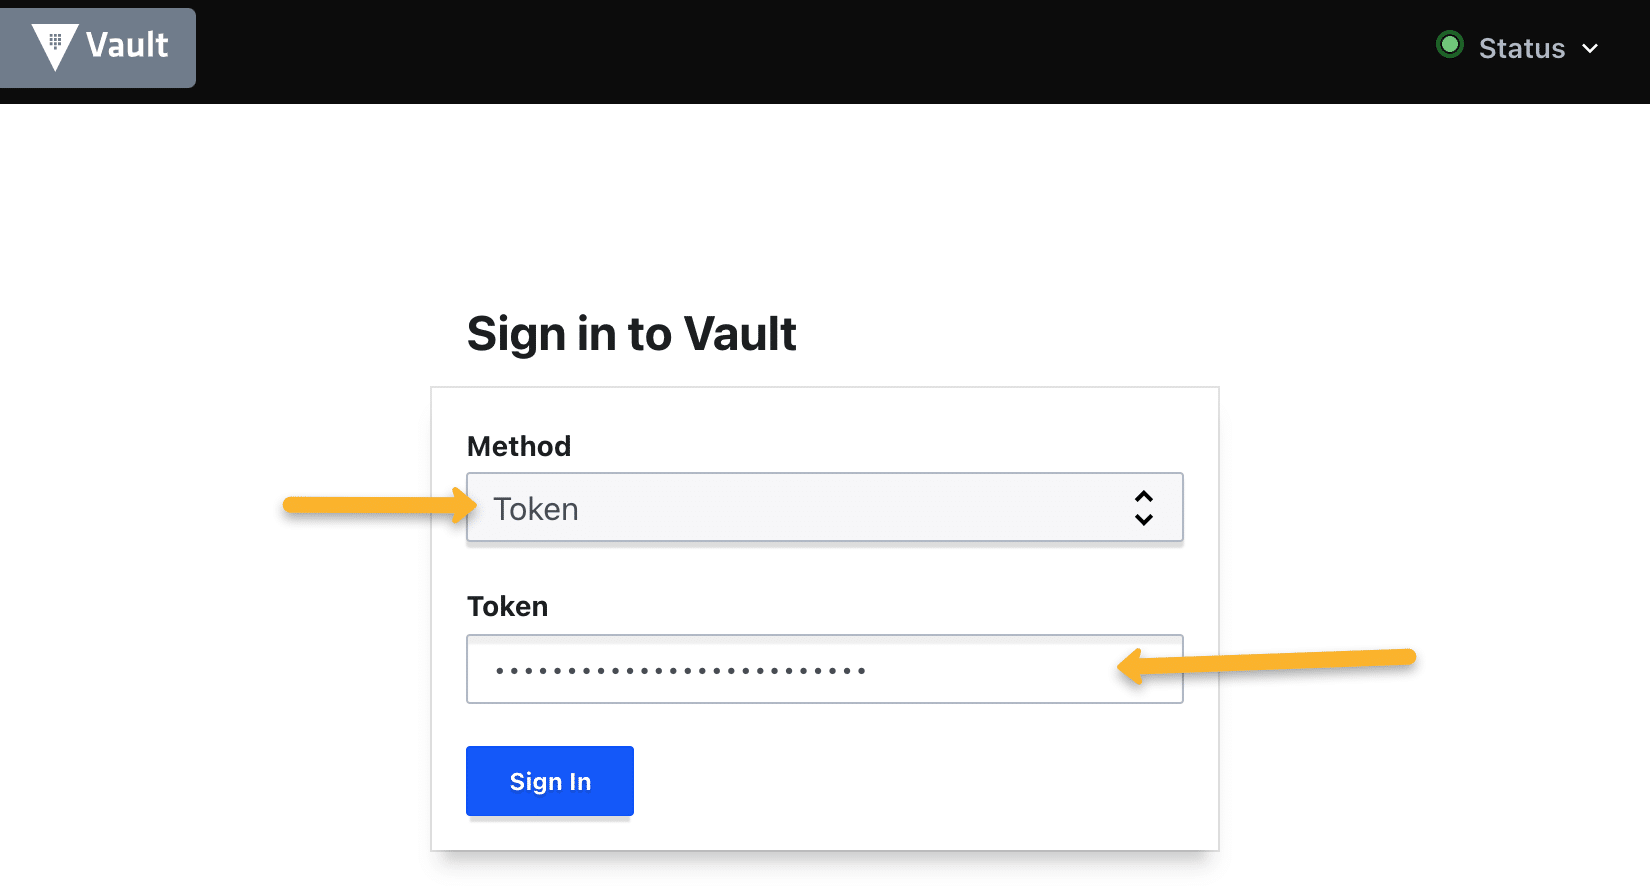
Creating Vault Secrets
We can create secrets using CLI as well as the UI. We will use the CLI to create secrets.
To use the vault CLI, we need to exec into the vault pod.
kubectl exec -it vault-0 -- /bin/shCreate secrets
There are multiple secret engines (Databases, Consul, AWS, etc). Refer to the official documentation to know more about the supported secret engines.
Here, we are utilizing key-value engine v2. It has advanced capabilities to keep multiple versions of the same keys. v1 can manage only a single version at a time.
Let's enable the Key value engine.
vault secrets enable -version=2 -path="demo-app" kvCreate a secret in key-value format and list it. The id (key) is name and secret(value) would be devopscube. Path is demo-app/user01
vault kv put demo-app/user01 name=devopscube
vault kv get demo-app/user01 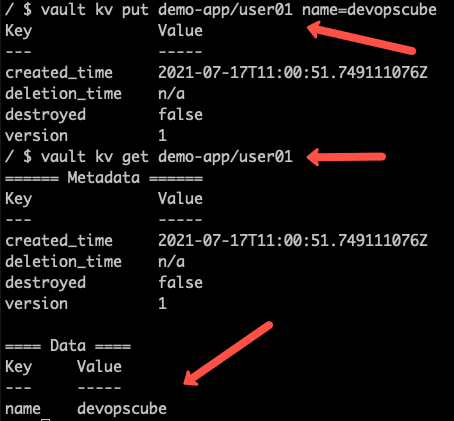
Create a Policy
By default, the secret path has the deny policy enabled. We need to explicitly add a policy to read/write/delete the secrets.
The following policy dictates that the entity be allowed the read operation for secrets stored under "demo-app". Execute it to create the policy
vault policy write demo-policy - <<EOH
path "demo-app/*" {
  capabilities = ["read"]
}
EOH
You can list and validate the policy.
vault policy listEnable Vault Kubernetes Authentication Method
For Kubernetes pods to interact with Vault and get the secrets, it needs a vault token. The kubernetes auth method with the pod service account makes it easy for pods to retrieve secrets from the vault.
In this way, any pod which has been assigned the "vault" as the service account - will be able to read these secrets without requiring any vault token.
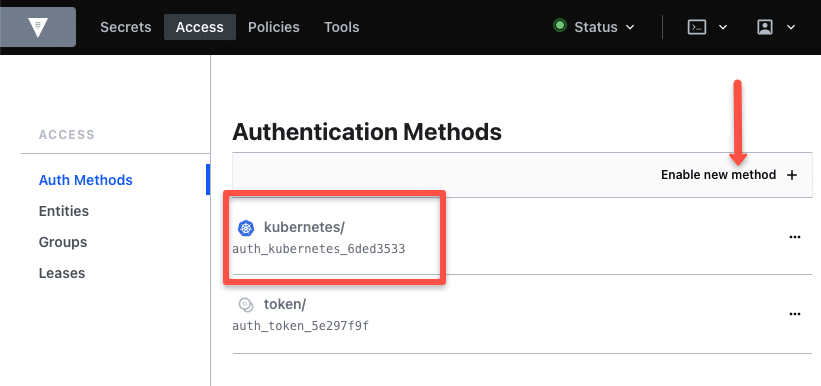
Let's enable the kubernetes auth method.
vault auth enable kubernetesYou can view and enable auth methods from the vault UI as well.
We have attached a service account with a ClusterRole to the vault Statefulset. The following command configures the service account token to enable the vault server to make API calls to Kubernetes using the token, Kubernetes URL and the cluster API CA certificate.
KUBERNETES_PORT_443_TCP_ADDR is the env variable inside the pod that returns the internal API endpoint.
vault write auth/kubernetes/config \
  token_reviewer_jwt="$(cat /var/run/secrets/kubernetes.io/serviceaccount/token)" \
  kubernetes_host="https://$KUBERNETES_PORT_443_TCP_ADDR:443" \
  kubernetes_ca_cert=@/var/run/secrets/kubernetes.io/serviceaccount/ca.crt
NOTE: Use thedisable_iss_validation=trueoption in the above command to disables issuer validation, this allowa Vault to skip checking the iss issuer claim in JWT tokens.
Avoid using in production environment, this is only for testing.
Now we have to create a vault approle that binds a Kubernetes service account, namespace, and vault policies. This way vault server knows if a specific service account is authorized to read the stored secrets.
Let's create a service account that can be used by application pods to retrieve secrets from the vault.
kubectl create serviceaccount vault-authLet's create a vault approle named webapp and bind a service account named vault-auth in the default namespace. Also, we are attaching the demo-policy we have created which has read access to a secret.
vault write auth/kubernetes/role/webapp \
        bound_service_account_names=vault-auth \
        bound_service_account_namespaces=default \
        policies=demo-policy \
        ttl=72h
Now, any pod in the default namespace with a vault-auth service account can request the secret under demo-policy.
Fetching Secrets Stored in Vault With Service Accounts
The objective is that a pod should be able to fetch secrets from the vault without it being fed any vault token i.e. it should use the service account token to make the request to the vault.
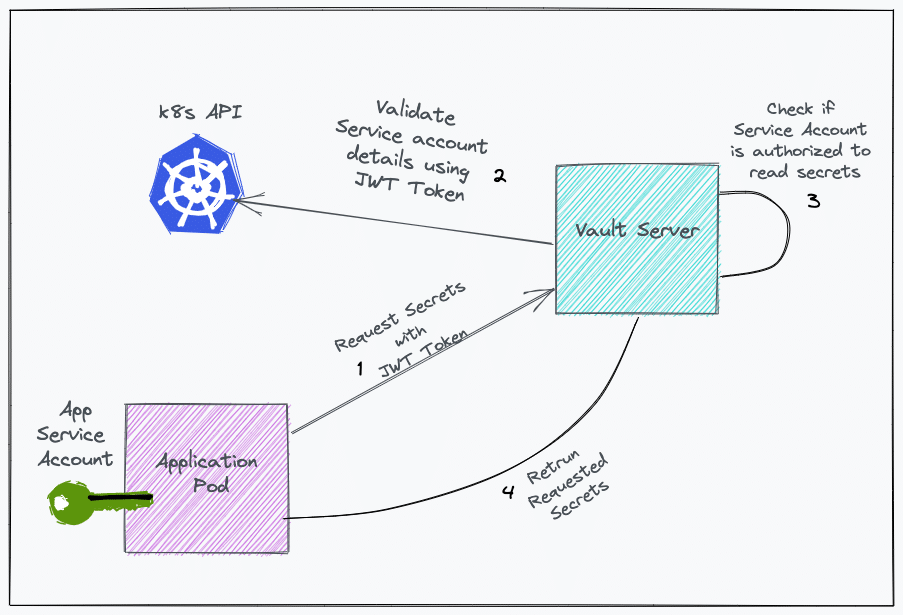
Here is how it works.
- A JWT token (Service account token) from the pod is passed to the vault server.
- Vault server requests the Kubernetes API server to get the service account and namespace attached to the JWT token.
- The Kubernetes API server returns the namespace and service account details.
- Vault server validates if the service account is authorized to read secrets using the attached policies.
- After validation, the vault server returns a vault token.
- In another API call, the vault token is passed with a secret path to retrieve the secrets.
To demonstrate this, first, we will deploy a pod named vault-client with vault-auth service account in the default namespace.
Save the manifest as pod.yaml
---
apiVersion: v1
kind: Pod
metadata:
  name: vault-client
  namespace: default
spec:
  containers:
  - image: nginx:latest
    name: nginx
  serviceAccountName: vault-auth
Deploy the pod.
kubectl apply -f pod.yamlNow, take the exec session of the pod, so that we can make the API requests and see if it is able to authenticate to the vault server and retrieve the required secrets.
kubectl exec -it vault-client -- /bin/bashFollow the steps given below.
Step 1: Make an API request to the vault server using the service account token (JWT) to acquire a client token.
First, install jq if it's not installed on your system using the following command.
apt-get update && apt-get install -y jqThen, save the service account token to a variable jwt_token
jwt_token=$(cat /var/run/secrets/kubernetes.io/serviceaccount/token)Make the API call using curl. Replace http://35.193.55.248:32000 with your vault URL.
curl --request POST \
    --data '{"jwt": "'$jwt_token'", "role": "webapp"}' \
    http://35.193.55.248:32000/v1/auth/kubernetes/login | jq
The above API request will return a JSON containing the client_token. Using this token, secrets can be read.
Sample JSON (beautified) output:
{
  "request_id": "87440e92-cbe9-8357-059d-c4ecdfd58e84",
  "lease_id": "",
  "renewable": false,
  "lease_duration": 0,
  "data": null,
  "wrap_info": null,
  "warnings": null,
  "auth": {
    "client_token": "s.r2kKKaYnGR48CR9aWvoV8skx",
    "accessor": "bqqCCmrxS58TiTyafH9udHm7",
    "policies": [
      "default",
      "demo-policy"
    ],
    "token_policies": [
      "default",
      "demo-policy"
    ]
  }
}
Now we will use the client_token to make an API call and fetch the stored secrets under demo-app. Replace the token and vault URL with relevant values.
curl -H "X-Vault-Token: s.bSRl7TNajYxWvA7WiLdTQS7Z" \
     -H "X-Vault-Namespace: vault" \
     -X GET http://35.193.55.248:32000/v1/demo-app/data/user01?version=1 | jq
The above API request will return a JSON containing the secrets under 'data'.
Sample output (beautified)
{
"request_id": "d2a2fc9c-6eca-9a12-a4a8-8799230e9449",
"lease_id": "",
"renewable": false,
"lease_duration": 0,
"data": {
"data": {
"name": "devopscube"
}
}
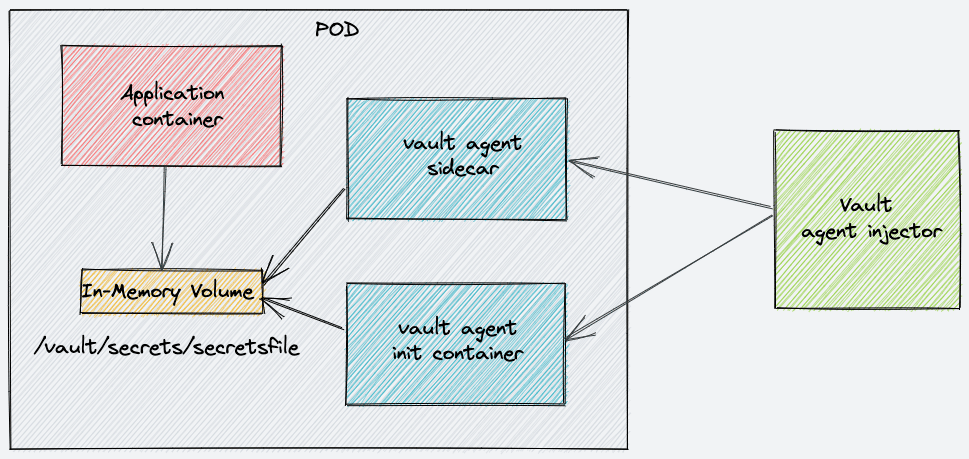
}Inject Secrets to Pods Using Vault Agent
Using a vault injector, you can inject secrets into Kubernetes pods. We have a detailed guide on setting up a vault injector that explains the whole workflow.
Refer: Vault Agent Injector Tutorial
Possible Errors & Troubleshooting
If you delete the stateful set and redeploy the vault again, don't run the init command again. It might throw the following error.
Error initializing: Error making API request.

URL: PUT http://127.0.0.1:8200/v1/sys/init
Code: 400. Errors:
It happens because by design when you delete a Statefulset the volumes attached to the pod won't get deleted. This way you have a chance to copy the data.
So the PVC will have the initialized configs. So you just have to use the existing key.json and use the secret token to unseal the vault without initialization. Or, you can delete the PVC entirely and redeploy the vault with a new PVC.
Conclusion
By now, you have learned to set up, configure and utilize vault in Kubernetes. It's a great starting point and there are more concepts and workflows that you can explore.
When it comes to vault production implementation, there are many considerations and standard security practices to be followed.
Also, when used with application pods to retrieve secrets, you can use Vault injector to inject secrets in the pod. We will publish the vault injector tutorial in the upcoming posts.
