
This Hashicorp vault beginners tutorial will walk you through the steps on how to setup and configure a Hashicorp vault server with detailed instructions.
Introduction
Vault is a tool from HashiCorp for securely storing and accessing secrets. Secret is nothing but all credentials like API Keys, passwords and certificates. Vault provides a unified interface to any secret while providing tight access control and recording a detailed audit log. Most of the organizations would keep their secrets in GitHub which can be seen by anyone who has access to the repo. Vault is designed in such a way that we can keep our database credentials, API keys for external services, credentials into vault and access directly from the application using APIs using various authentication mechanisms. HashiCorp Vault has more advantages than other similar services like HSMs, AWS KM, and keywhiz.
Most Common Use Cases of Vault
Following are the common use cases for Vault
- A bare minimum vault can be used as a general secret storage, It is a great tool to store environment variables, DB credentials and API keys.
- Vault is a good fit for storing credentials that employees share to access web services. The audit log mechanism lets you know what secrets an employee accessed and when an employee leaves, it is easier to roll keys and understand which keys have and haven't been rolled.
- The "dynamic secrets" feature of Vault is ideal for scripts: It can generate an access key for the duration of a script runtime which is like temporary access token.
- In addition to being able to store secrets, Vault can be used to encrypt/decrypt data that is stored elsewhere. The primary use of this is to allow applications to encrypt their data being in the primary data store.
Key Vault Features
Secure Secret Storage: Arbitrary key/value secrets can be stored in Vault. It encrypts the secret and stores in a persistent backend storage. Vault supports multiple storage backends such as a local disk, consul or cloud storage like AWS S3 or GCS bucket.
Dynamic Secrets: Vault can generate secrets on-demand for some systems, such as AWS or SQL databases. For example, when an application needs to access an S3 bucket, it asks Vault for credentials, and Vault will generate an AWS keypair with valid permissions on demand. After creating these dynamic secrets, Vault will also automatically revoke them after the lease is up.
Data Encryption: Vault is capable of encrypting and decrypting data without storing it. This allows security teams to define encryption parameters and developers to store encrypted data in a location such as SQL without having to design their own encryption methods.
Leasing and Renewal: Secrets in vaults are associated with the lease, end of the lease vault will revoke the secrets, We can renew lease using renew APIs.
Revocation: Vault has built-in support for secret revocation.
Setup and configure Vault Server on Linux
Follow the steps given below for setting up the vault server.
Step 1: Download the latest version of vault binary zip file from vault release page and unzip it.
cd /opt/
sudo wget https://releases.hashicorp.com/vault/0.10.3/vault_0.10.3_linux_amd64.zip
sudo unzip vault_0.10.3_linux_amd64.zip -d .
Step 2: Copy vault binary into /usr/bin. This will allow us to execute vault binary systemwide.
sudo cp vault /usr/bin/Step 3: Create a vault config directory under /etc, a vault data directory and logs directory.
sudo mkdir /etc/vault
sudo mkdir /vault-data
sudo mkdir -p /logs/vault/
Step 4: Create a config.json file and add the vault configuration.
sudo vi /etc/vault/config.jsonAdd the below configuration to the file. Vault supports both JSON and HCL formats. Here we are using JSON format.
Note: replace 10.128.0.2 with your vault host public/private IP.
{
"listener": [{
"tcp": {
"address" : "0.0.0.0:8200",
"tls_disable" : 1
}
}],
"api_addr": "http://10.128.0.2:8200",
"storage": {
    "file": {
    "path" : "/vault-data"
    }
 },
"max_lease_ttl": "10h",
"default_lease_ttl": "10h",
"ui":true
}
max_lease_ttl - Specifies the maximum possible lease duration for tokens and secrets. This is specified using a label suffix like "30s" or "1h".
default_lease_ttl - Specifies the default lease duration for tokens and secrets. This is specified using a label suffix like "30s" or "1h". This value cannot be larger than max_lease_ttl.
Note: This config file is created specifically to use filesystem backend, You can even use consul cluster backend, S3 or GCS (Google cloud storage) backend like shown below,
Vault Consul Backend Config
"storage": {
   "consul" : {
      "address" : "127.0.0.1:8500",
      "path": "vault"
    }
 }
Vault Google Storage (GCS) Backend Config
"storage": {
"gcs": {
"bucket" : “devopscube-demo",
"ha_enabled" : "true"
}
}
Step 5: Create a vault service file.
sudo vi /etc/systemd/system/vault.serviceCopy the following contents to the service file.
[Unit]
Description=vault service
Requires=network-online.target
After=network-online.target
ConditionFileNotEmpty=/etc/vault/config.json

[Service]
EnvironmentFile=-/etc/sysconfig/vault
Environment=GOMAXPROCS=2
Restart=on-failure
ExecStart=/usr/bin/vault server -config=/etc/vault/config.json
StandardOutput=/logs/vault/output.log
StandardError=/logs/vault/error.log
LimitMEMLOCK=infinity
ExecReload=/bin/kill -HUP $MAINPID
KillSignal=SIGTERM

[Install]
WantedBy=multi-user.target
Step 6: Start the vault service.
sudo systemctl start vault.serviceCheck the service status.
sudo systemctl status vault.serviceEnable vault service at boot up to make sure it starts automatically for reboots,
sudo systemctl enable vault.serviceStep 7: Login as root and Export VAULT_ADDR environment variable, don’t forget to add this to ~/.bashrc file. Change the IP to you vault server public/private IP.
export VAULT_ADDR=http://10.128.0.2:8200
echo "export VAULT_ADDR=http://10.128.0.2:8200" >> ~/.bashrc
Step 8: Check the status using vault status
vault statusYou will get an error server is not yet initialized as shown below. You could see vault is sealed by default. This is because of the default behavior of vault.
Error checking seal status: Error making API request.

URL: GET http://104.198.185.234:8200/v1/sys/seal-status
Code: 400. Errors:

* server is not yet initialized
Let's initiate the vault server and store the initial tokens in a file.
Note: execute the following command by logging in as the root user.
vault operator init > /etc/vault/init.fileNoe vault is initiated but sealed. You can view the status using the following command.
vault statusOpen the init file to get the unseal and root tokens. These tokens can be used to unseal the vault web UI during the first login.
cat /etc/vault/init.fileAn example, the output containing the root token is shown below.
Unseal Key 1: jsQ6ZshBCowoddwDhHTy7DgJU9To8YAprYToqPkMUrNg
Unseal Key 2: 9PWznYV+uM+a1o6rMEGcuINeCtGnMRiV1a5xTe6EerSd
Unseal Key 3: mavIFllXbQmo7QE2qmLuH9HfYEPQMLpCZNgT0QoRUkcE
Unseal Key 4: VzXhuvnNuZkld4LnhPEjNyTEMJR3qIkq/UsinwWWdv5l
Unseal Key 5: ho23N6R2WGPOpijGsCMElv/z4u9OxMw9AbEEMbePySU7

Initial Root Token: d4dd0b96-4767-57a3-9081-aca03e530c8f

Vault initialized with 5 key shares and a key threshold of 3. Please securely
distribute the key shares printed above. When the Vault is re-sealed,
restarted, or stopped, you must supply at least 3 of these keys to unseal it
before it can start servicing requests.

Vault does not store the generated master key. Without at least 3 key to
reconstruct the master key, Vault will remain permanently sealed!

It is possible to generate new unseal keys, provided you have a quorum of
existing unseal keys shares. See "vault operator rekey" for more information.
Once a Vault is unsealed, it remains unsealed until one of two things happens:
- It is re-sealed via the API (see below).
- If vault service gets restarted or during a server restart.
Step 9: Unseal vault using unseal command. There are 5 unseal tokens. You need to execute the unseal command with a minimum of three unseal token to unseal vault.
vault operator unseal jsQ6ZshBCowoddwDhHTy7DgJU9To8YAprYToqPkMUrNg
vault operator unseal 9PWznYV+uM+a1o6rMEGcuINeCtGnMRiV1a5xTe6EerSd
vault operator unseal mavIFllXbQmo7QE2qmLuH9HfYEPQMLpCZNgT0QoRUkcE
Here you can see your standalone vault is up and running successfully, you can start by enabling authentication method and secret engine which you like,
[root@devopscube opt]# vault status
Key Value
--- -----
Seal Type shamir
Sealed false
Total Shares 5
Threshold 3
Version 0.10.3
Cluster Name vault-cluster-865eaf7d
Cluster ID 3164ab8f-d344-c835-af14-644cdc487a73
HA Enabled true
HA Cluster https://10.128.0.2:8201
HA Mode active
Step 10: Now you can also view vault console using the following URL,
http://IPADDRESS:8200/uiFinally, you can log in with root credentials which we created while initializing vault, in our case d4dd0b96-4767-57a3-9081-aca03e530c8f. Managing will be easy through UI
Once you login you will see the following page,
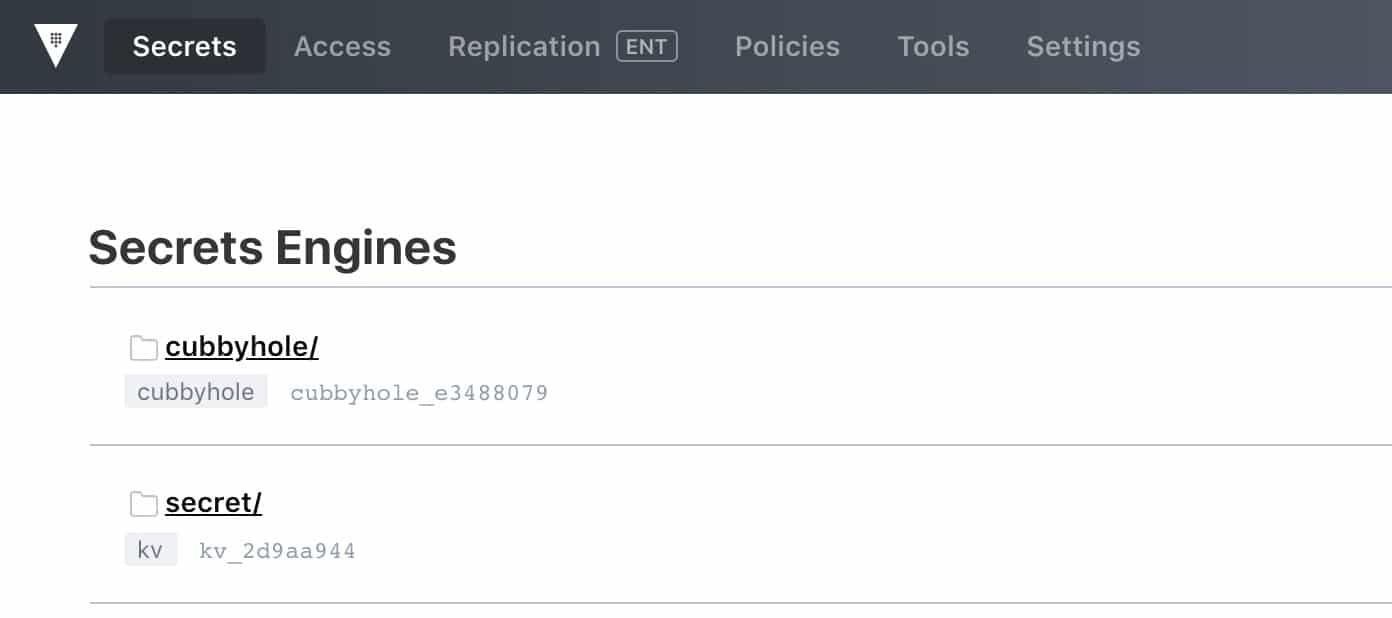
Vault Roles and Policies
Once the setup is done, you can use vault by enabling AppRoles or some other auth methods with proper policies associated with it. Covering full roles and policies is out of the scope of this article.
You can create AppRole and Policies through CLI as well as vault console.
vault auth enable approle
vault write auth/approle/role/demo bound_cidr_list=10.0.0.0/16 bind_secret_id=false policies=default-policy
Note: This same can be done from Vault console also
bound_cidr_list: If bound_cidr_list is set on the role, then the list of CIDR blocks listed here should be a subset of the CIDR blocks listed on the role.
bind_secret_id: Require secret_id to be presented when logging in using this AppRole.
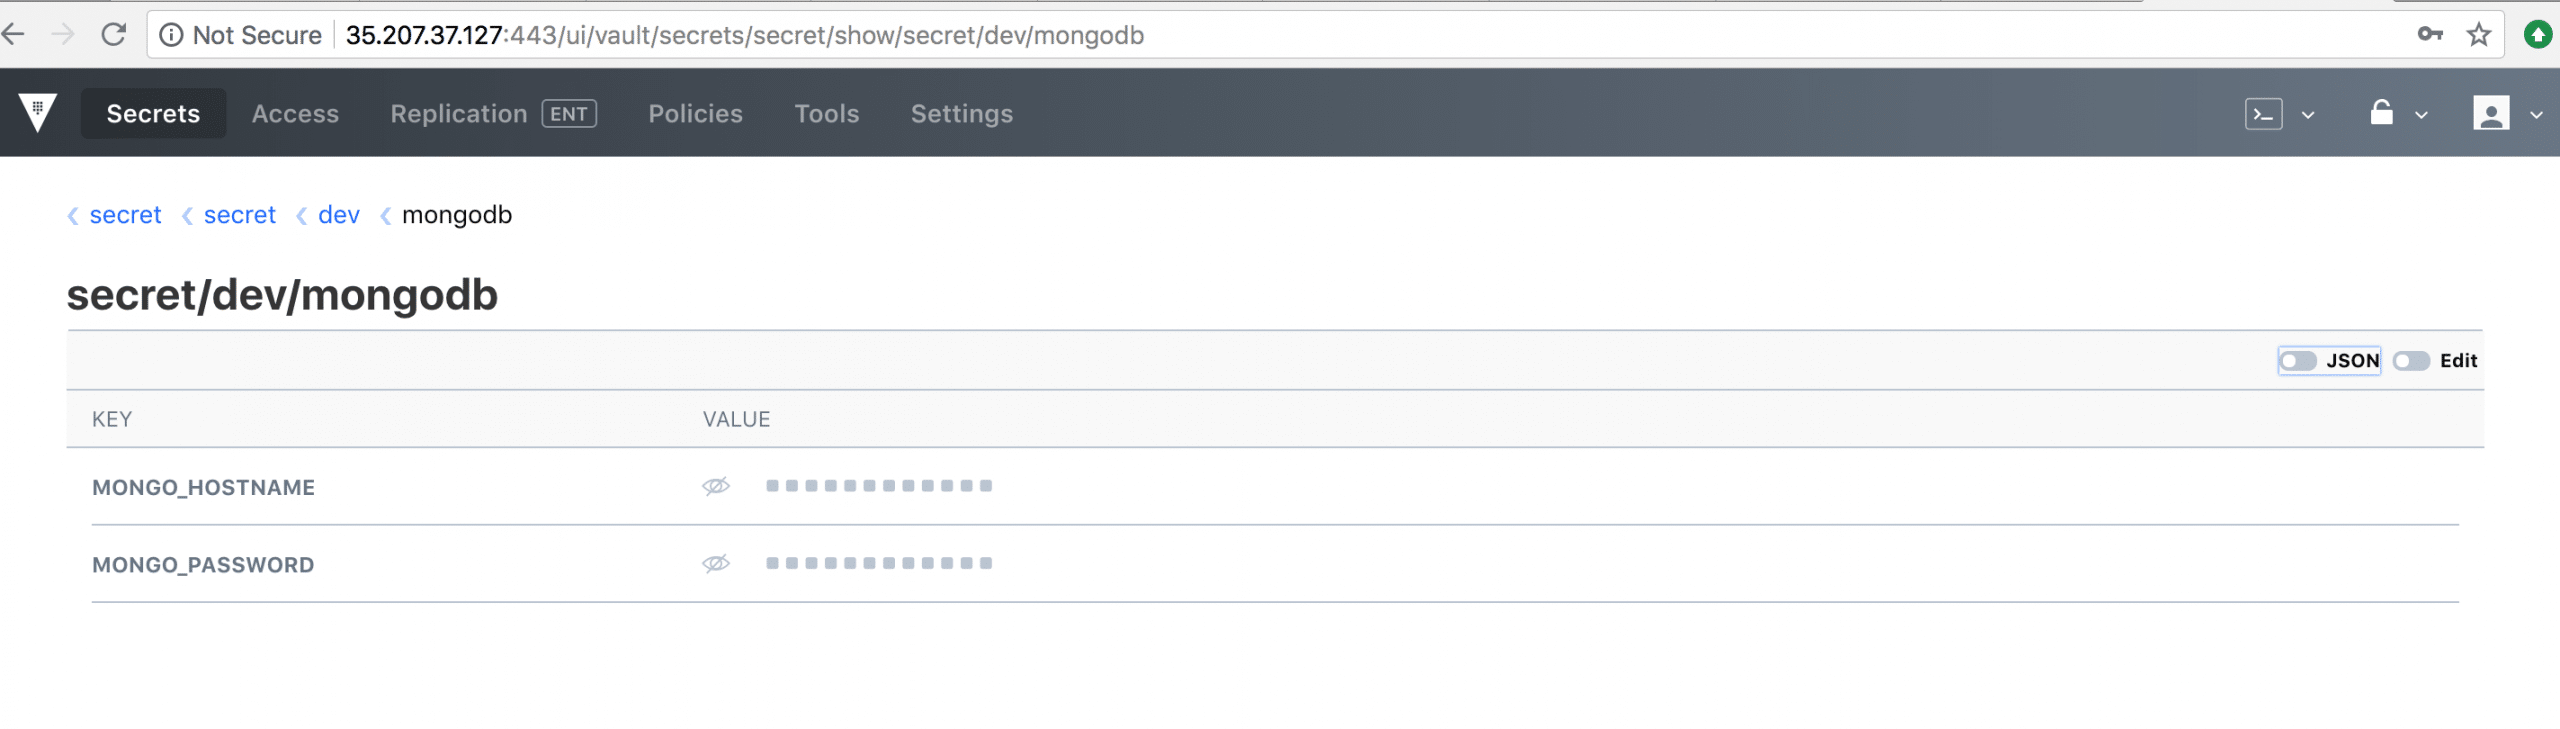
Configure secrets from the console as shown in below image, by default vault uses KV secret engine, we can even use AWS, RabbitMQ, Google cloud or any databases as a secret engine.
Vault server which we have created is a standalone instance with HA Enabled configuration, If we disable HA Enabled option from config.json this will act as a cluster without HA.
To enable HA we can have multiple machines where we configure api_addr parameter as the host IP, at a time only one of the node will act as the active node and rest of them are standby nodes.
ONLINE COURSE: Managing Secrets with Hashicorp Vault
Everything you need to get started with Hashicorp Vault
Managing Secrets with Hashicorp Vault
- Learn concepts and architecture of vault
- Get started secret management
- Vault HA and TLS management
- Learn to manage secrets using CLI
- Learn to build PKI solution