

In this vault agent injector tutorial, I will show you exactly how to use a Hashicorp vault agent configuration to inject agents and render secrets into a kubernetes pod.
I have covered the setup by step guide to implement kubernetes vault agent pods to dynamically retrieve secrets from the vault server
Towards the end of the article, I have added vault agent templating examples using annotations, configmaps, and environment variables.
Also, if you want to understand how pods authenticate to vault server, refer to this beginner's vault guide on Kubernetes.
Here is what you will learn from this article.
Application Secret Formats
It is standard security practice to isolate secrets from code, and the developers should not worry about where the secrets come from. Generally, applications expect secrets in a file format in a specific location.
The common formats in which applications expect secrets are,
- A config file (Text file with newline strings.)
- Json/Yaml File
- Environemnt variables
The format depends on the application and teams who design the CI/CD process.
For example, a java spring boot application property file can be application.properties with the following contents.
spring.datasource.url=jdbc:mysql://localhost:3306/myDb
spring.datasource.username=myuser
spring.datasource.password=secretpassword
spring.datasource.driver-class-name=com.mysql.cj.jdbc.Driver
When it comes to CI/CD process, you cannot commit the secrets to the source code or even have it as Kubernetes secret object. Therefore, you need an efficient mechanism like a vault injector for applications to consume secrets securely.
I’ll also show you how to use the Vault injector and all vault agent configurations to place or inject the secrets into a pod from the vault server in the required formats for the application.
What is Vault Agent Injector?
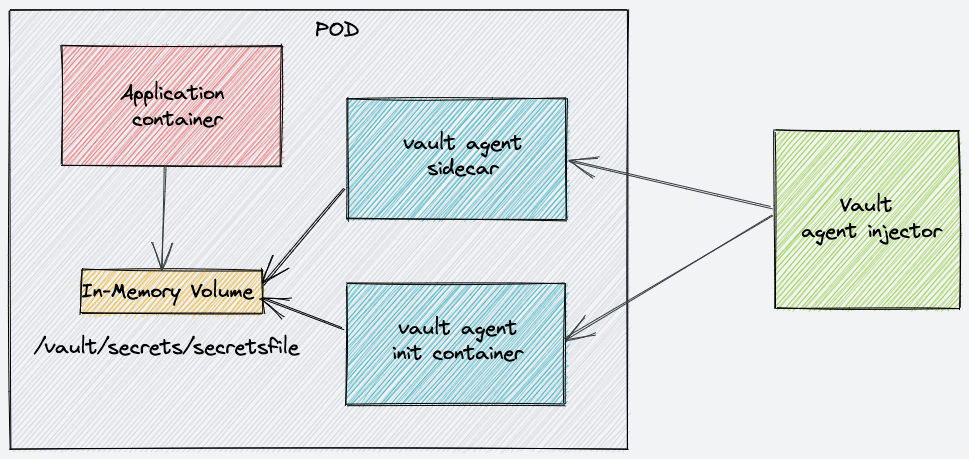
Vault Agent Injector is a controller (custom implementation) that can add sidecar and init containers to kubernetes pods in runtime.
The job of the init container is to authenticate and retrieve secrets from the vault server using the pod service account place them in a shared location (In memory volume) where the application container can access them.
You can use this implementation for kubernetes standalone pods, deployments, Statefuset, and Kubernetes jobs.
How Does Vault Injector Work
The Vault Agent Injector is a Kubernetes Mutation Webhook Controller.
Meaning, it is a custom piece of code (controller) and a webhook that gets deployed in kubernetes that intercepts pod events like create and update to check if any agent-specific annotation is applied to the pod.
For example, if a pod gets deployed with an annotation."vault.hashicorp.com/agent-inject: 'true'", here is what happens.
- Custom
MutatingWebhookConfigurationsends a webhook with all pod information to the injector controller deployment. - Then the controller modifies the Pod spec in runtime to introduce a sidecar and init container agents to the actual pod specification.
- Controller then returns the modifed object for object validation.
- After validation the modified pod spec gets deloyed with a sidecar and init container.
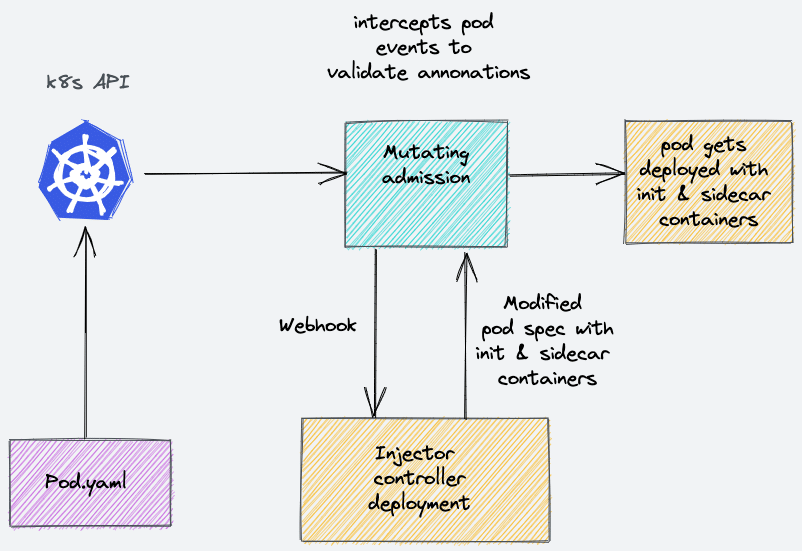
So when the pod comes up, it will have the application container, a sidecar, and a init container.
The init container is responsible for retrieving the secrets. In addition, a sidecar container is required if your application uses dynamic secrets. Dynamic secrets are secrets that are created on-demand with expiration time. The sidecar container ensures that the latest secrets are present inside the pod after every secret renewal.
If your application does not use dynamic secrets, then the sidecar container is not required.
You can read more about dynamic secrets here.
Prerequisites & Github Repository
To follow this tutorial, you need a running vault server on kubernetes.
If you don't have a vault server, follow the vault server setup guide on Kubernetes, which explains all the Kubberenetes components involved in vault setup.
Vault server and vault injector Kubernetes manifests are part of the following Github repository.
https://github.com/scriptcamp/kubernetes-vaultDeploy Vault Agent Injector
As explained earlier, vault inject is a controller code that listens to a mutation webhook. The injector controller is responsible for modifying the pod spec to add sidecar and init containers.
You can deploy the injector with one command.
cd into the vault-injector-manifests directory of the cloned repository and execute the following command.
kubectl apply -f .If you are a helm user, you can install both vault server and injector using a single helm chart.
helm repo add hashicorp https://helm.releases.hashicorp.com
helm repo update
helm install vault hashicorp/vault
Anyways, I will go through all the manifest files. Go to the next section if you want to skip the explanation.
All the vault injector components get deployed in the default namespace.
Let's get started.
Create rbac.yaml and copy the following manifest. It creates the following.
vault-injectorservice account- vault-agent-injector-clusterrole with persmissions to
mutatingwebhookconfigurationsas we will be deploying a mutating webhook.
---
apiVersion: v1
kind: ServiceAccount
metadata:
  name: vault-agent-injector
  namespace: default
  labels:
    app.kubernetes.io/name: vault-agent-injector
    app.kubernetes.io/instance: vault

---
apiVersion: rbac.authorization.k8s.io/v1
kind: ClusterRole
metadata:
  name: vault-agent-injector-clusterrole
  labels:
    app.kubernetes.io/name: vault-agent-injector
    app.kubernetes.io/instance: vault
rules:
- apiGroups: ["admissionregistration.k8s.io"]
  resources: ["mutatingwebhookconfigurations"]
  verbs:
    - "get"
    - "list"
    - "watch"
    - "patch"

---
apiVersion: rbac.authorization.k8s.io/v1
kind: ClusterRoleBinding
metadata:
  name: vault-agent-injector-binding
  labels:
    app.kubernetes.io/name: vault-agent-injector
    app.kubernetes.io/instance: vault
roleRef:
  apiGroup: rbac.authorization.k8s.io
  kind: ClusterRole
  name: vault-agent-injector-clusterrole
subjects:
- kind: ServiceAccount
  name: vault-agent-injector
  namespace: default
Execute the RBAC manifest.
kubectl apply -f rbac.yamlCreate mutating-webhook.yaml and copy the following manifest. This webhook is responsible for intercepting and sending pod events to the injector controller. It sends the webhook to the injector controller's service endpoint on /mutate path.
---
apiVersion: admissionregistration.k8s.io/v1
kind: MutatingWebhookConfiguration
metadata:
  name: vault-agent-injector-cfg
  labels:
    app.kubernetes.io/name: vault-agent-injector
    app.kubernetes.io/instance: vault
webhooks:
  - name: vault.hashicorp.com
    sideEffects: None
    admissionReviewVersions:
    - "v1beta1"
    - "v1"
    clientConfig:
      service:
        name: vault-agent-injector-svc
        namespace: default
        path: "/mutate"
      caBundle: ""
    rules:
      - operations: ["CREATE", "UPDATE"]
        apiGroups: [""]
        apiVersions: ["v1"]
        resources: ["pods"]
    failurePolicy: Ignore
Create the webhook.
kubectl apply -f mutating-webhook.yamlCreate a deployment.yaml using the following manifest file.
- This deployment assumes you have vault server running on default namespace with service endpoint
http://vault.default.svc:8200 - we are using the latest vault injector image
hashicorp/vault-k8s:0.11.0(At the time of writing this blog)
---
apiVersion: apps/v1
kind: Deployment
metadata:
  name: vault-agent-injector
  namespace: default
  labels:
    app.kubernetes.io/name: vault-agent-injector
    app.kubernetes.io/instance: vault
    component: webhook
spec:
  replicas: 1
  selector:
    matchLabels:
      app.kubernetes.io/name: vault-agent-injector
      app.kubernetes.io/instance: vault
      component: webhook
  template:
    metadata:
      labels:
        app.kubernetes.io/name: vault-agent-injector
        app.kubernetes.io/instance: vault
        component: webhook
    spec:

      affinity:
        podAntiAffinity:
          requiredDuringSchedulingIgnoredDuringExecution:
            - labelSelector:
                matchLabels:
                  app.kubernetes.io/name: vault-agent-injector
                  app.kubernetes.io/instance: "vault"
                  component: webhook
              topologyKey: kubernetes.io/hostname
      serviceAccountName: "vault-agent-injector"
      hostNetwork: false
      securityContext:
        runAsNonRoot: true
        runAsGroup: 1000
        runAsUser: 100
      containers:
        - name: sidecar-injector

          image: "hashicorp/vault-k8s:0.11.0"
          imagePullPolicy: "IfNotPresent"
          securityContext:
            allowPrivilegeEscalation: false
          env:
            - name: AGENT_INJECT_LISTEN
              value: :8080
            - name: AGENT_INJECT_LOG_LEVEL
              value: info
            - name: AGENT_INJECT_VAULT_ADDR
              value: http://vault.default.svc:8200
            - name: AGENT_INJECT_VAULT_AUTH_PATH
              value: auth/kubernetes
            - name: AGENT_INJECT_VAULT_IMAGE
              value: "hashicorp/vault:1.8.0"
            - name: AGENT_INJECT_TLS_AUTO
              value: vault-agent-injector-cfg
            - name: AGENT_INJECT_TLS_AUTO_HOSTS
              value: vault-agent-injector-svc,vault-agent-injector-svc.default,vault-agent-injector-svc.default.svc
            - name: AGENT_INJECT_LOG_FORMAT
              value: standard
            - name: AGENT_INJECT_REVOKE_ON_SHUTDOWN
              value: "false"
            - name: AGENT_INJECT_CPU_REQUEST
              value: "250m"
            - name: AGENT_INJECT_CPU_LIMIT
              value: "500m"
            - name: AGENT_INJECT_MEM_REQUEST
              value: "64Mi"
            - name: AGENT_INJECT_MEM_LIMIT
              value: "128Mi"
            - name: AGENT_INJECT_DEFAULT_TEMPLATE
              value: "map"
            - name: AGENT_INJECT_TEMPLATE_CONFIG_EXIT_ON_RETRY_FAILURE
              value: "true"

          args:
            - agent-inject
            - 2>&1
          livenessProbe:
            httpGet:
              path: /health/ready
              port: 8080
              scheme: HTTPS
            failureThreshold: 2
            initialDelaySeconds: 5
            periodSeconds: 2
            successThreshold: 1
            timeoutSeconds: 5
          readinessProbe:
            httpGet:
              path: /health/ready
              port: 8080
              scheme: HTTPS
            failureThreshold: 2
            initialDelaySeconds: 5
            periodSeconds: 2
            successThreshold: 1
            timeoutSeconds: 5
Create the deployment.
kubectl apply -f deployment.yamlCreate a service.yaml with the following manifest. The mutation webhook will use this service endpoint.
---
apiVersion: v1
kind: Service
metadata:
  name: vault-agent-injector-svc
  namespace: default
  labels:
    app.kubernetes.io/name: vault-agent-injector
    app.kubernetes.io/instance: vault
spec:
  ports:
  - name: https
    port: 443
    targetPort: 8080
  selector:
    app.kubernetes.io/name: vault-agent-injector
    app.kubernetes.io/instance: vault
    component: webhook
Create the service endpoint.
kubectl apply -f service.yamlNow we have all the vault agent injector components installed.
Create Vault Secrets & Policy
To demonstrate vault agent injector functionality, I will create the following.
- A set of secrets using vault kv engine
- Vault policy to read the secrets.
- Enable vault kubernetes authentication.
- Create a vault role to bind vault policy and kubernetes service account (vault-auth).
- Create a vault-auth kubernetes service account to be used for vault server authentication.
Note: I assume you have unsealed and loged in to vault using the vault token. If not please follow the vault server setup guide mentioned in the pre-requites and perform steps till vault login.
Exec into vault pod.
kubectl exec -it vault-0 -- /bin/sh Enable the vault kv engine (key-value store).
vault secrets enable -version=2 -path="kv" kvCreate two secrets under kv/dev/apps/service01 path. appkey & apptoken
vault kv put kv/dev/apps/service01 appkey="zsdkfjhj4534" apptoken="zsdasdfaskfjhj4534" Create a vault policy named svc-policy that allowed read operation on secrets under kv/data/dev/apps/service01 path.
vault policy write svc-policy - <<EOH
path "kv/data/dev/apps/service01" {
  capabilities = ["read"]
}
EOH
Enable Kubernetes authentication.
Note: If you have done this as part of the vault setup on kubernetes, you can ignore the following two commands.
vault auth enable kubernetesvault write auth/kubernetes/config \
token_reviewer_jwt="$(cat /var/run/secrets/kubernetes.io/serviceaccount/token)" \
kubernetes_host="https://$KUBERNETES_PORT_443_TCP_ADDR:443" \ kubernetes_ca_cert=@/var/run/secrets/kubernetes.io/serviceaccount/ca.crtCreate a vault role named webapp that binds svc-policy and vault-auth kubernetes service account.
vault write auth/kubernetes/role/webapp \
        bound_service_account_names=vault-auth \
        bound_service_account_namespaces=default \
        policies=svc-policy \
        ttl=72h
Now, exit the pod exec session and create a kubernetes service account named vault-auth. Vault agents will use this service account to authenticate to the vault server and retrieve the required secrets.
kubectl create serviceaccount vault-authInjecting Secrets With Vault Agents
Here is what you should know about injecting secrets with vault agents.
- The vault agent injector uses pod annotations to decide whether vault agents should be injected into pods.
- There are many supported annotations. Please refer the official documenation to know about all the supported annotations.
- If you are not using dyanmic secrets, you can disable the sidecar agent using an annotation.
- By default the vault agents write the secrets to
/vault/secrets/path. Which is a shared in memory pod volume.
First, we will look at a vault injector example using a simple pod definition with the vault agent annotations and see if the sidecar and init container gets injected into the pods.
Save the following manifest as pod.yaml. It deploys an Nginx container.
---
apiVersion: v1
kind: Pod
metadata:
  name: webapp
  namespace: default
  annotations:
    vault.hashicorp.com/agent-inject: 'true'
    vault.hashicorp.com/role: 'webapp'
    vault.hashicorp.com/agent-inject-secret-config.txt: 'kv/dev/apps/service01'
spec:
  containers:
  - image: nginx:latest
    name: nginx
  serviceAccountName: vault-auth
As you can see, we have three annotations.
vault.hashicorp.com/agent-inject: 'true'- This annotation enables sidecar and init containers.vault.hashicorp.com/role: 'webapp' : Assigns the webapp role we created earlier.vault.hashicorp.com/agent-inject-secret-config.txt: 'kv/dev/apps/service01'- Vault path where the secrets reside.
Let's deploy the pod. It creates a pod named webapp.
kubectl apply -f pod.yamlIf you look at the injector pod logs, you will see a log showing the request sent from mutation webhook to vault injector service endpoint.
handler: Request received: Method=POST URL=/mutate?timeout=10sTo validate vault agents, let's describe the pod and check the events.
kubectl describe pod webappIf you check the output events, you will notice three containers getting created.
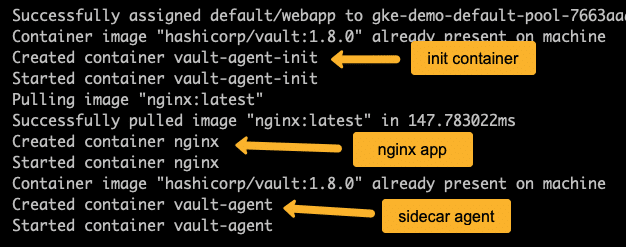
Now let's check the init container logs and see if it could connect to the vault server and retrieve secrets.
kubectl logs webapp -c vault-agent-initOn successful execution, you will see the following output. You can see a message saying the secrets rendered to /vault/secrets/config.txt
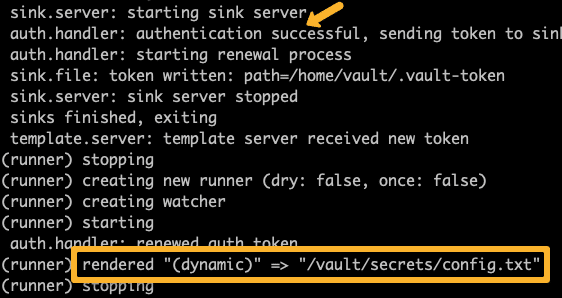
Now you might wonder how did /vault/secrets/config.txt path come in to picture?
By default, the vault agent writes all the secrets in /vault/secrets/ path, an in-memory volume that all the containers can access in the pod.
The filename config.txt came from the annotation vault.hashicorp.com/agent-inject-secret-config.txt. Any name you give after -secret will be considered as the secret file name.
Now, let's exec into the Nginx app container and see if we can access the secret file.
kubectl exec webapp -c nginx -- cat /vault/secrets/config.txtYou should be getting the following output.
data: map[appkey:zsdkfjhj4534 apptoken:zsdasdfaskfjhj4534]
metadata: map[created_time:2021-08-08T11:29:42.495211138Z deletion_time: destroyed:false version:1]
As you can see, we have the secrets in the file. This means the vault agent is working as expected.
However, the output is not in a format that the application can use. As discussed in the introduction, every application expects the secret config in a specific format. A text file with newline strings, a JSON file, or a YAML file.
To achieve this, the vault agent provides templating where you can render secrets in required formats. I will show all the methods with an Nginx deployment as an example.
Vault Agent Template Example
You can use vault templates to render secrets in required formats. In this example, we will see how to use templates in deployment annotation.
Save the following manifest as deployment-template.yaml. It is a simple nginx deployment with vault agent configs.
apiVersion: apps/v1
kind: Deployment
metadata:
  name: nginx
  labels:
    app: nginx
spec:
  selector:
    matchLabels:
      app: nginx
  replicas: 1
  template:
    metadata:
      annotations:
        vault.hashicorp.com/agent-inject: 'true'
        vault.hashicorp.com/role: 'webapp'
        vault.hashicorp.com/agent-pre-populate-only: 'true'
        vault.hashicorp.com/agent-inject-secret-config.txt: 'kv/dev/apps/service01'
        vault.hashicorp.com/agent-inject-template-config.txt: |
          {{ with secret "kv/dev/apps/service01" }}
          [DEFAULT]
          LogLevel = DEBUG
          [DATABASE]
          Address=127.0.0.1
          Port=3306
          User={{ .Data.data.appkey }}
          Password={{ .Data.data.apptoken }}
          Database=app
          {{ end }}
      labels:
        app: nginx
    spec:
      serviceAccountName: vault-auth
      containers:
        - name: nginx
          image: nginx:latest
Here if you see, I have added an annotation named vault.hashicorp.com/agent-pre-populate-only: 'true'. It disables the sidecar agent, and only init container gets deployed in the pod along with Nginx.
vault.hashicorp.com/agent-inject-template-config.txt annotation contains the secret file template with newline config.
{{ with secret "kv/dev/apps/service01" }}
[DEFAULT]
LogLevel = DEBUG
[DATABASE]
Address=127.0.0.1
Port=3306
User={{ .Data.data.appkey }}
Password={{ .Data.data.apptoken }}
Database=app
{{ end }}
It starts with the with block with the secret path and ends with end keywords. All the substitution should happen between these blocks.
Here we are substituting the user and password values using {{ .Data.data.appkey }} & {{ .Data.data.apptoken }}. Where appkey and apptoken are the vault secret keys. Vault agent substitutes the actual values in run-time.
Let's create the deployment.
kubectl apply -f deployment-template.yamlIf you exec into the Nginx pod created by the deployment, you will see the rendered config.txt file with user and password substituted with actual values from the vault server.
kubectl exec nginx-7c897d75cb-mvjft -c nginx "--" cat /vault/secrets/config.txt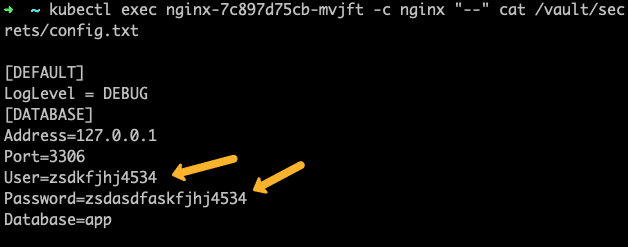
Vault Agent Configmap example
You can add the secret file template as a configmap also. Along with the template, you need to add a few vault agent configs as well.
Here is an example deployment with configmap that contains the vault agent template and configs.
apiVersion: apps/v1
kind: Deployment
metadata:
  name: nginx-configmap
  labels:
    app: nginx
spec:
  selector:
    matchLabels:
      app: nginx
  replicas: 1
  template:
    metadata:
      annotations:
        vault.hashicorp.com/agent-inject: 'true'
        vault.hashicorp.com/agent-pre-populate-only: 'true'
        vault.hashicorp.com/agent-configmap: 'my-configmap'
      labels:
        app: nginx
    spec:
      serviceAccountName: vault-auth
      containers:
        - name: nginx
          image: nginx:latest
---
apiVersion: v1
kind: ConfigMap
metadata:
  name: my-configmap
data:
  config-init.hcl: |
      "auto_auth" = {
        "method" = {
          "config" = {
            "role" = "webapp"
          }
          "type" = "kubernetes"
        }

        "sink" = {
          "config" = {
            "path" = "/home/vault/.token"
          }

          "type" = "file"
        }
      }

      "exit_after_auth" = true
      "pid_file" = "/home/vault/.pid"

      "template" = {
        "contents" = "{{ with secret \"kv/dev/apps/service01\" }} \n User={{ .Data.data.appkey }} \n Password={{ .Data.data.apptoken }} \n config=testing\n env=dev\n {{ end }}"
        "destination" = "/vault/secrets/db-creds"
      }

      "vault" = {
        "address" = "http://vault.default.svc:8200"
      }
In the configmap spec, you can see the filename as config-init.hcl. It is for vault init agent. If you are also using a sidecar agent, then you need to create one more config.hcl in the configmap with the same configuration as config-init.hcl
If you notice, other than the template content, we have other vault agent configs like vault address, role, type, etc., as part of the configmap.
Also, we are using the same template content we used before, but here, we are using \n for next line.
You can create the deployment and check the secret file.
Vault Agent Environment Variable Example
There is no direct way using vault agents t make the secrets available as environment variables. However, there is a workaround to do it.
We can use the regular vault template to create a file with an export command for all the environment variables. Then in the deployment, we can use the command arguments to source this file so that all the export commands get executed. The secrets will be available as environments variable for the application.
Create a file named deployment-env.yaml using the following manifest. I used a basic ubuntu image for demonstration purposes.
apiVersion: apps/v1
kind: Deployment
metadata:
  name: nginx
  labels:
    app: nginx
spec:
  selector:
    matchLabels:
      app: nginx
  replicas: 1
  template:
    metadata:
      annotations:
        vault.hashicorp.com/agent-inject: 'true'
        vault.hashicorp.com/role: 'webapp'
        vault.hashicorp.com/agent-pre-populate-only: 'true'
        vault.hashicorp.com/agent-inject-secret-database-config: 'kv/dev/apps/service01'
        vault.hashicorp.com/agent-inject-template-database-config: |
          {{ with secret "kv/dev/apps/service01" -}}
            export appkey="{{ .Data.data.appkey }}"
            export apptoken="{{ .Data.data.apptoken }}"
          {{- end }}
      labels:
        app: nginx
    spec:
      serviceAccountName: vault-auth
      containers:
        - name: nginx
          image: ubuntu:latest
          command: ["/bin/bash"]
          args:
            ['-c', 'source /vault/secrets/database-config && env > /vault/secrets/test && tail -f /dev/null']
If the above deployments,
- In the annotation we have the template with a export commands for appkey and apptoken. You can have multiple export commands like this
- In command arguments, we are sourcing the /vault/secrets/database-config
- Ther we are writing the env variables to
/vault/secrets/testfor validation. This is just for testing this setup beacuae if you exec it a different session those variable will not be available. - The tail -f /dev/null keeps the container running as we are using the base ubuntu image.
Create the deployment.
kubectl apply -f deployment-env.yamlNow, if you check the /vault/secrets/test file, you will see both appkey and apptoken as environment variables. Replace nginx-767dbbd58b-bsxks with your pod name.
kubectl exec -it nginx-767dbbd58b-bsxks -c nginx -- cat /vault/secrets/testVault Injector Troubleshooting & Issues
Following are the issues I have faced during the vault injector setup.
- Vault agent Template works only after a first pod restart:- The agent was not able to render the template when the pod gets deployed. However, when I restarted the pod, it worked. I suspect it to be a node resource issue as I was using small k8 nodes. Later when i increse the the node resources, i never got the error.
- Templated rendered empty secret values: In vault documentation, for rendering secrets, the systax is given as
.Data.key. It didnt work. Somewhere if found that we have to add data to the syntax. eg,.Data.data.apptoken - error authenticating: error="context deadline exceeded" : This happends when the vault agent is not able to connect to the vault server or the service account doest have persmissions to read the secrets. Check the vault URL, policy, role and service account mapping.
- Private GKE connectivity issues: In few forums I found people discussing about connectivity issues (Timeout errors in MutatingWebhookConfiguration) from master to injector controller pods due to firewall issues. I can be solved by adding a custom firewall rule from master to nodes on port 8080. Check out the discussion thread here.
Conclusion
Using Kubernetes with a vault for secret management, a vault injector is a great way to introduce secrets to pods.
This way application doesn't need to be aware of the secret management system. It just has to consume the secrets from a designated file path.
Also, the production vault server should be highly available. Vault server unavailability could result in application failure if there is a pod restart or scaling activity.
Next, in this vault series, we will look at solutions like Bank vault and Kubernetes external secrets.
You may be using a different approach in managing secrets or using solutions like Hashicorp vault.
Either way, leave a comment.