

This blog will teach you to use AWS CLI to create an EC2 instance. Also, we will look at all the possible options available in the CLI.
Create EC2 instance Using AWS CLI
To create an ec2 instance using CLI, you need the following.
- Security group ID
- Key pair name
- AMI Id
- Subnet ID
We will create each resource using the CLI. If you have existing resources, you can directly use the respective resource IDs instead of creating them.
Get VPC ID and Subnet ID
To create a security group, you need the following two IDs
- VPC ID: To create a security group
- One Subnet ID: To launch ec2 instance.
You can get these details from the AWS Management console.
Go to the VPC dashboard and click on the VPC. You will get the VPC ID, click on the subnets, and search with the VPC ID to list all the subnets associated with that VPC, as shown below.

I'm going to use the following VPC and subnet IDs for this guide. You need to replace these IDs with your VPC and subnet ID.
- VPC ID:
vpc-0d42bf2f27be967ff - Subnet ID:
subnet-00b5ede5e160caa59
Get AMI Id
Next, you need to get the AMI ID to be used with ec2 CLI.
AMI ID could be a base image AMI Id or ID of a custom image created by you or your team.
To get the AMI Id, Go to ec2 Dashboard --> AMI Catalog and find the list of base images from AWS along with the AMI Id as shown below.
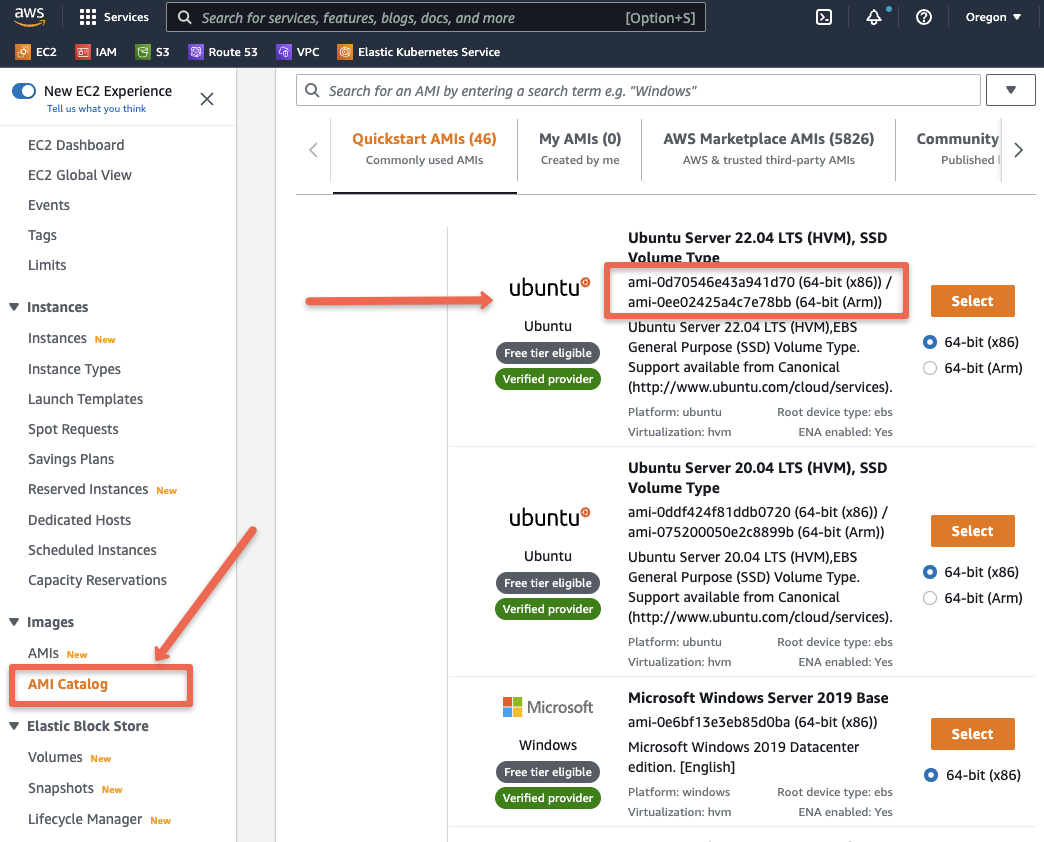
All the custom AMIs are present under AMIs option.
I am going to use the AWS Ubuntu AMI id ami-0d70546e43a941d70.
Create Security Group
Our next requirement is a security group ID to be attached to the ec2 instance. You can attach more than one security group.
Either you can use the ID of an existing security group or you can create one using the following command. Replace vpc-0d42bf2f27be967ff with your VPC ID
aws ec2 create-security-group \
    --group-name demo-sg \
    --description "AWS ec2 CLI Demo SG" \
    --tag-specifications 'ResourceType=security-group,Tags=[{Key=Name,Value=demo-sg}]' \
    --vpc-id "vpc-0d42bf2f27be967ff"
Note down the security group ID from the output. The output would look like the following.
{
    "GroupId": "sg-07570e17ab8331f13",
    "Tags": [
        {
            "Key": "Name",
            "Value": "demo-sg"
        }
    ]
}
Refer create-security-group official CLI reference for more details.
Now, you need to add inbound (ingress) firewall rules to the security group. Replace sg-07570e17ab8331f13 with your security group ID.
aws ec2 authorize-security-group-ingress \
    --group-id "sg-07570e17ab8331f13" \
    --protocol tcp \
    --port 22 \
    --cidr "0.0.0.0/0"
If you want to add multiple ports and multiple CIDRs to the security group using the CLI, use the following command.
aws ec2 authorize-security-group-ingress \
    --group-id "sg-07570e17ab8331f13" \
    --tag-specifications 'ResourceType=security-group-rule,Tags=[{Key=Name,Value=demo-sg}]' \
    --ip-permissions "IpProtocol=tcp,FromPort=22,ToPort=22,IpRanges=[{CidrIp=0.0.0.0/0},{CidrIp=10.0.0.0/24}]" \
    --ip-permissions "IpProtocol=tcp,FromPort=80,ToPort=80,IpRanges=[{CidrIp=0.0.0.0/0},{CidrIp=10.0.0.0/24}]"
Create SSH Key Pair
If you have an existing pem key, you can use it. If you don't, you can create an SSH key pair using the following command. The output key gets stored in ~/.ssh location.
aws ec2 create-key-pair \
   --key-name  wp-key-03 \
   --query 'KeyMaterial' --output text > ~/.ssh/demo-key
Refer ec2 create-key-pair CLI reference for more details.
AWS CLI Command to Create ec2
Now we have the following pre-defined values.
- VPC ID:
vpc-0d42bf2f27be967ff - Subnet ID:
subnet-00b5ede5e160caa59 - AMI ID:
ami-0d70546e43a941d70 - Security Group ID: sg-063c02687e1103c7b
- Key name: demo-key
Here is an example AWS CLI command to create an ec2 instance.
aws ec2 run-instances \
    --image-id ami-0d70546e43a941d70 \
    --count 1 \
    --instance-type t2.micro \
    --key-name bibin-server \
    --security-group-ids sg-07570e17ab8331f13 \
    --subnet-id subnet-00b5ede5e160caa59 \
    --block-device-mappings "[{\"DeviceName\":\"/dev/sdf\",\"Ebs\":{\"VolumeSize\":30,\"DeleteOnTermination\":false}}]" \
    --tag-specifications 'ResourceType=instance,Tags=[{Key=Name,Value=demo-server}]' 'ResourceType=volume,Tags=[{Key=Name,Value=demo-server-disk}]'
Following are some of the important parameters you should know.
| Parameter | Details |
|---|---|
--block-device-mappings | To set the custom volume size for the root volume /dev/sdf. You can also add additional volumes using this parameter. |
--monitoring | To enable detailed ec2 monitoring |
--ebs-optimized | To optimize ec2 for EBS IO |
--iam-instance-profile | To add instance profile (IAM role) to the instance. |
--launch-template | To launch the ec2 instance from a launch template. |
Refer ec2 run-instances official CLI documentation for all the parameter references.
AWS CLI Command to Create ec2 Instance With User Data
With ec2 CLI, you can pass the ec2 user data script using the --user-data flag.
First, create a user data script file. For example, a shell script named script.sh
#!/bin/bash
apt-get update -y
sudo systemctl nginx start
chkconfig nginx on
Now, along with the ec2 create CLI command we have learned in the last section, just add the --user-data flag with the file path as highlighted below. You can provide the relative path or the absolute path of the script file based on your requirements.
aws ec2 run-instances \
    --image-id ami-0d70546e43a941d70 \
    --count 1 \
    --instance-type t2.micro \
    --key-name bibin-server \
    --security-group-ids sg-07570e17ab8331f13 \
    --subnet-id subnet-00b5ede5e160caa59 \
    --block-device-mappings "[{\"DeviceName\":\"/dev/sdf\",\"Ebs\":{\"VolumeSize\":30,\"DeleteOnTermination\":false}}]" \
    --tag-specifications 'ResourceType=instance,Tags=[{Key=Name,Value=demo-server}]' 'ResourceType=volume,Tags=[{Key=Name,Value=demo-server-disk}]' \
    --user-data file://path/to/script.sh
If it is a single-line command, you can pass it directly without an external file as shown below.
--user-data sudo systemctl nginx startConclusion
In this step-by-step guide, we learned to use AWS CLI to create an ec2 instance.
If you are a DevOps engineer working on the AWS cloud, learning to use AWS CLI to create AWS resources is essential. You can use it for automation as well as ad-hoc tasks.
Also, if you are learning AWS, check out my comprehensive guide to becoming a DevOps engineer, where I talk about what to learn on the AWS cloud.
