


In this step-by-step guide, you will learn to setup and validate Feast Feature store on Kubernetes using Feast Operator.
Feature Store is the core component of MLOps and Feast is the widely used feature store for ML projects.
By the end of this guide, you will have a clear understanding of:
- What is Feast?
- Key Feast components
- Feast Operator setup on Kubernetes
- Deploy Feast using CRD and configure offline and online stores.
- Use a simple Python script to verify feature serving
Lets get started.
What is Feast?
Feast is an open source feature store used by teams to store, manage, and serve ML features for both training and inference.
Feast acts as a centralized storage for features that will be used by different teams. The following image illustrates the Feast architecture on Kubernetes.
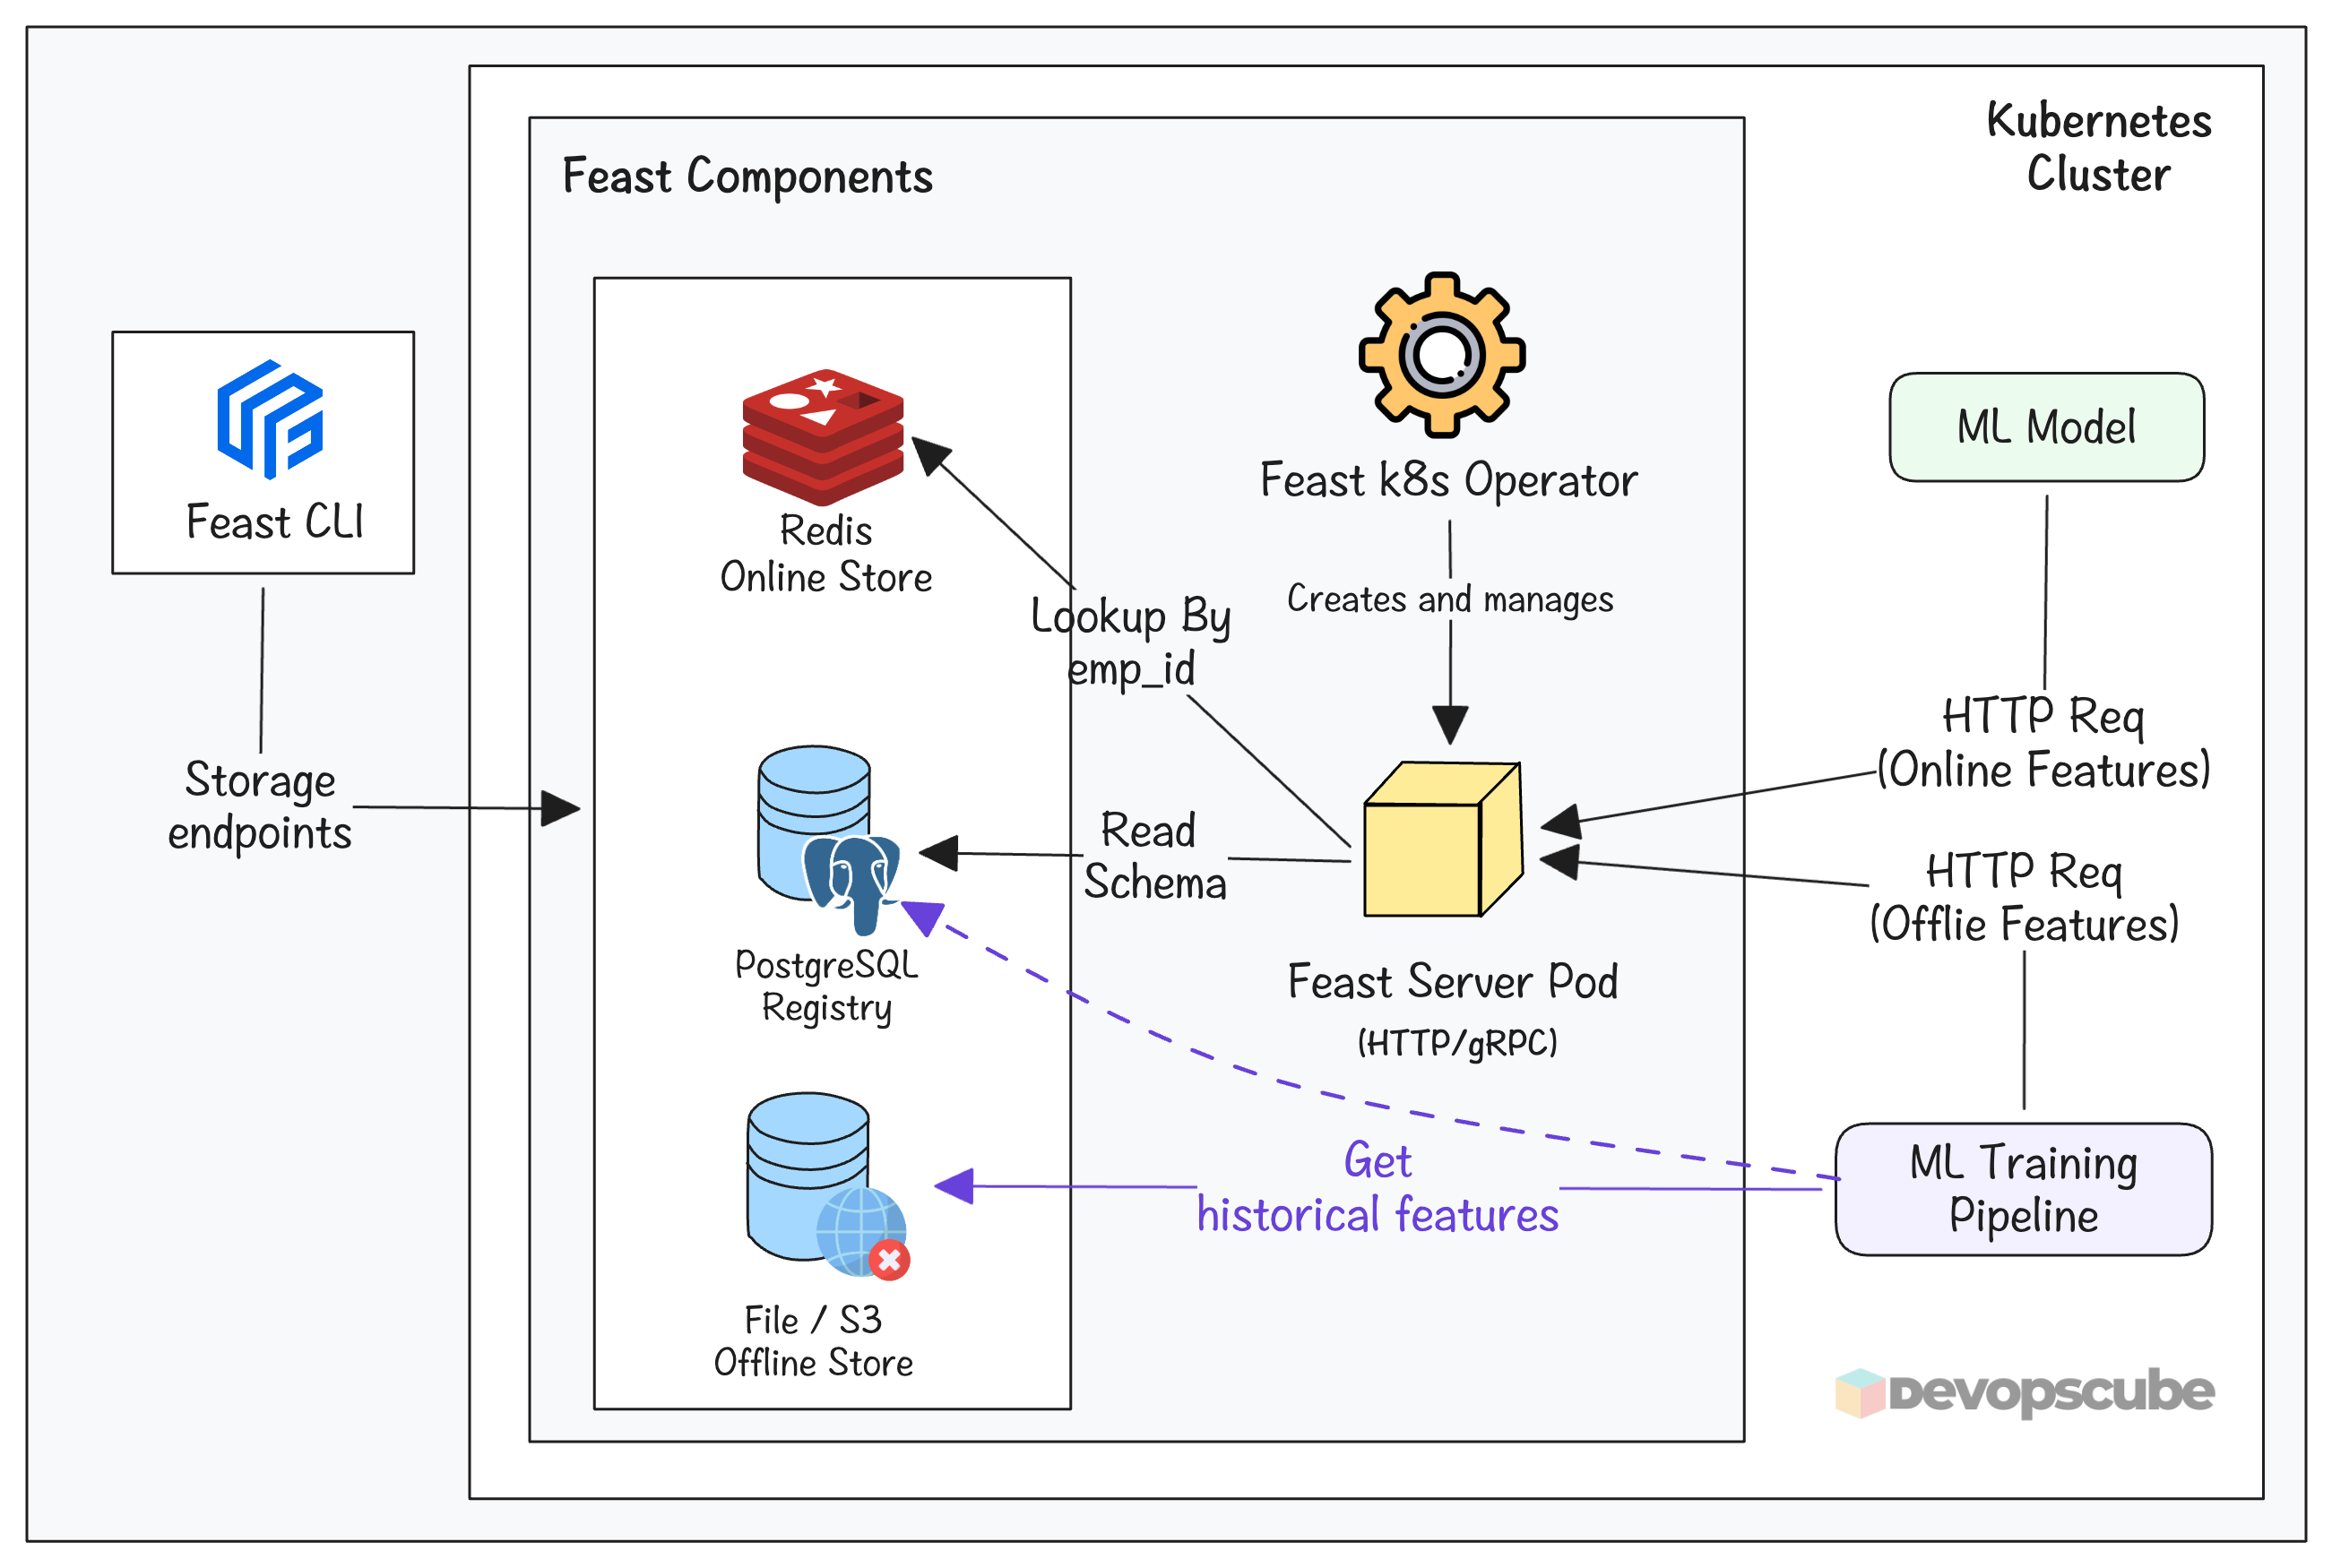
The following are the key components of Feast.
- PostgreSQL Feature Registry: It stores the definitions (schema) of the features. Eg,. age, name, etc.
- Redis Online store: It is used to reduce the latency during inferencing.
- Offline store: It is used to store historical features used for model training.
- Feast pod: It serves latest features to ML model by reading from the registry and the online store.
- Feast CLI: It is a tool used to connect Feast and to run Feast commands. It connects to feature registry, offline Store and online Store
Lets get started with the setup.
Setup Prerequisites
Following are the prerequisites to follow this guide.
- Kubernetes cluster
- kubectl
- Python 3+
- Pip
GitHub Repository
First, fork and clone the MLOPs Github repository.
https://github.com/techiescamp/mlops-for-devops.gitCD into the mlops-for-devops directory.
cd mlops-for-devopsplatform-tools/feast folder of the repository that you cloned before.The files we are going to use in this guide are shown below.
.
├── phase-1-local-dev
│   └── datasets
│       └── employee_attrition.csv
├── phase-2-enterprise-setup
│   └── feast
│      ├── csv_to_parquet.py
│      ├── feature_store.yaml
│      ├── feature_definitions.py
│      └── smoke_test.py
└── platform-tools
    └── feast
        ├── feast.yaml
        ├── psql.yaml
        └── redis.yaml
Setup Feast on a Kubernetes Cluster
The first step is to setup Feast on a Kubernetes cluster using the Feast Operator.
Here is what we are going to do.
- Setup feast operator
- Deploy Redis and PostgreSQL for the registry and Online store
- Uses
FeatureStoreCustom Resource to create Feast feature store
In actual setup, use Ingress or Gateway API to expose Feast externally.
Lets get started.
Step1: Install Feast Operator
Use the following command to deploy the Feast Operator. It will deploy the operator on the feast-operator-system namespace.
kubectl apply --server-side --force-conflicts -f https://raw.githubusercontent.com/feast-dev/feast/refs/heads/stable/infra/feast-operator/dist/install.yamlRun the following command to verify if the operator is running and CRD is created.
$ kubectl get pods -n feast-operator-system

$ kubectl get crd featurestores.feast.dev
You should see the following output.
NAME                                     READY  STATUS   RESTARTS  AGE

feast-operator-controller-manager-482tt  1/1    Running  0         38s

NAME                      CREATED AT

featurestores.feast.dev   2026-01-08T10:32:38Z
Step 2: Create a Namespace for Feast Deployment
We will be deploying the Feast pods on a dedicated namespace named feast. Create it using the following command.
$ kubectl create namespace feastStep 3: Setup PostgreSQL for Feast Registry
We need to set up PostgreSQL as a registry for Feast. It stores the metadata of Feast.
Assuming you are in the root directory, run the following command to move into the platform-tools/feast folder.
cd platform-tools/feastYou will find the following files.
.
├── feast.yaml
├── psql.yaml
└── redis.yaml
The psql.yaml manifest, deploys a kubernetes secret that contains the PostgreSQL username, password, and database name as shown below. (feast as default)
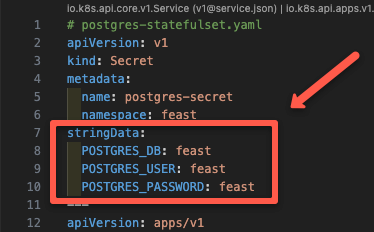
It also contains manifest to deploy PostgreSQL as a StatefulSet and Service to expose PostgreSQL as Nodeport.
Now, apply the PostgreSQL manifest using the following command.
$ kubectl apply -f psql.yamlThen run the following command to ensure the postgres pod is up and running.
$ kubectl get po -n feast

NAME         READY   STATUS        RESTARTS   AGE

postgres-0   1/1     Running       0          34s
Step 4: Setup Redis for Feast Online Store
Next, we need to deploy Redis Statefulset. It will be the online store for Feast.
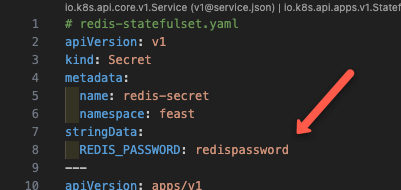
The redis.yaml manifest creates a secret that contains the Redis password, Redis as StatefulSet, and a Service to expose Redis as Nodeport.
Now, apply the manifest using the following command.
$ kubectl apply -f redis.yamlThen run the following command to ensure the redis pod is up and running.
$ kubectl get po -n feast

NAME         READY   STATUS    RESTARTS   AGE

postgres-0   1/1     Running   0          1m
redis-0      1/1     Running   0          8s
You can see a Redis pod along with the PostgreSQL pod.
Step 5: Deploy Feast Feature Store
Now its time to deploy the Feast feature store using the FeatureStore CR. It tells the Feast operator to deploy the Feast pod, its service, and configure the backend storage.
The feast.yaml manifest will create a secret that contains the connection string of Redis and PostgreSQL, along with the credentials to authenticate them.
Additionally, it will also create an extra service to expose it as a NodePort.
Apply the manifest using the following command.
$ kubectl apply -f feast.yamlThen run the following command to check if the Feast deployment is up and running.
$ kubectl get po -n feast

NAME               READY   STATUS    RESTARTS   AGE

feast-feast-tbn5k  1/1     Running   0          30s
postgres-0         1/1     Running   0          3m
redis-0            1/1     Running   0          2m
You can see that all three pods are running.
Feature Repository
The phase-2-enterprise-setup/feast directory which contains all the feast Python files to create, store, and retrieve features. It is called the feature respository.
cd ../../phase-2-enterprise-setup/feast/Here is the structure of our feature repository.
.
├── csv_to_parquet.py
├── feature_store.yaml
├── feature_definitions.py
├── smoke_test.py
└──.feastignore
In this:
feature_store.yaml- It is the configuration file that Feast CLI uses to read the Redis and PostgreSQL connection strings. It should be present in root of a feature repositorycsv_to_parquet.py- Contains logic to process the CSV file and convert it to a Parquet file.feature_definitions.py- It is the schema/contract for the feature store (feature registry definition file) . Meaning, it defines what features exist, where the data comes from, and how they should be servedsmoke_test.py- It is a smoke-test script that hits the Feast online feature store HTTP API and verifies that real-time feature retrieval is working end-to-end..feastignore- Contains file and folder names that should be ignored by feast apply.
Store Features into Feast feature store
Now, our setup is ready. Now lets look at how to store features into Feast feature store. Both offline and online store.
Lets get started.
Step 1: Setup Feast CLI
In the local environment, we need to install Feast CLI along with PostgreSQL and Redis packages.
Run the following command to create a isolated virtual environment and install the Feast CLI with PostgreSQL and Redis packages.
python3.11 -m venv env

source env/bin/activate

pip install --upgrade pip setuptools wheel

pip install 'feast[postgres,redis]'
Step 2: Update NodePort IP to feature_store.yaml
Since we need to run the feast commands from our local workstations, we have exposed Feast as NodePort. So you need to update one of the cluster node IP in the feature_store.yaml file.
To get the node IP, run the following command.
kubectl get no -o wideStep 3: Setup Offline Source (Convert CSV to Parquet)
For model training, an offline store is used. For file based feast offline store, we need to convert the CSV to Parquet format.
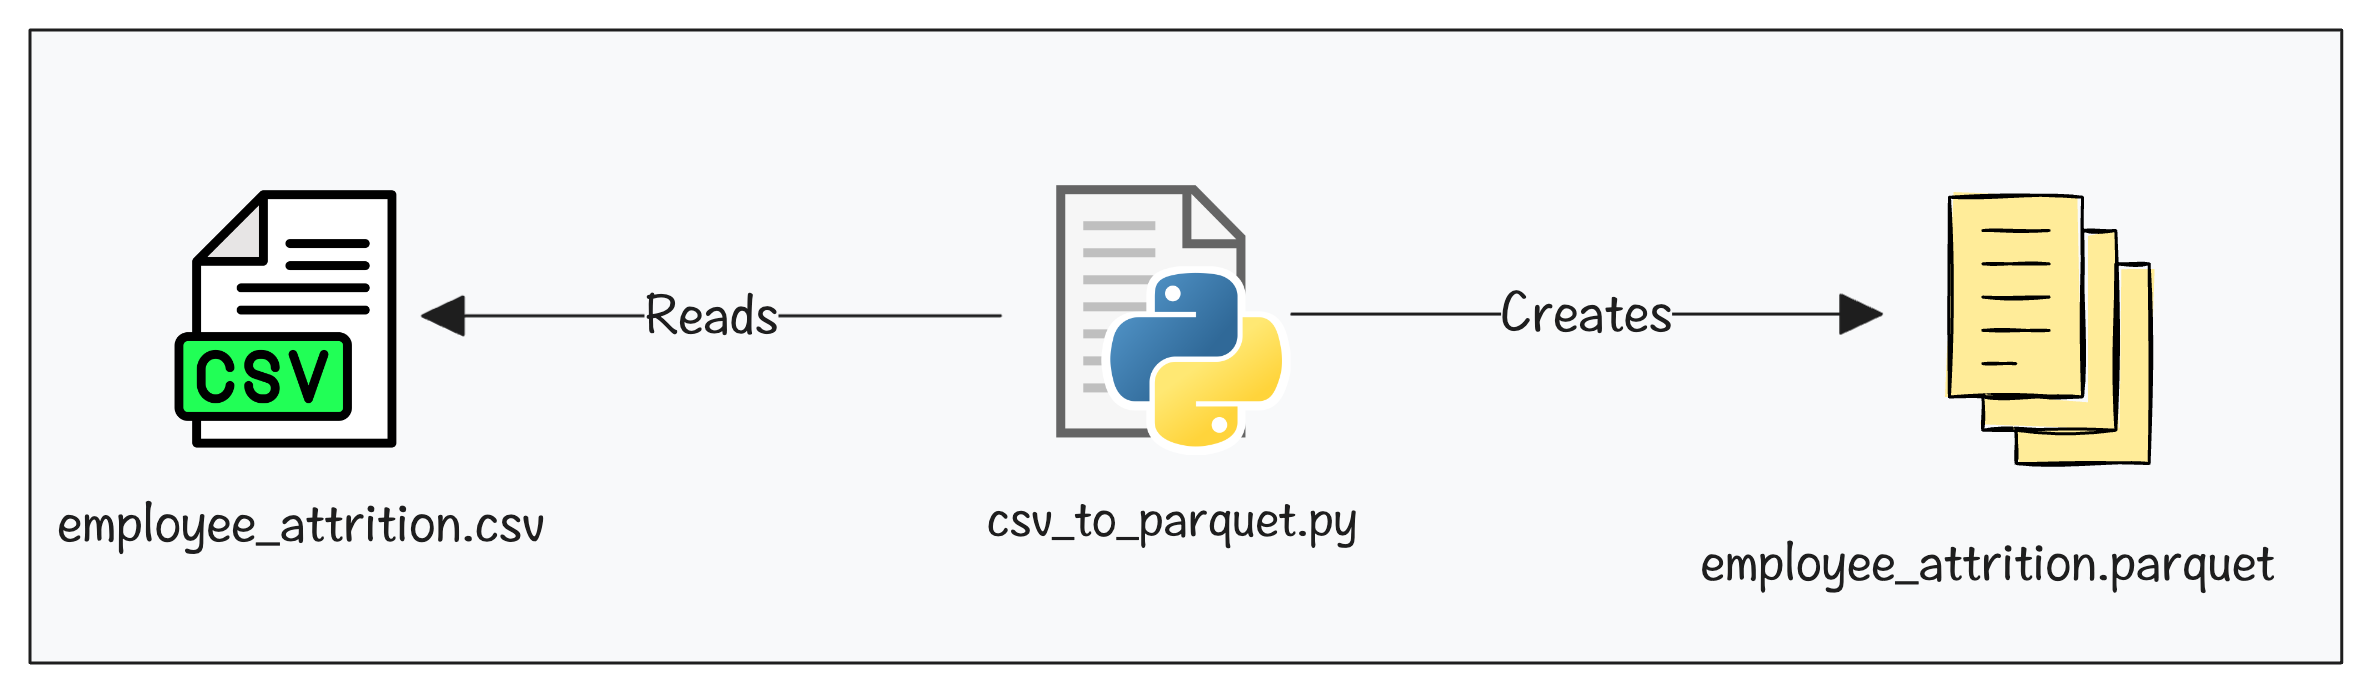
The csv_to_parquet.py has the code to generate the Parquet file by processing the data on the employee_attrition.csv file.
Here is high level overview of what the script does.
- Reads
employee_attrition.csvfrom yourphase-1-local-dev/datasets/ - Since ML models need numbers, it converts
Yes/Nocolumns (Overtime, Remote Work, etc.) to1/0 - Feast expects
snake_casecolumn names. So it convertsMonthly Income"to"monthly_incomeetc - Add Feast-required timestamp column like
event_timestamp&created - Writes the final output to
data/employee_attrition_features.parquet. This file becomes the offline data source that Feast reads from.
Run the Python Script csv_to_parquet.py using the following command.
python csv_to_parquet.pyNow, if you check the /phase-2-enterprise-setup/feast/data folder, you can see a employee_attrition_features.parquet file created.
Step 4: Register Features to Feast
I already have a Parquet file. So why do I need to register features in Feast?
Well, Parquet file only stores data. Feast needs a structured definition (schema, entity, source, and usage) to serve those features consistently across training and inference.
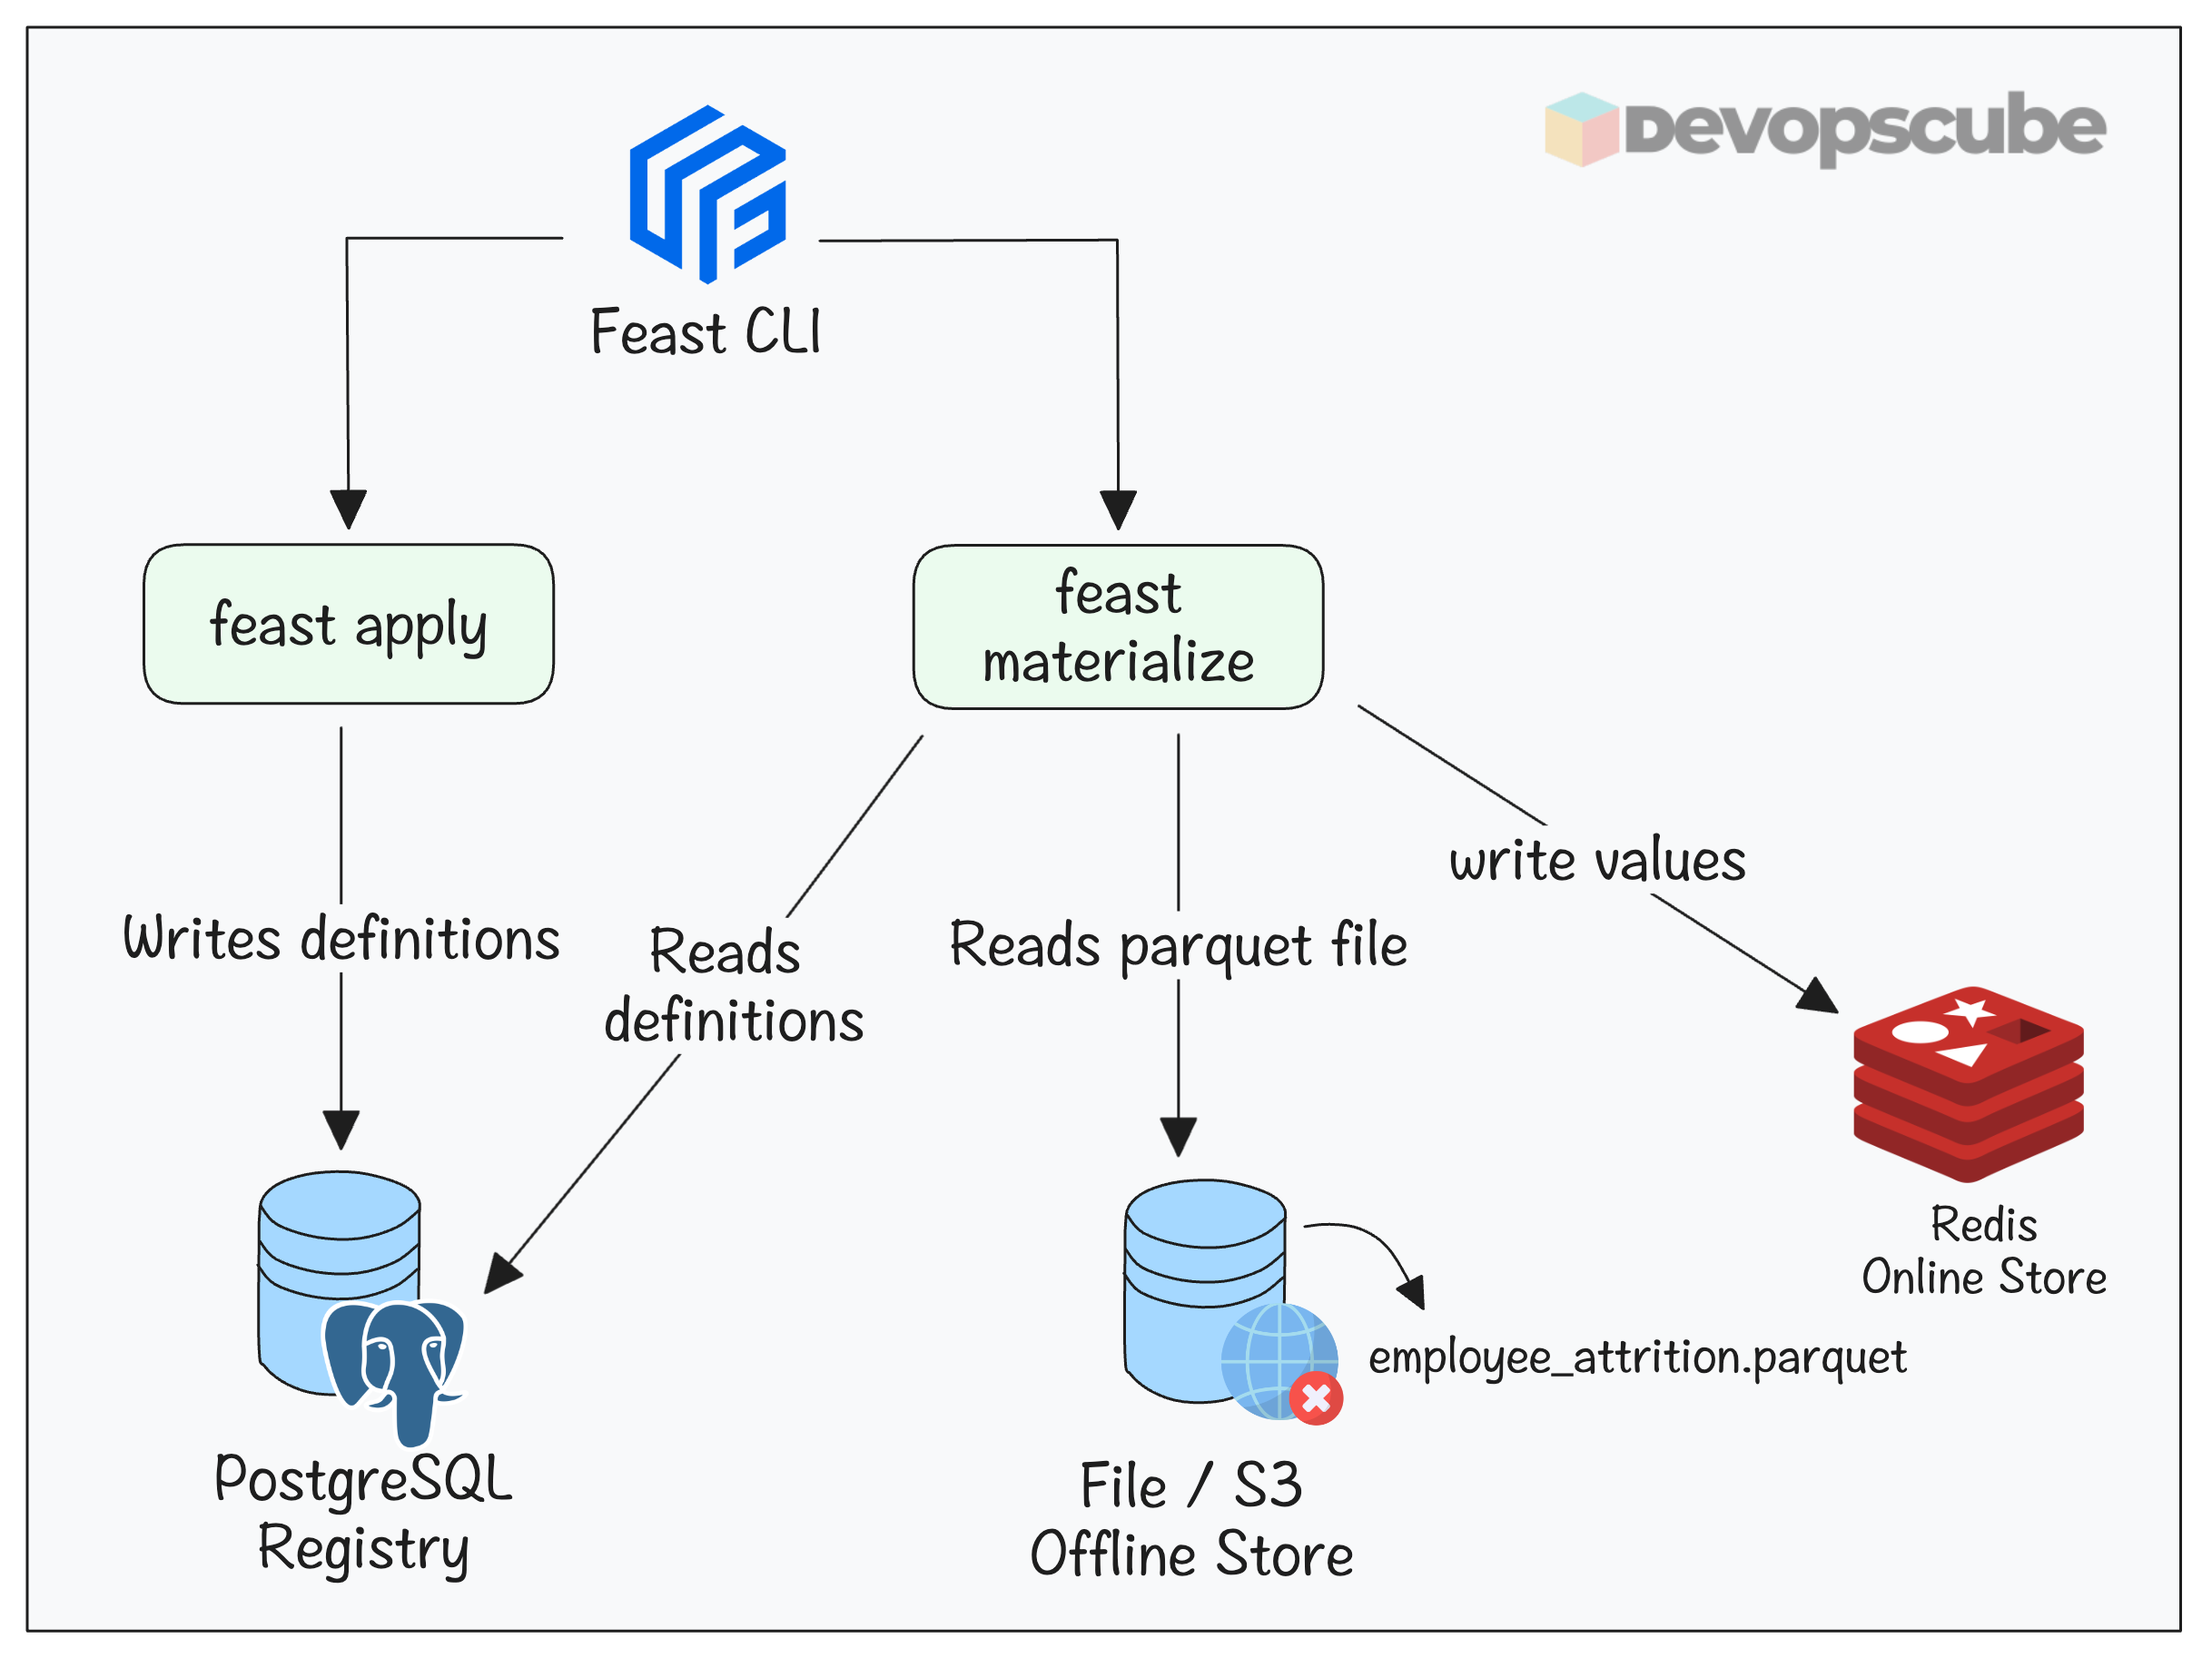
Registering features involves two commands:
- feast apply - This reads the
feature_definitions.pythat has the feature definitions and registers them in its internal registry (In our case its PostgreSQL). - feast materialize - This reads the definitions in PostgreSQL registry and Parquet file in the offline store and stores the values in Redis online store.
The folloing image illustrates the feast apply and materialize workflows.
Lets run the apply command.
feast applyYou will get the following output if the apply command is successful.
Applying changes for project employee_attrition
Deploying infrastructure for employee_features
Now that the features are registered, you can view them using the following command. When a developer runs this, they immediately know exactly which features the model needs and in what order without asking a data scientist.
feast feature-views describe employee_featuresYou will get an output as shown below.
spec:
  name: employee_features
  entities:
  - employee_id
  features:
  - name: age
    valueType: INT64
    description: Employee age
  .
  .
Here, the entity is the primary key. So, when you fetch features at inference time, you dont have to fetch all the features. You say "give me features for employee_id. Feast uses employee_id as the lookup key to find the right row in the online store (Ex: Redis)
Step 5: Setup Online Store (Redis)
To setup the online store, we need to run the materialize command as shown below.
feast materialize-incremental $(date -u +"%Y-%m-%dT%H:%M:%S")You will get the following output if the materialization is successful.
Materializing 1 feature views to 2026-04-02 12:49:12+00:00 into the redis online store.

employee_features from 2025-04-02 12:49:39+00:00 to 2026-04-02 12:49:12+00:00:
In the feast command, $(date -u +"%Y-%m-%dT%H:%M:%S") means we are specifying the current UTC timestamp as the time features are materialized and stored in the registry for tracking.
And, when you run the materialize-incremental command again, it will only save the changes from the last run.
Step 6: Validate Feature Serving
Now, the features have been added to the Feast feature store. Let's use simple Python script to validate if Feast is able to serve the features.
The Python script smoke_test.py we are going to use in the phase-2-enterprise-setup/feast folder.
This script sends multiple requests to the Feast online API and measures the time taken to fetch features. It prints feature serving latency metrics such as p50, p95, and p99, which are commonly used in SRE and DevOps.
smoke_test.py and update your node-ip in FEAST_ENDPOINTNow, run the script using the following command.
$ python smoke_test.py You will get the following output.
Feature Serving Latency (100 runs)
Min:  491.81 ms
p50:  513.82 ms
p95:  674.24 ms
p99:  732.57 ms
Max:  732.57 ms
Mean: 542.29 ms
These metrics help us understand real-time feature serving performance. It is particularly useful to define and validate SLOs (Service Level Objectives) as an MLOps engineer.
For example, you can set an SLO like “p95 latency should be under 200 ms” .
Clean Up
If you no longer need the setup, run the following commands to delete it
$ kubectl delete namespace feast

$ kubectl delete -f https://raw.githubusercontent.com/feast-dev/feast/refs/heads/stable/infra/feast-operator/dist/install.yaml
Feast Troubleshooting
Following are some of the issues you may face and their solutions.
1. PVC Stuck in Pending State
While creating PostgreSQL and Redis, their PVC might end up in pending state.
To troubleshoot, check the following:
- Dynamic PV creation is available in your cluster
- Check if you have given the correct StorageClass name under the
volumeClaimTemplateblock.
2. Missing CRD Error
When you apply the feast.yaml manifest, you may get the following error.
the server could not find the requested resource (post featurestores.feast.dev)If you got this error, check if the Feast Operator pods are up and running.
kubectl get pods -n feast-operator-systemIf the pods are not running, delete and re-run the installation command.
Conclusion
You now have a production-style Feast setup running on Kubernetes, with the registry, online store, and feature serving all deployed through the Feast Operator.
Most importantly, you have seen how feast apply registers schema in PostgreSQL, how feast materialize moves data from the offline store into Redis, and how the online API serves features.
If you are a DevOps engineer, understanding feast architecture and its workflows will help you in MLOps projects as it is a core component in ML development.
Another key area is monitoring feature freshness and serving latency as SLOs. We will cover it in detail in a separate blog.
If you have any questions or face any issues during the setup, do let us know in the comments.