

In this blog, we dive deep into Istio service mesh architecture, especially Ambient Mesh, which is expected to become the default service-mesh architecture.
By the end of this blog, you will learn:
- Why Istio needed a new architecture
- Overview of Istio architecture
- Deep dive into key components: Istiod, Ztunnel, Waypoint Proxy, and CNI
- Is Ztunnel a single point of failure?
- Business use cases of Ambient Mesh, including cost benefits.
and more.
Lets get started.
Istio Architecture (Ambient Mesh)
Istio Ambient Mesh consists of the following key components.
- Istio Control Plane (Istiod)
- Ztunnel (The Per-Node Layer 4 Proxy)
- Waypoint Proxy (For Layer 7 Traffic Management)
- Istio Gateway (To Handling External Traffic)
- Istio CNI (Node agent)
The following diagram illustrates the 1000-foot view of the Istio Ambient mesh.
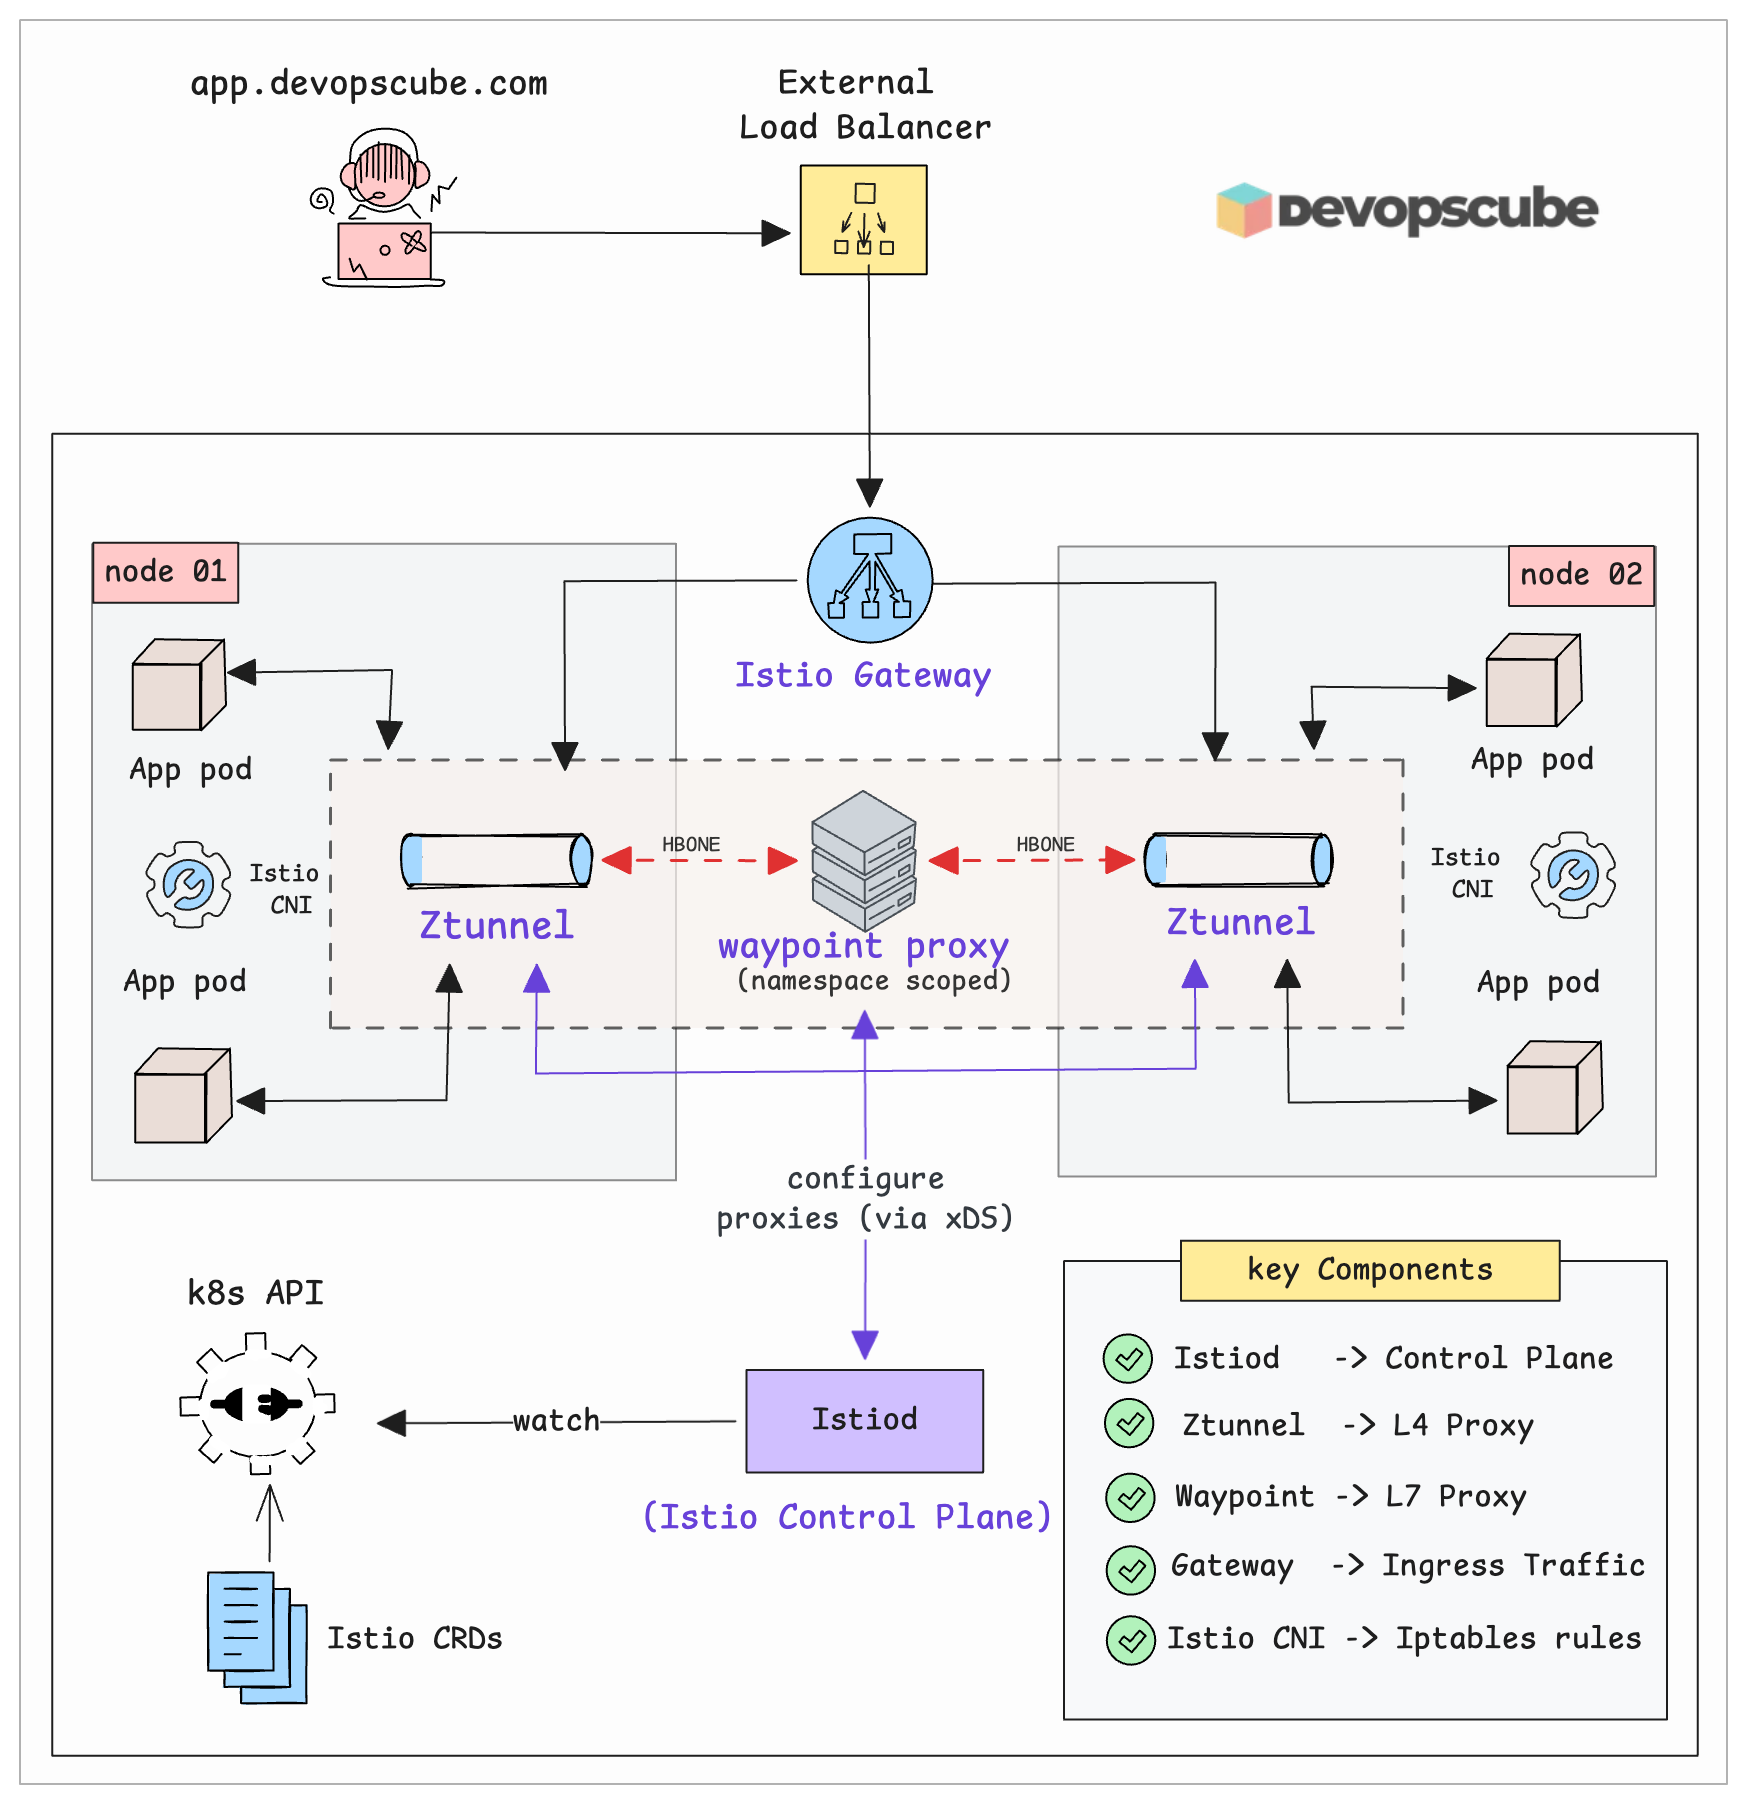
Lets dive deep into each component and see how it works and how it fits into the overall mesh architecture.
Istiod (The Control Plane)
Think of Istiod as the brain of your service mesh. It doesn't handle any actual traffic. Instead, it tells all the proxy components (ztunnel, waypoint etc) on what rules to follow.
Initially the Istio control plane was split into three separate services. 1. Galley for config validation, 2. Pilot for traffic management, and 3. Citadel for security. Now they merged everything into a single binary called Istiod (the Istio Daemon).
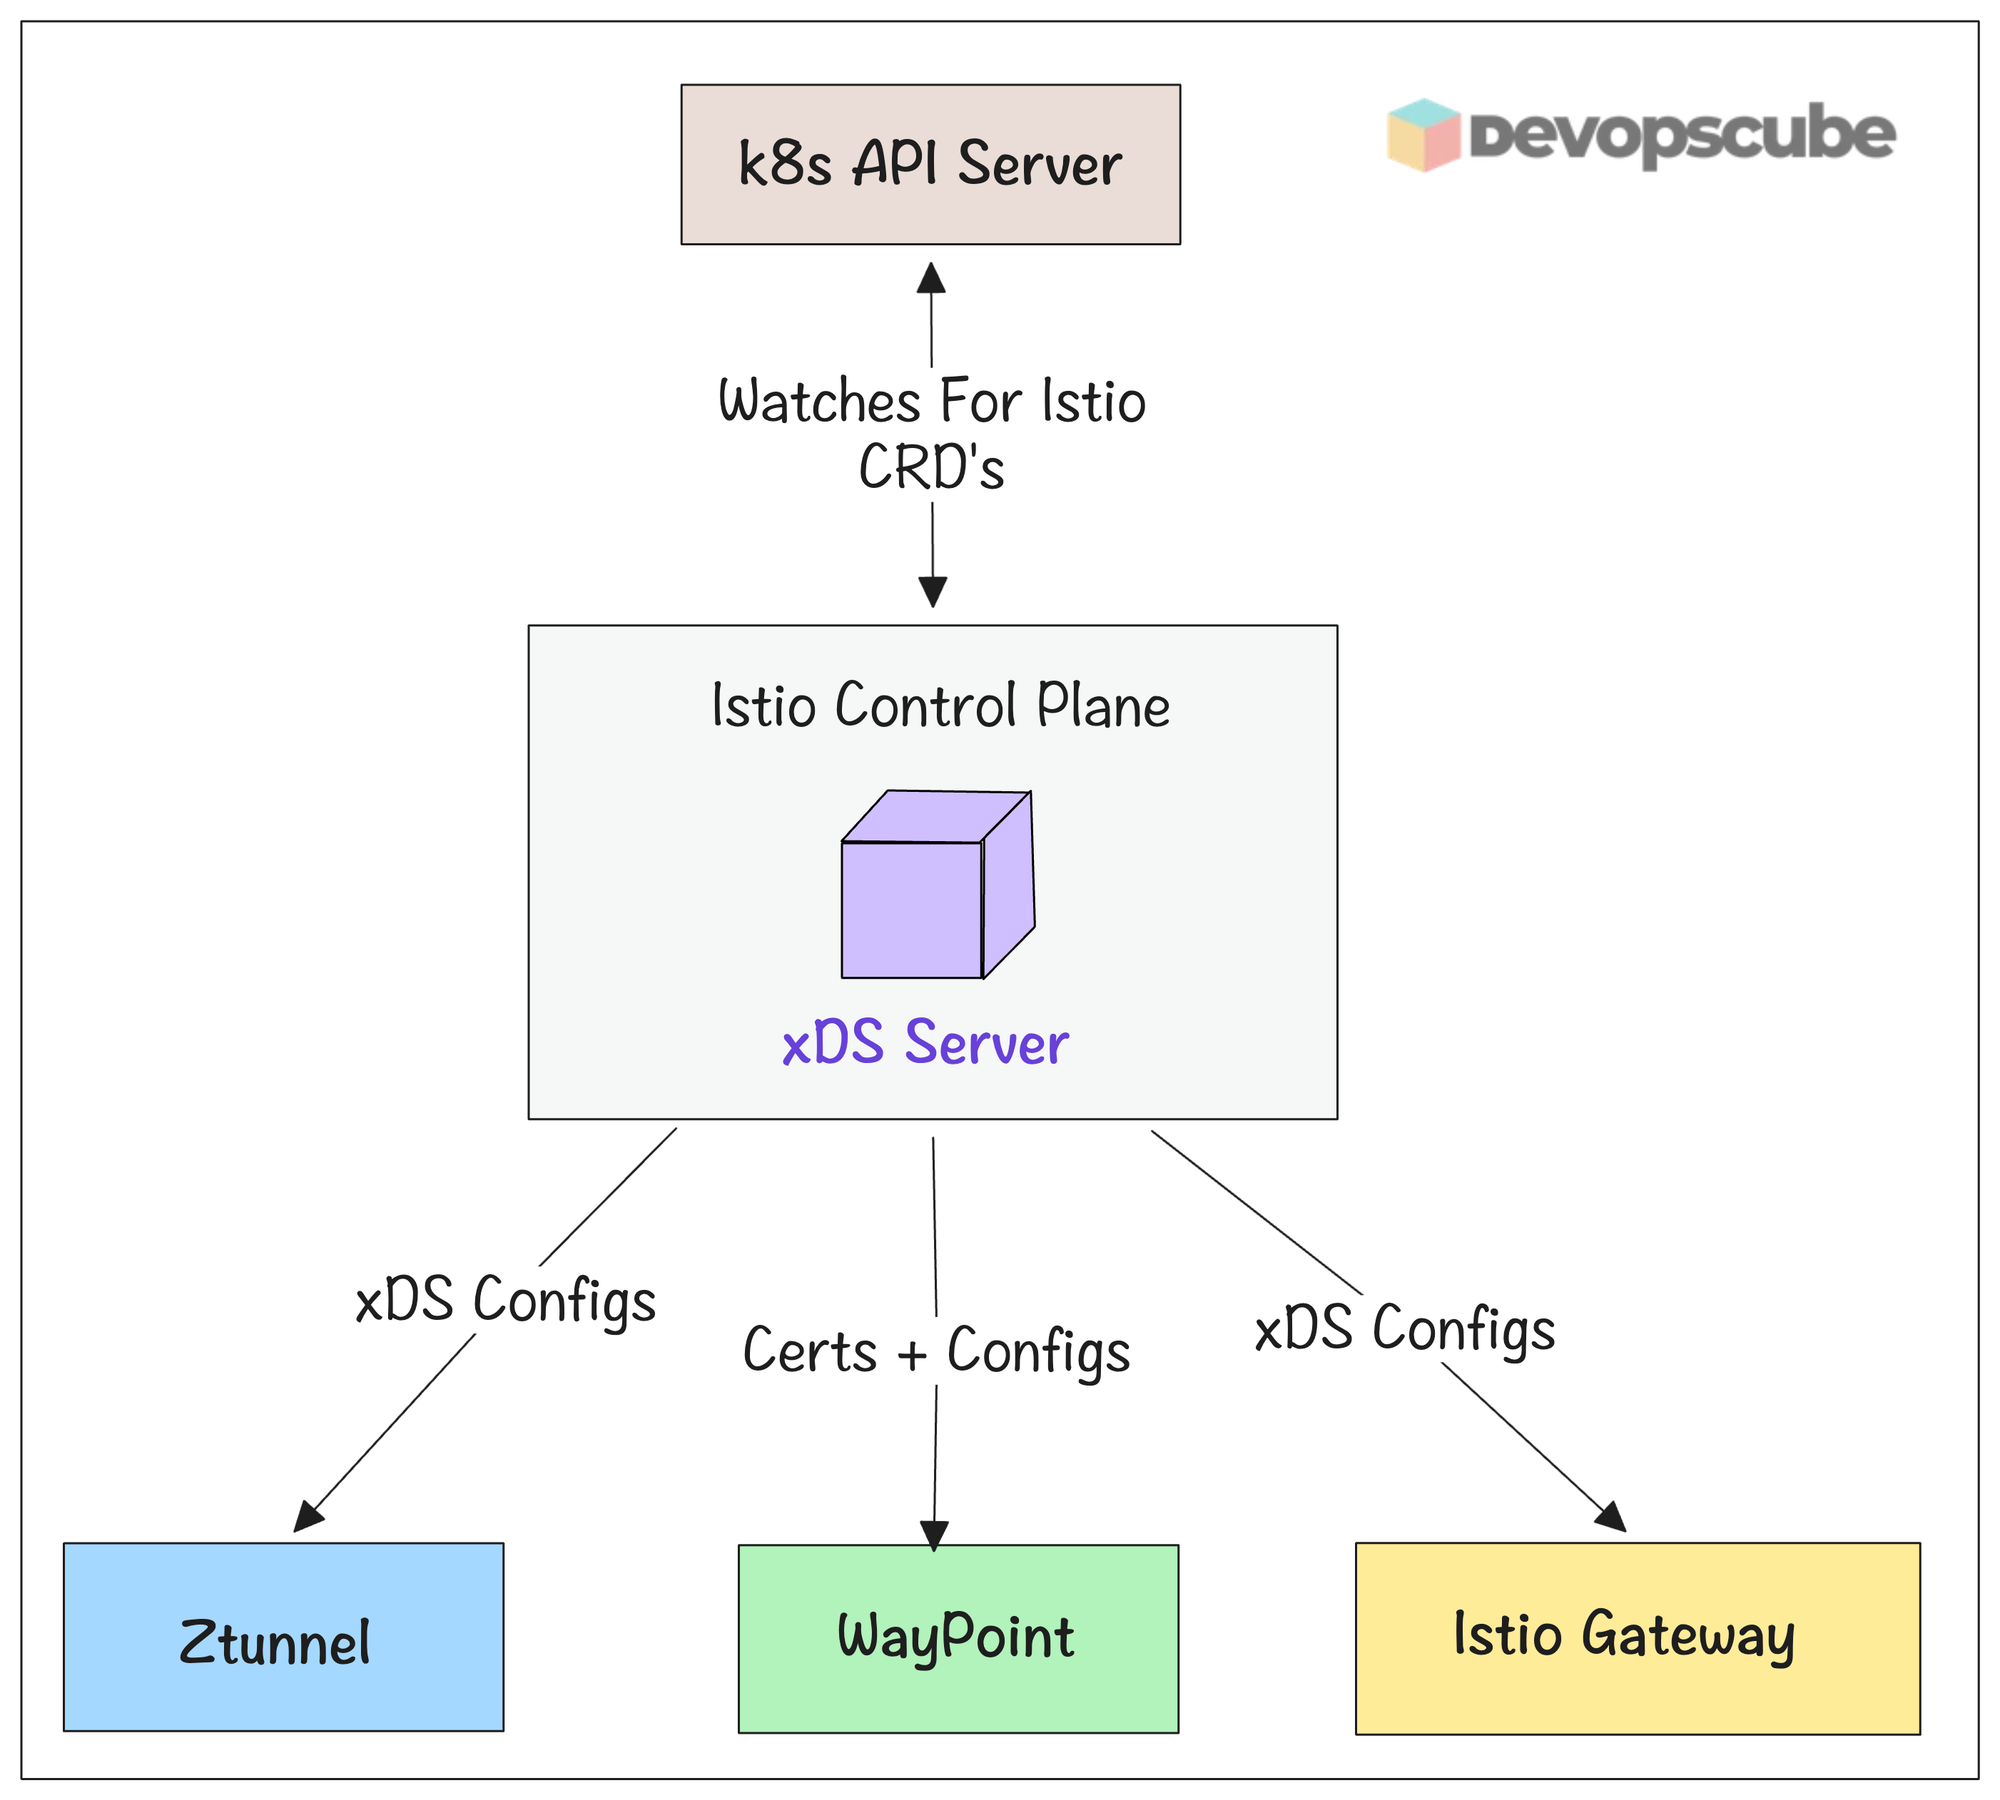
Here is what Istiod does.
- Istiod watches Kubernetes for Istio custom resources (like
VirtualService,DestinationRule, etc.) that are created, updated, or deleted. - It then validates the CRD configs.
- It then converts the routing and policy rules from CRDs into detailed configuration, and pushes them to all proxy components (sidecars, gateways, ztunnel, waypoint) using the xDS protocol.
- Istiod also does the certificate management for for mutual TLS (mTLS) inside the mesh so services can authenticate and communicate securely
- If something changes in Kubernetes that affects the mesh (for example a pod stops), Istiod detects the Endpoint change and immediately pushes updated routing info to all proxies so they stop sending traffic to the dead pod.
Istio Data Plane
The data plane does the actual work. Every request between services passes through it.
Data plane consists of lightweight proxies. All the incoming and outgoing traffic inside the cluster flows through these proxies. The control plane pushes routing rules and configurations to these proxies.
Here is what the data plane handles.
- Load balancing and service discovery.
- Traffic management (routing, retries, timeouts, canary releases, and traffic splitting)
- It enforces mutual TLS (mTLS) between services, along with authentication and authorization. Your app does not need to manage certificates.
- It collects telemetry data, such as metrics, logs, and distributed traces.
- It applies resiliency features like circuit breakers, fault injection etc..
In Ambient mode, the data plane has two components.
- Ztunnel (L4 proxy)
- Waypoint ((L7 proxy)
Lets look at each data plane component in detail.
Ztunnel - Layer 4 Proxy
Ztunnel stands for Zero Trust Tunnel. It is a rust based proxy and the core building block of Ambient Mesh.
Instead of running a proxy inside every pod, Ztunnel runs as a DaemonSet (one pod per node). All traffic from pods on that node flows through the Ztunnel on the same node first.
Ztunnel handles all Layer 3 and Layer 4 features like encryption, identity, and basic access control. It uses the HBONE protocol (HTTP-Based Overlay Network Environment) to create encrypted tunnels between services.
The following diagram illustrates the traffic flow via Ztunnel in the mesh.
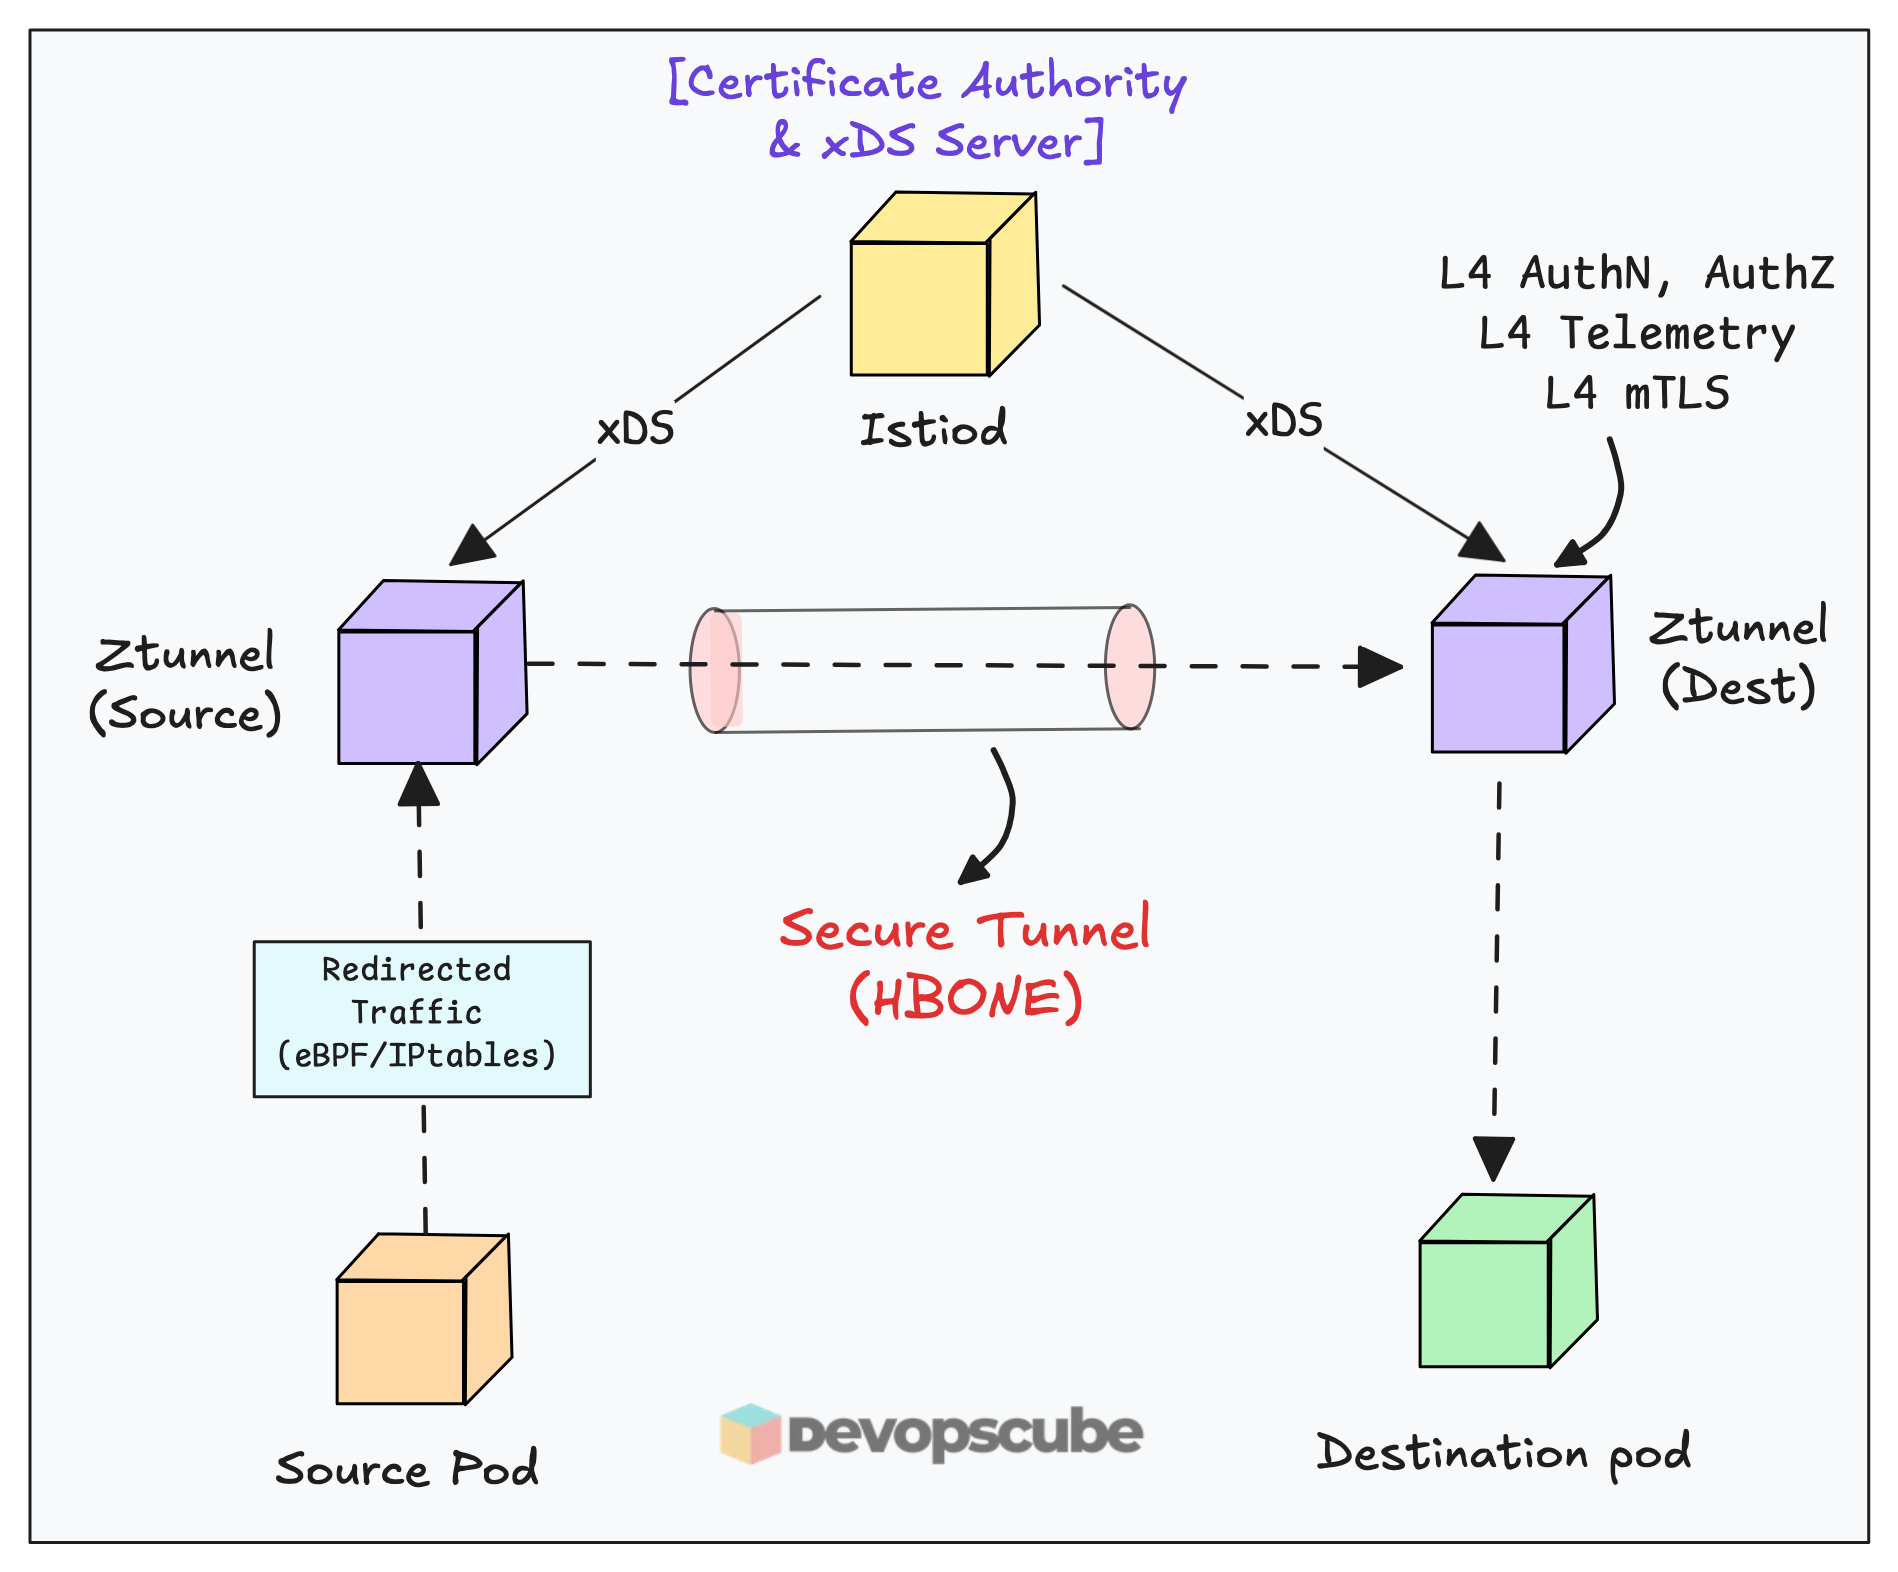
Here is how it works.
- When traffic enters a node, ztunnel intercepts it using iptables by default ( You can also enable eBPF-based redirection)
- Once intercepted it handles Layer 3 and 4 traffic
- It then uses the HBONE protocol to create secure tunnels between services, ensuring zero trust communication.
- It also enforces Layer 3 and 4 mTLS encryption, authentication, authorization policies covering identity, IP addresses, and ports.
- Throughout this process, it collects Layer 4 telemetry including TCP metrics and connection logs.
- Behind the scenes, ztunnel communicates with the Istio daemon using xDS APIs to receive configuration updates dynamically.
From Istio's 1.24 official benchmark data: a single ztunnel at 1,000 req/sec consumes approximately 0.06 vCPU and 12 MB of memory. That is a 3x reduction per-proxy compared to sidecars
Next, lets look at Waypoint proxy.
Waypoint Proxy - Layer 7 Proxy
Ztunnel only understands TCP. Meaning, it has no idea about HTTP headers, request paths, or retry logic.
When you need Layer 7 features like HTTP routing, canary deployments, circuit breaking, rate limiting, or fault injection you need to implement an optional Waypoint Proxy (envoy).
Now, you may ask, why Waypoint is an optional component?
Well, not every service needs L7 features. So use it only when you actually need HTTP routing, circuit breaking, rate limiting etc. (Its a design choice).
Now, a key things to understand is, Waypoint proxy works on top of Ztunnel. It cannot function without Ztunnel being present. Ztunnel handles the L4 secure tunnel, Waypoint sits inside that tunnel and handles L7 logic.
The following image illustrates the Waypoint proxy traffic flow.
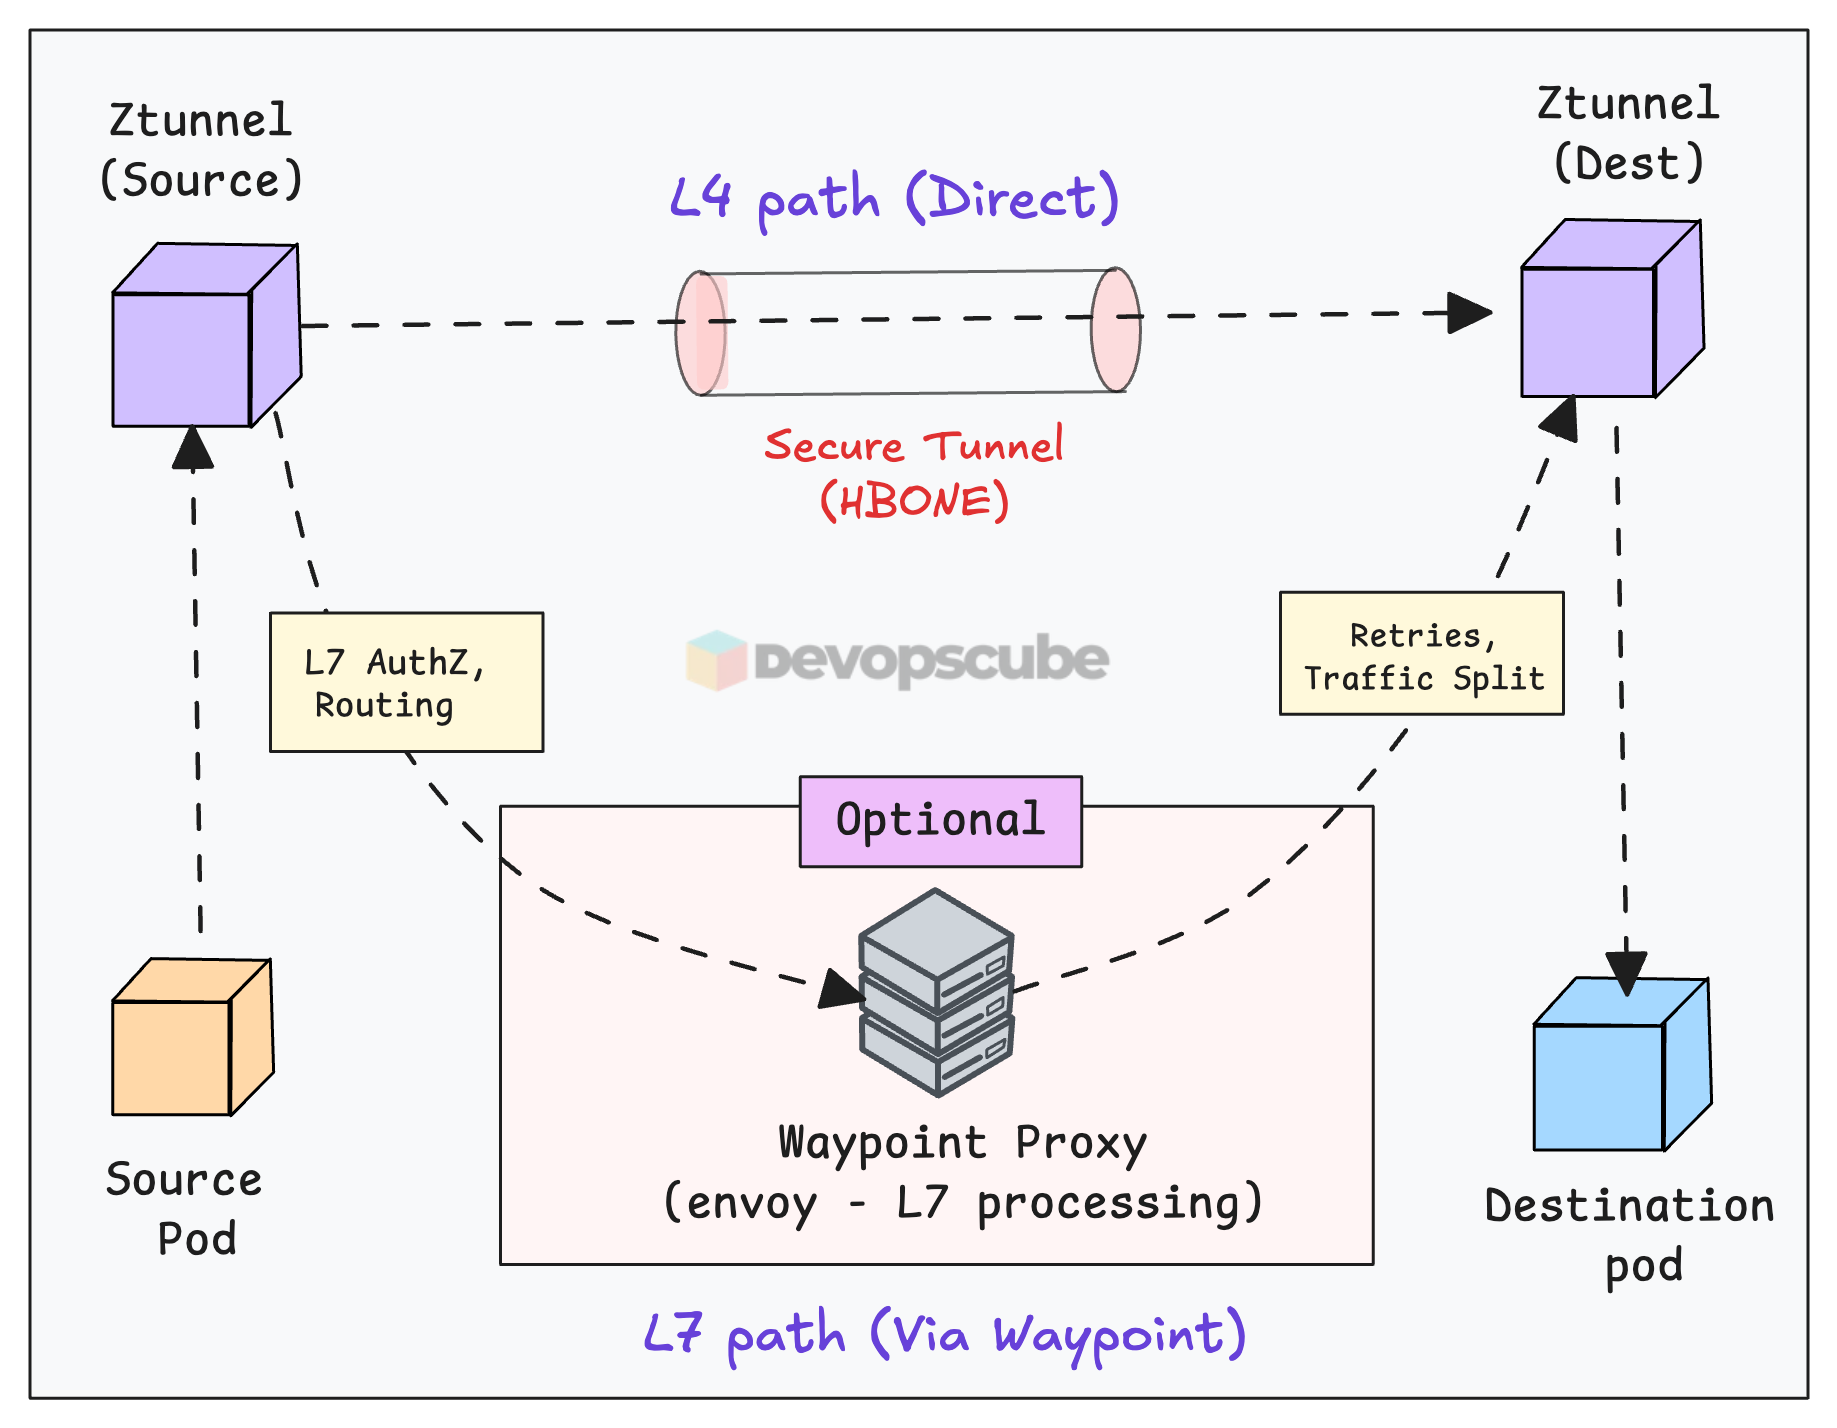
Here is how it works.
- First, you need to enable L7 policies by adding a label to your Service or Namespace.
- When any source ztunnel gets traffic from the labelled services, it knows from its xDS config to route to the waypoint address instead of directly to the destination ztunnel.
- The ztunnel then builds an HBONE tunnel to the waypoint proxy.
- The waypoint proxy (Envoy) performs L7 processing ( retries, traffic splitting etc)
- After processing, the waypoint forwards traffic via another HBONE tunnel to the destination ztunnel, which delivers to the pod.
Istio Gateway
Ztunnel and Waypoint handle east-west traffic. It means internal service-to-service communication inside your cluster.
But what about traffic coming in from outside? That's what Istio Gateway handles.
It works similarly to a Kubernetes Ingress controller. When you create an Istio Gateway object, it spins up an external Load Balancer. All traffic entering the cluster goes through this gateway first.
The following image illustrates the high level Istio Gateway architecture.
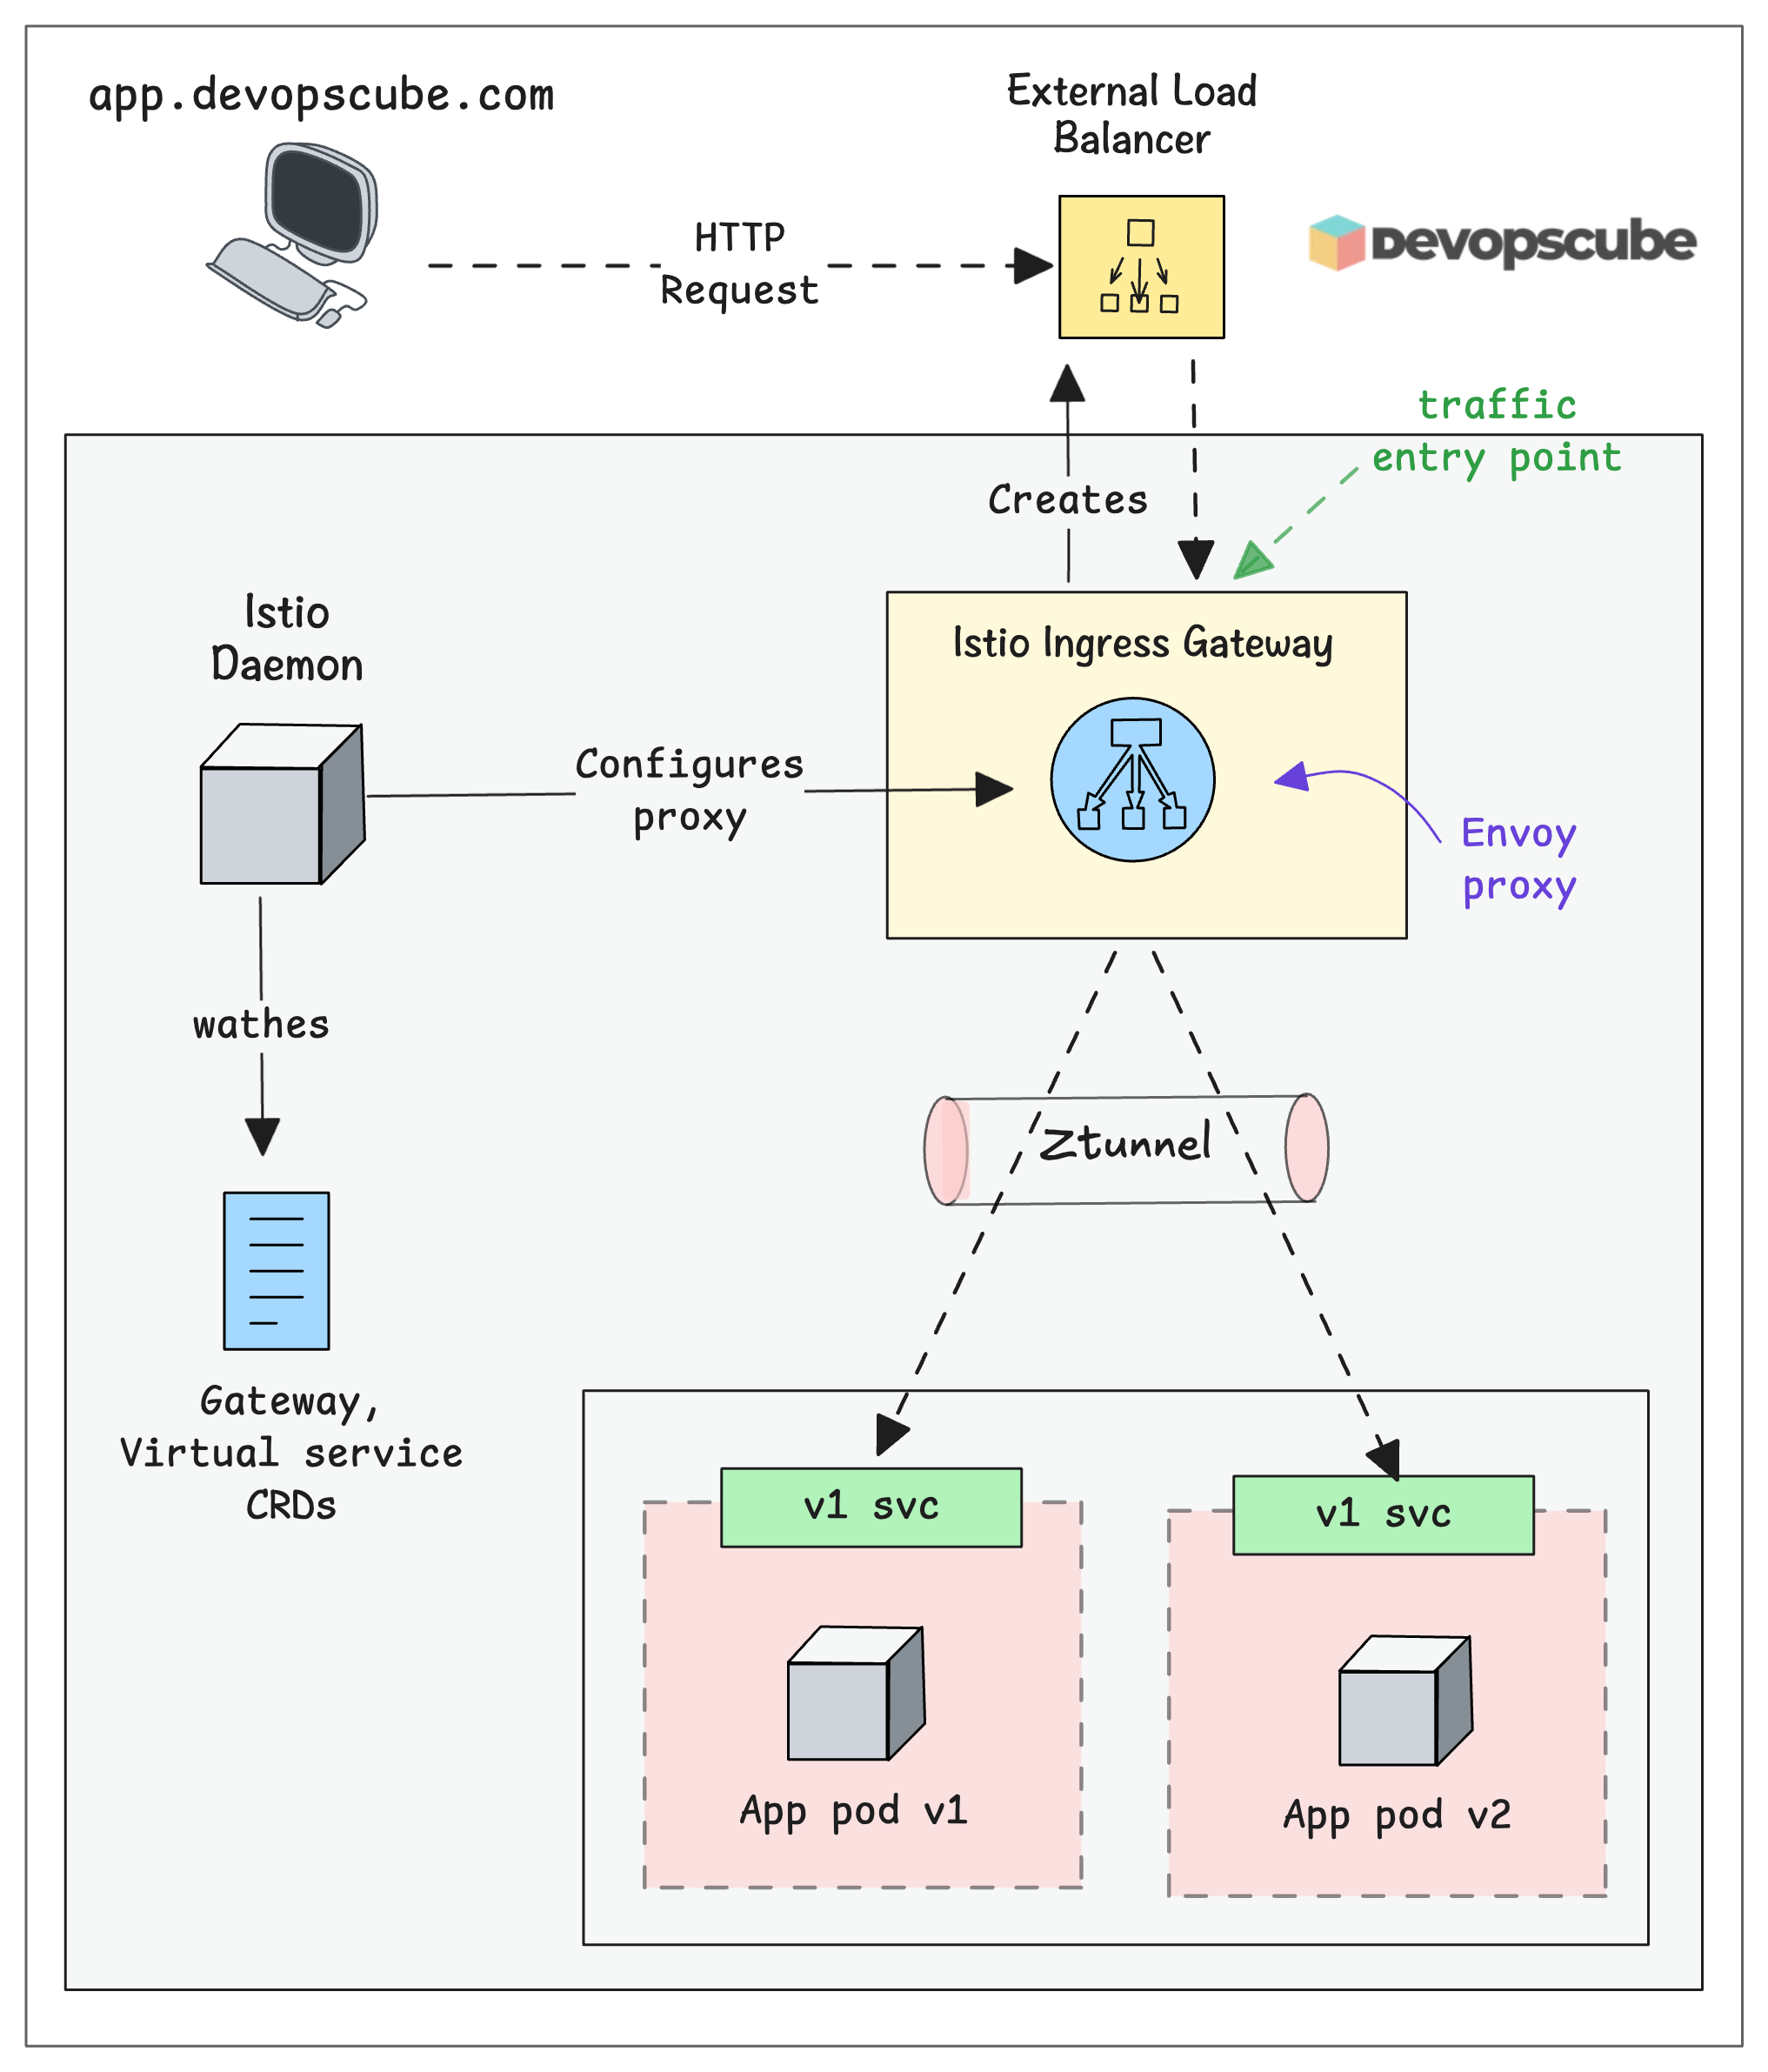
Here is how it works.
- External request hits the cloud Load Balancer
- Load Balancer forwards traffic to the Istio Gateway pod
- Istio Gateway applies ingress/egress rules (TLS termination, routing, etc.)
- Traffic is forwarded to the correct internal service via Ztunnel
Istio CNI
Your app doesn't know Istio exists. There is no proxy injected into the pod.
So how does traffic from your pods actually end up at Ztunnel?
Well, that is the job of Istio CNI. It is a DaemonSet that runs on every node and creates iptables rules inside your pod's network namespace to redirect traffic to the local Ztunnel.
The following image illustrated how Istio CNI works.
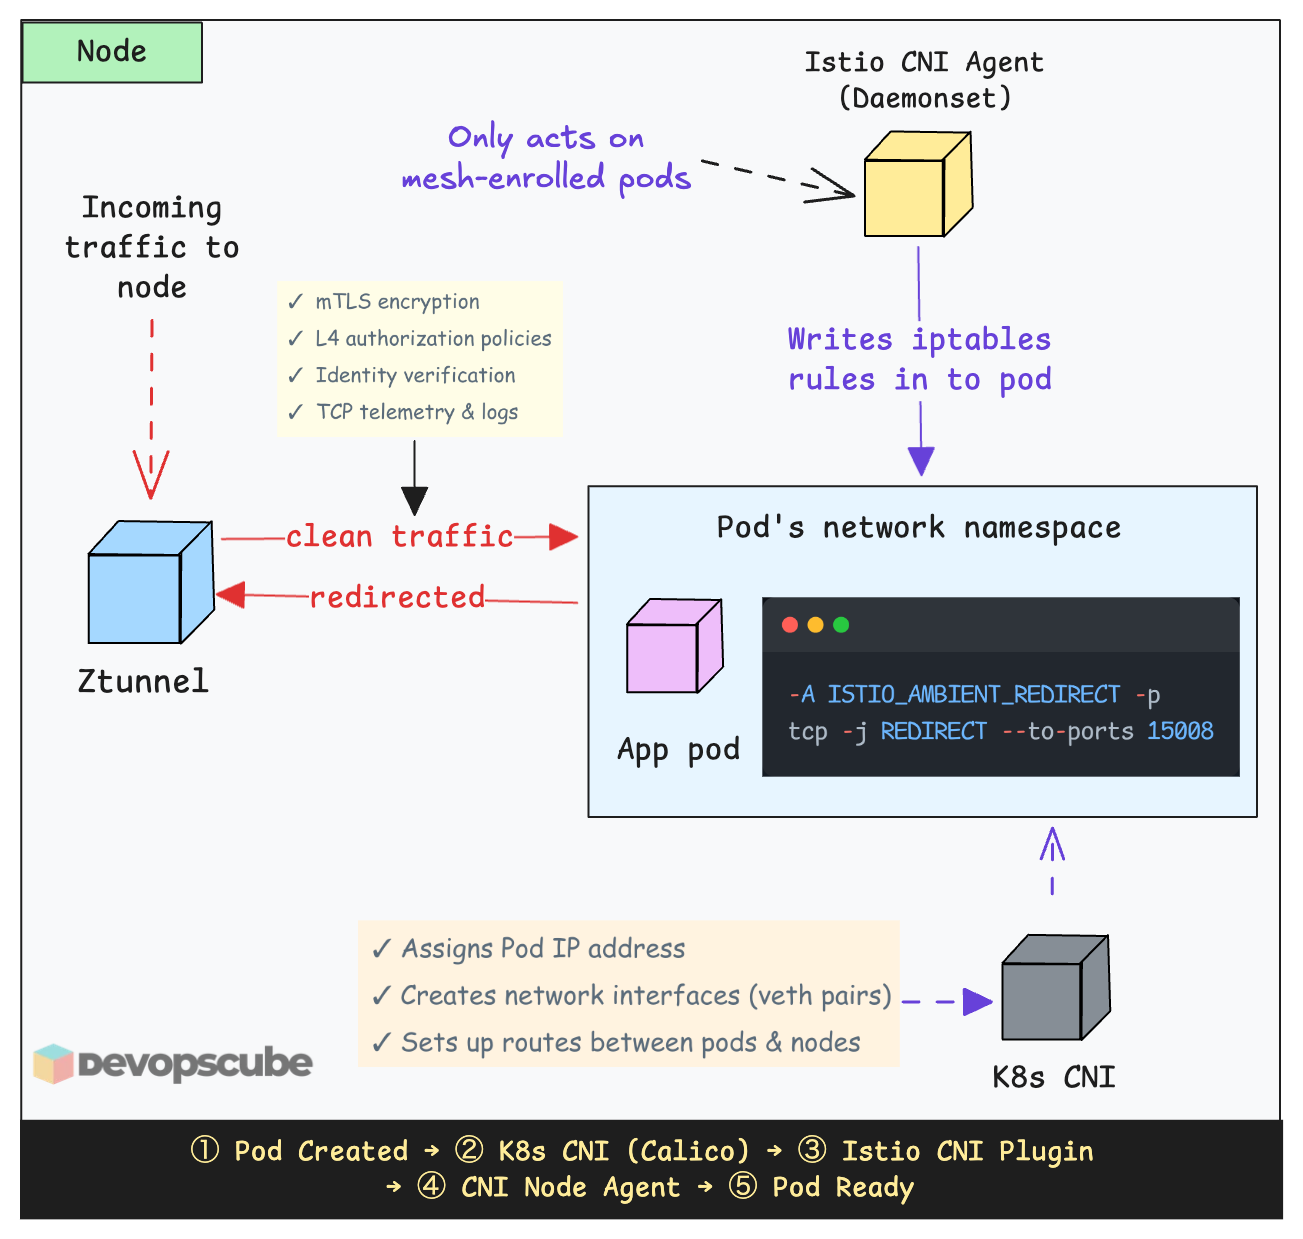
Here is how it works.
- You label a namespace with
istio.io/dataplane-mode=ambientto make it part of the mesh. - The Istio CNI node agent detects the label change
- For every pod in that namespace on its node, the CNI agent configures iptables rules inside that pod's network namespace to redirect traffic to the local ztunnel.
- Pods in unlabeled namespaces get no iptables rules and their traffic flows normally, outside the mesh.
Does Istio CNI replace your Kubernetes cluster CNI?
No. It works together with your existing CNI like Calico or Cilium as a chaining plugin. Here is the key difference.
When a pod starts, Kubernetes calls a CNI plugin to set up networking, assign an IP, create network interfaces, set up routes, etc. So it does the real networking work. Istio CNI then sets up iptables redirect rules.
Instead of iptables, you can configure Istio CNI to use eBPF mode for lower latency and less CPU overhead.
Is Ztunnel a single point of failure (SPOF)?
If you compare this with the Istio architecture with sidecar more, one common question people ask is,
Is ztunnel a single point of failure? What happens if ztunnel goes down on a node?
Since ztunnel runs as one pod per node, it may sound like a single point of failure. If ztunnel goes down, traffic to the pods on that specific node will be affected.
However, pods on other nodes are not impacted. Each node has its own healthy ztunnel instance. Because ztunnel runs as a DaemonSet, Kubernetes will automatically restart it, just like it does for any other daemonset pod.
So, is ztunnel a SPOF? Absolutely not.
The design assumes that nodes can fail, which is normal in distributed systems. Recovery is handled automatically by Kubernetes.
The Business Case for Ambient Mesh
I used the Ambient mesh cost calculator for resource comparison between the traditional Istio Sidecar architecture and the Ambient Mesh architecture.
The comparison is based on a large-scale cluster with 10,000 pods, 50 namespaces, and 100 nodes.
The following image illustrates the significant infrastructure savings both in terms of compute resources and monetary cost (up to $432,674) that organizations can achieve by switching to Ambient mode.
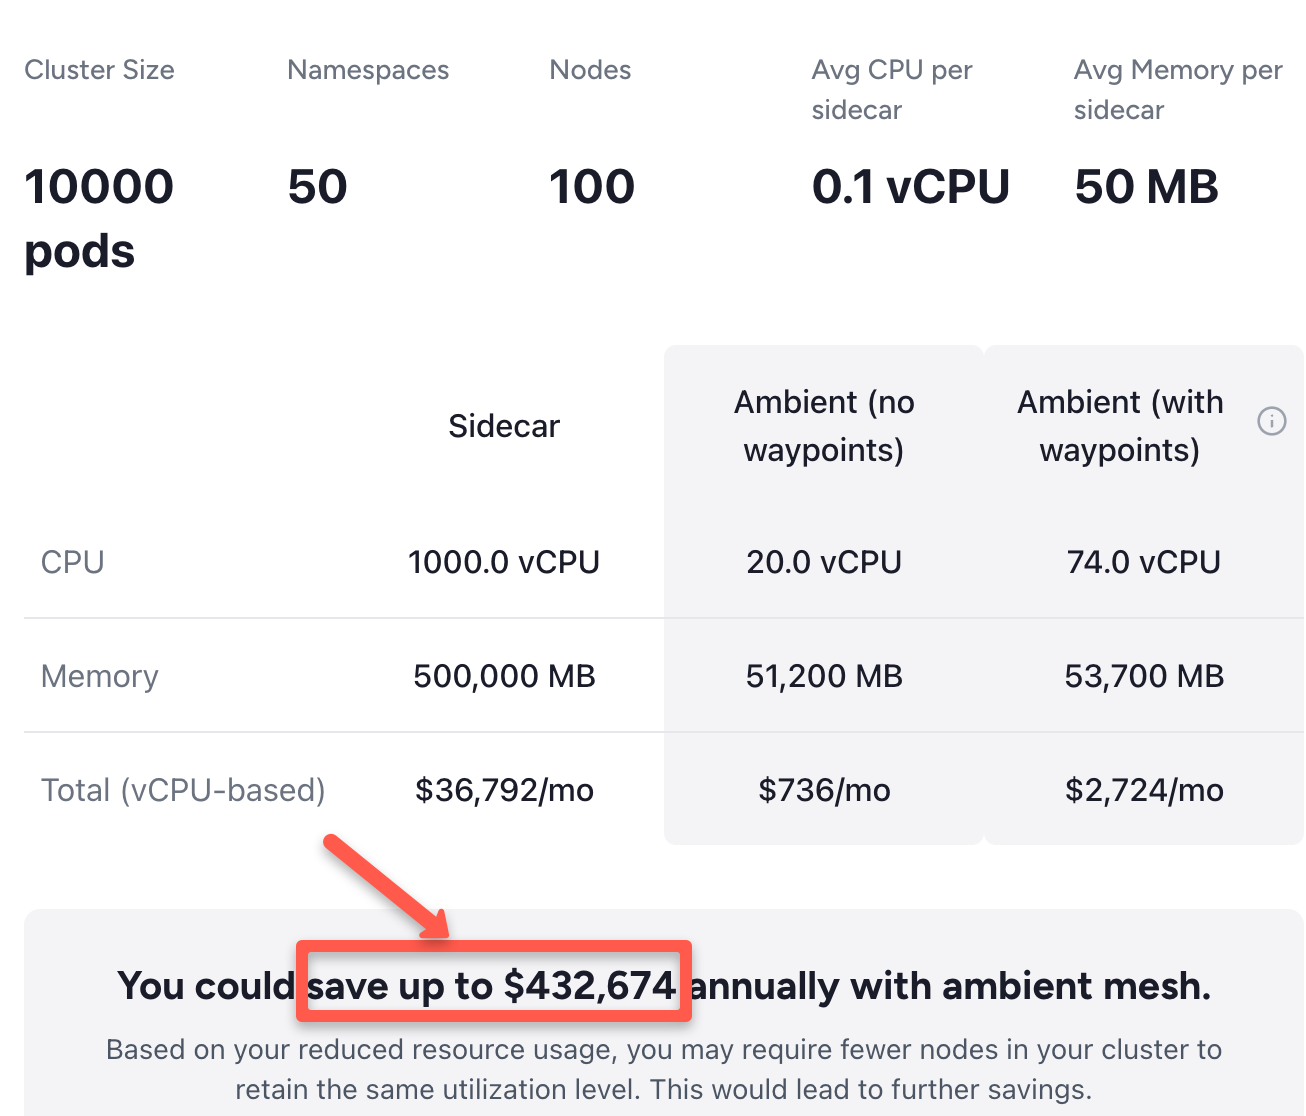
In a sidecar model, every pod runs its own Envoy proxy. In this example, those 10,000 proxies consume a massive amount of CPU and RAM.
Because Ambient Mesh uses a shared Ztunnel per node (only 100 proxies total in this scenario) instead of one per pod, the CPU requirements drop from 1,000 vCPUs to just 20–74 vCPUs.
Conclusion
When it comes to service mesh for microservices architectures, Istio is the defacto standard.
As a DevOps engineer, it is very important to understand the key components and how the mesh works under the hood.
This blog covered the key topics to understand the Istio Architecture (Ambient Mesh)
Traditional service meshes required a sidecar proxy in every pod. Istio Ambient Mesh changes it by decoupling the data plane, reducing memory overhead by up to 90% and eliminating the need for pod restarts during upgrades.
Essentially, it ends the proxy bloat.
Now, the "million-dollar question". Do we still need the Sidecar in 2026?
Well, before 2025, sidecars were the only way to get Istio features. However in 2026 and Beyond, Ambient is the default. You only move to sidecars if you have a specific technical requirement that Ambient cannot yet meet.
If you want to get started with Ambient mesh, refer our Istio Ambient mesh setup guide.
Over to you!
Have you tried Ambient Mode in a real cluster yet? Or are you still running sidecars in production.
Let me know your experience in the comments. I would like to know what worked, what broke, and what is holding you back.