

If you are working with Helm charts, you might have seen a _helpers.tpl file inside the /templates folder. Most people ignore it without understanding what it is used for while deploying a chart.
It is key feature to create reusable helm templates.
In this guide, we will look at.
- What
_helpers.tplis and how it works. - Hands-on example demonstrating its usage.
Lets get started.
What is _helpers.tpl?
_helpers.tpl is a reusable block that can be used in the Helm template files inside the /templates folder.
For example, Kubernetes resources such as Deployments, Services, and other objects often use the same labels.
For example,
app.kubernetes.io/name: web-app
app.kubernetes.io/managed-by: Helm
app.kubernetes.io/instance: web-app-{release}
app.kubernetes.io/component: frontend
app.kubernetes.io/version: 1.0.0
Usually we add the same labels in every resource template file.
Now, lets say you want to add or remove a label. For this you have to update the it in every template file.
What if you define the label in one place and it gets updated in all the templates?
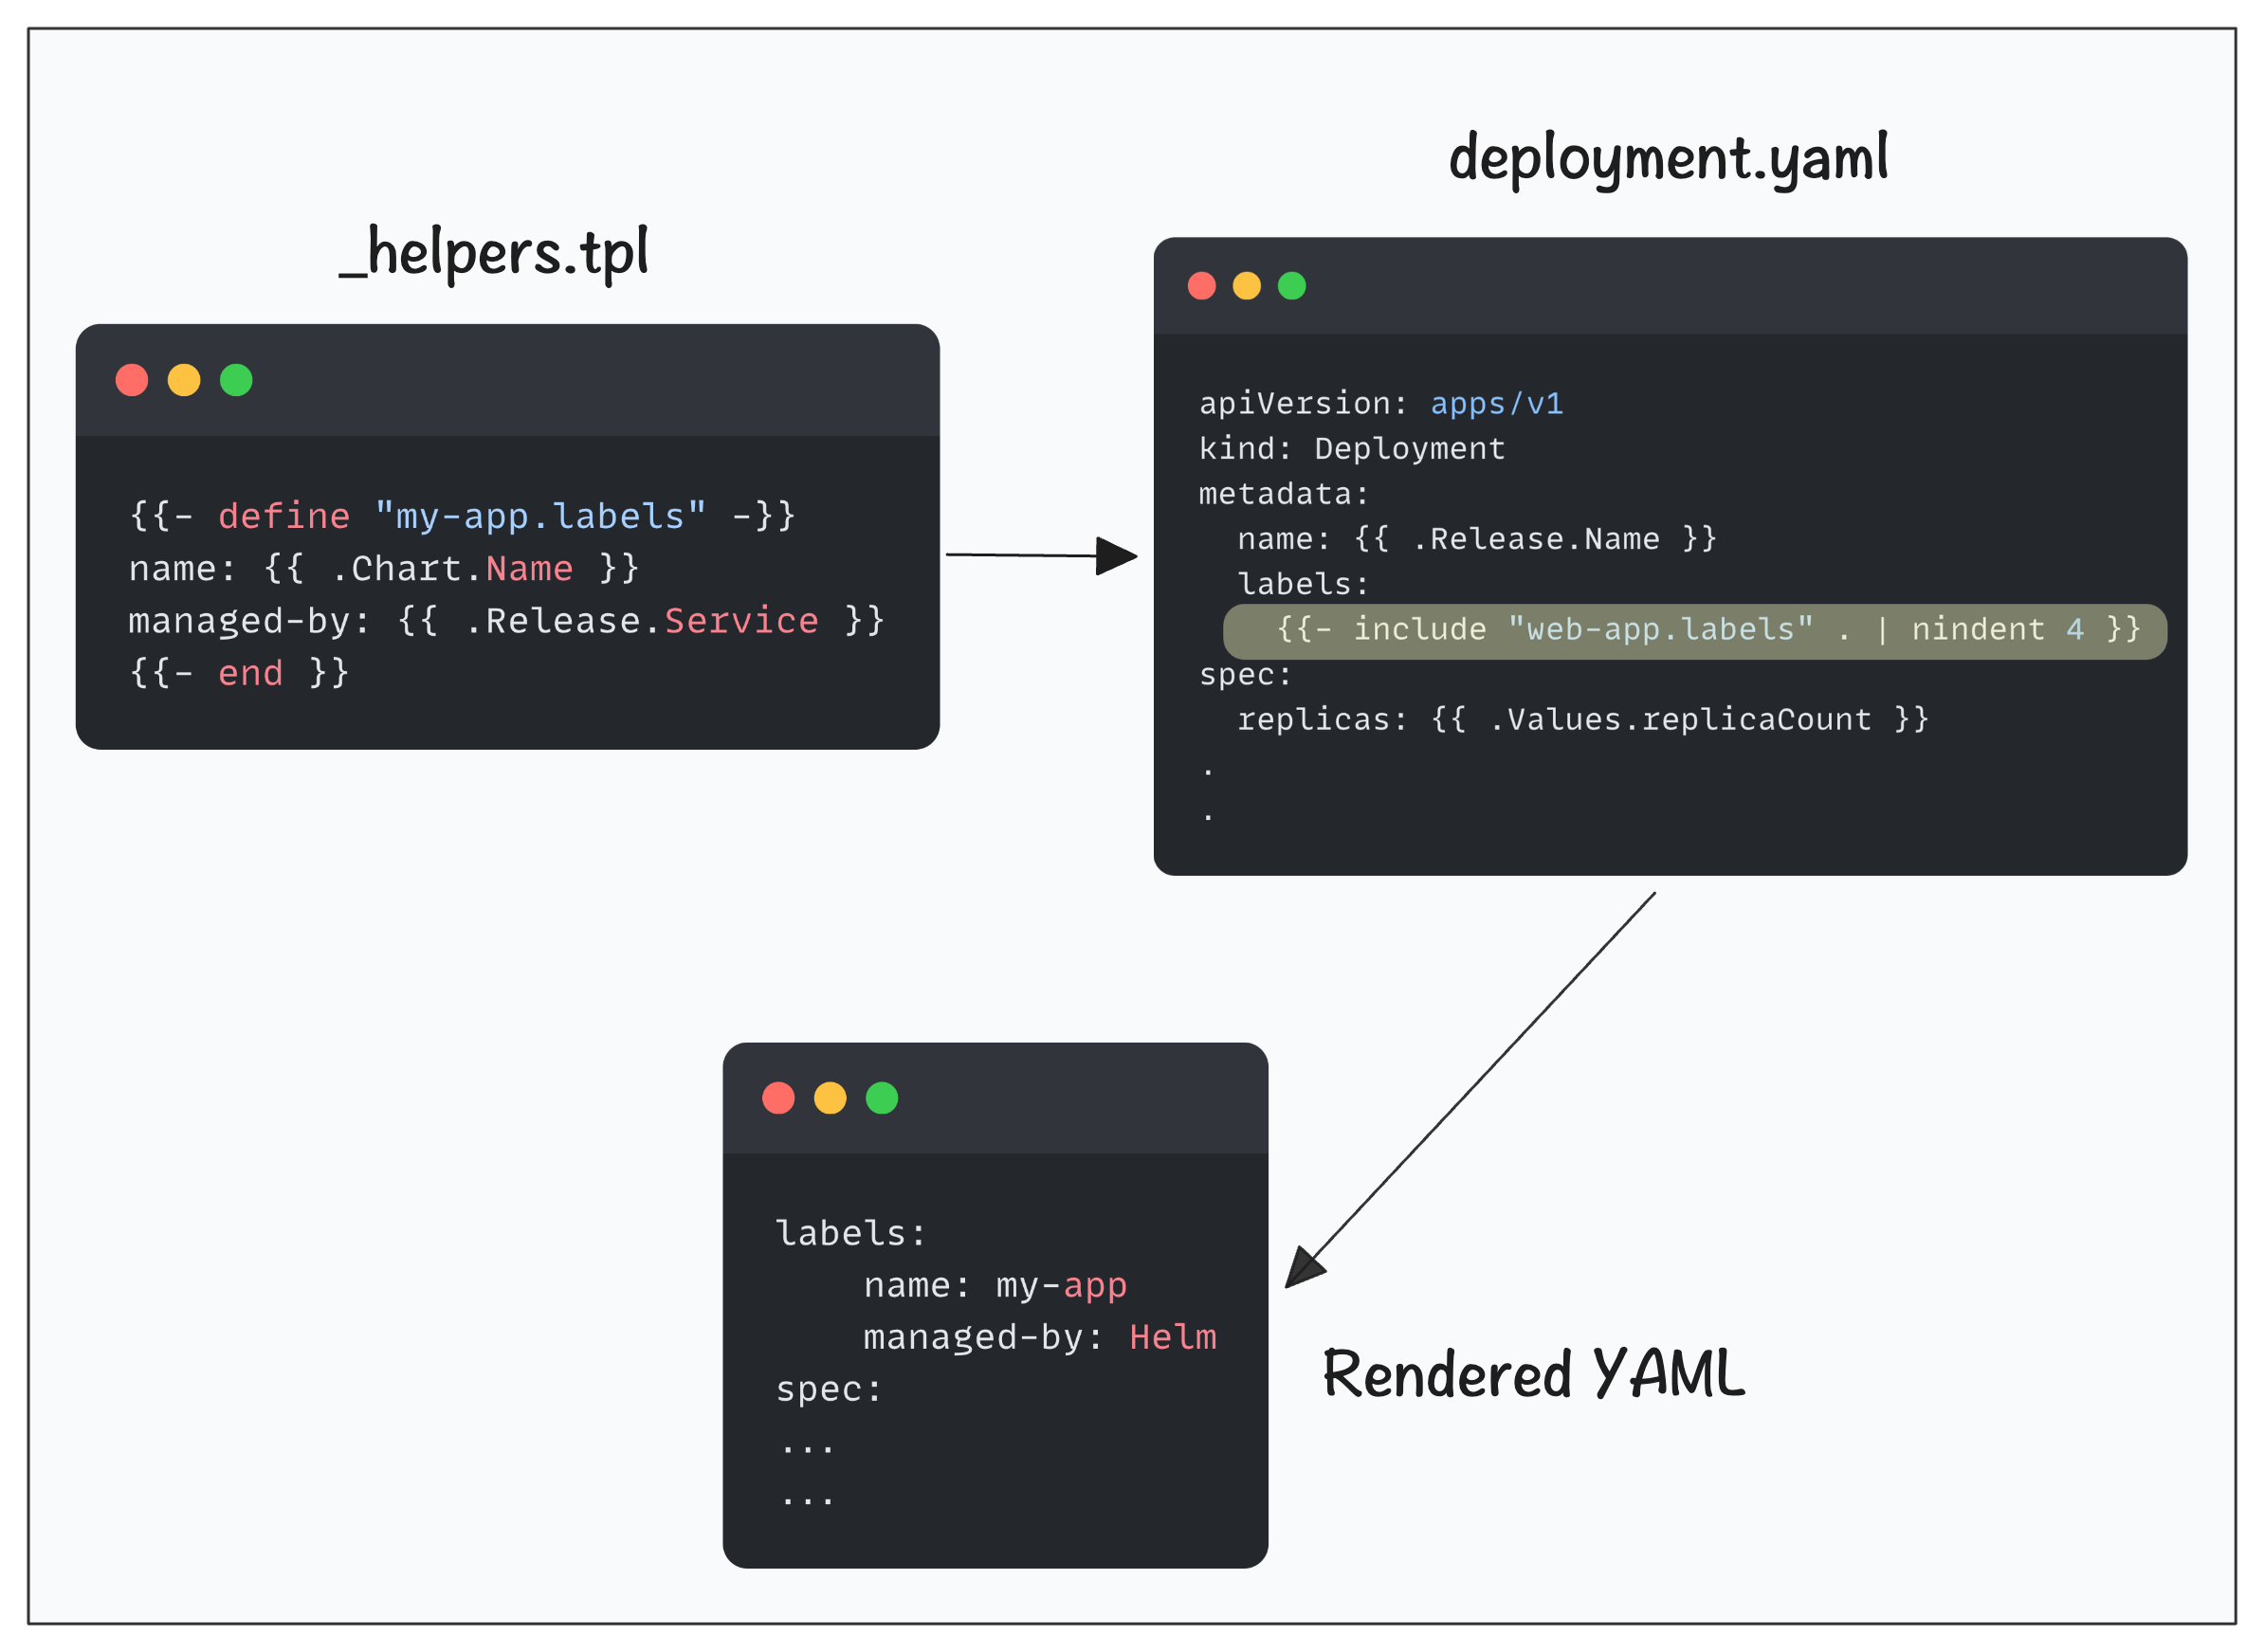
It is what _helpers.tpl solves. You just need to declare the block in _helpers.tpl file using the define field as shown below.
{{- define "web-app.labels" -}}
app.kubernetes.io/name: {{ .Chart.Name }}
app.kubernetes.io/managed-by: {{ .Release.Service }}
{{- end }}
In Helm terms, you call that block as a named template or a partial. It simply means reusable template snippets.
Next, the reusable block can be called by other resource templates like deployment.yaml, service.yaml etc using the include field as shown below.
metadata:
  labels:
{{- include "web-app.labels" . | nindent 4 }}This way, even if you need to change something, just update it in the _helpers.tpl file and it gets applied to all the templates that references it.
Another interesting features is you can substitute values from chart.yaml and values.yaml files in the _helpers.tpl. For example, you might want to add the image name, version and app details dynamically to the object metadata.
Here is an example.
{{- define "web-app.labels" }}
app.kubernetes.io/name: {{ .Chart.Name }}
app.kubernetes.io/version: {{ .Chart.Version }}
app.kubernetes.io/managed-by: {{ .Release.Service }}
environment: {{ .Values.env }}
image: "{{ .Values.image.repository }}:{{ .Values.image.tag }}"
{{- end }}
The following image illustrates the high-level flow of how _helpers.tpl works in a Helm chart.
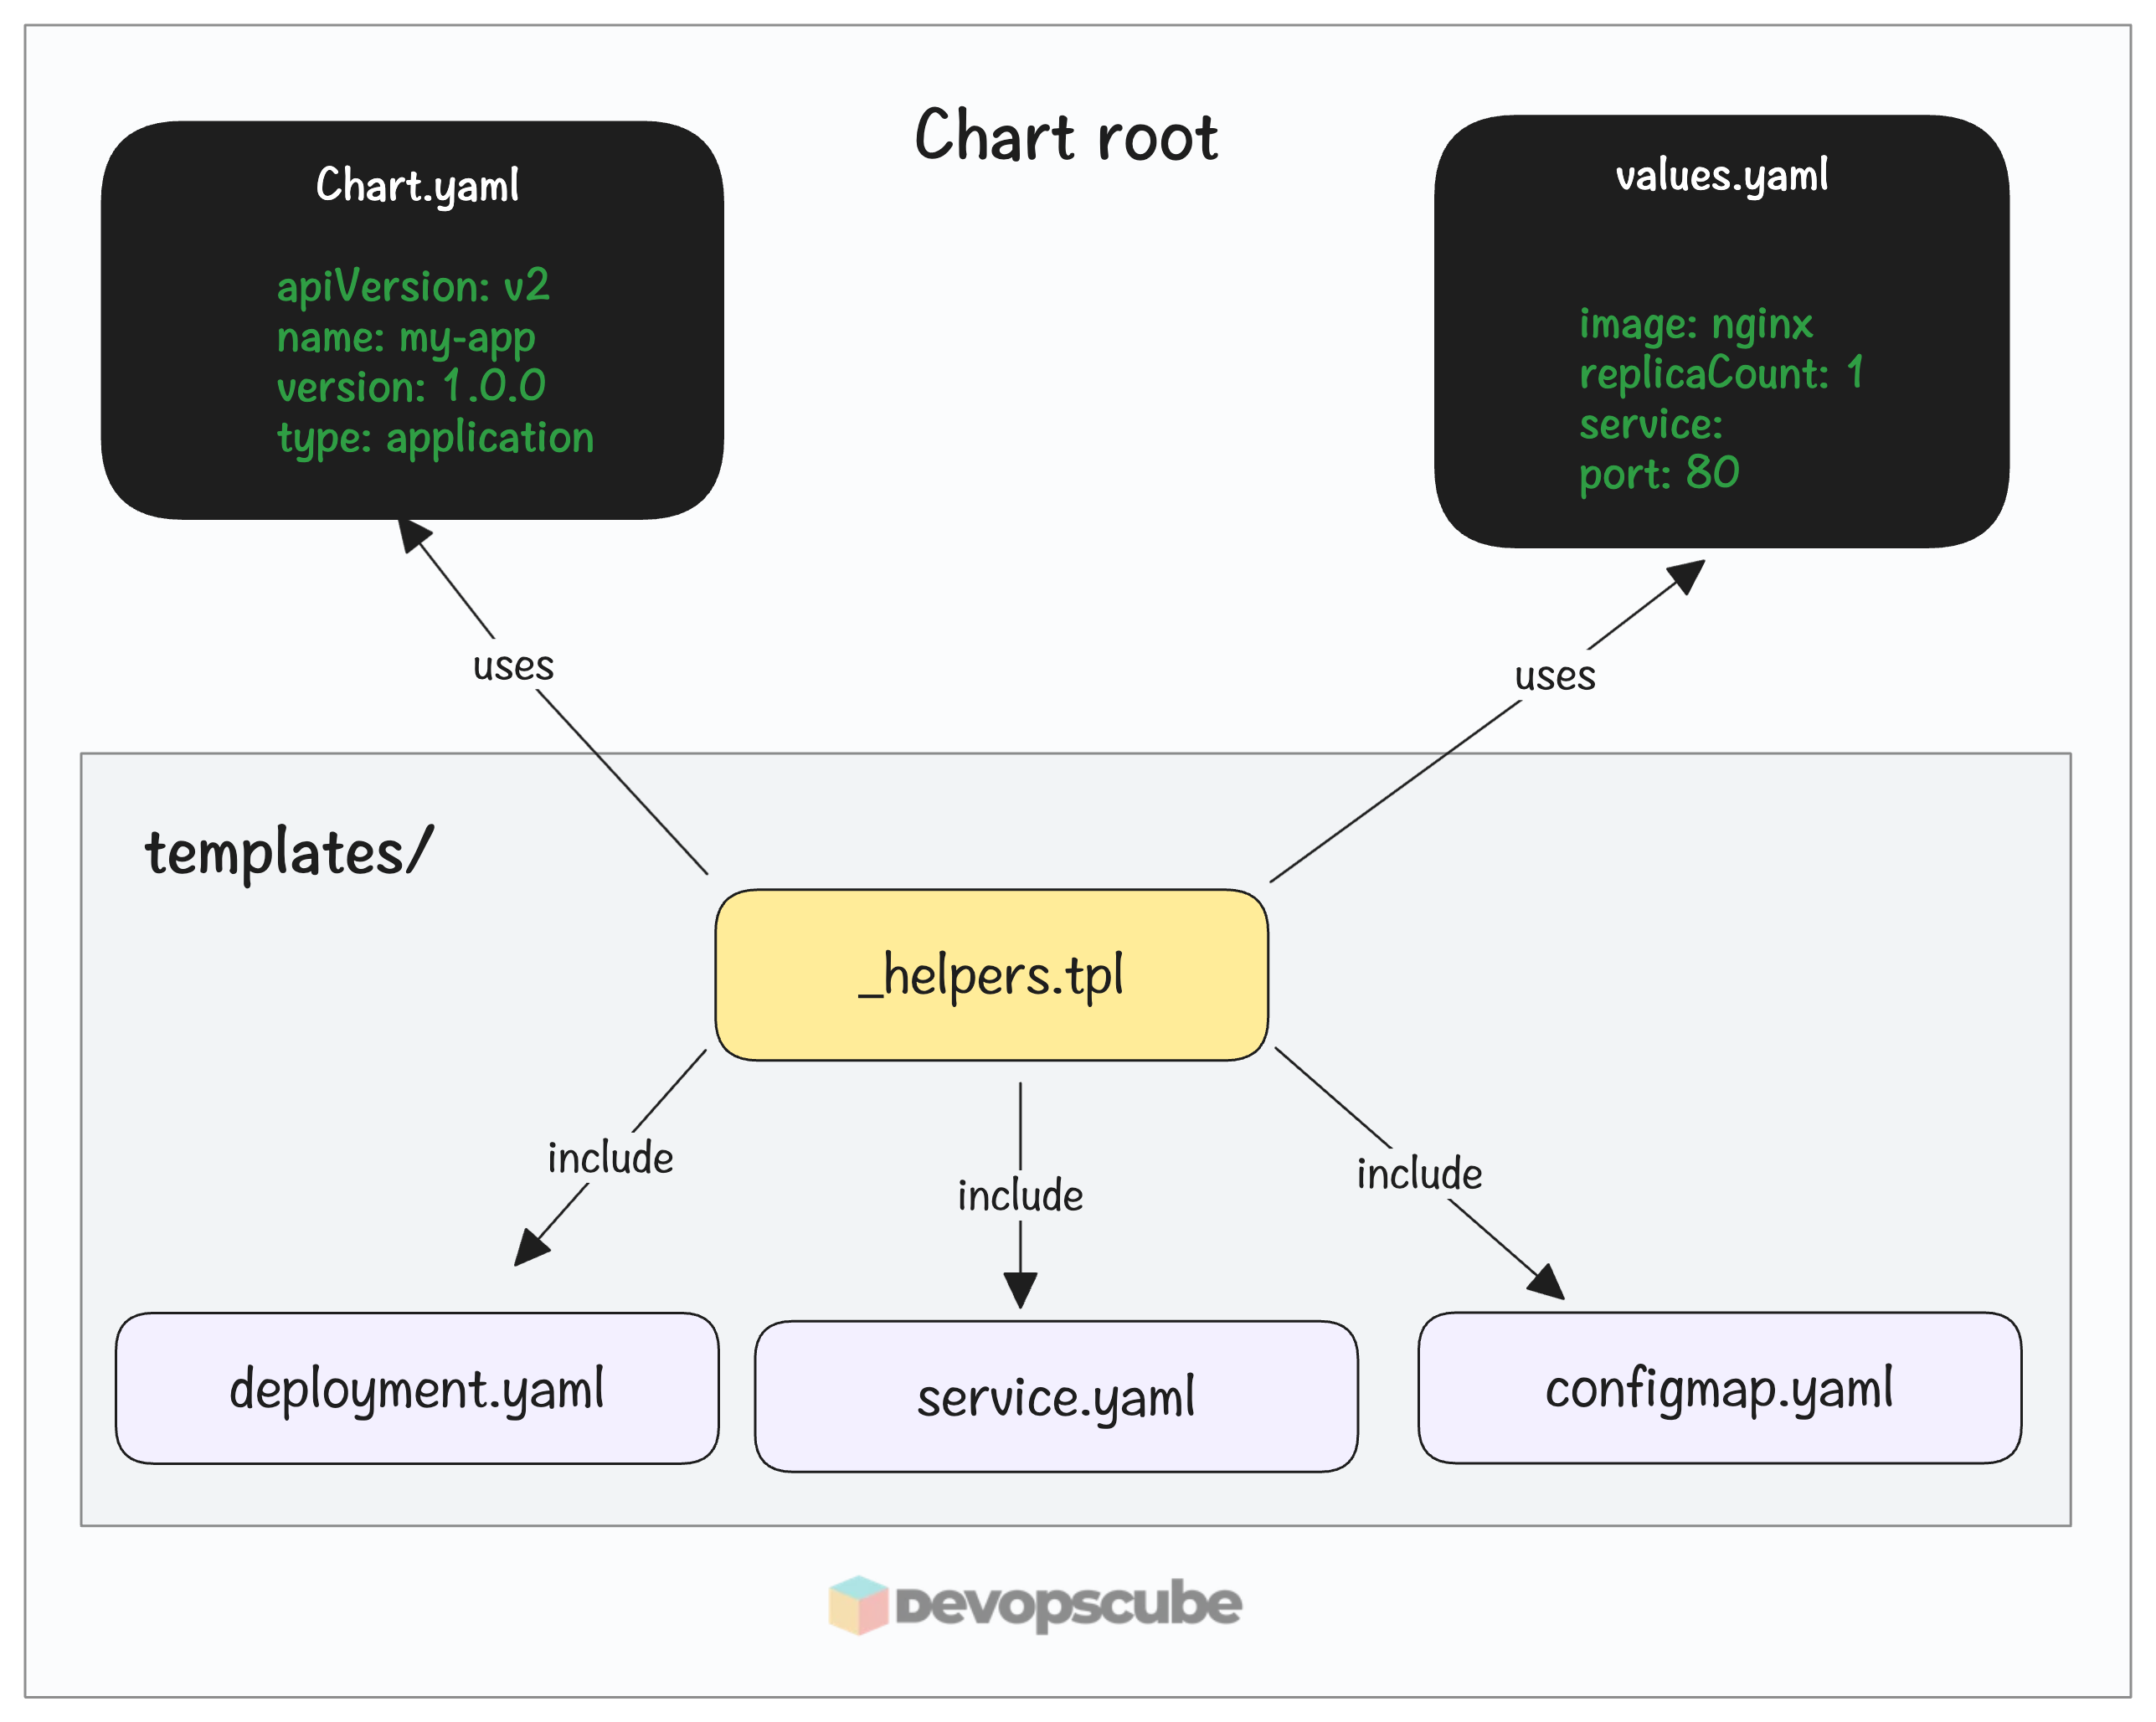
It is somewhat similar to Jenkins shared library or GitHub Actions reusable workflows, but scoped to a helm chart.
In short, _helpers.tpl is a recommended file to store template partials.
_ as helper/partial files and does not render them as Kubernetes manifests. However, you can use the defined block in any chart template. Same logic applies to _helpers.tplhelpers.tpl Hands On Example
Now lets look at a hands on example on how we can use _helpers.tpl for partials in a Helm chart.
Here is what we are going to do.
- We will create a
_helpers.tplwhich defines the labels used in the deployment and services templates. - Also, it gets label values from
chart.yamlandvalues.yamlfiles. - During installation, the label block will be included in both the deployment and services templates.
Lets get started.
Step 1: Create a Helm Boilerplate
To start, lets create a Helm boilerplate with the following command.
helm create web-appThis will create a Helm chart directory structure, from that remove the values file and files inside the /templates folder, which we will create with the TPL file.
rm -rf web-app/templates/*
rm web-app/values.yaml
Step 2: Create a values.yaml file
Run the following command to create the values file.
cat > web-app/values.yaml << 'EOF'
replicaCount: 1

image:
  repository: nginx
  tag: "1.25"

service:
  type: ClusterIP
  port: 80

env: stage
EOF
In here, we added an env field, which we will be using in a label block with the .tpl file.
Step 3: Write the _helpers.tpl File
Lets create a simple .tpl file using the following command.
cat > web-app/templates/_helpers.tpl << 'EOF'
{{- define "web-app.labels" -}}
app: {{ .Release.Name }}
version: {{ .Chart.AppVersion }}
managed-by: Helm
env: {{ .Values.env }}
{{- end }}
EOF
In this partial, we defined four labels.
- app name - This will be based on the Helm release name
- version - Uses the app version in the Charts.yaml file
- managed-by - This is static and specified as Helm
- env - This label will be used from the values file
Step 4: Create a Deployment and Service Template With Partials
In this step we will create a deployment and service template that includes the partial from the helper file.
Lets create a deployment Helm template with the label partial.
cat > web-app/templates/deployment.yaml << 'EOF'
apiVersion: apps/v1
kind: Deployment
metadata:
  name: {{ .Release.Name }}
  labels:
    {{- include "web-app.labels" . | nindent 4 }}
spec:
  replicas: {{ .Values.replicaCount }}
  selector:
    matchLabels:
      app: {{ .Release.Name }}
  template:
    metadata:
      labels:
        {{- include "web-app.labels" . | nindent 8 }}
    spec:
      containers:
        - name: nginx
          image: "{{ .Values.image.repository }}:{{ .Values.image.tag }}"
          ports:
            - containerPort: 80
EOF
Now run the following to create a service template file with the label partial.
cat > web-app/templates/service.yaml << 'EOF'
apiVersion: v1
kind: Service
metadata:
  name: {{ .Release.Name }}
  labels:
    {{- include "web-app.labels" . | nindent 4 }}
spec:
  type: {{ .Values.service.type }}
  selector:
    app: {{ .Release.Name }}
  ports:
    - protocol: TCP
      port: {{ .Values.service.port }}
      targetPort: 80
EOF
In both files we created, you can see that we called the .tpl file using include "web-app.labels". The partial we defined inside the .tpl file will be substituted here.
Step 5: Validate the Helm Chart
Before installing the chart, lets render it and see if all labels are adding correctly.
helm template web-app ./web-appYou will get an output of the YAML files with the labels rendered from the partial in _helper.tpl
For example, the label block will be like this.
  labels:
    app: web-app
    version: 1.16.0
    managed-by: Helm
    env: stage
Step 6: Install the Chart
Now that the rendering checks if it runs without any issue, let's install the chart.
helm install web-app ./web-appYou will get an output as follows.
NAME: web-app
LAST DEPLOYED: Tue Apr 28 14:41:52 2026
NAMESPACE: default
STATUS: deployed
REVISION: 1
DESCRIPTION: Install complete
And, check the labels of the deployment, you can see all the labels added to it that we defined in the partial.
$ kubectl get deploy web-app --show-labels

NAME      READY   UP-TO-DATE   AVAILABLE   AGE   LABELS

web-app   1/1     1            1           46s   app.kubernetes.io/managed-by=Helm,app=web-app,env=stage,managed-by=Helm,version=1.16.0
Step 7: Clean Up
To uninstall Helm use the following command.
helm uninstall web-appConclusion
In summary, _helpers.tpl is a simple file that helps you avoid duplicating blocks in Helm templates.
Instead of copying the same block in multiple files, just define the block in the _helpers.tpl file and call it using the include field inside the templates.
Here are the key things to remember.
- It should be used for reusable template logic, not for putting large amounts of application configuration or complicated business logic.
- Dont turn Helm into a programming language with deeply nested or complex logics in partials.
