In this tutorial, we'll cover the essential concepts of Jenkins shared libraries and provide a hands-on guide to creating shared libraries for pipelines.
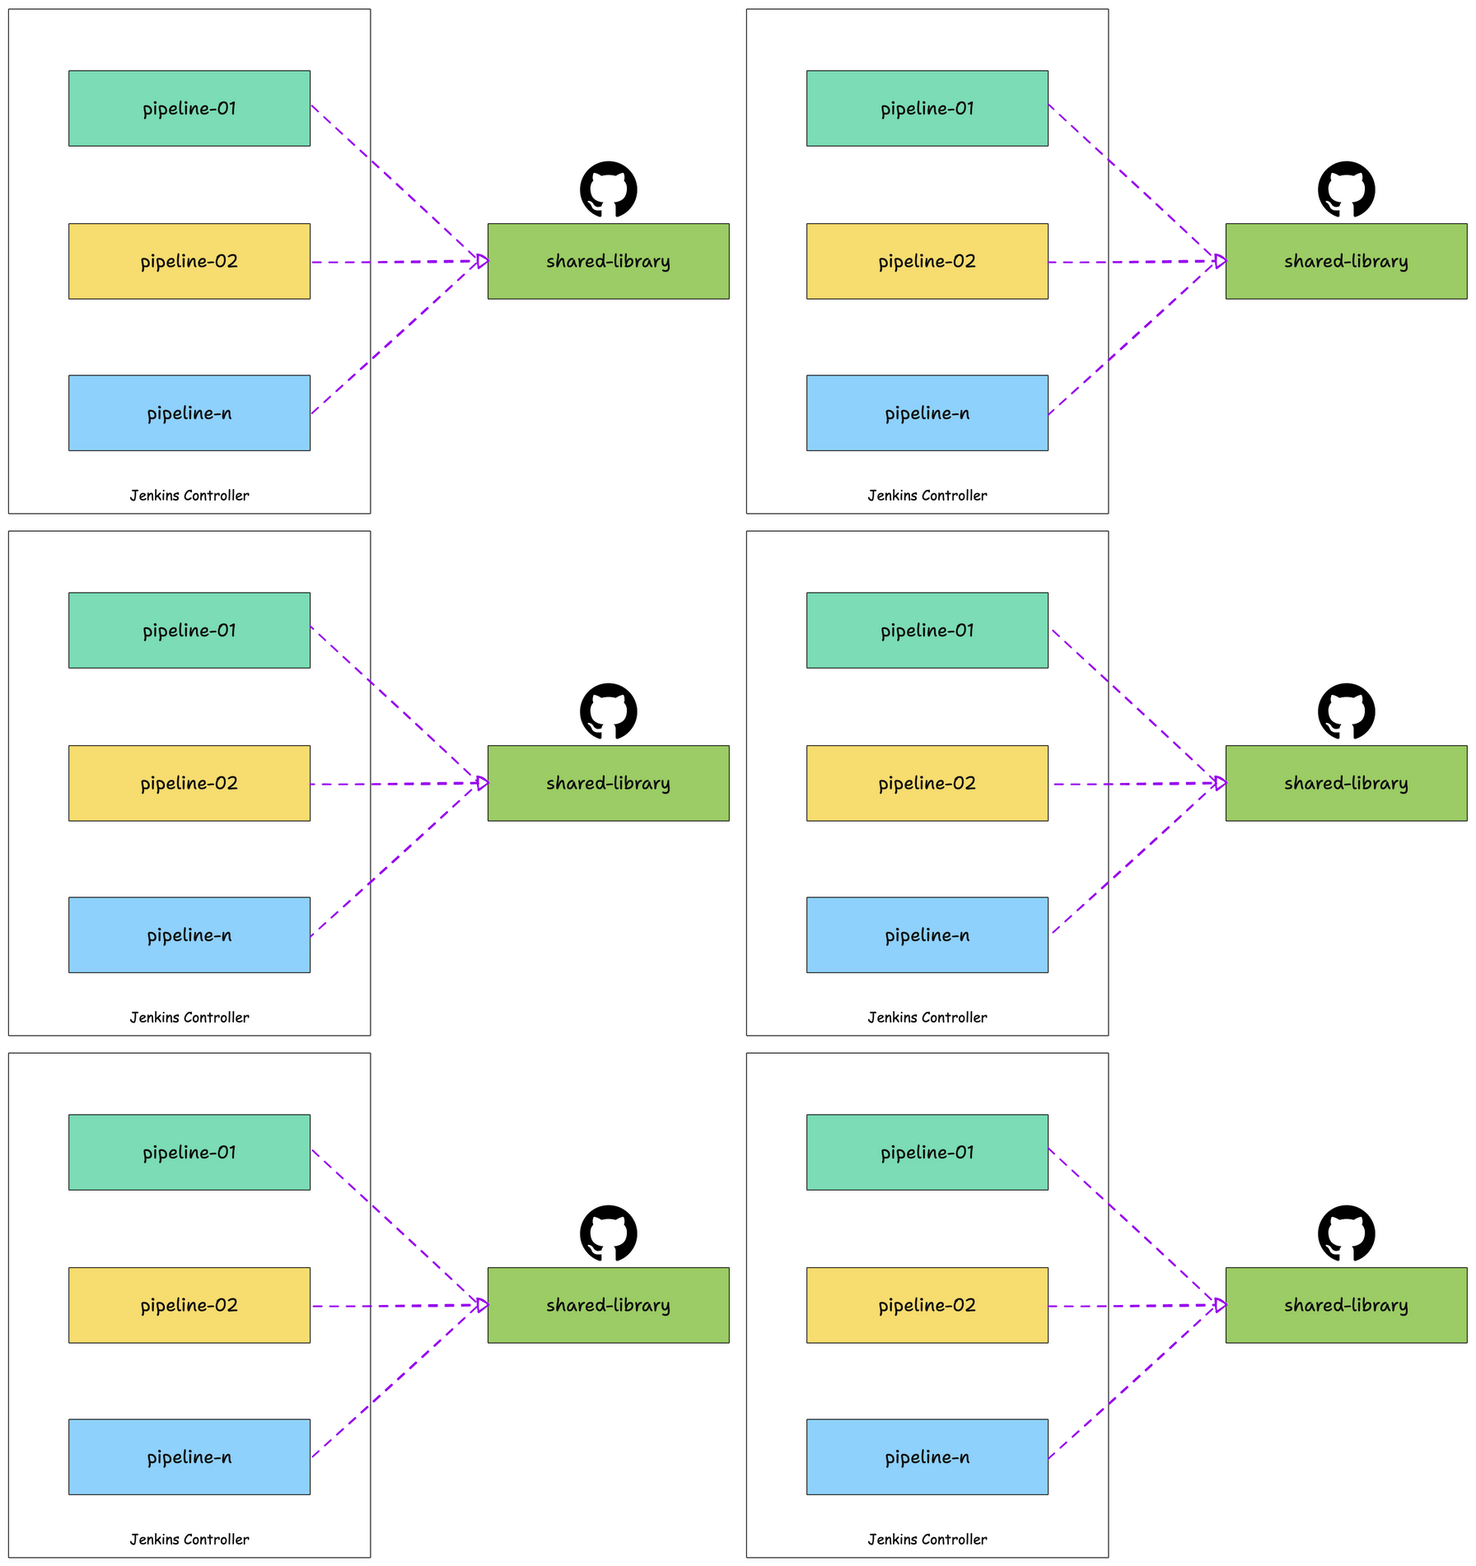
We are in an era of microservices, where modern applications are divided into individually deployable components. Unlike a monolithic application, you may have multiple pipelines to deploy each microservice.
Additionally, Jenkins is used for infrastructure as code development and deployment.
With Jenkins pipeline as code, we can code our entire CI/CD process. It is treated the same way we develop application code. You can version your pipeline code and perform all levels of testing before using it for any application deployments.
However, we have can have well defined re-usable pipelines using Jenkins shared library.
What is Jenkins Shared Library?
When we say CI/CD as code, it should have modularity and reusability. And mainly it should follow the DRY principles (Don't repeat yourself). This is where Jenkins Shared Library comes into play.
Shared library - As the name indicates, it is a library that can be shared.
Jenkins Shared library is the concept of having a common pipeline code in the version control system that can be used by any number of pipelines just by referencing it. In fact, multiple teams can use the same library for their pipelines.

You can compare it with the common programming library. In programming, we create individual libraries that can be used by anyone just by importing them into their code.
Assume, you have ten Java microservices pipelines, the maven build step gets duplicated on all the ten pipelines. And whenever a new service gets added, you will have to copy and paste the pipeline code again. Now, let's say you want to change some parameters in the Maven build step. You will have to change it in all the pipelines manually.
To avoid pipeline code duplication, we can write a shared library for Maven build, and in all the pipelines we just have to refer to the Maven build library code.
In the future, for any Maven build changes, all you need to do is update the shared library code. The changes will then be applied to all pipelines using the Maven build library.
Overall Jenkins shared library addresses the following.
- Code Reusability: Write once, use in multiple pipelines.
- Consistency: Maintain a consistent set of workflows across all your Jenkins pipelines.
- Maintainability: Changes can be made in a single library location is applied across multiple pipelines, making updates easier to manage.
Shared Library Github Repo
The Jenkins shared library examples used in this guide are hosted on a GitHub Repository.
Clone the repository to follow along with the guide.
git clone https://github.com/techiescamp/jenkins-shared-libraryGetting Started With Shared Library
A shared library is a collection of Groovy files (DSLs + Groovy). All the Groovy files should be present in a git repo.
In this example, we will be using Github as our Git repo.
You can clone this repo to get the basic structure of the shared library.
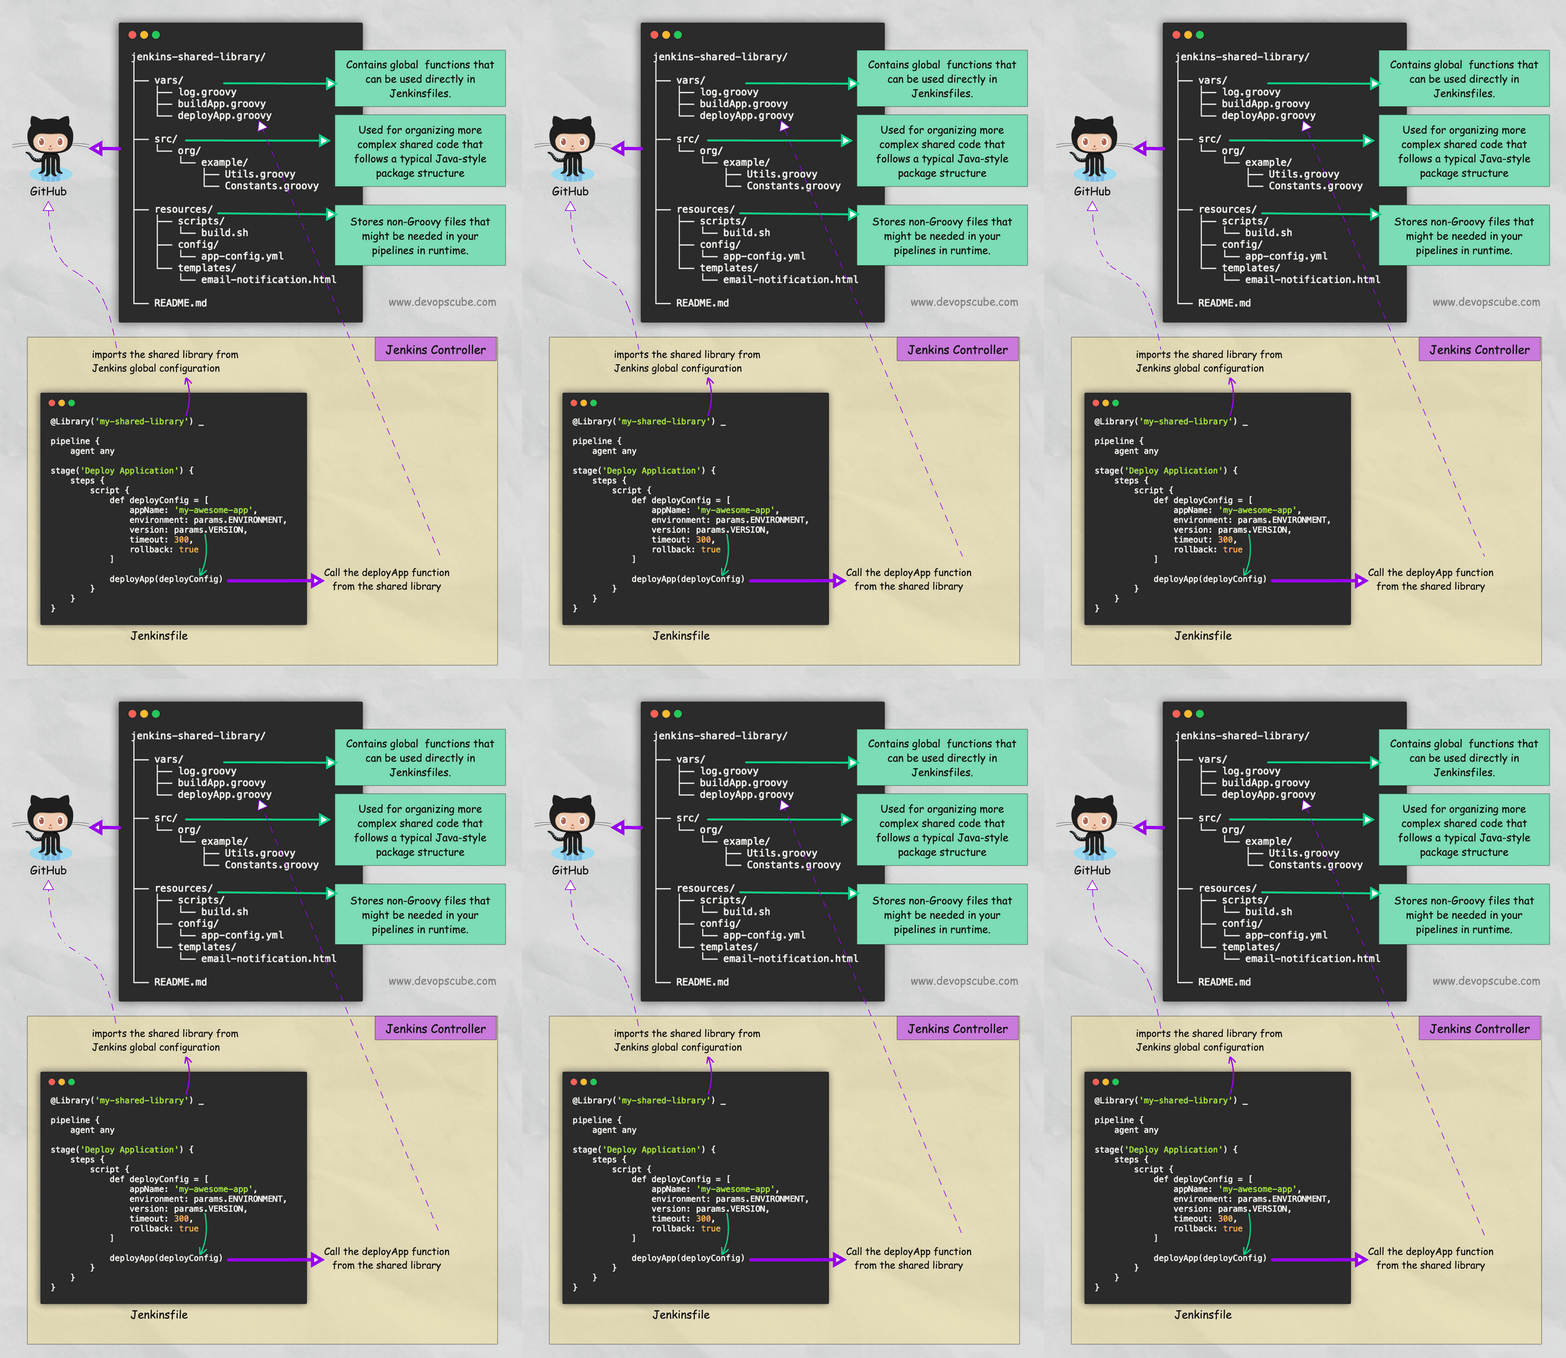
The shared library repo has the following folder structure.
jenkins-shared-library |____resources |____src |____vars
Let's understand what each folder means.

1. vars
This directory holds all the global shared library code that can be called from a Jenkins pipeline. It holds all the library files with a .groovy extension.
Here is a simple library code for Git checkout.
def call(Map stageParams) {

    checkout([
        $class: 'GitSCM',
        branches: [[name:  stageParams.branch ]],
        userRemoteConfigs: [[ url: stageParams.url ]]
    ])
  }
Don't worry about the syntax. We can generate it using the Jenkins pipeline generator. We will look at it practically in the following sections.
The vars directory also supports .txt files for the documentation of shared library code.
For example, if you have a file named maven-build.groovy, you can have a helper file named maven-groovy.txt. In this file, you can write the respective shared library function help documentation in markdown format. The help file can be viewed from <your-jenkins-url>/pipeline-syntax/globals page.
2. src
It is a regular Java source directory. Here you can add mode complex and object-oriented code Groovy code to extend your shared library code. Also, you can import core Jenkins and its plugin classes using an import statement.
You might ask, when we have a vars directory, what is the need for src?
There are scenarios where the groovy DSLs will not be flexible enough to achieve some complex functionalities. In this case, you can write custom Groovy functions in src and call them in your shared library code.
The src directory is added to the classpath during every script compilation. So we can directly use the classes defined in the src directory in Jenkinsfiles.
3. resources
All the non-groovy files (e.g., text files, templates) required for your pipelines can be managed in this folder. Typically files.
One such example is, you might need a common JSON template to make an API call during the build. This JSON template can be stored in the resources folder and can be accessed in the shared library using the libraryResource function.
Or You can use a HTML file as a template for sending HTML-formatted email notifications from your Jenkins pipelines. In your pipeline script or shared library function, you can load this template and replace the placeholders with actual values.
Creating Shared Library
We will look into the following four things to get your hands dirty with the shared library.
- Create a Shared Library Structure
- Create Custom Shared Library Code
- Configure Shared Library In Jenkins Configuration
- Create Declarative Pipeline as Code With Shared Library.
Let's look at each one in detail.
Step 1: Create a Shared Library Structure
Note: In this guide, we will concentrate only on the vars folder for creating your first shared library. The advanced shared library guide will cover src and resources.
Jenkins shared library has the following structure. You can get the basic structure and code used in this article from Github -> Jenkins Shared Library Structure
jenkins-shared-library
|____vars
|____src
|____resources
All the files under vars are global functions and variables. The file name is the function name. We will be using the filename in our declarative pipeline.
Step 2: Create Custom Shared Library Code
In this section, we will create the shared library code for Git Checkout functionality.
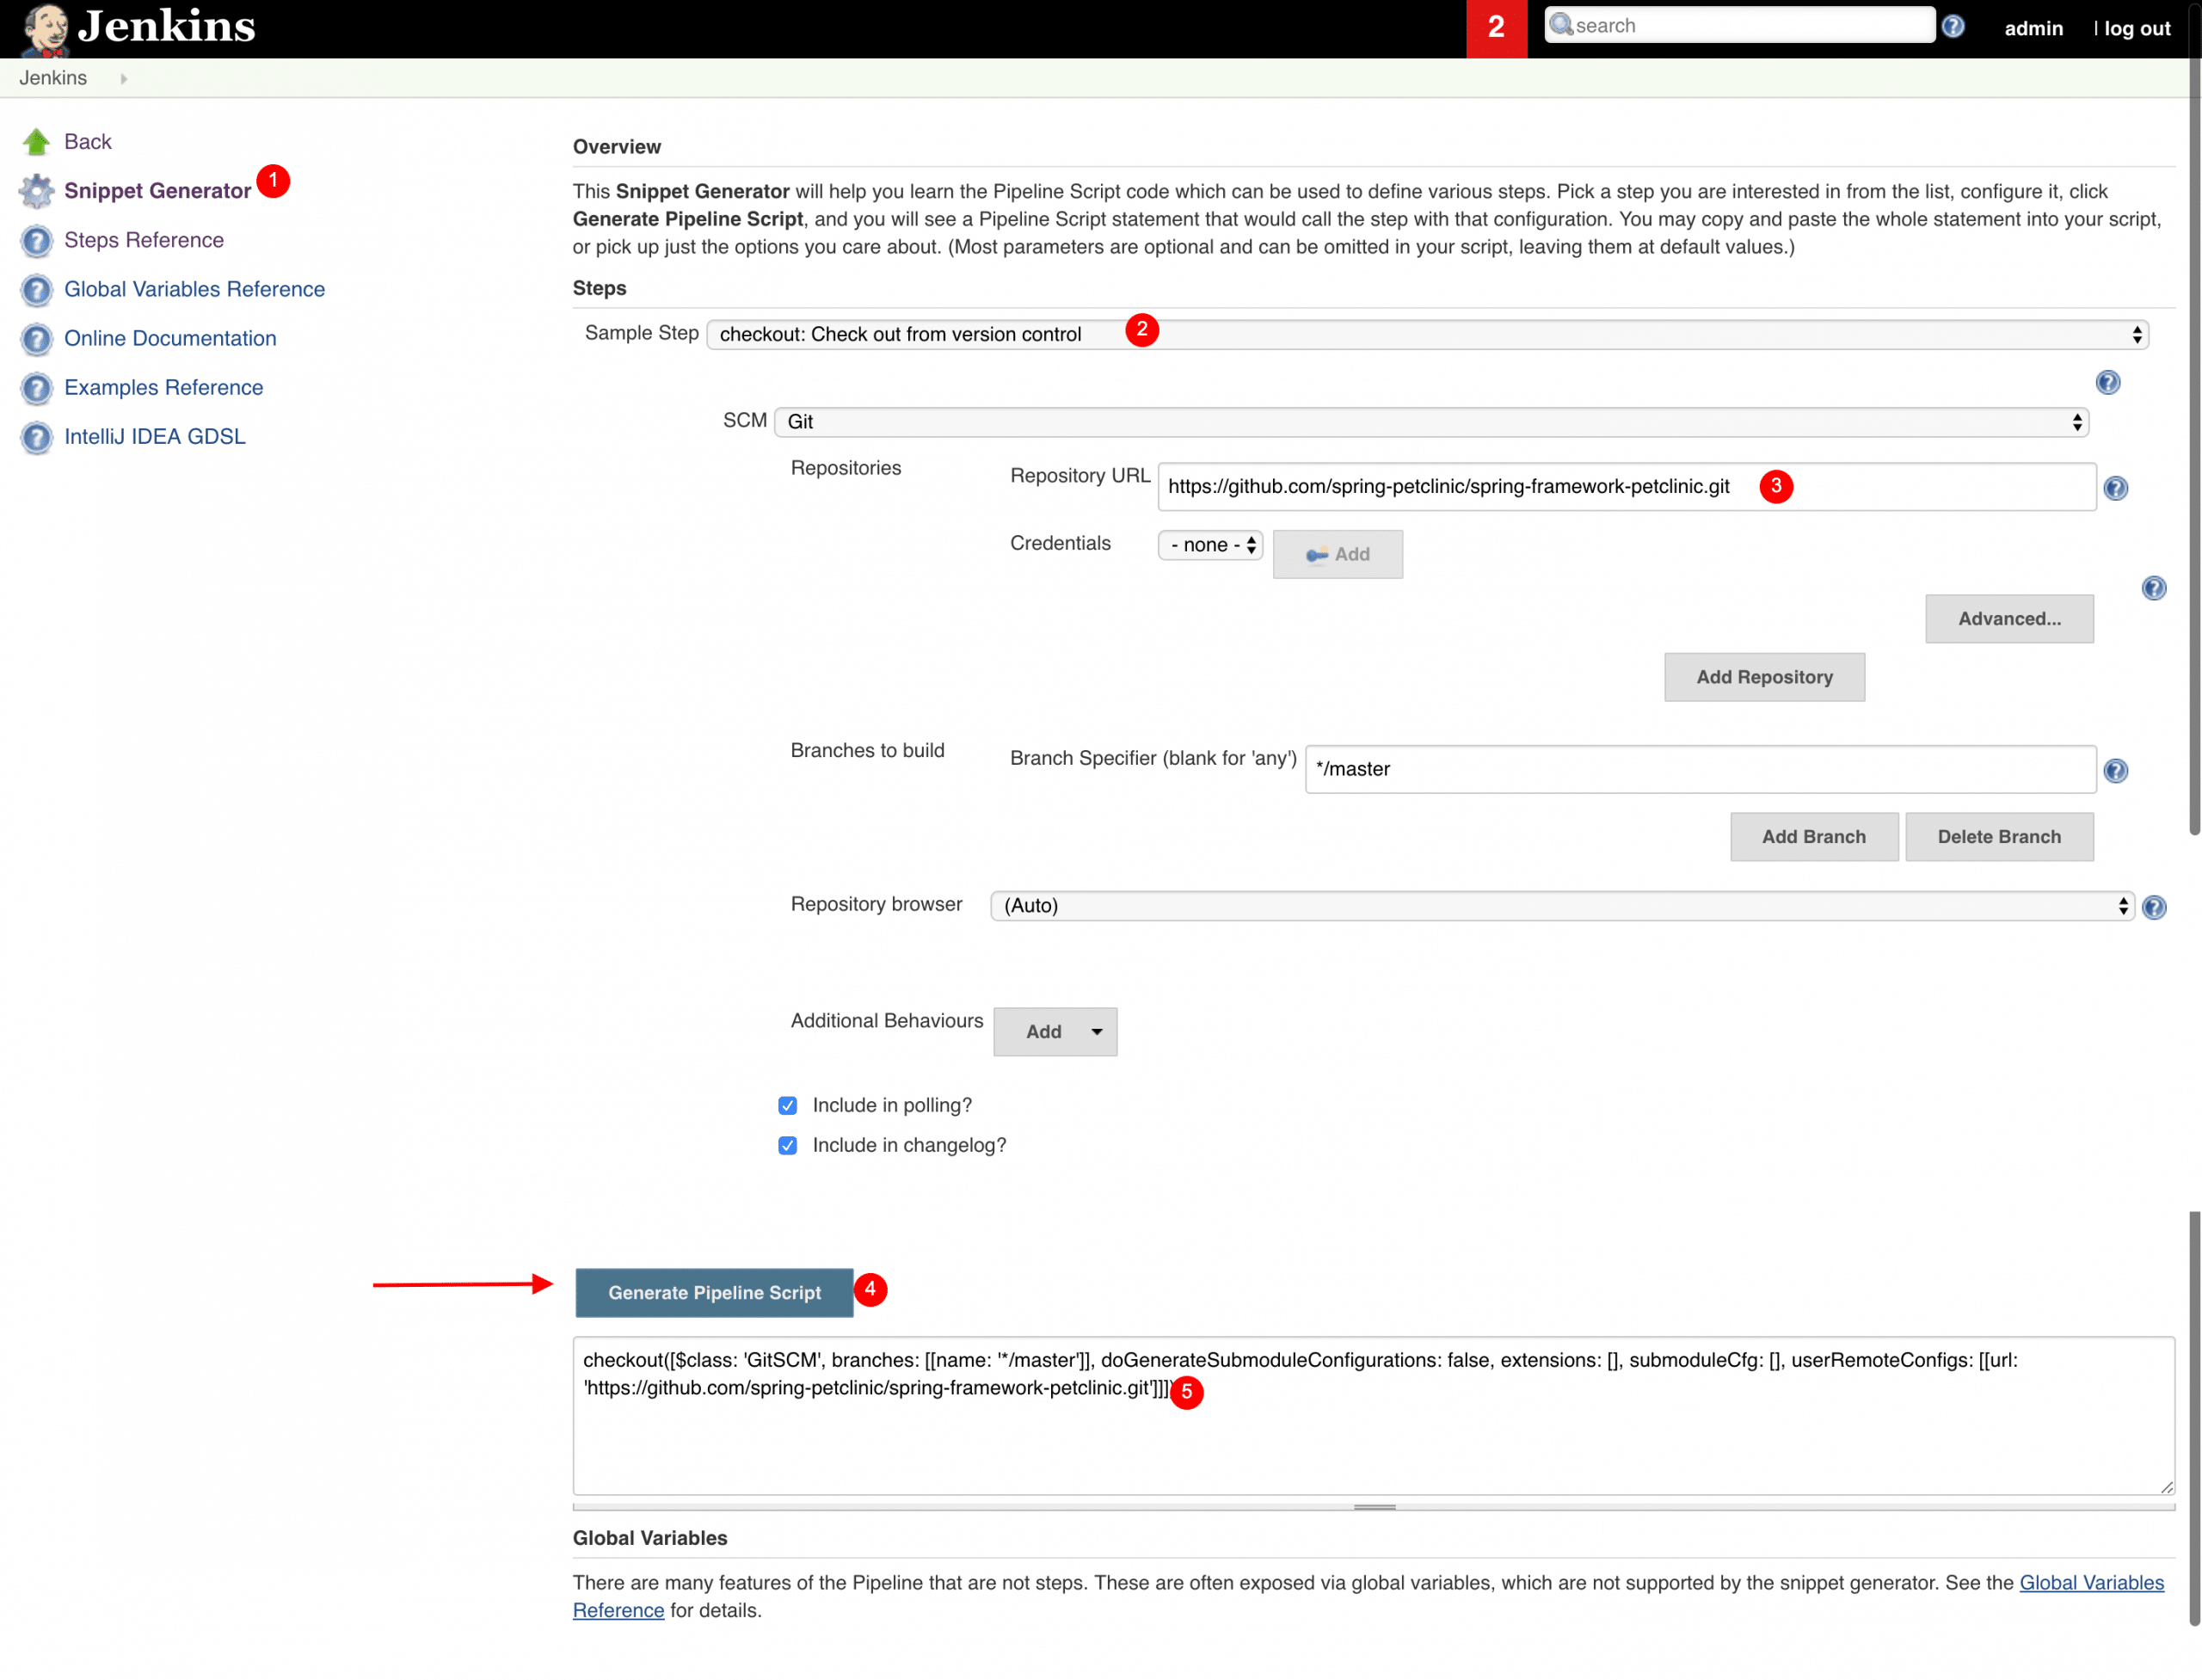
Generate Pipeline Syntax Using Snippet Generator:
You can create the code snippets that can be used in share library function using the Pipeline Syntax Generator available in Jenkins. This will make our life easier for creating custom library DSL. All the supported pipeline functionality can be generated from the snippet generator.
You can access the syntax generator from your Jenkins on /pipeline-syntax/ path. For example,
http://devopscube-jenkins.com:8080/pipeline-syntax/Here is the screenshot, which shows creating a git checkout pipeline snippet using the pipeline syntax generator.

Here is the properly formatted checkout snippet.
checkout([
    $class: 'GitSCM',
    branches: [[name: '*/main']],
    extensions: [],
    userRemoteConfigs: [[url: 'https://github.com/spring-projects/spring-petclinic.git']]
    ])
Step 3: Create a Shared Library For Git Checkout
Let's convert the checkout snippet we generated in the above step to a shared library.
Create a file named gitCheckout.groovy under vars folder.
Here is our Git Checkout shared library code. We have removed all the empty checkout parameters that were generated by default.
def call(Map stageParams) {

    checkout([
        $class: 'GitSCM',
        branches: [[name:  stageParams.branch ]],
        userRemoteConfigs: [[ url: stageParams.url ]]
    ])
  }
Here is the code explanation,
def call(Map stageParams)- A simple call function that accepts a Map as an argument. From the pipeline stage, we will pass multiple arguments, which will be passed as a map to the shared library.stageParams.branch- it's the branch parameter that comes from the pipeline stage, and we usestageParamsto access that variable in the shared library.
Commit the changes and push it to your repository.
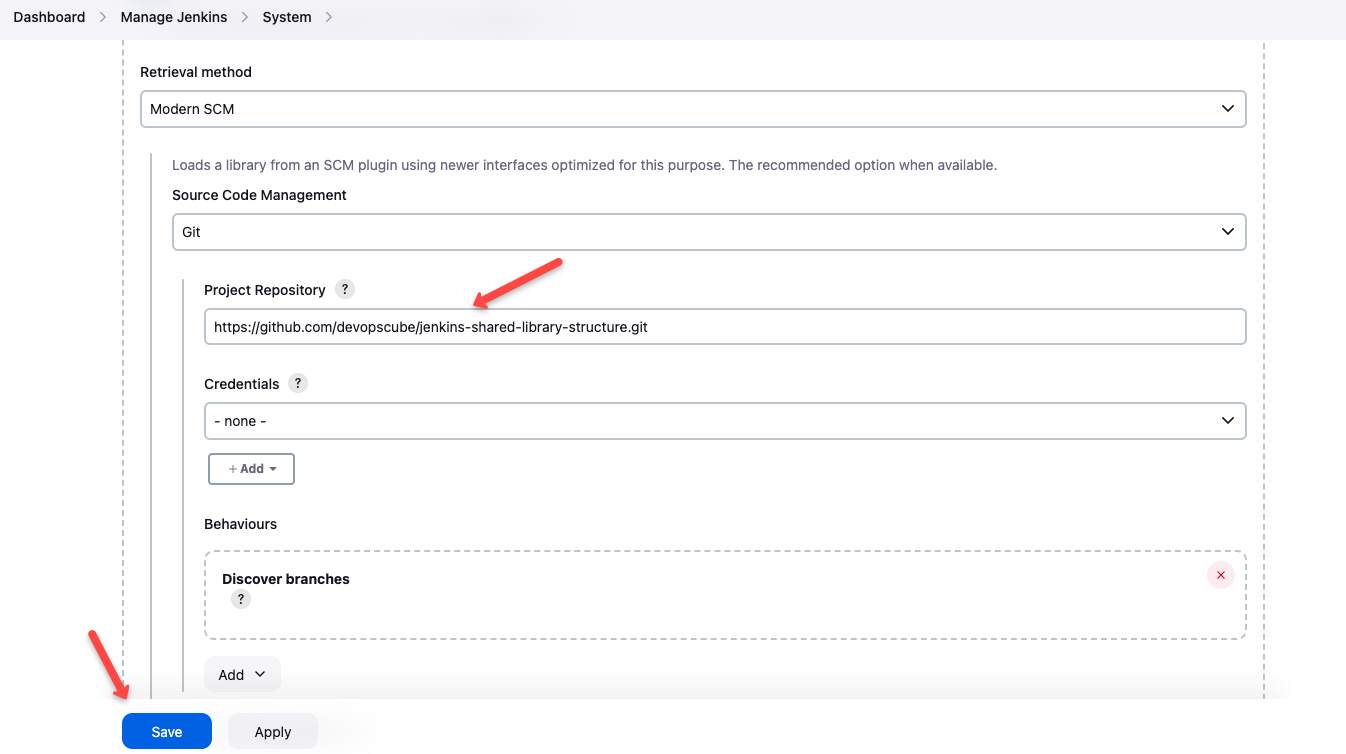
Step 4: Add Github Shared Library Repo to Jenkins
Now that we have a basic git checkout library ready, let's add it to Jenkins configurations.
Step 1: Go to Manage Jenkins --> System
Step 2: Find the Global Trusted Pipeline Libraries section and add your repo details and configurations as shown below.


Step 5: Use Library in Declarative Pipeline
We always call the library using the filename under vars. In this case, gitCheckout is the filename created under vars.
Here is how we call the gitCheckout library from the pipeline or Jenkinsfile
stage('Git Checkout') {
    gitCheckout(
        branch: "main",
        url: "https://github.com/spring-projects/spring-petclinic.git"
    )
}
As you can see, we are passing branch and url parameter to the Checkout function. Here is the full declarative pipeline code.
@Library('jenkins-shared-library@master') _

pipeline {
    agent any
    stages {
        stage('Git Checkout') {
            steps {
            gitCheckout(
                branch: "main",
                url: "https://github.com/spring-projects/spring-petclinic.git"
            )
            }
    }
    }
}
Like gitCheckout, you can create all your pipeline steps a shared library and you don't have to repeat your common functionalities in all your pipelines.
@Library('jenkins-shared-library@master') _ tells Jenkins to use the globally configured library named jenkins-shared-library.
When you use this import statement, Jenkins will fetch the shared library code from the configured source (typically a Git repository) and make it available for use in your pipeline.
Real World Example
In larger enterprises, it is common to have central platform teams.
If Jenkins is used in such organizations, these platform teams usually create common Jenkins libraries for all application and infrastructure deployment tasks.
Application teams can reuse these pipelines to save time. Since these libraries are extensible, if the common libraries don't meet the specific project needs, they can always be customized.
It is also common practice for teams to contribute to the central platform teams' shared libraries. This way, organizations can maintain efficient and streamlined pipeline libraries.
Unit Testing Shared Libraries
As I have explained in many other blogs, unit testing is important for Infrastructure as code.
Not every team writes tests, however, unit testing shared libraries is an important best practice in Jenkins pipeline development. It ensures code reliability, catches bugs early, and facilitates safe refactoring.
By thoroughly testing shared library functions, teams can prevent widespread issues across multiple pipelines, as these libraries often form the backbone of an organization's CI/CD processes.
Writing unit test requires familiarity with Java, Groovy and JUnit testing framework. Usually central platform team will have dedicated resources to write these tests for all the shared library functions.
In essence, although it takes time and effort, unit testing shared libraries is an investment in the stability, maintainability, and efficiency of your entire CI/CD ecosystem.
Conclusion
If you are using Jenkins for your CI/CD needs, implementing a shared library is a must.
It streamlines your CI/CD workflow with Jenkins. The best part is that you can have a well-defined development workflow for developing and testing Jenkins pipeline code.
If you have any questions regarding shared libraries, do let us know in the comments section.

