

Jenkins pipeline as code is a concept that defines a Jenkins build pipeline in Jenkins DSL/Groovy format. This article covers the key concepts of writing Jenkins pipeline as code using declarative syntax.
Jenkins Pipeline Tutorial
In this Jenkins pipeline tutorial, we will look at the following
- Types of Jenkins Pipeline
- Pipeline as code basics
- Building a basic CI pipeline as code for a Java app.
- Building a job from pipeline code present in source code repo.
- Executing parallel stages in a pipeline
- Generating pipeline script & directives using Jenkins inbuilt generators.
Types of Jenkins Pipeline
There are two types of Jenkins pipeline code.
- Declarative Pipeline
- Scripted Pipeline
In this tutorial, we will focus only on the declarative syntax, which is an advanced version of the scripted pipeline with extensible features. I recommend using the declarative pipeline approach for all your Jenkins use cases. It offers many features and benefits.
Now let's get started with the pipeline tutorial.
For better understanding, we will create a pipeline for the Java Spring Boot application build using the declarative pipeline as code.
Prerequisites
- Jenkins controller (Check Jenkins installation steps)
- Jenkins agent node connected to the controller (Check Jenkins agent setup guide)
- Access to Github.com from your Jenkins server. If you are trying out from your corporate Jenkins setup, you can use your organization's private git repo.
Here is the pictorial representation of the simple build pipeline we will build.
Note: Do not worry about the DSL used in the pipeline code. Read the article fully to understand how to generate the DSLs in an easy way.
Here is the pipeline code for the above workflow. Before setting up the pipeline, we will understand what each block means.
pipeline {

    agent {
        node {
            label 'AGENT-01'
        }
    }

    tools {
        maven 'maven3'
    }

    options {
        buildDiscarder logRotator(
                    daysToKeepStr: '15',
                    numToKeepStr: '10'
            )
    }

    environment {
        APP_NAME = "DCUBE_APP"
        APP_ENV  = "DEV"
    }

    stages {

        stage('Cleanup Workspace') {
            steps {
                cleanWs()
                sh """
                echo "Cleaned Up Workspace for ${APP_NAME}"
                """
            }
        }

        stage('Code Checkout') {
            steps {
                checkout([
                    $class: 'GitSCM',
                    branches: [[name: '*/main']],
                    userRemoteConfigs: [[url: 'https://github.com/spring-projects/spring-petclinic.git']]
                ])
            }
        }

        stage('Code Build') {
            steps {
                 sh 'mvn install -Dmaven.test.skip=true'
            }
        }

        stage('Printing All Global Variables') {
            steps {
                sh """
                env
                """
            }
        }

    }
}
Now, let's understand what each block means.
The Pipeline Block: All your pipelines, as code, should be wrapped inside the pipeline block.
pipeline {

---<All Pipeline blocks go here>---

}
Agent Block: In the agent block, you have to mention the agent details for where you want to run the pipeline job. It supports both static agents and docker-based dynamic agents. Here we have mentioned the label as "AGENT-01". It is the name of an agent node.
    agent {
        node {
            label 'AGENT-01'
        }
    }
Tools Block: Here, you can refer to the tools you have configured in the Jenkins Global tool configuration. We have covered the tool configuration in the next section.
tools {
        maven 'maven3'
    }
Options Block: It contains all the options required for the job. One example we have given is "Build Discarder," which rotates the build logs.
options {
        buildDiscarder logRotator(
                    daysToKeepStr: '15',
                    numToKeepStr: '10'
            )
    }
Environment Block: In this block, you can mention all the required variables for the job that must be available in all the stages. You can define any number of variables, like a key-value pair.
    environment {
        APP_NAME = "DCUBE_APP"
        APP_ENV  = "DEV"
    }
Stages: Stages block contains multiple stages.
stages {

---<All Pipeline Stages Go Here>---

}
Stage Block: A stage is a subset of stages. Each stage has a steps block.
Steps Block: In each steps block, you define a set of operations to perform. In the following example, we show a workplace cleanup step and echo a variable we defined in the environment block. What you want to run inside each stage depends totally on your use case.
stage('Cleanup Workspace') {
            steps {
                cleanWs()
                sh """
                echo "Cleaned Up Workspace for ${APP_NAME}"
                """
            }
        }
Now that we have a basic understanding of a minimal pipeline as code, let's execute it practically on a Jenkins server with an agent node.
Configure Pipeline as Code Job In Jenkins
To execute the pipeline code we have in this article, we need to configure maven in the global tool configuration.
Go to Manage Jenkins --> Global Tool Configuration --> Maven --> Maven Installation.
Add a maven configuration as shown below. We are using the tool name as maven3 in the pipeline so that it refers to the maven under "Global Tool Configuration".
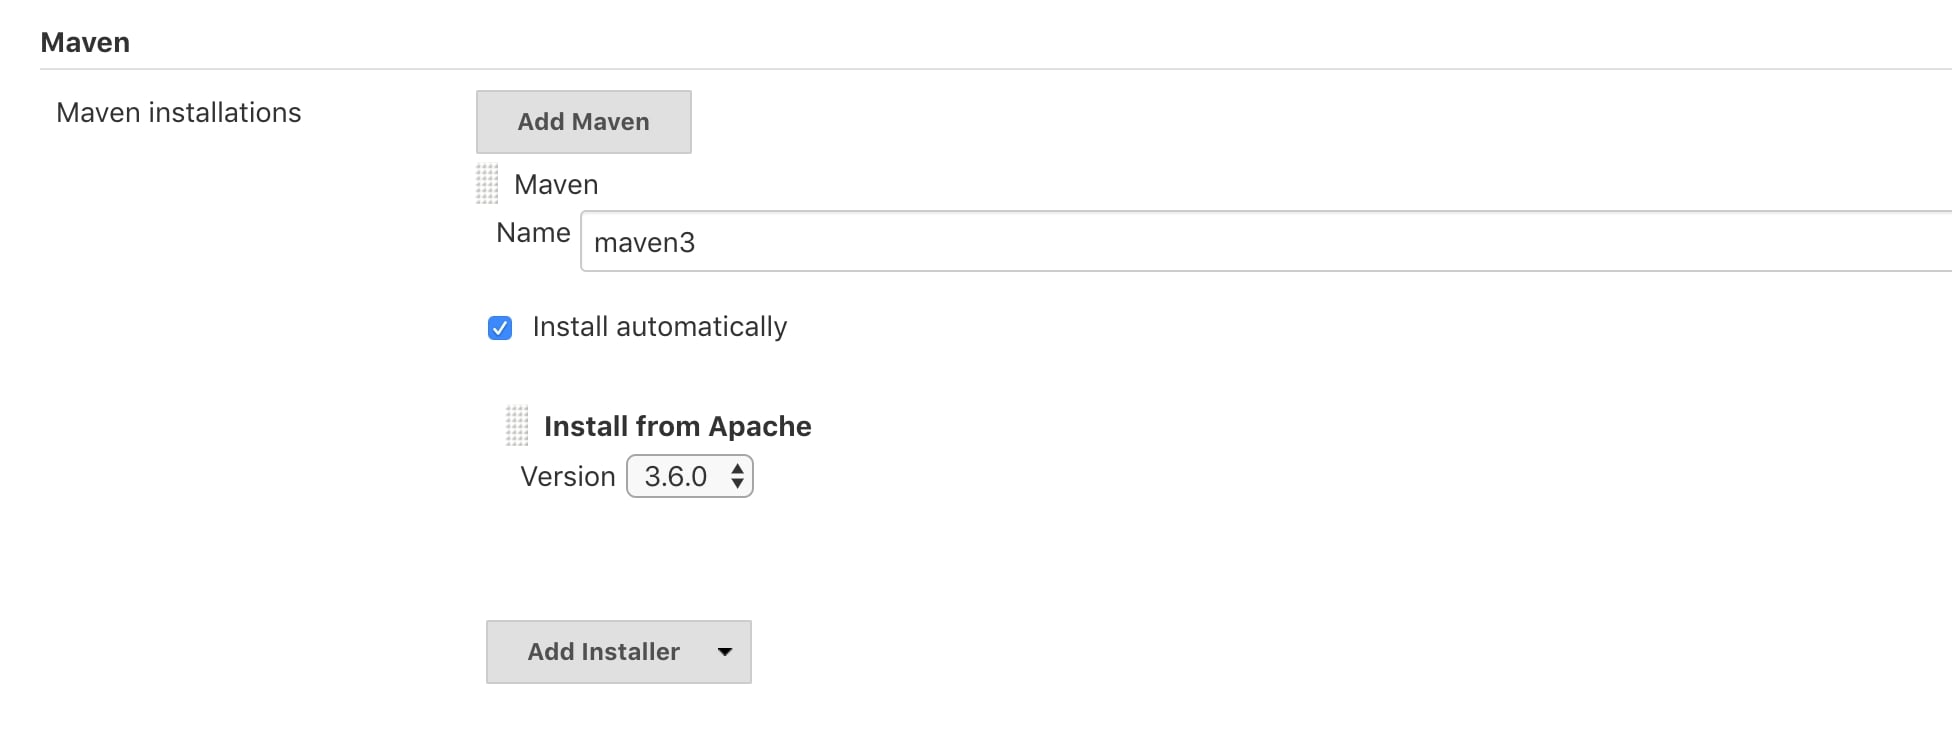
Note: We have selected "Install Automatically" option, which will download the selected version every time you execute the job.
Creating & Building a Jenkins Pipeline Job
Follow the steps given below to create and build our pipeline as code.
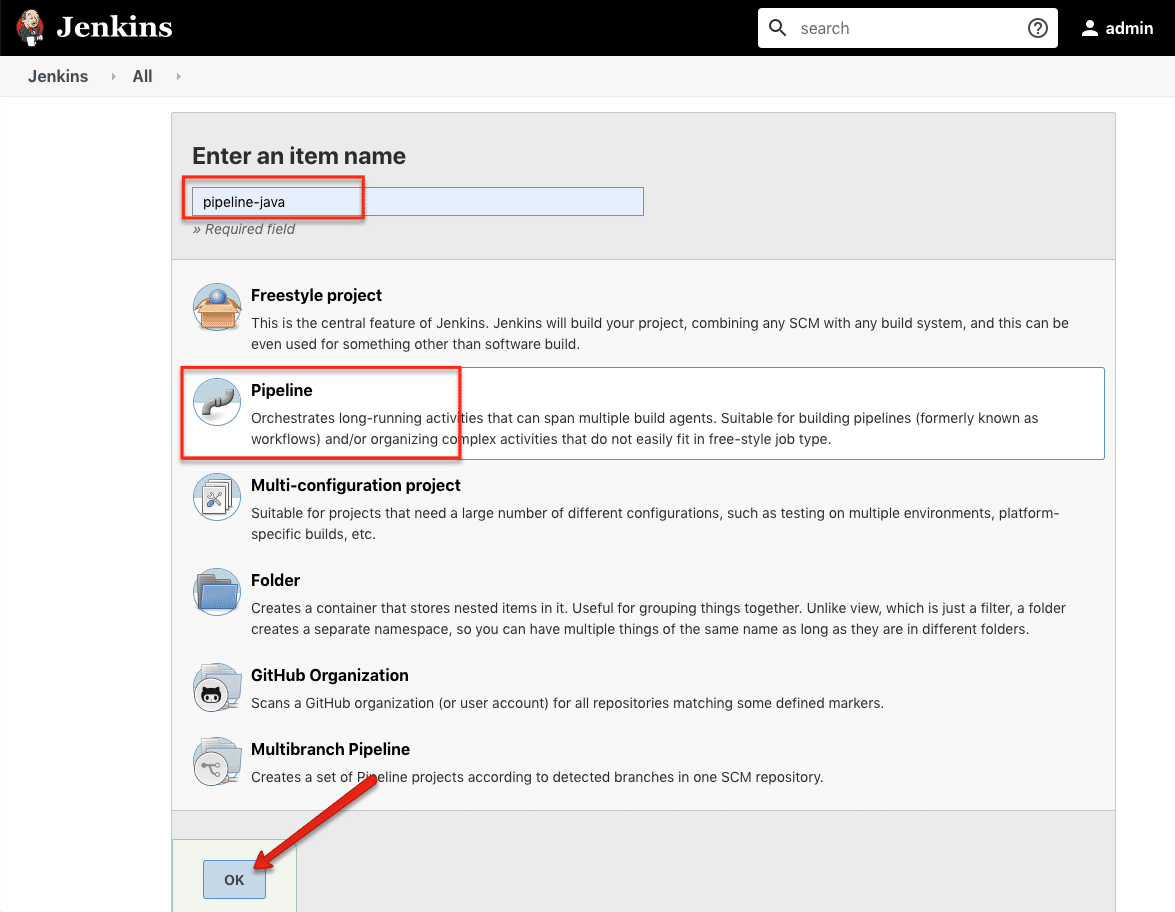
Step 1: Go to Jenkins home and select "New Item"

Step 2: Give a name, select "Pipeline" and click ok.
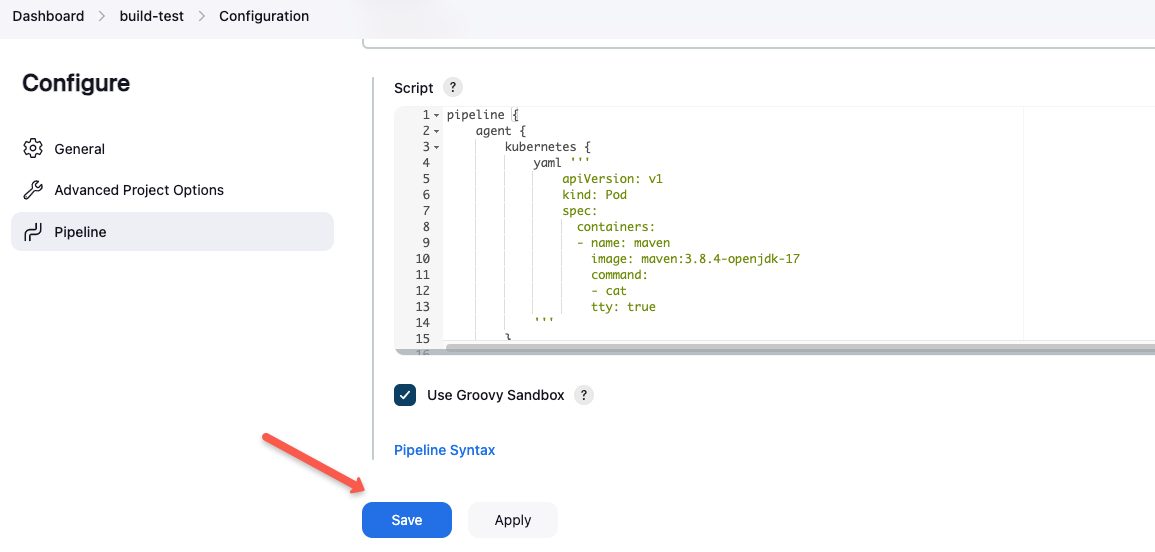
Step 3: Scroll down to the Pipeline section, copy the whole pipeline code in the script section, and save it.
Step 4: Now, click "Build Now" and wait for the build to start.
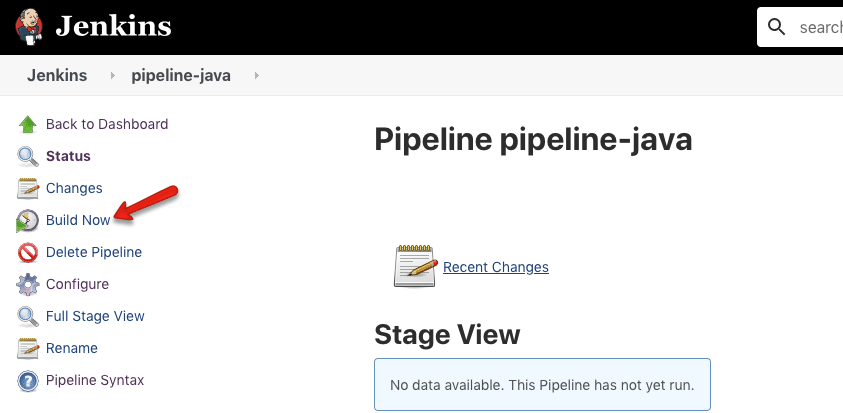
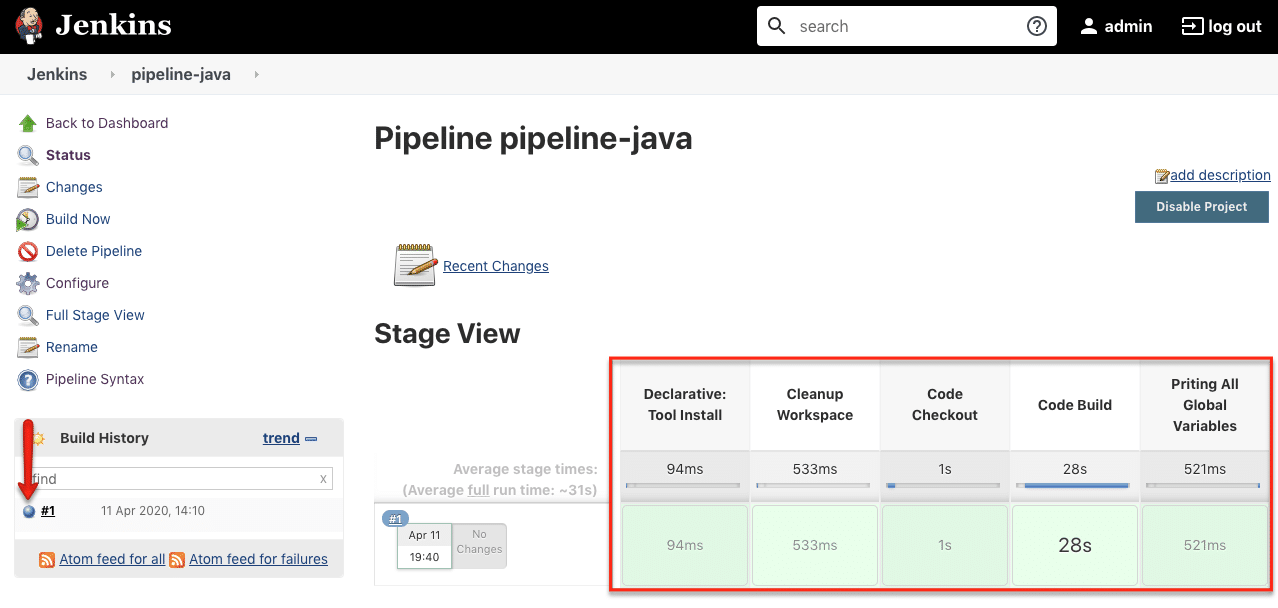
While the job starts, you can view each stage executing in stage view. Here is the screenshot of a successfully executed job. Also, you can the job logs by clicking the blue icon.
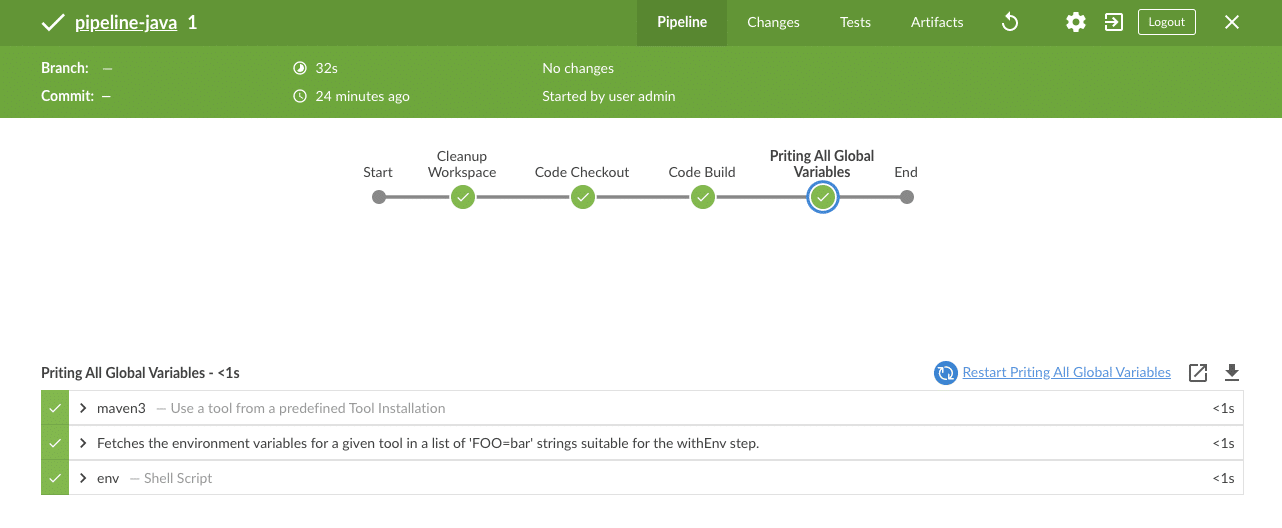
If you have the Blue Ocean plugin installed, you will have a very good UI to view your job status and logs, as shown below. Use the "Open in Blue Ocean" from the left to open a job in the blue ocean view.
Executing Jenkins Pipeline From Github (Jenkinsfile)
In the last section, we used the pipeline script directly on Jenkins. In this section, we will look at how to execute a pipeline script that is available in an SCM system like Github.
Step 1: Create a Github repo with our pipeline code in a file named Jenkinsfile. Or you can use this Github repo for testing. https://github.com/devopscube/pipeline-as-code-demo
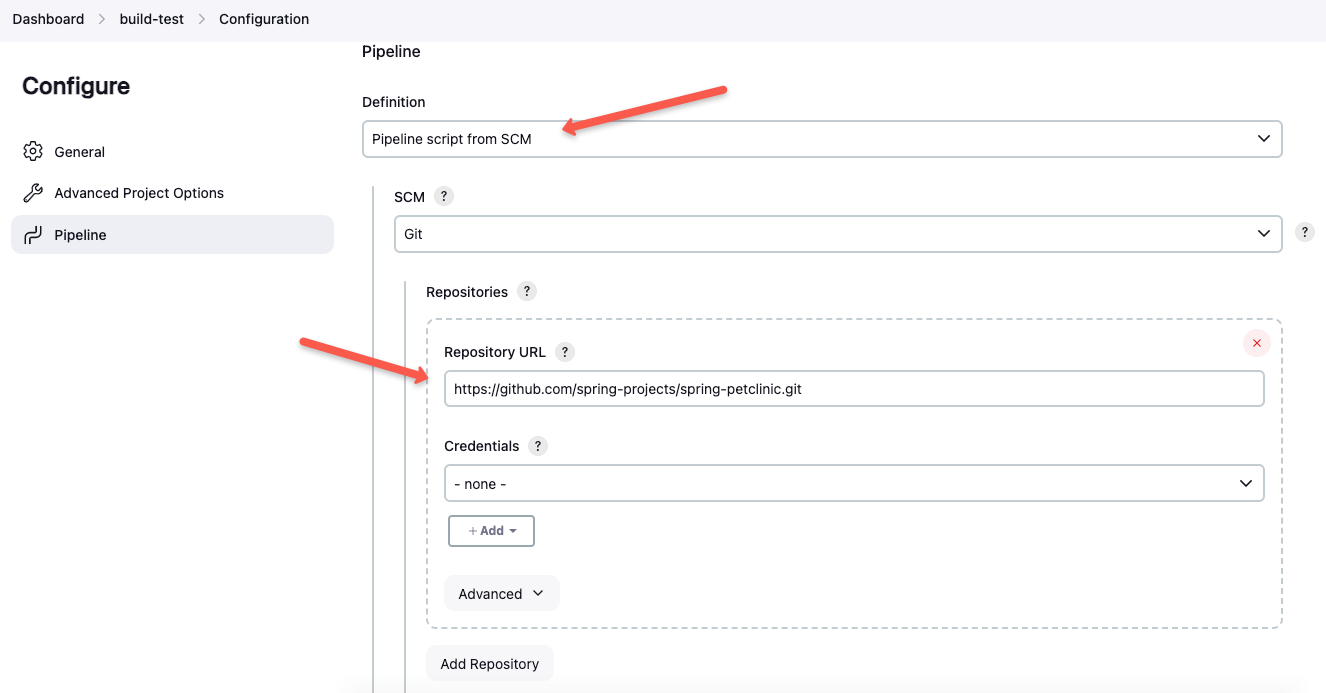
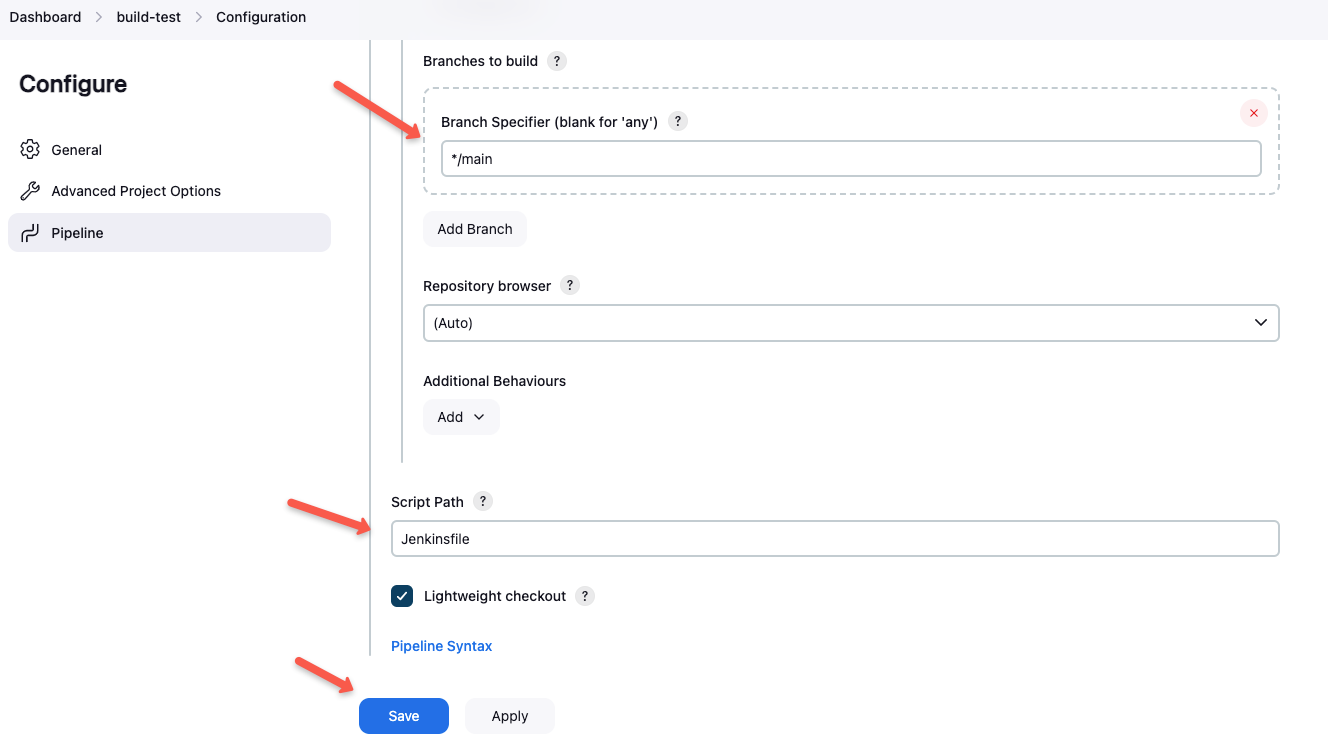
Step 2: Follow the same steps we used for creating a pipeline job. But instead of entering the code directly into the script block, select the "Pipeline script from SCM" option and fill in the details as shown below.
- Definition: Pipeline script from SCM
- Repository URL: https://github.com/devopscube/pipeline-as-code-demo
- Script Path: Jenkinsfile
Specify the required details and save the configurations.
Step 3: Save the configuration and run the build. You should see a successful build.
Executing Jenkins Pipeline Stages In Parallel
There are use cases where you have to execute different stages in parallel because each stage is independent and does not depend on other steps. Running separate stages in parallel will also reduce the build times.
You can achieve parallelism in Jenkins pipelines as code using the parallel block.
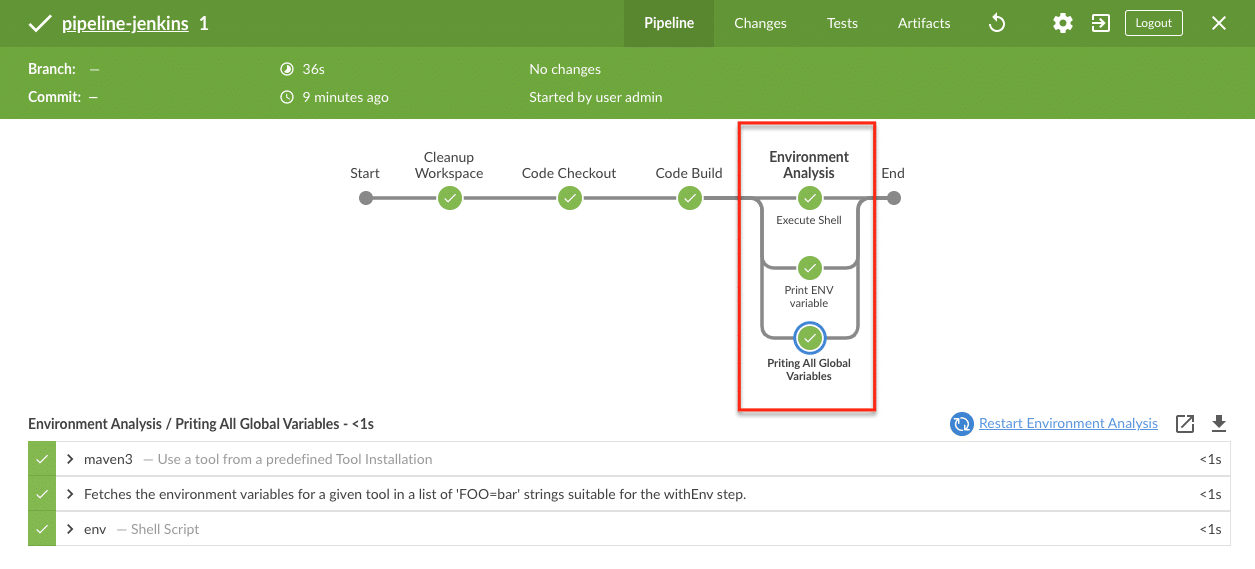
Here is an example stage that contains three parallel stages. It's like you will have multiple stages inside a stage. You can test this by adding the following code to your existing pipeline.
stage('Environment Analysis') {

            parallel {

                stage('Priting All Global Variables') {
                    steps {
                        sh """
                        env
                        """
                    }
                }

                stage('Execute Shell') {
                    steps {
                        sh 'echo "Hello"'
                    }
                }

                stage('Print ENV variable') {
                    steps {
                        sh "echo ${APP_ENV}"
                    }
                }


            }
        }
You can clearly see the parallel execution on the blue ocean view.
How to Generate Jenkins Pipeline Scripts?
Is it possible to generate Jenkins pipeline scripts?
Yes! you can generate most of the pipeline scripts from Jenkins. Here is how it works.
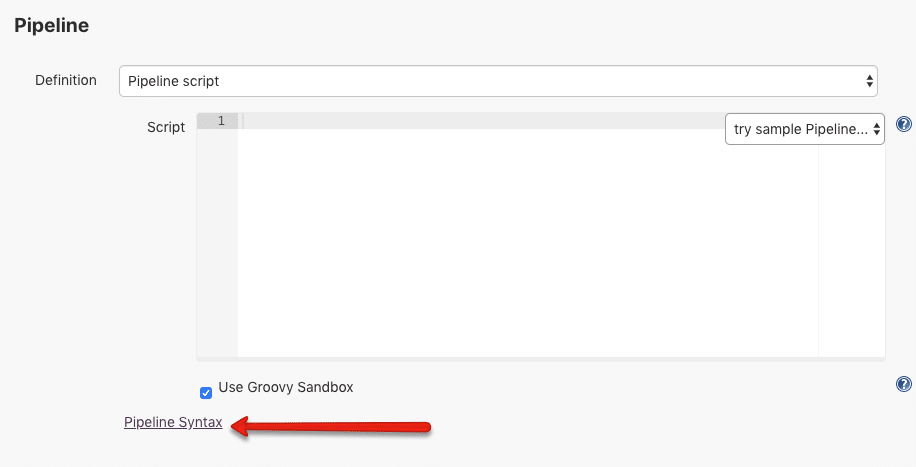
Jenkins has its own pipeline script generator. You can access the generator on the /pipeline-syntax path.
http://<your-jenkins-ip>:port/pipeline-syntax/You can also get the syntax generator path from your pipeline job configuration as shown below.
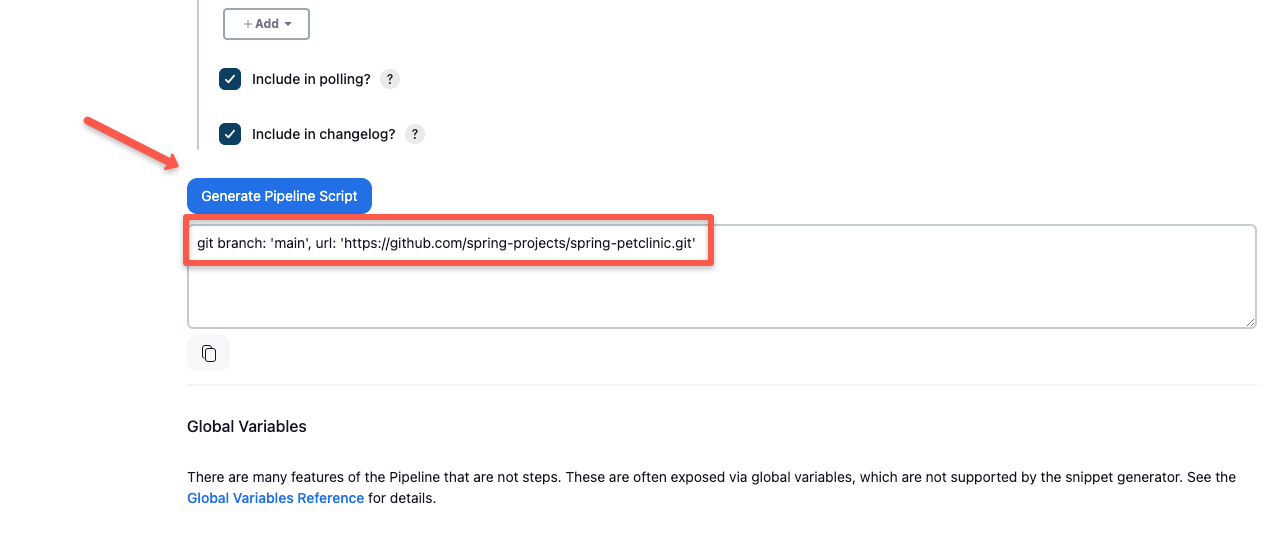
Snippet Generator
A Snippet generator is used to generate all the scripts that are used inside the stages.
Here is how the generator looks. You can select the required option from the steps dropdown.
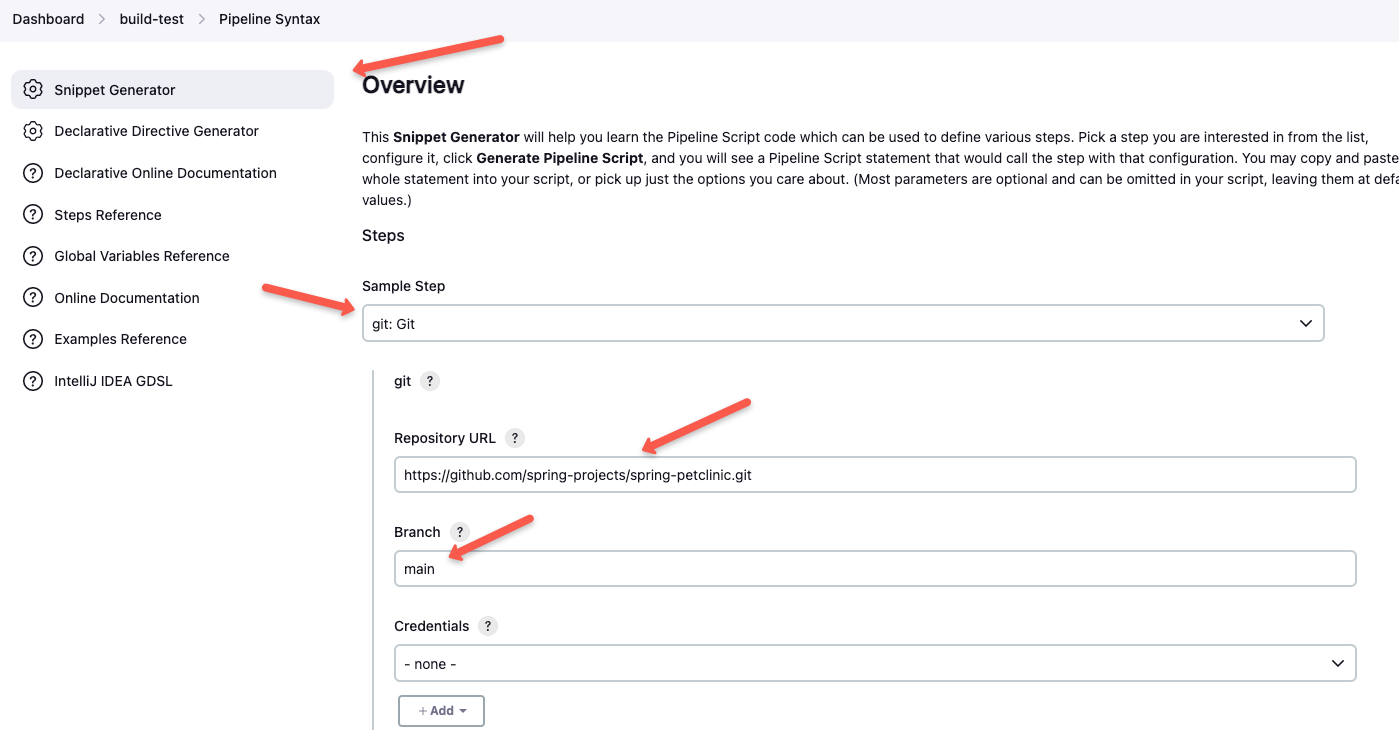
Fill in the required details, and generate the script for your pipeline.
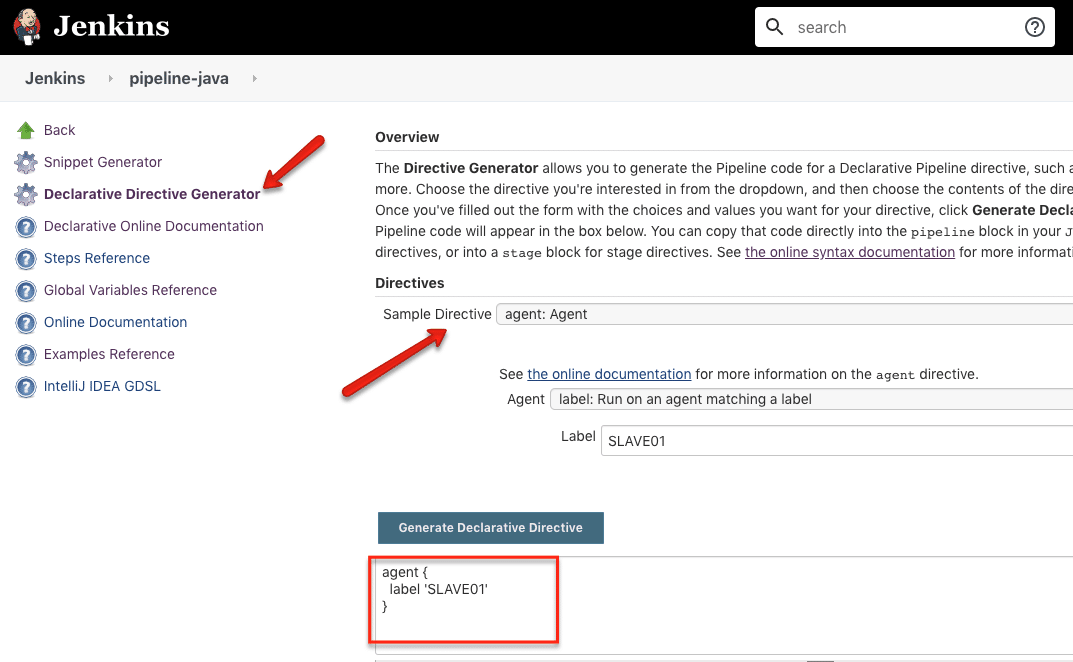
Declarative Directive Generator
You can use the directive generator to generate all other options in the pipeline, such as options, parameters, triggers, etc.
Here is an example of generating the agent block.
Conclusion
Adopting pipeline code for all Jenkins workflows will give you more control and streamline your pipelines for your CI/CD needs.
In the next post, we will learn about Jenkins Multi Branch Pipeline
Extending your pipelines with a shared library lets you reuse the pipeline code for all implementations.
Let us know your thoughts in the comment section below.