

If you are looking for a well-automated Pull Request based or branch-based Jenkins Continuous Integration & Delivery (CI/CD) pipeline, this guide will help you get the overall picture of how to achieve it using the Jenkins multibranch pipeline.
Jenkins's multi-branch pipeline is one of the best ways to design CI/CD workflows as it is entirely a git-based (source control) pipeline as code. This guide will talk about all the key concepts involved in a Jenkins multi-branch pipeline setup.
Jenkins Multibranch Pipeline Fundamentals
Let’s start with the multi-branch pipeline basics. Specifically, in this section, I will cover the concept of a multi-branch pipeline and why it is essential to use it for all Jenkins CI/CD pipelines.
I’ll also show you how a multi-branch pipeline works with a detailed workflow diagram.
What is a Multi-branch Pipeline?
A multi-branch pipeline is a concept of automatically creating Jenkins pipelines based on Git branches.
It can automatically discover new branches in the source control (Github) and automatically create a pipeline for that branch. When the pipeline build starts, Jenkins uses the Jenkinsfile in that branch for build.
SCM (Source Control) can be Github, Bitbucket, or a Gitlab repo.
You can choose to exclude selected branches if you don't want them to be in the automated pipeline with Java regular expressions.
Multi-branch pipeline supports PR based branch discovery. Meaning, branches get discovered automatically in the pipeline if someone raises a PR (pull request) from a branch or a forked repository. So if you are looking for a Pull Request based Jenkins build workflow, this is a great option.
Also, you can add conditional logic to the Jenkinsfile to build jobs based on the branch requirement.
For example, if you want the develop branch to run only unit testing, sonar analysis and artifact build, you can have a condition to skip the deployment stage with a when a condition, as shown below.
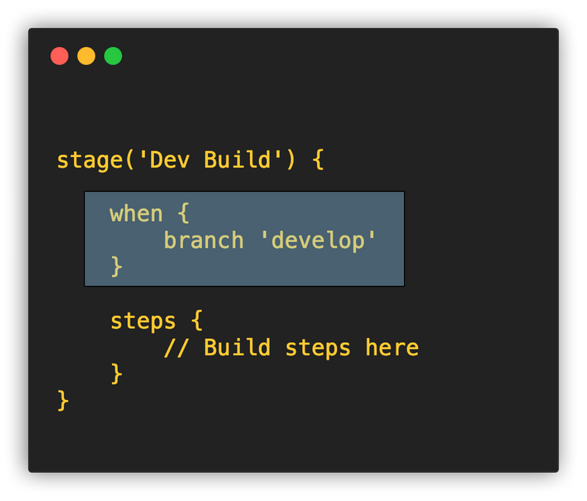
So whenever the code is merged develop branch, the pipeline will run the unit testing and sonar analysis stages skipping the deployment stage.
Also, multi-branch pipelines are not limited to the continuous delivery of applications. You can use it to manage your infrastructure code as well.
One such example is having a continuous delivery pipeline for Docker image builds , terraform deployment pipeline, VM image patching, building, and upgrade process.
How Does a Multi-Branch Pipeline work?
I will walk you through a basic git-flow based build and deployment workflow to understand multi-branch pipeline in a better way. The branching strategy provided in this example is for explanation purposes only.
Let's say I want a Jenkins pipeline to build and deploy an application with the following conditions.
- The application repo would have two branches (main and develop)
- Development starts with the developer forking the application repository and creating a branch in the forked repository. The developer commits code to the feature branch. Once the code is locally tested and ready for integration, they will raise a PR to the develop branch of the main repository from the forked repo.
- Whenever a developer raises a PR from the feature branch of the forked repository to the develop branch, a Jenkins pipeline should trigger to merge the source and target branches, followed by running unit tests and static code analysis. Lets call it as PR build.
- After the code passes the tests in the PR build, the developer or reviewer merges the PR into the develop branch.
- Once the code is merged it to develop branch, it should trigger a pipeline that will run the relevant tests and deploy the code in relevant envirnments (Eg, dev, qa, etc)
- When the code is ready for release, developers raise a PR from the develop branch to the master branch. This should trigger a PR build pipeline that will merge the source and target branches, run unit tests, perform code analysis, build artifacts (docker image, jar files etc), conduct vulnerability tests, etc.
- If the tests pass, the PR will be reviewed and merged into the main branch.
- When the merge happens, Jenkins should trigger a build that will compile the code, create a release artifact, and deploy it to the staging and pre-production environments.
From the above conditions, you can see that there is no manual trigger of Jenkins jobs, and whenever there is a pull request for a branch, the pipeline needs to be triggered automatically and run the required steps for that branch.
This workflow builds a great feedback loop for engineers and avoids dependence on the DevOps team to build and deploy in non-prod environments.
Developer can check the build status on Github and take decisions on what to do next.
This workflow can be achieved easily through a Jenkins multi-branch pipeline.
The following image shows how a multi-branch pipeline workflow would look like for the above example build process.
Here is how the multi-branch pipeline works.
- When a developer creates a PR from a feature branch from forked repo to develop a branch, Github sends a webhook with the PR information to Jenkins.
- Jenkins receives the PR and finds the relevant multibranch pipeline, and creates a PR build pipeline automatically. It then runs the jobs with the steps mentioned in the
Jenkinsfile. During checkout, the source and target branches in the PR gets merged. The PR merge will be blocked on Github until a build status from Jenkins is returned (It Github ruleset is configured). - Once the build finishes, Jenkins will update the status to Github PR. Now you will be able to merge the code. If you want to check the Jenkins build logs, you can find the Jenkins build status and log link in the PR status (If Github App forJenkins is configured).
Multibranch Pipleline Jenkinsfile
Before jumping into implementation, let's look at multibranch pipeline Jenkins example Jenkinsfile that can be used in the pipeline.
For the multibranch pipeline to work, you need to have the Jenkinsfile in the SCM repo.
If you are learning/testing, you can use the multibranch pipeline Jenkinsfile given below. It has a checkout stage and other dummy stages, which echoes the message.
Also, you can clone and use this Github repo which has this Jenkinsfile.
agent-01 with your Jenkins agent name.pipeline {
agent {
node {
label 'agent-01'
}
}
options {
buildDiscarder logRotator(
daysToKeepStr: '16',
numToKeepStr: '10'
)
}
stages {
stage('Cleanup Workspace') {
steps {
cleanWs()
sh """
echo "Cleaned Up Workspace For Project"
"""
}
}
stage('Code Checkout') {
steps {
checkout([
$class: 'GitSCM',
branches: [[name: '*/main']],
userRemoteConfigs: [[url: 'https://github.com/spring-projects/spring-petclinic.git']]
])
}
}
stage('Unit Testing') {
steps {
sh """
echo "Running Unit Tests"
"""
}
}
stage('Code Analysis') {
steps {
sh """
echo "Running Code Analysis"
"""
}
}
stage('Deploy To Dev & QA') {
when {
branch 'develop'
}
steps {
sh """
echo "Building Artifact for Dev Environment"
"""
sh """
echo "Deploying to Dev Environment"
"""
sh """
echo "Deploying to QA Environment"
"""
}
}
stage('Deploy To Staging and Pre-Prod Code') {
when {
branch 'main'
}
steps {
sh """
echo "Building Artifact for Staging and Pre-Prod Environments"
"""
sh """
echo "Deploying to Staging Environment"
"""
sh """
echo "Deploying to Pre-Prod Environment"
"""
}
}
}
}
Setup Jenkins Multi-branch Pipeline
Now, I will walk you through the step by step process of setting up a multi-branch pipeline on Jenkins.
This setup will be based on Github and latest Jenkins version.
If you are learning, you can use the following repository as a reference for the pipeline.
https://github.com/techiescamp/jenkins-pipelinesCreate Multibranch Pipeline
(Step by Step Guide)
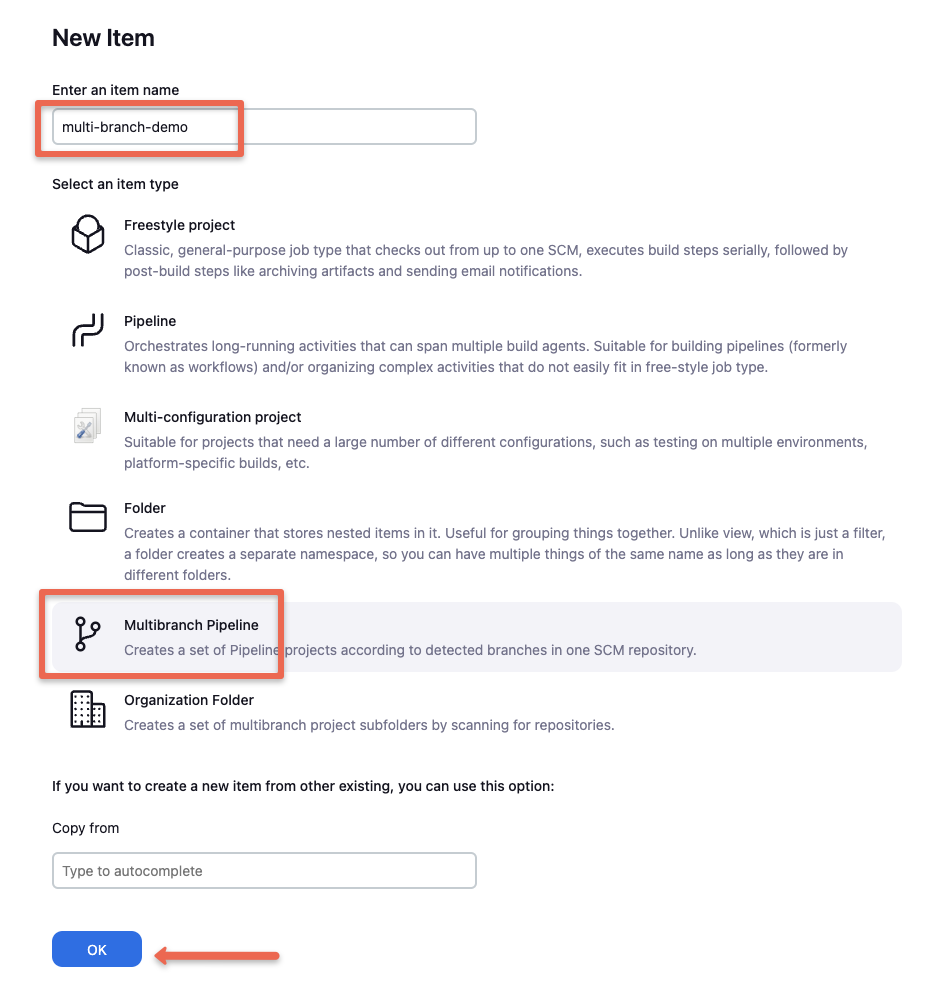
Step 1: From the Jenkins home page create a “new item”.

Step 2: Select the “Multibranch pipeline” from the option and click ok.
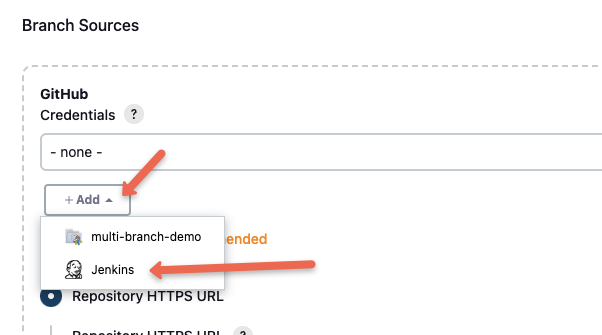
Step 3: Click “Add a Source” and select Github.

Step 4: Under the credentials field, select Jenkins, and create a credential with your Github username and password.
Step 5: Select the created credentials and provide your Github repo to validate the credentials as shown below.

Step 6: Under "Behaviours" select the required option matches your requirement. You can either choose to discover all the branches in the repo or only branches with a Pull Request.
The pipeline can discover branches with a PR from a forked repo as well. Choosing these options depends on your required workflow.
The options shown below is for the PR based workflow I explained earlier in the guide.

There are additional behavior you can choose from the “add” button.
For example, If you choose not to discover all the branches from the repo, you can opt for the regular expression or wildcard method to discover branches from the repo as shown below.

Here is a regex and wildcard example.

Step 7: If you choose to have a different name for Jenkinsfile, you can specify it in the build configuration.
In the “Script Path” option, you can provide the required name. Ensure the Jenkinsfile is present in the repo with the same name you provide in the pipeline configuration.
I am using multi-branch-pipeline/Jenkinsfile becuase the Jenkinsfile is present in the multi-branch-pipeline folder.
Also, Enable "Discard old builds" to keep only required build logs as shown below.

Step 8: Save all the job configurations.
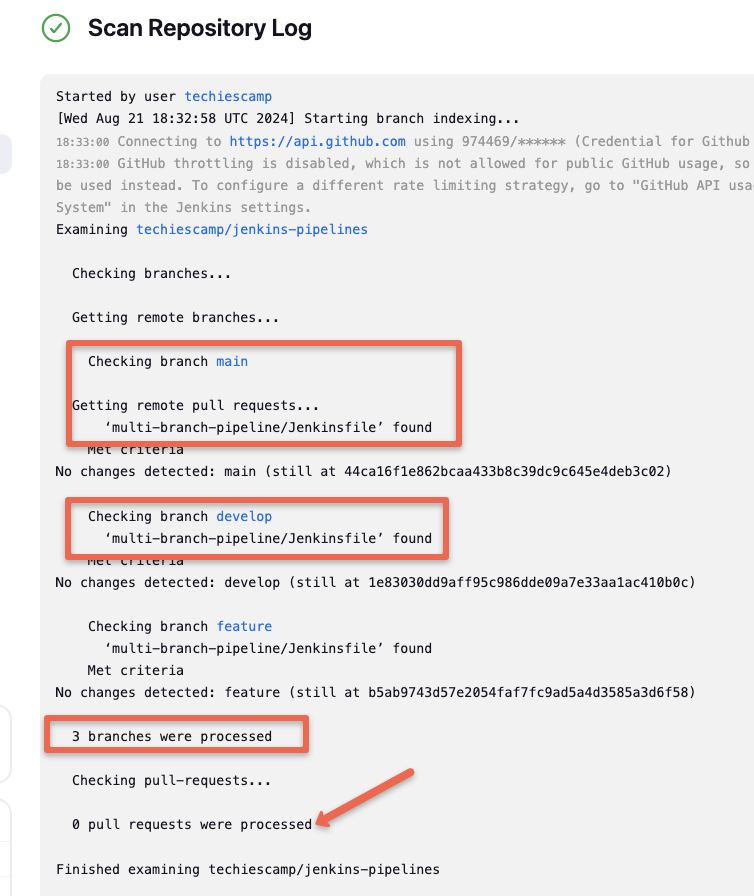
Jenkins scans the configured Github repo for all the branches and PR requests based on our configurations.
The following image shows the job scanning the three branches, and since I haven’t raised any pull request, Jenkins won’t create any branch-based pipeline. I will show how to test the automatic pipeline creation after the webhook setup.
Till now, we have done configurations on the Jenkins side to scan branches based on the PR requests.
To have a complete workflow, we need to configure a webhook in GitHub to send all repository events (commits, PRs, etc.) to Jenkins, so the pipelines can be triggered automatically.
Configure Webhook For Multibranch Pipeline
Follow the steps given below to setup the Jenkins webhook on the repo.
Step 1: Head over to the Github repo and click on the settings.

Step 2: Select the webhook option at the left and click “Add Webhook” button.

Step 3: dd your Jenkins URL followed by “/github-webhook/” under payload URL. Select the content type as “application/json” and click “Add Webhook”

You should see a green tick mark on a successful webhook configuration as shown below.

If you don’t see a green tick or see a warning sign, click on the webhook link, scroll down to “Recent Deliveries,” and click on the last webhook. You should be able to view why the webhook delivery failed with the status code.

Now we are done with all the required configurations for the multi-branch pipeline. The next step is to test the multi-branch pipeline workflow triggers.
Test Multi-branch Pipeline
This repo am using has two branches. main and develop.
Update some content in the README file in the develop branch and raise a PR to main. You can also do this from a forked repository.
It will send a webhook to Jenkins and and it will create a pipeline for the raised PR and starts building it.
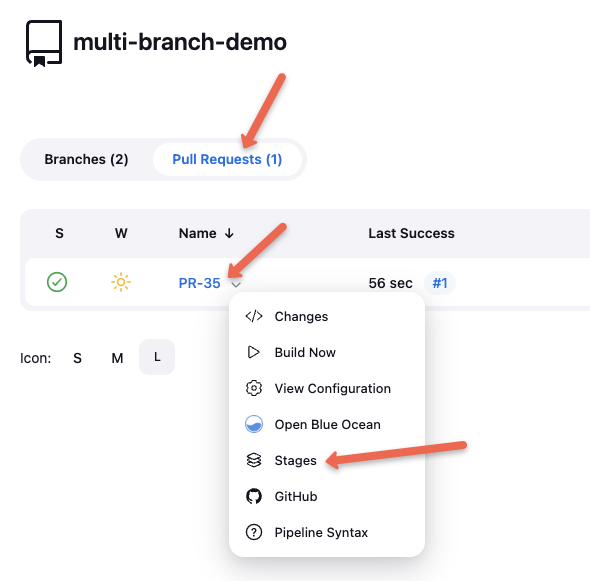
Now, if you check Jenkins you will find a pipeline for PR in Jenkins as shown below.
If the build fails, you can commit the changes to the develop branch and as long as the PR is open, it will trigger the PR pipeline.
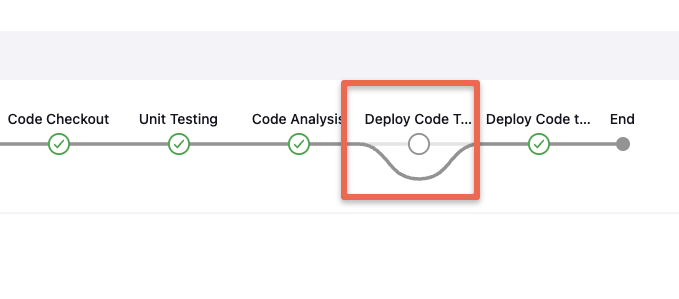
In the Jenkinfile I have added a condition to skip the deploy stage if the branch is develop and main if it is a PR build. You can check that in the Jenkins build stages. If you check the stages you can clearly see the skipped deployment stages as shown below.

Now if you merge the PR, Jenkins will trigger the main branch pipelin and executes all the deployment stages mentioned in the Jenkinsfile for the main branch.
For example, in out pipeline example, we skip the dev and QA deployment if the branch is main. You can see that in the stages output.
Enabling Pull Request Status Checks
With multi-branch pipeline, you can enable status checks. Meaning Jenkins reports the results back to GitHub as status checks. It appears on the PR page as shown below.
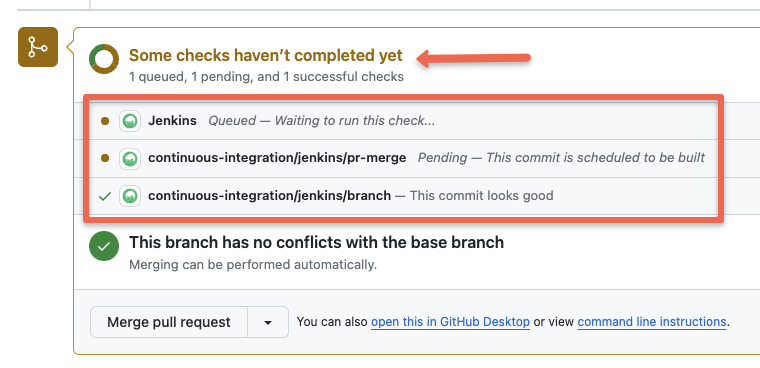
For example, developers may need status checks for the following.
Common status checks might include:
- Build verification
- Unit tests
- Code style checks
- Security scans
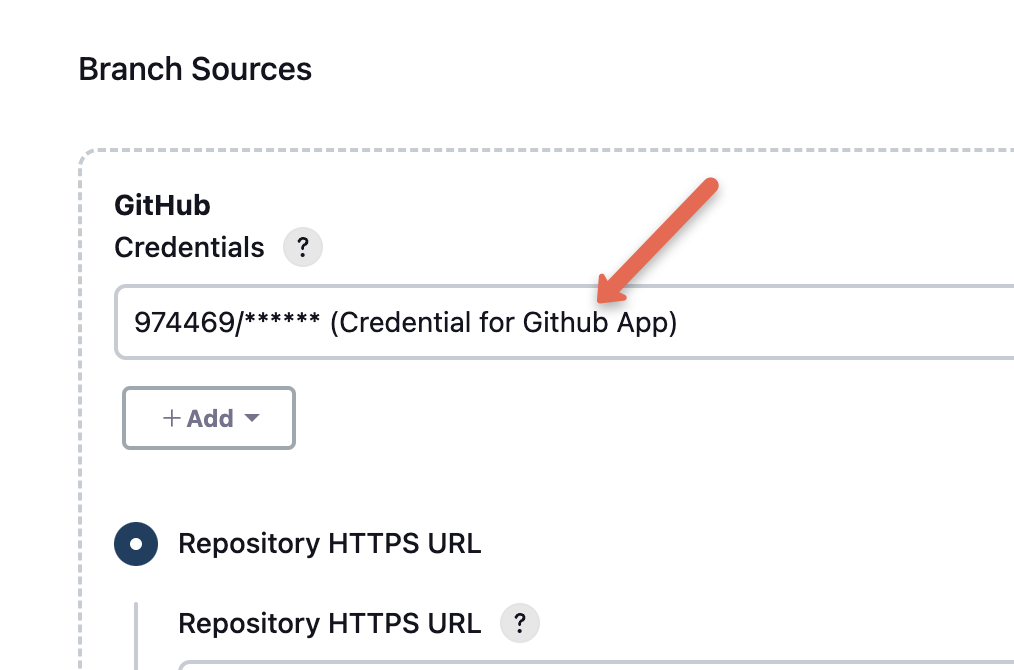
To enable these status checks in Github PR, you need to create create a Github App for Jenkins.
You can follow this Github App for Jenkins detailed guide to create one.
Then in the multi-branch pipeline configuration, you need to use the Github App credential instead of username and password.
Troubleshooting Multibranch Pipelines
I will talk about a few possible errors in a multibranch pipeline that you might encounter and how to troubleshoot them.
Branch Discovery Issue
Sometimes even after creating new branches in the SCM, it might not reflect in the Jenkins pipeline. You can try running the "Scan Repository Now" option to scan the repo again. Also, check the repository scan configurations in the pipeline.
PR Webhooks Not Triggering the Pipelines
When a webhook is not triggering the pipeline, check the webhook delivery in Github for status code and error. Also, check if the Jenkins URL is correct. Also, check Jenkins logs from Manage Jenkins --> System Logs --> All Jenkins logs. If Jenkins is able to receive the webhook, the log should show the reason why the jobs are not getting triggered.
Commits Not Triggering Pipeline
If you want each commit to rigger the branch pipeline, then you should select the "Discover All Branches or " option in the branch discovery configuration. So whenever you commit a change to the discoverable branches or raise a PR, the pipeline will automatically get triggered.
Multibranch Pipeline Best Practices
Let's have a look at some of the best practices for a multibranch pipeline.
Repo Branching – Have a Standard Structure
It is essential to have the standard branching structure for your repositories. Whether it is your application code or infra code, having a standard branching will reduce the inconsistent configurations across different pipelines.
Shared Libraries – Reusable Pipeline Code
Make use of shared libraries for all your multi-branch pipelines. Reusable libraries make it easy to manage all the pipeline stages in a single place.
Pull Request Vs Commit Triggers
Try to use a PR based pipeline rather than commit based. If a code repo gets continuous commits it might overwhelm Jenkins with many builds.
Commit based triggers are supported in PR based discovery as well. Here the commit trigger happens only when the PR is still open.
Jenkins Pipeline Vs. Multibranch Pipeline
A normal pipeline job is meant for building a single branch from the SCM and deploy to a single environment. However, you can
A multibranch pipeline is meant for building multiple branches from a repository and deploy to multiple environments if required.
A pipeline job supports both pipeline steps to be added in Jenkins configuration and form SCM.
Use pipeline job for adhoc jobs, parameterised job executions and to debug pipeline as code.
Do not use multibranch pipeline if you do not have a standard branching and CI/CD strategy.
Multibranch Pipeline Vs. Github Organization Job
Like a multi-branch pipeline, the Github organization folder is one of the Jenkins project types.
Mullitbranch pipleine can only configure pipelines for a single Git repository. Whereas a Jenins Github organization project can automatically configure multi-branch pipelines for all the repos in a Github organization.
It can discover all the repositories in the configured Github organization, with a Jenkinsfile.
Also, you can configure a generic webhook in the organizational level to avoid having webhooks in each repo.
The only difference between multi-branch and organization project is that organizations can configure multi-branch pipelines for multiple repos.
So which one should I use?
This totally depends on the workflow you need. If you have a standard pipeline and process of deploying applications or infra code, Github organization is great. Or else, configuring multibranch pipeline separately will be a good option.
I’d like to hear from you
That’s all for my guide to multi-branch pipelines.
What type of Jenkins pipleines are you using?
Do you think multi-branch pipeline will add value to your workflows?
Or maybe you want stick to regular Jenkinsfile pipelines
Either way, let me know by leaving a comment.