

If you're new to Kubernetes Daemonsets and want to learn more, this complete beginner's guide is for you.
You'll learn about
- How Daemonset works
- Deploying and managing Daemonsets
- Daemonset use cases
- Daemonset best practices.
So if you want to learn and implement Daemonset practically, you’ll love this guide.
Let’s get started.
What is a DaemonSet In Kubernetes?
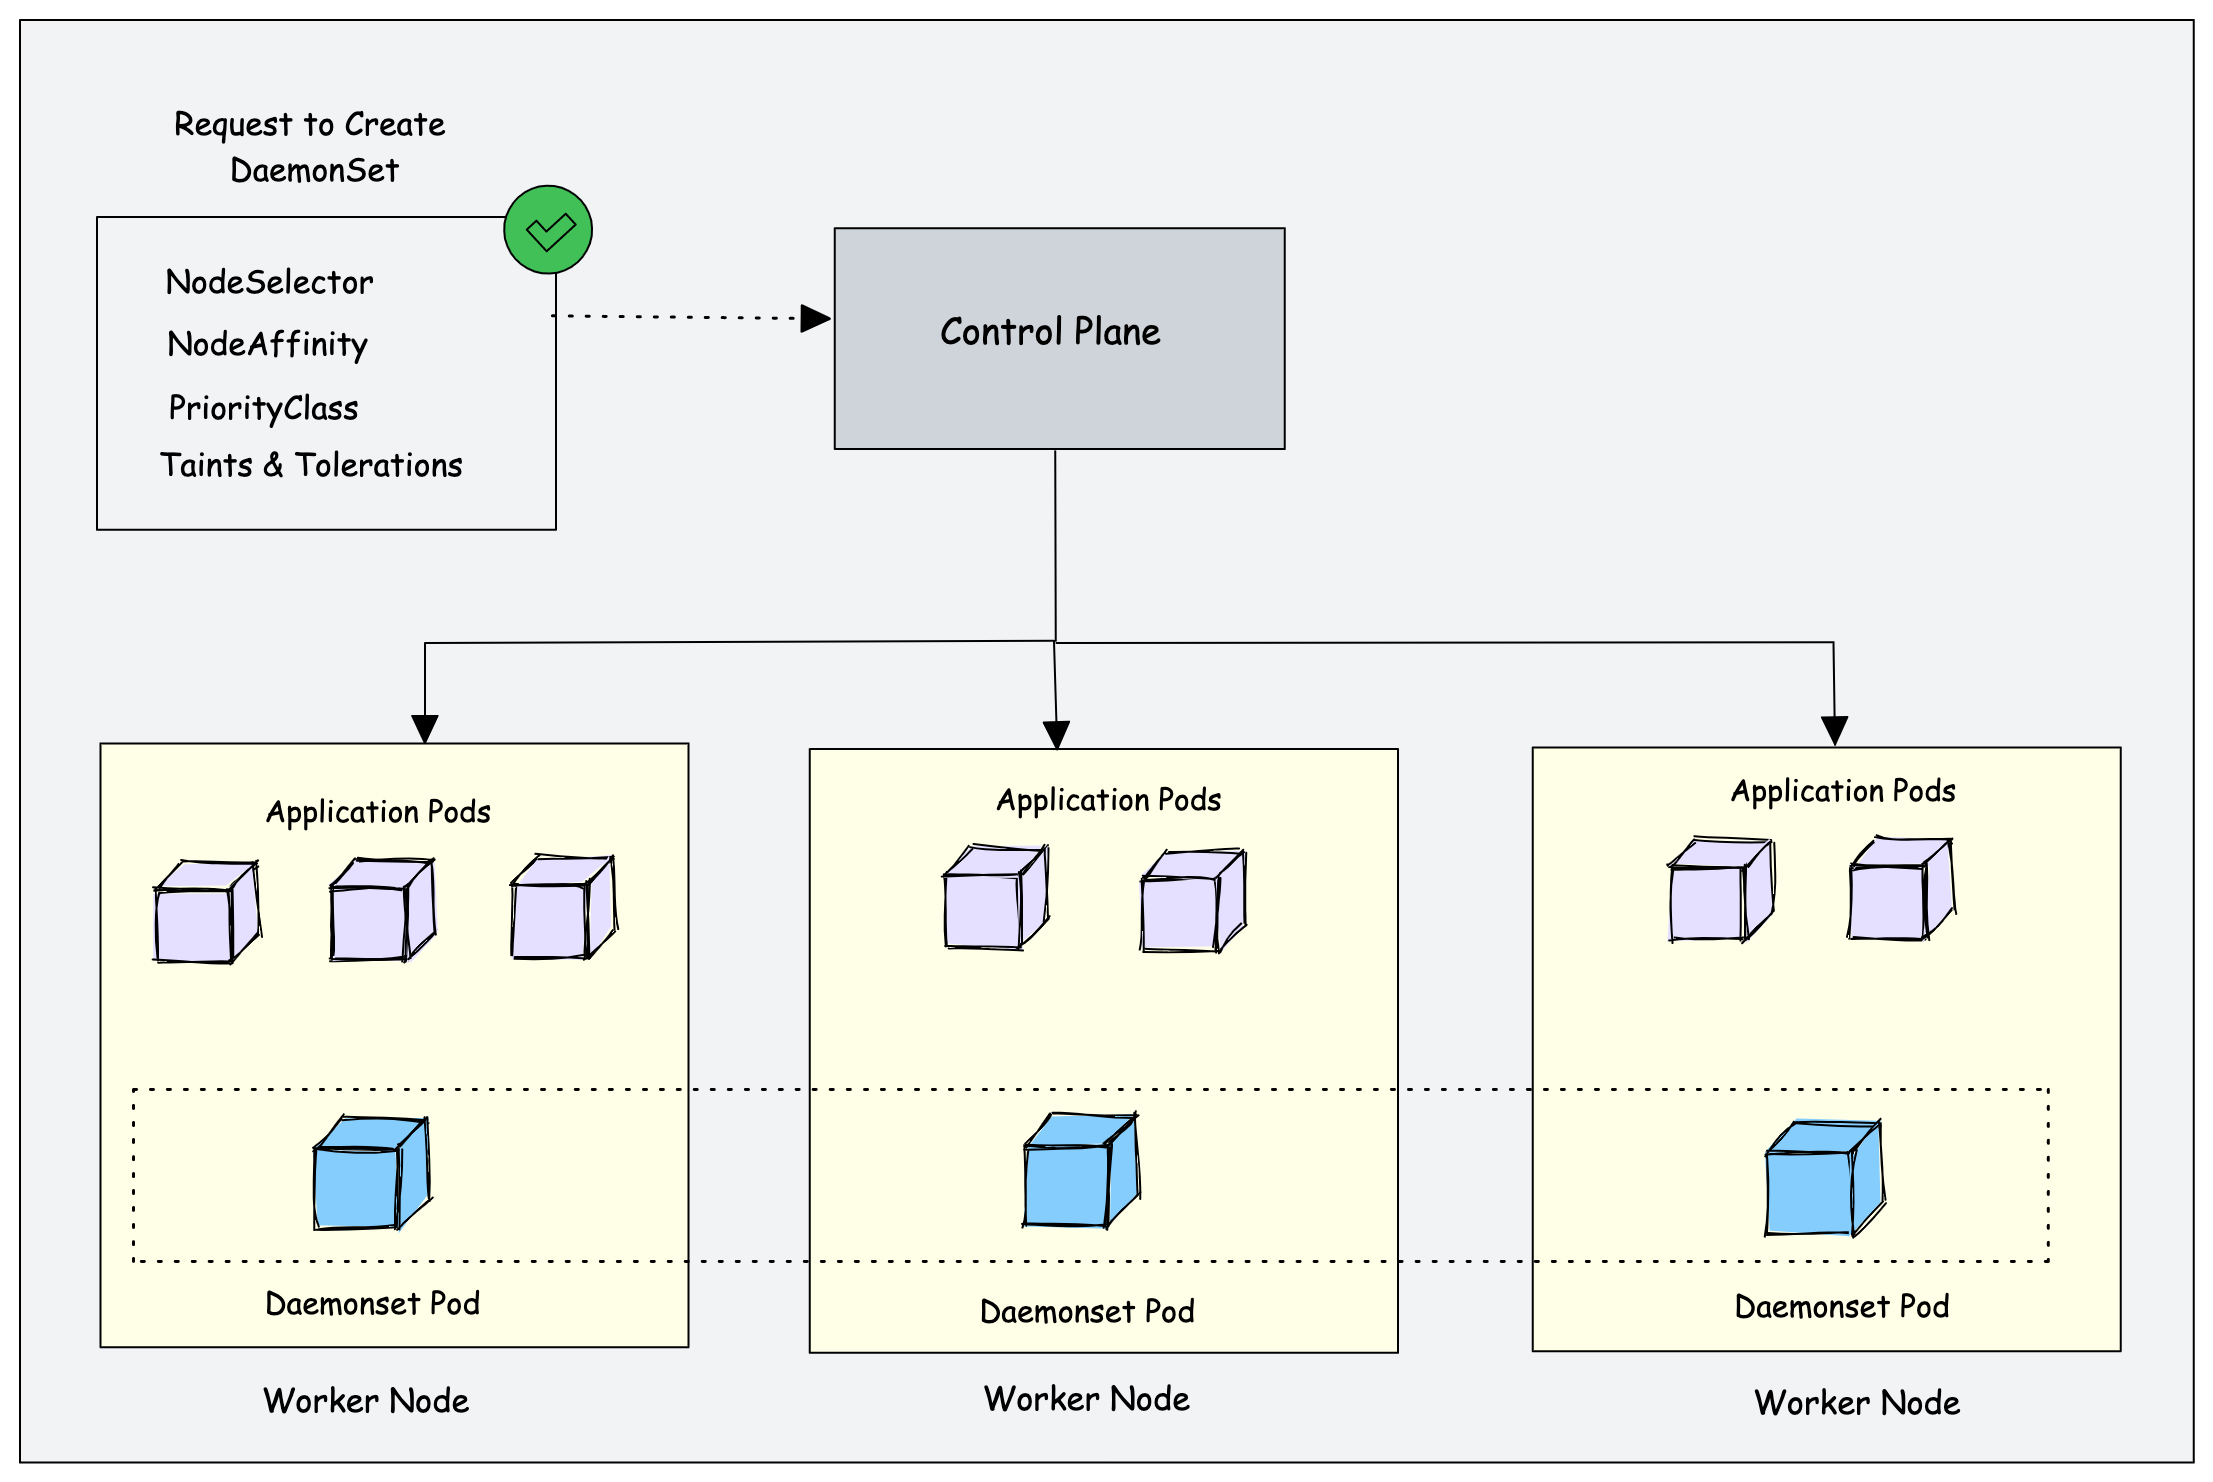
Kubernetes is a distributed system, and there should be some functionality for kubernetes platform administrators to run platform-specific applications on all the nodes. For example, running a logging agent on all the Kubernetes nodes.
Here is where Daemonset comes into the picture.
Daemonset is a native Kubernetes object. As the name suggests, it is designed to run system daemons.
The DaemonSet object is designed to ensure that a single pod runs on each worker node. This means you cannot scale daemonset pods in a node. And for some reason, if the daemonset pod gets deleted from the node, the daemonset controller creates it again.
Let's look at an example.
If there are 500 worker nodes and you deploy a daemonset, the daemonset controller will run one pod per worker node by default. That is a total of 500 pods. However, using nodeSelector, nodeAffinity, Taints, and Tolerations, you can restrict the daemonset to run on specific nodes.
For example, in a cluster of 100 worker nodes, one might have 20 worker nodes labeled GPU enabled to run batch workloads. And you should run a pod on those 20 worker nodes. In this case, you can deploy the pod as a Daemonset using a node selector. We will look at it practically later in this guide.
Another example is that you have a specific number of worker nodes dedicated to platform tools (ingress, monitoring, logging, etc.) and want to run Daemonset related to platform tools only on the nodes labeled as platform tools.
In this case, you can use the nodeSelector to run the daemonset pods only on the worker nodes dedicated to platform tooling.
Kubernetes DaemonSet Use Cases
The very basic use case of DaemonSet is in the cluster itself. If you look at the Kubernetes architecture, the kube-proxy component runs a daemonset.
The following are the real-world use cases of Daemonset.
- Cluster Log Collection: Running a log collector on every node to centralize Kubernetes logging data. Eg: fluentd , logstash, fluentbit
- Cluster Monitoring: Deploy monitoring agents, such as Prometheus Node Exporter, on every node in the cluster to collect and expose node-level metrics. This way prometheus gets all the required worker node metrics.
- Security and Compliance: Running CIS Benchmarks on every node using tools like kube-bench. Also deploy security agents, such as intrusion detection systems or vulnerability scanners, on specific nodes that require additional security measures. For example, nodes that handle PCI, and PII-compliant data.
- Storage Provisioning: Running a storage plugin on every node to provide a shared storage system to the entire cluster.
- Network Management: Running a network plugin or firewall on every node to ensure consistent network policy enforcement. For example, the Calico CNI plugin runs as a Daemonset on all the nodes.
According to the requirements, we can deploy multiple DaemonSet for one kind of daemon, using a variety of flags or memory and CPU requests for various hardware types
DaemonSet Example
Like other Kubernetes objects, DaemonSet also gets configured by using YAML files. We need to create a manifest file that will contain all of the necessary configuration information for our DaemonSet.
Let's assume we want to deploy a Fluentd logging agent as a DaemonSet on all the cluster worker nodes.
Below is a sample daemonset.yaml file that gets deployed in the logging namespace.
You can also get the daemonset YAML examples from the Kubernetes Course Github Repo
apiVersion: apps/v1
kind: DaemonSet
metadata:
  name: fluentd
  namespace: logging
  labels:
    app: fluentd-logging
spec:
  selector:
    matchLabels:
      name: fluentd
  template:
    metadata:
      labels:
        name: fluentd
    spec:
      containers:
      - name: fluentd-elasticsearch
        image: quay.io/fluentd_elasticsearch/fluentd:v2.5.2
        resources:
          limits:
            memory: 200Mi
          requests:
            cpu: 100m
            memory: 200Mi
        volumeMounts:
        - name: varlog
          mountPath: /var/log
      terminationGracePeriodSeconds: 30
      volumes:
      - name: varlog
        hostPath:
          path: /var/log
Let's understand the manifest file.
apiVersion:apps/v1forDaemonSetkind:DaemonSetsuch as Pod, Deployment, and Servicemetadata:Put the name of theDaemonSet, mention namespace, annotations, and labels. In our caseDaemonSet'sname is fluentd.spec.selector:The selector for the pods is managed by theDaemonSet. This value must be a label specified in the pod template. This value is immutable.spec.template:This is a required field that specifies a pod template for theDaemonSetto use. Along with all the required fields for containers. It has everything of pod schema exceptapiVersionandkind.
template.metadata will have the details about the pod and template.spec will have the schema of the pod.
Here in the pod template, we are using quay.io/fluentd_elasticsearch/fluentd:v2.5.2 image that will run on every node in a Kubernetes cluster. Each pod would then collect logs and send the data to ElasticSearch. Added resource limit and request for the pod, also volume and volumeMount accordingly.
We don't provide any replica counts. It is because the replica count of DaemonSet is dynamic in nature, as it depends on the node count of the cluster.
Let's deploy this manifest by using the below commands. First, we will have to create a namespace and deploy the Daemonset in that namespace.
kubectl create ns logging

kubectl apply -f daemonset.yaml
Check the DaemonSet status and pods' status.
kubectl get daemonset -n loggingkubectl get pods -n logging -o wide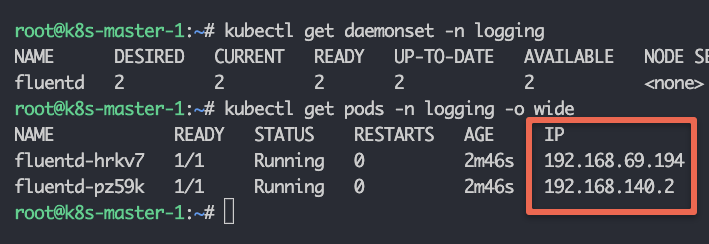
You can see Fluentd pods are running on the two available worker nodes.
Here are some other useful commands to describe, edit, and get the DaemonSet.
kubectl describe daemonset -n loggingkubectl edit daemonset -n logging#shortcut for daemonset is ds
kubectl get dsApply Taint and Tolerations For Daemonset
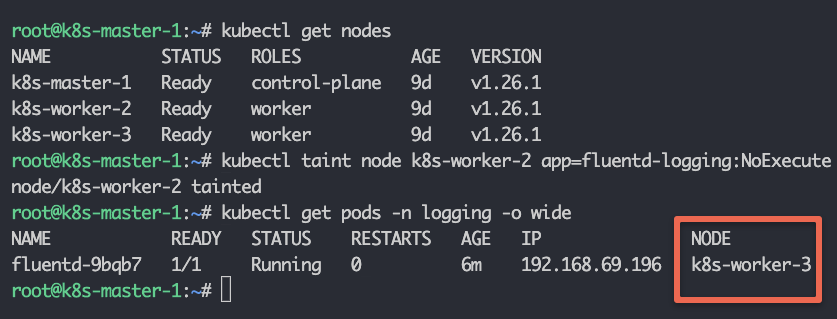
Taints and Tolerations are the Kubernetes feature that allows you to ensure that pods are not placed on inappropriate nodes. We taint the nodes and add tolerations in the pod schema.
kubectl taint nodes node1 key1=value1:<Effect>There are 3 effects:
NoSchedule: Kubernetes scheduler will only allow scheduling pods that have tolerations for the tainted nodes.PreferNoSchedule:Kubernetes scheduler will try to avoid scheduling pods that don’t have tolerations for the tainted nodes.NoExecute:Kubernetes will evict the running pods from the nodes if the pods don’t have tolerations for the tainted nodes.
Below, I'm tainting one of the nodes with key app and value monitoring and the effect is NoExecute. We don't want DaemonSet to run the pod on this particular node.
kubectl taint node k8s-worker-2 app=fluentd-logging:NoExecuteNow adding toleration like this in our daemonset.yaml
spec:
  tolerations:
  - key: app
    value: fluentd-logging
    operator: Equal
    effect: NoExecute
  containers:
  -----
  -----
As you will update the DaemonSet, you will see that one pod got deleted which was running on the node k8s-worker-2. DaemonSet now won't schedule any pod on this node.
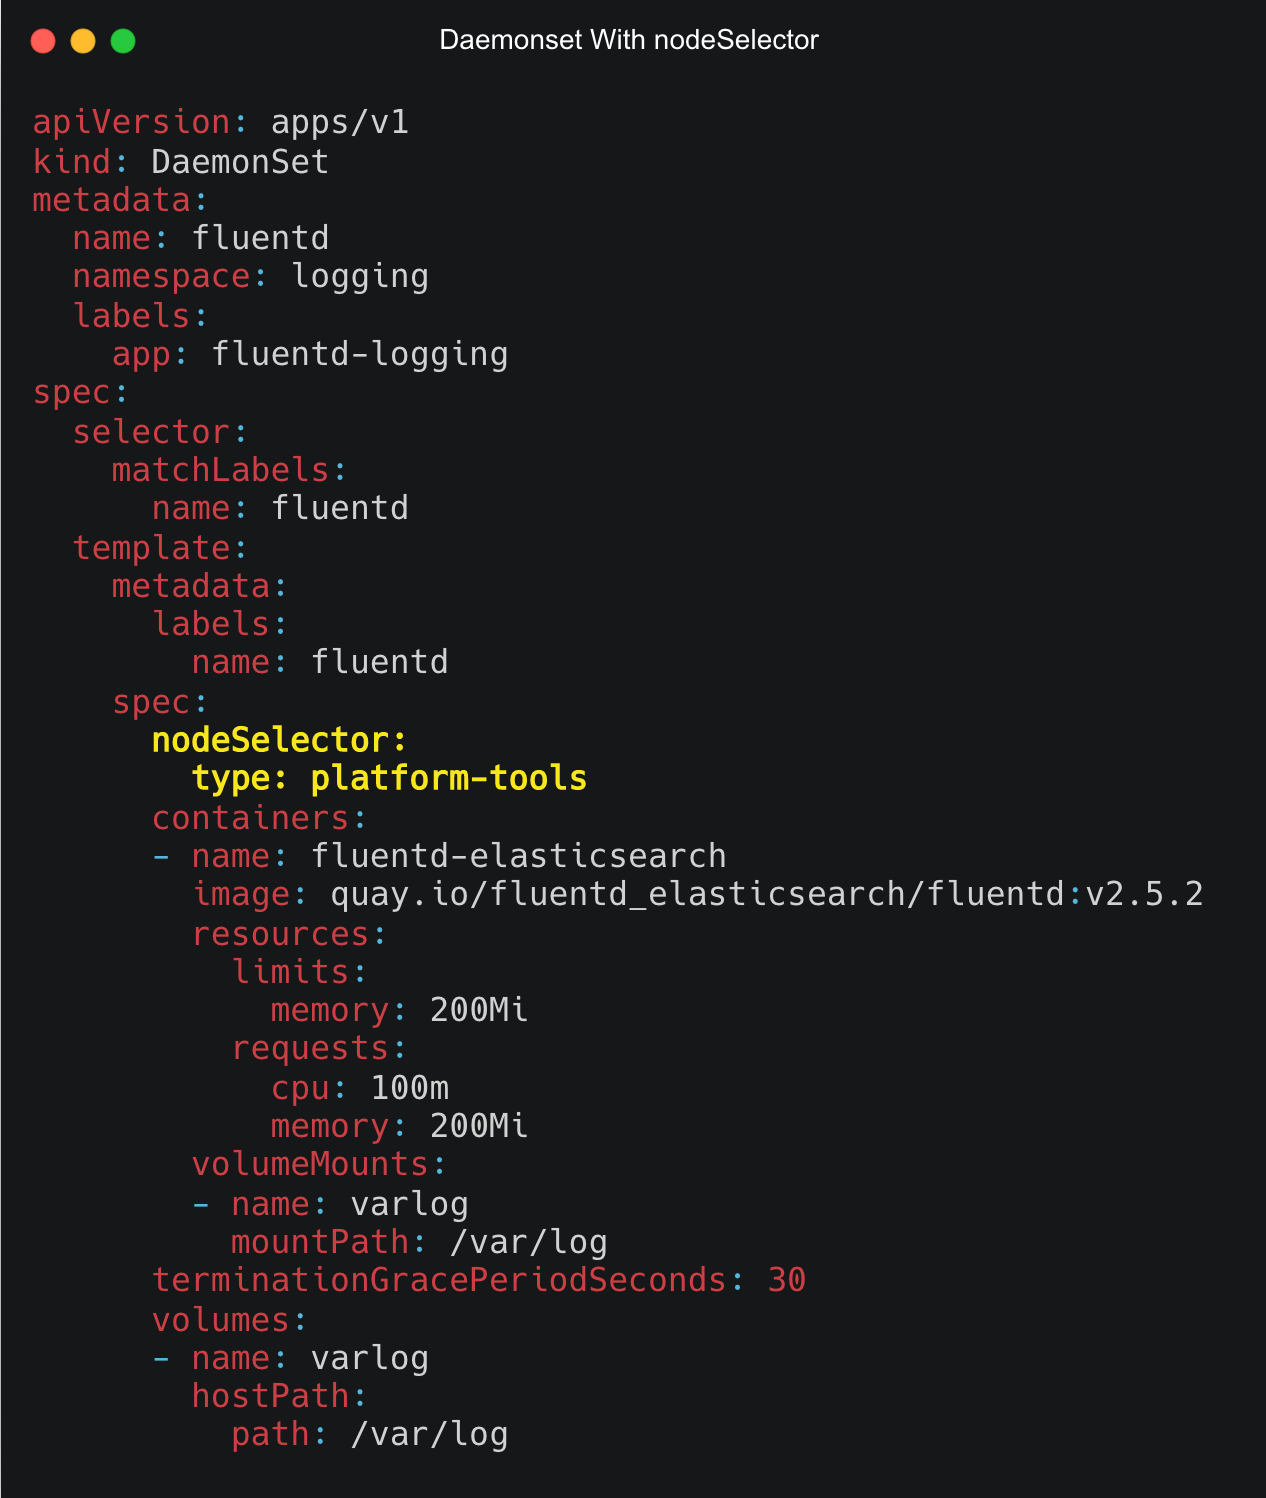
Using Nodeselector For Daemonset Pods
We can use nodeSelector to run the pods on some specific nodes. DaemonSet controller will create Pods on nodes that match the node selector's key and value
First, you need to add a label to the node.
kubectl label node <node-name> key=valueFor example, let's say you want to label a node as type=platform-tools, you can use the following command.
kubectl label node k8s-worker-1 type=platform-toolsNow, to apply a nodeSelector to a Daemonset, under the spec section, add the nodeSelector with the key and value as shown below.
spec:
  nodeSelector:
    <key>: <value>
The following image shows the Daemonset YAML with the nodeSelector spec highlighter in yellow.
Daemonset Node Affinity
We can also achieve more fine-grained control over how nodes are selected using Node affinity. DaemonSet controller will create Pods on nodes that match Node affinity.
Node affinity is conceptually similar to nodeSelector, allowing you to constrain which nodes your pod can be scheduled on based on node labels. There are two types of node affinity:
requiredDuringSchedulingIgnoredDuringExecution: The scheduler can't schedule the Pod unless the rule is met. This functions likenodeSelector, but with a more expressive syntax.preferredDuringSchedulingIgnoredDuringExecution: The scheduler tries to find a node that meets the rule. If a matching node is not available, the scheduler still schedules the Pod.
We can add an affinity like this to our manifest
spec:
  affinity:
    nodeAffinity:
      requiredDuringSchedulingIgnoredDuringExecution:
        nodeSelectorTerms:
        - matchFields:
          - key: key-name
            operator: In
            values:
            - value-name
The Pods are only allowed to run on nodes that have the key and values mentioned in the matchFields section.
The following Daemonset YAML uses both Affinity rules highlighted in bold. Required rules for node label and a preferred rule to select a node with instance label instance type t2.large
apiVersion: apps/v1
kind: DaemonSet
metadata:
  name: fluentd
  namespace: logging
  labels:
    app: fluentd-logging
spec:
  selector:
    matchLabels:
      name: fluentd
  template:
    metadata:
      labels:
        name: fluentd
    spec:
      affinity:
        nodeAffinity:
          requiredDuringSchedulingIgnoredDuringExecution:
            nodeSelectorTerms:
            - matchExpressions:
              - key: type
                operator: In
                values:
                - platform-tools
          preferredDuringSchedulingIgnoredDuringExecution:
          - weight: 1
            preference:
              matchExpressions:
              - key: instance-type
                operator: In
                values:
                - t2.large
      containers:
      - name: fluentd-elasticsearch
        image: quay.io/fluentd_elasticsearch/fluentd:v2.5.2
        resources:
          limits:
            memory: 200Mi
          requests:
            cpu: 100m
            memory: 200Mi
        volumeMounts:
        - name: varlog
          mountPath: /var/log
      terminationGracePeriodSeconds: 30
      volumes:
      - name: varlog
        hostPath:
          path: /var/log
Daemonset Privileged Access
There are use cases where you need privileged access to the host from the Deamonset pod. For example, the calico CNI daemoset requires host-level access for its networking requirements because it needs to modify IPtables.
Another example is the Kube-proxy daemonset. It also requires privileged access.
You can use securityContext in the Pod Spec to allow or deny Privileged access. A security context defines privilege and access control settings for a Pod or Container. To specify security settings for a pod, you need to include the securityContext field in the pod manifest.
spec:
  securityContext:
    runAsNonRoot: true
  containers:
  - name: fluentd-elasticsearch
    image: quay.io/fluentd_elasticsearch/fluentd:v2.5.2
    securityContext:
      allowPrivilegeEscalation: false
    -------
The first is a pod-level security context defined by the object, and the second is a SecurityContext defined by the individual container.
allowPrivilegeEscalation: AllowPrivilegeEscalation controls whether a process can gain more privileges than its parent process.privileged: Run the container in privileged mode. Processes in privileged containers are essentially equivalent to root on the host.runAsNonRoot: Indicates that the container must run as a non-root user.runAsUser: The UID to run the entry point of the container process.runAsGroup: The GID to run the entry point of the container process.
Rolling Update, Rollback, and Deleting Daemonset
Let's look at the concepts for updating, deleting, and rolling back Daemonset deployments.
Rolling Update
DaemonSet has two update strategy types:
OnDelete: Using theOnDeletestrategy, theDaemonSetpod will only be created when we manually delete any pod.RollingUpdate: This is the default update strategy. Using theRollingUpdatestrategy, whenever you update aDaemonSettemplate, old pods will be killed, and new pods will be created automatically. At most one pod of theDaemonSetwill be running.
spec:
  updateStrategy:
    type: RollingUpdate
    rollingUpdate:
      maxUnavailable: 1
Rollback
We can rollback the DaemonSet by using the below command:
kubectl rollout undo daemonset <daemonset-name>To check all the revisions of the DaemonSet:
kubectl rollout history daemonset <daemonset-name>If you want to rollback to the specific revision, then use:
kubectl rollout undo daemonset <daemonset-name> --to-revision=<revision>Deletion
kubectl delete daemonset <daemonset-name>Use --cascade=false if you want the pods to be running on the node.
DaemonSet Pod Priority
Kubernetes Pod Priority determines the importance of a pod over another pod.
We can set a higher pod PriorityClass to the DaemonSet in case you are running critical system components as a Deamonset. This ensures that the daemonset pods are not preempted by lower-priority or less critical pods.
PriorityClass is used to define the priority of the pod. PriorityClass objects can have any 32-bit integer value smaller than or equal to 1 billion. The higher the value, the higher will be the priority.
Create a priority class and that to DaemonSet pod spec
apiVersion: scheduling.k8s.io/v1
kind: PriorityClass
metadata:
  name: high-priority
value: 100000
globalDefault: false
description: "daemonset priority class"
Check by running this command
kubectl get priorityClassWe need to add the priorityClass in our daemonset.yaml
spec:
  priorityClassName: high-priority
  containers:
  ------
  ------
  terminationGracePeriodSeconds: 30
  volumes:
  ------
If you look at Kube-Proxy & Cluser CNI (Calico) Daemonsets, it has the priority class set to system-node-critical which has the highest priority. It is a built-in PriorityClass in Kubernetes that is applied to pods that should not be evicted in any circumstances.
Daemonset Troubleshooting
A DaemonSet is called unhealthy when any pod is not running on the node. The generic reason for that is pod status is crashloopbackoff, the pod is in the pending state or in an error state.
In such cases, the initial step to check the logs of the Pods using the following command.
kubecttl -n <NAMESPACE> logs <POD NAME> -fFrom the output, we can fix this by:
- Pod might be running out of resources. We can lower the requested CPU and memory of the
DaemonSet. - We can move some pods off of the affected nodes to free up resources. Use taints and tolerations to prevent the pods from running on certain nodes.
- We can scale up the nodes as well.
You can perform normal pod troubleshooting steps to figure out the issues.
DaemonSet Best Practices
Below are some practices that we must follow:
DaemonSetpods must have Restart Policy set toAlwaysorunspecified- Separate each
DaemonSetinto its own namespace to ensure clear isolation and easier resource management. - It is better to use
preferredDuringSchedulingIgnoredDuringExecutioninstead ofrequiredDuringSchedulingIgnoredDuringExecutionbecause it is impossible to start new Pods if the number of nodes required for the new Pods is larger than the number of nodes available. DaemonSetpriority should be 10000. It is not advised forDaemonSetPods to be evicted from cluster nodes- We must specify a pod selector that matches the labels of the
.spec.template. - We can use
minReadySecondsin pod schema. It tells Kubernetes how long it should wait until it creates the next pod. This property ensures that all application pods are in the ready state during the update. - Use proper labels and selectors to deploy the DaemonSets on specific nodes.
- DaemonSet resource request/limit should be kept as minimal as possible, because they run on each node.
- Use the
PodDisruptionBudgetsto ensure the controlled eviction of Daemonset pods.
Conclusion
In this kubernetes tutorial, we learned about Kubernetes DaemonSets. DaemonSet is a great way to manage and deploy applications in a clustered environment.
We have seen how can we create the DaemonSet along with its use case. We can configure them to create pods on certain nodes using tolerations and node selectors and perform rolling updates on them in a controlled manner.
Further, we have talked about unhealthy DaemonSet and their best practices. Also, If you are preparing for CKA certification, Daemonset is an important concept to prepare for the exam.
If you are learning Kubernetes check out the Kubernetes learning roadmap to deepen your Kubernetes knowledge.
