

When you install a Helm Chart, at the end of the deployment you usually see operational instructions in your terminal like what to do next, commands to check the service health, Chart repository, etc.
This is done by via NOTES.txt in Helm chart.
In this blog, you will learn about:
- What is Helm Notes.txt
- How it works and its use cases
- How to view notes before and after chart installation.
- Simple hands-on guide to show the Notes.txt functionality.
- How to suppress notes output
Lets get started.
What is NOTES.txt in Helm Chart?
Lets understand NOTES.txt with a use case.
Lets say you are developing a Helm chart to deploy a backend application.
After the chart deployment, you want to print the the key details about the deployment like its configured DNS endpoint, API paths etc..
NOTES.txt solves this.
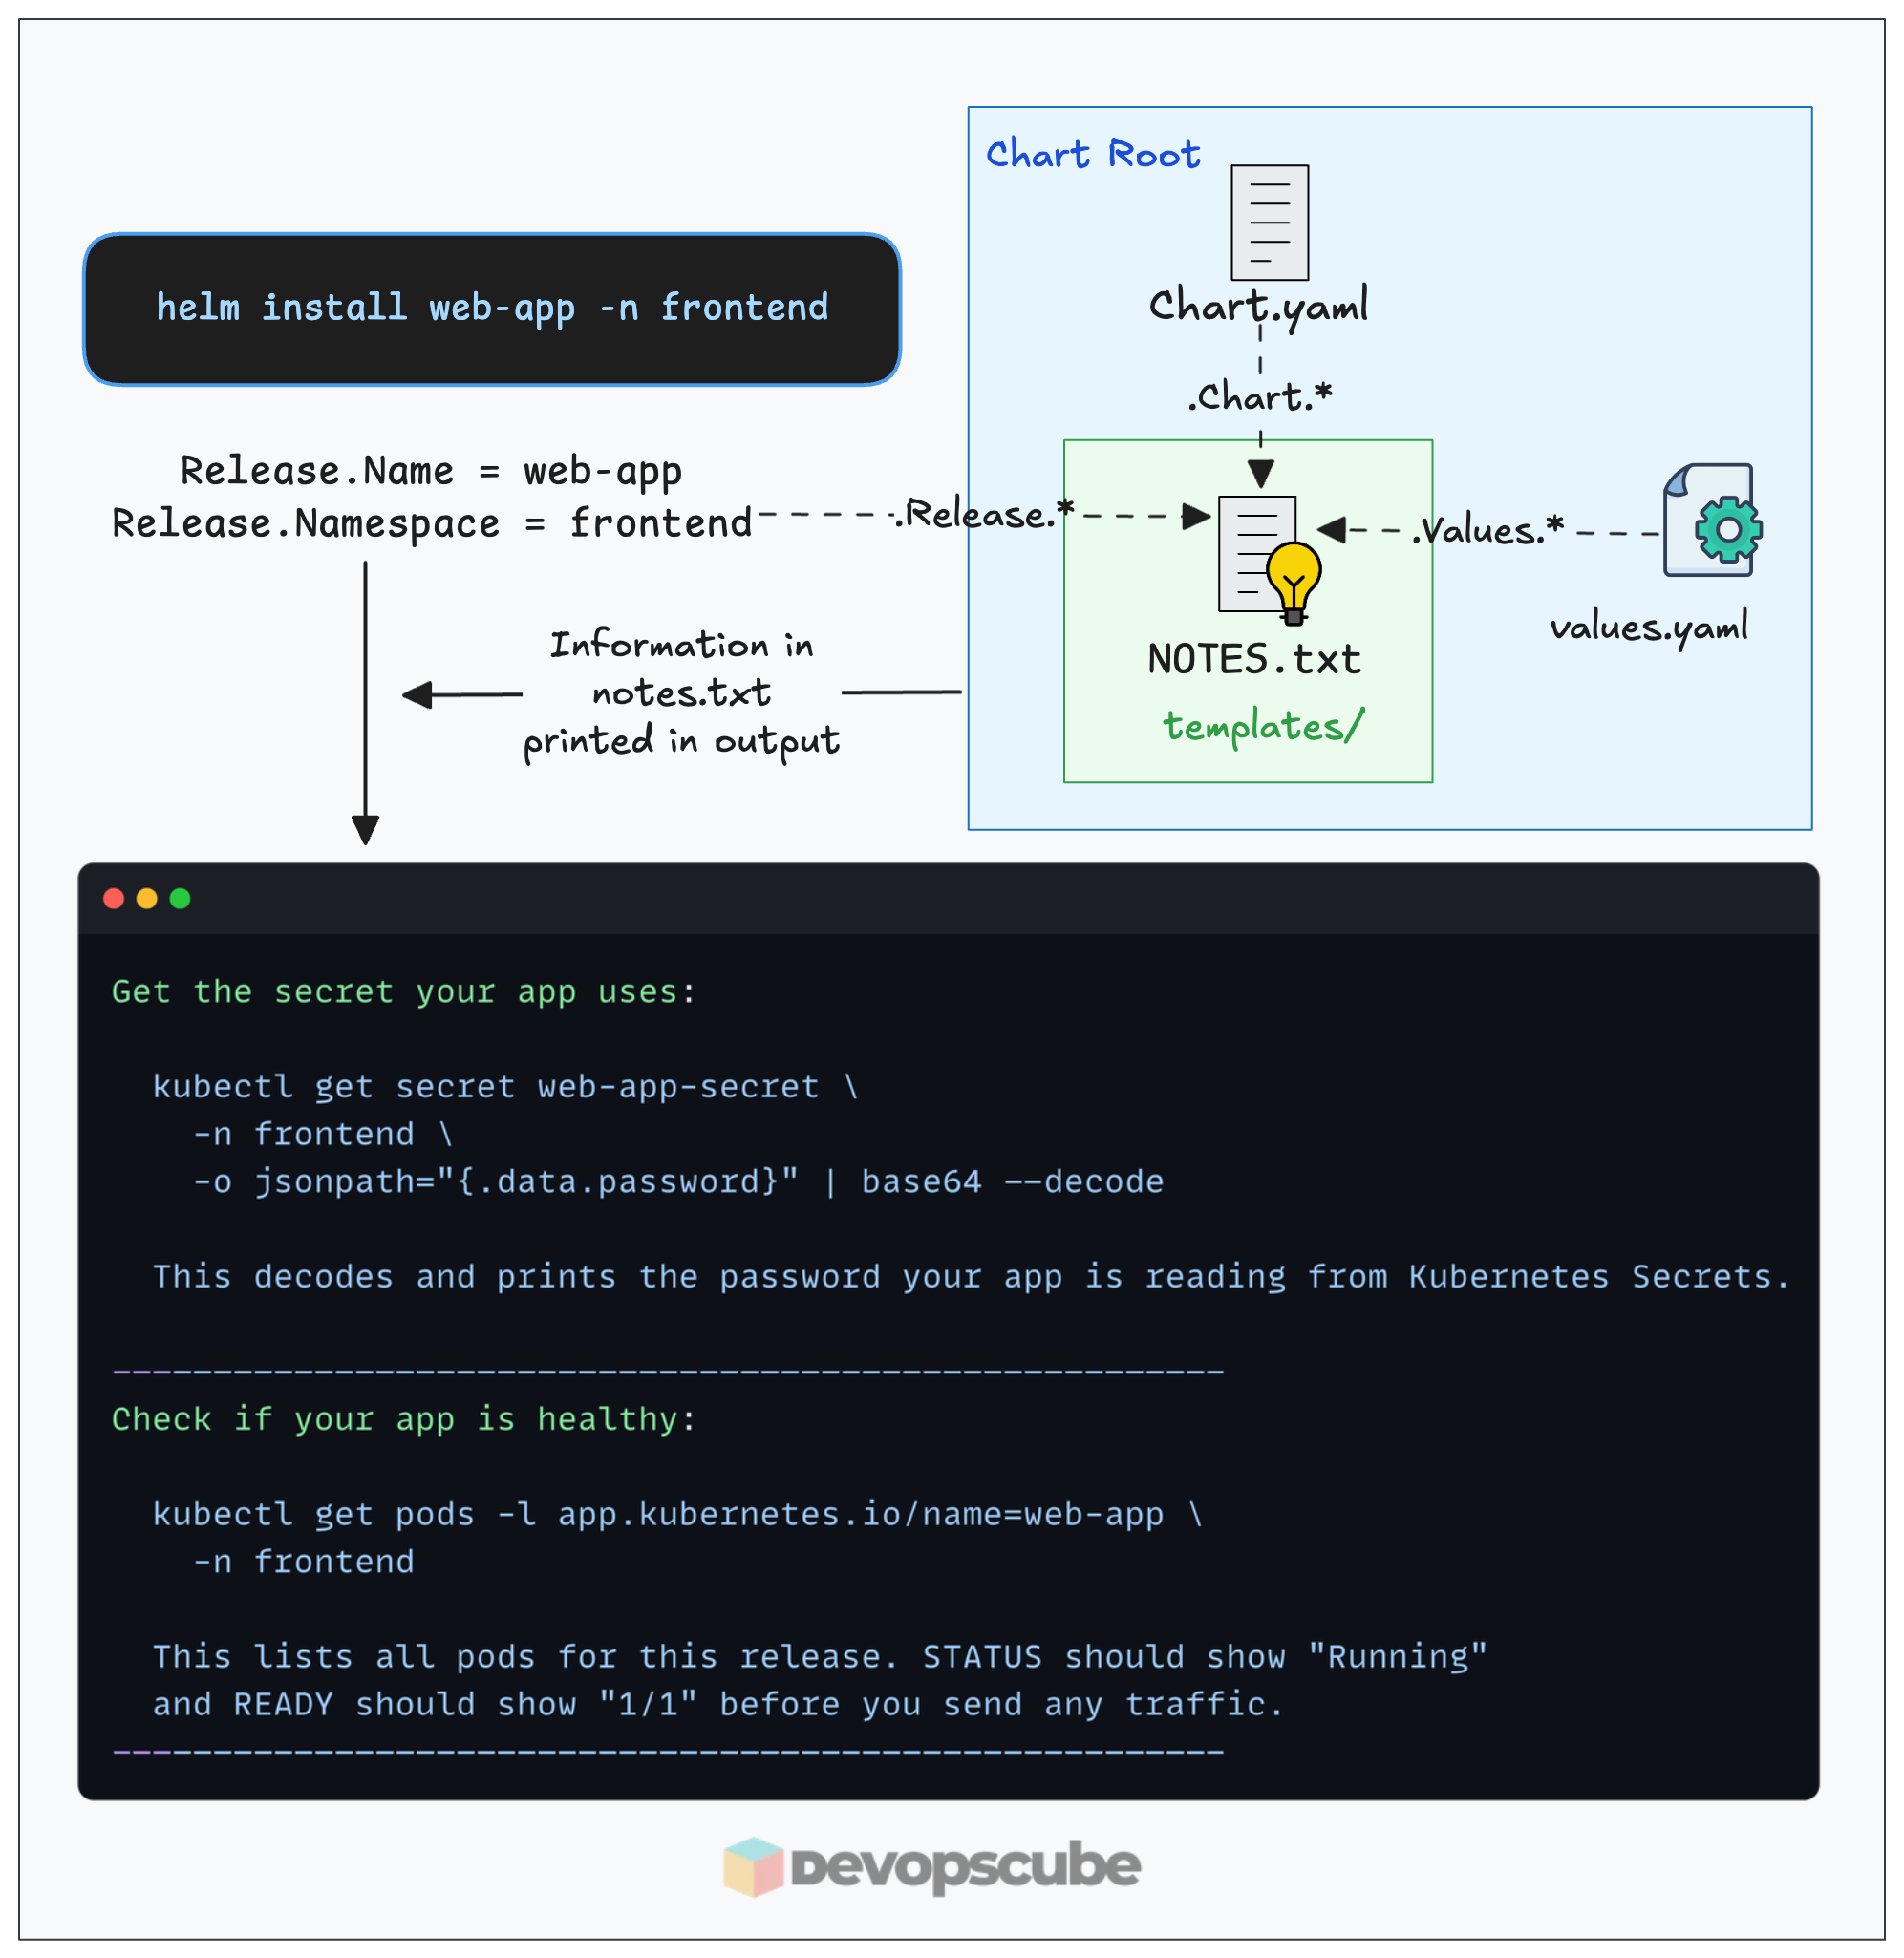
NOTES.txt is an optional text file in the Helm chart that contains the post install instructions that is displayed in the terminal after a successful Helm deployment or upgrade command. We need to add NOTES.txt under templates as shown below.
web-app/
├── Chart.yaml
├── values.yaml
└── templates/
    ├── deployment.yaml
    ├── service.yaml
    └── NOTES.txt
NOTES.txt is processed with Helm rendering engine even though it is text file. So it supports GO templating. Instead of sending anything to Kubernetes API, it just prints the rendered output to the terminal with the operational instructions you added to it.
With Go templating support, it can get dynamic values like release name, namespace used, Chart.yaml, values.yaml, etc..
You can also make use of values from the _helpers.tpl named templates. This way the outputs can add more value to chart users.
NOTES.txt Example
The best way to understand NOTES.txt is through community Helm Charts. If you download any community Helm charts, you can find this file under /templates folder with other template files.
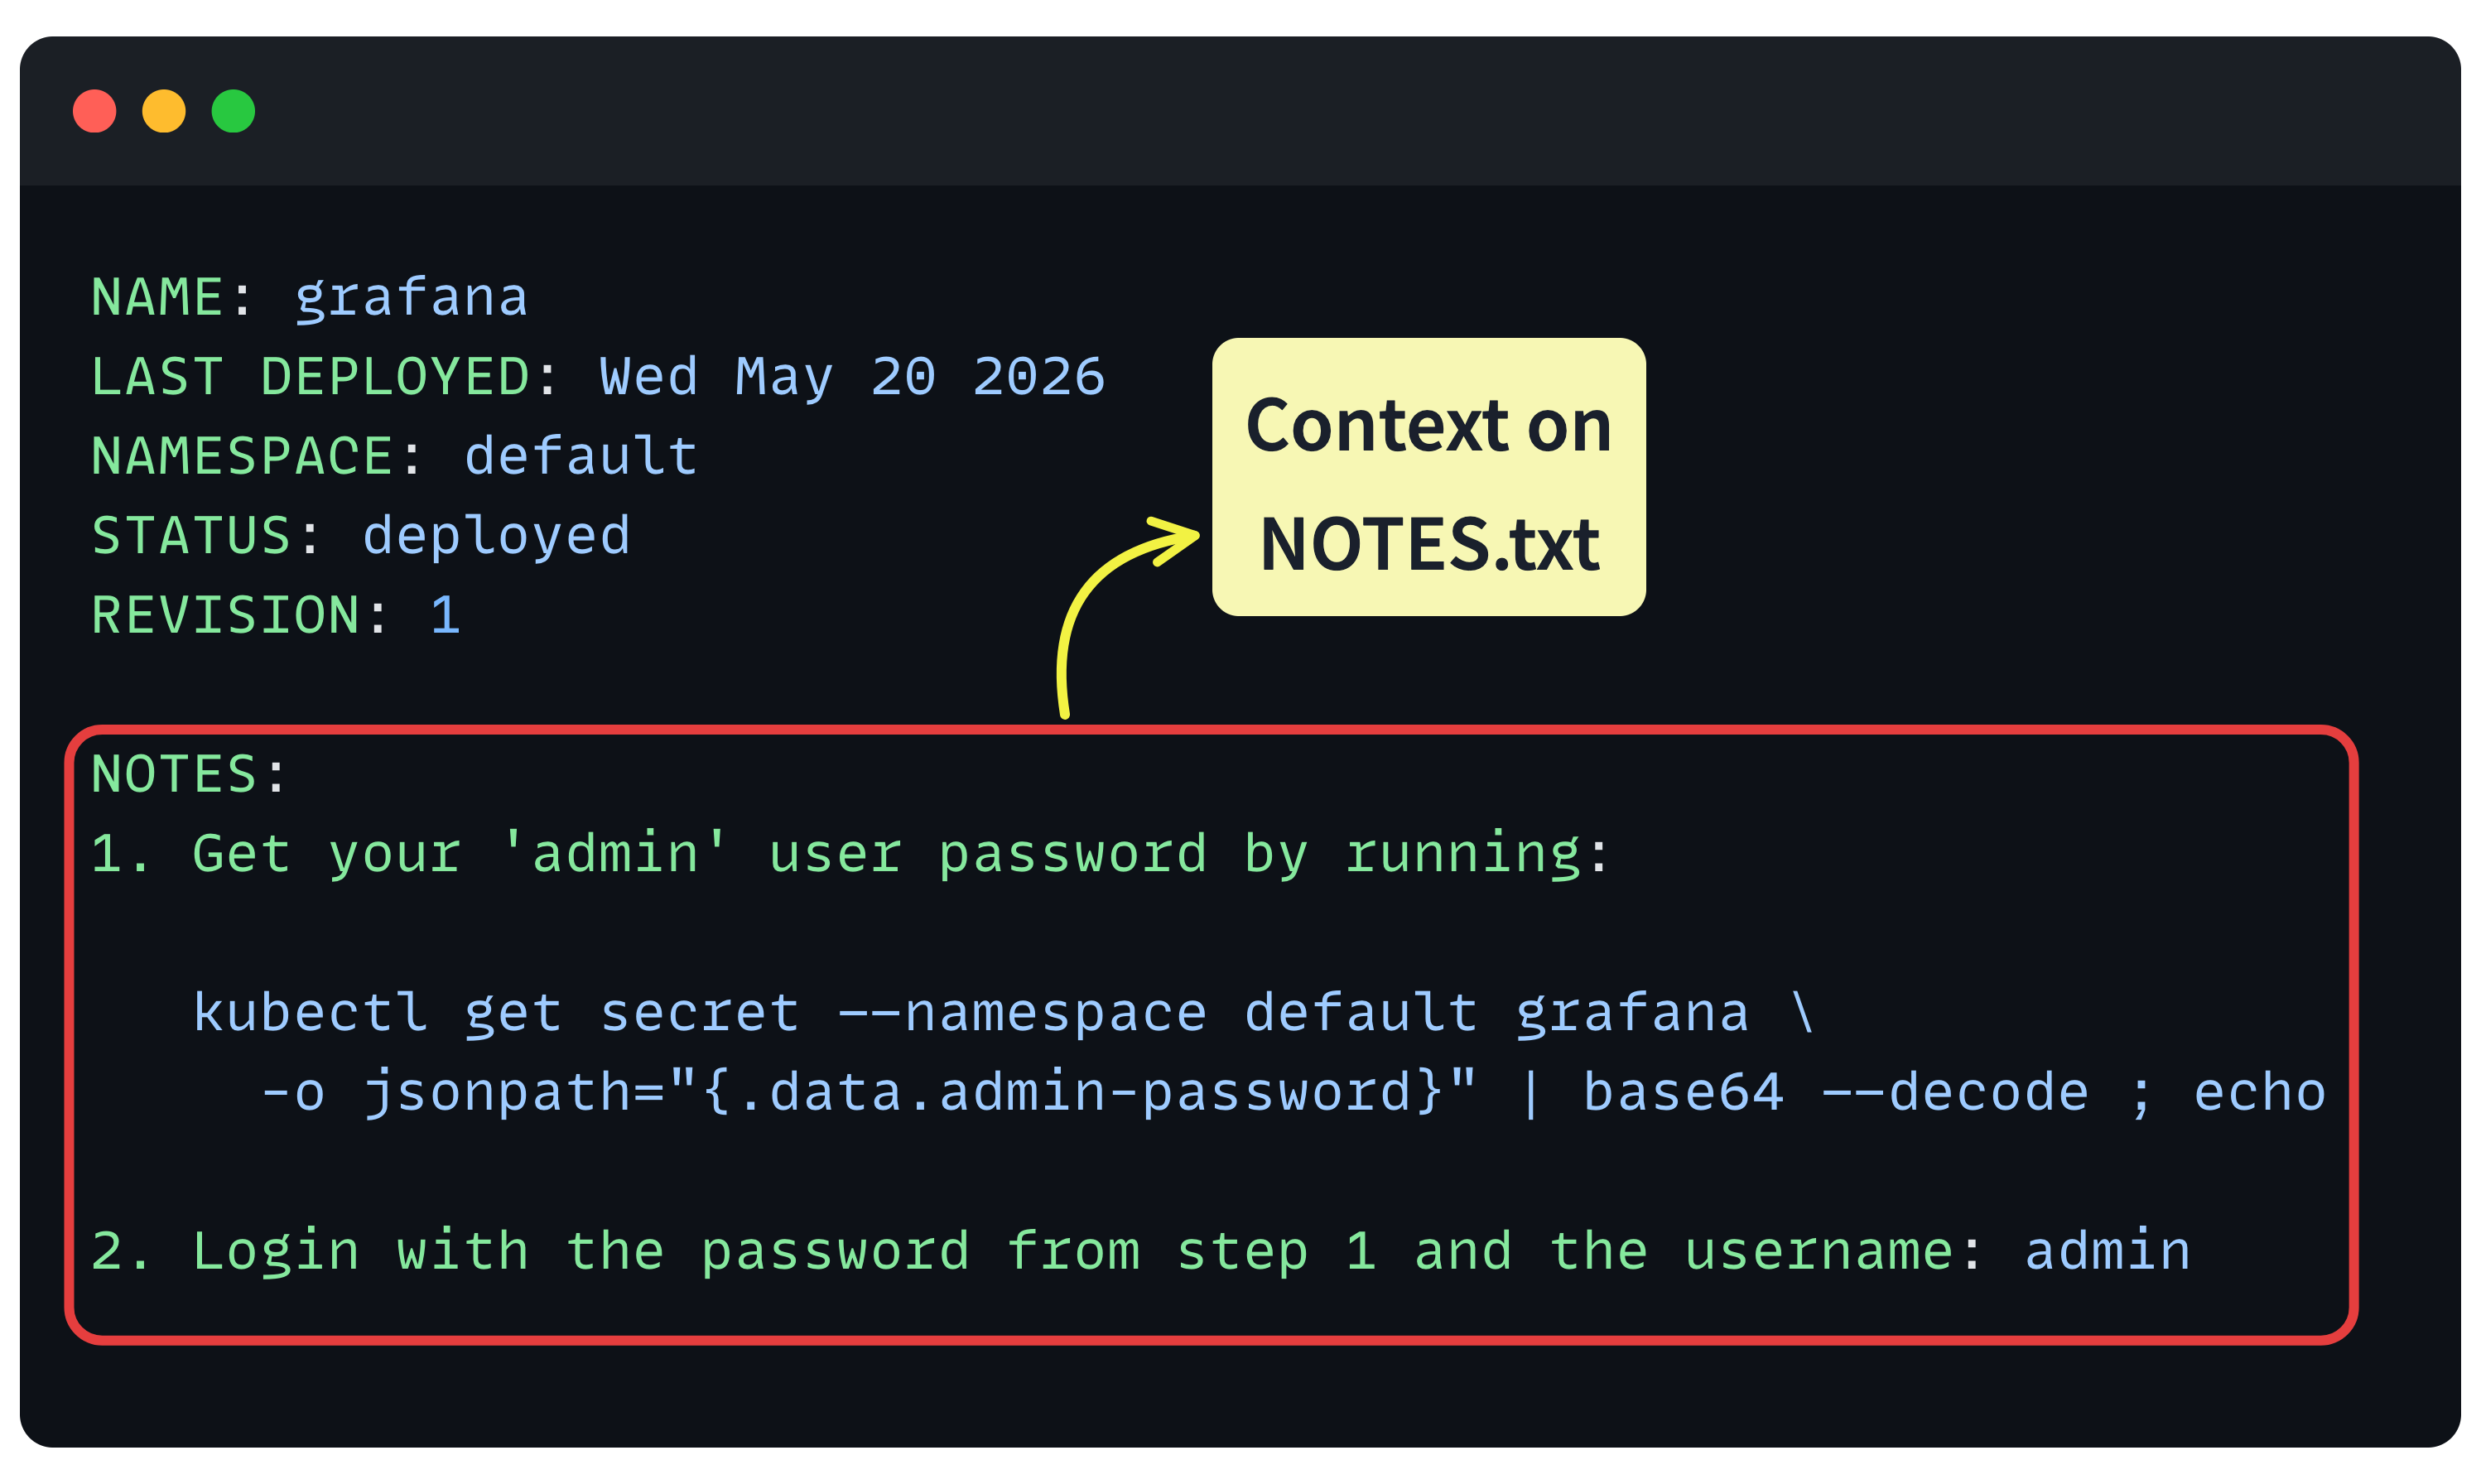
For example, Grafana's Helm charts NOTES.txt file gives you the post install kubectl commands to get the admin password as shown below.
Here is a custom NOTES.txt example for your reference. It is a combination of plain text instructions and Go templates to get the rendered chart values dynamically.
1. Get the application URL:

   {{- if .Values.ingress.enabled }}
   http://{{ .Values.ingress.host }}
   {{- else }}
   export POD_NAME=$(kubectl get pods --namespace {{ .Release.Namespace }} \
     -l "app.kubernetes.io/name={{ .Chart.Name }}" \
     -o jsonpath="{.items[0].metadata.name}")

   kubectl --namespace {{ .Release.Namespace }} port-forward $POD_NAME 8080
   {{- end }}

2. Get the admin password:

   kubectl get secret --namespace {{ .Release.Namespace }} {{ .Release.Name }} \
     -o jsonpath="{.data.password}" | base64 --decode ; echo

3. Check the pod status:

   kubectl get pods -l app.kubernetes.io/name={{ .Chart.Name }} \
     -n {{ .Release.Namespace }}
It prints the following.
- Ingress URL
- How to get the admin password.
- How to validate deployment by checking the pod status.
Now that you have an understanding of how NOTES.txt works, let's do a simple hands-on in the next section.
Viewing Notes Before Installation
If you want to render the post installation instruction from the Notes.txt before the chart installation, you need to perform a dry run.
For example, here is the command that displays the notes of the Prometheus helm chart.
helm install prometheus prometheus-community/prometheus \
  --dry-run --debug
Post installation there is a helm command to render the notes that we will look at it in the next section.
Helm NOTES.txt Hands-on Example
In this section, we will create a Helm chart boilerplate with NOTES.txt and modify it to print the custom information we add to it.
Step 1: Create a Helm Boilerplate
Run the following command to create a boilerplate.
helm create web-appStep 2: Modify the Existing NOTES.txt file
Open the NOTES.txt file in an editor.
vi web-app/templates/NOTES.txtReplace the default notes with the following content. It contains plain text and Go template to get the Dynamic chart information.
Release "{{ .Release.Name }}" deployed to namespace "{{ .Release.Namespace }}".

-------------------------------------------------------
Get the secret your app uses:

  kubectl get secret {{ .Release.Name }}-secret \
    -n {{ .Release.Namespace }} \
    -o jsonpath="{.data.password}" | base64 --decode

  This decodes and prints the password your app is reading from Kubernetes Secrets.

-------------------------------------------------------
Check if your app is healthy:

  kubectl get pods -l app.kubernetes.io/name={{ .Chart.Name }} \
    -n {{ .Release.Namespace }}

  This lists all pods for this release. STATUS should show "Running"
  and READY should show "1/1" before you send any traffic.
-------------------------------------------------------
You can validate the Notes using the following dry-run command.
helm install web-app ./web-app -n frontend --create-namespace --dry-run --debugStep 3: Deploy the Helm Chart
Now, run the following command to deploy the chart.
helm install web-app ./web-app -n frontend --create-namespaceAfter installation, you will see the information in the NOTES.txt file in the output as shown below.
NAME: web-app
LAST DEPLOYED: Wed May 20 11:15:17 2026
NAMESPACE: frontend
STATUS: deployed
REVISION: 1
DESCRIPTION: Install complete
NOTES:
Release "web-app" deployed to namespace "frontend".

-------------------------------------------------------
Get the secret your app uses:

  kubectl get secret web-app-secret \
    -n frontend \
    -o jsonpath="{.data.password}" | base64 --decode

  This decodes and prints the password your app is reading from Kubernetes Secrets.

-------------------------------------------------------
Check if your app is healthy:

  kubectl get pods -l app.kubernetes.io/name=web-app \
    -n frontend

  This lists all pods for this release. STATUS should show "Running"
  and READY should show "1/1" before you send any traffic.
-------------------------------------------------------
Step 4: View Helm Notes
After the chart installation, you can use the following command to view the notes again in the terminal.
helm get notes web-app -n frontendThis will list only the notes, as shown below.
NOTES:
Release "web-app" deployed to namespace "frontend".

-------------------------------------------------------
Get the secret your app uses:

  kubectl get secret web-app-secret \
    -n frontend \
    -o jsonpath="{.data.password}" | base64 --decode

  This decodes and prints the password your app is reading from Kubernetes Secrets.

-------------------------------------------------------
Check if your app is healthy:

  kubectl get pods -l app.kubernetes.io/name=web-app \
    -n frontend

  This lists all pods for this release. STATUS should show "Running"
  and READY should show "1/1" before you send any traffic.
-------------------------------------------------------
Suppressing Notes
When you use CI/CD tools like Github actions or Jenkins, you might not want to clustter the output logs with notes output. In such scenarios you can suppress the notes using output redirection.
Here is an example.
helm install web-app ./web-app -n frontend --create-namespace > /dev/null--hide-notes flag. However, Helm 4 removed/deprecated this flag. So if you are using Helm 4, you need to use shell redirection as given above.Conclusion
In this guide we looked at what is NOTES.txt and how to setup post installation instructions using NOTES.txt.
If you are using community chart, pull the charts to local, modify the NOTES.txt as per your requirements and then deploy it.
By doing this, you can remove all the unwanted information from the output and keep only the information that helps in moving forward smoothly.
