

If you are planning to run Machine Learning workflows in Kubernetes, one of the best options is using Kubeflow Pipelines.
You can consider this guide as a crash course in Kubeflow pipelines.
Before we dive deep in to Kubeflow pipelines, we will first understand about the Kubeflow stack.
About Kubeflow
When it comes to running AI/ML workloads on Kubernetes, Kubeflow is the foundation platform.
When the project started (2017–2020), it was primarily built as an MLOps platform for Kubernetes to build and manage traditional ML pipelines.
Fast forward to 2026 and the platform has changed a lot. Kubeflow is no longer just an MLOps platform. It has become a cloud-native AI platform for building and operating GenAI, LLMOps, Agentic AI, distributed AI training, and fine-tuning foundation models.
The KubeFlow Stack
The Kubeflow ecosystem has nine subprojects at the time of writing this edition. Each project solves a specific use case in the AI/ML lifecycle.
The following image illustrates the key projects that are part of Kubeflow and what each does.
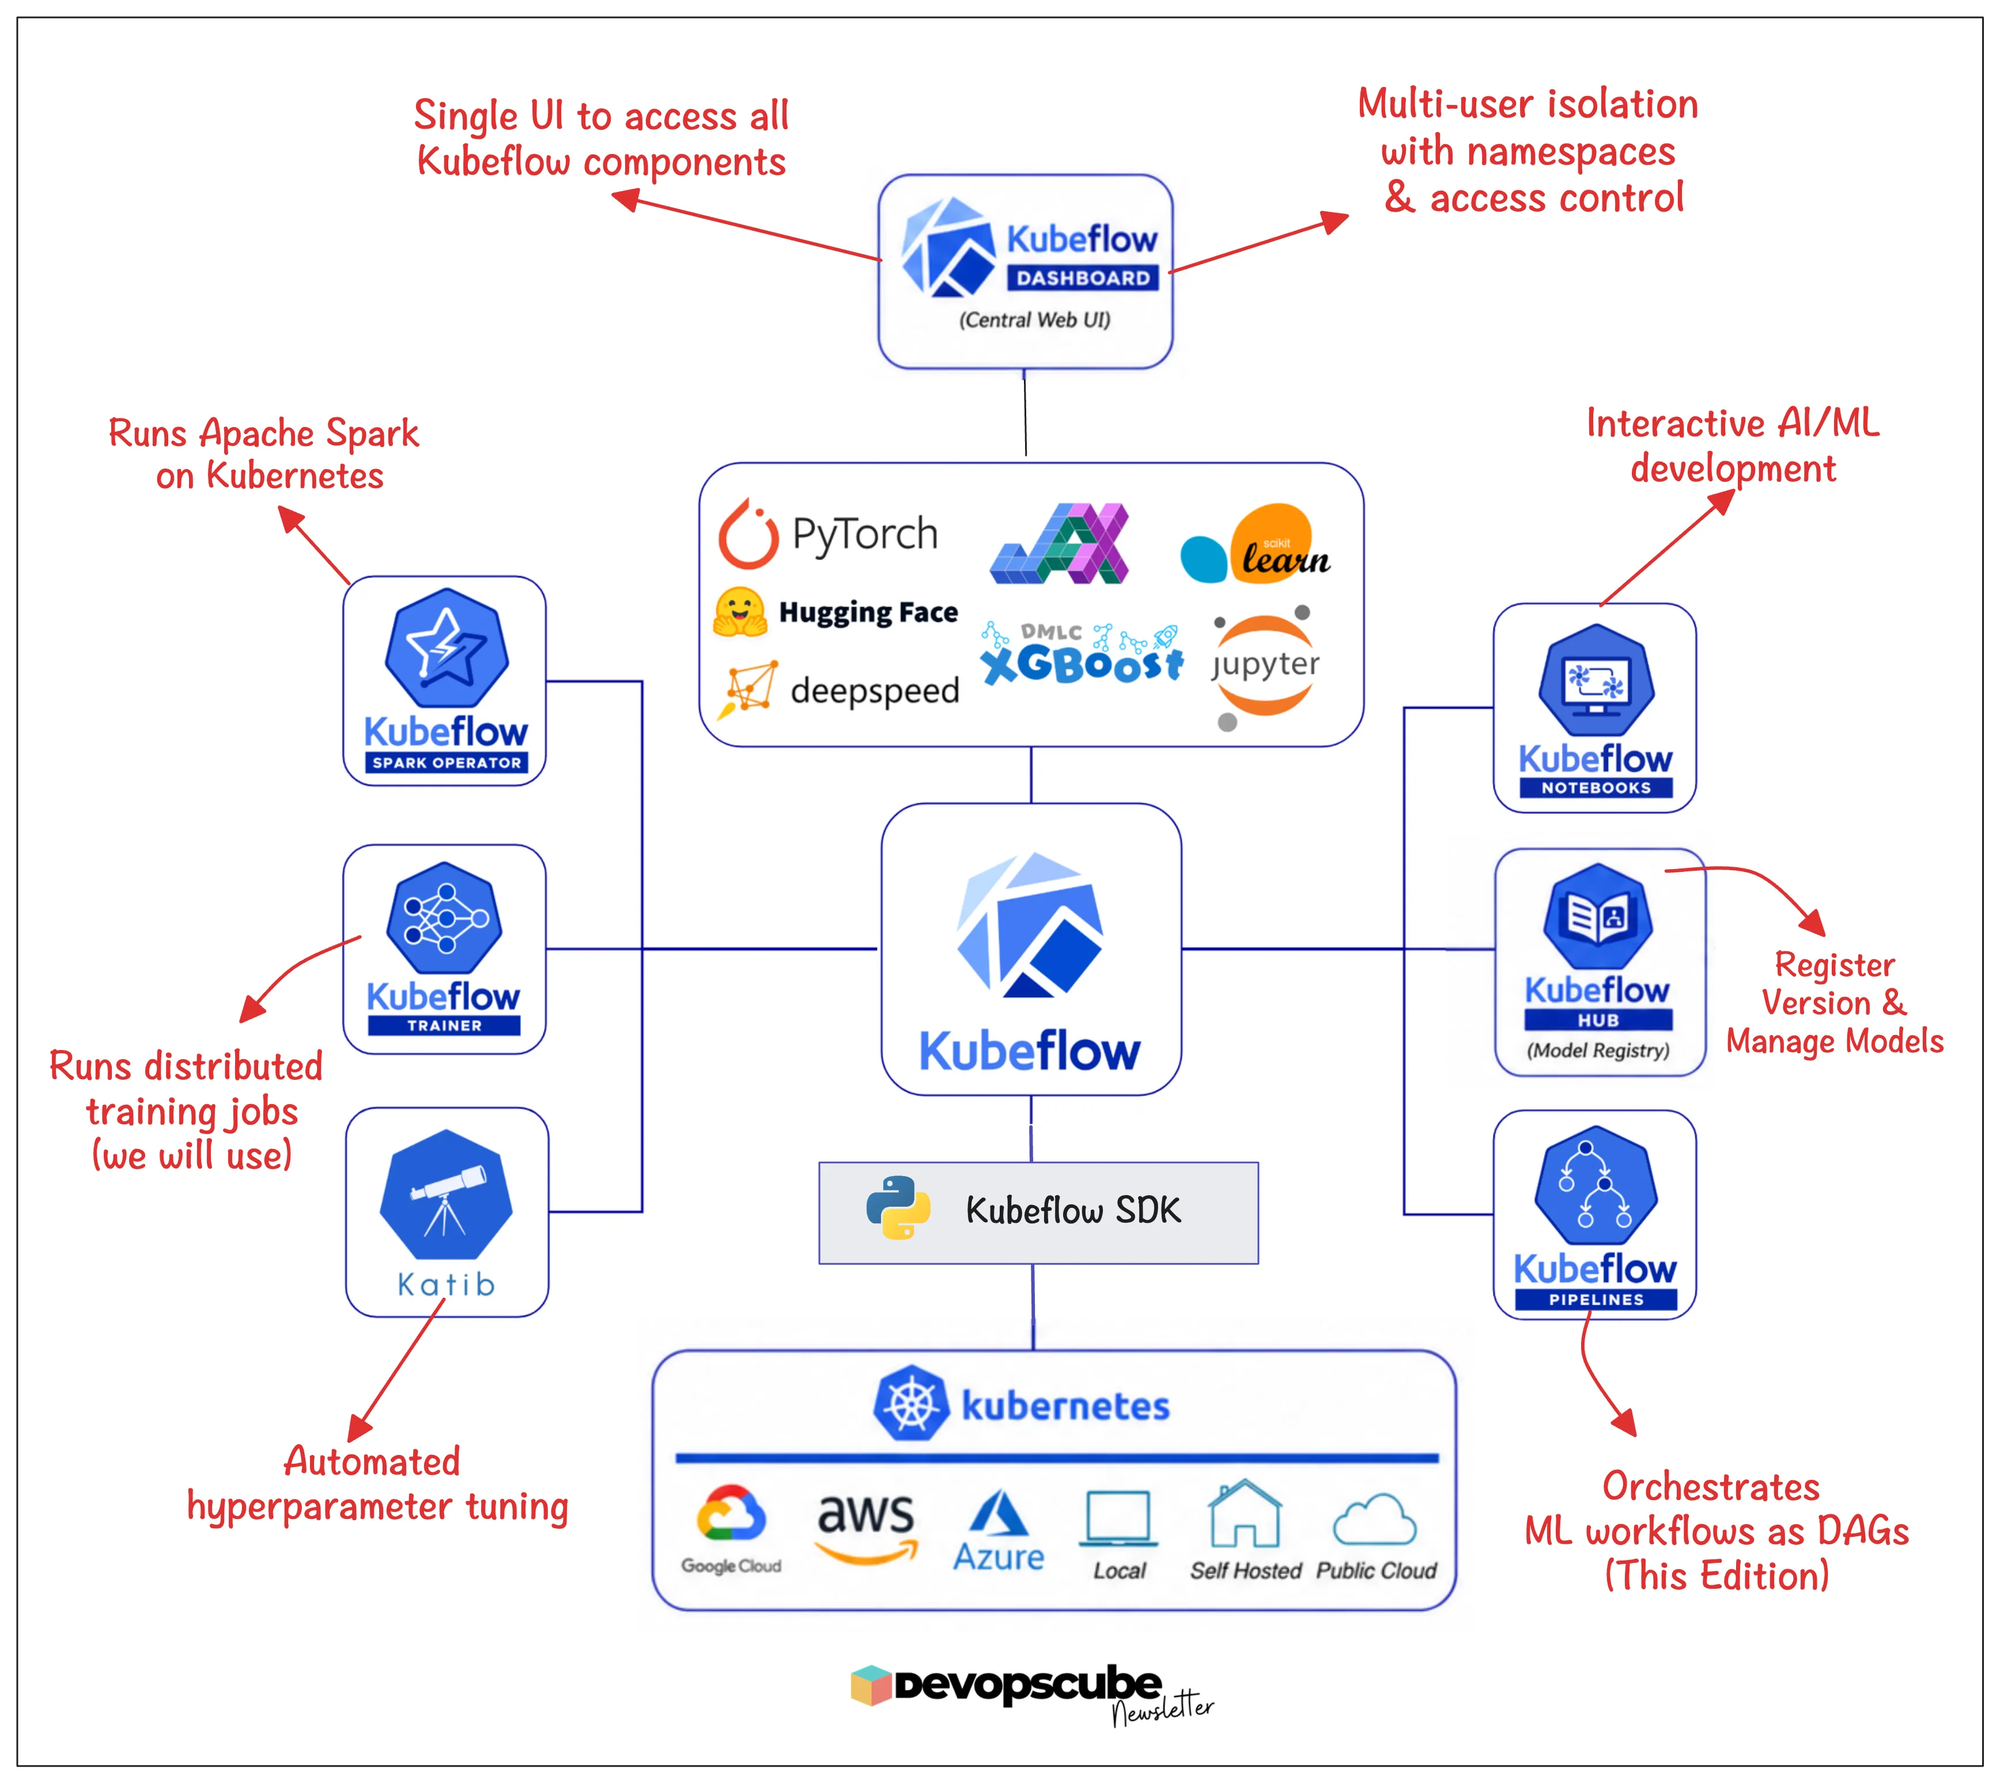
The best part is that these subprojects can run independently or as part of the full stack. You can adopt only Pipelines, only Trainer, or only Notebooks instead of installing the whole platform.
This way you are free to choose only the subprojects that work for your project’s requirements.
What is Kubeflow Pipelines (KFP)?
Kubeflow Pipelines (KFP) is one of the core components of the Kubeflow project. It is a standalone DAG runtime that lets you describe your entire ML workflow in Python.
Here is the interesting part.
Kubeflow Pipelines uses Argo Workflows as its workflow execution engine.
Argo Workflows is a Kubernetes-native DAG orchestration engine. However, you write DAG declaratively in YAML (CRD) and not as Python code and Argo executes each task as a Kubernetes pod (Like Airflow Kubernetes operator).
Kubeflow uses Argo Workflows as the backend and adds an AI/ML layer on top of Argo Workflows.
So instead of just orchestrating containers, it understands concepts like datasets, model artifacts, experiment tracking, metrics, caching, and reproducible ML pipelines.
When it comes to pipelines, instead of writing Argo Workflow YAML directly, we need to write the pipelines using Python DAGs like we did in Airflow.
Kubeflow then compiles your DAG into an Argo Workflow and submits it to Kubernetes for execution.
Kubeflow Pipelines Architecture
Before you start learning about the workflow, you need to understand all the components that make Kubeflow Pipelines.
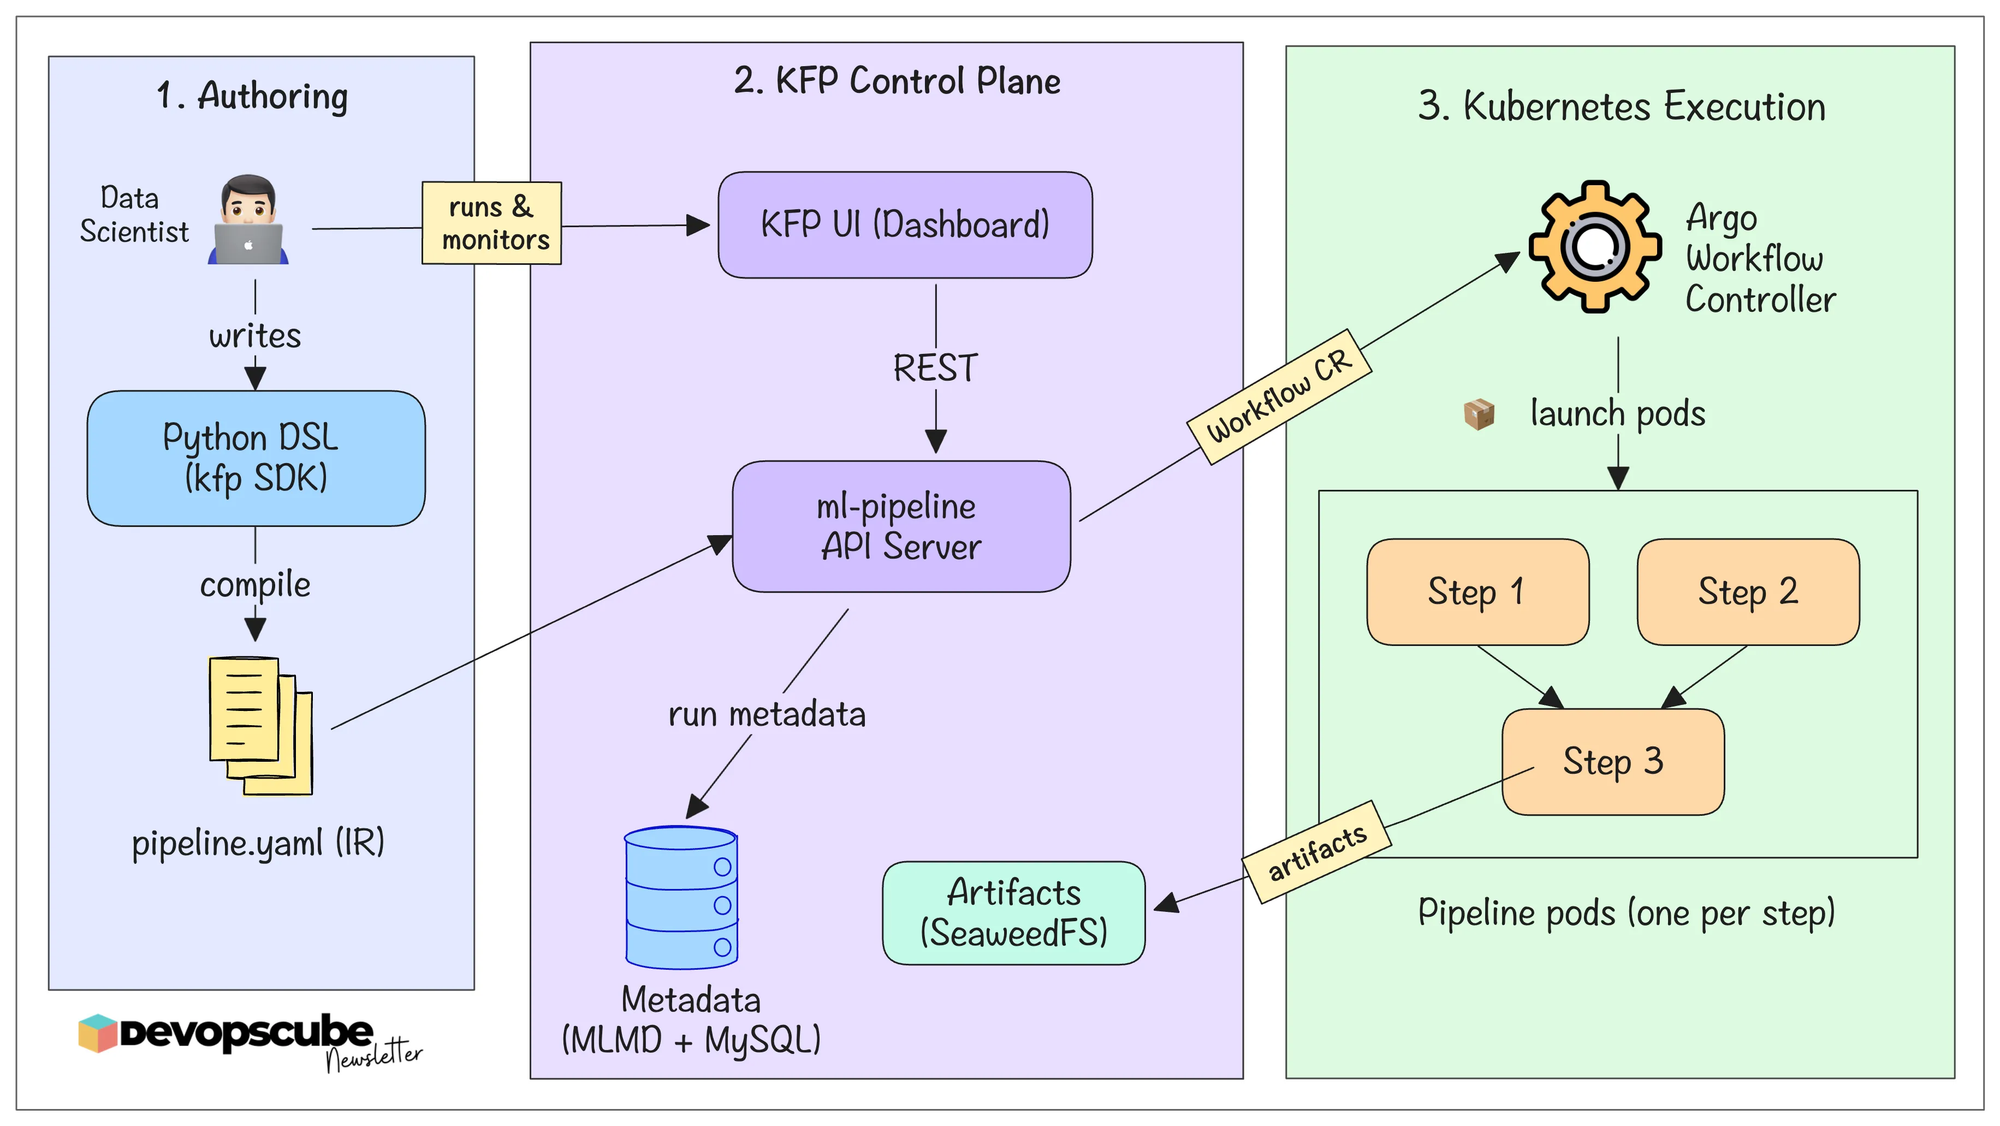
The following image illustrates high-level architecture of KFP.
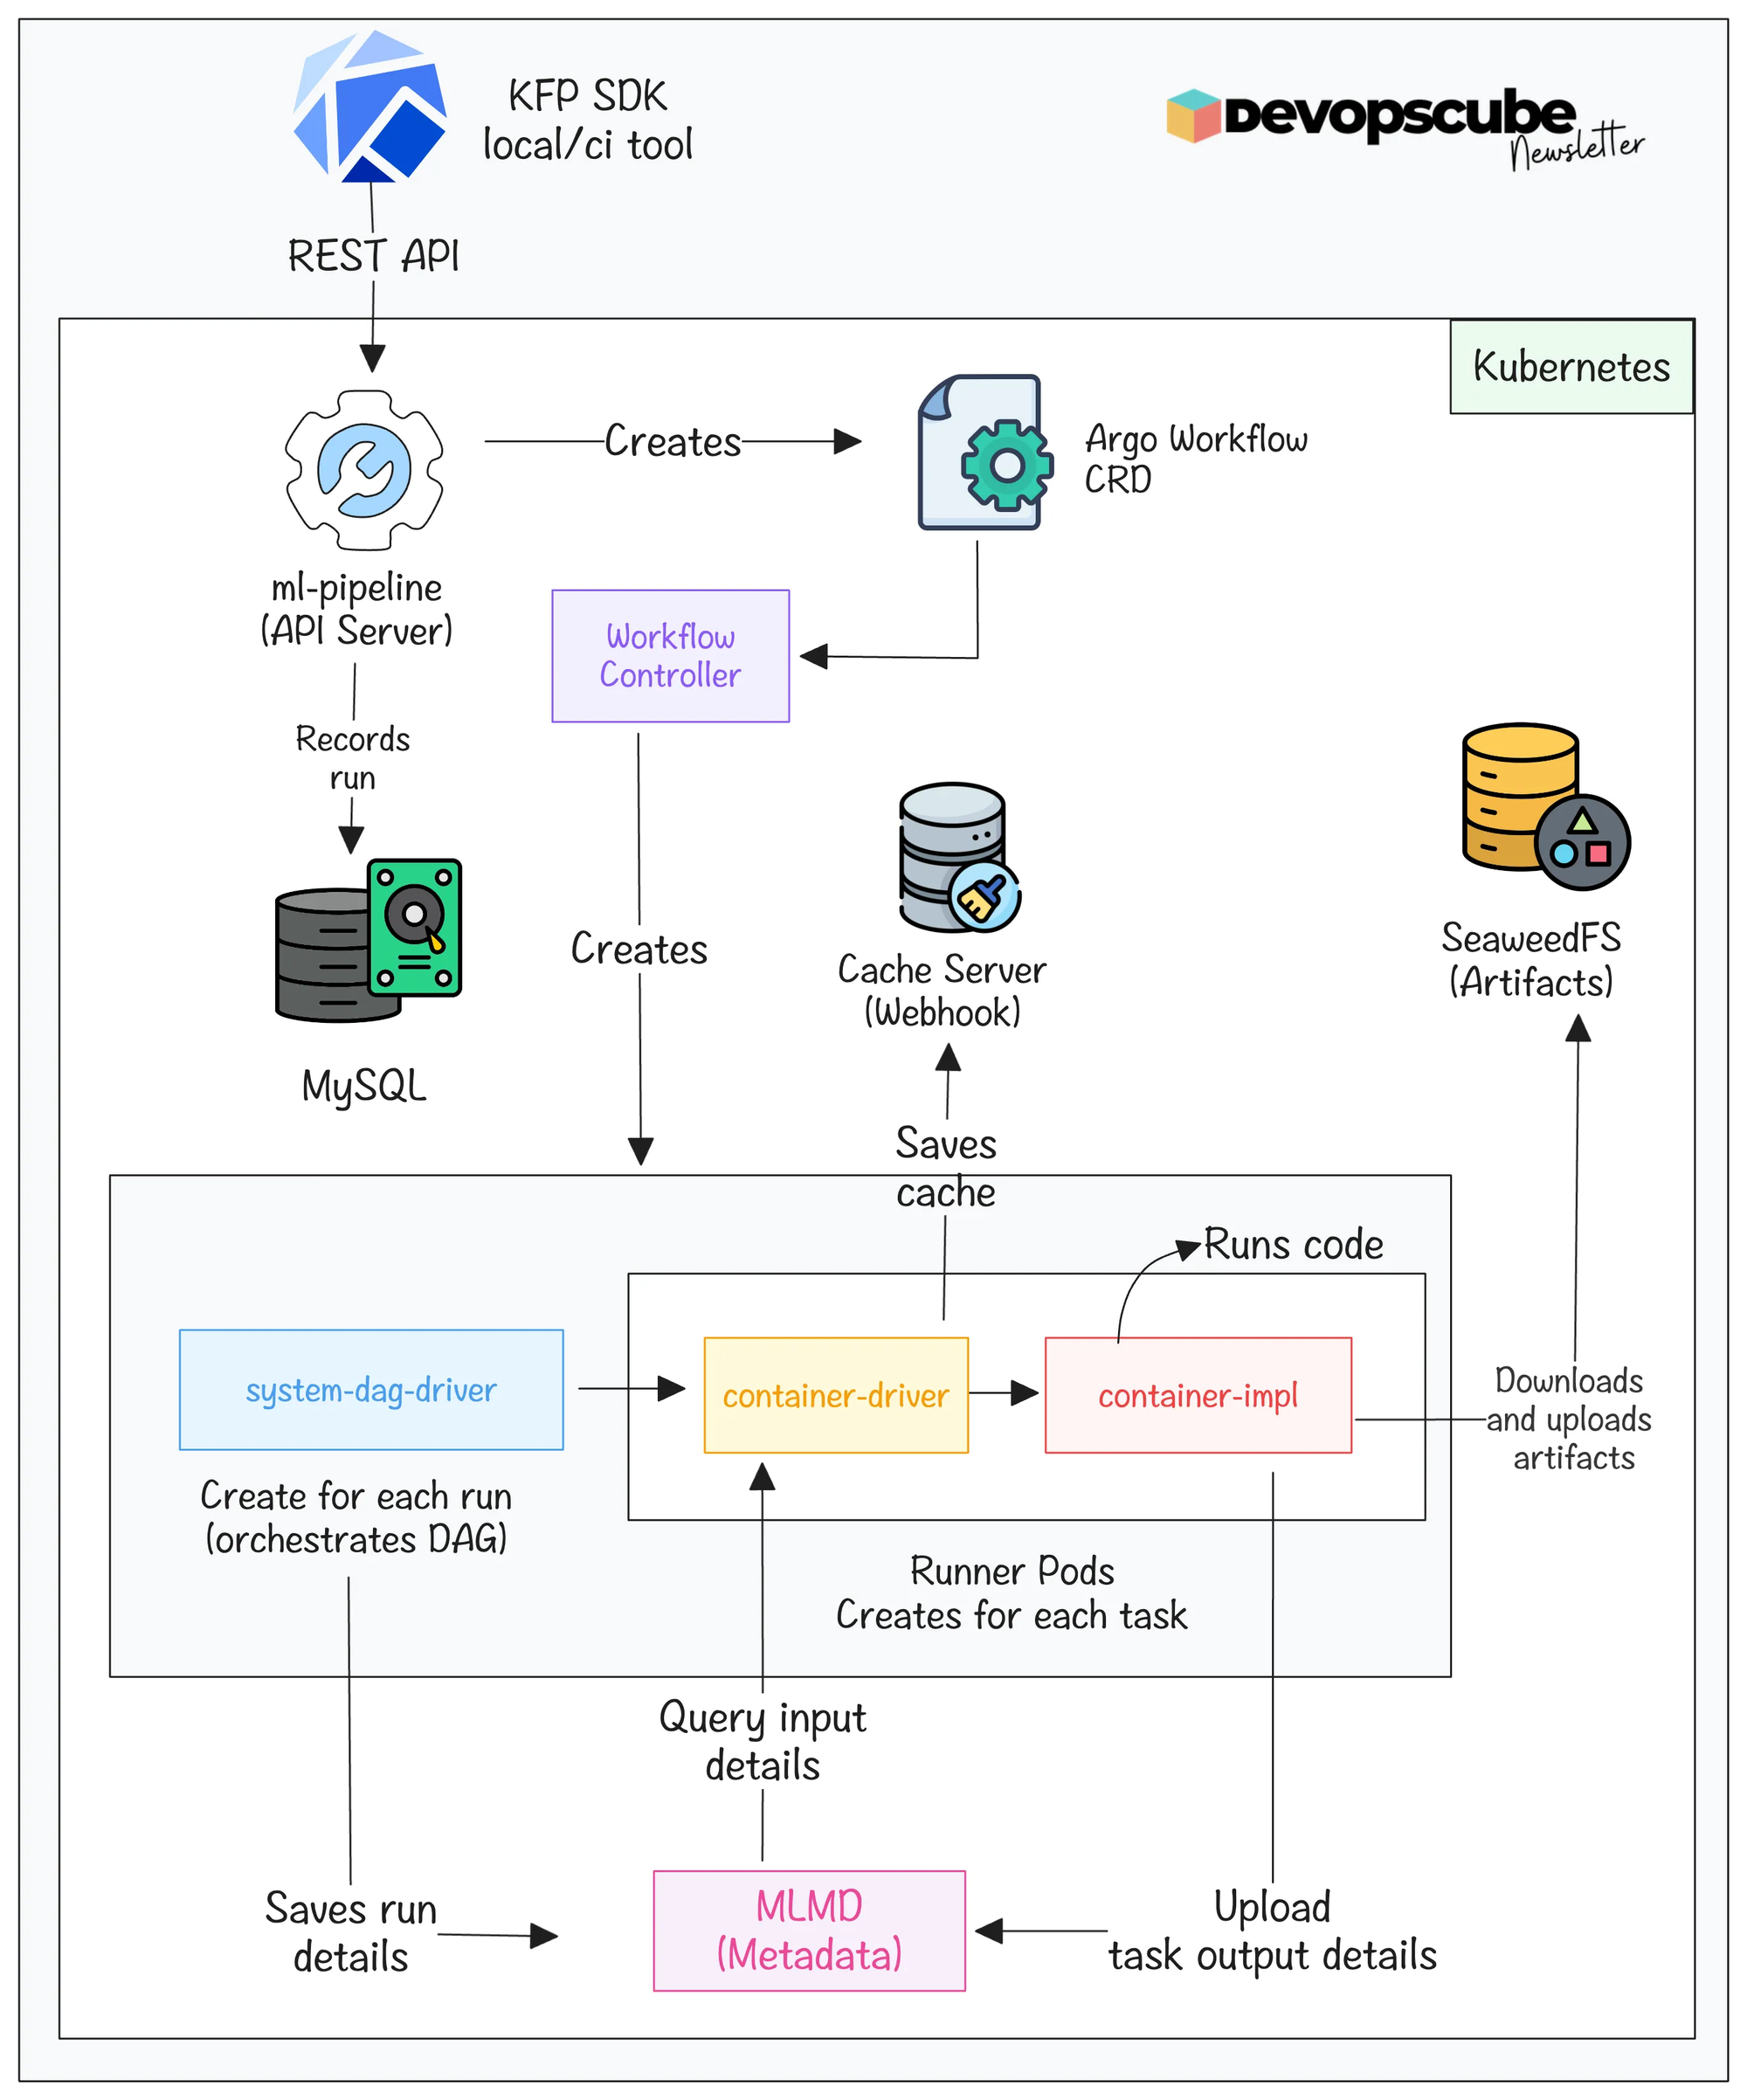
Now lets look at each KFP component and what it does.
- ml-pipeline - This is the api server of Kubeflow pipeline, which is the entry point for it.
- ml-pipeline-ui - Manages Kubeflow Pipelines UI
- workflow controller - This is the Argo workflow controller, which runs pipelines and creates pods for each task.
- mysql - Database that stores pipeline definition, experiment details, run history, and metadata.
- seaweedfs server - Object storage that stores artifacts that have the same functionality as Amazon S3 and Minio.
- cache-server - This checks if a task ran with the same code before, if there is no change, it will skip the task and use the cache of the previous run.
- cache-deployer - Creates TLS certificates for the cache server webhook.
- ML Metadata Pods - Track inputs and outputs of each task.
The following pipeline components get deployed dynamically for every pipeline run, which I have explained in the upcoming section in detail.
- system-dag-driver-* - This pod will be created for each run, and it is responsible for setting the details of the run in MLMD.
- system-container-driver-* - Runner pod which gets input data and gives it to the container implementation pod.
- system-container-impl-* - Runner pod which runs actual code.
Kubeflow Pipeline DAG Structure
Let's understand what a typical Kubeflow Pipelines DAG looks like.
A typical machine learning project has multiple steps, like data ingestion, data validation, feature engineering, data preprocessing, etc. These are mostly sequential tasks, and in real-world ML projects, some tasks happen in parallel or are repeated.
The following image shows an example KFP data preparation pipeline.
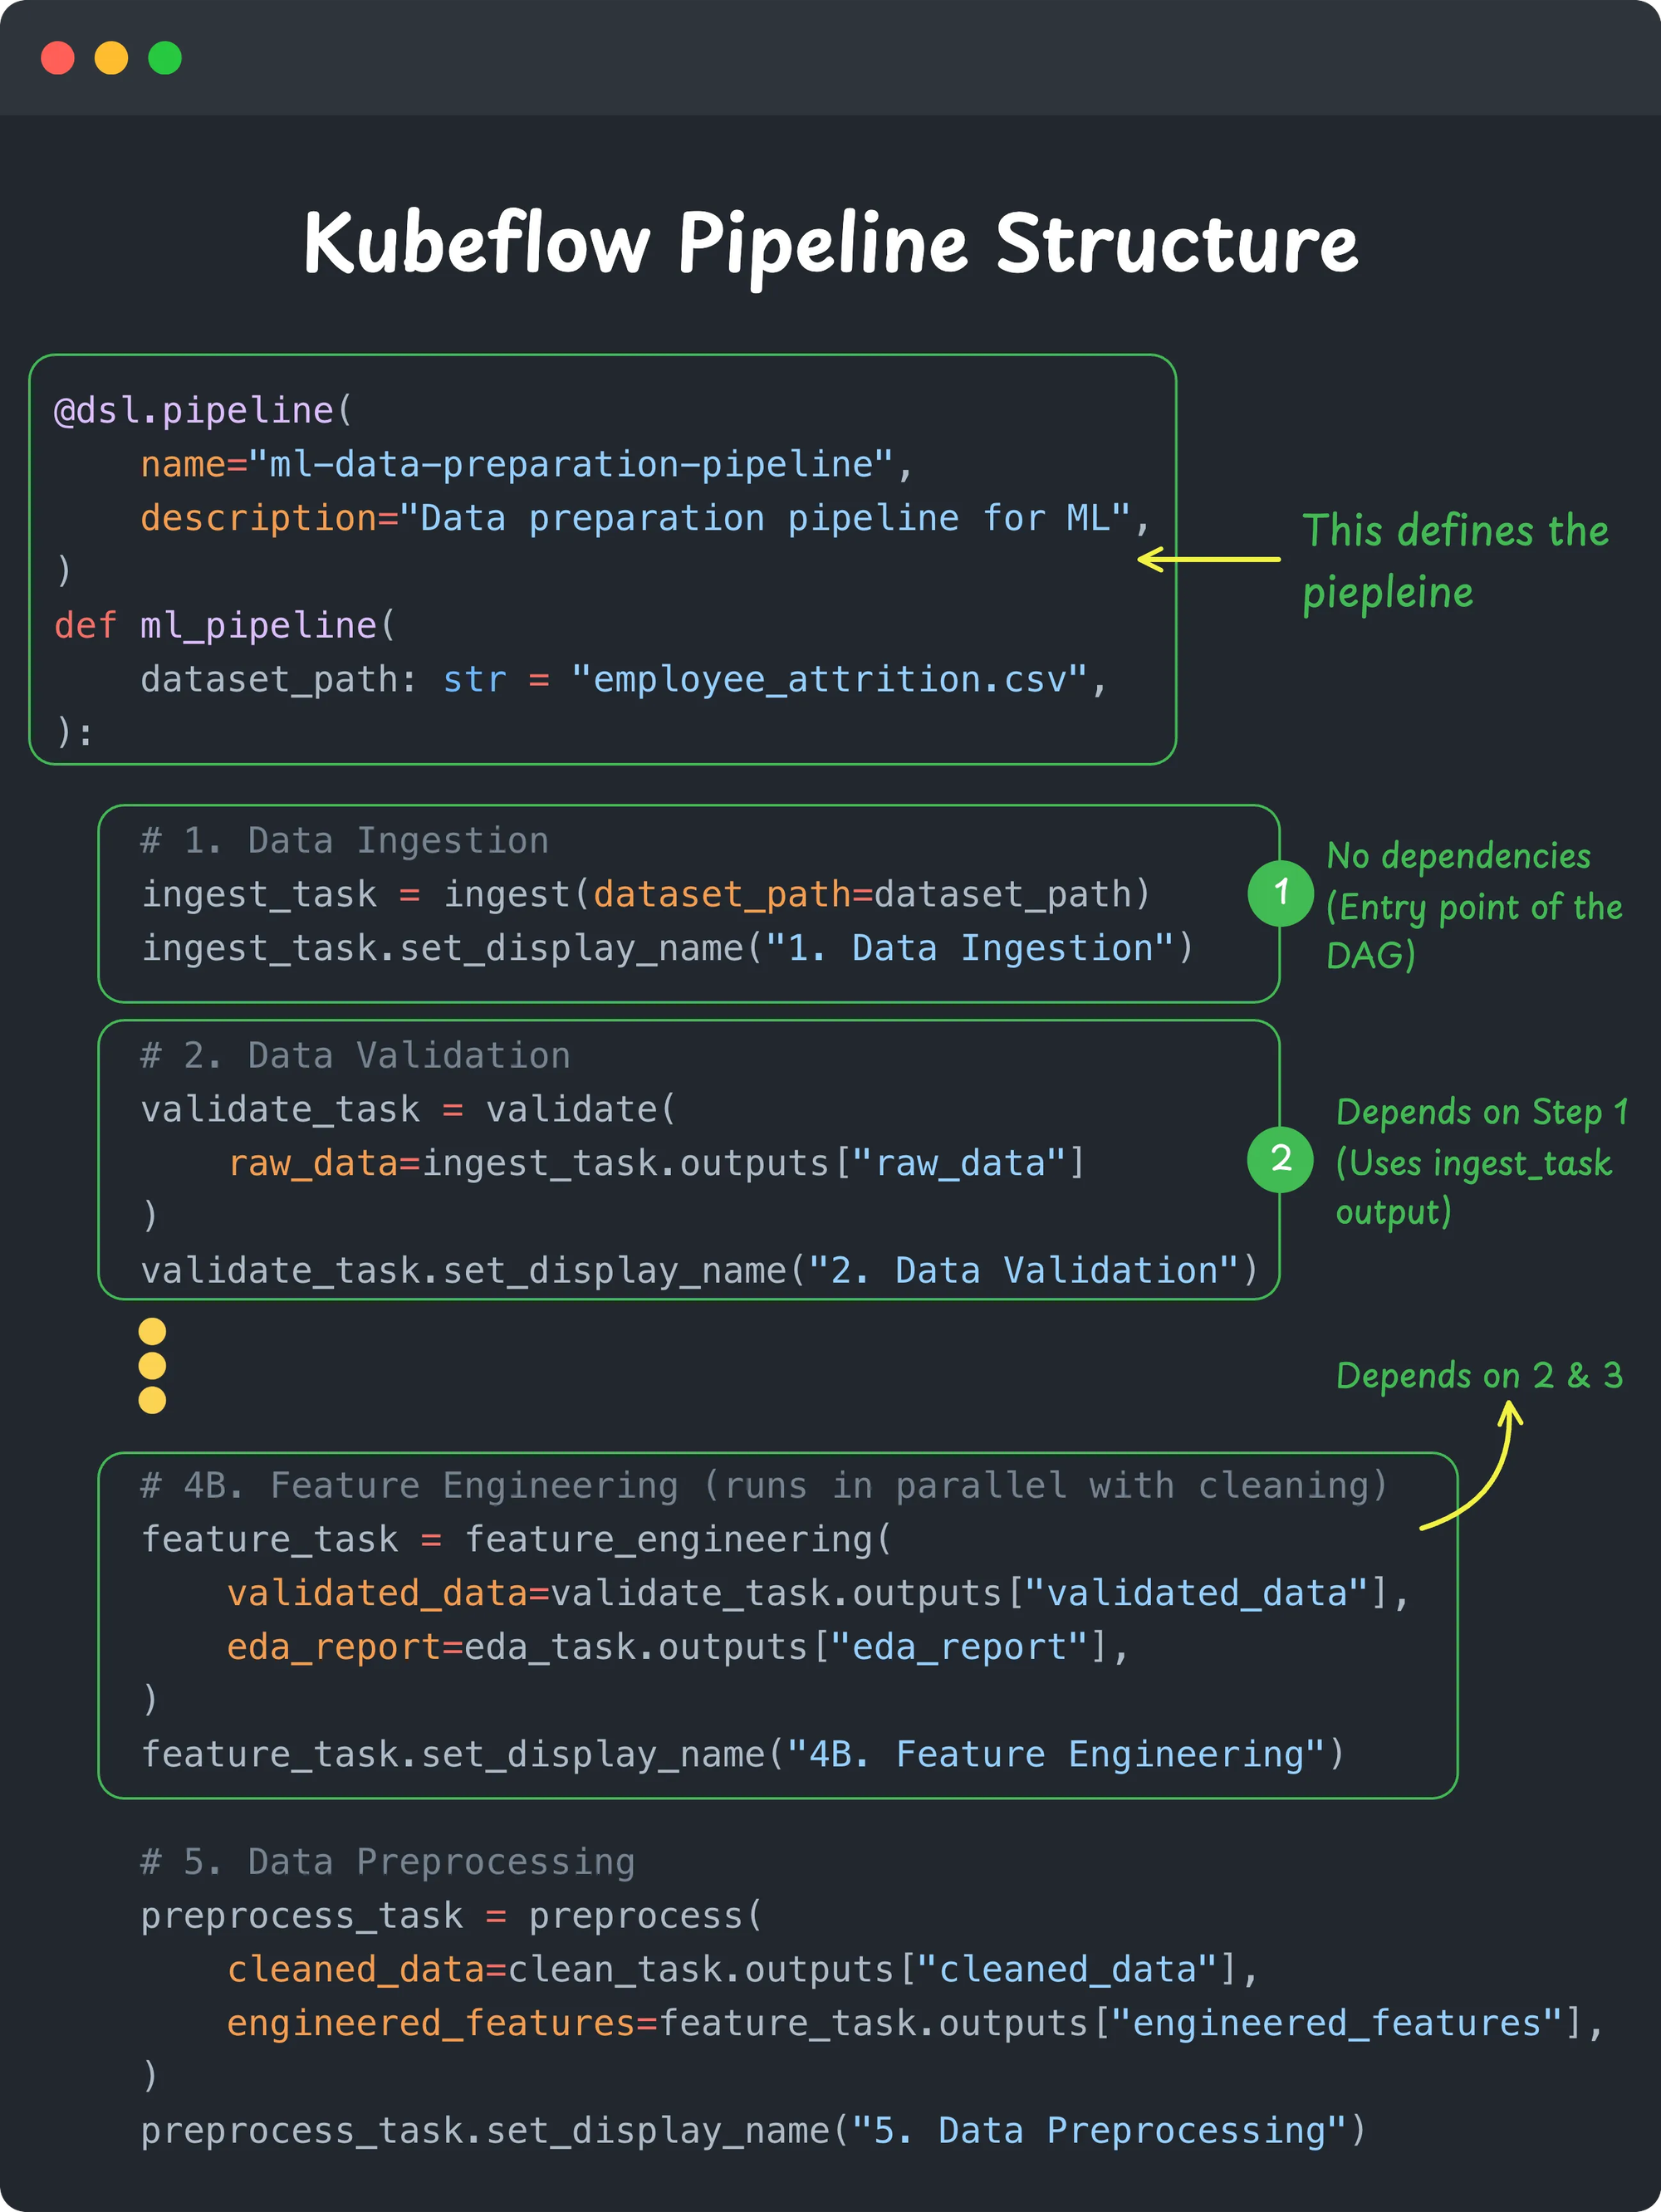
As you can see, the KFP pipeline uses the @dsl.pipeline decorator to define the entire workflow. Inside this pipeline function, you call each pipeline component (task) and connect them using inputs and outputs.
The interesting part is that you never explicitly write a DAG.
Kubeflow creates the DAG automatically from task dependencies. Whenever one task consumes another task's output, a dependency is created.
How Does Kubeflow Pipelines Work?
Now that you understand how a Kubeflow Pipeline is structured, let's see what actually happens when you run it.
As we discussed earlier, a Kubeflow Pipeline is executed as a Directed Acyclic Graph (DAG). Each task depends on the outputs of one or more previous tasks. If there is no dependency between two tasks, Kubeflow runs them in parallel.
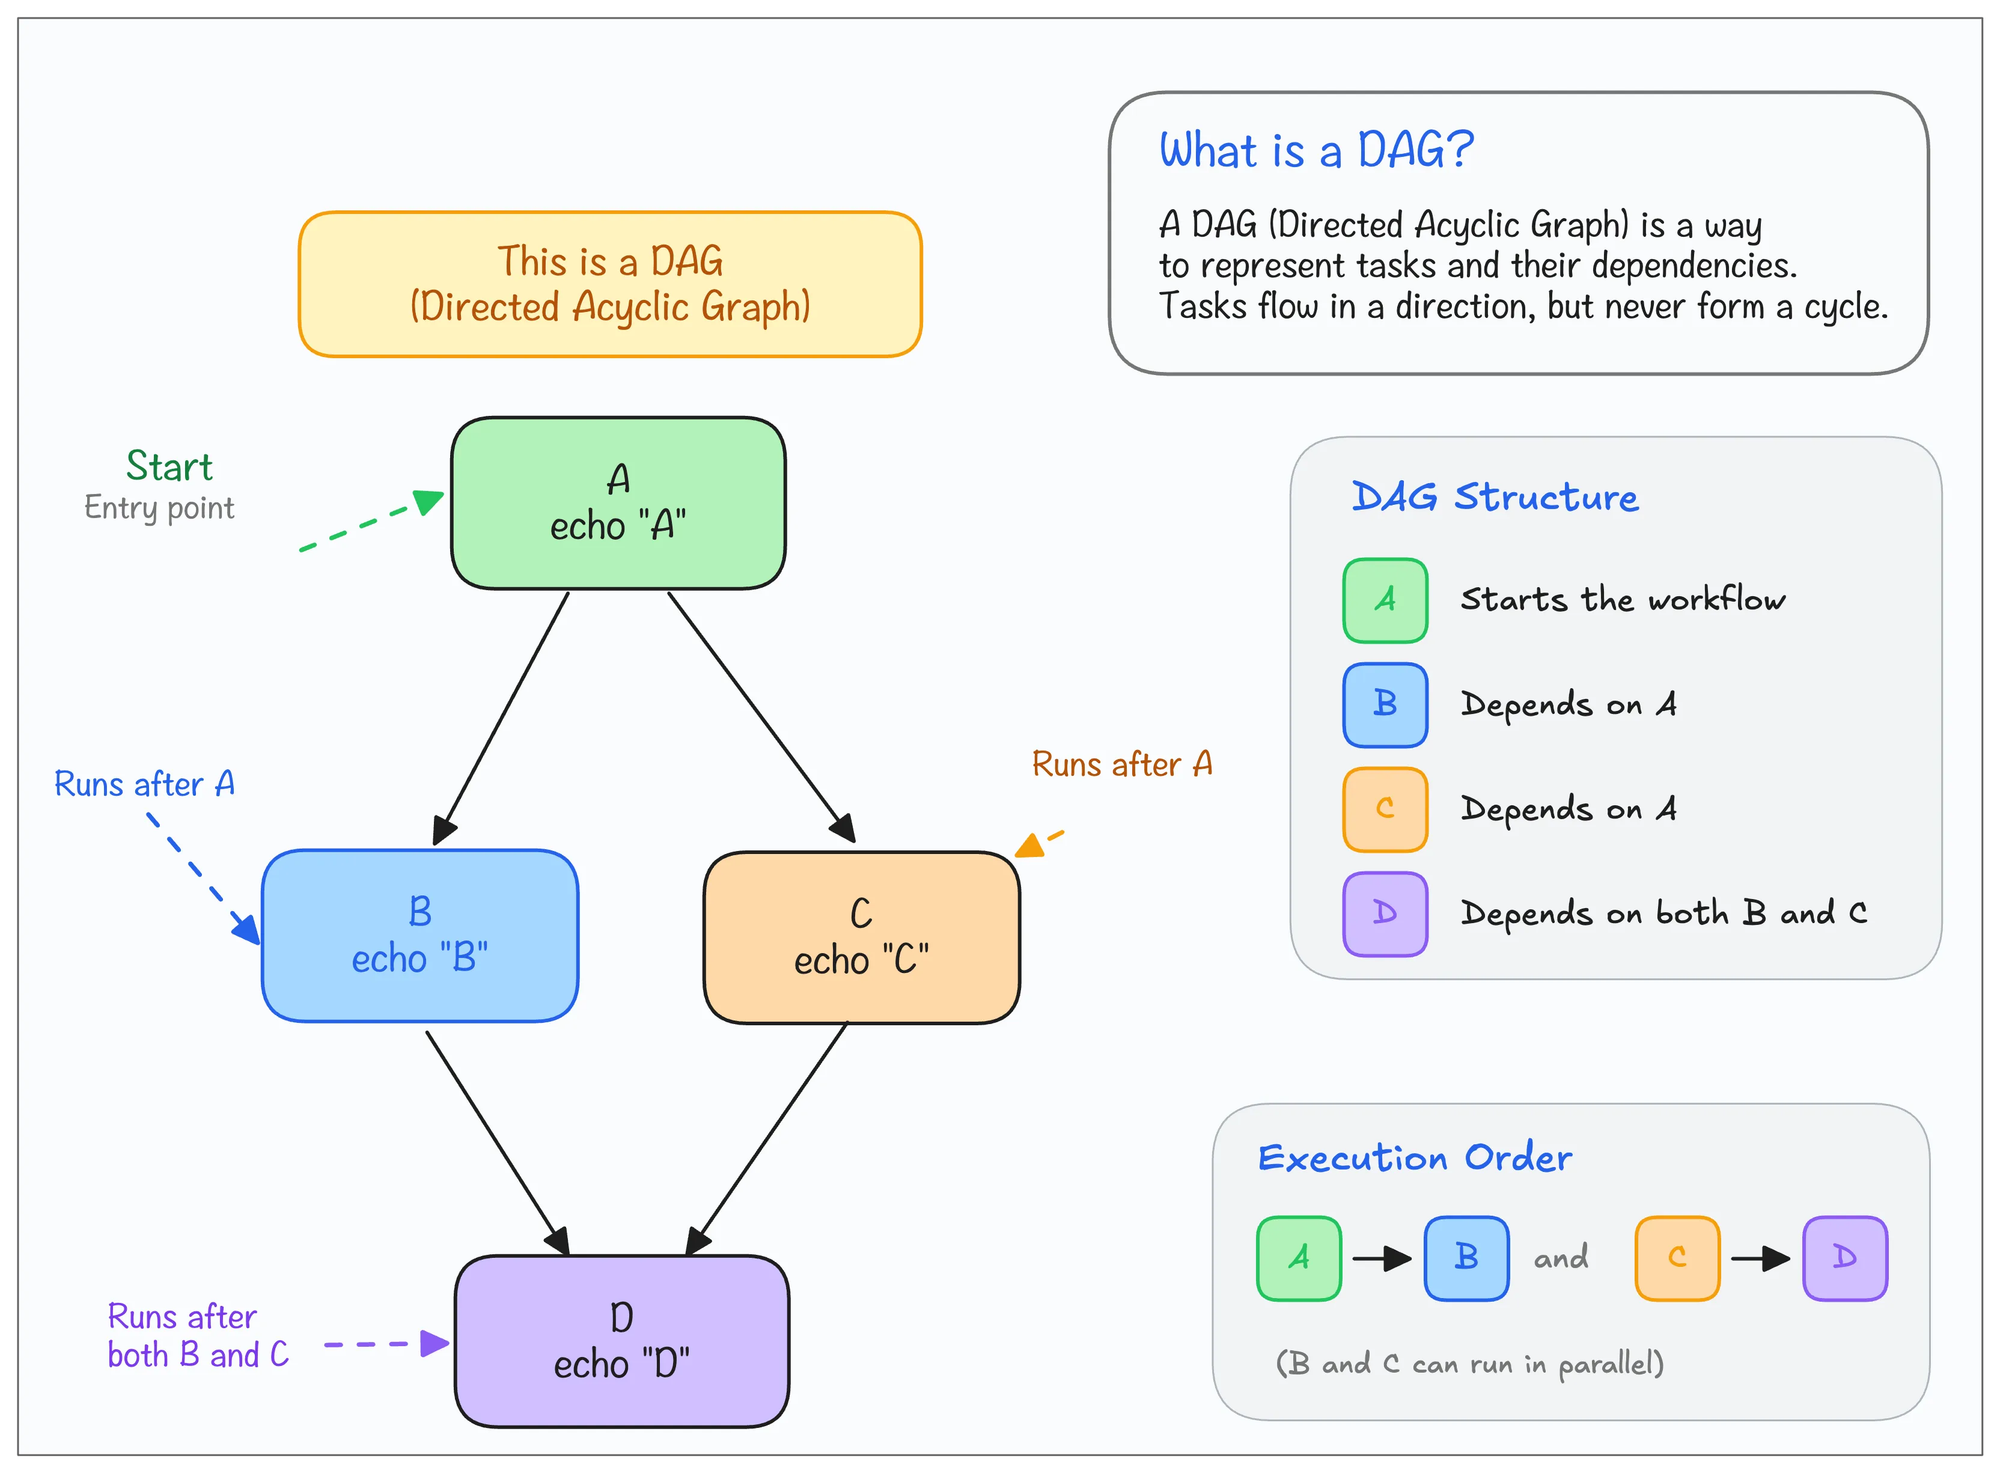
Also, every pipeline task runs in its own Kubernetes pod. Instead of running everything in a single process like a Python script, Kubeflow schedules each step as an independent containerized workload.
It is similar to Airflow Kubernetes Executors
Kubeflow Pipeline Execution Flow
When you submit the pipeline, the KFP SDK compiles the Python pipeline definition into an Intermediate Representation (IR) YAML. It describes the entire workflow, including its tasks, inputs, outputs, and dependencies
The compiled IR YAML is then submitted to the Kubeflow API server, which records the run in MySQL and creates an Argo Workflow CRD.
Then the Argo Workflow controller gets the CRD details and creates pods for running the task.
The following image illustrates the pipeline execution flow.
Runner Pod Implementation
Now, let's understand the runner pod implemenation and what happens behind the scenes.
The following illustration shows what happens internally when a pipeline is triggered. This part is especially important for DevOps engineers.
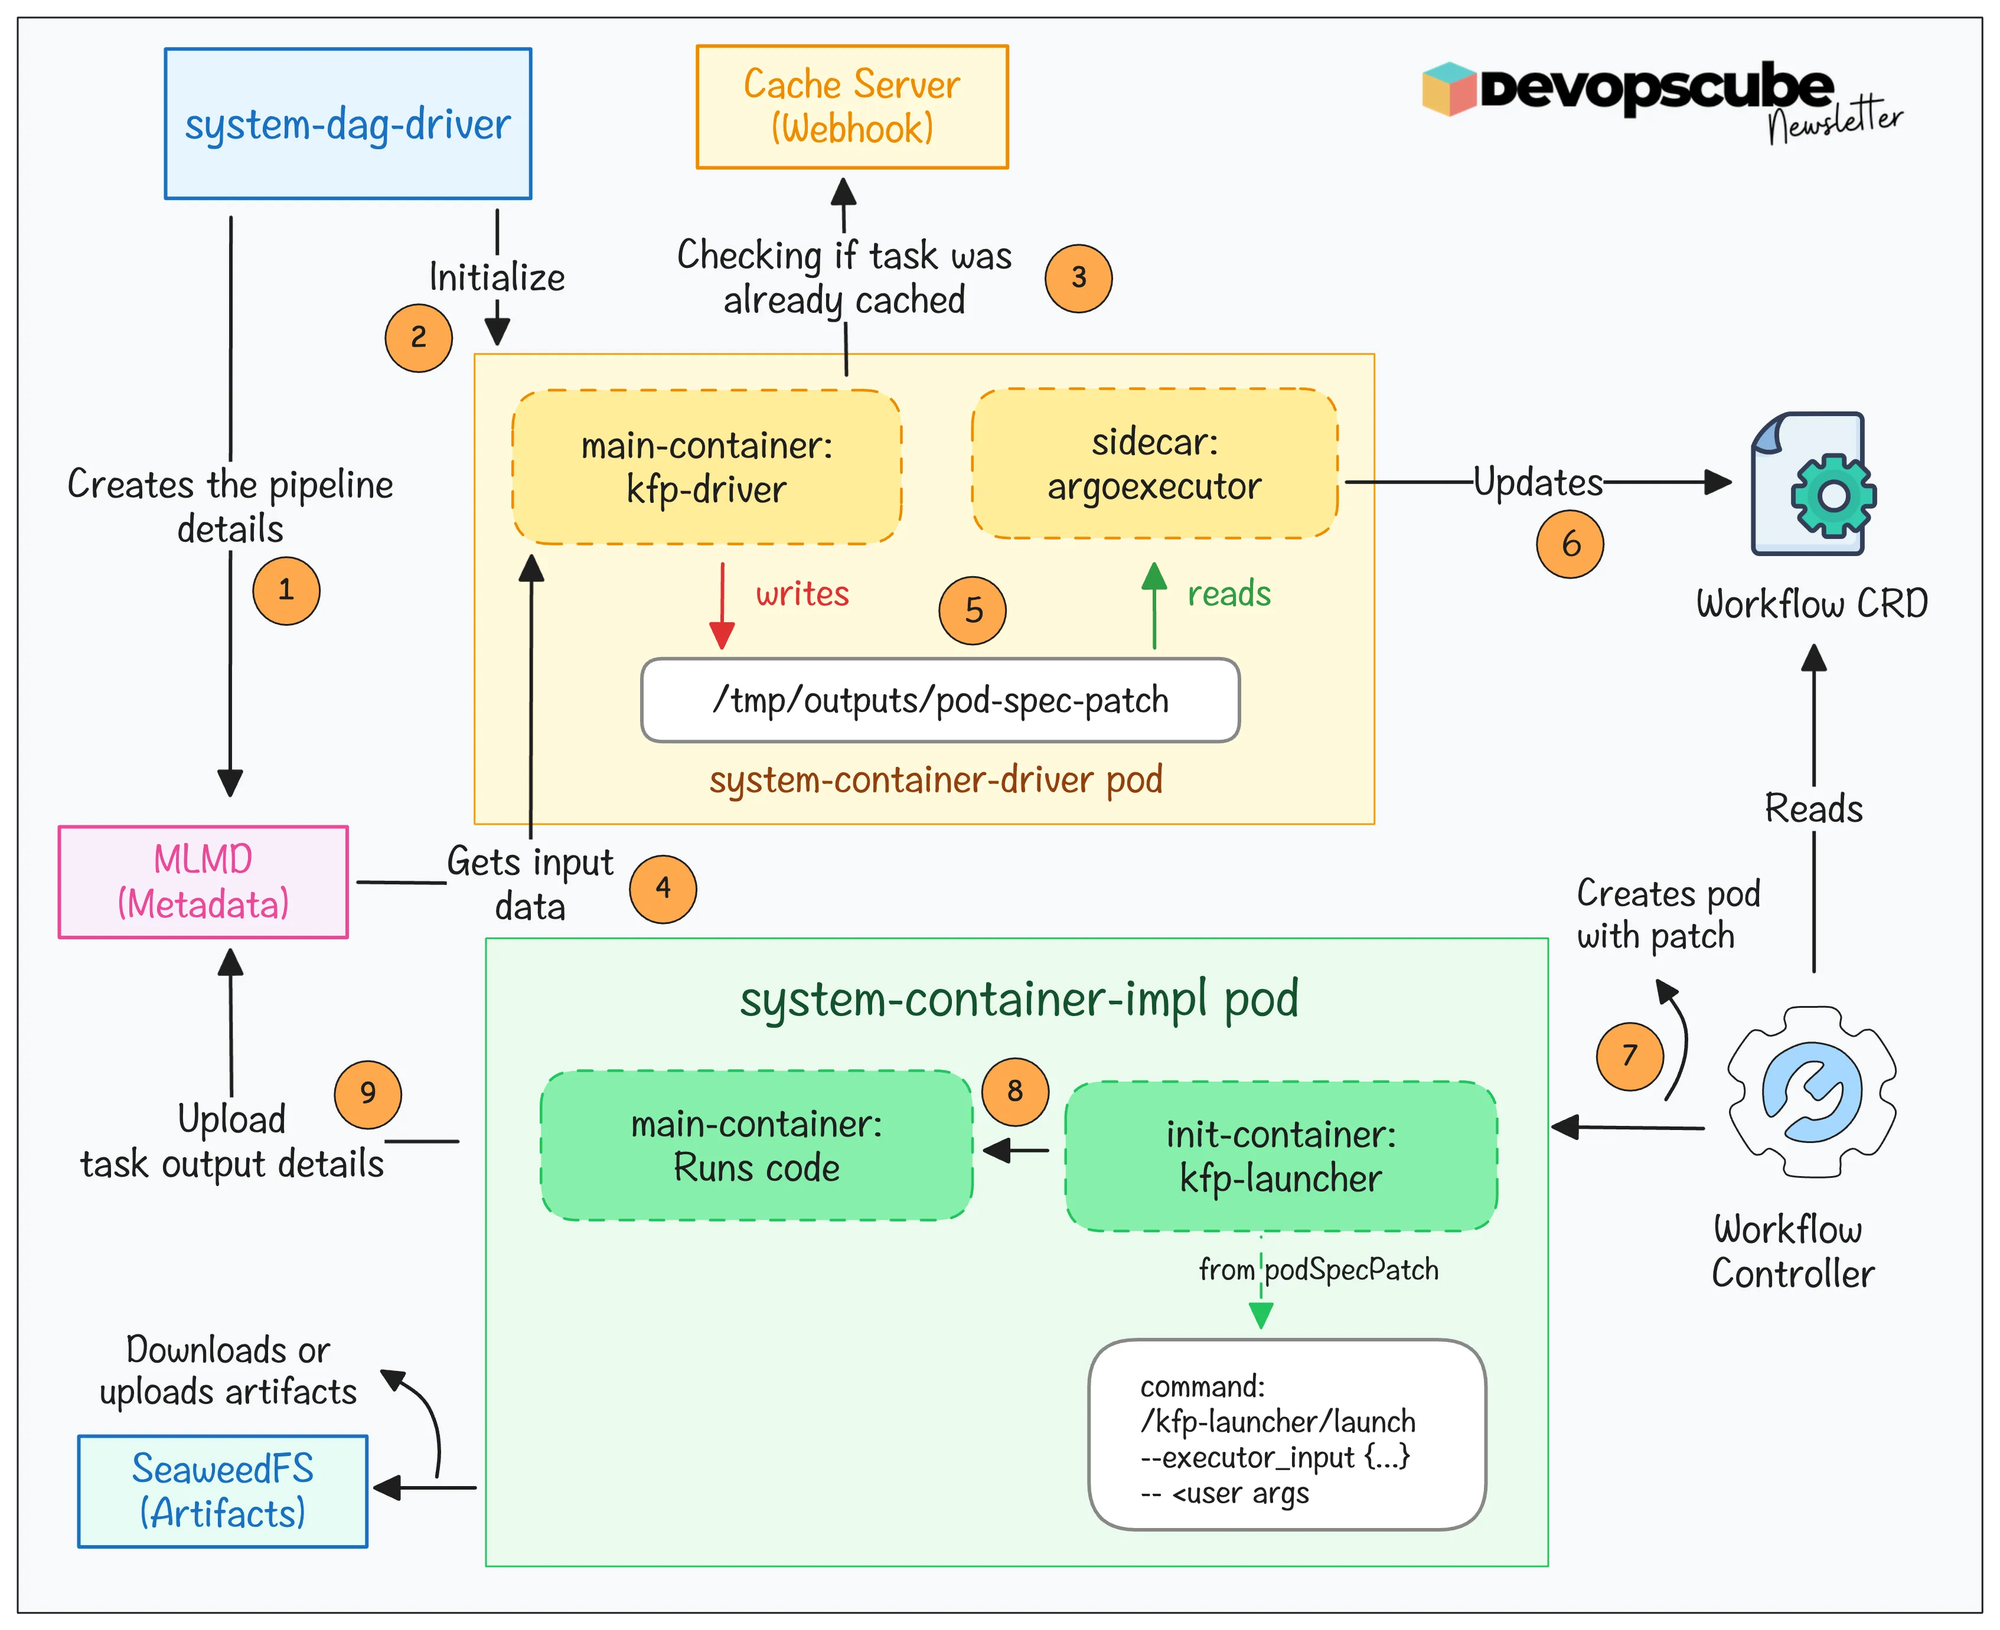
Here is what happens.
- A system-dag-driver pod initializes the pipeline run and creates the execution context in ML Metadata (MLMD).
- For each pipeline task, a system-container-driver pod checks for cached results. If a cache hit is found, the task is skipped.
- If there is no cache, the container-driver gathers the required inputs and generates the executor_input JSON for the task.
- A system-container-impl pod is then created to run your actual component code.
- When the task finishes, Kubeflow stores the parameters, artifacts, metrics, and lineage in ML Metadata (MLMD) for experiment tracking and future caching.
How Caching Works in Kubeflow Pipelines?
One of the most useful features of Kubeflow Pipelines is task-level caching.
In Kubeflow Pipeline, caching is enabled by default, and it is managed by the cache-server.
When you run a pipeline, data like the image used, commands used, etc., are saved as cache. If you run the same pipeline with changes in some steps, only the modified steps will be used. And the same old step details are fetched from the previous runs' cache.
You can also configure the pipeline script to disable cache if caching is not needed for a specific step.
Triggering the Kubeflow Pipeline
At this point, you might be wondering, how do we actually trigger a pipeline?
During development, it's usually very straightforward. You trigger the pipeline from your local machine using the Kubeflow Pipelines SDK. We will do exactly that in the next hands-on section.
In a production environment, however, you rarely run the pipelines manually. Pipelines are usually triggered automatically in one of three ways:
- On a schedule, such as running every night or every week.
- On an event, for example when new training data is uploaded to an S3 bucket.
- From a CI/CD pipeline, where the Kubeflow Pipelines API triggers the workflow automatically after code is merged into the main branch.
Kubeflow Pipelines Setup (Must Do Exercise)
Now it's time to put everything you have learned into practice.
To reinforce everything you have learned in this guide, I highly recommend completing the kubeflow hands-on setup on Kubernetes
In this hands-on guide, I have convered the following.
- Setting up Kubeflow Pipelines on Kubernetes
- Access Kubeflow Pipelines UI
- Trigger Kubeflow Pipelines Run using Kubeflow SDK
- and more..
Kubeflow Pipelines FQA's
The following are some of the frequently asked questions about Kubeflow pipelines.
Why does Kubeflow Pipelines create two pods for each step?
In the above workflow section, I mentioned that two pods will be created for each step of the pipeline. One of the reasons the pods are separated is to save resources because the driver pod is lightweight, and the implementation pod is heavy.
When you run the pipeline, each step will create two pods each, if there are 10 steps, the number of pods created will be 20.
For example, Kubeflow Pipeline skips steps if the same cache is present. In such cases, the implementation pod is not created only the driver pod is created for checking the cache.
And the other reason is to make troubleshooting easier.
If an error occurred in the driver pod, you can check in the source path or the object present in the specified path. If the implementation pod crashes, you need to check the script used in the step.
What's the difference in using Airflow and Kubeflow Pipelines?
This is probably the first question many DevOps engineers ask.
If we already have Airflow, why do we need another workflow orchestration tool?
The answer is simple.
Airflow is for running a general purpose ETL pipelines, data engineering jobs etc and it is not Kubernetes-specific, it can run on any platform. But Kubeflow Pipelines is a Kubernetes native tool that is specifically built to run ML workflows using Kubernetes native AI/ML features
And another thing that makes Kubeflow Pipelines a suitable option is that it comes with every component that is needed for caching, saving the metadata, lineage and artifact management.
That’s a Wrap!
Before we wrap up, one final thought.
If your goal is to move into AI infrastructure, MLOps, or LLMOps, I think Kubeflow is one of the useful platforms you can learn today.
The interesting part is that even if your future employer doesn't use Kubeflow, the knowledge you gain won't go to waste. By learning Kubeflow, you will understand how production AI platforms are designed and operated.
You will learn concepts like AI workflow orchestration, model training pipelines, distributed GPU workloads, model serving, experiment tracking, etc.