


One of the key aspects of container image management is supply chain security, and container image signing plays a key role in it.
Through the hands-on exercises in this tutorial, we will help you understand how container image signing and attestation work in Kubernetes.
The ultimate goal of this guide is to teach you the following.
- What image signing is and how it works
- Why SBOM and build provenance are necessary
- How to sign container images using Cosign
- How to generate and attach provenance and SBOM attestations
- How to enforce run-time verification at the Kubernetes admission layer using Kyverno.
Let's get started.
What is Container Image Signing?
Let's say you build a container image and push it to any image registry. But anyone with permission to the registry might accidentally overwrite it, or an attacker might modify it by injecting malware and push the compromised image back to the registry.
Without signing, there is no reliable way to know whether the image has been modified. You just deploy it, which could potentially introduce a security vulnerability that attackers can exploit to gain access to your infrastructure.
Here is where Container image signing comes into the picture.
Container image signing adds a cryptographic digital signature to the container image. This signature helps you verify that the image has not been modified since it was signed and that it comes from a trusted source.
So what if someone modifies the image after signing?
If it's modified, signature verification will fail. This makes image signing the fundamental part of the software supply chain security stack.
Also, modern MLOps pipelines are adding many third-party models, datasets, and build artifacts. So, verifying 'what you deploy' is now a core security requirement, not a nice-to-have.
What are Attestations?
Image signing alone is no longer enough.
Container image signing ensures that the image was created by a trusted source and not modified. However, modern software supply chain security requires more than just image signing. You also need to verify image metadata.
The following three kinds of metadata are very important.
1. Software bill of materials (SBOM)
It is a list of software packages and dependencies included in the image. It is generated in formats such as SPDX or CycloneDX JSON using tools like Trivy.
2. Build Provenance (SLSA)
Information about how, where, and by which CI/CD pipeline the image was built. It can be created using Github actions workflows or similar CI platform functionalities.
3. Vulnerability Scan Results
Using tools like Trivy, you can scan the image for vulnerabilities and generate a JSON report.
The SBOM, provenance documents, and vulnerability scan results can all be attached to a container image as attestations.
The following image shows the anatomy of container image trust.
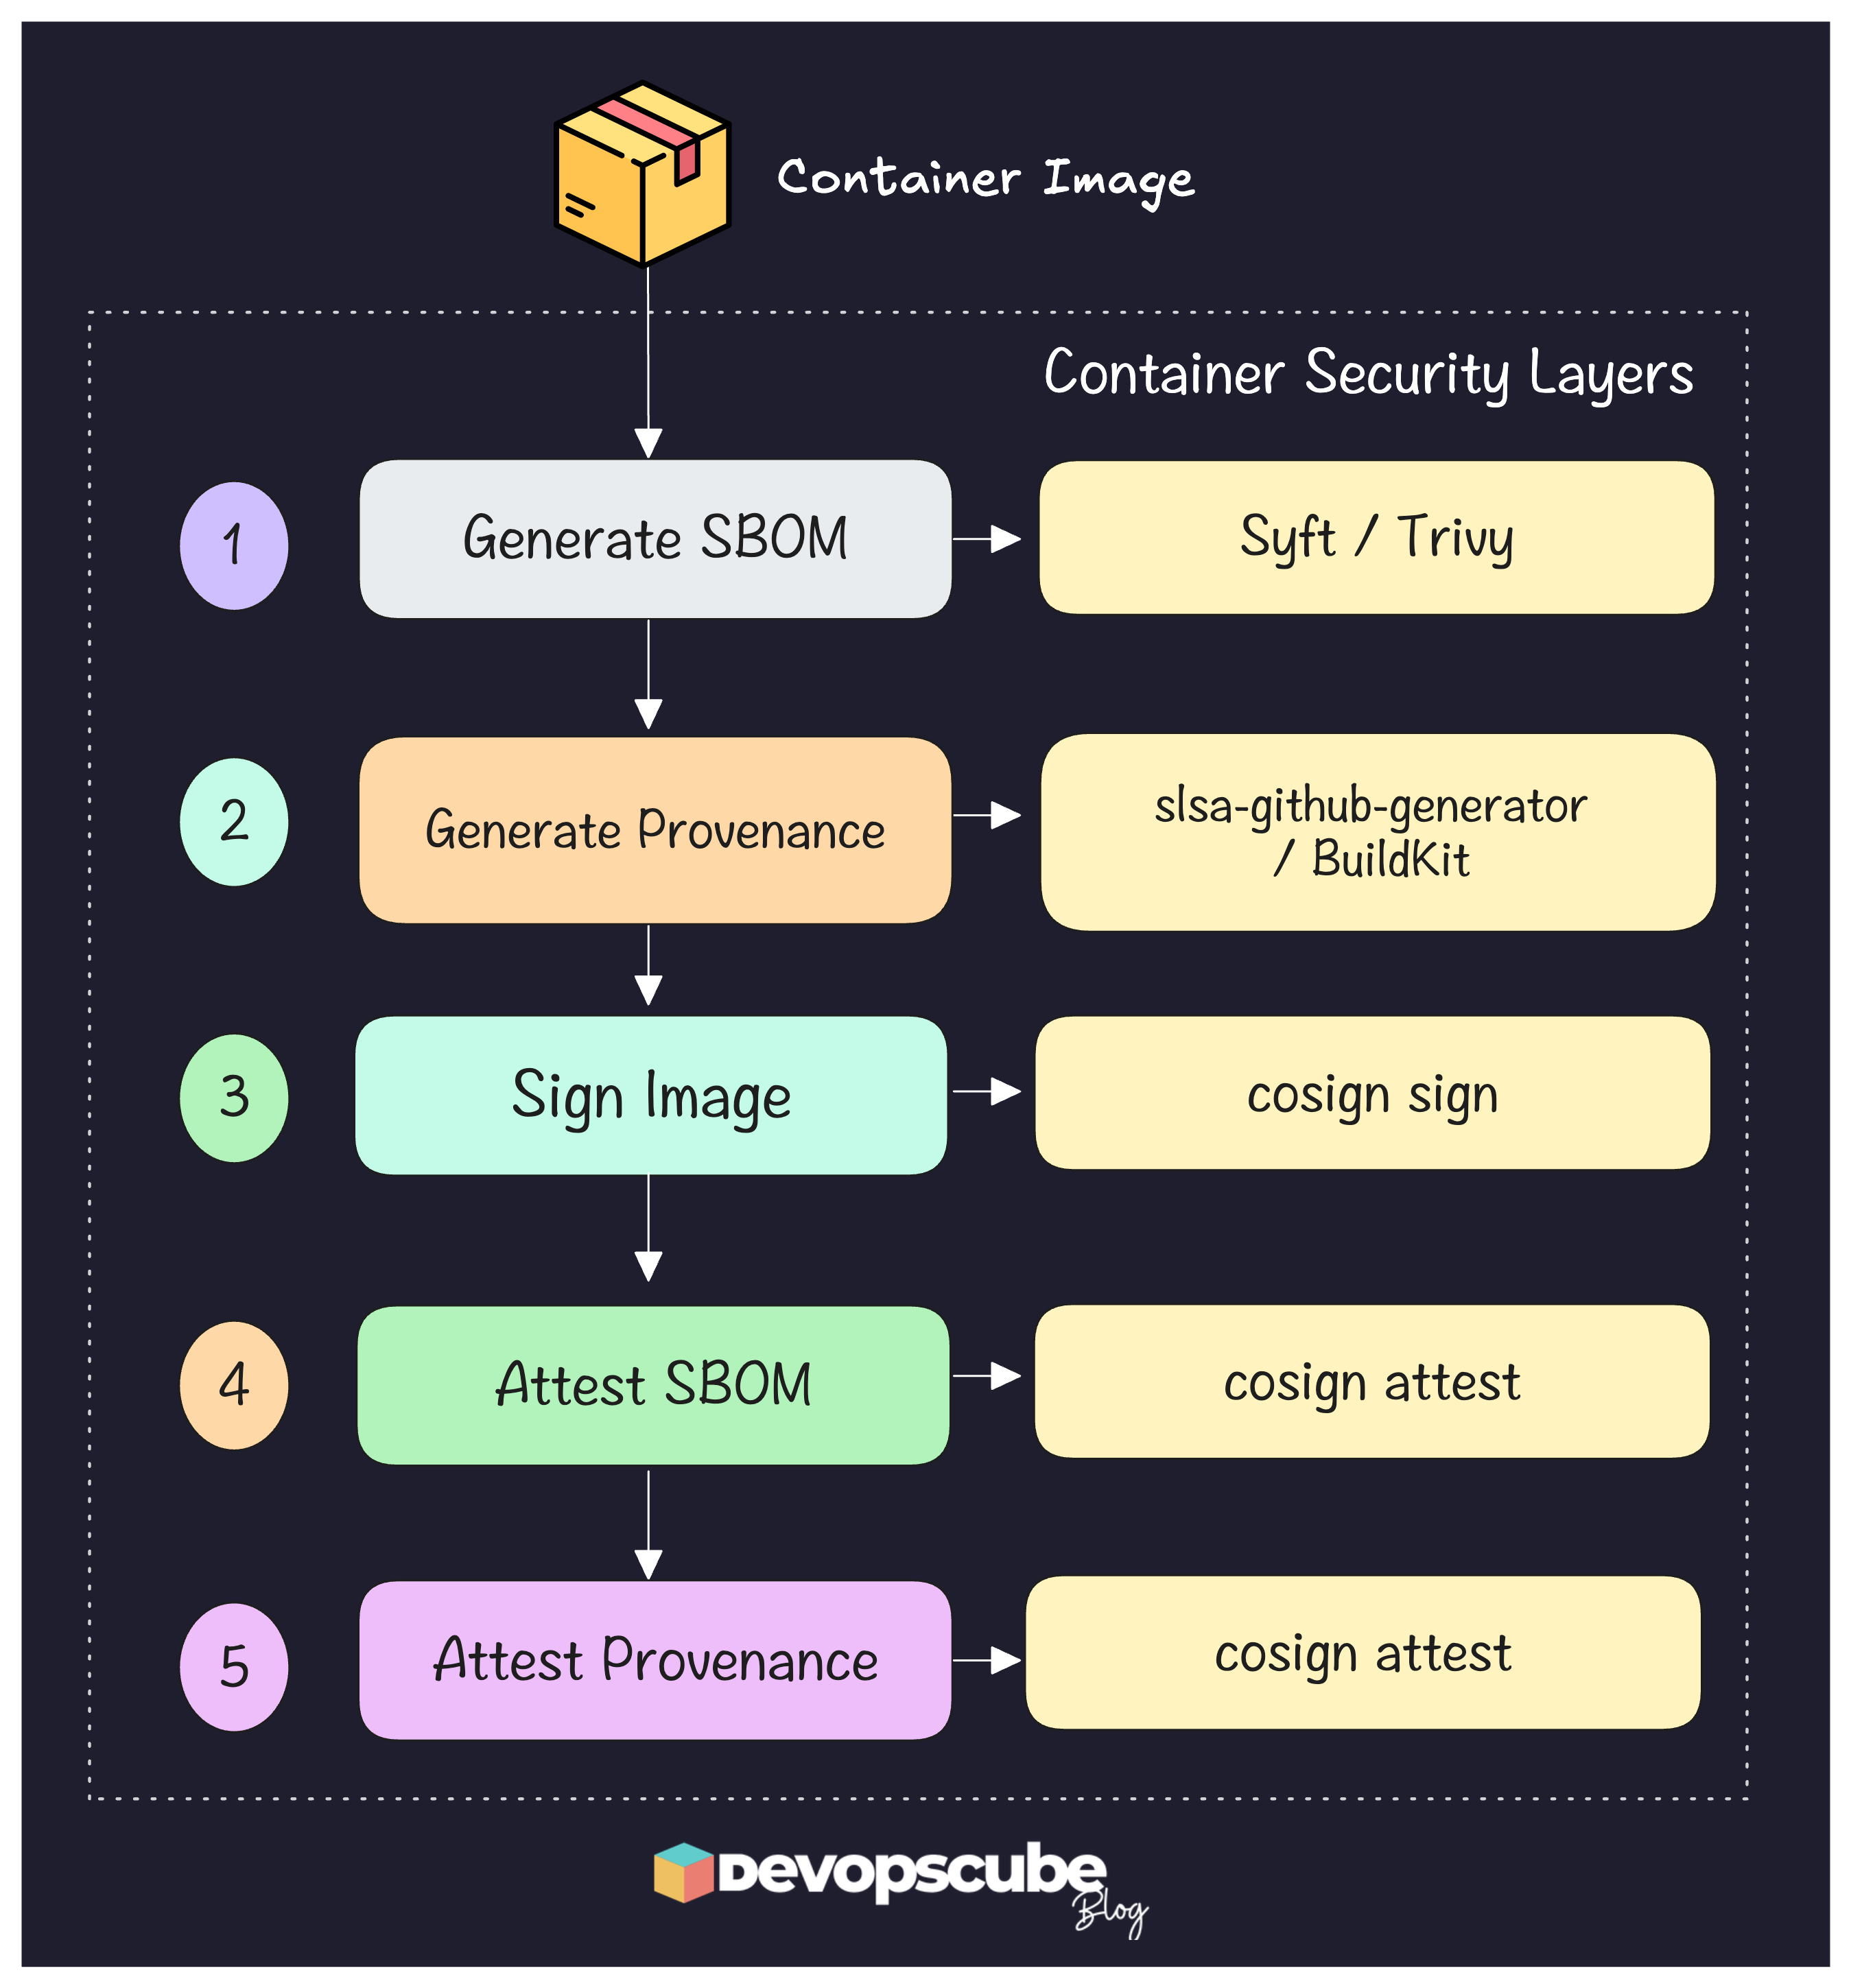
If there is a valid signature and attestations, the pod will be deployed. Otherwise, Kyverno will block the pod from being deployed.
Image Signing, Attestation, and Verification Flow
The following image shows a high-level design of the image signing and attestation process used in a typical enterprise environment.
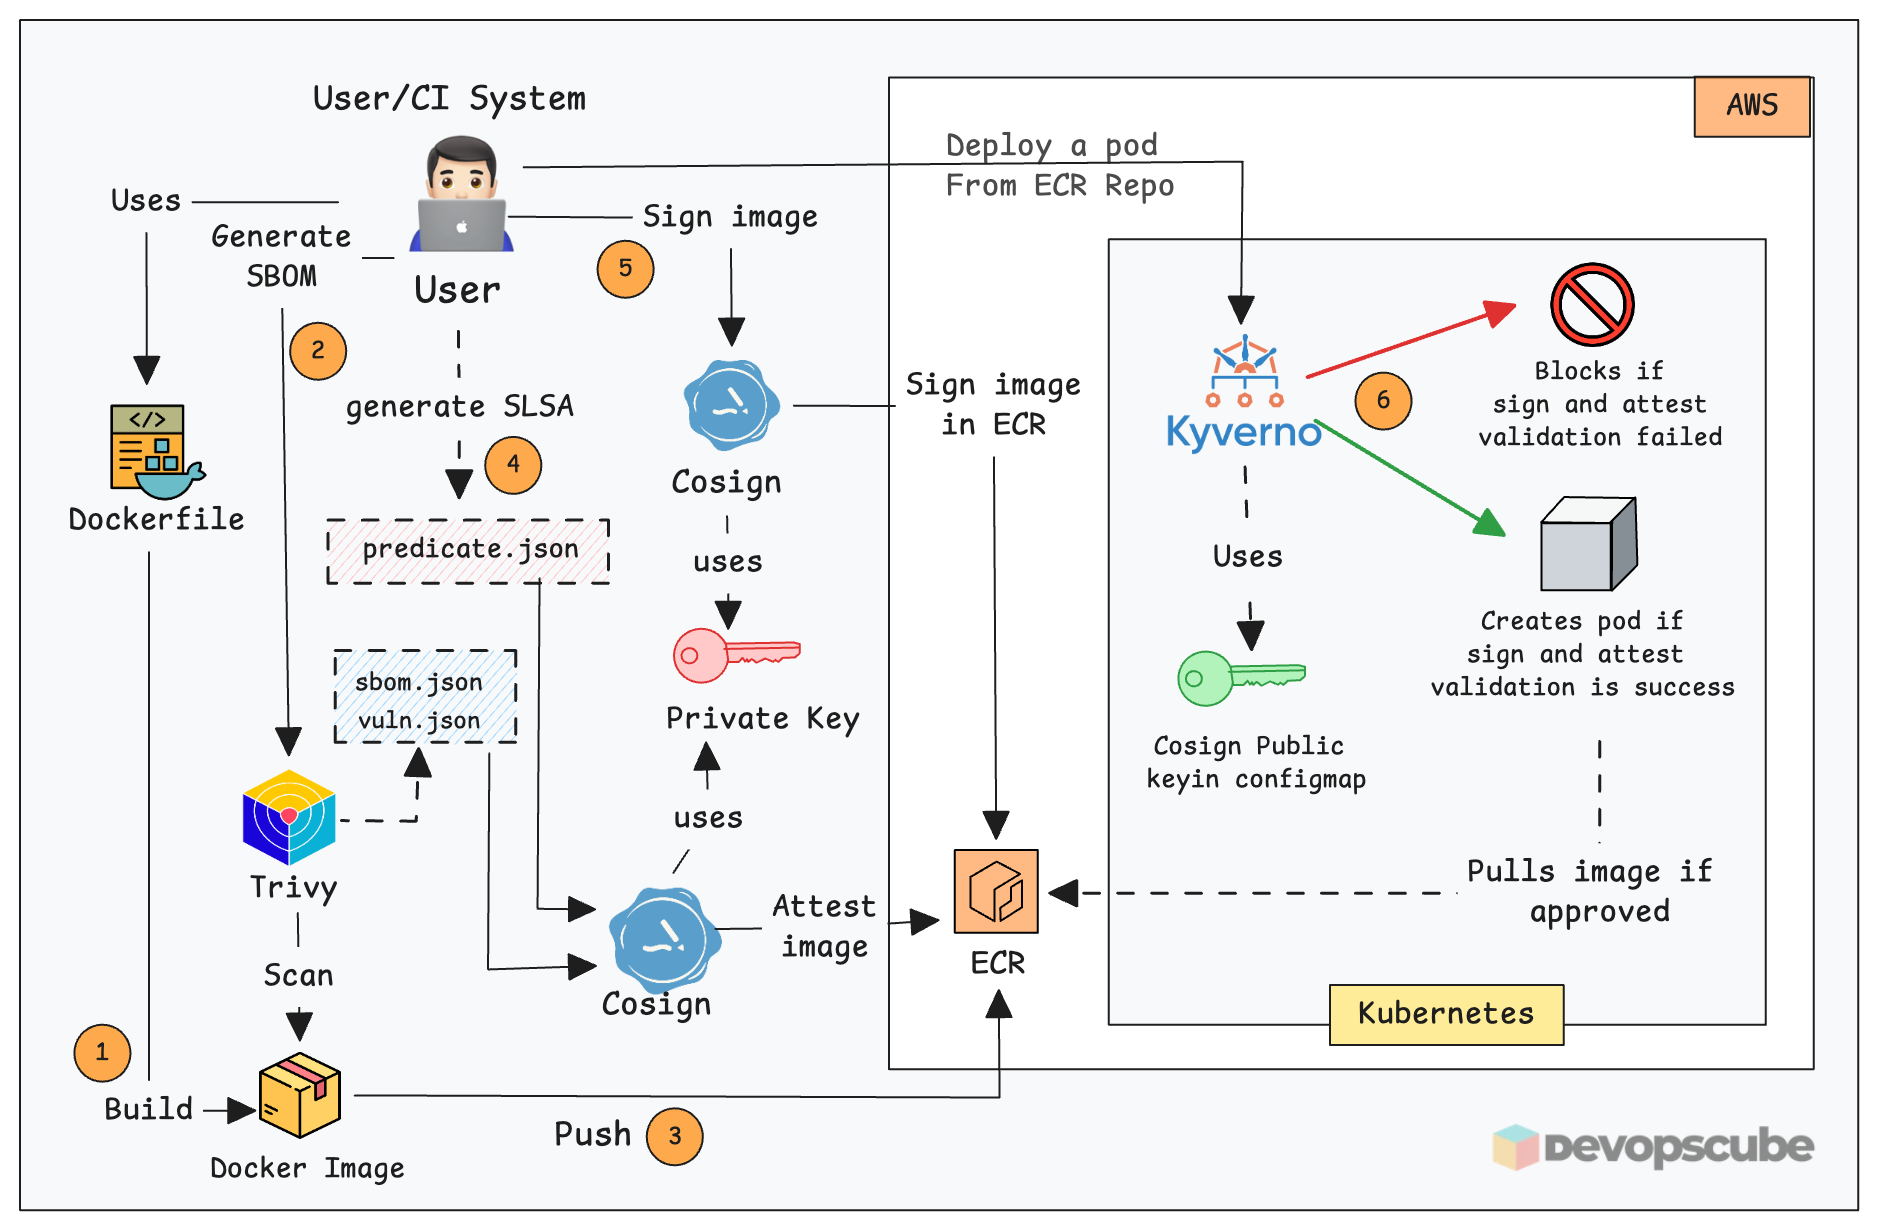
The design primarily shows how a container image is signed and attested with Cosign, and validated in a Kubernetes cluster with Kyverno.
Here is how it works.
- The process starts with the CI/CD pipeline. It builds a container image and then pushes it to a container registry (For ex, AWS ECR).
- Next, the image is digitally signed using Cosign and a private key.
- Then the build provenance (
predicate.json) is generated by the CI pipeline. It is also signed with the same private key and uploaded to the registry alongside the image. - Now, when someone or a CD system tries to deploy the image in a Kubernetes cluster, Kyverno intercepts the API request through the admission controller.
- Kyverno uses the related Cosign public key (referenced from a ConfigMap) to verify both the image signature and the attestation.
- If both the signature and attestation are valid, the Pod gets deployed. Otherwise, Kyverno blocks the deployment.
The whole workflow ensures that only trusted container images with verified build metadata can be deployed to the cluster.
What we are Building
To better understand the workflow, we will build the full setup we discussed on our local system, using AWS ECR as the image repository.
Ideally, all the steps we perform would be done by a CI/CD system. But my idea is to teach the key implementation details of every stage. So we will set it up manually and simulate a couple of details.
Prerequisites
To get started, the following are the key prerequisites.
Let's get started.
Sign and Attest a Container Image with Cosign
Here is what we are going to do in this section, step by step.
- Install cosign
- Generate Cosign Key Pair
- Create SBOM Report and Vulnerability Scan Report of the image
- Generate SLSA Provenance document for the image
- Push Image to ECR
- Sign a Container Image Using Cosign
- Attest SLSA Provenance and SBOM Using Cosign
- Verify the Signing and Attestation
Once you complete all eight steps, you will have a clear picture of the image signing and attestation process.
Let's get started.
Step 1: Build the Container Image
To complete all the steps, you need a container image locally to work with.
I already have an web-server:v1.0.0 image on my local workstation, and I will be using it for the demonstration.
If you don't have one, refer to this guide to build your own image and build an image named web-server:v1.0.0
Step 2: Create a Project Directory
Now create a dedicated project directory to store all the files we generate.
mkdir -p image-security-demo
cd image-security-demo
Perform all the following steps from this directory.
Step 3: Install Cosign
Let's start by installing Cosign on your local system
Use the following command to install Cosign.
For Mac:
brew install cosignFor Linux:
curl -O -L "https://github.com/sigstore/cosign/releases/latest/download/cosign-linux-amd64"
sudo mv cosign-linux-amd64 /usr/local/bin/cosign
sudo chmod +x /usr/local/bin/cosign
For other installation methods, refer to the official documentation.
Step 4: Generate Cosign Key Pair
To sign and verify the images, you need Cosign keys.
To generate them, use the following command. You will be asked to set a PIN for the private key
cosign generate-key-pair
The keys will be created as cosign.key and cosign.pub. Keep the keys safe and don't forget the PIN you set; you'll need it every time you sign.
Step 5: Create SBOM Report and Vulnerability Scan Report
Now, we will generate an SBOM report of the container image using Trivy.
Use the following command to generate an SBOM report.
trivy image --format spdx-json --output sbom_report.json web-server:v1.0.0This will create a JSON file sbom_report.json in your current working directory.
Use the following command to generate a vulnerability scan report.
trivy image --scanners vuln --format cosign-vuln --output vuln.json web-server:v1.0.0 Your policy reads metadata.scanFinishedOn, so check it's actually there and in timestamps(RFC3339)
jq '.metadata' vuln.jsonExpected output:
{
  "scanStartedOn": "2026-07-31T14:59:43.393352+05:30",
  "scanFinishedOn": "2026-07-31T14:59:43.393352+05:30"
}
Step 6: Generate SLSA Provenance
The next step is to create SLSA provenance documentation.
Create an predicate.json environment predicate file with the sample build metadata as given below.
cat > predicate.json <<'EOF'
{
  "subject": [
    {
      "name": "ghcr.io/techiescamp/demo-app",
      "digest": {
        "sha256": "4fd9b6d3d7cc4a1b2c3d4e5f60718293a4b5c6d7e8f90"
      }
    }
  ],
  "predicate": {
    "builder": {
      "id": "https://localhost/manual-build"
    },
    "buildType": "https://localhost/manual",
    "invocation": {
      "configSource": {
        "uri": "git+https://github.com/techiescamp/demo-app@refs/heads/main",
        "digest": {
          "sha1": "bd51f526433a11a0d9c8b26977c9b1ef6dbd35ca"
        },
        "entryPoint": ".github/workflows/docker-build.yml"
      }
    }
  }
}
EOF
In the above file, the subject block contains the image name and a unique SHA ID indicating which version of the image was created. It contains the details of the GitHub Actions repository where it was built, the workflow SHA ID, and the file used to build the image.
With this information, you can find which workflow and repository created the image.
Also, you may notice we are using the URI format for buildtype and buildid. Because that's how SLSA defines both fields, it shows the build tool used to build the provenance.
For example, the builder ID URL looks like the following.
https://github.com/slsa-framework/slsa-github-generator/.github/workflows/generator_container_slsa3.yml@refs/tags/v2.1.0This means it was built using slsa-github-generator version 2.1.0.
Step 7: Push Image to ECR
The next step is to tag the image and push it to ECR.
When you push the image to the registry, it gets the immutable SHA-256 digest. Cosign signs that digest and stores that signature as a separate OCI artifact in the registry.
If you haven't logged into ECR yet, run the following commands.
aws ecr get-login-password --region <REGION> | \
  docker login --username AWS --password-stdin <ACCOUNT-ID>.dkr.ecr.<REGION>.amazonaws.com/<REPO-NAME>
Now let's save the ECR repository URL as an environment variable.
export ECR_REPO=<ACCOUNT-ID>.dkr.ecr.<REGION>.amazonaws.com/<REPO-NAME>
You can set the ECR repo to immutable using the following command. This way no one can overwrite the tag.
Note: If you used a different repository name or AWS Region update it in the following command before running it.aws ecr put-image-tag-mutability \
--repository-name web-server \
--region us-west-2 \
--image-tag-mutability IMMUTABLENext, tag the image and push it to ECR.
docker tag web-server:v1.0.0 ${ECR_REPO}:v1.0.0

docker push ${ECR_REPO}:v1.0.0
Step 8: Sign The Container Image Using Cosign
Now that we have the image in the repository, let's sign it with Cosign.
First, we need to get the image's digest. You can also use the image tag to sign an image. This resolves the tag to the digest of the tag at that moment. However, the standard best practice is to sign it with its digest because the digest is immutable.
Note: If you used a different repository name, AWS Region, or image tag, update the values in the following command before running it.aws ecr describe-images \
--repository-name web-server \
--region us-west-2 \
--image-ids imageTag=v1.0.0 \
--query 'imageDetails[0].imageDigest' \
--output textThe above command would return the image digest. We need it in this step and the next. So copy it to Notepad.
Now, run the following command with your image DIGEST to sign the image
cosign sign --key cosign.key ${ECR_REPO}@<DIGEST>
The command will prompt you to enter the private key PIN you created while generating the Cosign key pair. Once the PIN is verified, Cosign signs the image and stores the signature in ECR as an OCI artifact.
Step 10: Attest Provenance and SBOM and Vulnerability Scan Using Cosign
The next step is to attest the Provenance file and SBOM report to the container image.
Use the following command to attest the predicate.json provenance file we generated in step 6 using the image digest you got in the previous step.
cosign attest \
  --key cosign.key \
  --predicate predicate.json \
  --type slsaprovenance1 \
  ${ECR_REPO}@<DIGEST>
The --type flag is to specify the version. It tells which Cosign version the SLSA provenance format your predicate JSON follows.
Then, use the following command to attest the SBOM report we generated in step 5.
cosign attest \
  --key cosign.key \
  --predicate sbom_report.json \
  --type spdxjson \
  ${ECR_REPO}@<DIGEST>
Then, use the following command to attest the Vulnerability Scan Report
cosign attest \
  --key cosign.key \
  --predicate vuln.json \
  --type vuln \
  ${ECR_REPO}@<DIGEST>
Step 11: Verify the Signing and Attestation
Now that the image in the repository is signed and attested, let's verify it using cosign.
Use the following command to check if the image is signed. Replace ${ECR_REPO}:v1.0.0 with the correct image URL if you are using a different one.
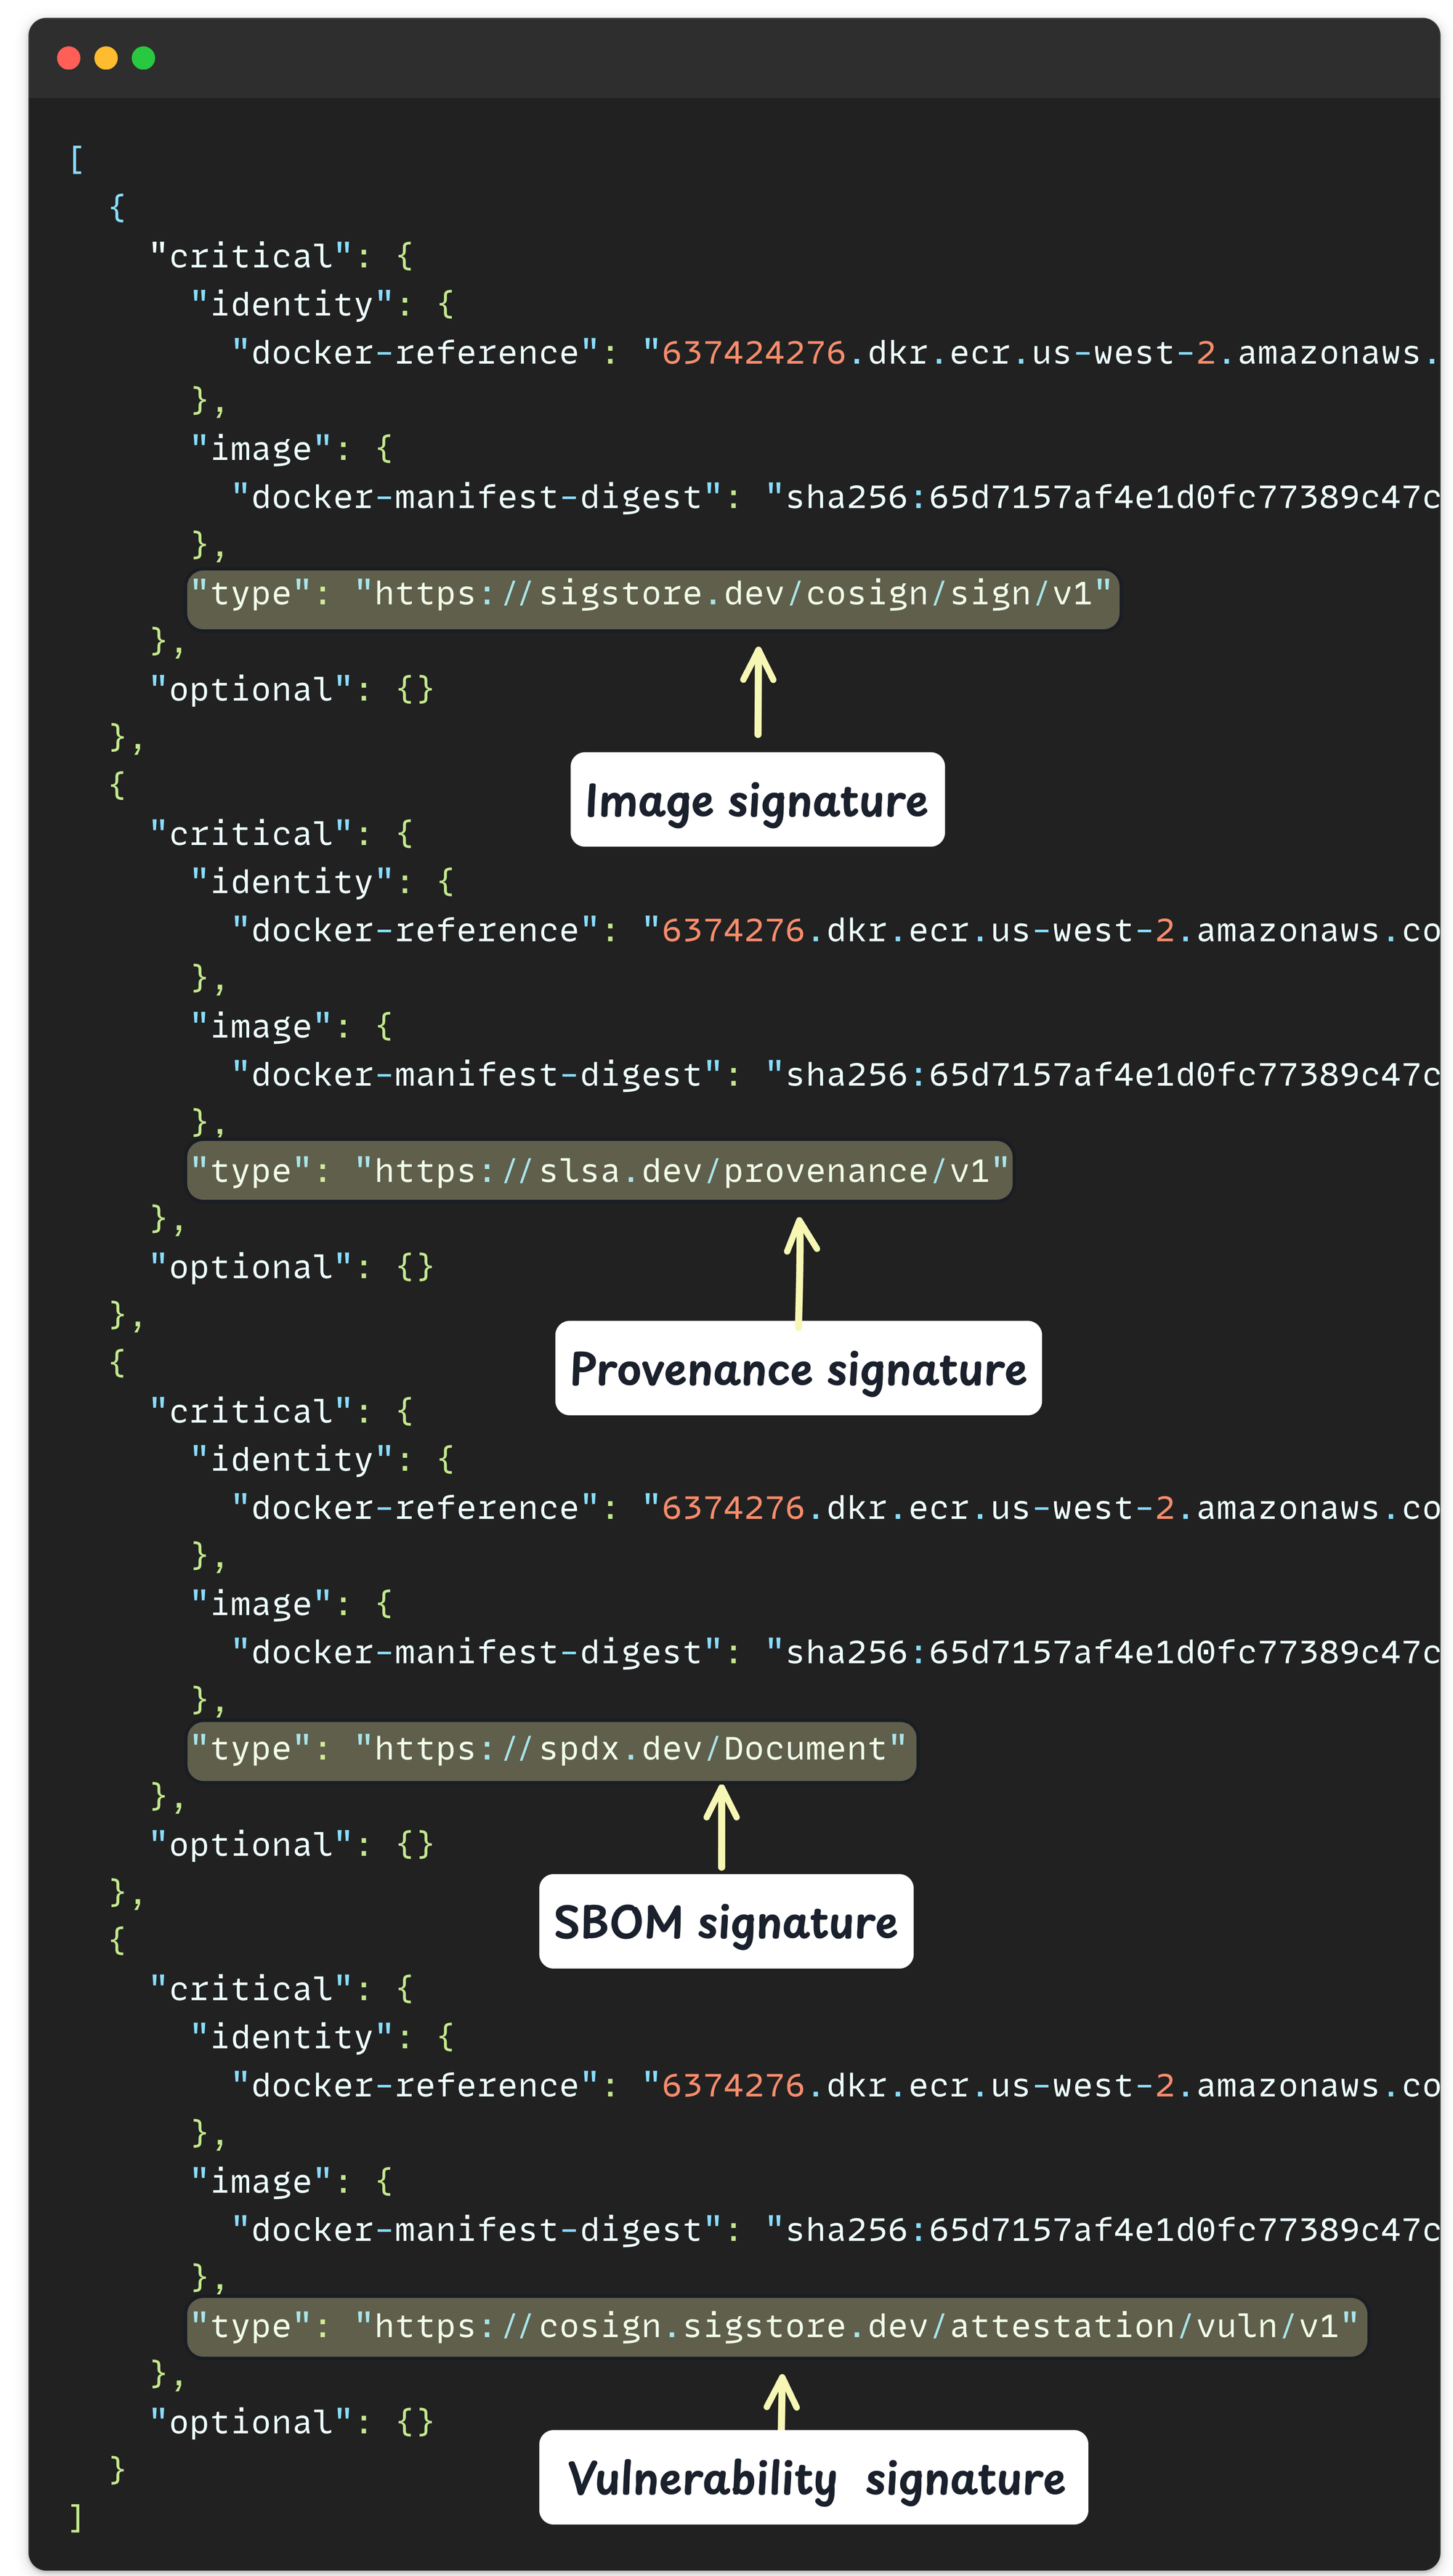
cosign verify --key cosign.pub ${ECR_REPO}:v1.0.0 | jq '.'You will get cosign claims were validated a message if the image is signed and Error: no signatures found a message if the image is not signed.
You will also get the three entries in the output as shown in the image below.
After completing all the steps, you can see four artifacts in the ECR as shown in the image below.
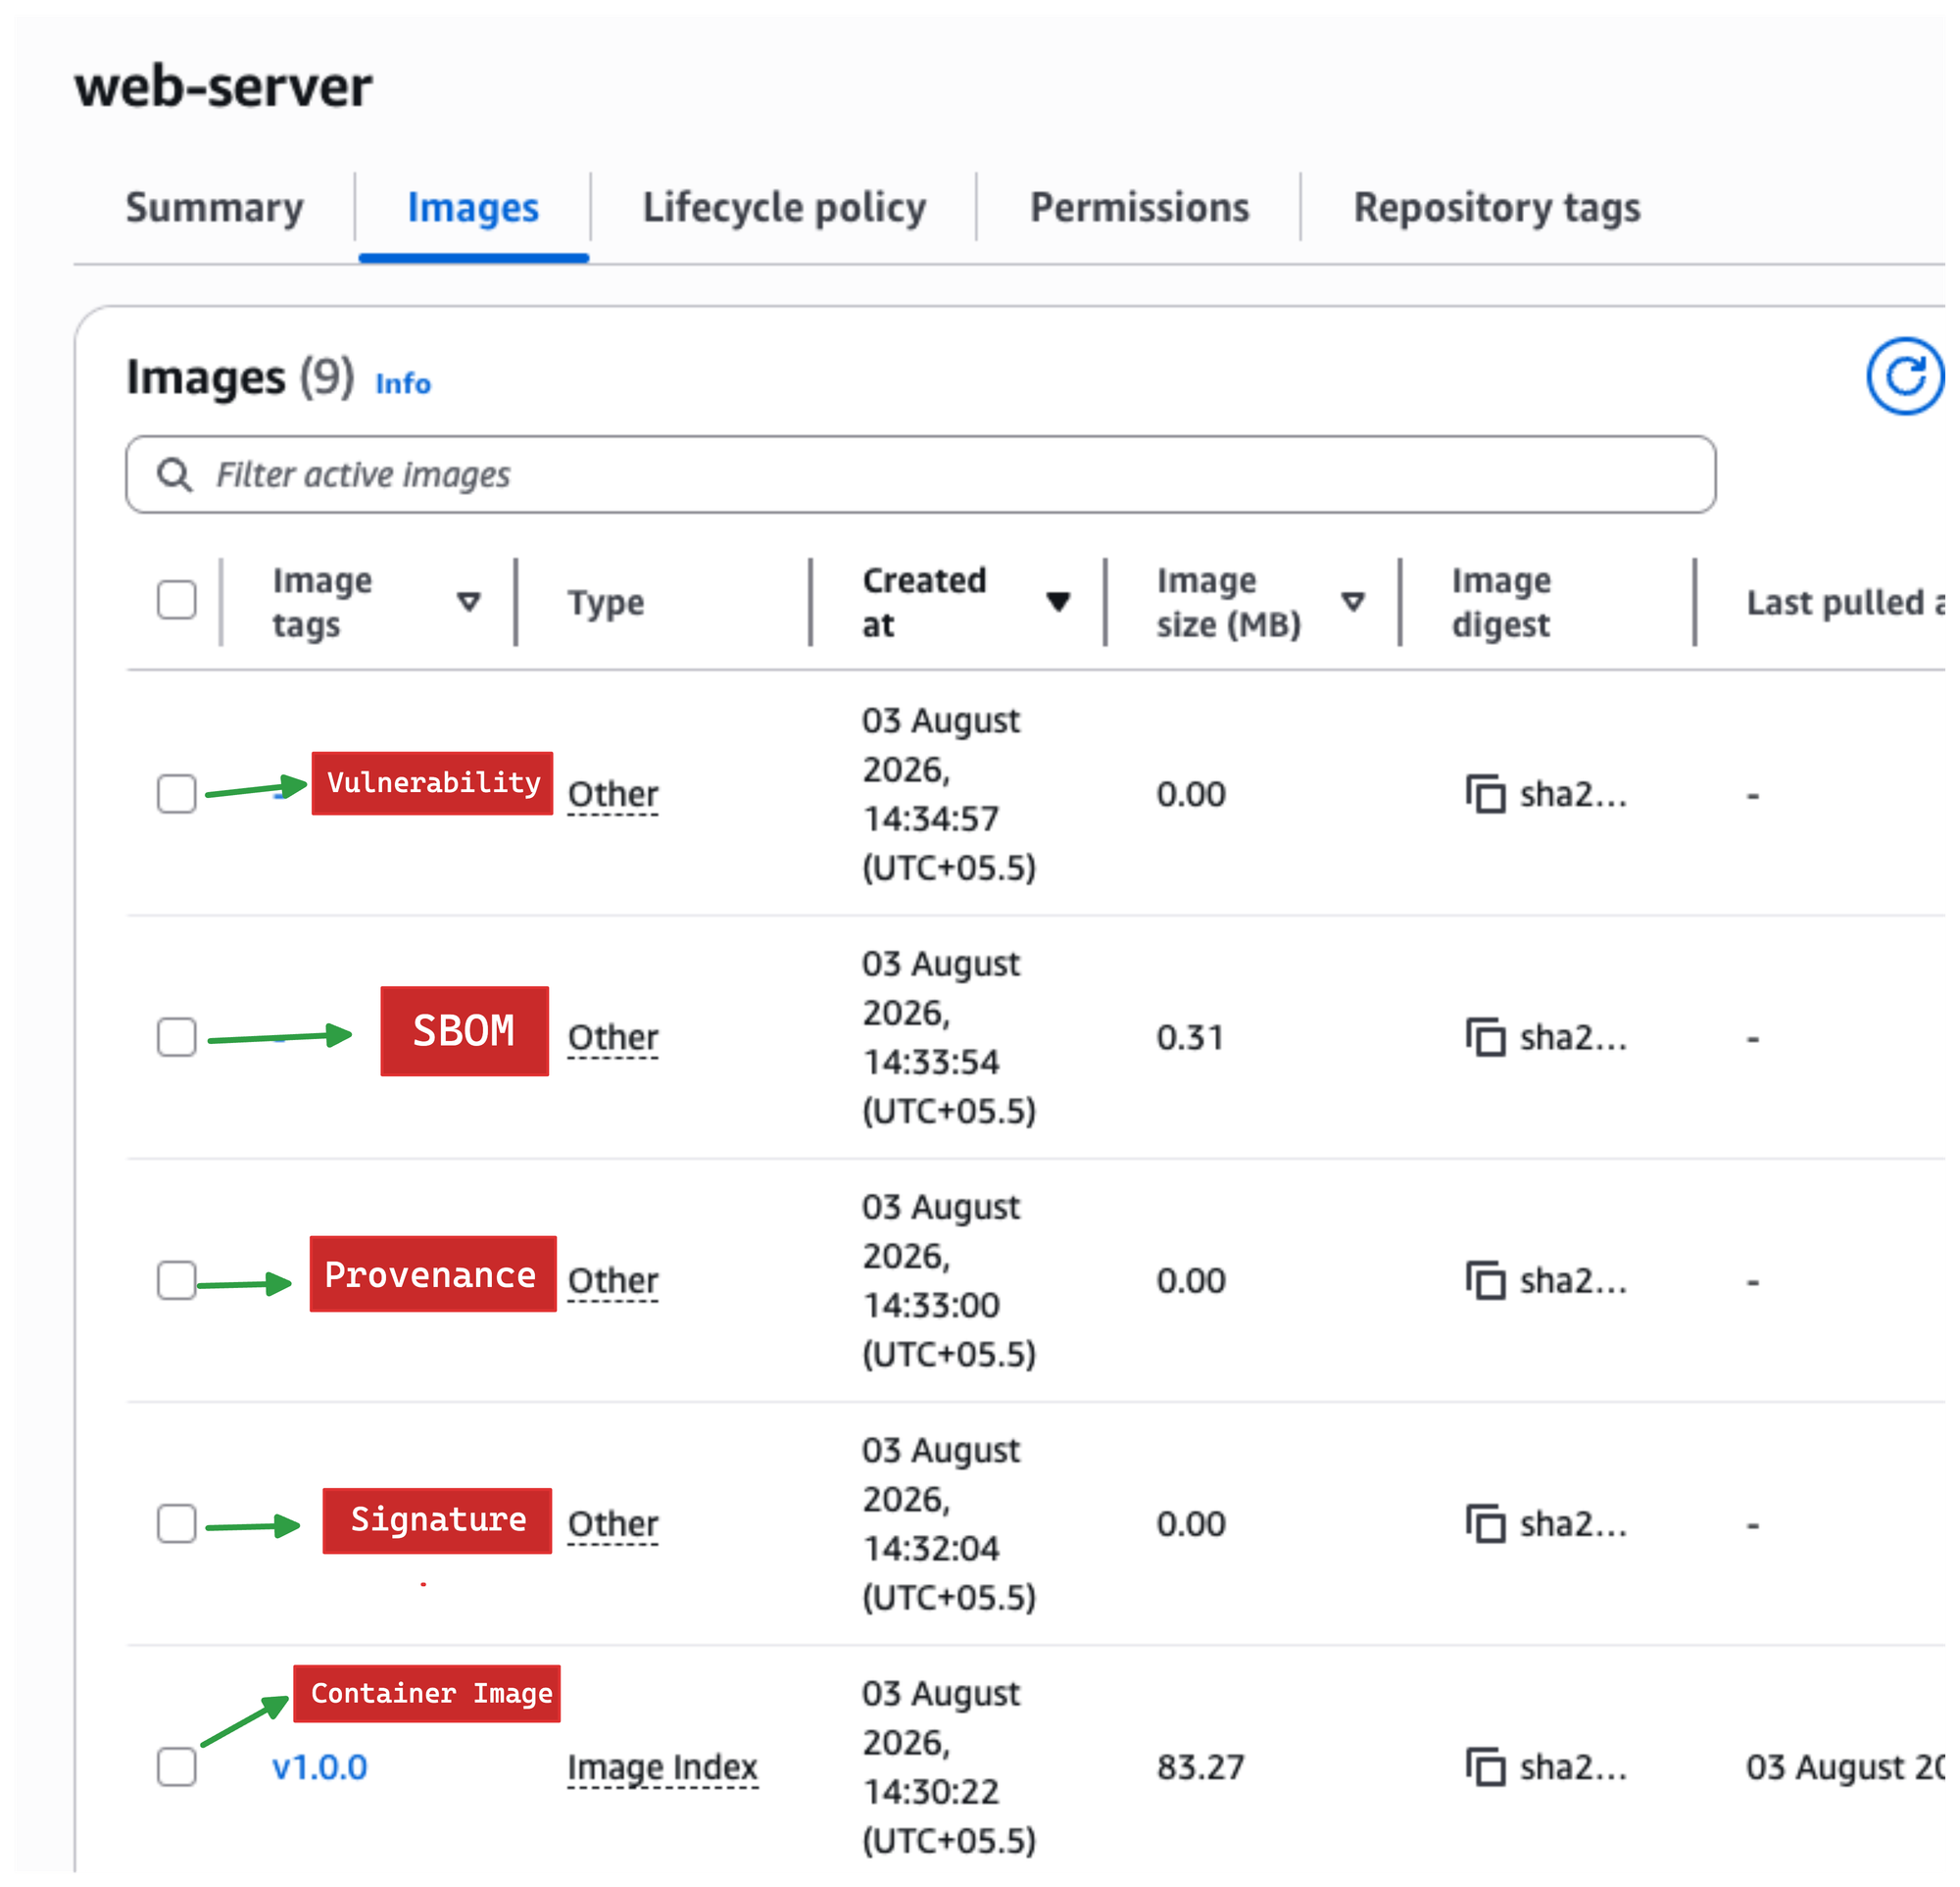
As you can see, the artifact tagged as v1.0.0 is the container image, and the other three are Signature, Provenance, and SBOM also present as OCI artifacts along with the image.
Signing Multi-Arch Images
If you build with docker buildx for more than one platform, you do not get one image. You get a manifest list that points to one image per architecture, each with its own digest
For example,
web-server:v1.0.0
        │
        ▼
Multi-arch image index
sha256:index123
        │
        ├── linux/amd64 manifest
        │   sha256:amd123
        │
        └── linux/arm64 manifest
            sha256:arm123
As shown above, each architecture has its own image manifest and digest. So if you run the regular signing command, it will only sign the top-level image index. So the verification of other image architectures would fail.
This is solved using the --recursive flag. For example, the following command would sign all the architecture-specific image manifests.
cosign sign --key cosign.key --recursive ${ECR_REPO}@<DIGEST>
Download Provenance and SBOM From Registry
There are scenarios where you might want to inspect the SBOM and check whether the exact package and version exist in the image.
Let's see how to download the Provenance file and SBOM report from the registry.
Run the following command to pull the provenance file.
cosign verify-attestation \
  --key cosign.pub \
  --type slsaprovenance1 \
  ${ECR_REPO}:v1.0.0 \
  | jq -r '.payload' | base64 -d | jq . > provenance.json
You will get the provenance.json file locally, which you can open and check manually.
Then, run the following command to get the SBOM report.
cosign verify-attestation \
  --key cosign.pub \
  --type spdxjson \
  ${ECR_REPO}:v1.0.0 \
  | jq -r '.payload' | base64 -d | jq . > sbom.json
You will get the sbom.json report locally.
Then, run the following command to get the vulnerability scan report.
cosign verify-attestation \
  --key cosign.pub \
  --type vuln \
  ${ECR_REPO}:v1.0.0 \
  | jq -r '.payload' | base64 -d | jq '.predicate.metadata' > vuln-metadata.json
You will get the vuln-metadata.json report locally.
Now that we have learned all the key signing and attestation concepts, let's understand how this is verified at runtime in a Kubernetes cluster.
Enforce Verification in Kubernetes With Kyverno
The key security aspect comes at runtime verification. You need to verify the following before the container image is deployed in the cluster.
- Is the image signature valid?
- Does it contain a valid SLSA document?
- Does it have a valid, recent vulnerability scan report attested?
- Does it have a valid SBOM report?
You can verify all these using Kyverno. It does so in the admission layer. Meaning, when the Kubernetes API server receives the pod deployment request, Kyverno admission controller intercepts that request and runs through all the checks mentioned in the Kyverno policy.
If all checks pass, Kyverno allows the pod to be deployed. Otherwise, the deployment gets blocked.
Let's see how we can use Kyverno to validate a container image in a Kubernetes cluster.
Install Kyverno
In Kubernetes, we will use Kyverno to create policies that verify that images are signed.
Run the following command to add the Kyverno Helm repo.
helm repo add kyverno https://kyverno.github.io/kyverno/
helm repo update
Now, install Kyverno.
helm install kyverno kyverno/kyverno -n kyverno --create-namespaceThen use the following command to list the pods to check they are up and running.
$ kubectl get po -n kyverno

NAME                                            READY   STATUS    RESTARTS   AGE
kyverno-admission-controller-748865c877-hqvc4   1/1     Running   0          37s
kyverno-background-controller-746b6968-c8fql    1/1     Running   0          37s
kyverno-cleanup-controller-59dbd88b9-kj9zt      1/1     Running   0          37s
kyverno-reports-controller-58c566fb8c-rpz44     1/1     Running   0          37s
Store the Public Key in a ConfigMap
Kyverno needs the public key to verify whether the image is signed.
So let's create a Kubernetes ConfigMap with the cosign.pub key.
kubectl create configmap cosign-public-key \
  --from-file=cosign.pub=./cosign.pub \
  -n kyverno
Then run the following command to verify if the ConfigMap is created.
$ kubectl get cm -n kyverno

NAME                DATA   AGE
cosign-public-key   1      16s
kube-root-ca.crt    1      42s
kyverno             8      36s
kyverno-metrics     3      36s
You can see the ConfigMap cosign-public-key created along with other Kyverno ConfigMaps.
Create the Kyverno ImageValidatingPolicy
Let's create a Kyverno policy that accepts and denies images.
Create a YAML file kyverno-policy.yaml by running the following command.
apiVersion: policies.kyverno.io/v1
kind: ImageValidatingPolicy
metadata:
  name: image-validation-policy

spec:
  validationActions:
    - Deny
  failurePolicy: Fail

  matchConstraints:
    resourceRules:
      - apiGroups: [""]
        apiVersions: ["v1"]
        operations: ["CREATE", "UPDATE"]
        resources: ["pods"]

  matchImageReferences:
    - glob: "<ACCOUNT-ID>.dkr.ecr.<REGION>.amazonaws.com/<REPO-NAME>:*"

  credentials:
    providers:
      - amazon

  variables:
    - name: cm
      expression: >-
        resource.Get("v1", "configmaps", "kyverno", "cosign-public-key")
    - name: maxScanAge
      expression: 'duration("168h")'

  attestors:
    - name: cosign
      cosign:
        key:
          expression: "variables.cm.data['cosign.pub']"
        ctlog:
          url: "https://rekor.sigstore.dev"
          insecureIgnoreTlog: true
          insecureIgnoreSCT: true

  attestations:
    - name: provenance
      intoto:
        type: "https://slsa.dev/provenance/v1"

    - name: vulnerabilityScan
      intoto:
        type: "https://cosign.sigstore.dev/attestation/vuln/v1"

  validations:
    # Verify the image signature.
    - expression: >-
        images.containers.map(image,
          verifyImageSignatures(
            image,
            [attestors.cosign]
          )
        ).all(result, result > 0)
      message: "Image must be signed with the trusted Cosign key"

    # Verify the SLSA provenance attestation.
    - expression: >-
        images.containers.map(image,
          verifyAttestationSignatures(
            image,
            attestations.provenance,
            [attestors.cosign]
          )
        ).all(result, result > 0)
      message: "Image must have a valid SLSA provenance attestation"

    # Verify the vulnerability attestation and require a scan
    # performed within the last seven days.
    - expression: >-
        images.containers.map(image,
          verifyAttestationSignatures(
            image,
            attestations.vulnerabilityScan,
            [attestors.cosign]
          ) > 0
          &&
          has(extractPayload(image, attestations.vulnerabilityScan)
                .predicate.metadata)
          &&
          timestamp(
            extractPayload(image, attestations.vulnerabilityScan)
              .predicate.metadata.scanFinishedOn
          ) >= time.now() - variables.maxScanAge
        ).all(result, result)
      message: >-
        Image must have a valid vulnerability scan attestation
        created within the last seven days
Let's see what each section is for.
- matchConstraints - Contains the policy that only applies to pods during creation and update. Modify the policy according to your objects.
- matchImageReferences - URL of your image repository.
- credentials - Since we are using ECR, we specify the provider as amazon.
- variables - Fetches the public key from the ConfigMap we created.
- attestors.cosign - This part verifies the image using cosign with the public key from the ConfigMap.
- attestors.ctlog - We are ignoring the Rekor verification, but we are still using this because cosign expects this configuration even if it is disabled.
- attestations - Here, we specify the attestation label we need to look for in ECR for attestation verification. https://slsa.dev/provenance/v1" is the label, not a URL.
- validations - Checks all containers for signatures.
Open the YAML file and update your Account ID, Regions, and Repository name.
Then apply it using the following command.
kubectl apply -f kyverno-policy.yaml
Then, verify whether the image validation policy has been created.
$ kubectl get imagevalidatingpolicy image-validation-policy

NAME                      AGE     READY
image-validation-policy   5m12s   true
Now that the policy is ready, let's test it.
Test Image Validation
For testing, we will try to create a pod with our signed and attested image.
First, let's try deploying a pod with our signed image.
kubectl run web-server --image=${ECR_REPO}:v1.0.0The pod will be deployed, since the image is signed and attested.
$ kubectl get po

NAME         READY   STATUS    RESTARTS   AGE
web-server   1/1     Running   0          5s
If you deploy an image without a signature, you will get the following error message.
Error from server: admission webhook "ivpol.validate.kyverno.svc-fail" denied the request: Policy image-validation-policy failed: Image must be signed with the cosign keyYou will also get the following error message if the image is not attested.
Error from server: admission webhook "ivpol.validate.kyverno.svc-fail" denied the request: Policy image-validation-policy failed: Image must have valid SLSA provenance attestationYou can try deploying a pod with the Nginx image from the web and see what happens.
Keyless Image signing
In our example, we generated a key and signed the image. Cosign also supports keyless image signing, where it automatically creates a temporary key pair and uses the OIDC identity instead of a long-lived signing key.
When you run the Cosign signing command, it asks you to authenticate with an OIDC provider, such as Google or GitHub.
Once authenticated, Sigstore certificate authority provides a short-lived certificate for signing and saves the data in your Sigstore account. And during verification, tools like Kyverno get the data from Sigstore and verify the image.
For an air-gapped private cluster, you must host your own Sigstore infrastructure within your environment.
Production Checklist
If you are implementing the complete image signing and run-time verification workflow, here is the production checklist for you.
- Tag immutability enabled on every repository
- Signing runs in CI, not on a laptop
- Multi-arch child digests signed
- Keyless signing, or keys in a KMS. No key files in the repository
- Key rotation procedure written down and tested
- Signing and verification always by digest, never by tag
- Provenance generated by the build platform, not written by hand
- SBOM attestation attached and verified in policy
- Vulnerability scan attestation attached, with a freshness requirement in Kyverno. For example, the scan must be no older than seven days.
- Roll out the Kyverno policy in Audit mode first.
Clean Up
If you no longer need the setup, use the following command to remove the objects we created in this guide.
Run the following command to delete Kyverno.
helm delete kyverno -n kyvernoThen, use the following command to delete the ConfigMap.
kubectl delete cm cosign-public-key -n kyvernoFAQs
1. Can we use KMS instead of a local key?
Instead of using the key generated on your local system, you can use a KMS service like AWS KMS to generate keys and use them with Cosign.
Below is an example Cosign command to use keys in AWS KMS.
cosign sign --key awskms:///<key-arn> <image-uri>This is a recommended method for a production environment where everything is private. Cosign supports a wide range of KMS services, including Azure Key Vault and Cloud KMS.
2. Does image signing still make sense in a private network?
Yes, image signing not only proves that the image does not change after the final push. But also proves that the image has been thoroughly tested and has gone through every approval process.
3. The Kyverno policy is blocking the Helm upgrade. How do I fix it?
Kyverno checks every image before it is deployed. You need to keep the proper order for new images. Every image you create goes through the signing process before deploying. For example, Build -> Push to ECR -> Sign -> helm upgrade.
4. What is ECR managed image signing?
It is an ECR-managed feature where you create a signing configuration using an AWS Signer signing profile. Once configured, ECR signs images automatically on push using the pusher's identity. AWS Signer handles key material and rotation, and operations are logged to CloudTrail. A key thing to understand is that it covers signing only, not attestations.
5. What is Google Cloud Binary Authorization?
Binary Authorization is a native security control in GKE that functions similarly to Kyverno. It only works on GKE and checks every image before deploying it.
Conclusion
We signed a container image with Cosign, attached SLSA provenance and an SBOM as attestations, and verified all three at the Kubernetes admission layer with Kyverno ImageValidatingPolicy
The key thing is to always sign and verify with a digest.
Hope this comprehensive guide helped you understand the whole signing and attestation workflow.
Over to you! Do you have any existing signing workflow in place?
Do you have run-time verification enabled in production clusters?
Let us know in the comments below.