


Looking for an end-to-end guide to self-host the Ghost platform? Then this guide is for you.
We have been using Ghost for many years now. In fact, DevOpscube is running on the Ghost platform. Although we use managed Ghost hosting, we do development and testing in our self-hosted setup with a proper CI/CD setup.
In this guide, we have covered the following.
- Ghost self-hosted setup architecture
- How all self-hosted Ghost components work
- Setting up the whole stack using Docker Compose
- SMTP setup and configuration for transactional emails
- Mailgun configuration for newsletter setup
and more..
Overall, we have covered all the essential setup you need to implement a production-level, self-hosted Ghost setup.
Before we get started with the setup, let's first understand the high-level architecture of a self-hosted Ghost platform.
Self-hosted Ghost Setup Architecture
The following diagram illustrates the high-level architecture of a self-hosted Ghost setup.
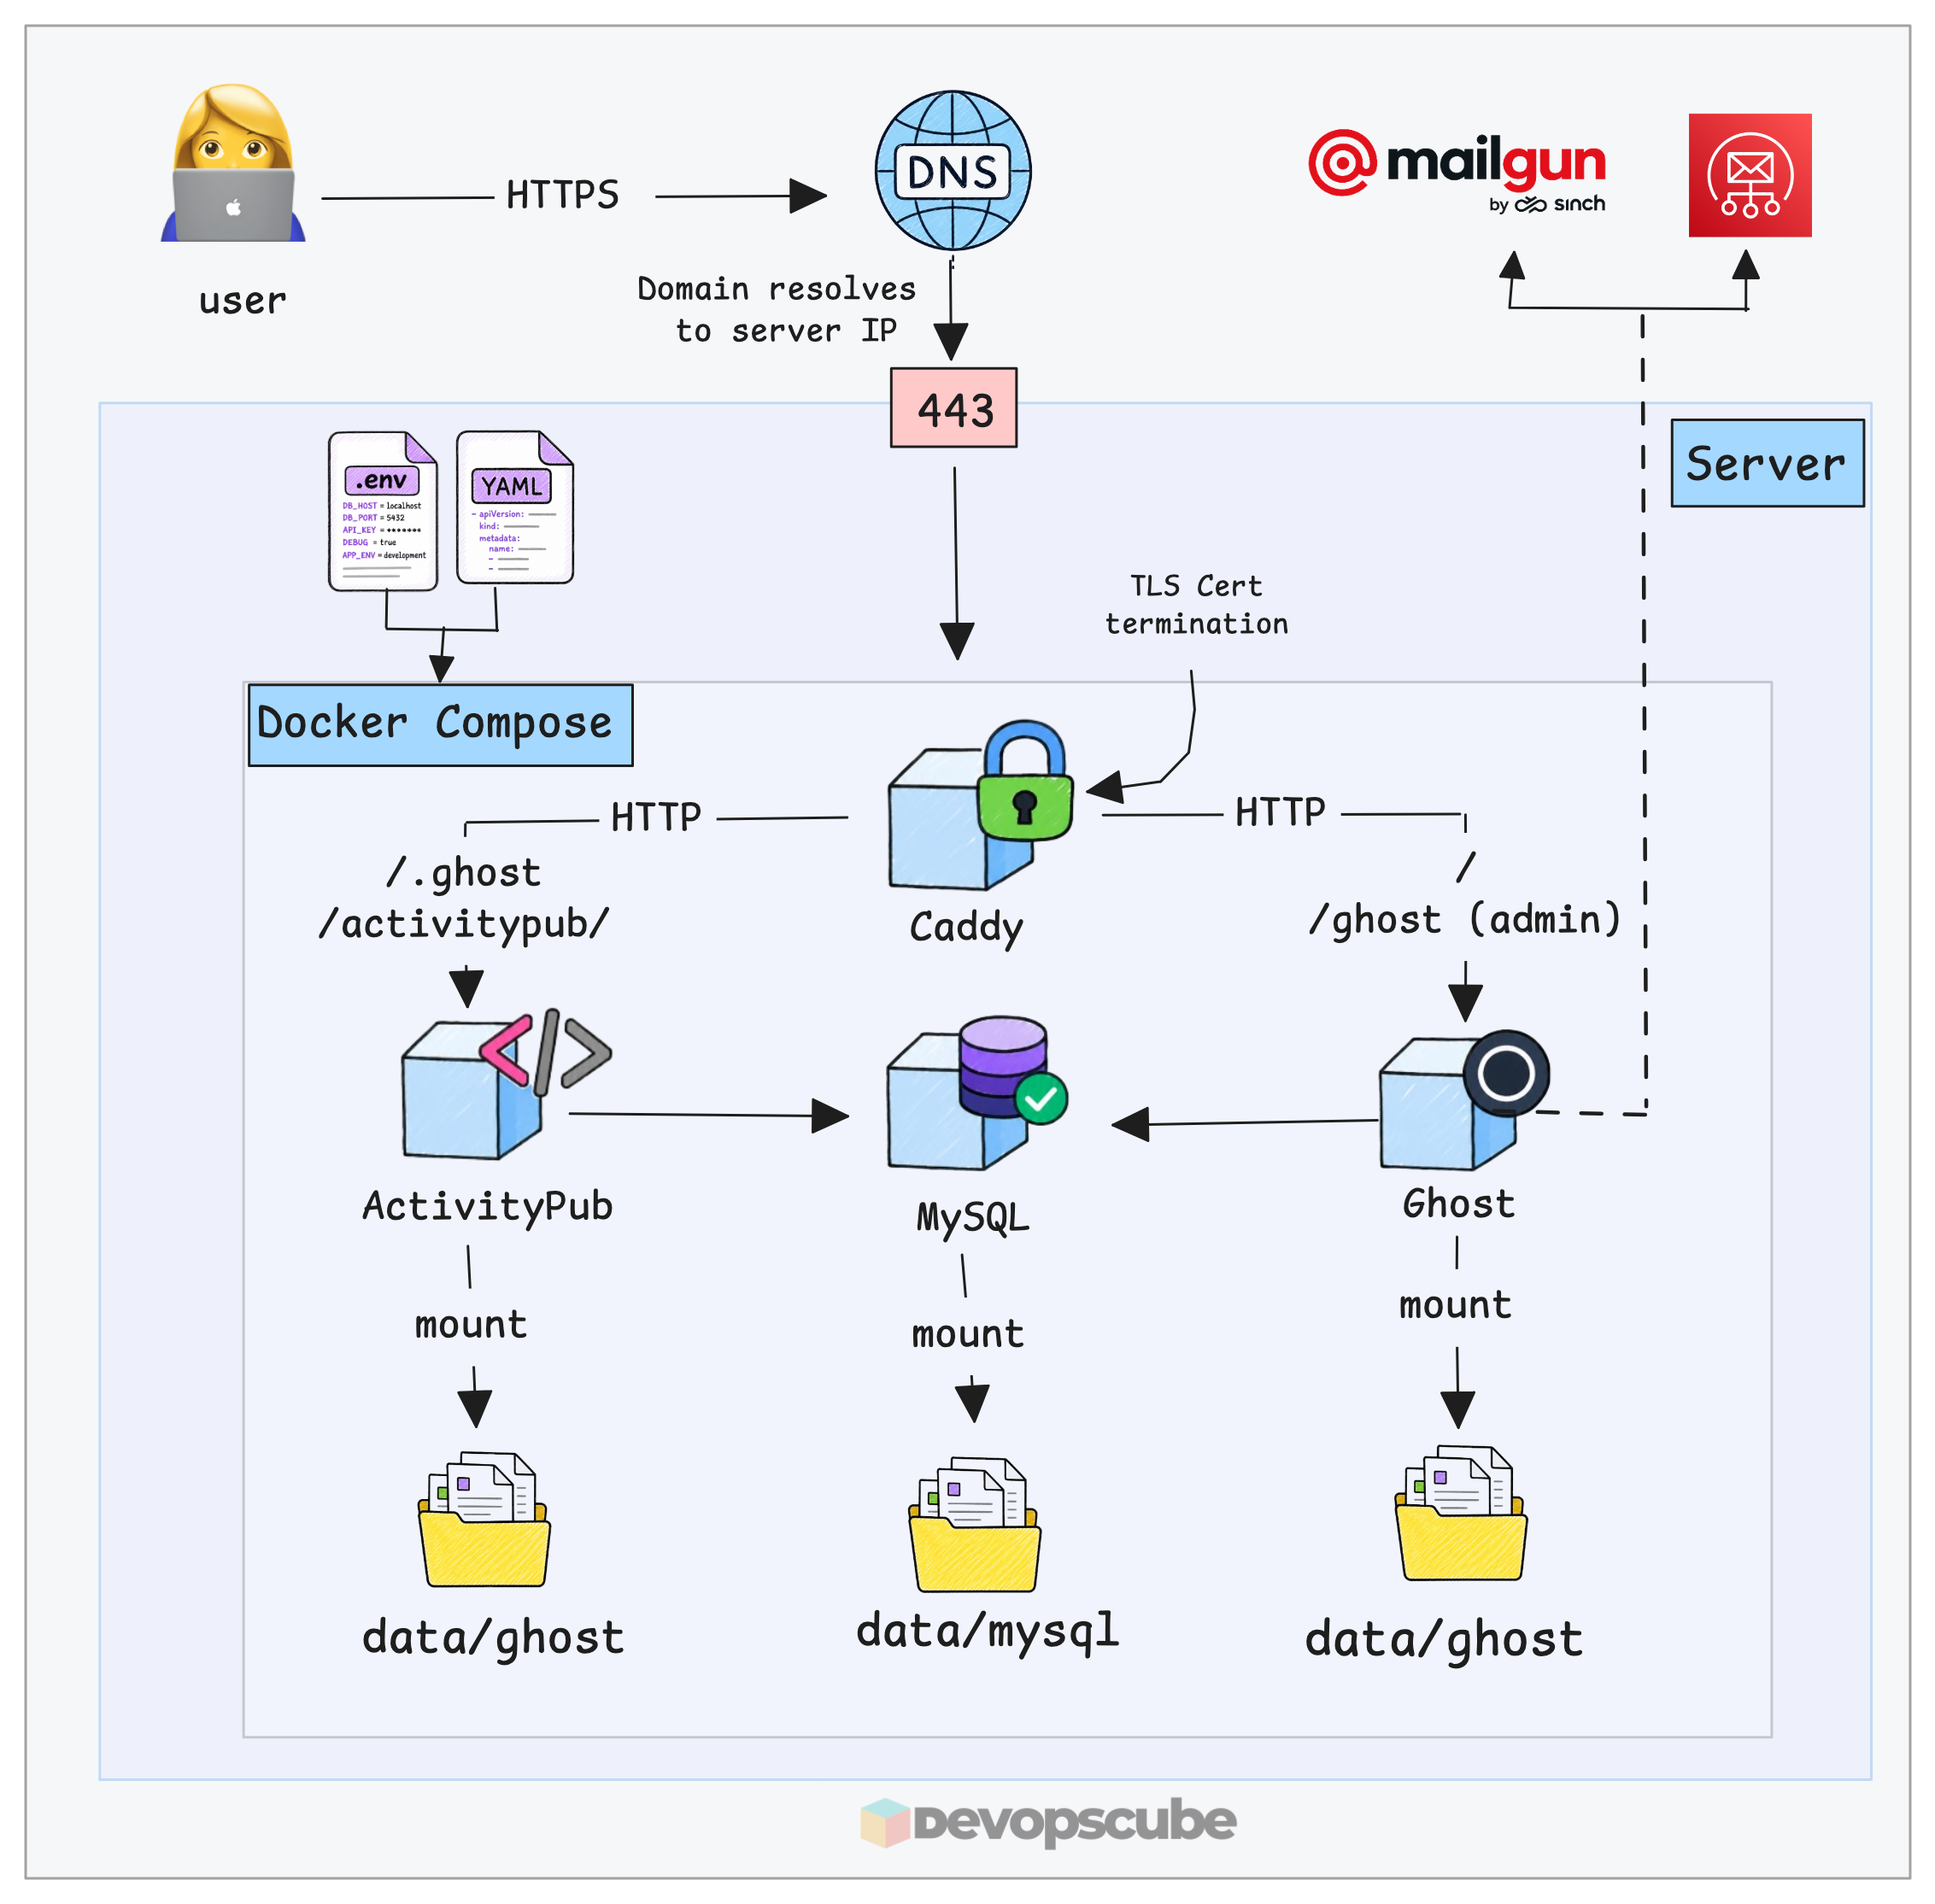
Now, let's take a look at the key components of the self-hosted Ghost Platform.
Caddy
Caddy is an open-source web server written in Go. Unlike other servers such as NGINX, it automatically manages HTTPS routing and TLS certificates.
In our architecture, Caddy is the only Docker container that is exposed to the Internet on ports 80 and 443. Everything else (MySQL, ActivityPub, and Ghost) is not directly exposed to the Internet.
In this setup, Caddy does two things.
- Automates HTTPS routing and manages TLS certificates: If you have a valid domain, Caddy automatically obtains TLS certificates from a public Certificate Authority such as Let’sEncrypt using the ACME protocol, renews them before they expire, and handles HTTPS connections.
- Path-based routing and reverse proxying: Caddy checks the incoming request path and forwards it to the appropriate backend service.
Ghost CMS
Ghost CMS is a Node.js based application. It is the core component that serves your public website and provides features such as the Ghost Admin dashboard for writing, editing, and publishing content.
Same like Caddy, Ghost is also deployed as a container using an Alpine image. Caddy receives the public traffic and forwards the requests to Ghost on this port.
Another important Ghost config is the content directory. All the content files of the Ghost platform live in the data/ghost host directory. For example, uploaded images, themes, and its local configs.
Docker mounts data/ghost host directory to /var/lib/ghost/content directory on the Ghost container. So, even if the container is recreated, you won't lose any data.
MySQL
Here, MySQL is the shared database server that is used in this stack. The data/mysql host directory is where all the data, such as Ghost's posts, pages, tags, member records, and settings, is stored. It is mounted to /var/lib/mysql directory on the container.
Both containers (Ghost and ActivityPub) connect to the same MySQL instance, each using the credentials you set in .env file (you'll learn more about it in the configuration section).
ActivityPub
ActivityPub gives Ghost an additional way to distribute your content on platforms like WordPress, Mastodon, and others. When you publish a new post, it can also appear in the feeds of people following your publication on those platforms.
ActivityPub runs as a dedicated container that listens on port 8080 internally and stores its state in the activitypub database.
SMTP Server (For Transactional Emails)
Transactional Emails are one-to-one emails.
For example, when a visitor subscribes, a new member requests a sign-in link, or you invite a new staff user, Ghost needs to send a verification code to their email address.
The SMTP server is the core component in the setup for sending transactional emails. We will use Amazon SES as the SMTP provider for transactional emails because Ghost sends them using its standard mail configuration.
.env config file.Mailgun (For Sending Newsletters)
Newsletters work differently from transactional emails. Publishing one newsletter can generate thousands of individual emails.
So newsletters are sent via bulk email, using Mailgun. This is the only native option supported by the Ghost platform for sending bulk email. Once Mailgun is verified and connected to Ghost using Mailgun's API key, transactional emails and newsletters can use their separate delivery systems.
Why Docker Compose?
We strongly recommend you use Docker Compose for the setup. Here is why.
If you install all the Ghost components directly on the Ubuntu server, you need to manage all the dependencies on the server itself. The problem is that system updates and dependency changes can affect the Ghost installation.
But when you use Docker Compose, the problem gets solved.
You can start the entire stack using a single docker compose up -d command.
Also, if a new Docker image is available, updating the entire stack with Docker Compose is easier. At the same time, if an image update causes problems, it is much easier to roll back to the previous image version.
And it is easier to recreate the whole stack on a different server if required.
Now let's get started with the setup.
Setup Prerequisites
These are some prerequisites you need before starting this implementation.
- A valid Domain name.
- SMTP server details.
Now, let's start our implementation.
Setting Up Ghost with Docker
Follow the steps below to set up a complete, working Ghost environment using Docker.
Step1: Provision an Ubuntu Server
We need Ubuntu Server 24.04 (LTS) with 2 vCPUs, 4 GB of RAM, and 40 GB of disk space.
You can use cheaper hosting platforms like DigitalOcean or Cloudways to host your Ubuntu Server.
Step2: Install Docker on Ubuntu Server
We need to install Docker for this implementation. Use the following one-line command to install it on your Ubuntu server.
curl -sSL https://get.docker.com/ | sudo shStep 3: Create a New User
Then we need to create a new user by executing the following commands. Make sure you run the commands as the root user.
adduser  deploy
usermod -aG sudo deploy
Here, we have created the user named deploy and modified the user's attributes with configuration settings.
Now we need to switch to the deploy user using the following command.
su deployStep 4: Create a Directory and Change Ownership
First, we need to create a directory inside the path /opt/ghost and change the ownership of the directory, which sets both the user and group to deploy using the following command.
sudo mkdir -p /opt/ghost && sudo chown deploy:deploy /opt/ghostStep 5: Clone the repository and rename the env and Caddyfile
Now we need to clone the repo into the new directory we have created.
git clone https://github.com/TryGhost/ghost-docker.git /opt/ghostNow get into the directory using the cd command.
cd /opt/ghostThere will be an .env.example file. Rename it to the .env file using the following command.
cp .env.example .envDo the same for the Caddyfile.example file, which is present inside the /caddy directory.
cp caddy/Caddyfile.example caddy/CaddyfileStep 6: Generate Database Credentials
Run the following commands to generate two random passwords for the database.
echo "ROOT: $(openssl rand -hex 32)"
echo "USER: $(openssl rand -hex 32)"
This command generates two random 32-byte security keys, each as a 64-character hex string, for MySQL authentication.
Copy both keys. We need to use them in the .env file for the DATABASE_ROOT_PASSWORD and DATABASE_PASSWORD.
Step 7: Change .env File Permissions
Using the following command, change permissions for the .env file.
chmod 600 .envThis command gives read and write permission for the .env file. It also ensures that only the file owner can read or modify it.
Step 8: Configure Domain, SMTP and MySQL Credentials in the .env file
The .env file contains the key configurations of the following.
- Domain name
- Activitypub endpoint
- Database credentials
- SMTP Configurations (For Transactional emails)
Open the .env file using the VIM editor and change the values accordingly.
COMPOSE_PROFILES variable in the below .env file.COMPOSE_PROFILES=activitypub
DOMAIN=<Your-domain-name>
ACTIVITYPUB_TARGET=activitypub:8080
DATABASE_ROOT_PASSWORD=<paste the first key you generated>
DATABASE_PASSWORD=<paste the second key you generated>
mail__transport=SMTP
mail__options__host=email-smtp.<YOUR_REGION>.amazonaws.com
mail__options__port=2587
mail__options__secure=false
mail__options__auth__user=<ses-smtp-user>
mail__options__auth__pass=<ses-smtp-pass>
mail__from='DevOps Project <noreply@example.com>'
UPLOAD_LOCATION=./data/ghost
MYSQL_DATA_LOCATION=./data/mysql
Enter your specific domain name.
Make sure you replace the DATABASE_ROOT_PASSWORD and DATABASE_PASSWORD with your actual values you got from Step 6.
Also, you need to add your specified AWS region in the mail__options__host variable.
For example, AWS SES provides 2465 and 2587 as alternatives to 465 and 25.
Step 9: Start your Ghost Platform Using Docker
Below are the two commands to start your Ghost stack using Docker containers.
sudo docker compose pullThis pull command downloads the Docker images specified in docker-compose.yml file.
You can verify using the output that the images are pulled.
[+] pull 48/48
 ✔ Image caddy:2.10.2-alpine@sha256:953131cfea8e12bfe1c631a36308e9660e4389f0c3dfb3be957044d3ac92d446  Pulled 19.8s
 ✔ Image ghcr.io/tryghost/activitypub:1.2.9@sha256:f950017169c778f90bc1d4097c0c83735dd88ee26a7dfac... Pulled 38.0s
 ✔ Image ghcr.io/tryghost/activitypub-migrations:1.2.9@sha256:f8a376e83187cc927fd6286a9e825b71056b... Pulled  7.5s
 ✔ Image mysql:8.0.44@sha256:f37951fc3753a6a22d6c7bf6978c5e5fefcf6f31814d98c582524f98eae52b21         Pulled 38.0s
 ✔ Image ghost:6-alpine                                                                               Pulled 71.7s
Now let's start the containers.
sudo docker compose up -dThe above command starts all the containers defined in your Docker Compose configuration.
You can verify with the following output,
[+] up 8/8
 ✔ Network ghost_ghost_network           Created                                                              0.1s
 ✔ Volume ghost_caddy_config             Created                                                              0.0s
 ✔ Volume ghost_caddy_data               Created                                                              0.0s
 ✔ Container ghost-db-1                  Healthy                                                             29.3s
 ✔ Container ghost-activitypub-migrate-1 Exited                                                              28.4s
 ✔ Container ghost-activitypub-1         Started                                                             28.6s
 ✔ Container ghost-ghost-1               Started                                                             29.4s
 ✔ Container ghost-caddy-1               Started                                                             29.9s
You can use the following command to verify,
sudo docker compose psIt shows the following output.
NAME                  IMAGE                                                                                                        COMMAND                  SERVICE       CREATED             STATUS                       PORTS
ghost-activitypub-1   ghcr.io/tryghost/activitypub:1.2.9@sha256:f677e8af8df41418c3bfd63b4ec76b9bf2bbd85bde7da0aa9ecd86e41a230835   "docker-entrypoint.s…"   activitypub   About an hour ago   Up About an hour             8080/tcp
ghost-caddy-1         caddy:2.10.2-alpine@sha256:953131cfea8e12bfe1c631a36308e9660e4389f0c3dfb3be957044d3ac92d446                  "caddy run --config …"   caddy         About an hour ago   Up About an hour             0.0.0.0:80->80/tcp, [::]:80->80/tcp, 0.0.0.0:443->443/tcp, [::]:443->443/tcp, 443/udp, 2019/tcp
ghost-db-1            mysql:8.0.44@sha256:f37951fc3753a6a22d6c7bf6978c5e5fefcf6f31814d98c582524f98eae52b21                         "docker-entrypoint.s…"   db            About an hour ago   Up About an hour (healthy)   3306/tcp, 33060/tcp
ghost-ghost-1         ghost:6-alpine                                                                                               "docker-entrypoint.s…"   ghost         33 minutes ago      Up 33 minutes                2368/tcp
You can watch the live logs of the containers running in your Ghost setup using the following command.
sudo docker compose logs -f ghost caddyYou can verify the logs as follows:
ghost-1  | [2026-08-28 13:24:39] INFO Ghost is running in production...
ghost-1  | [2026-08-28 13:24:39] INFO Your site is now available on https://ghost.devopsproject.dev/
ghost-1  | [2026-08-28 13:24:39] INFO Ctrl+C to shut down
ghost-1  | [2026-08-28 13:24:39] INFO Ghost server started in 3.347s
ghost-1  | [2026-08-28 13:24:39] WARN Database state requires initialisation.
ghost-1  | [2026-08-28 13:24:39] INFO Creating table: newsletters
ghost-1  | [2026-08-28 13:24:39] INFO Creating table: posts
ghost-1  | [2026-08-28 13:24:40] INFO Creating table: posts_meta
ghost-1  | [2026-08-28 13:24:40] INFO Creating table: gift_links
ghost-1  | [2026-08-28 13:24:40] INFO Creating table: post_gift_links
ghost-1  | [2026-08-28 13:24:40] INFO Creating table: users
ghost-1  | [2026-08-28 13:24:40] INFO Creating table: posts_authors
ghost-1  | [2026-08-28 13:24:40] INFO Creating table: roles
ghost-1  | [2026-08-28 13:24:40] INFO Creating table: roles_users
ghost-1  | [2026-08-28 13:24:40] INFO Creating table: permissions
ghost-1  | [2026-08-28 13:24:40] INFO Creating table: permissions_users
ghost-1  | [2026-08-28 13:24:40] INFO Creating table: permissions_roles
You can check the output for any errors. If there are no errors, press CTRL + C to stop the output.
Step 10: Ghost Admin Setup
Now we need to create an admin user for our Ghost platform.
Open your browser, enter your domain name, and add /ghost at the end. And hit Enter.
For example, https://<your-domain>.com/ghost
You will see a page like the one below. This is the Ghost Admin page, where you need to enter the following.
- Site title
- Your full name
- Email Address
- Password
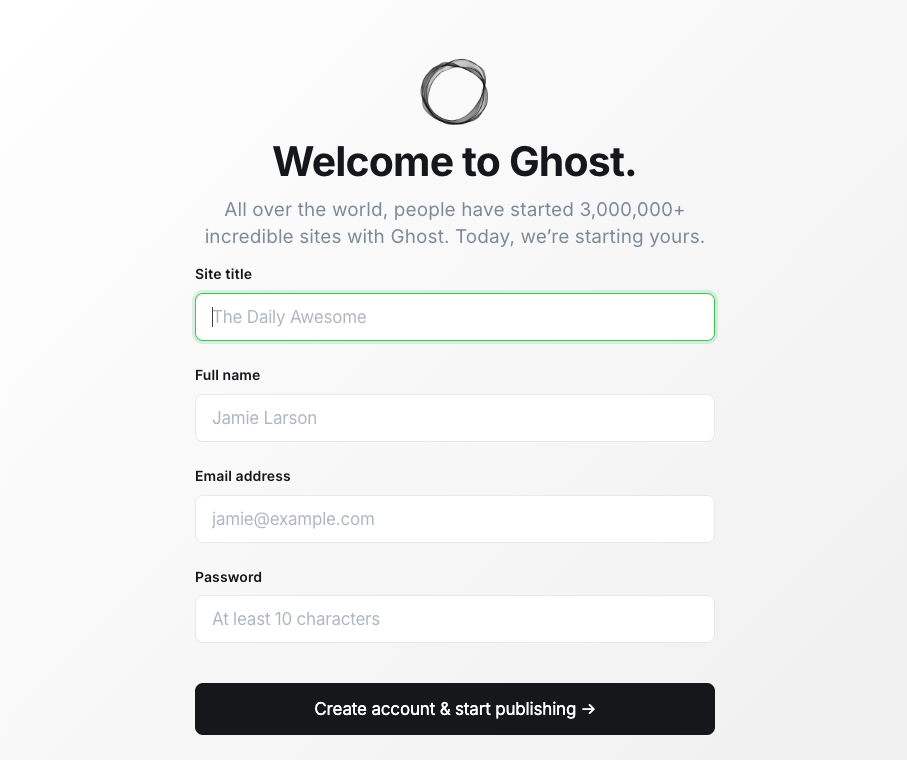
Enter the valid details. Then click on the Create Account button. You will be redirected to your Ghost admin page.
That's it, you have now successfully set up a self-hosted Ghost platform using Docker Compose.
Configuring Mailgun for Newsletter (Optional)
If you want to send newsletters to your subscribers, you need to set up Mailgun.
Let's have a look at how we can set it up.
Signup for Mailgun
Open Mailgun in your browser. And click on the Get started for free option.
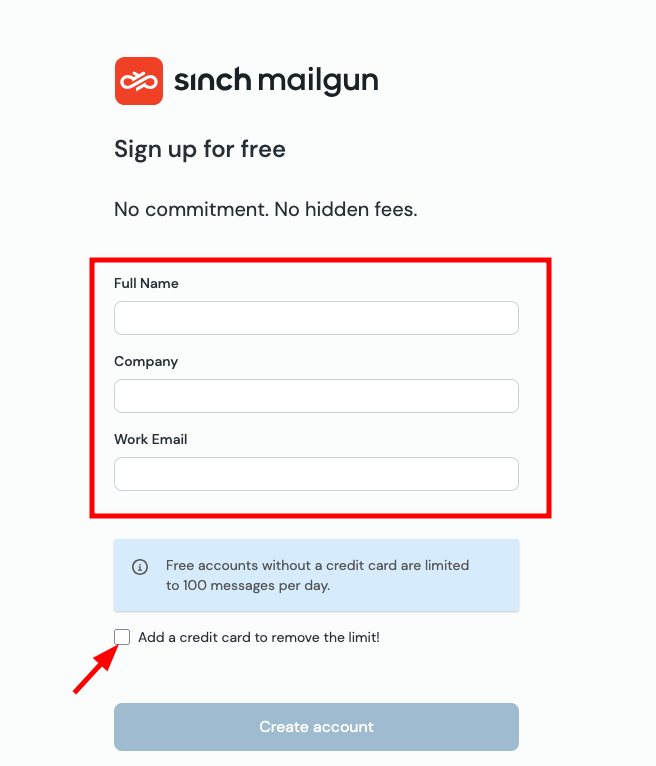
Uncheck the "Add a credit card" option to get the free tier. Then fill in the required details.
You will get an email from the Mailgun support team to verify your account. Click on it and complete your verification.
Set up a domain on Mailgun
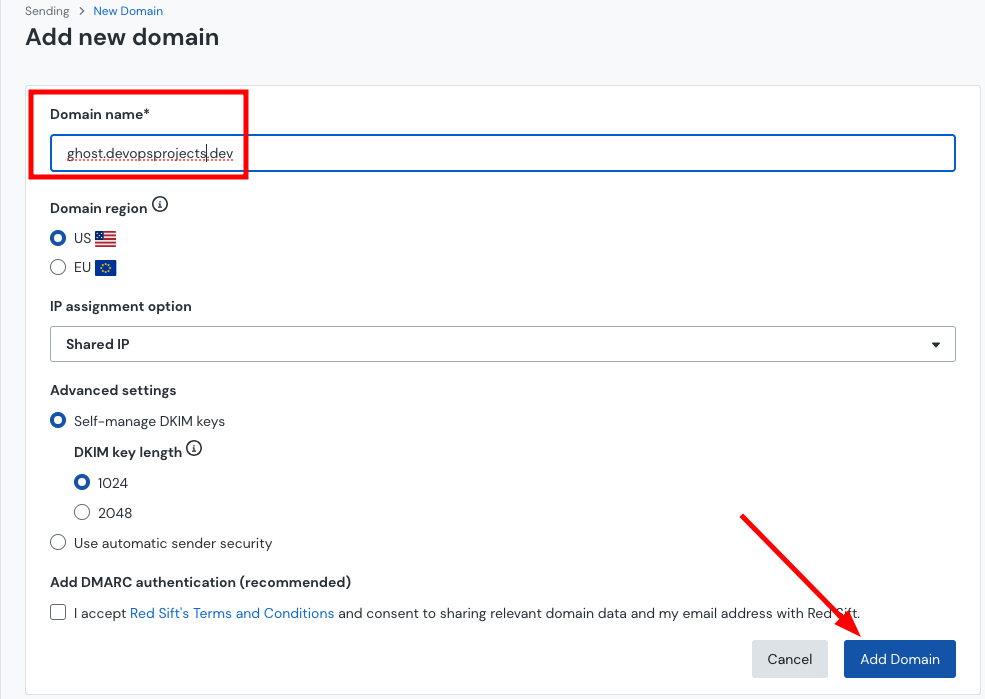
After completing the verification, we need to add our domain by selecting the Domains option under the Send section.
In the top-right corner, you will see the Add new domain option, as shown below.
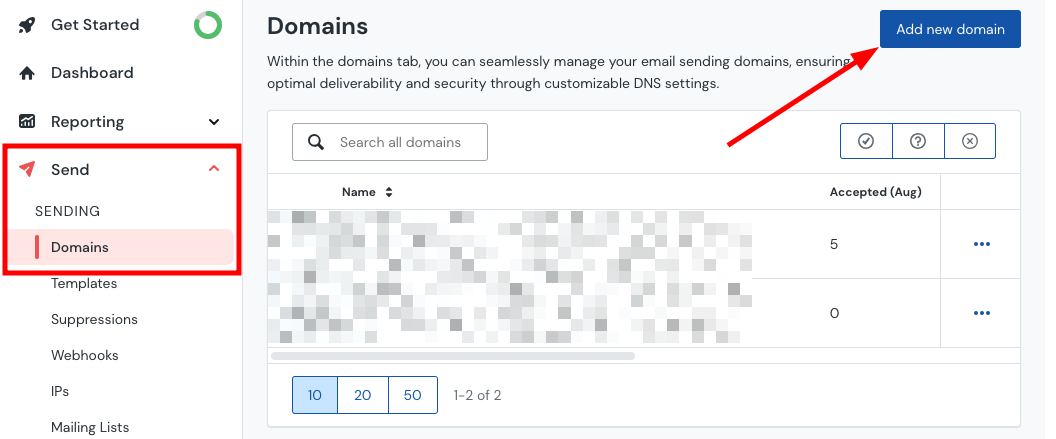
Add your domain name and specify the region in which your server is located. For testing purposes, a 1024-character DKIM key is enough. For production, choose 2048 characters, as 1024 is deprecated and may be blocked by providers like Gmail.
Configure MX Records in your DNS Provider
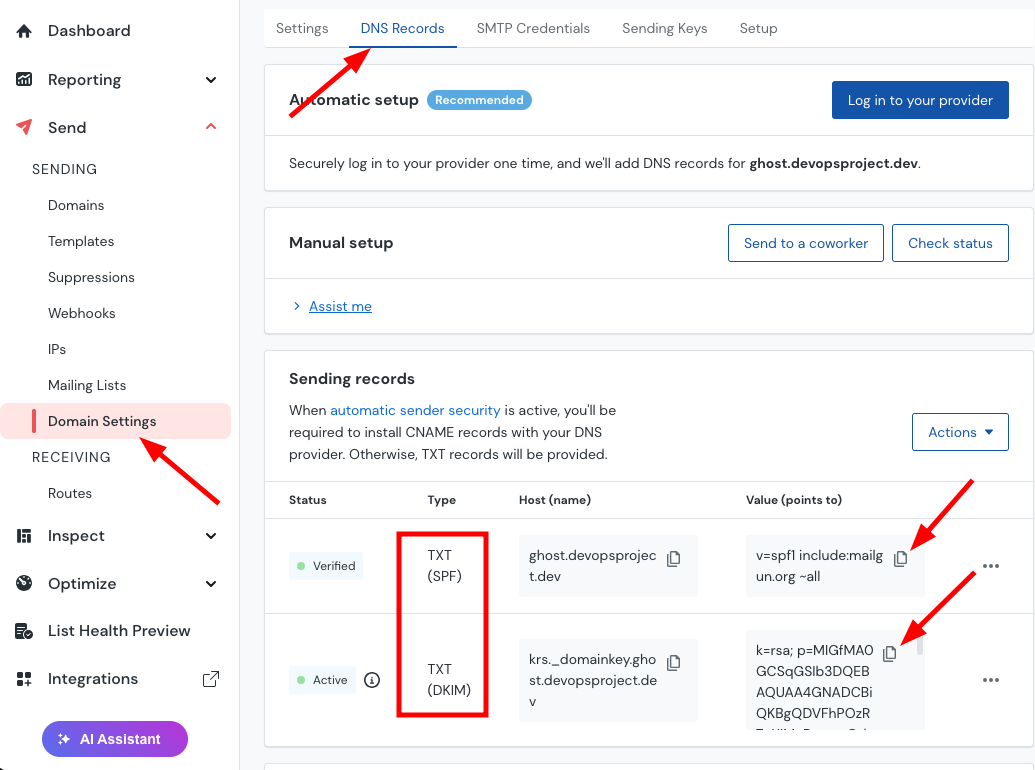
The next step is to configure the mail-related DNS records (MX, CNAME, SPF, DKIM from Mailgun with your DNS provider.
Go to Domain Settings. Under the DNS Records page, you will find four records named TXT (SPF) and TXT (DKIM), MX, and CNAME, as shown in the image below.
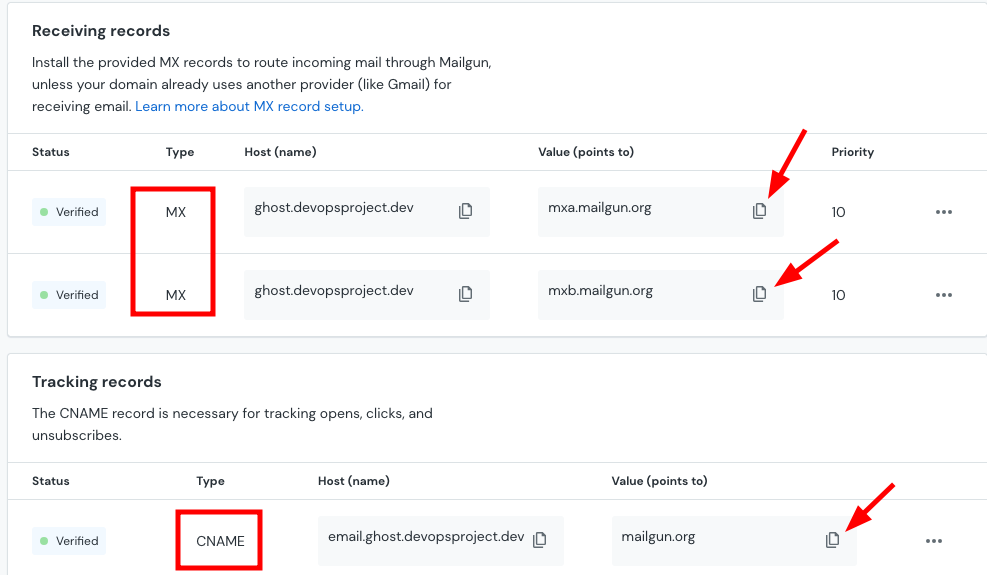
Scroll down; you will find two MX records and also a CNAME record.
Now, here is the important step.
Go to your DNS provider where you manage the website's domain name and add all four records, pointing to the correct values as listed on the Mailgun DNS page.
Configure the Mailgun API Key in Ghost
Now that we have configured our domain with Mailgun, we need to do one final step: connect Mailgun to the Ghost platform using the Mailgun API key.
Go to Mailgun, Domain settings under the section of Sending keys, and click on Add sending keys. Add a short description. Then click on Create sending key as shown below.
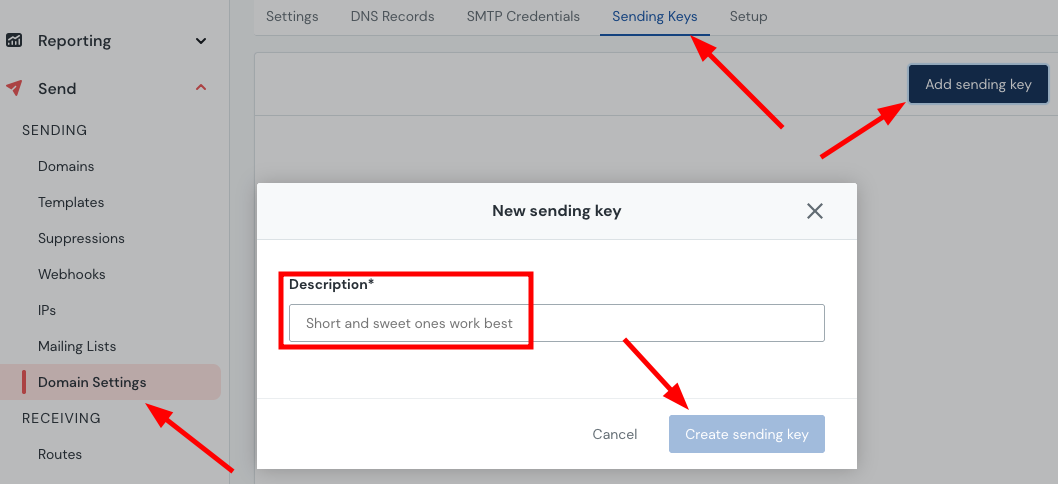
It will generate an API key. Copy it.
Now, open your self-hosted Ghost platform. On the settings page, search for Newsletter to find the Mailgun section. Add your Mailgun region (there are only two regions: US and EU). Add your Mailgun domain, then paste the private API key generated in the previous step as shown below.
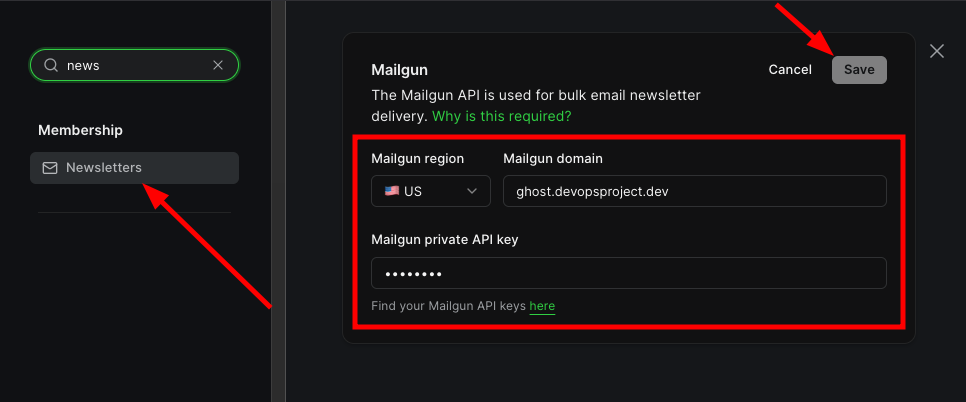
Now all the Mailgun configurations for newsletter setup are done.
Test and Validate the Ghost Setup
Now we need to conduct a comprehensive health check to validate the entire setup. These checks confirm TLS certificate validity and HTTP-to-HTTPS redirection.
Let's execute the testing commands one by one.
ghost.devopsproject.dev. When you execute each command, replace it with your configured domain name.Check TLS Certificate Validity
First, we need to verify if the Let's Encrypt TLS Certificate is configured properly.
Use the following command to validate the certificate.
curl -sI https://ghost.devopsproject.dev/ | head -1

echo | openssl s_client -connect ghost.devopsproject.dev:443 \
  -servername ghost.devopsproject.dev 2>/dev/null \
  | openssl x509 -noout -dates
The output should look like the following.
HTTP/2 200
notBefore=Aug 24 05:31:04 2026 GMT
notAfter=Nov 22 05:31:03 2026 GMT
Validate HTTP to HTTPS redirection
Now we need to confirm that the HTTP traffic is automatically redirected to HTTPS, so that no request gets a response over an unencrypted connection.
Use the following curl command to verify the redirection from HTTP to HTTPS
curl -sI http://ghost.devopsproject.dev | grep -i locationYou should see the redirected output as given below.
Location: https://ghost.devopsproject.dev/Test and Validate Email Deliverability
When you set up Ghost for production testing, transactional and email newsletter deliverability is very important.
Let's test both.
Test the Transactional Email by Sending a Staff Invite
First of all, we need to run an email test to verify whether we can invite a staff member using their Email ID. For this, we are using Amazon Simple Email Service (SES).
To test this. Open your Ghost admin page.
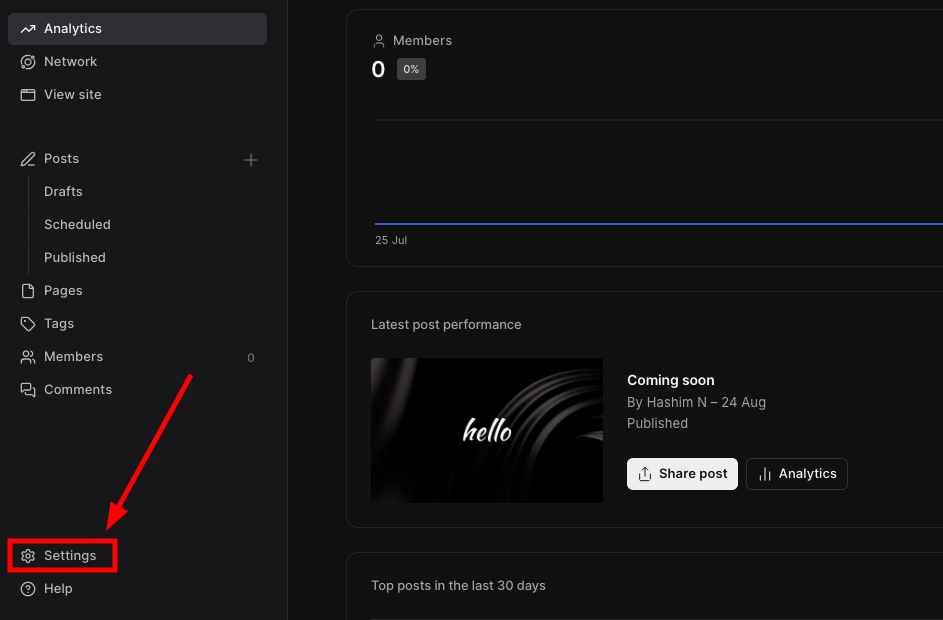
After that, you will get to an analytics page. In the bottom-left corner, you will see a settings button. Click on that.
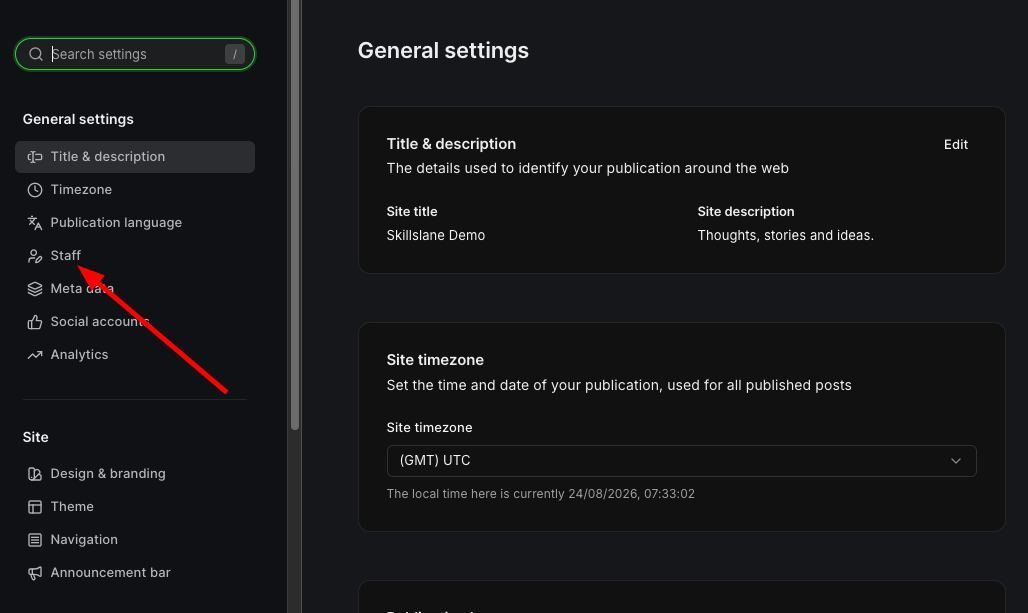
Now click on the Staff button as shown below.
Then click on the Invite People button.
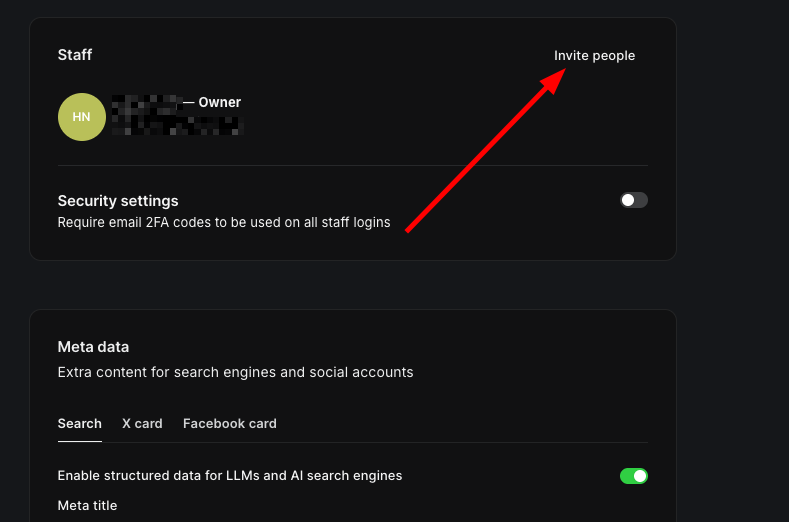
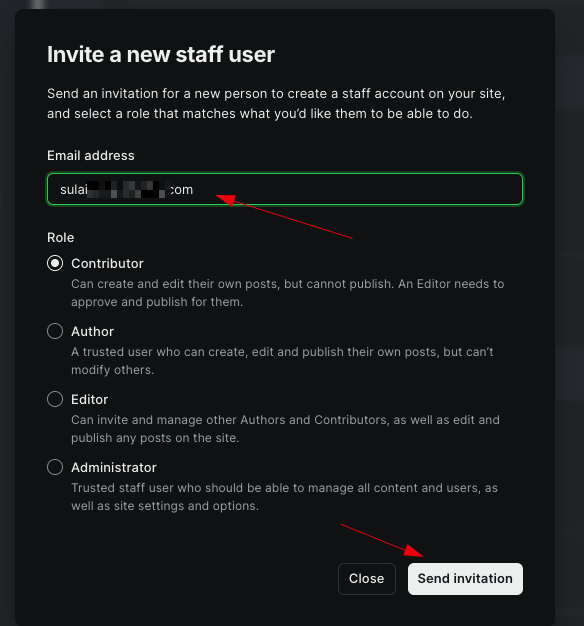
Enter an email address (must be different from your admin email). Also, select the staff member's role according to your preferences. Then click the Send Invitation button below.
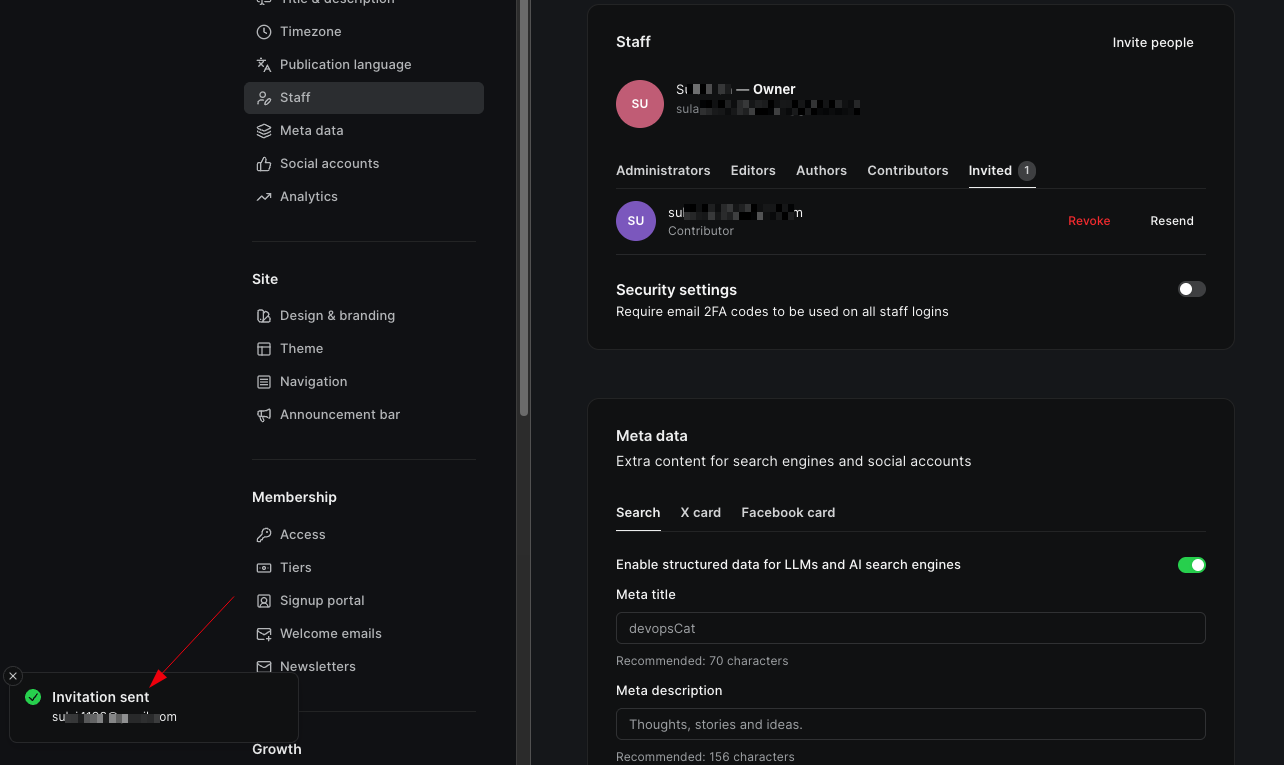
You can verify that the Invitation Sent notification is shown on the bottom-left side.
And now, check your email. You will receive an invitation to activate your account, as shown below.
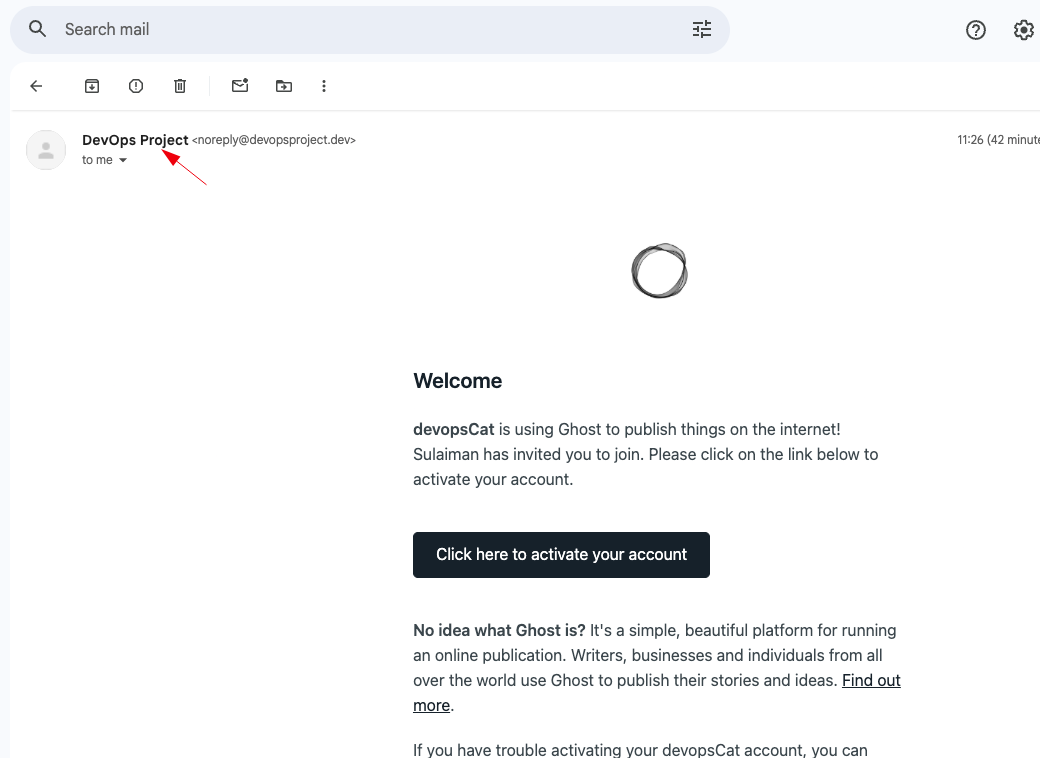
Click the Click here to activate account button.
That's it. You have now successfully verified transactional email deliverability.
Testing the Newsletter Email Deliverability
We have already configured the newsletter bulk email sending setup for our self-hosted Ghost platform using Mailgun.
Now, we just need to test the setup by creating a new post, publishing it, and sending it to your email subscribers.
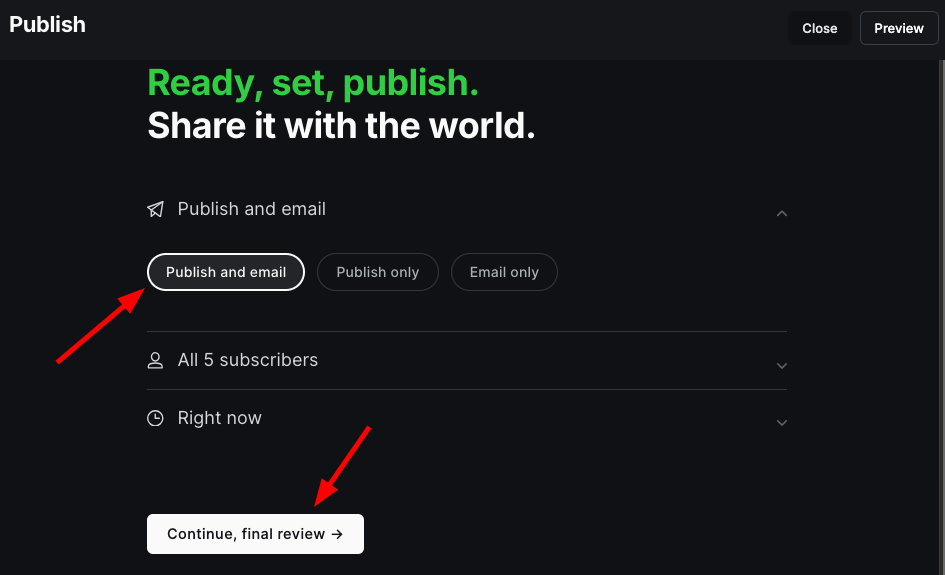
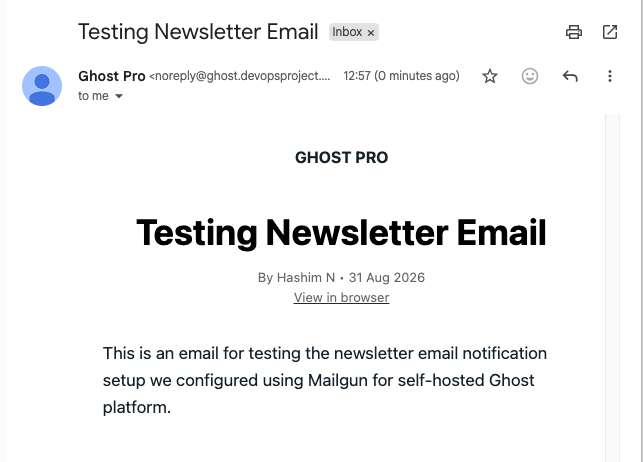
For example, I created a sample post, added the email addresses of five members, and then hit publish using the "Publish and email" option.
The newsletter email is successfully delivered, as shown below.
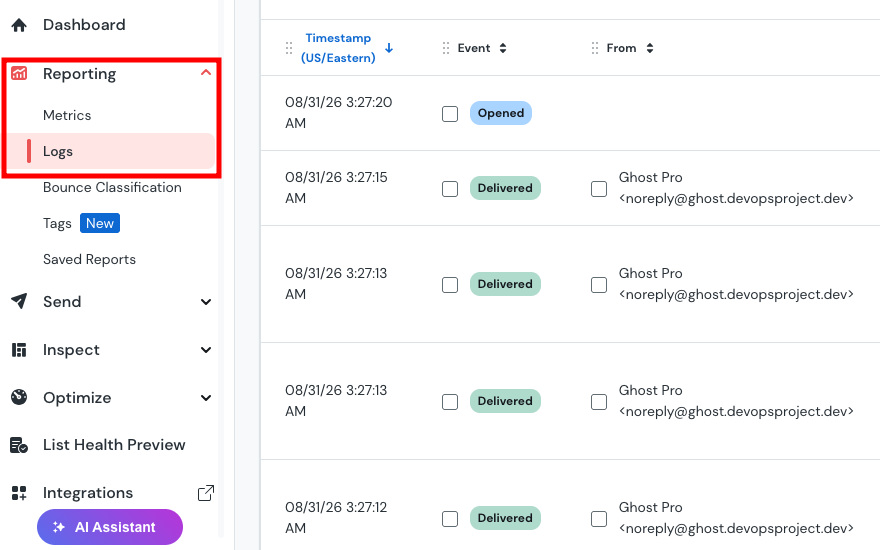
You can also verify whether the emails are delivered and opened by the members in the Mailgun application UI. Under the Reporting section, there will be an option called Logs, as shown in the image below.
We have now successfully tested the newsletter email deliverability.
You now have a production ready self-hosted ghost setup.
Ghost Self-Hosting FAQs
Now let's clarify some of the frequently asked Questions about the topic.
1. How safe is Ghost self-hosting?
It's only safe if you maintain it properly with best security practices, such as two-factor authentication, Backups, and monitoring.
2. What are the different deployment options for self-hosting Ghost?
There are many other ways we can self-host the Ghost platform. We can self-host on a plain vanilla server or use Docker or Kubernetes. Also, many hosting providers offer one-click deployment options for a fully configured Ghost setup.
Conclusion
We have successfully set up a self-hosted Ghost platform from scratch and validated it by sending newsletters.
Self-hosting gives you SSH and database access, full control over the configuration, and the freedom to modify it.
However, you need to handle operational tasks, such as server updates, backups, security patching, and email delivery.
If you cannot handle the administrative overhead, Ghost(Pro) is the better choice. Hosting infrastructure, backups, updates, and support are handled for you, and you only need to write and publish.
We follow the hybrid approach. We use a self-hosted setup for development, with robust CI/CD practices, and managed hosting for our production website.
Over to you!
Are you planning to self-host Ghost, or are you already running it on your own server?
If you followed this guide, let us know how the setup went.
And if you ran into any issues along the way, please leave a comment below. We will try our best to help.
