

When it comes to supply chain security, SLSA (Supply-chain Levels for Software Artifacts) plays a key role. Higher the level, lower the probability of supply chain attacks.
In this guide, you will learn to create an SLSA Provenance build level 3 for container images using slsa-github-generator
At the end of this guide, you will have an understanding of the following:
- What is slsa-github-generator
- Using GitHub Actions to create SLSA Provenance for container images
- How to verify a SLSA Provenance file
- And what happens if the SLSA Provenance verification fails
Lets get started.
What is slsa-github-generator?
The slsa-github-generator is a collection of reusable workflows managed by the SLSA community. It helps in creating SLSA Level 3 provenance for your build artifacts.
slsa-github-generator is based on Build Your Own Builder (BYOB) framework. It isolates the provenance generation from the user-controlle build logic. This way it prevents the tampering of provenance.
The generator integrates the following three Sigstore tools for keyless signing.
- Cosign - Request signing certificate, signs the provenance attestation, and stores the signed attestation.
- Fulcio CA - It issues a short-lived certificate for signing for the request sent using GitHub Actions OIDC identities.
- Rekor - Records signing events in an immutable (append-only) transparency log for public verification.
slsa-github-generator does these in an isolated ephemeral build system that is different from the actual build steps. This isolated build is a key requirement for achieving SLSA Build Level 3 provenance generation.
For container images, the provenance attestation can be stored alongside the image in OCI-compatible registries such as Amazon ECR and GitHub Container Registry (GHCR). It makes it easy to distribute and verify provenance together with the artifact.
The provenance file will be pushed as an OCI image, so make sure to use an OCI registry or registries that support OCI images, like AWS ECR, GitHub Container Registry.
In the next section, we will look at how GitHub Actions uses slsa-github-generator, to generate and sign SLSA provenance for build artifacts.
SLSA Provenance Creation Workflow
The followin diagram illustrates the complete workflow of SLSA Provenance Creation using Github Actions slsa-github-generator.
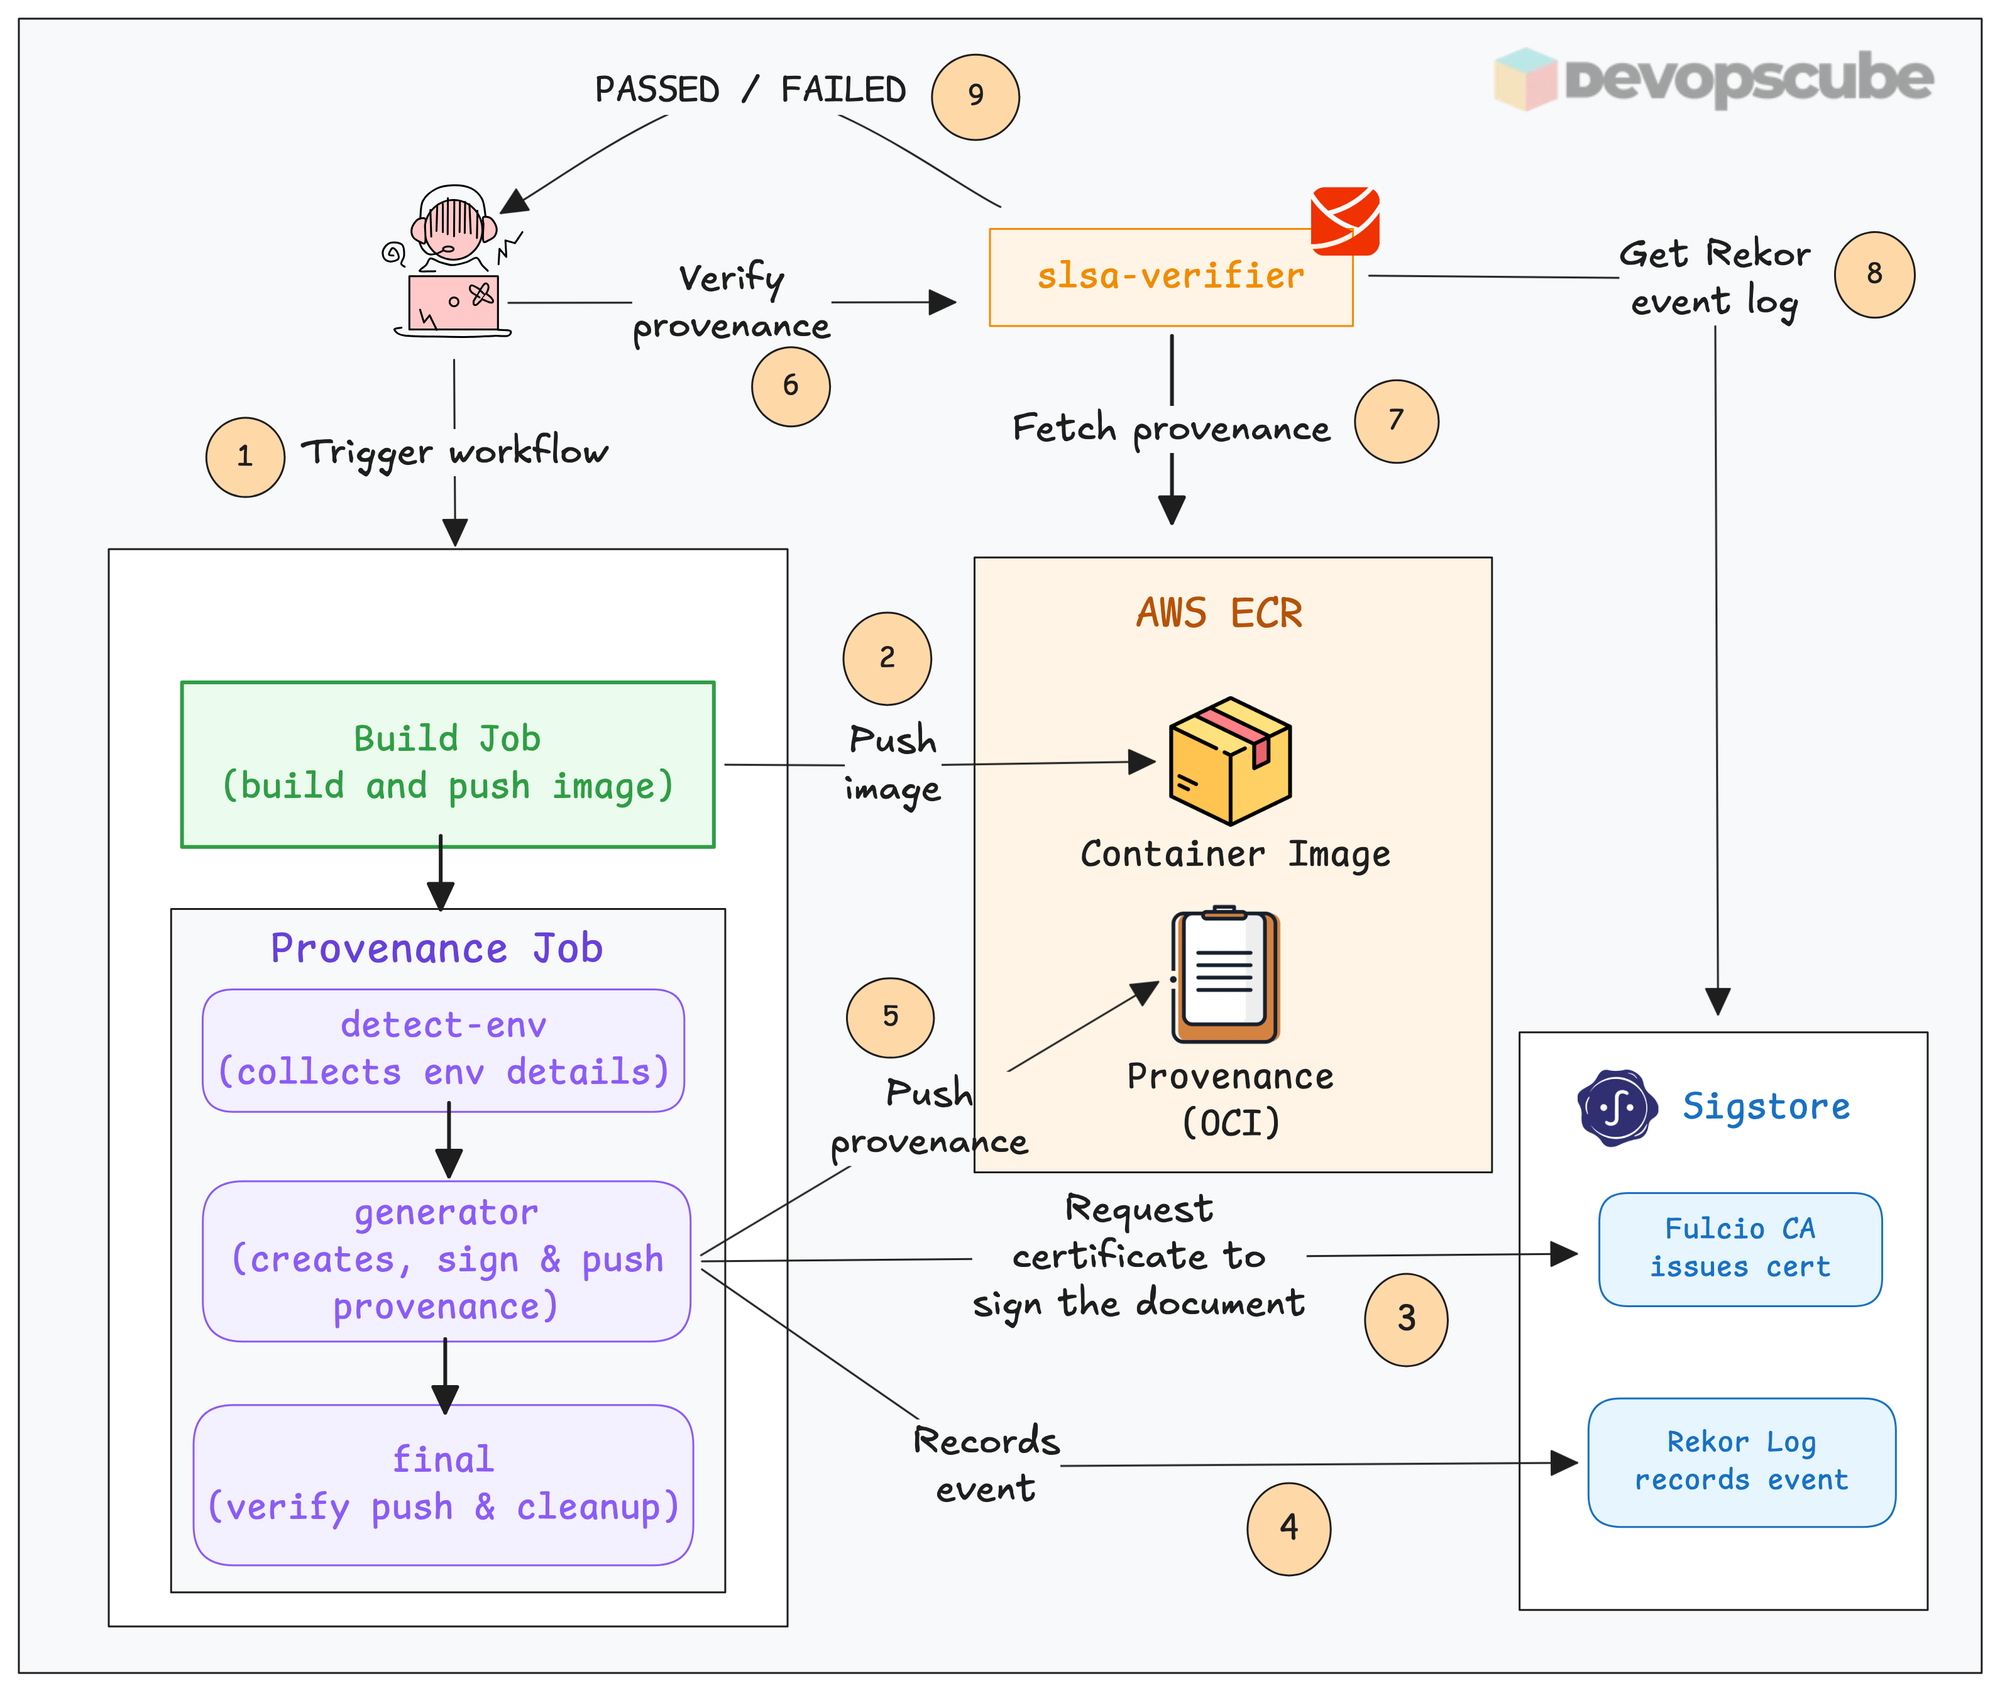
Here is how the workflow works.
- The build workflow first creates the software artifact (for example, a container image) and pushes it to the OCI registry or release location.
- After the build completes, the workflow from
slsa-github-generatoris triggered to generate provenance. This workflow runs separately from the user-controlled build workflow to provide the isolation required for SLSA Build Level 3. - The provenance job runs as three separate jobs.
detect-env,generatorandfinal. These are user defined names.- The
detect-envjob collects details of the build with details such as repository and workflow information, source commit, builder identity, build environment information etc. - Then the
generatorjob uses the details to create the provenance document and uses a GitHubs OIDC token to request certificates from Fulcio CA. - It uses the certificate to sign the provenance document, and the event is recorded in the Rekor log.
- The signed provenance attestation is then stored along the container image in the registry.
- And the
finaljob does the cleanup and verifies if the provenance document is pushed to the container registry.
- The
In such cases, use Cosign with self-hosted Fulcio CA and Rekor, or use key-based signing with services like AWS KMS.
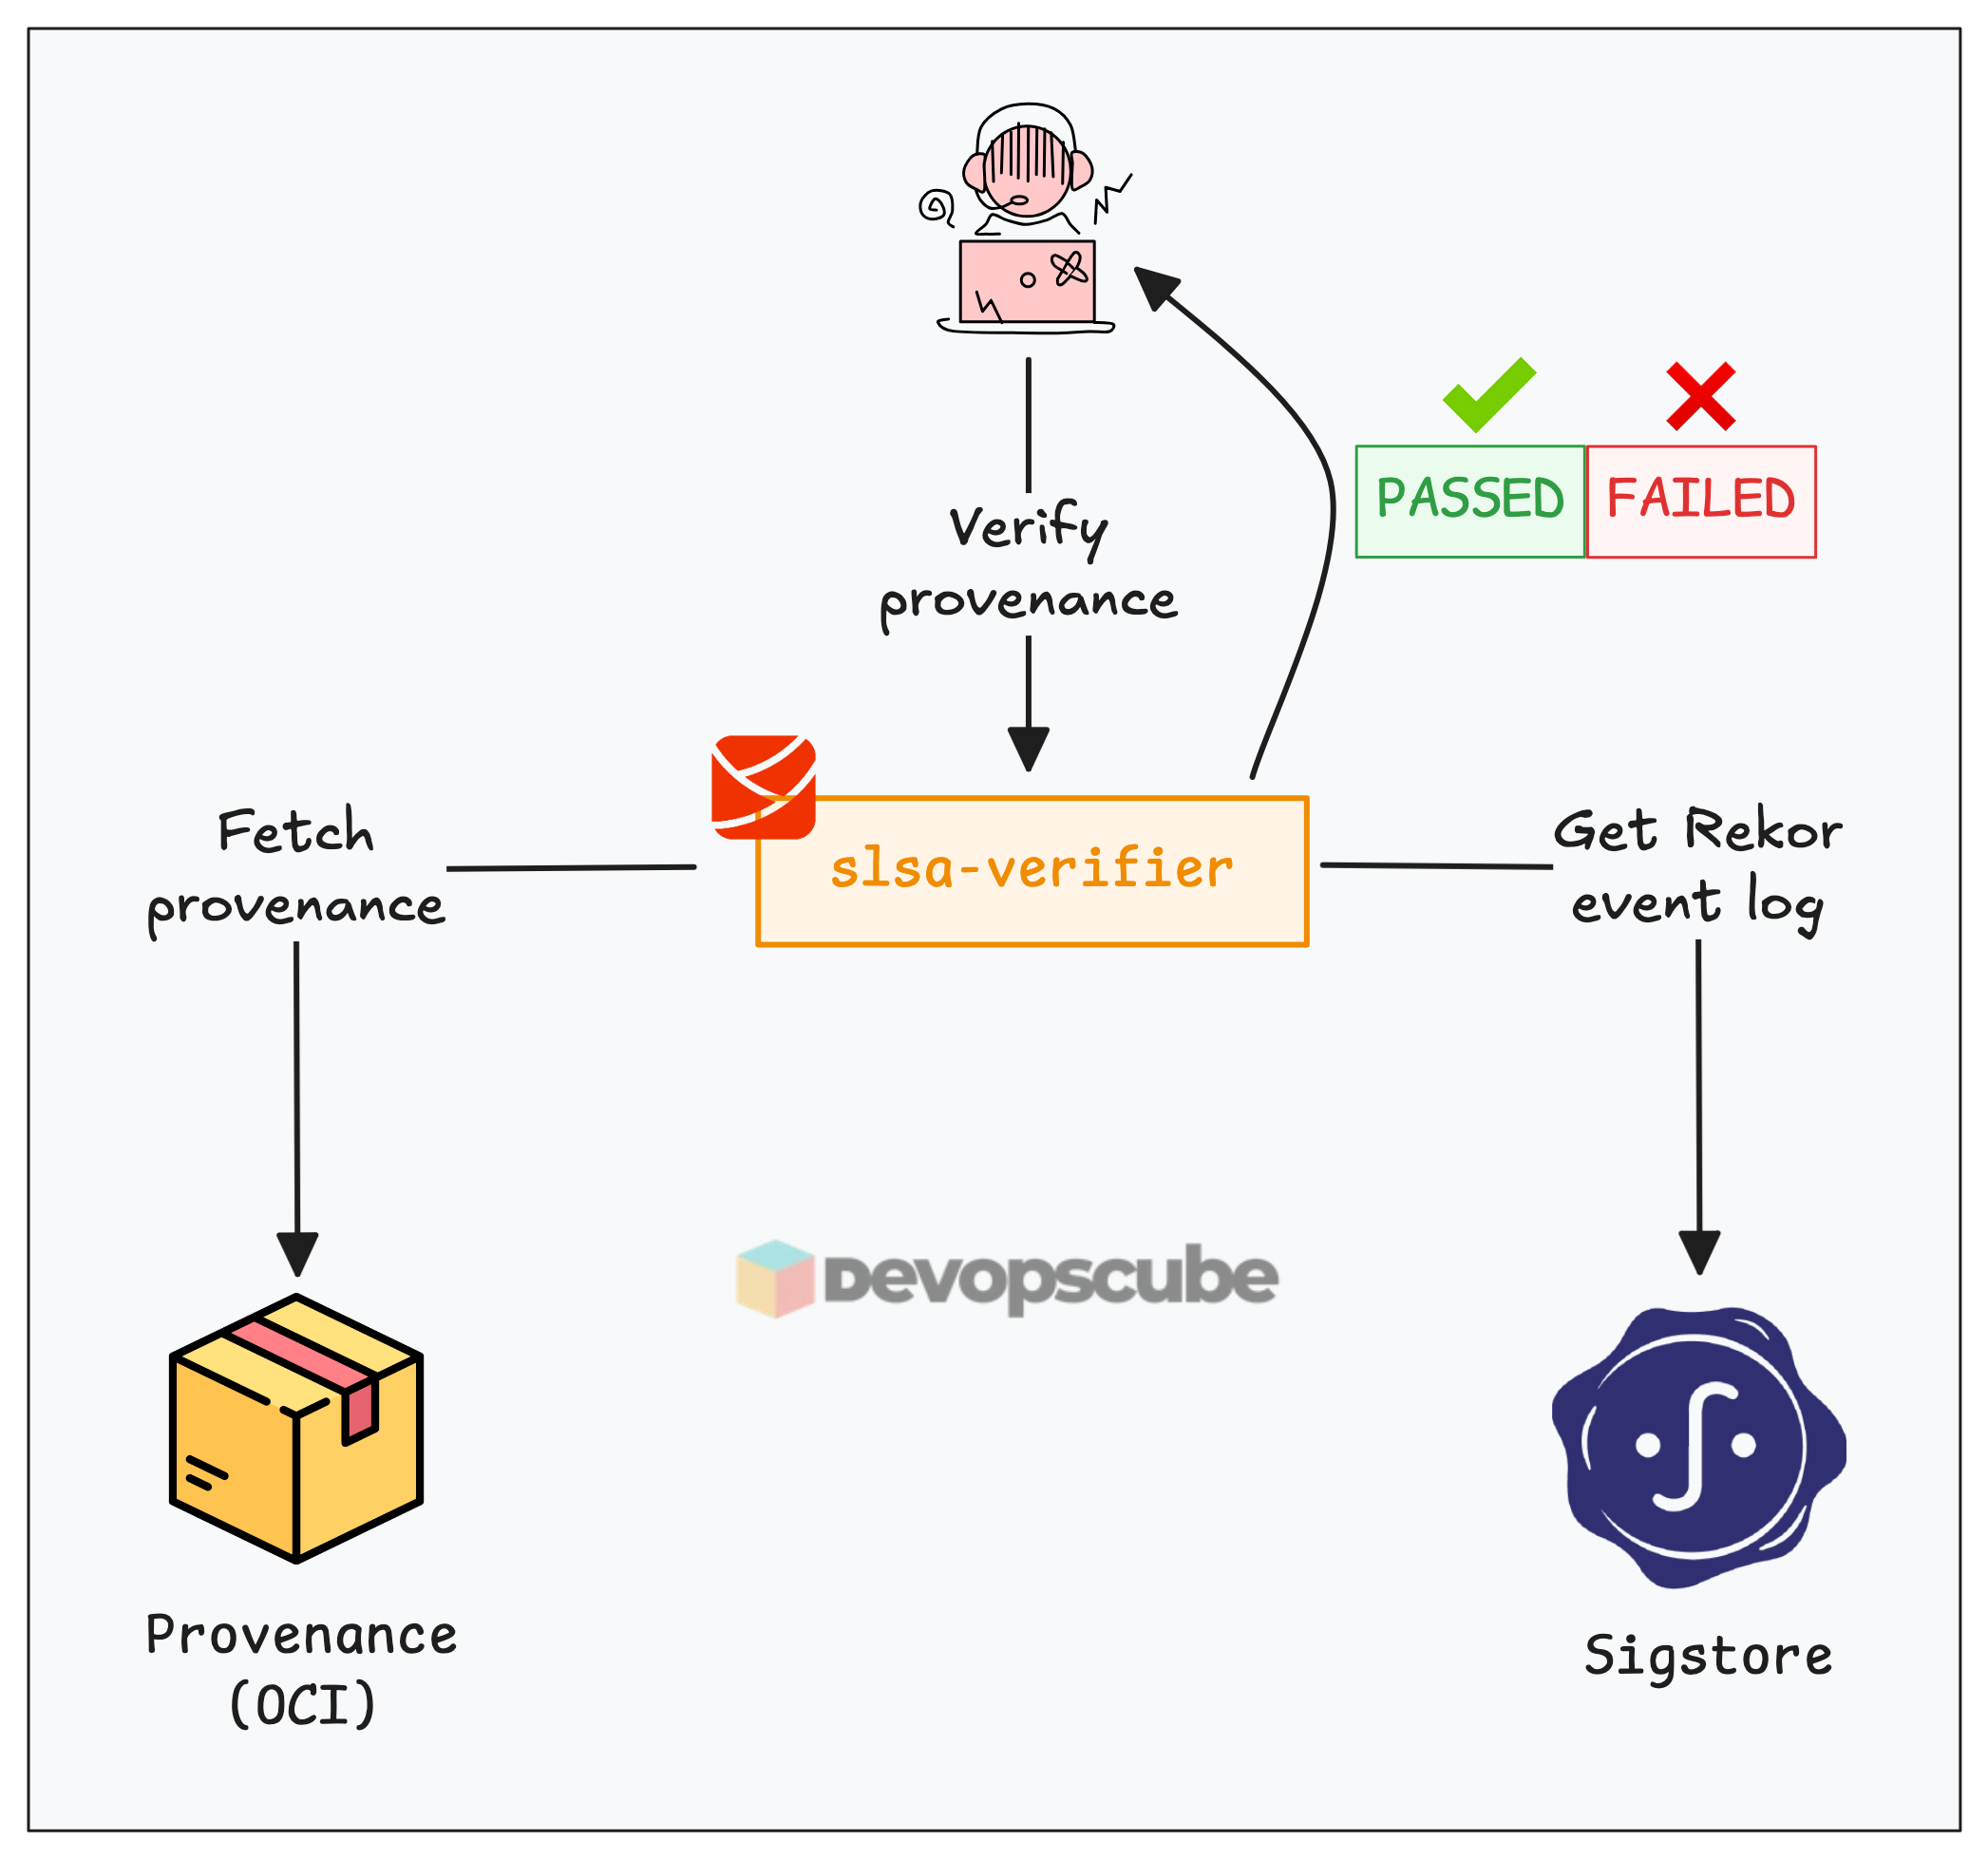
For verifying the provenance, you can use the SLSA Verifier.
It retrieves provenance from the registry and event logs from Rekor to verify that container image is originated from the expected source.
Setup Prerequisites
Following are the prerequisites for this guide.
- GitHub Repository
- AWS CLI configured
- AWS ECR repository ( We have already created an ECR repository named web-app)
- AWS IAM policy permission to create roles
- Github Actions configured with OIDC for AWS
GitHub Repository
We have pushed the workflow file in this setup to our GitHub repository.
It contains the following files.
.
├── Dockerfile
|    └── workflows
|         └── slsa-provenance.yaml
├── Dockerfile
├── README.md
└── app.py
The workflow file runs 2 jobs.
- One builds and pushes the image to ECR registry,
- Other creates SLSA Provenance for the image build.
Also, it contains source code for a demo Python Flask app and the related Dockerfile.
How to Create SLSA Provenance with GitHub Actions?
In this section, we will build an image, create SLSA Provenance, and push to the ECR registry.
We will be using two jobs in the build pipeline,
- One builds and pushes the container image to the AWS ECR registry
- Second builds and pushes the SLSA provenance to the AWS ECR registry along with the container image
Update Environment Variables in the Workflow
Clone the GitHub repository to your local and update the environment variables in the workflow file.
env:
  AWS_ROLE: <role arn of github oidc connect>
  AWS_REGION: <REGION>
  AWS_ACCOUNT_ID: <ACCOUNT-ID>
  ECR_REGISTRY: <ACCOUNT-ID>.dkr.ecr.<REGION>.amazonaws.com
  IMAGE_NAME: web-app
In this update, the values include your AWS role ARN of GitHub OIDC connect, region, account ID, ECR registry URL, and image name.
Once it's updated, push it to your registry.
Triggering the Workflow
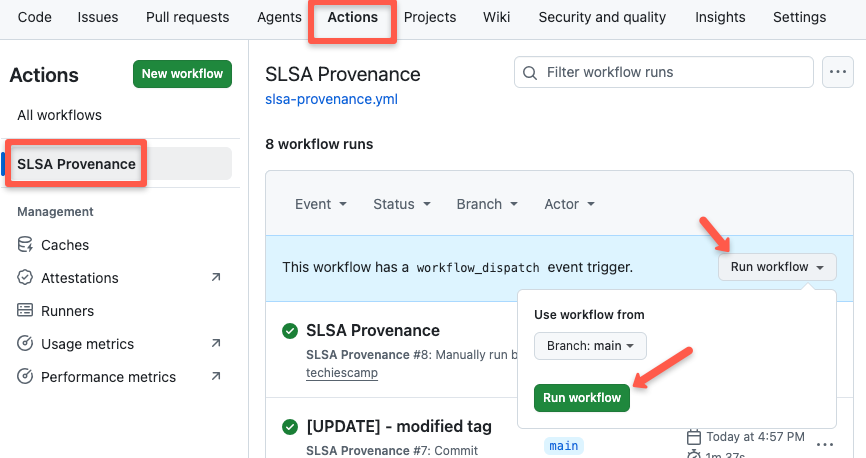
The workflow only supports manual triggering.
To trigger it, go to your repository -> Actions -> SLSA Provenance and toggle the Run workflow button and click the Run workflow button to trigger the workflow.
Once the workflow is completed, you can see the jobs completed as shown below.
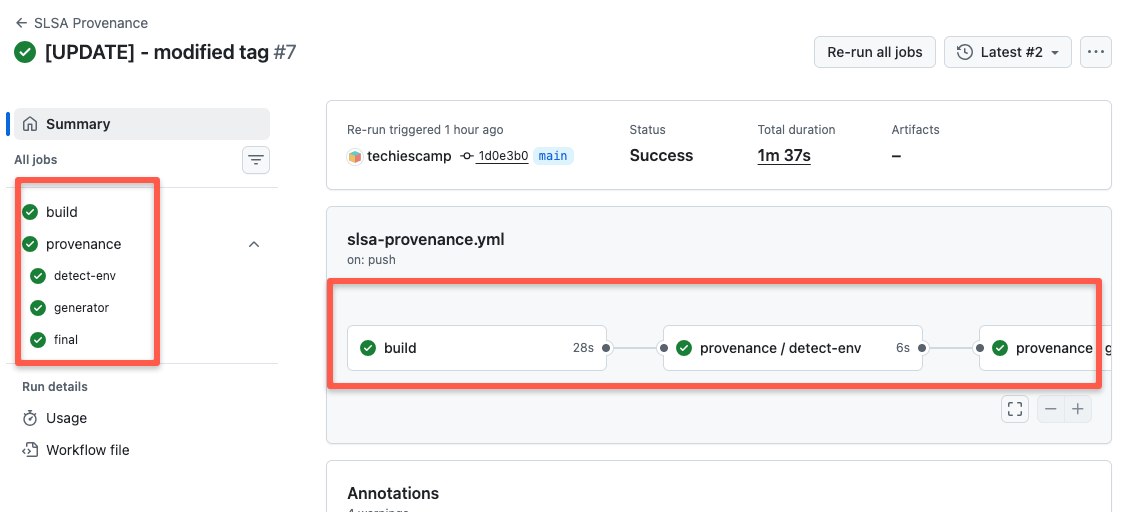
You can see the Provenance job runs three additional jobs. This is how the slsa-github-generator is designed to run.
This distributed job makes it SLSA Level 3.
Now, go to your ECR registry and check your image repository.
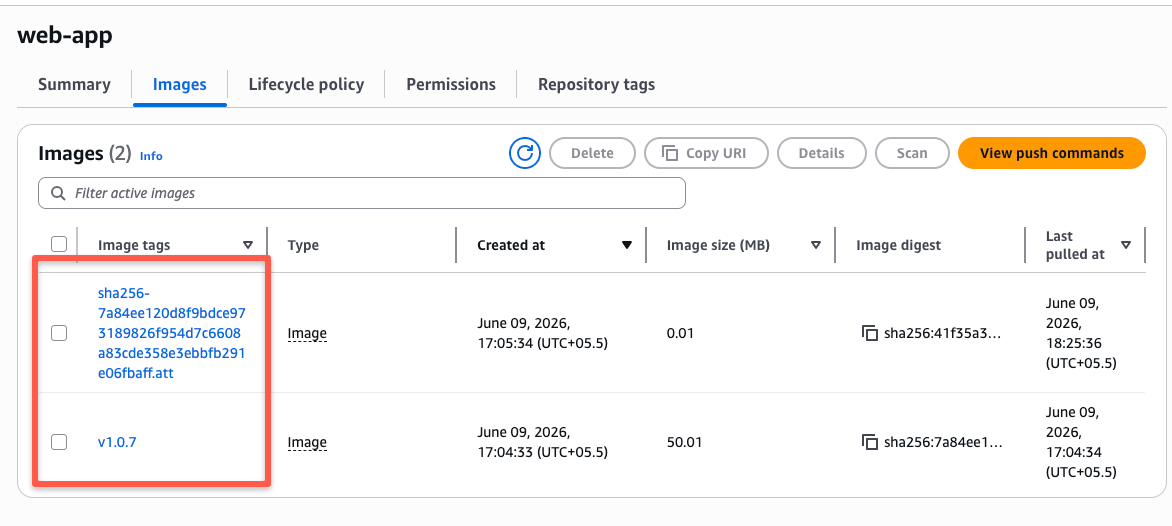
You can see the container image pushed with the tag based on the build number, and the provenance is pushed as SHA256 digest.
How to Verify SLSA Using slsa-verifier Tool
To verify SLSA, you need to install a tool called slsa-verifier.
It will get the provenance document from ECR, check it with the event recorded on rekor.sigstore.dev over the internet, and check the provenance attestation as illustrated in the image below.
Lets start with installing slsa-verifier.
Use the following command to install it.
curl -sL https://github.com/slsa-framework/slsa-verifier/releases/download/v2.7.1/slsa-verifier-linux-amd64 \
  -o slsa-verifier
chmod +x slsa-verifier
sudo mv slsa-verifier /usr/local/bin/
For more installation options, check the official GitHub repository.
Before verifying first, you need to log in to the registry locally.
Since we are using ECR, use the following command to log in.
aws ecr get-login-password --region us-west-2 | docker login --username AWS --password-stdin 637423664276.dkr.ecr.us-west-2.amazonaws.comOnce it's installed, use the following command to verify SLSA.
slsa-verifier verify-image \
  "637423664276.dkr.ecr.us-west-2.amazonaws.com/web-app@sha256:7a84ee120d8f9bdce973189826f954d7c6608a83cde358e3ebbfb291e06fbaff" \
  --source-uri github.com/techiescamp/slsa \
  --source-branch main
If nothing has changed, you will get a "SLSA verification passed" message similar to the one below.
Verified build using builder "https://github.com/slsa-framework/slsa-github-generator/.github/workflows/generator_container_slsa3.yml@refs/tags/v2.1.0" at commit 1d0e3b0c13dc9330fca55aac6130f320d007d4fd
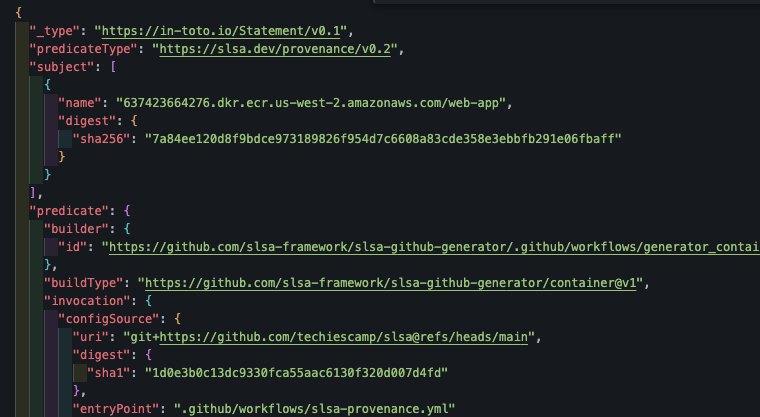
PASSED: SLSA verification passedAnd, if you want to download the provenance file locally, use the same command with --print-provenance flag.
slsa-verifier verify-image \
  "637423664276.dkr.ecr.us-west-2.amazonaws.com/web-app@sha256:7a84ee120d8f9bdce973189826f954d7c6608a83cde358e3ebbfb291e06fbaff" \
  --source-uri github.com/techiescamp/slsa \
  --source-branch main \
  --print-provenance | jq . > provenance-aws.json
You will get the provenance format as shown below.
What Happens if Verification Fails?
Let's see what happens if the information is different from the information on provenance. For testing, we will use the same command but change the source branch.
slsa-verifier verify-image \
  "637423664276.dkr.ecr.us-west-2.amazonaws.com/web-app@sha256:7a84ee120d8f9bdce973189826f954d7c6608a83cde358e3ebbfb291e06fbaff" \
  --source-uri github.com/techiescamp/slsa \
  --source-branch feature-branch
It throws an error with a message showing what is changed.
FAILED: SLSA verification failed: expected branch 'feature-branch', got 'main': branch used to generate the binary does not match provenanceAlso, if the attestation does not match the artifact being verified, the verification will fail with a "no matching attestations" error as given below.
FAILED: SLSA verification failed: no matching attestationsConclusion
In this blog, we have seen the hands-on part of how we can use GitHub Actions and slsa-github-generator to build and attach SLSA provenance.
As attackers are focussing more on the software supply chain, it is essential for DevOps engineers to implement SLSA in the CI/CD pipelines.
This way you can be proactive in securing the infrastructure rather can being reactive to supply chain attacks.
