


In this blog, I have covered detailed steps to set up gVisor on an AWS EKS cluster using EKSCTL.
gVisor basically implements container sandboxing. If you want to understand how gVisor works, its use cases, and how it sandboxes containers, please read our detailed guide on sandboxed containers.
gVisor on AWS EKS
By default, the AMIs used to deploy the EKS cluster don't have gVisor installed. Even if you create a gVisor runtimeClass, the pod will go into pending state.
So if you have a use case for using the gVisor runtime in the cluster, you will need to customize the AMI to include gVisor and runsc. For example, we are working on the Kubernetes agent sandbox project for an implementation, and it requires gVisor sandboxing.
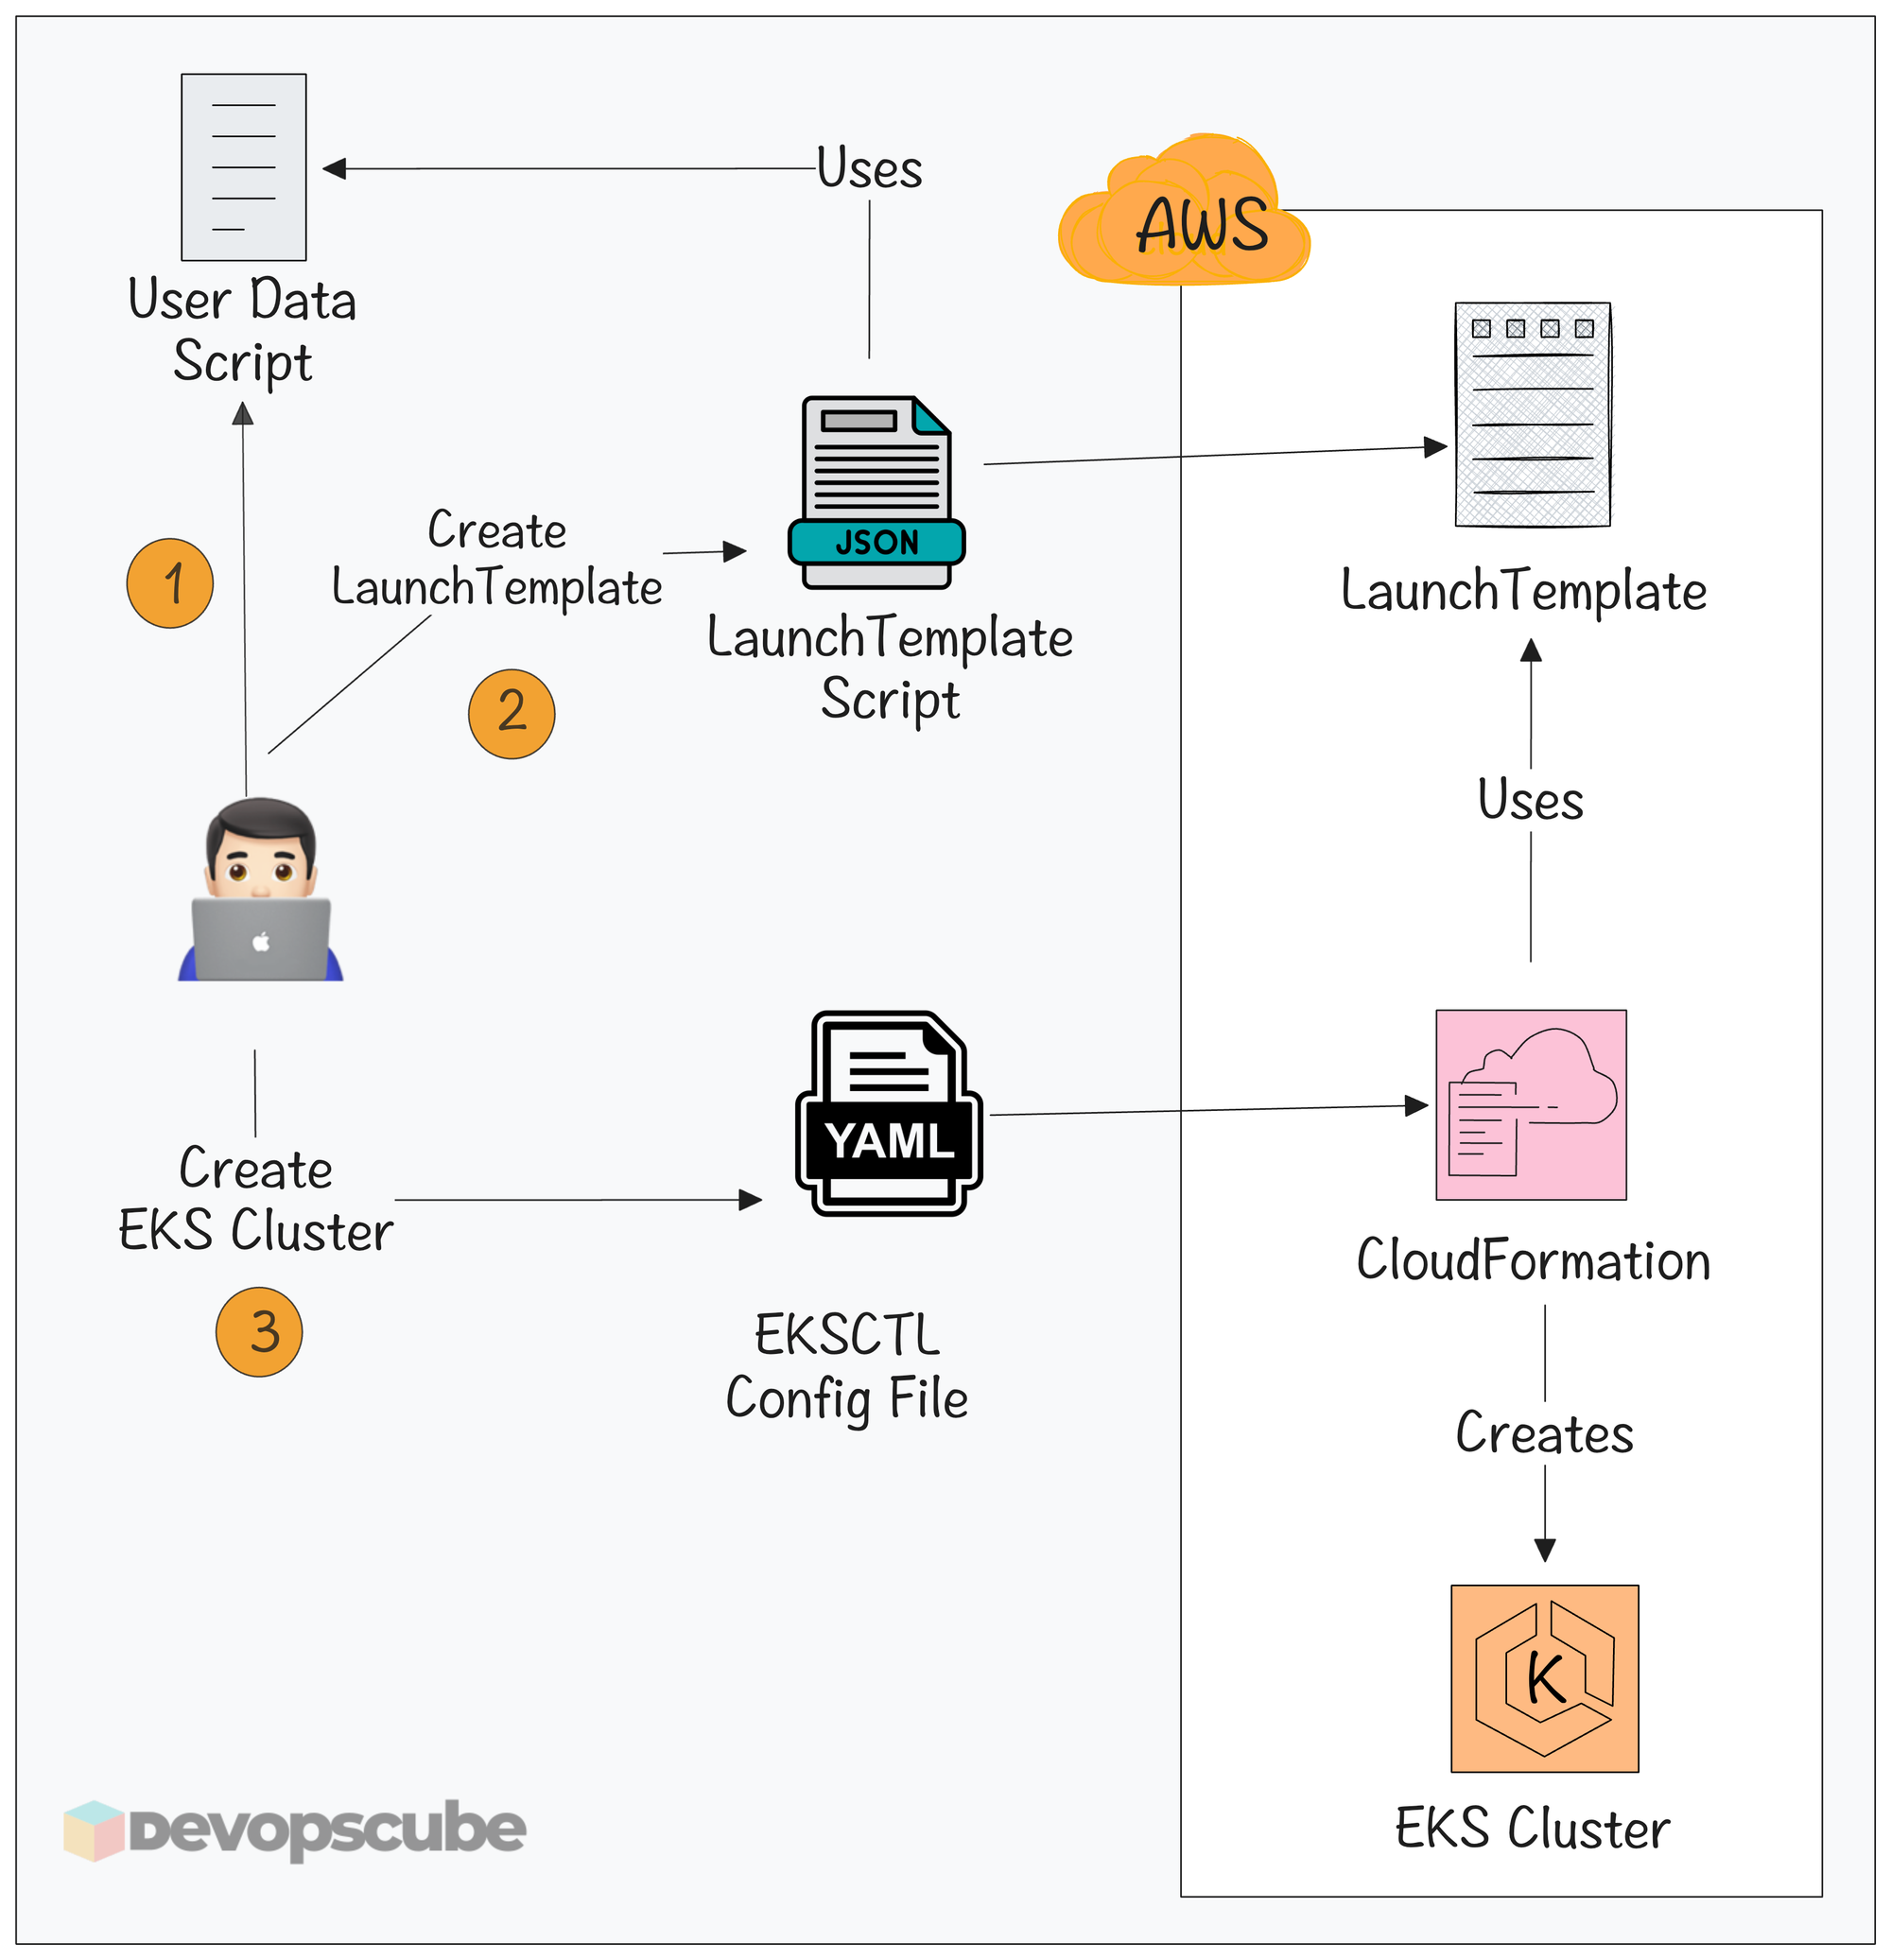
Here are the key steps you need to perform to enable gVisor on EKS nodes.
- Create a user data script to install gVisor binaries on EKS cluster nodes during creation. Also, it contains
NodeConfigto registerrunscas an additional runtime. - Create a JSON file to create an EC2 LaunchTemplate.
- Then create a
LaunchTemplateusing the JSON referring to the user data script. - Next, create the EKS cluster using the launch template in the node group configuration, which installs gVisor in the nodes during creation.
The following image gives you a mental model of the key steps involved.
Let's get started with the setup.
Setup Prerequisites
Below are the prerequisites for this setup.
Set up gVisor on an AWS EKS Cluster
In this setup, we will create a Launch Template with gVisor installed and create the EKS cluster using EKSCTL so every node comes up with gVisor installed.
Before starting, make sure you have added the environment variables below to your workspace.
export AWS_REGION=us-west-2
export CLUSTER_NAME=gvisor-demo
export K8S_VERSION=1.35
export NODE_INSTANCE_TYPE=t3.medium
Let's start the setup.
Step 1: Create User Data
Let's create the user data script we'll use in the launch template to set up gVisor on EKS nodes.
Run the following command to create it.
cat > gvisor-userdata.txt <<'EOF'
MIME-Version: 1.0
Content-Type: multipart/mixed; boundary="//"

--//
Content-Type: application/node.eks.aws

apiVersion: node.eks.aws/v1alpha1
kind: NodeConfig
spec:
  containerd:
    config: |
      [plugins.'io.containerd.cri.v1.runtime'.containerd.runtimes.runsc]
        runtime_type = 'io.containerd.runsc.v1'

--//
Content-Type: text/x-shellscript; charset="us-ascii"

#!/bin/bash
set -euxo pipefail

command -v bzip2 >/dev/null 2>&1 || dnf install -y bzip2

ARCH=$(uname -m)
URL="https://storage.googleapis.com/gvisor/releases/release/latest/${ARCH}"

cd /tmp
curl -fsSLO "${URL}/gvisor.tar.bz2"
curl -fsSLO "${URL}/gvisor.tar.bz2.sha512"

sha512sum -c gvisor.tar.bz2.sha512

tar -xjf gvisor.tar.bz2 -C /usr/local/bin
rm -f gvisor.tar.bz2 gvisor.tar.bz2.sha512

/usr/local/bin/runsc --version

--//--
EOF
This will create a user data script gvisor-userdata.txt which configures containerd with runsc and then installs the gVisor runtime runsc. During node creation, it downloads the gVisor binary, verifies it, and installs it in the node.
Step 2: Create EC2 LaunchTemplate
To use the user data during node creation, we need to create an EC2 LaunchTemplate with the user data.
Run the following command to create a JSON file for the launch template that gets the user data from gvisor-userdata.txt.
cat > lt-data.json <<EOF
{
  "InstanceType": "${NODE_INSTANCE_TYPE}",
  "UserData": "$(base64 -i gvisor-userdata.txt)",
  "MetadataOptions": {
    "HttpTokens": "required",
    "HttpPutResponseHopLimit": 1
  },
  "TagSpecifications": [
    {
      "ResourceType": "instance",
      "Tags": [{ "Key": "Name", "Value": "${CLUSTER_NAME}-gvisor-node" }]
    }
  ]
}
EOF
Then, run the following AWS CLI command to create the launch template.
aws ec2 create-launch-template \
  --region "$AWS_REGION" \
  --launch-template-name "${CLUSTER_NAME}-gvisor-lt" \
  --version-description "gvisor-v1" \
  --launch-template-data file://lt-data.json
You will get output similar to the following.
{
    "LaunchTemplate": {
        "LaunchTemplateId": "lt-0c6be519a89ecad4b",
        "LaunchTemplateName": "gvisor-demo-gvisor-lt",
        "CreateTime": "2026-07-27T14:56:37+00:00",
        "CreatedBy": "arn:aws:iam::637423664276:user/DevopsCube",
        "DefaultVersionNumber": 1,
        "LatestVersionNumber": 1,
        "Operator": {
            "Managed": false
        }
    }
}
Then run the following command to get the launch template ID, which is needed in the next step.
export LT_ID=$(aws ec2 describe-launch-templates \
  --region "$AWS_REGION" \
  --launch-template-names "${CLUSTER_NAME}-gvisor-lt" \
  --query 'LaunchTemplates[0].LaunchTemplateId' --output text)

echo "$LT_ID"
Step 3: Create the EKS Cluster using EKSCTL
Now, let's create an EKSCTL configuration file with the launch template we created in the previous step.
cat > cluster.yaml <<EOF
apiVersion: eksctl.io/v1alpha5
kind: ClusterConfig

metadata:
  name: ${CLUSTER_NAME}
  region: ${AWS_REGION}
  version: "${K8S_VERSION}"

managedNodeGroups:
  - name: gvisor-ng
    amiFamily: AmazonLinux2023
    desiredCapacity: 2
    minSize: 0
    maxSize: 4
    labels:
      sandbox: gvisor
    launchTemplate:
      id: ${LT_ID}

addons:
  - name: eks-pod-identity-agent
    version: latest

addonsConfig:
    autoApplyPodIdentityAssociations: true
EOF
This will create an EKSCTL configuration file cluster.yaml.
The config file contains a node group for gVisor-enabled nodes. Also, the amiFamily AmazonLinux2023 and the launchTemplate ID will be specified inside the node group.
gvisor on the gVisor enabled node.Run the following EKSCTL apply command to create the cluster.
eksctl create cluster -f cluster.yamlThis will take some time; move on to the next step once the cluster creation is completed.
Step 4: Verify the Nodes
To verify the nodes are created with gVisor, we need to connect to the node.
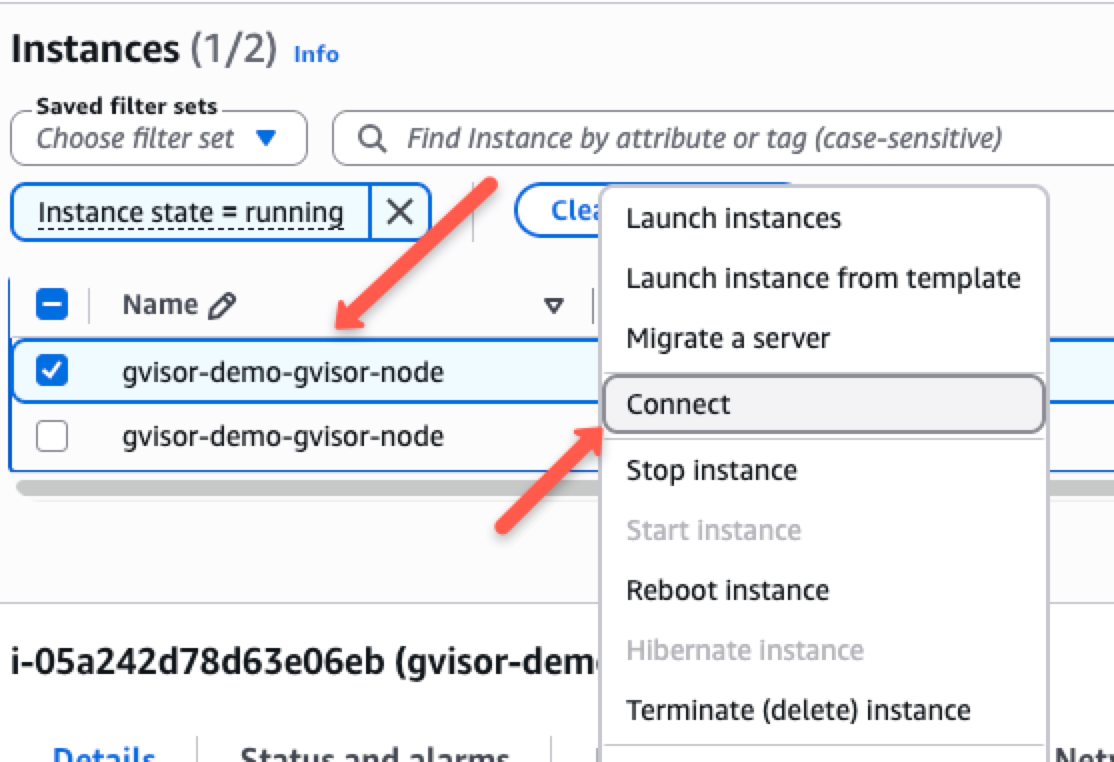
In this step, we will connect to the node using the SSM Session Manager. To do that, go to the EC2 dashboard and right-click one of the nodes. There, click on Connect, which will take you to a new tab.
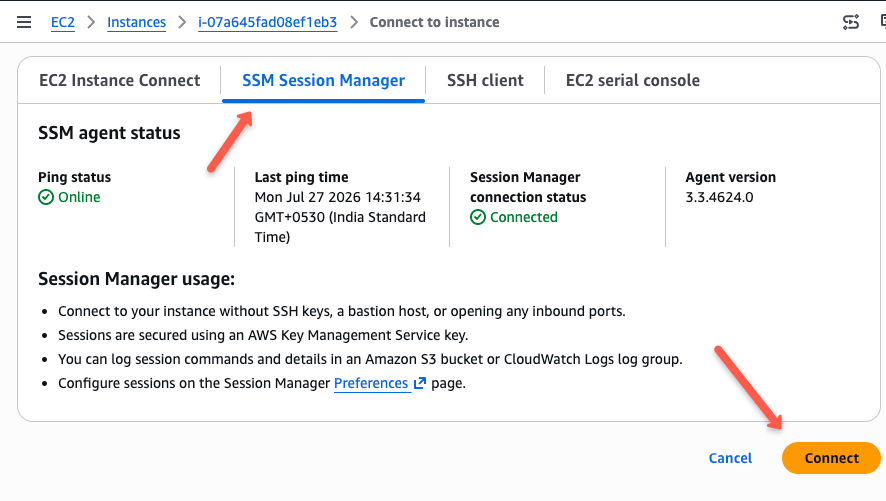
Once in the new tab, click SSM Session Manager and click the Connect button.
A new terminal will be opened. In that terminal, run the following command.
$ runsc --version
runsc version release-20260721.0
spec: 1.2.1

$ sudo grep -A2 'runtimes.runsc' /etc/containerd/config.toml

[plugins.'io.containerd.cri.v1.runtime'.containerd.runtimes.runsc]
runtime_type = 'io.containerd.runsc.v1'
From the output, we can see the runsc runtime is installed, and containerd is configured with the runsc runtime.
Step 5: Create RuntimeClass
And finally, create a RuntimeClass so pods can use it to run on the gVisor (runsc) runtime.
Because by default pods uses default runtime runc, but to run pods on gVisor you need to specify a runtime class with runsc.
Run the following command to create the RuntimeClass.
kubectl apply -f - <<'EOF'
apiVersion: node.k8s.io/v1
kind: RuntimeClass
metadata:
  name: gvisor
handler: runsc
scheduling:
  nodeSelector:
    sandbox: gvisor
EOF
Once it's created, use the following command to verify it.
$ kubectl get runtimeclasses

NAME     HANDLER   AGE

gvisor   runsc     6s
Test the gVisor Installed Node
To test it, we will deploy a privileged pod and check if we can access kernel files.
Run the following command to create the pod with the runtime class name and privileged: true field.
kubectl apply -f - <<'EOF'
apiVersion: v1
kind: Pod
metadata:
  name: gvisor-test
spec:
  runtimeClassName: gvisor
  containers:
    - name: busybox
      image: public.ecr.aws/docker/library/busybox:latest
      securityContext:
        privileged: true
      command: ["sh", "-c", "dmesg; sleep 3600"]
EOF
Then run the following command to check if the pod is running.
$kubectl get po

NAME                     READY   STATUS    RESTARTS   AGE

gvisor-test              1/1     Running   0          5s
Now, check the pod logs. Unlike pods running on normal nodes, pods running on gVisor-enabled nodes give startup logs in a sarcastic way as shown below.
$ kubectl logs gvisor-test

[   0.000000] Starting gVisor...
[   0.459871] Adversarially training Redcode AI...
[   0.906489] Moving files to filing cabinet...
[   1.173096] Feeding the init monster...
[   1.638273] Daemonizing children...
[   1.700028] Checking naughty and nice process list...
[   2.136456] Segmenting fault lines...
[   2.411983] Creating process schedule...
[   2.471545] Rewriting operating system in Javascript...
[   2.578584] Searching for needles in stacks...
[   2.761174] Verifying that no non-zero bytes made their way into /dev/zero...
[   3.071352] Ready!
The pod is up, and everything is working properly.
Let's exec into the pod and try to access the kernel files.
$ kubectl exec gvisor-test -- sh -c "cat /proc/modules" 2>&1

cat: can't open '/proc/modules': No such file or directory
command terminated with exit code 1
You can see that even if the pod is privileged, it cannot access Kernel files.
Instead of saying it cannot access, the pods can't even find the kernel files. That's how gVisor isolates the pods from the kernel.
Clean UP
If you no longer need the setup, run the following commands to delete the cluster and the launch template.
$ eksctl delete cluster --name="$CLUSTER_NAME" --region="$AWS_REGION"

$ aws ec2 delete-launch-template --launch-template-id "$LT_ID" --region "$AWS_REGION"
Conclusion
In summary, we have created user data with steps to install and configure gVisor, then created a launch template with the user data script.
Then we used the launch template in the node group and created the cluster. The node group with the launch template creates nodes with gVisor installed.
Once the cluster is ready, we ran a test pod on the gVisor node and checked if the pod can access kernel files.
If you find this guide useful, leave your feedback in the comments.
