

In this blog, you will learn about the Kubernetes in-place pod resize feature and how to implement it with Vertical Pod Autoscaler (VPA).
At the end, you will learn:
- What in-place pod resize.
- How it works behind the scenes.
- Why do we need VPA for in-place pod resize
- Practically deploy and test in-place pod resize
- Downsizing considerations and more..
Lets get started.
What is In-Place Pod Resize?
In Kubernetes, it was not possible to change the CPU or memory for a running Pod without a restart.
But the In-Place Pod Resize feature solves that problem.
In-Place Pod Resize feature allows you to change CPU and memory requests and limits on a running pod without deleting or recreating it.
When a resize is needed, the kubelet updates the container's Linux cgroup directly, without deleting the pod or restarting the container, unless you explicitly request it.
Here is an example that resizes a nginx pod without restarting it.
kubectl patch pod nginx-demo \
  --subresource resize \
  --type merge \
  -p '{
    "spec": {
      "containers": [{
        "name": "nginx",
        "resources": {
          "requests": { "cpu": "500m" },
          "limits": { "cpu": "500m" }
        }
      }]
    }
  }'
In the above example, the --subresource resize flag is the key part. It tells kubernetes that it is updating only the resizable fields (CPU and memory) of the pod.
Think of /resize subresource as a instruction that tells the cluster to adjust the running container's resources without terminating the process.
But there is a problem.
You can only do it only on a pod level. You cannot do that for a deployment. If you update the Deployment, Kubernetes will recreate the Pods. That is why, you need to use VPA to perform in-place update for resources.
In-Place Pod Resize With VPA
The following image illustrates how below VPA In-Place Pod Resize works behind the scenes.
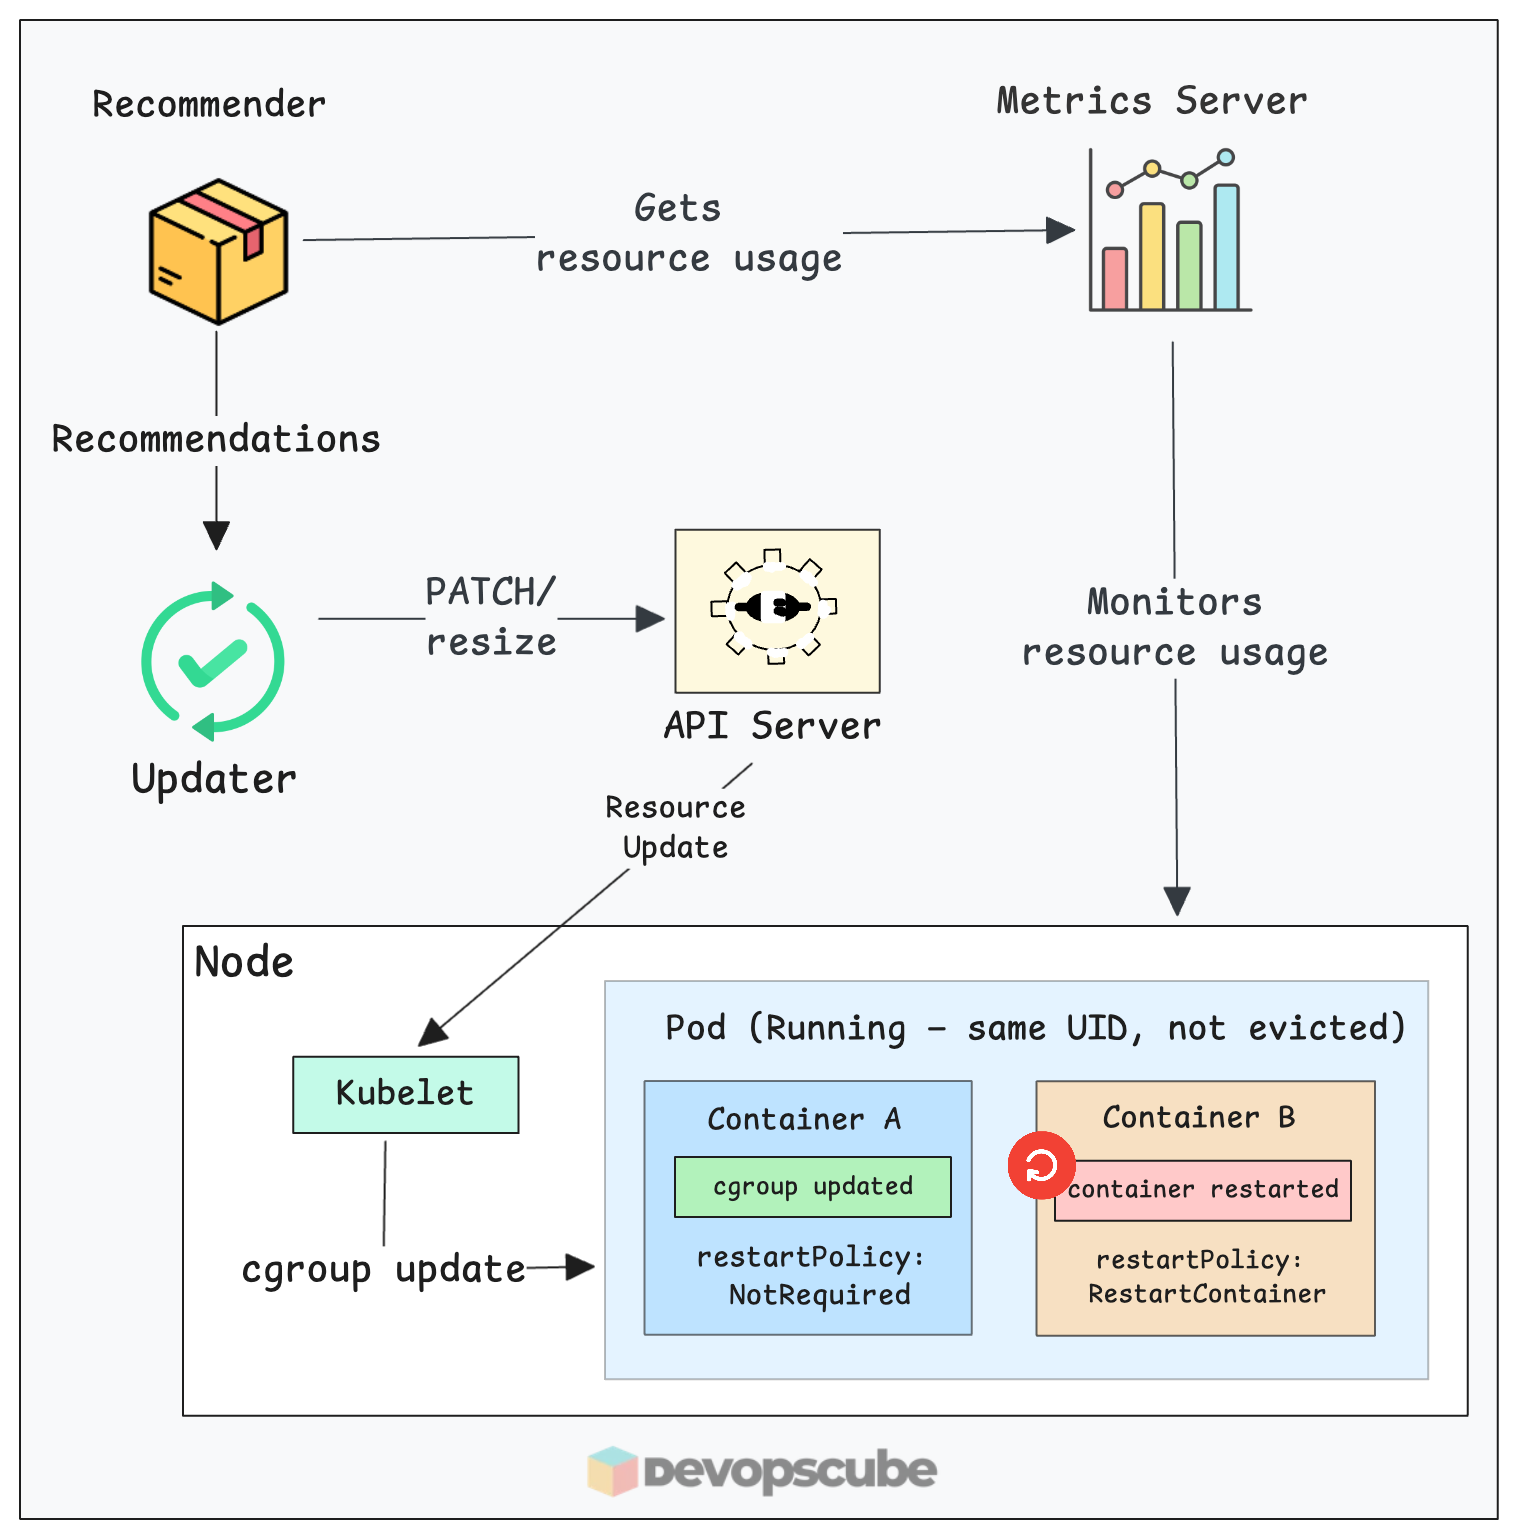
Here is how the components work together to resize your pod:
- Everything starts with the metrics server. It continuously tracks the CPU and memory usage of your pods.
- The VPA Recommender analyzes these metrics. If it detects that a pod is under or overused, it calculates a new target resource value.
- The VPA Updater, instead of evicting it, sends a patch request to the Kubernetes API to update the pod's resources via the
/resizesubresource. - Then, the Kubelet on the node receives the update and updates the container's cgroups directly.
- Thus, the new resource range will be updated to the pod without restarting it.
Use Case
One limitation when VPA applies a new recommendation is, it evicts the running pod and recreates it. A new pod with the updated resources comes up, the old one gets deleted.
For many workloads, this is acceptable. But for stateful apps, apps like Wordpress, long-running jobs, or anything sensitive to restarts, that eviction may cause issues.
This is where VPA In-Place Pod Resize comes in. We can use VPA InPlaceOrRecreate mode to use the kubernetes In-Place Pod Resize feature. It updates the pods of the target deployment without restarting it.
In
InPlaceOrRecreate mode, if the node does not have enough CPU or memory to complete the resize request, VPA will evict the pod and try to schedule in another node that has enough capacity. Otherwise, the pod remains pendingContainer ResizePolicy (must know)
What if I want to restart the container after an in-place resize?
For example, JVM based apps read the maximum heap size once when they start, based on the container's memory limit at that time. If you increase the cgroup memory limit without restarting, the JVM will not use the extra memory, and its heap size does not change.
To use in-place resize effectively, you can add a resizePolicy field to each container in your pod spec. This tells the kubelet what to do when a specific resource changes.
This policy allows the container to be restarted without restarting the pod.
There are two options in resizePolicy:
- NotRequired - The cgroup is updated while it keeps the container running.
- RestartContainer - The container is restarted after the resource change.
NotRequiredYou can also use both options for the container. The example below shows the resizePolicy block.
resizePolicy:
  - resourceName: cpu
    restartPolicy: NotRequired
  - resourceName: memory
    restartPolicy: RestartContainer
This causes a container restart when memory changes, but not when CPU changes.
Now lets move on to hands-on and look VPA in place resizing practically.
Prerequisites
Make sure you have the following prerequisites before moving forward.
- Kubernetes cluster (Version 1.35)
- kubectl
To verify the cgroup version, SSH into a node and run the following command.
stat -fc %T /sys/fs/cgroup/
The output should be cgroup2. If it says tmpfs, your nodes are on cgroup v1, and in-place resize will not work.
Install Metrics Server
Before installing VPA, you need to install the metrics server. VPA gets the resource usage of pods from the metrics server. (Ignore this step if you already have metrics server running in your cluster)
Use the following command to install it.
kubectl apply -f https://raw.githubusercontent.com/techiescamp/kubeadm-scripts/main/manifests/metrics-server.yaml
Then use the following command to check if the pods are up and running.
$ kubectl get pods -n kube-system | grep metrics-server

metrics-server-6dc6795f96-8jj5w     1/1     Running   0             3m32s
Install VPA
Use the following commands to install VPA with the in-place feature enabled.
git clone https://github.com/kubernetes/autoscaler.git

cd autoscaler/vertical-pod-autoscaler/

./hack/vpa-up.sh
Then use the following command to make sure all the VPA pods are running.
kubectl get pods -n kube-system | grep vpa
You should see the vpa-recommender, vpa-updater, and vpa-admission-controller pods all in Running state.
vpa-admission-controller-786f8fd784-nbqd7  1/1   Running   0   14s
vpa-recommender-797589f6c9-qhf66           1/1   Running   0   16s
vpa-updater-579cc98d57-6jwd7               1/1   Running   0   16s
Validating In-Place Resize
To test In-Place Resize, let's create a deployment with an Nginx image and create a VPA object for the deployment.
Create a Deployment with resizePolicy
Lets create a simple nginx application with no resource limit or request set.
Copy the following content and execute in the terminal.
kubectl apply -f - <<EOF
apiVersion: apps/v1
kind: Deployment
metadata:
  name: nginx
spec:
  replicas: 1
  selector:
    matchLabels:
      app: nginx-resize
  template:
    metadata:
      labels:
        app: nginx-resize
    spec:
      containers:
        - name: nginx
          image: nginx:latest
          resources:
            requests:
              cpu: "50m"
              memory: "64Mi"
            limits:
              cpu: "50m"
              memory: "64Mi"
          resizePolicy:
            - resourceName: cpu
              restartPolicy: NotRequired
            - resourceName: memory
              restartPolicy: NotRequired
EOFWhen the VPA later adds a request, it tries to change that label to Burstable. Since a Pod’s QoS class is permanent and cannot be changed while it’s running, the cluster is forced to delete and recreate the pod instead of just resizing it.
Now, verify the pod is running.
kubectl get pods -l app=nginx-resizeYou will get the following output.
NAME                      READY   STATUS    RESTARTS   AGE

nginx-77d65d859c-h8v8     1/1     Running   0          45s
Use the following command to check the resource allocation of the pod.
kubectl get pod -l app=nginx-resize \
  -o jsonpath='{.items[0].spec.containers[0].resources}' | jq
You will get the CPU and memory request as you specified.
{
  "limits": {
    "cpu": "50m",
    "memory": "64Mi"
  },
  "requests": {
    "cpu": "50m",
    "memory": "64Mi"
  }
}
Create a VPA Object
Lets create a VPA object targeting the nginx deployment with InPlaceOrRecreate mode.
In the VPC we set the CPU minimum to 100m and memory to 200Mi
Copy and apply the manifest in the terminal using the following.
kubectl apply -f - <<EOF
apiVersion: autoscaling.k8s.io/v1
kind: VerticalPodAutoscaler
metadata:
  name: web-vpa
spec:
  targetRef:
    apiVersion: "apps/v1"
    kind: Deployment
    name: nginx
  updatePolicy:
    updateMode: "InPlaceOrRecreate"
    minReplicas: 1
  resourcePolicy:
    containerPolicies:
      - containerName: "nginx"
        minAllowed:
          cpu: "100m"
          memory: "200Mi"
        maxAllowed:
          cpu: "500m"
          memory: "500Mi"
        controlledResources: ["cpu", "memory"]
EOF
Now, run the following command to verify if the VPA object is created. It will take couple of minutes for the Recommender to collect metrics and update the resource.
kubectl get vpa --watchYou can see the resources updated from 50m to 100m CPU and 64Mi to 250Mi memory.
$ kubectl get vpa --watch

NAME   MODE                CPU   MEM     PROVIDED   AGE
web-vpa    InPlaceOrRecreate   50m   64Mi   True       7m18s
web-vpa    InPlaceOrRecreate   100m   250Mi   True       7m42s
Even though the min was 200Mi, the VPU updated to 250 as the app requires it.
Now use the following command to check the resource allocation of the pod again.
kubectl get pod -l app=nginx-resize \
  -o jsonpath='{.items[0].spec.containers[0].resources}' | jq
You can see the resource request and limit have been updated as per the VPA values.
  "limits": {
    "cpu": "100m",
    "memory": "250Mi"
  },
  "requests": {
    "cpu": "100m",
    "memory": "250Mi"
  }
}
And, if you check the pod, you can see the resources are changed without the pod getting evicted.
Downsizing Pods
There may be use cases where you might want to downsize the resource for the pods. But following are the things to consider.
- CPU downsizing: CPU is compressible so the kernel throttles it without killing the process.
- Memory downsizing: Memory is non-compressible. If the container is currently using more memory than the new limit, it will end up crashing the pod with OOMkill error.
For memory downsizing, you can consider using resizePolicy to restart for memory changes
VPA Best Practices
Following are some of the best pracrtices when using in-place pod resizing.
- Always use in
Offmode in production or your pods resource change according to the usage, or even leads to eviction. - Always set
minAllowedandmaxAllowed. WithoutmaxAllowed, VPA could recommend values that exhaust node capacity. - Use
RestartContainerfor memory on JVM apps. Without a restart, the JVM heap ceiling does not change even if the cgroup limit does.
Clean Up
If the setup is no longer needed, run the following commands to clean it.
Run the following commands to delete the deployment and VPA object we created.
kubectl delete vpa web-vpa
kubectl delete deploy nginx
Then, run the following command from where you have cloned the autoscaler repository. It removes VPA installtion.
./autoscaler/vertical-pod-autoscaler/hack/vpa-down.shConclusion
VPA In-Place Pod Resize lets your pods get the right resources without being evicted.
With InPlaceOrRecreate, VPA applies its recommendations by patching the running pod directly. The pod UID stays the same, the container keeps running, and the only evidence of the change is the updated resource values.
Also, using the InPlaceOrRecreate mode does not mean it always changes the pods resources without a restart. If resource modification is not possible without a restart, it will restart the pod.
