In this blog, we will look at the steps to build and deploy a Java application with the MySQL database on the Kubernetes cluster.
Prerequisites
The following are prerequisites to follow this guide.
- Kubernetes Cluster
- kubectl
- Maven (3.9.6) and Java-17 installed in your system
- Install Docker
- You should have access to Docker Hub repo from your system to push the docker image.
- MySQL client (Optional) – If you will log in to your MySQL database through CLI.
Setup Architecture
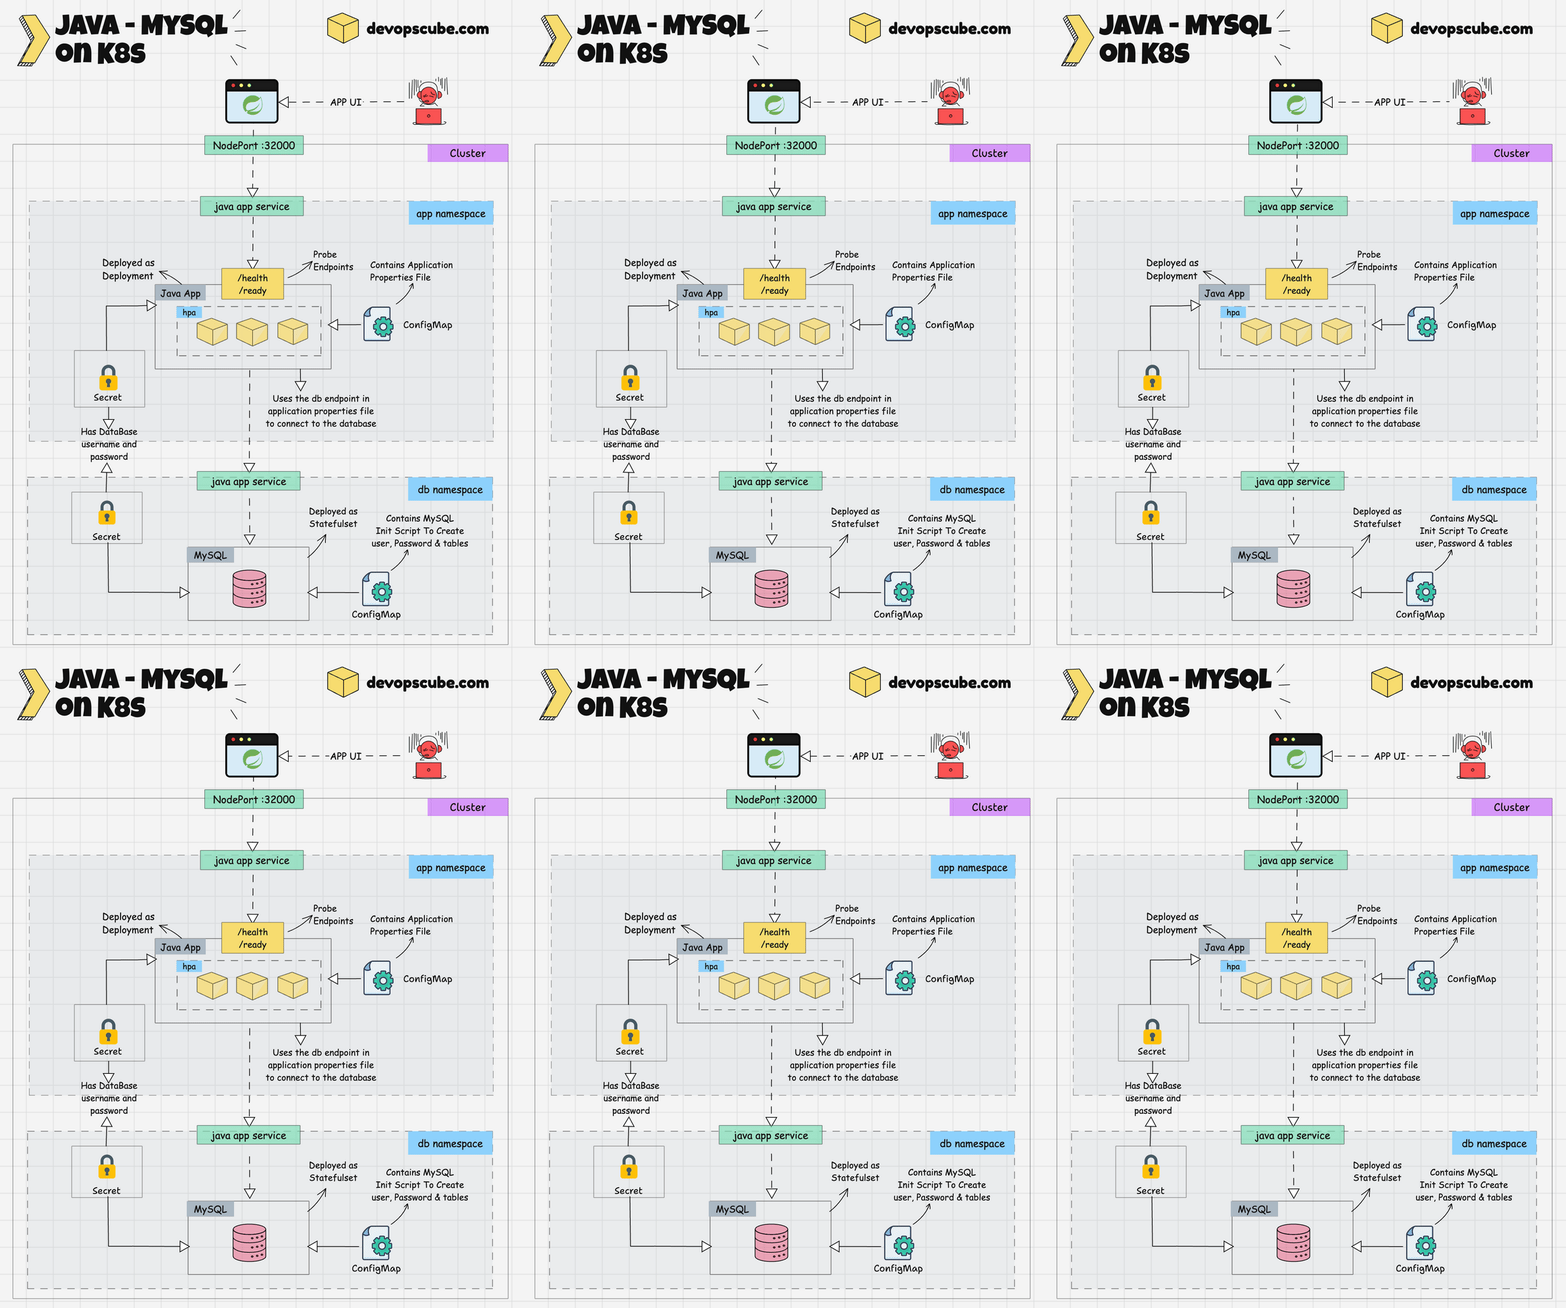
The workflow of this setup is given in the below diagram.
You will practically use the following key Kubernetes objects. It will help you understand how these objects can be used in real-world project implementations:
- Deployment
- HPA
- ConfigMap
- Secrets
- StatefulSet
- Service
- Namespace
It also covers key concepts such as:
- Creating an application properties file from ConfigMap to be consumed by the app
- Startup, readiness, and liveness probes
- Consuming secret and configmap data using Environment Variables
- MySQL initialization script from ConfigMap to create tables
Lets get started with the setup.
Build and Create Java Application Docker Image
Note: You can skip this section if you only want to try the Kubernetes deployment. Just use the image provided in the guide.
Given below is the step-by-step guide to building and deploying Java Apps with MySQL on Kubernetes.
Clone the Git repository below, which contains the source code to build the application. We will using the publicly available pet clinic spring boot app for this setup.
https://github.com/spring-projects/spring-petclinic.gitStep 1: Build the Java Application
Now, CD into the spring-petclinic directory and run the below command to build the application using maven.
mvn clean installIf you want to skip the test during the build, use the -DskipTests flag .
After the build is finished, you can find the application JAR file inside the spring-petclinic/target folder
Step 2: Build a Docker Image of the Application
To build the docker image of the application, create a Dockerfile using the below content inside the spring-petclinic directory.
FROM techiescamp/jre-17:1.0.0
COPY /target/*.jar /app/java.jar
EXPOSE 8080
This dockerfile uses techiescamp/jre-17:1.0.0 as the base image which has JRE installed in it and it copies the JAR file from the target folder and pastes it inside the docker image inside the /app folder as java.jar.
It also exposes port 8080, because the Java application runs on port 8080.
Run the below command from the same directory where the Dockerfile is present to build the docker image
docker build -t kube-petclinic-app:3.0.0 .kube-petclinic-app:3.0.0 is the name and tag I have given to my docker image.
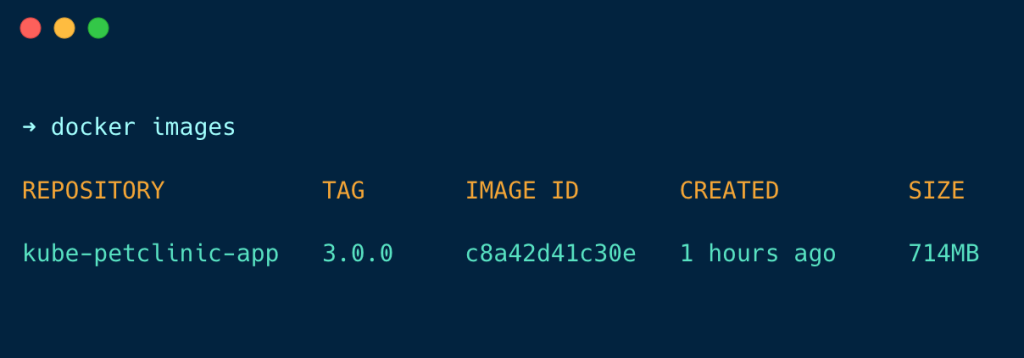
Run the docker images command to check if your docker image has been created successfully.
Step 3: Push the image to DockerHub
Before pushing the image to the DockerHub repository, you have to tag the image that you want to push, use the below to tag the image
docker tag kube-petclinic-app:3.0.0 techiescamp/kube-petclinic-app:3.0.0In this command kube-petclinic-app:3.0.0 is the name of the image I build and techiescamp/kube-petclinic-app:3.0.0 is my DockerHub repository and image tag.
Now, push the image to DockerHub using the command. Before proceeding, ensure you have logged in to docker hub from the CLI.
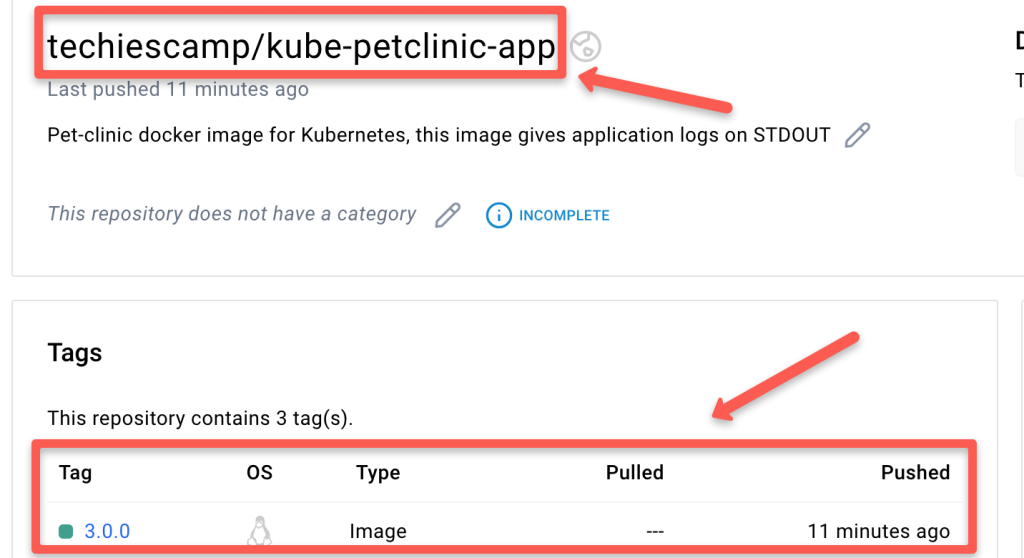
docker push techiescamp/kube-petclinic-app:3.0.0Check if your image is pushed into DockerHub as shown below
Deploy Java & MySQL On Kubernetes
Clone the Git repository given below which contains all the YAML manifest we used in this guide under 03-java-app-deployment folder.
git clone https://github.com/techiescamp/kubernetes-projects.gitIn the 03-java-app-deployment folder, you can see the YAML manifests in the below structure.
.
├── java-app
│   ├── configmap.yml
│   ├── hpa.yml
│   └── java.yml
├── mysql
│   ├── configmap.yml
│   └── mysql.yml
└── secret.yml
Given below are the steps to deploy Java and MySQL on Kubernetes
Step 1: Create Namespaces
We are going to deploy the app and MySQL on two different namespaces so create two new namespaces pet-clinic-app and pet-clinic-db.
Run the following commands to create both namespace
kubectl create ns pet-clinic-app

kubectl create ns pet-clinic-db
Step 2: Create Secrets
CD into the 03-java-app-deployment directory and run the secret.yml in both pet-clinic-app and pet-clinic-db namespaces because the secret contains the MySQL login credentials which are needed in both MySQL and app deployment process.
apiVersion: v1
kind: Secret
metadata:
  name: mysql-cred
  namespace: pet-clinic-app
type: Opaque
data:
  username: Y3J1bmNob3Bz
  password: Y3J1bmNob3BzQDEyMzQ=
Just change the namespace and run the secret.yml file two times to create a secret in both pet-clinic-app and pet-clinic-db namespaces.
data:
  username: Y3J1bmNob3Bz
  password: Y3J1bmNob3BzQDEyMzQ=
You can see the data in the above block is given in base64-encoded values because the secret won’t be created unless you specify your username and password in base64-encoded values.
You can use the echo command with base64 to encode your data, the echo command will give the encoded values of your data. The command to encode your data is given below
echo -n '<data>' | base64For example, I set my username as crunchops, then the echo command will be
echo -n 'crunchops' | base64This command will give the encoded values of my data.

Now, create the secret in both namespaces using the following command.
kubectl apply -f secretRun the following command to verify the secret is created in both namespace
kubectl get secret -n pet-clinic-app

kubectl get secret -n pet-clinic-db
You will get the following output

Step 3: Create ConfigMap for MySQL
CD into the 03-java-app-deployment/mysql directory and run the configmap.yml.
apiVersion: v1
kind: ConfigMap
metadata:
  name: mysql-configmap
  namespace: pet-clinic-db
data:
  init.sql: |
    CREATE USER '$MYSQL_USER'@'%' IDENTIFIED BY '$MYSQL_PASSWORD';
    GRANT ALL PRIVILEGES ON petclinic.* TO '$MYSQL_USER'@'%';
    FLUSH PRIVILEGES;

    USE petclinic;

    CREATE TABLE IF NOT EXISTS vets (
      id INT(4) UNSIGNED NOT NULL AUTO_INCREMENT PRIMARY KEY,
      first_name VARCHAR(30),
      last_name VARCHAR(30),
      INDEX(last_name)
    ) engine=InnoDB;

....... View Complete File content on the mysql/configmap.yml file ......
This creates a configmap mysql-configmap on the pet-clinic-db namespace, that contains the SQL command to create a user, password, and tables on the database, and to insert data on the table.
It gets the username and password from env variables, which are retrieved from the secret.
Run the below command to create a configmap.
kubectl apply -f configmap.ymlNow, run the following command to verify if the ConfigMap is created
kubectl get cm -n pet-clinic-dbYou will get the following output

Step 4: Deploy MySQL Database
CD into the 03-java-app-deployment/mysql directory and run the mysql.yml.
apiVersion: apps/v1
kind: StatefulSet
metadata:
  name: mysql
  namespace: pet-clinic-db
spec:
  serviceName: "mysql"
  replicas: 1
  selector:
    matchLabels:
      app: mysql
  template:
    metadata:
      labels:
        app: mysql
    spec:
      containers:
      - name: mysql
        image: mysql:latest
        env:
        - name: MYSQL_RANDOM_ROOT_PASSWORD
          value: "yes"
        - name: MYSQL_USER
          valueFrom:
            secretKeyRef:
              name: mysql-cred
              key: username
        - name: MYSQL_PASSWORD
          valueFrom:
            secretKeyRef:
              name: mysql-cred
              key: password
        - name: MYSQL_DATABASE
          value: petclinic
        volumeMounts:
        - name: mysql-config
          mountPath: /docker-entrypoint-initdb.d
        resources:
            requests:
              memory: "256Mi"
              cpu: "100m"
            limits:
              memory: "512Mi"
              cpu: "200m"
      volumes:
      - name: mysql-config
        configMap:
          name: mysql-configmap
---
apiVersion: v1
kind: Service
metadata:
  name: mysql-service
  namespace: pet-clinic-db
spec:
  type: NodePort
  selector:
    app: mysql
  ports:
    - protocol: TCP
      port: 3306
      targetPort: 3306
      nodePort: 30244
This file deploys a MySQL statefulset database on the pet-clinic-db namespace and also a nodeport service mysql-service on the pet-clinic-db namespace so we can log in to MySQL from outside the cluster.
It gets the database username and password from the secret you created before.
The docker-entrypoint-initdb.d directory is part of the MySQL image. Any MySQL scripts placed in this folder will be executed during MySQL startup. It is primarily used for running database initialization scripts.
In our setup, we placed an init script (init.sql) in this folder through a ConfigMap (mysql-configmap). init.sql creates the username, password, and tables for our application. The script retrieves the username and password from environment variables set by the secret object using secretKeyRef
Run the below command to deploy the MySQL database.
kubectl apply -f mysql.ymlNow, run the following command to check if the MySQL StatefulSet has been created.
kubectl get sts -n pet-clinic-dbYou will get the following output

Step 5: Create ConfigMap for Java Application
CD into the 03-java-app-deployment/java-app folder and run the configmap.yml.
apiVersion: v1
kind: ConfigMap
metadata:
  name: java-app-config
  namespace: pet-clinic-app
data:
  application.properties: |
    # database init, supports mysql too
    database=mysql
    spring.datasource.url=jdbc:mysql://mysql-service.pet-clinic-db.svc.cluster.local:3306/petclinic
    spring.datasource.username=${DB_USERNAME}
    spring.datasource.password=${DB_PASSWORD}
    # SQL is written to be idempotent so this is safe
    spring.sql.init.mode=always

    # Web
    spring.thymeleaf.mode=HTML

    # JPA
    spring.jpa.properties.hibernate.dialect=org.hibernate.dialect.MySQLDialect
    spring.jpa.open-in-view=true

    # Internationalization
    spring.messages.basename=messages/messages

    # Actuator
    management.endpoints.web.exposure.include=*
    # Logging
    #logging.config=classpath:logback-spring.xml
    logging.level.org.springframework=INFO
    # logging.level.org.springframework.web=DEBUG
    # logging.level.org.springframework.context.annotation=TRACE

    # Maximum time static resources should be cached
    spring.web.resources.cache.cachecontrol.max-age=12h
Run the below command to create a configmap.
kubectl apply -f configmap.ymlThis creates a configmap java-app-config on the pet-clinic-app namespace, which contains content of the application.properties file which helps the application to connect with the MySQL database.
The username and password are given as a variable so that it can get the username and password from the env variables, which are retrieved from the secret.
Run the following command to check if the configmap is created
kubectl get cm -n pet-clinic-appYou will get the following output

Step 6: Deploy Java Application
apiVersion: apps/v1
kind: Deployment
metadata:
  name: java-app
  namespace: pet-clinic-app
spec:
  replicas: 1
  selector:
    matchLabels:
      app: java-app
  template:
    metadata:
      labels:
        app: java-app
    spec:
      containers:
      - name: java-app-container
        image: techiescamp/kube-petclinic-app:3.0.0
        env:
            - name: DB_USERNAME
              valueFrom:
                  secretKeyRef:
                    name: mysql-cred
                    key: username
            - name: DB_PASSWORD
              valueFrom:
                  secretKeyRef:
                    name: mysql-cred
                    key: password
        resources:
            requests:
              memory: "256Mi"
              cpu: "100m"
            limits:
              memory: "512Mi"
              cpu: "200m"
        ports:
        - containerPort: 8080
        volumeMounts:
        - name: java-app-config
          mountPath: "/opt/config"
        command: ["java", "-jar", "/app/java.jar", "--spring.config.location=/opt/config/application.properties", "--spring.profiles.active=mysql"]
        startupProbe:
          httpGet:
            path: /actuator/health
            port: 8080
          failureThreshold: 30
          periodSeconds: 20
          initialDelaySeconds: 180
        readinessProbe:
          httpGet:
            path: /actuator/health/readiness
            port: 8080
          periodSeconds: 10
          failureThreshold: 3
          timeoutSeconds: 10
        livenessProbe:
          httpGet:
            path: /actuator/health/liveness
            port: 8080
          periodSeconds: 15
          failureThreshold: 3
          timeoutSeconds: 10
      volumes:
      - name: java-app-config
        configMap:
          name: java-app-config

---
apiVersion: v1
kind: Service
metadata:
  name: java-app-service
  namespace: pet-clinic-app
spec:
  selector:
    app: java-app
  type: NodePort
  ports:
  - protocol: TCP
    port: 8080
    targetPort: 8080
    nodePort: 32000
This file deploys the Java application java-app on the pet-clinic-app namespace and also a nodeport service java-app-service on the pet-clinic-app namespace so we can access the application on the web browser.
It gets the database username and password from the secret you created before and the application.properties file gets the username and password from the env during startup.
The command is used to run the application JAR file along with the application.properties file so that the application can access the MySQL database.
Also, I have added health checks for this application:
- startupProbe – This keeps the readinessProbe and livenessProbe on hold until the application is started and configured to check the path /actuator/health.
- readinessProbe – This checks if the application is ready to accept traffic using the readiness path /actuator/health/readiness. If this probe fails, it won’t receive any traffic.
- livenessProbe – Checks if the application is up and running using the liveness path /actuator/health/liveness. If the probe fails, Kubernetes will restart the pod.
Run the below command to deploy the Java application.
kubectl apply -f java.ymlAfter deploying the application, run the following command to check if the deployment pods are up and running. It takes minimum 2min for the pods to get ready.
kubectl get deploy -n pet-clinic-appYou will get the following output.

Step 7: Deploy HorizontalPodAutoscaler (HPA)
For HPA to work, you need to have a metrics server running in the cluster.
If you don’t have a metrics server, you can install the Metrics server using the following command.
kubectl apply -f https://raw.githubusercontent.com/techiescamp/kubeadm-scripts/main/manifests/metrics-server.yamlNow, run the top command to check if the metrics server is installed properly
kubectl top po -n pet-clinic-appYou will get the following output.

Now, deploy the HorizontalPodAutoscaler in your cluster.
You can find the below HPA file inside the 03-java-app-deployment/java-app directory.
apiVersion: autoscaling/v2
kind: HorizontalPodAutoscaler
metadata:
  name: java-app-hpa
  namespace: pet-clinic-app
spec:
  scaleTargetRef:
    apiVersion: apps/v1
    kind: Deployment
    name: java-app
  minReplicas: 1
  maxReplicas: 3
  metrics:
  - type: Resource
    resource:
      name: cpu
      target:
        type: Utilization
        averageUtilization: 50
This will deploy the HPA in the pet-clinic-app namespace.
It is configured to scale the target deployment Java app if the pod’s CPU utilization is 50% and its maximum replica count is 3.
Run the following command to deploy HPA
kubectl apply -f hpa.ymlNow, run the following command to check if the HPA is deployed
kubectl get hpa -n pet-clinic-appYou will get the following output

You can see the CPU usage of the target deployment and the number of pods available.
Step 8: Access the Java Application
Once the pod is up and running, check if the application is deployed properly by trying to access it on the browser, search on the browser as {node-IP:nodeport} you will get the following

Step 9: Clean Up
It’s important to clean up the setup if it’s no longer needed; run the following commands to clean up the setup.
1. Delete Java App Deployment
Let’s start with deleting the Java application, CD into the 03-java-app-deployment/java-app folder and run the following command
kubectl delete -f .This command will delete all the resources created by the manifest files inside the java-app directory, it deletes the Java app deployment, configmap, and HPA.
2. Delete MySQL
The next step is to delete MySQL, CD into the 03-java-app-deployment/mysql folder and run the following command
kubectl delete -f .This command will delete all the resources created by the manifest files inside the mysql directory, it deletes the MySQL statefulset and configmap.
3. Delete Secret
To delete the secret in both namespace, CD into the 03-java-app-deployment and run the following commands
Just change the namespace in the secret.yml file to pet-clinic-app and pet-clinic-db then run the following command twice, once for each namespace.
kubectl delete -f secret.yml4. Delete Namespaces
Finally, delete the namespaces, run the following command to delete both namespaces
kubectl delete ns pet-clinic-app

kubectl delete ns pet-clinic-db
Conclusion
In summary, we have built the pet clinic Java application using maven, pushed it to the docker hub, used the image to deploy the application on Kubernetes, and configured a MySQL database to it.
I believe you find this blog helpful in understanding deploying applications and configuring the database to the application on Kubernetes.




6 comments
Can we make use of Karpenter instead of HPA since Karpenter provides more flexibility?
its failing at step 6 ->
[root@k8s-master java-app]# kubectl apply -f https://github.com/kubernetes-sigs/metrics-server/releases/latest/download/components.yaml –validate=false
serviceaccount/metrics-server unchanged
clusterrole.rbac.authorization.k8s.io/system:aggregated-metrics-reader unchanged
clusterrole.rbac.authorization.k8s.io/system:metrics-server unchanged
rolebinding.rbac.authorization.k8s.io/metrics-server-auth-reader unchanged
clusterrolebinding.rbac.authorization.k8s.io/metrics-server:system:auth-delegator unchanged
clusterrolebinding.rbac.authorization.k8s.io/system:metrics-server unchanged
service/metrics-server unchanged
deployment.apps/metrics-server created
[root@k8s-master java-app]# kubectl top po -n pet-clinic-app
Error from server (ServiceUnavailable): the server is currently unable to handle the request (get pods.metrics.k8s.io)
[root@k8s-master java-app]#
Hi,
Can you check the metrics server status? Looks like its not running. Also, metrics server takes a coupled of minutes to the be in running state.
This is resolved now – everything else set up , but i am struggling with what IP to use to access the app -.> 10.0.0.10 doesnt seem to be working with nodePort 32000.
Hi,
When you list yours nodes, whats the IP it is listing?
I found the IP’s using the -o wide option – the actual problem was with the probes – things worked after disabling the probes and running everything again.