

In this blog, we are going to learn about a tool called Slimtoolkit and how to use it effectively to shrink Docker image size.
Do you have Docker images that are large in size, which take up a lot of storage space and time to upload or download?
We can put an end to large images by reducing their size using the slim tool, but you may ask: won't the slimming process cause any problems for the application or related files inside the image?
The answer is no. Mostly, the slim process reduces the image size without affecting any important files. We can also specify the directories or files that need to be excluded during the slim process as a precaution.
What is SlimToolkit?
SlimToolkit is a tool that helps to optimize Docker images by removing unnecessary layers and files.
SlimToolkit does this by analyzing the Docker image and identifying the unwanted layers and files that will not affect the image's ability to run properly even if they are not included in the image.
The SlimToolkit can reduce the image size by up to 30%, and the image size may be reduced even more for applications run on compiled languages such as C, C++, Java, etc.
SlimToolkit can be used on Docker images for different use cases such as:
- Reduces the size of Docker images to improve deployment time and transfer speeds of images.
- Makes Docker images more secure by removing unwanted files and dependencies.
- Improves the performance of Docker images by removing unused binaries and libraries.
How Does the SlimToolkit Work?
The below diagram gives you an overview of how the SlimToolkit works.

Let me explain how the SlimToolkit works.
- You can see in the above image the size of the image is 500MB before the slim process, then the slim process starts with the slim build command.
- First, the tool analyses the Docker image to find the unnecessary layers and files in the image.
- It ignores the files and directories specified in the ignore.txt file.
- Once it finds the unnecessary files and layers it removes them and creates a new optimized image.
- Along with the new image, it also reports the slim process in a JSON file named slim.report.json
Note: The SlimToolkit does not modify the Docker image, instead it creates a new optimized Docker image.
Slim Installation
To install Slim on Linux and Mac, follow the below steps.
First, download the zip package based on the platform you need to install Slim.
Once you have downloaded the packages, run the below commands based on your platform
For Mac
unzip ds.zip
mv dist_mac/slim /usr/local/bin/
mv dist_mac/slim-sensor /usr/local/bin
For Linux
tar -xvf ds.tar.gz
mv dist_linux/slim /usr/local/bin/
mv dist_linux/slim-sensor /usr/local/bin/
Using Slim To Reduce Image Size
Let's look at slim commands and how to use them to reduce Docker image size using a practical example.
The Slim command syntax is given below
slim [command] [flags] [image-name:tag]An example of how the Slim command can be used is given below. The below command is to optimize the Docker image and reduce the image size.
slim build <image-name:tag>You can use the flag --http-probe=false to disable sending API calls to the exposed port, by default the http-probe is enabled.
For example, if your application port is port 80 it sends API calls to port 80 to check if it can be accessed.
In most cases during the slim process, it is not possible to send API calls to check if the port is accessible and it causes the slim process to take more time or cause errors.
If you want to slim the Docker image to a specific name run the below command
slim build --target <image-name:tag> --tag <new-image-name:tag>You can also specify the files and directories you want to exclude during the slim process.
Practical Example 1: Slimming Python Flask Application.
As a first example, I am going to slim a Docker image with a Python Flask Application.
You can use the below Flask Application Docker image for testing
docker pull techiescamp/flask-application:1.0.0First, create a ignore.txt file with the file name or directory path that should not be removed during the slim process.
/app
/usr/local/bin/flask
In my text file, I have specified the path where I have the application code and files needed to run the Flask application . Now, run the below command to slim the Docker image with the text file.
slim build --preserve-path-file ignore.txt --target <image-name:tag> --tag <new-image-name:tag>This command will slim the Docker images without affecting the file or file path mentioned in the text file.
The size comparison of before and after using the Slim command is given below.
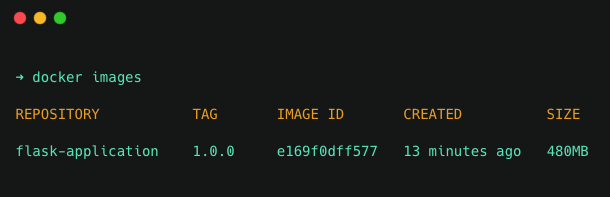
The below image shows the actual size of the Python Flask Application Docker image.
The size of the Python Flask Application Docker image after using the Slim command is given below.
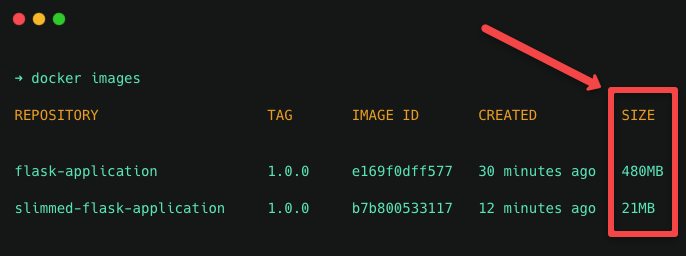
You can see the size difference between the two Docker images before and after using the Slim command.
Also, you can see, that the slim process doesn't modify the Docker image instead it creates a new optimized image.
Practical Example 2: Slimming Java Application
In this example, I am going to slim a Java based Docker image
You can use the below Java Application Docker image for testing
docker pull techiescamp/pet-clinic-app:1.0.0Like the first example, create an ignore.txt file with the file name or directory path that shouldn't be removed during slim process
/app
/usr/bin/java
Now, run the below command to slim the Docker image with the text file.
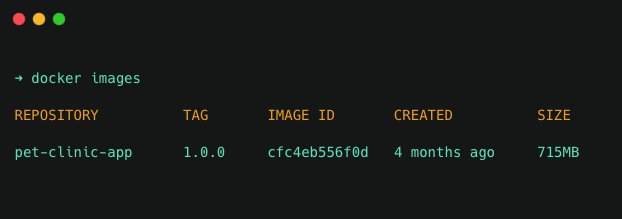
slim build --preserve-path-file ignore.txt --target <image-name:tag> --tag <new-image-name:tag>The below image shows the actual size of the pet-clinic Java Application Docker image.
The size of the Pet-clinic Java Application Docker image after using the Slim command is given below.
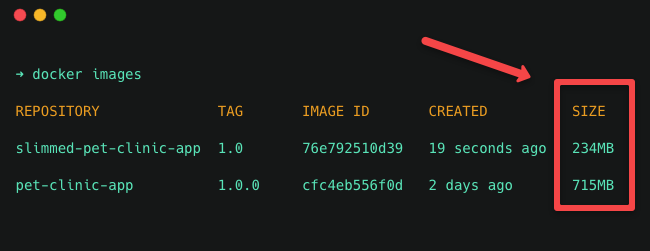
You can see the size difference between the two Docker images before and after using the Slim command.
Other Useful Slim Commands
The SlimToolkit provides a number of commands that help you to optimize your Docker images. Some of the commands are listed below:
- xray: With the help of this command you can analyze the Docker image and see what's inside your Docker image.
- lint: This command helps you to check for any errors in Dockerfiles, so you can avoid the errors that occur during the image build process because of errors in Dockerfile.
- build: This is the most important command that optimizes the Docker image with only the required dependencies and files for the applications and thus reduces the image size.
- debug: This command helps you debug a running container that was created from a slimmed Docker image.
- profile: This command collects information about the Docker image and gives a report in JSON format, that you can use to analyze its size and performance.
- merge: If you want to merge two images into a single image, use the merge command.
Disadvantage of Using SlimToolkit
Below are some disadvantages you should keep in mind while using SlimToolkit.
- The time taken for the slim process is based on the image size. The larger the image size the more time it takes to slim the image.
- It may remove necessary files for an application, which makes the application not runnable. You need to carefully add the ignore list to avoid necessary files being removed.
- It may also remove necessary utilities, binaries, and files along with unnecessary files to reduce the size of the image. For example,
- It removes bash utility. So after the slim process you can not run commands inside the optimized image.
- Also, utilities like Terraform and Ansible will be removed from the image if it's installed in the image and not added to the ignore list.
Conclusion
In the guide, you have learned about Docker image SlimToolkit, how it works, how to install it, and how to use the Slim commands.
I believe this guide gives you good information about SlimToolkit.
You can refer to this Slim GitHub repo for further information about SlimToolkit.
Now I would like to hear from you.
How do you optimize Docker image sizes in your projects? Do you use any utilities in your CI pipeline to ensure no bloated images goes to production?
Drop a comment with the strategies you use for docker image optmizations.
