

If you want to reduce docker image size, you need to use the standard best practices in building a Docker Image.
This blog talks about different optimization techniques that you can quickly implement to make the smallest and minimal docker image. We will also look at some of the best tools for Docker Image Optimization.
Docker as a container engine makes it easy to take a piece of code & run it inside a container. It enables engineers to collect all the code dependencies and files into a single location which can be run anywhere, quite quickly & easily.
The whole concept of "run anywhere" images starts from a simple configuration file called Dockerfile. First, we add all the build instructions, such as the code dependencies, commands, and base image details, in Dockerfile.
Need for Docker Image Optimization
Even though the Docker build process is easy, many organizations make the mistake of building bloated Docker images without optimizing the container images.
In typical software development, each service will have multiple versions/releases, and each version requires more dependencies, commands, and configs. This introduces a challenge in Docker image build, as now - the same code requires more time & resources to be built before it can be shipped as a container.
I have seen cases where the initial application image started with 350MB, and over time it grew to more than 1.5 GB.
Also, by installing unwanted libraries, we increase the chance of a potential security risk by increasing the attack surface.
Therefore, DevOps engineers must optimize the docker images to ensure that the docker image is not getting bloated after application builds or future releases. Not just for production environments, at every stage in the CI/CD process, you should optimize your docker images.
Also, with container orchestration tools like Kubernetes, it is best to have small-sized images to reduce the image transfer and deploy time.
How to Reduce Docker Image Size?
If we take a container image of a typical application, it contains a base image, Dependencies/Files/Configs, and cruft (unwanted software).
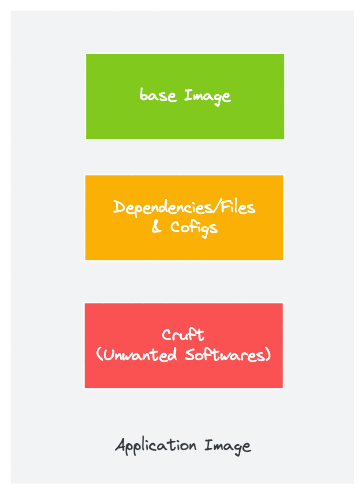
So it all boils down to how efficiently we can manage these resources inside the container image.
Let's look at different established methods of optimizing Docker images. Additionally, we have given practical examples to understand docker image optimization in real time.
Either you use the examples given in the article or try the optimization techniques on existing Dockerfiles.
The following are the methods by which we can achieve docker image optimization.
- Using distroless/minimal base images
- Multistage builds
- Minimizing the number of layers
- Understanding caching
- Using Dockerignore
- Keeping application data elsewhere
Method 1: Use Minimal Base Images
Your first focus should be on choosing the right base image with a minimal OS footprint.
One such example is alpine base images. Alpine images can be as small as 5.59MB. It's not just small; it's very secure as well.
alpine latest c059bfaa849c 5.59MBNginx alpine base image is only 22MB.
By default, it comes with the sh shell that helps debug the container by attaching it.
You can further reduce the base image size using distroless images. It is a stripped-down version of the operating system. Distroless base images are available for Java, Node.js, Python, Rust, etc.
Distroless images are so minimal that they don't even have a shell in them. So, you might ask, then how do we debug applications? They have the debug version of the same image that comes with the busybox for debugging.
Also, most of the distributions now have minimal base images.
Method 2: Use Docker Multistage Builds
The multistage build pattern is evolved from the concept of builder pattern where we use different Dockerfiles for building and packaging the application code. Even though this pattern helps reduce the image size, it puts little overhead when it comes to building pipelines.
In multistage build, we get similar advantages as the builder pattern. We use intermediate images (build stages) to compile code, install dependencies, and package files in this approach. The idea behind this is to eliminate unwanted layers in the image.
After that, only the necessary app files required to run the application are copied over to another image with only the required libraries, i.e., lighter to run the application.
Let's see this in action, with the help of a practical example where we create a simple Nodejs application and optimize its Dockerfile.
First, let's create the code. We will have the following folder structure.
├── Dockerfile1
├── Dockerfile2
├── env
├── index.js
└── package.json
Save the following as index.js.
const dotenv=require('dotenv');
dotenv.config({ path: './env' });

dotenv.config();

const express=require("express");
const app=express();

app.get('/',(req,res)=>{
  res.send(`Learning to Optimize Docker Images with DevOpsCube!`);
});


app.listen(process.env.PORT,(err)=>{
    if(err){
        console.log(`Error: ${err.message}`);
    }else{
        console.log(`Listening on port ${process.env.PORT}`);
    }
  }
)
Save the following as package.json.
{
  "name": "nodejs",
  "version": "1.0.0",
  "description": "",
  "main": "index.js",
  "scripts": {
    "test": "echo \"Error: no test specified\" && exit 1"
  },
  "keywords": [],
  "author": "",
  "license": "ISC",
  "dependencies": {
    "dotenv": "^10.0.0",
    "express": "^4.17.2"
  }
}
Save the following port variable in a file named env.
PORT=8080A simple Dockerfile for this application would like this - Save it as Dockerfile1.
FROM node:16

COPY . .

RUN npm installEXPOSE 3000

CMD [ "node", "index.js" ]
Let's see the storage space that it requires by building it.
docker build -t devopscube/node-app:1.0 --no-cache -f Dockerfile1 .After the build is complete. Let's check its size using -
docker image lsThis is what we get.
devopscube/node-app 1.0 b15397d01cca 22 seconds ago 910MBSo the size is 910MBs.
Now, let's use this method to create a multistage build.
We will use node:16 as the base image, i.e., the image for all the dependencies & modules installation, after that, we will move the contents into a minimal and lighter 'alpine' based image. The 'alpine' image has the bare minimum utilities & hence is very light.
Here is a pictorial representation of a Docker multistage build.
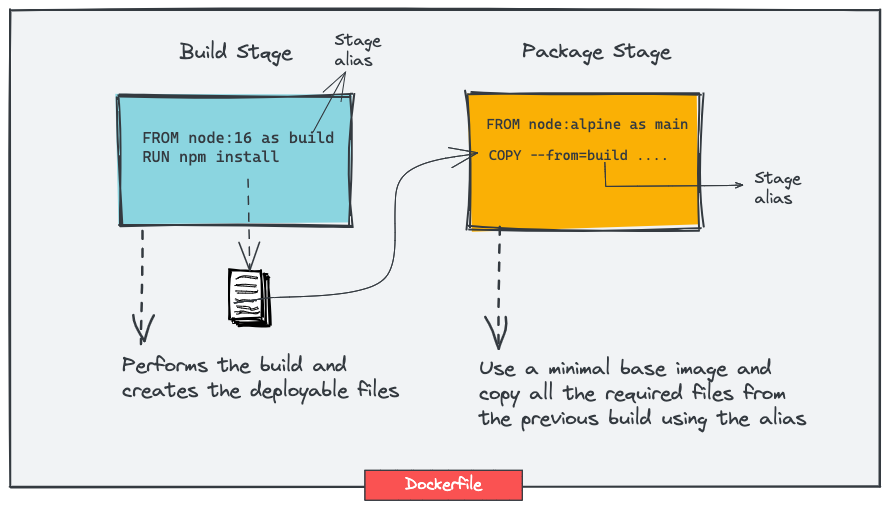
Also, in a single Dockerfile, you can have multiple stages with different base images. For example, you can have different stages for build, test, static analysis, and package with different base images.
Let's see what the new Dockerfile might look like. We are just copying over the necessary files from the base image to the main image.
Save the following as Dockerfile2.
FROM node:16 as build

WORKDIR /app
COPY package.json index.js env ./
RUN npm install

FROM node:alpine as main

COPY --from=build /app /
EXPOSE 8080
CMD ["index.js"]
Let's see the storage space that it requires by building it.
docker build -t devopscube/node-app:2.0 --no-cache -f Dockerfile2 .After the build is complete. Let's check its size using
docker image lsThis is what we get.
devopscube/node-app 2.0 fa6ae75da252 32 seconds ago 171MBSo the new reduced image size is 171MBs as compared to the image with all dependencies.
That's an optimization of over 80%!
However, if we would have used the same base image we used in the build stage, we wouldn't see much difference.
You can further reduce the image size using distroless images. Here is the same Dockerfile with a multistage build step that uses the Google nodeJS distroless image instead of alpine.
FROM node:16 as build

WORKDIR /app

COPY package.json index.js env ./

RUN npm install

FROM gcr.io/distroless/nodejs

COPY --from=build /app /

EXPOSE 3000

CMD ["index.js"]
If you build the above Dockerfile, your image will be 118MB,
devopscube/distroless-node 1.0 302990bc5e76 118MBMethod 3: Minimize the Number of Layers
Docker images work in the following way - each RUN, COPY, FROM Dockerfile instructions add a new layer & each layer adds to the build execution time & increases the storage requirements of the image.
Let's see this in action, with the help of a practical example: let's create a ubuntu image with updated & upgraded libraries, along with some necessary packages installed such as vim, net-tools, dnsutils.
A Dockerfile to achieve this would be as follows - Save this as Dockerfile3.
FROM ubuntu:latest

ENV DEBIAN_FRONTEND=noninteractive

RUN apt-get update -y

RUN apt-get upgrade -y

RUN apt-get install vim -y

RUN apt-get install net-tools -y

RUN apt-get install dnsutils -y
We wish to also look into the build time for this image.
The Docker daemon has an in-built capability to display the total execution time that a Dockerfile is taking.
To enable this feature, take the following steps -
- Create a
daemon.jsonfile with the following contents at/etc/docker/
{
  "experimental": true
}
2. Execute the following command to enable the feature.
export DOCKER_BUILDKIT=1Let's build it and see the storage & build time.
time docker build -t devopscube/optimize:3.0 --no-cache -f Dockerfile3 .It would display the execution times in the terminal.
time docker build -t devopscube/optimize:3.0 --no-cache -f Dockerfile3 .


[+] Building 117.1s (10/10) FINISHED
 => [internal] load build definition from Dockerfile
.
.
.
.
 => => writing image sha256:9601bcac010062c656dacacbc7c554b8ba552c7174f32fdcbd24ff9c7482a805      0.0s
 => => naming to docker.io/devopscube/optimize:3.0                                                0.0s

real    1m57.219s
user	0m1.062s
sys	0m0.911s
After the build is complete - the execution time comes to be 117.1 seconds.
Let's check its size using
docker image lsThis is what we get.
devopscube/optimize 3.0 9601bcac0100 About a minute ago 227MB
So the size is 227MBs.
Let's combine the RUN commands into a single layer & save it as Dockerfile4.
FROM ubuntu:latest

ENV DEBIAN_FRONTEND=noninteractive

RUN apt-get update -y && \
    apt-get upgrade -y && \
    apt-get install --no-install-recommends vim net-tools dnsutils -y
In the above RUN command, we have used --no-install-recommends flag to disable recommended packages. It is recommended whenever you use install in your Dockerfiles
Let's see the storage & build time required by building it.
time docker build -t devopscube/optimize:4.0 --no-cache -f Dockerfile4 .It would display the execution times in the terminal.
time docker build -t devopscube/optimize:0.4 --no-cache -f Dockerfile4 .


[+] Building 91.7s (6/6) FINISHED
 => [internal] load build definition from Dockerfile2                                             0.4s
.
.
.
 => => naming to docker.io/devopscube/optimize:4.0                                                0.0s

real    1m31.874s
user	0m0.884s
sys	0m0.679s
After the build is complete - the execution time comes to be 91.7 seconds.
Let's check its size using
docker image lsThis is what we get.
devopscube/optimize 4.0 37d746b976e3 42 seconds ago 216MBSo the size is 216MBs.
Using this optimization technique, the execution time was reduced from 117.1s to 91.7s & the storage size was reduced from 227MBs to 216MBs.
Method 4: Understanding Caching
Often, the same image has to be rebuilt again & again with slight modifications in code.
As Docker uses layered filesystem, each instruction creates a layer. Due to which, Docker caches the layer and can reuse it if it hasn't changed.
Due to this concept, it's recommended to add the lines which are used for installing dependencies & packages earlier inside the Dockerfile - before the COPY commands.
The reason behind this is that docker would be able to cache the image with the required dependencies, and this cache can then be used in the following builds when the code gets modified.
Also, COPY and ADD instructions in a Dockerfile invalidate the cache for subsequent layers. Which means, Docker will rebuild all the layers after COPY and ADD.
This means, it is recomended to add instructions that are less likely to change earlier in the Dockerfile.
For example, let's take a look at the following two Dockerfiles.
Dockerfile 5 (Good Example)
FROM ubuntu:latest

ENV DEBIAN_FRONTEND=noninteractive

RUN apt-get update -y && \
    apt-get upgrade -y && \
    apt-get install -y vim net-tools dnsutils

COPY . .
Dockerfile 6 (Less Optimal Example)
FROM ubuntu:latest

ENV DEBIAN_FRONTEND=noninteractive

COPY . .

RUN apt-get update -y && \
    apt-get upgrade -y && \
    apt-get install -y vim net-tools dnsutils
Docker would be able to use the cache functionality better with Dockerfile5 than Dockerfile6 due to the better placement of the COPY command.
Method 5: Use Dockerignore
As a rule, only the necessary files need to be copied over the docker image.
Docker can ignore the files present in the working directory if configured in the .dockerignore file.
It also improves caching by ignoring unnecessary files and prevents unnecessary cache invalidation.
This feature should be kept in mind while optimizing the docker image.
Method 6: Keep Application Data Elsewhere
Storing application data in the image will unnecessarily increase the size of the images.
It's highly recommended to use the volume feature of the container runtimes to keep the image separate from the data.
If you are using Kubernetes, ensure
Docker Image Optimization Tools
Following are some of the open-source tools that will help you optimize the Docker images. You can choose a tool and make it part of your Docker Image Pipeline to ensure only optimized images get created for application deployments.
- Dive: It is an image explorer tool that helps you discover layers in the Docker & OCI containers images. Using Dive, you can find ways to optimize your Docker images. Check out the Dive Github repo for more details.
- SlimtoolKit: It helps you optimize your Docker images for security and size. Check out the Docker Slim Github repo for more details. You can reduce the docker image size up to 30x using Slim.
- Docker Squash: This utility helps you to reduce the image size by squashing image layers. The squash feature is also available in the Docker CLI using squash flag.
I will keep adding tools to this list.
Summary
The above methods should help you build optimized Docker images and write better Dockerfiles.
Also, If you follow all the standard container best practices, you can reduce the docker image size to have lightweight image deployments.
Also, from a DevSecOps perspective, you can use open-source vulnerability scanning tools like Trivy to scan Docker images
If you are getting started with your Docker journey, you can check out my article on 3 methods to run docker in docker.
If you are learning container orchestration using Kubernetes, check out comprehensive Kubernetes tutorials for beginners.