

MAC silicon M1/M2 chips use ARM architecture which is different from x86 used by Intel processors.
The only solution to run virtual machines on mac silicon is using VMware fusion and Vagrant. I have tried Virtualbox and it doesnt work well and you dont find good ARM based vagrant boxes that has support for Virtual box.
Virtual box + Vagrant works great on my MAC intel based system. But for my MAC silicon, I use VMware Fusion + vagrant and it works great.
In this blog I will walk you through step by step process of setting up VMware fusion and vagrant to create VMs.
Prerequisites
Following are the prerequisites for this setup.
- macOS (M1/M2) with admin access.
- Homebrew
Setting Up VMware Fusion
Since Broadcom acquired Vmware, we have to download it form the Broadcom website.
VMware Fusion pro can be used for free with the personal free licence. Follow the steps given below to setup VMware Fusion.
Step 1: Register for the Broadcom Account. You need this account to download softwares from the Broadcom website.
Step 2: Download and install VMware Fusion Pro Personal
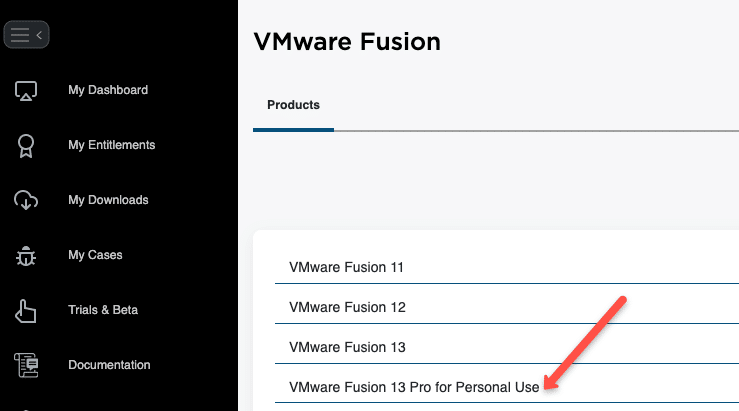
Follow the installation wizard. All are self explanatory steps.
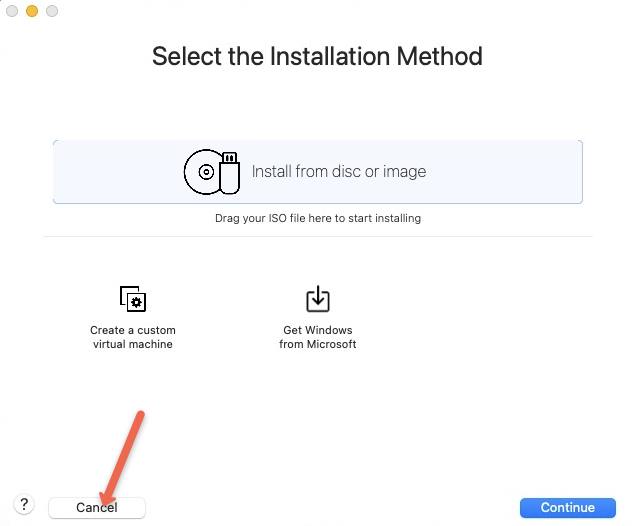
You can cancel the final installation method as we will be managing the VMs using Vagrant
Setting Up Vagrant & Related Utiltities
Vagrant is a open source wrapper utiltiy that interacts with VMWare Fusion to create and manager virtual machines.
Follows the steps to install vagrant and VMWare related vagrant utilties.
Step 1: Install vagrant from the Downloads page
If you have homebrew, you can install it using the following commands.
brew tap hashicorp/tap
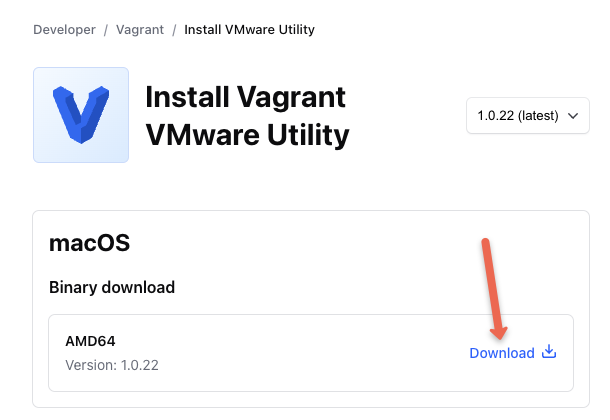
brew install hashicorp/tap/hashicorp-vagrantStep 2: Install Vagrant VMware Utility
Download and install the VMware Vagrant Utilty for MAC
Step 3: Install VMware Provide plugin using the vagrant command.
sudo vagrant plugin install vagrant-vmware-desktopStep 4: Restart Your System
Once all the above mentioned installations are done, restart your MAC.
If you dont restart your MAC, you will get the following error.
Vagrant failed to create a new VMware networking device. The following
error message was generated while attempting to create a new device:

  Failed to enable device

Please resolve any problems reported in the error message above and
try again.
Building a VM with Vagrant
To test the setup, you can clone the Kubernetes certification repo where we have the Vagrantfile to deploy three VMs.
git clone https://github.com/techiescamp/kubernetes-certification-guide.gitcd in the the mac silicon folder. It has a Vagrantfile with bento/ubuntu-22.04 vargantbox for arm architecture that deploys three VM's. You can modify the VM details in the settings.yaml file present in the folder.
cd lab-setup/mac-siliconNow, bring up the VMs using vagrant.
sudo vagrant upIt should bring up three VMs.
Using the VM
To login to specific VM, use the node name with ssh.
To get the node names, execute,
$ sudo vagrant status

Current machine states:

controlplane              running (vmware_fusion)
node01                    running (vmware_fusion)
node02                    running (vmware_fusion)
Use the machine names to ssh. For example,
sudo vagrant ssh controlplaneTop stop the VMs,
sudo vagrant haltTo bring up the VMs again, run
sudo vagrant upConclusion
Vagrant is a great utility for running VMs locally on MAC silicon.
You can setup multi node applications, kubeadm kubernetes clusters etc that closely replicates the production systems.
If you face any errors during the setup, drop a comment. We will look at it.