


Kubeflow project is a complete stack that comes with different tools for different use cases like Data engineering, ML model training, serving, monitoring and managing GenAI application lifecycle.
In this guide will focus on setting up Kubeflow Pipelines(KFP) standalone in a Kubernetes cluster.
At the end of this guide, you will learn the following.
- Setting up Kubeflow Pipelines
- Create and trigger a Kubeflow Pipelines run using Kubeflow SDK.
Let get started.
Setup Prerequisites
Below are the prerequisites for this guide.
- Kubernetes cluster with dynamic PV provisioner
- Kubectl
- Kustomize
Fork and Clone Repository
We have pushed every code file we are going to use in this guide into our GitHub repository.
Fork and clone our repository to get it.
git clone https://github.com/techiescamp/mlops-for-devops.git

cd mlops-for-devops
You will see the following folder structure of Kubeflow Pipelines.
.
├── phase-2-enterprise-setup
│   └── kubeflow-pipeline
│       └── components
│       │   ├── evaluate.py
│       │   ├── preprocess.py
│       │   └── train.py
│       ├── config.py
│       └── pipeline.py
└── platform-tools
    └── kubeflow-pipeline
        └──kustomization.yaml
In this,
phase-2-enterprise-setup/kubeflow-pipelinecontains the Python code (DAG) files.platform-tools/kubeflow-pipelinecontains the Kustomize patch file.
Steps to Set up Kubeflow Pipeline
To deploy Kubeflow Pipeline, we will be using Kustomize, so make sure you have Kustomize installed before starting this section.
Also, we will be removing the cache-deployer pod and using Cert Manager to create and manage TLS certificates for KFP. Because the cache-deployer requests the Kubernetes CSR API to generate TLS certificates.
But, in managed services like AWS EKS and Azure AKS, there are strict security rules to approve CSR requests only from Kubelet. Since EKS denies it, the Cache-deployer keeps crashing, and this causes the cache-server to crash.
To prevent this, you have to disable cache-deployer and use cert-manager to create and manage certificates.
Step 1: Install Cert Manager
Lets start with installing Cert Manager.
This is required to create and manage TLS certifications for Kubeflow Pipeline. Before installing Cert Manager, first check the latest version.
Then, use the following command to install Cert Manager with the latest version.
kubectl apply -f https://github.com/cert-manager/cert-manager/releases/download/v1.20.0/cert-manager.yamlThis will create a new namespace cert-manager and install all its resources.
Once the installation command is finished, run the following command to check if the Cert Manager pods are up and running.
$ kubectl get po -n cert-manager

NAME                                       READY   STATUS    RESTARTS   AGE
cert-manager-66487b786-dxf8k               1/1     Running   0          44s
cert-manager-cainjector-65fdc9b9d7-csnjh   1/1     Running   0          44s
cert-manager-webhook-7d96469bf8-ll9x5      1/1     Running   0          43s
Move to the next section once the pods start running.
Step 2: Deploy Kubeflow Pipelines CRD's
Now, installing the cluster resources.
kubectl apply -k "github.com/kubeflow/pipelines/manifests/kustomize/cluster-scoped-resources?ref=2.16.1"This will create cluster-scoped resources like CRDs, ServiceAccount, and RBACs for the Kubeflow Pipelines and also the kubeflow namespace.
Step 3: Create a Kustomize Patch File
To modify the default installation values, we need to create a Kustomize patch file. It is similar to creating a custom Helm Charts Values file.
We have created a Kustomize patch file and pushed it to our GitHub repository. It contains the custom values and URL of offical KFP manifest files.
From the root directory of the cloned repository, move into the platform-tools/kubeflow-pipeline folder.
cd platform-tools/kubeflow-pipelineThere, you can see the kustomization.yaml patch file.
In the patch file, we have added the following patches:
- Exposed Kubeflow Pipelines service as
NodePort 30088to connect it from local to trigger pipeline runs for testing. - Exposed Kubeflow Pipelines UI in
NodePort30080to access the UI. - Removed the
default-allow-same-namespaceandseaweedfsnetwork policies to access UI from the browser. - Modified the seaweedfs server volume permission so it can write its data.
- Removed cache-deployer and updated cache-server to get TLS certificates from cert-manager.
For more details, clone the official GitHub repo and check the Kustomize files.
git clone https://github.com/kubeflow/pipelines.gitYou can find the files inside pipelines/manifests/kustomize.
cd pipelines/manifests/kustomizeStep 4: Deploy Kubeflow Pipelines using Kustomize
kubectl patch storageclass gp2 -p '{"metadata": {"annotations":{"storageclass.kubernetes.io/is-default-class":"true"}}}'
Lets start deploying the Kubeflow Pipeline.
We will be using the official Kustomize to install the pipeline with some modifications in the initial step itself.
All the offical manifest URLs and custom values are present in the kustomization.yaml patch file.
Now, lets apply the kustomize patch file. Ensure you are executinf this from the platform-tools/kubeflow-pipeline folder.
kubectl apply -k .Then, run the following command to check if all the pods are running.
$ kubectl get po -n kubeflow

NAME                                             READY  STATUS   RESTARTS

cache-server-5cff6d84c8-g784t                    1/1    Running  0
metadata-envoy-deployment-6b867d6fd-pvqch        1/1    Running  0
metadata-grpc-deployment-7fc85ffd8f-qx7q4        1/1    Running  0
metadata-writer-6cdb9c7484-9qw4j                 1/1    Running  0
ml-pipeline-85b759494b-jb7gc                     1/1    Running  0
ml-pipeline-persistenceagent-fb57b55cf-77gkx     1/1    Running  0
ml-pipeline-scheduledworkflow-7fcb8d76f8-2vnbk   1/1    Running  0
ml-pipeline-ui-5fd7cb4cb6-8rdqj                  1/1    Running  0
ml-pipeline-viewer-crd-7d584d5978-jrcnh          1/1    Running  0
ml-pipeline-visualizationserver-77d9bbcc85-dj2wg 1/1    Running  0
mysql-5bb7cf8b95-pp547                           1/1    Running  0
seaweedfs-546d8465ff-kz8cj                       1/1    Running  0
workflow-controller-6b89c5dd44-frjlf 1/1 Running 0You can see all these pods are created for the Kubeflow Pipeline, let's access the UI in the next section.
Step 5: Access Kubeflow Pipelines UI
Since we have added a block in the patch file to expose the Kubeflow pipelines service as a nodeport, we can access it using the URL <node-ip>:30080.
To verify, use the following command.
$ kubectl get svc ml-pipeline-ui -n kubeflow

NAME             TYPE       CLUSTER-IP       EXTERNAL-IP   PORT(S)        AGE
ml-pipeline-ui   NodePort   10.100.119.114   <none>        80:30080/TCP   4h16m
Use the URL in the browser you will get the following dashboard.
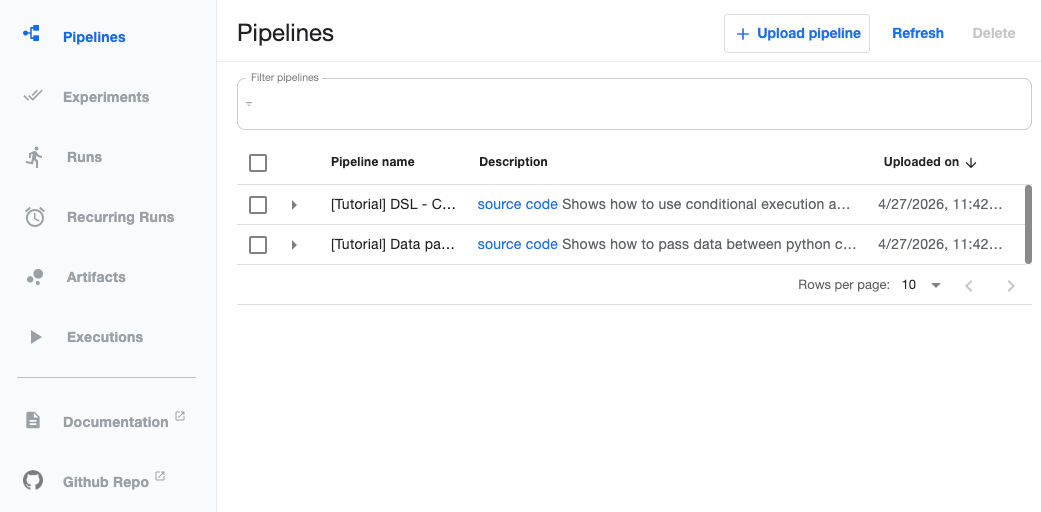
Now, we can access the UI, let's trigger a test pipeline to verify if everything is working.
Trigger Kubeflow Pipelines Run
In this section, we will create sample machine learning runs in the Kubeflow Pipelines to check if everything is working properly.
The pipeline codes are inside the phase-2-enterprise-setup/kubeflow-pipeline directory of the cloned repository.
Assuming you are inside the platform-tools/kubeflow-pipeline directory.
Run the following command to move into the phase-2-enterprise-setup/kubeflow-pipeline directory.
cd ../../phase-2-enterprise-setup/kubeflow-pipelineThere, you can see the following structure.
.
│
├── components
│   ├── __init__.py
│   ├── evaluate.py
│   ├── preprocess.py
│   └── train.py
├── config.py
└── pipeline.py
In this,
The components folder contains the files that have codes for each pipeline step.
The pipeline.py is the main pipeline file, which calls all the component files and runs them in the Kubeflow pipeline using Kubeflow Pipelines SDK.
config.py contains variables like base image, Kubeflow pipelines endpoints.
KFP_ENDPOINT and KFP_UI_ENDPOINT before moving forward.Now, create an isolated environment to install the KFP SDK package to connect with Kubeflow Pipeline.
python3 -m venv env

source env/bin/activate
Then, run the following pip command to install the Kubeflow Pipelines SDK.
pip install kfpNow, open the config.py file and update your Kubeflows IP in KFP_ENDPOINT.
Then, run the following command to trigger the pipeline.
python pipeline.pyYou will get output similar to the following when triggering the pipeline.
Experiment details: https://35.167.234.106:30088/#/experiments/details/11234f25-799e-46d9-bbcc-d26d2538a8a4
Run details: https://35.167.234.106:30088/#/runs/details/78807a6b-ce72-4840-a5d1-4a182b376df8
Run: 78807a6b-ce72-4840-a5d1-4a182b376df8
URL: https://35.167.234.106:30088/#/runs/details/78807a6b-ce72-4840-a5d1-4a182b376df8
Check the UI, under Runs, you can see a new pipeline is triggered.
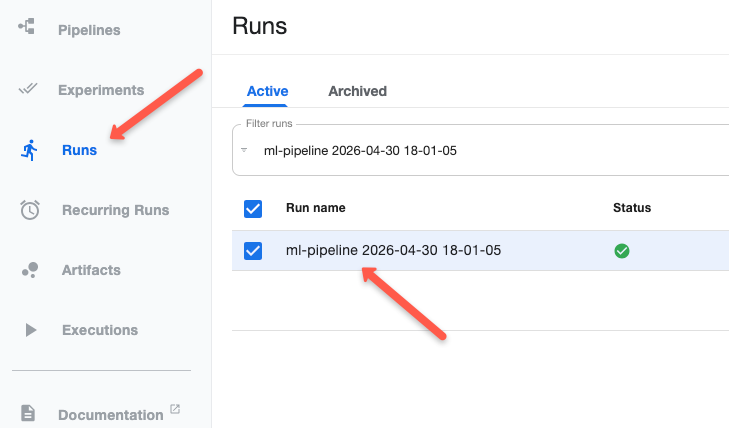
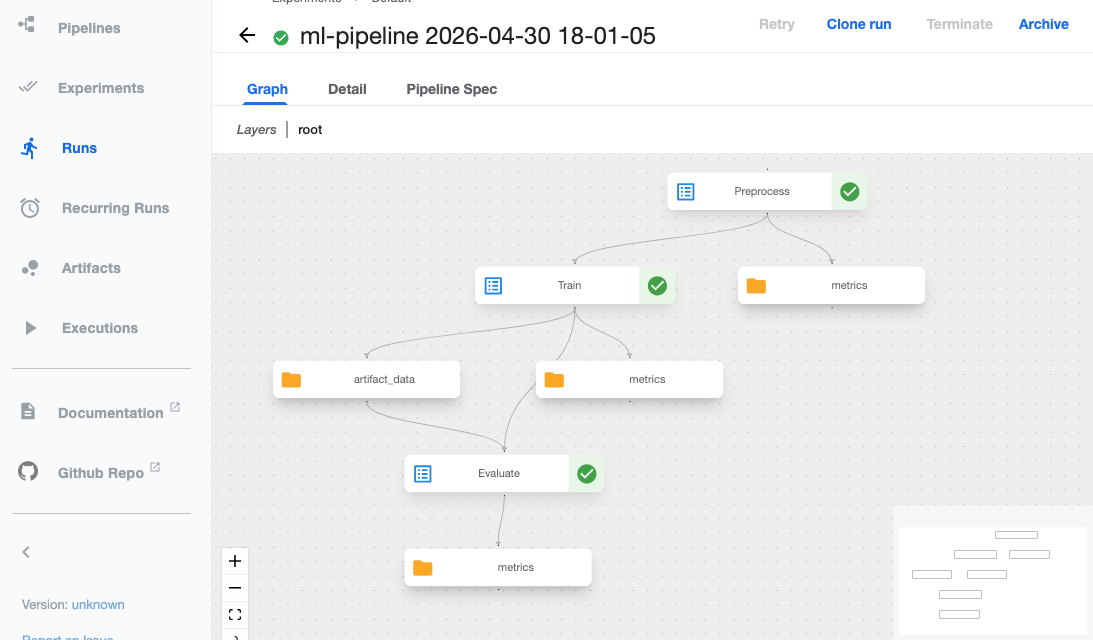
Select it, and you will see the steps in a graph and how each is connected.
Clean Up
If you no longer need the step, run the following command from the same directory as the Kusztmize patch file to delete the resources created by it.
kubectl delete -k .And use the following command to delete CRDs installed.
kubectl delete -k "github.com/kubeflow/pipelines/manifests/kustomize/cluster-scoped-resources?ref=2.16.1"Then, delete the cert-manager you deployed.
kubectl apply -f https://github.com/cert-manager/cert-manager/releases/download/v1.20.0/cert-manager.yamlWays to Trigger Kubeflow Pipelines Runs
The following are the ways you can trigger a Kubeflow Pipeline run.
- KFP SDK - This is the method we did in the example using the KFP Python SDK and Python code.
- CI/CD - In production, runs are triggered by CI/CD tools, not by manual trigger.
- UI - You can also trigger runs from the KFP UI. But only compiled IR YAML is supported.
- Scheduled/Recurring Run - KFP supports scheduled runs in two types, they can be in a cron job or an interval based run.
Kubeflow Log Persistence
KFP does not have a default log persistence option, logs will get deleted once the run pods are deleted.
To prevent this, you can configure external log aggregation tools like Loki, Elasticsearch, or AWS CloudWatch to save the logs.
You can also configure KFP to save the log files in object storage like Amazon S3 or use SeaweedFS server, which comes as the default object storage of KFP.
Monitoring & Observability
KFP has its own UI to view the run details and status of each run.
And use Prometheus to monitor core pods like ml-pipeline, mysql database, SeaweedFS server, etc. If core pods are down, other pods start crashing.
Also, write your pipeline in a way that exposes custom metrics.
Cost Optimization
For cost optimization, use spot nodes for your cluster and schedule the runner pods on them.
Once the task runs are completed, even if the pods are deleted, it's not a problem.
Set CPU and memory limits for each task based on their needs to prevent overuse of resources.
Troubleshooting Kubeflow Pipelines
Below is one of the common issues you may face in Kubeflow Pipeline.
Seaweedfs Permission Issue
The Seaweedfs container runs as a non-root user, which may cause the following write permission issue.
please verify /data is writable, see https://github.com/seaweedfs/seaweedfs/issues/717: mkdir /data/m9333: permission deniedTo solve this issue, we have added the following block in the patch file.
- target:
    kind: Deployment
    name: seaweedfs
  patch: |
    - op: add
      path: /spec/template/spec/securityContext
      value:
        fsGroup: 1000
        runAsUser: 1000
        runAsGroup: 1000
This tells the container to run as user 1000(seaweed), which has permission to write in the /data location.
Conclusion
In summary, we have seen how to deploy KPF in managed services like EKS and the configuration changes needed for it.
And finally, we also looked into the common issues you may face in KFP.
Share your feedbacks in the comments.