

In this blog, we are going to set up and configure the Prometheus Operator.
The Prometheus is not a native object of the Kubernetes, but we can make it a Kubernetes native object using the Prometheus operators.
What is Prometheus Operator
Prometheus Operator is a Kubernetes Custom Controller that can communicate with the Kubernetes API Server and allow Prometheus to do the operations.
We will install Prometheus on our Kubernetes cluster but the main moto of installing the Prometheus Operator is to reduce the complexity of the configuration.
In normal Prometheus deployment, configMap is an important object where we inform the targets and rules information to the Prometheus.
Instead of that, the Prometheus Operator has dedicated objects for that. For example, prometheusRuler for rules, podMonitor object for monitoring the Pods, scrapeConfig object for static targets and more.
In a normal Prometheus stack, if you want to make any modifications that will disturb the present configuration, but in the Prometheus Operator, we can make the configuration changes whenever we want, and also, the current state won't be disturbed.
If you set up the Prometheus operators, you won't feel that the Prometheus is an external object, and it will simplify the overall integration and configuration process.
If you want to install Prometheus on your Kubernetes cluster without the Operator, here is the blog.
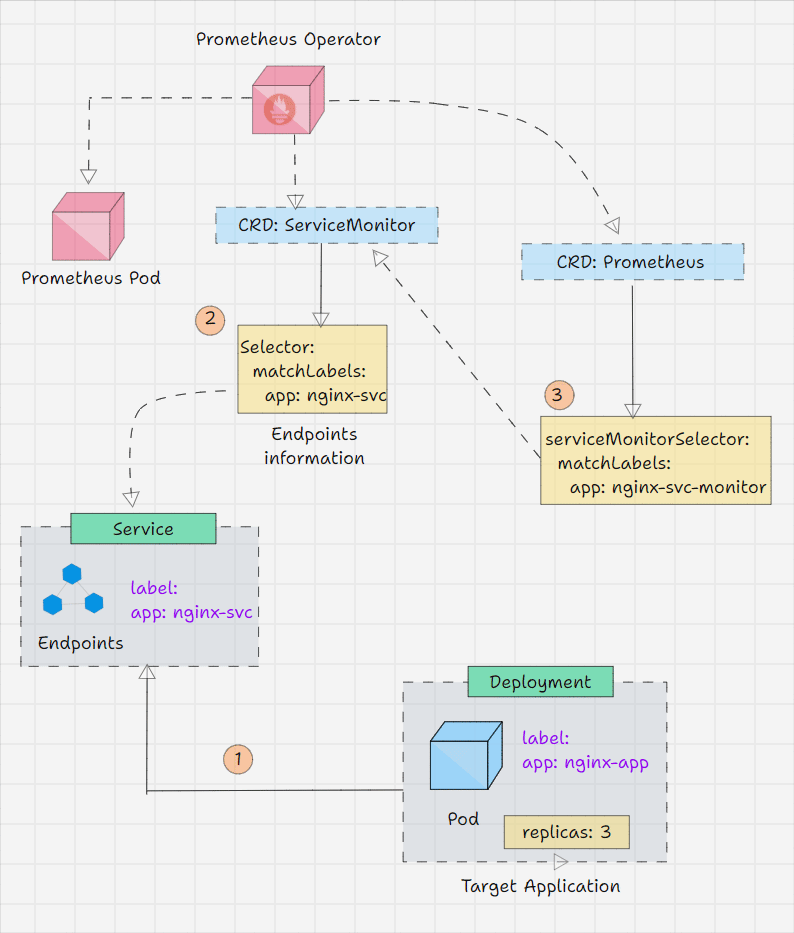
Prometheus Operator Workflow
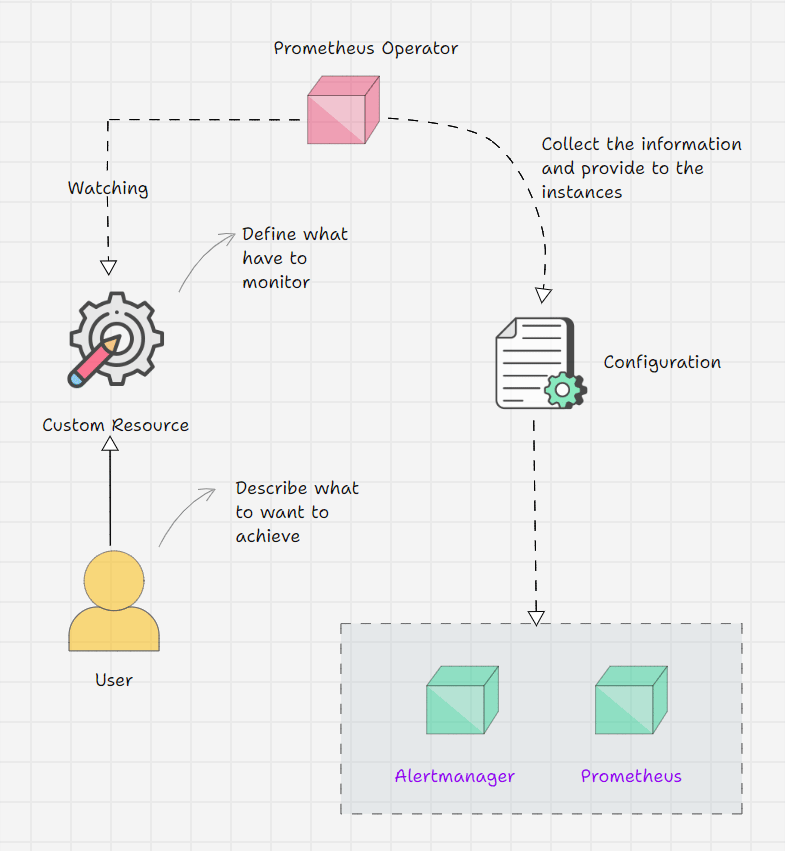
- Prometheus Operator keeps watching its Custom Resource Definitions.
- We inform the Operator via Custom Resource what outcome we are expecting.
- For example, I am telling on a Custom Resource that I have a service, and the service's endpoint should be monitored.
- The operator will get this information from the CRD and will do the required changes.
- But the Operator has all the logic in it, which means that the operator will identify the Service with the labels that we provide and collect the endpoint information then make a structure and place it on the Prometheus instance.
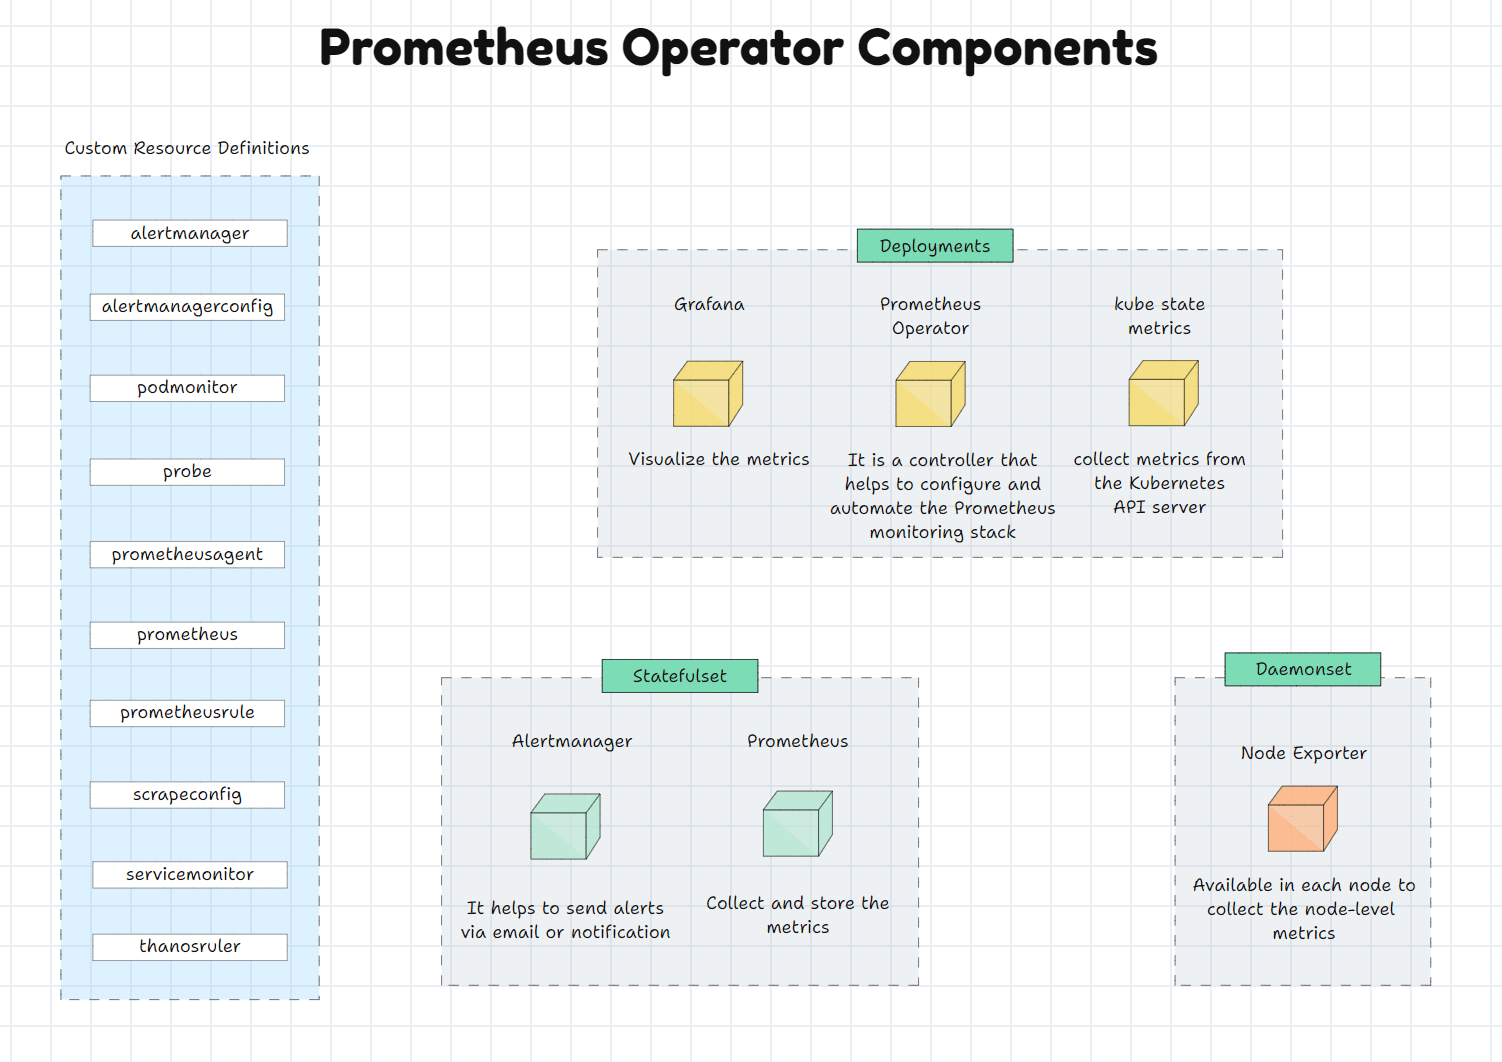
What are the Prometheus Supported Custom Resource Definitions
Prometheus
Prometheus Custom Resource Definition (CRD) is used to create the Prometheus Custom Resource, or we can simply say the Prometheus deployment on the Kubernetes cluster also offers the replication and storage related configuration.
Alertmanager
Alertmanager CRD is used to create an Alertmanager deployment on the cluster.
ThanosRuler
ThanosRuler CRD manages and validates the Prometheus Recording Rules and the Alerting Rules.
ServiceMonitor
ServiceMonitor CRD helps add the Kubernetes services to the Prometheus Custom Resources.
PodMonitor
PodMonitor CRD is used to add the Pods on the Prometheus Custom Resource.
Probe
Probe CRD is used to add the static targets on the Prometheus Custom Resource.
PrometheusRule
Add alerting rules and recording rules on the Prometheus.
AlertmanagerConfig
Alertmanager-related configuration such as inhibition, routing, silencing, etc.
Prometheus Operator Setup - Helm
The Helm chart will deploy all the Prometheus Operator components, such as Custom Resource Definitions and Deployments.
Prerequisites
- Kubernetes cluster v1.31 or higher.
- kubectl v1.31 or higher should be available on the local system.
- Helm v3.16 or higher should be available on the local system.
Note: If you are using an EKS cluster, suitable VPC-CNI should be available in the cluster.
To install the VPC-CNI, use this official documentation.
Add the Prometheus community Helm chart.
helm repo add prometheus-community https://prometheus-community.github.io/helm-chartsUpdate the Helm repository
helm repo updateBefore the installation of the operator, we need to get the values file of the helm chart so that we can make configuration changes if we want.
To get the values file, use the following command.
helm show values prometheus-community/kube-prometheus-stack > values.yamlNow, we can install the Prometheus Operator using the Helm
helm install prometheus prometheus-community/kube-prometheus-stack -n prometheus-operator --create-namespaceIt will take a few minutes to complete the setup; once it is completed, we can check the Pods.
kubectl get pods -n prometheus-operator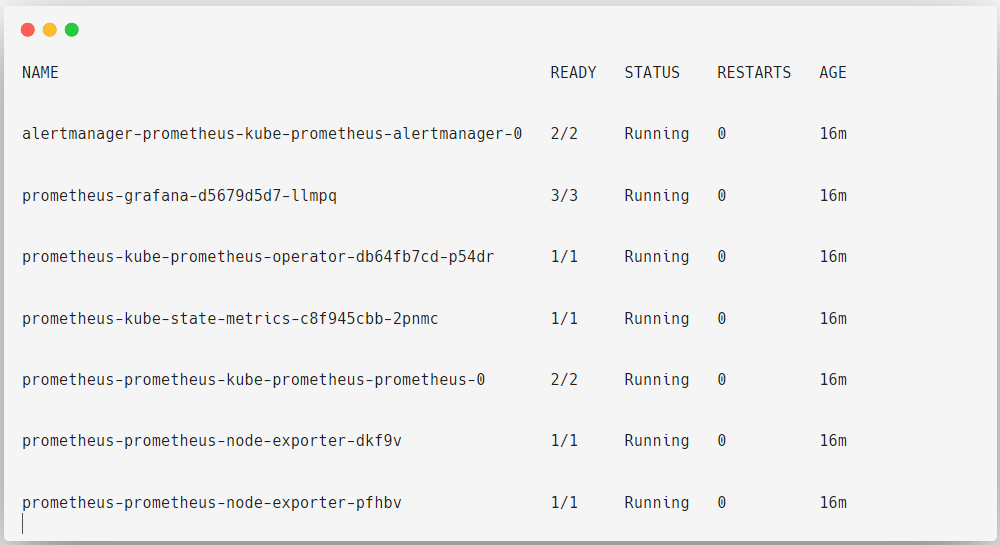
In this, Grafana, Prometheus Operator and Kube State Metrics are deployed as Deployment Objects.
kubectl get deployments -n prometheus-operator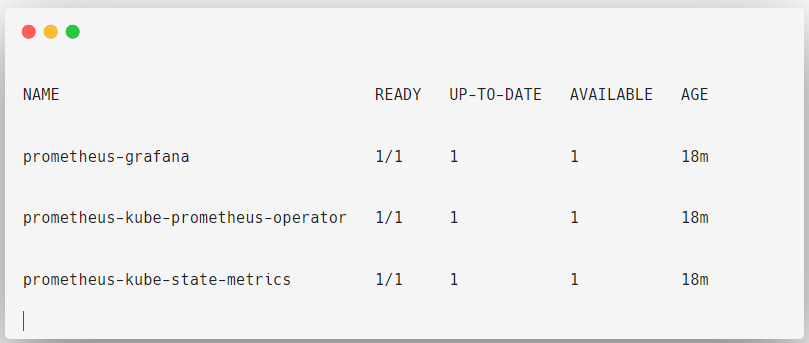
Grafana: Visualize the metrics
Prometheus Operator: It is a controller to manage and configure the Prometheus stack
Kube state metrics: Collect the Kubernetes API Server metrics
Alertmanager and Prometheus are deployed as StatefulSets.
kubectl get statefulsets -n prometheus-operator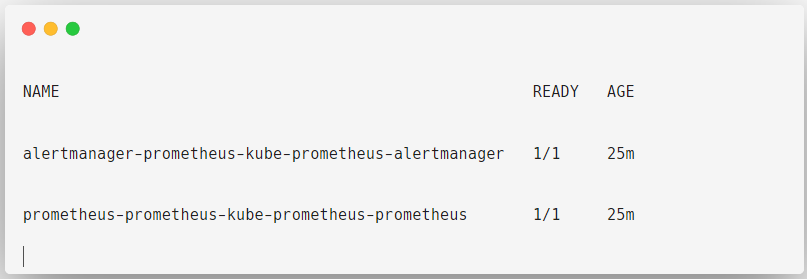
Alertmanager: Sending alerts via email or notifications
Prometheus: Collect metrics
Prometheus and Alertmanager are deployed as StatefulSet objects because Prometheus has the Time Series Database that stores the metrics, and both these Objects have configurations, so it does need persistent volumes.Because of the persistent volume, the data will persist even if the Pod is removed or rescheduled.
The Node Exporter is deployed as a Daemonset because this object ensures that the Node Exporter is available on each node to collect the metrics.
kubectl get daemonsets -n prometheus-operator
Now, let's view their intended Services.
kubectl get svc -n prometheus-operator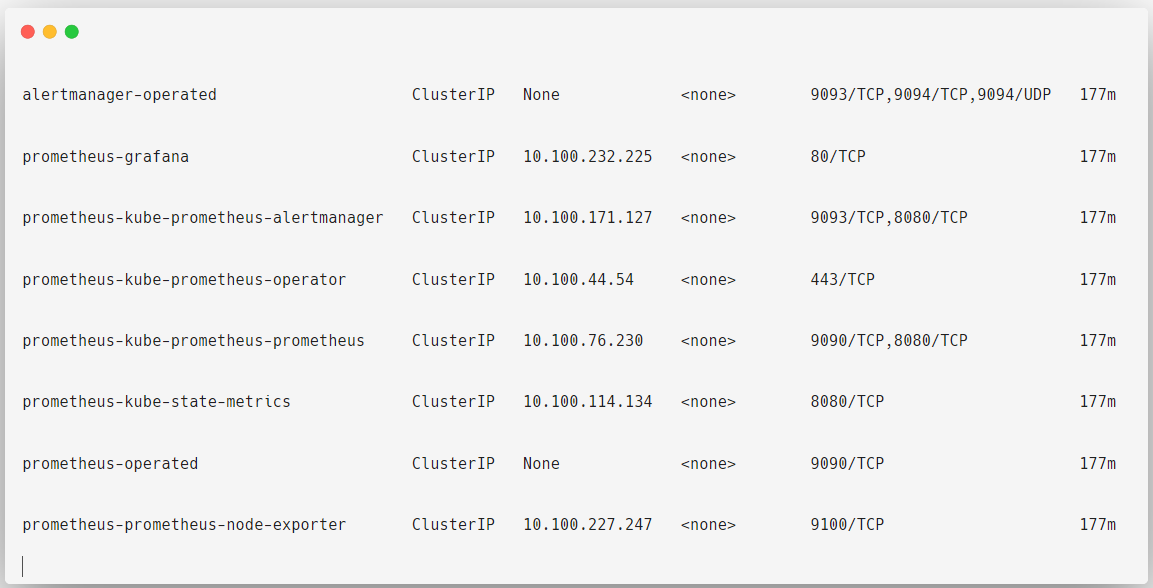
Deploying the Prometheus Operator will create custom resources to monitor the default Kubernetes resources, such as nodes, API server, kube-proxy, kubelet, etc.
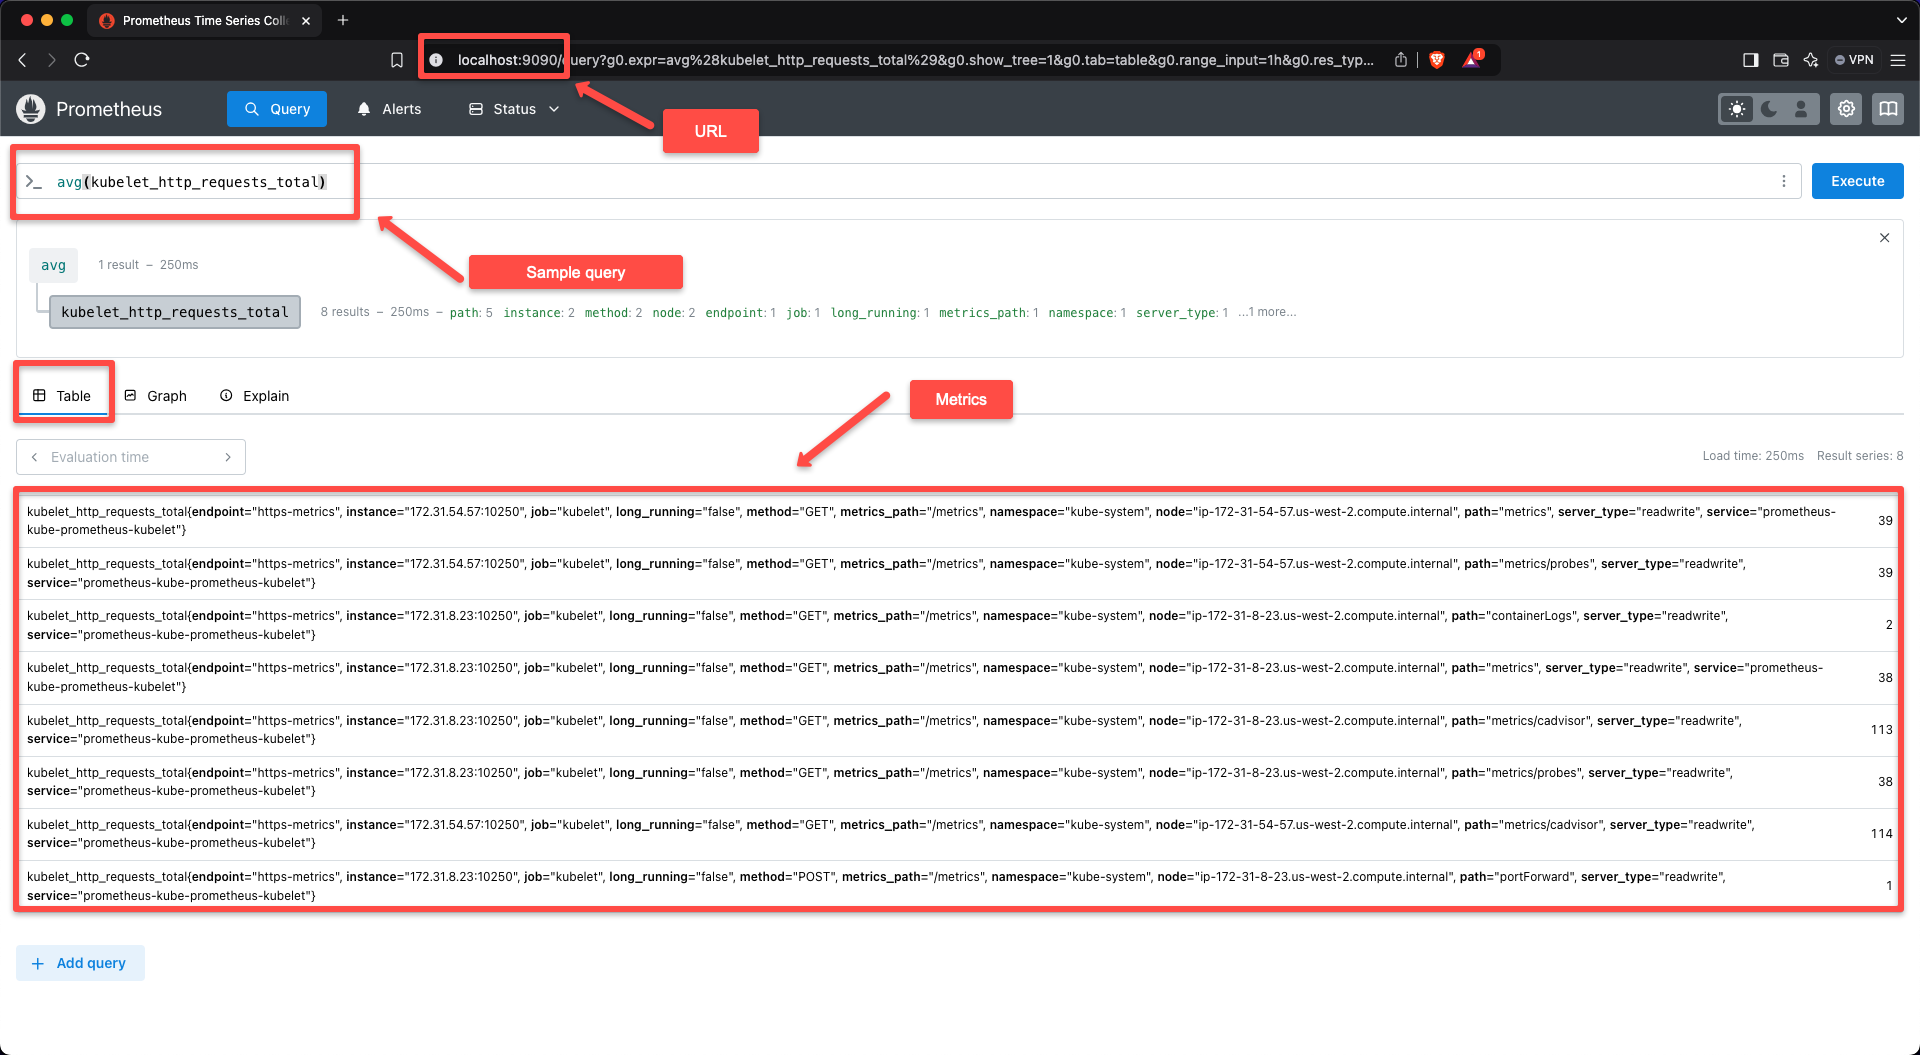
We need to perform the port forwarding to see the web UI of Prometheus, Alertmanager, or Grafana.
For that, we need the service name prometheus-kube-prometheus-prometheus and the related port number 9090.
To view the Dashboard of the Prometheus, use the following command.
kubectl port-forward -n prometheus-operator svc/prometheus-kube-prometheus-prometheus 9090:9090Now, open any of the web browsers from your local machine and paste the URL localhost:9090.
In the target section of the dashboard, we can see some of the targets are pre-configured.
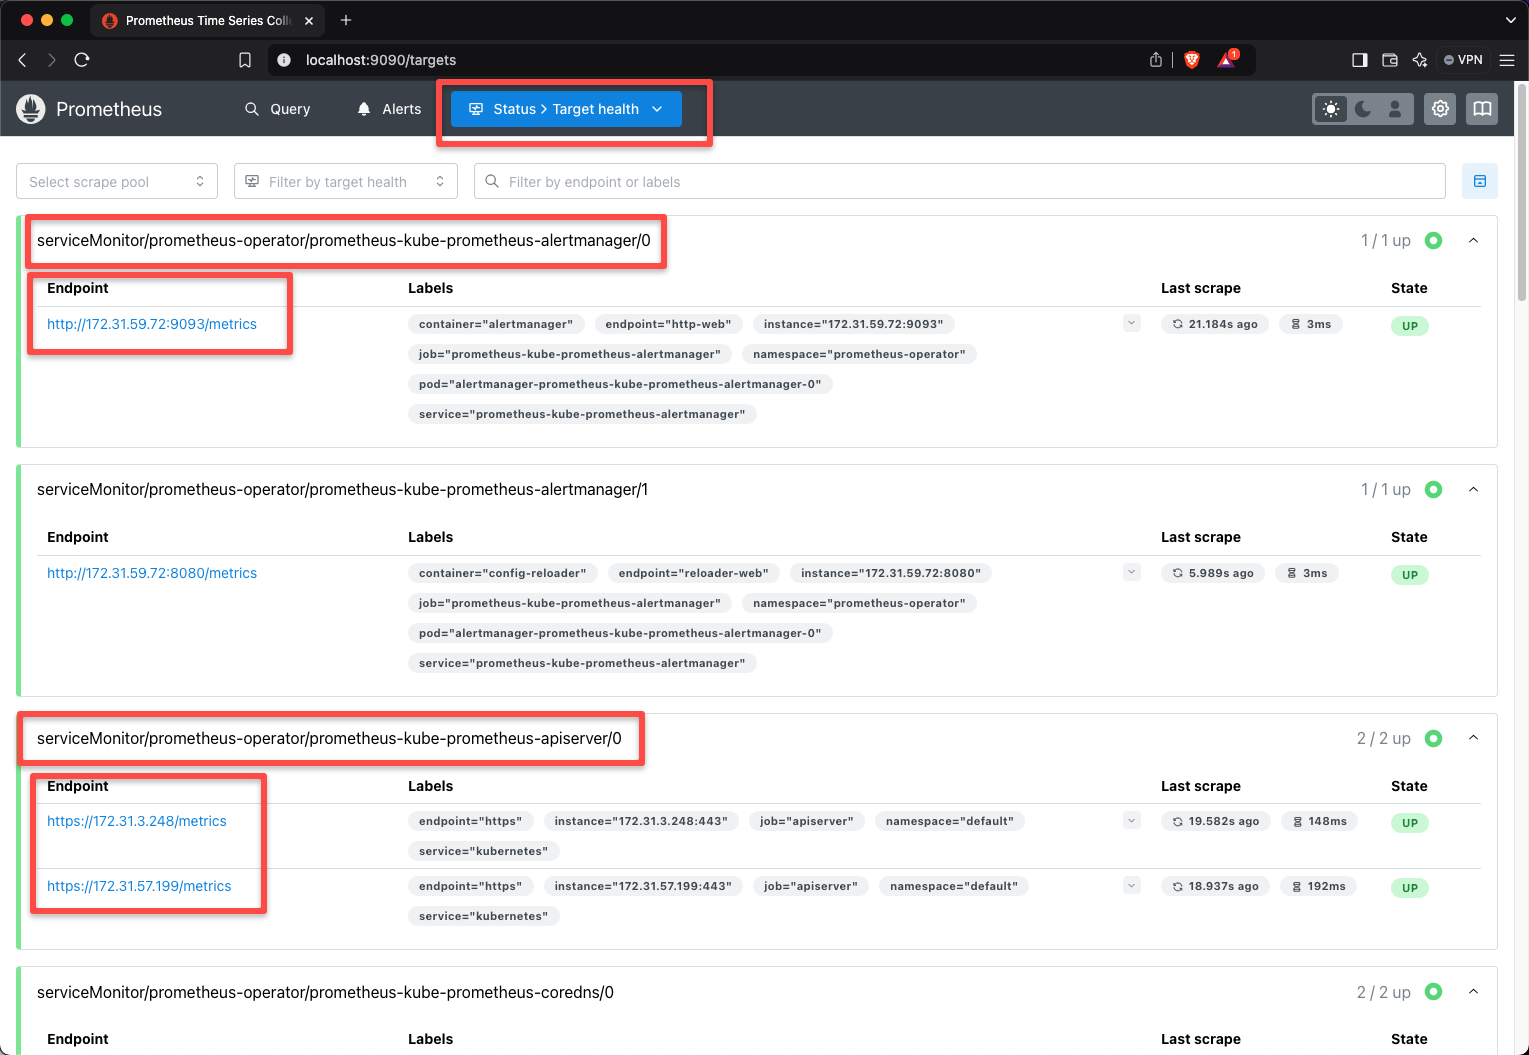
These Custom Resources are created by using the ServiceMonitor Custom Resource Definition.
kubectl get servicemonitors -n prometheus-operator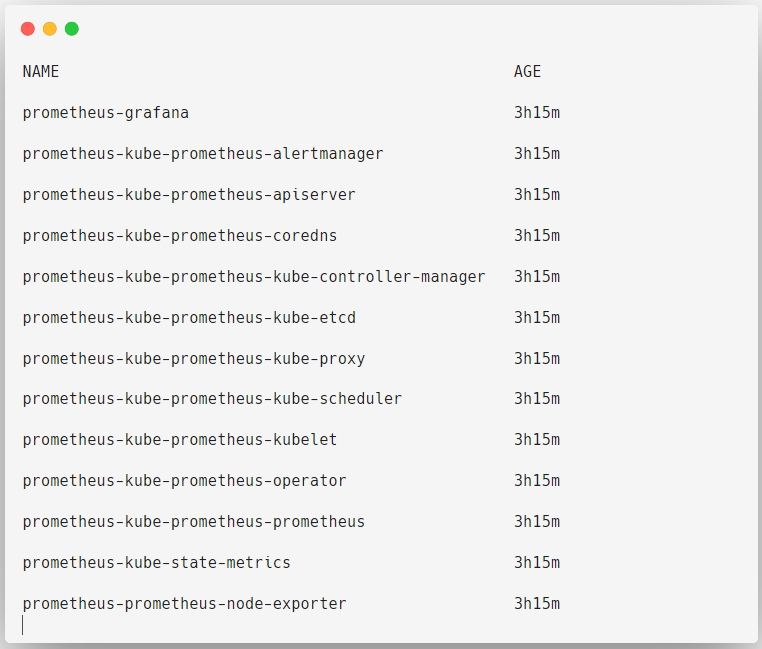
To see the dashboard of the Alertmanager, use the following command.
kubectl port-forward --namespace prometheus-operator svc/prometheus-kube-prometheus-alertmanager 9093:9093Let's try to access the dashboard from our local system localhost:9093.
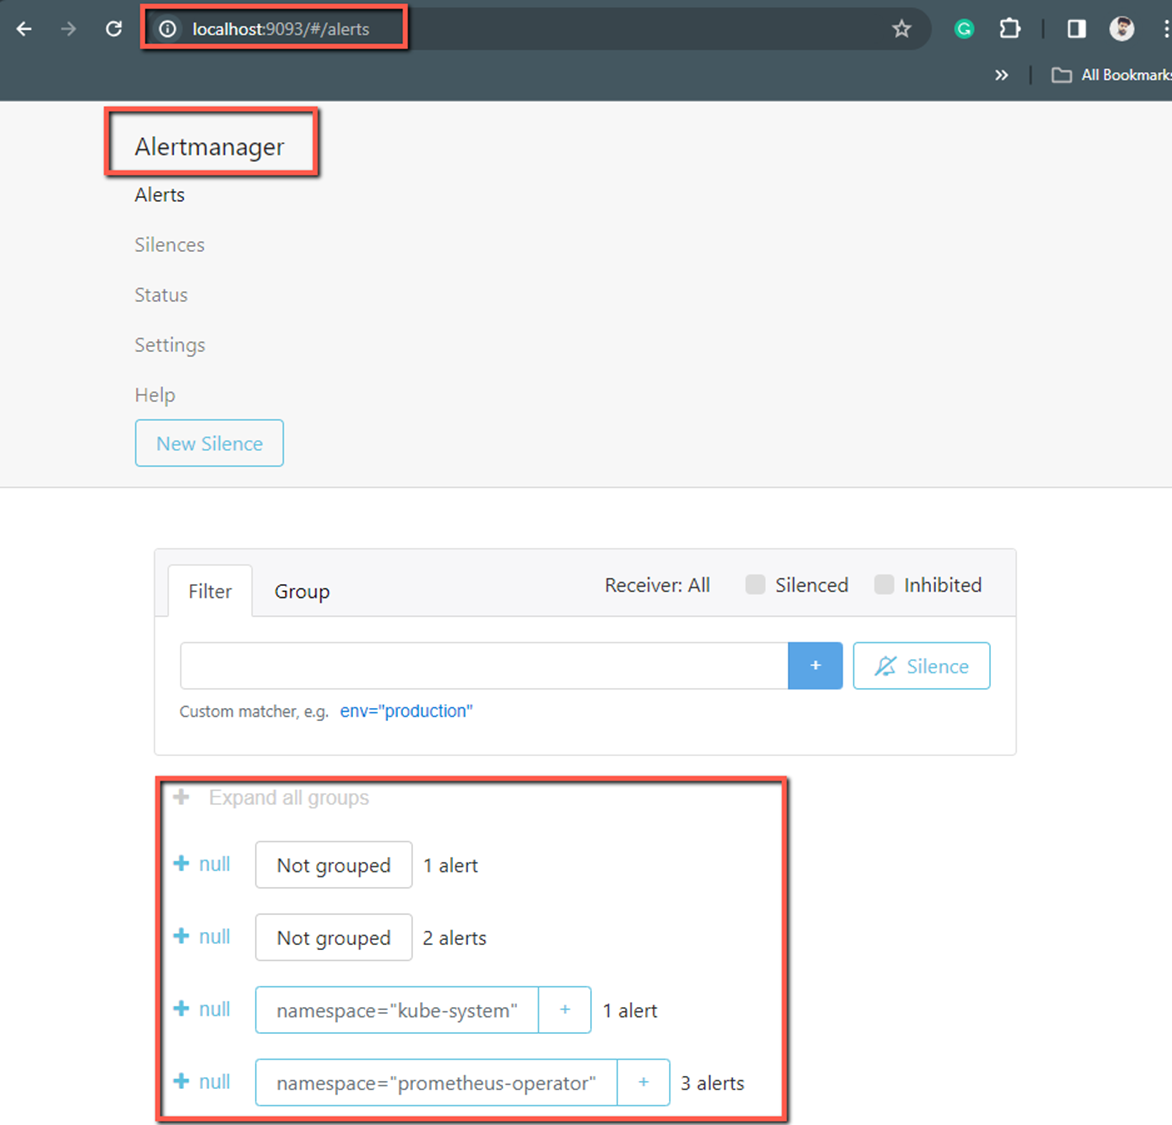
Most of the configurations are already defined and if you want modifications you can do it, also in this setup, by default, you can't access the dashboards of the services such as Prometheus, Alertmanager, Grafana, etc.
So, if you want to access the internet, you need to create a new Service object for them with the type NodePort or Loadbalancer.
To view the list of all the Custom Resource Definitions related to the Prometheus Operator.
kubectl get crds -n prometheus-operator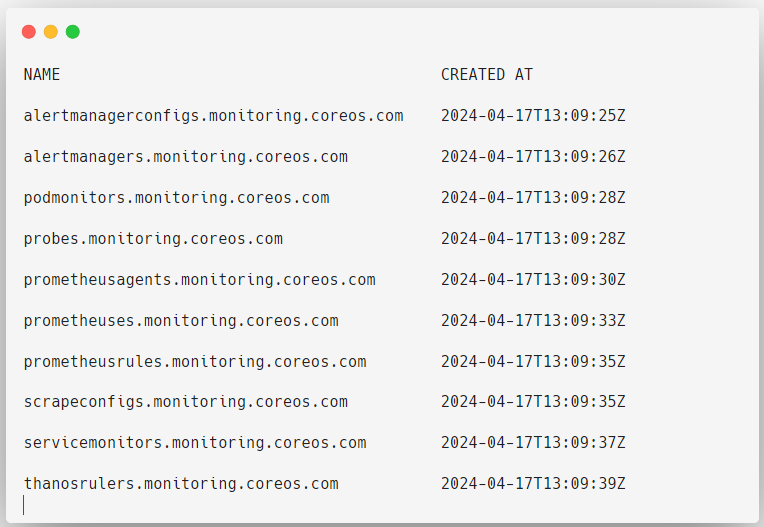
With these custom resource definitions, you can create as many custom resources as you want.
How to Install Prometheus Operator - YAML Manifest
In this method, you can customize the Prometheus Operator installation. For example, if you only want Prometheus but don't need Alertmanager or Grafana, you can easily do that with this setup.
Download the bundle.yaml file from the Prometheus Operator GitHub repository to define the Prometheus Custom Resource Definitions and the Prometheus Operator.
wget https://github.com/prometheus-operator/prometheus-operator/releases/download/v0.79.2/bundle.yamlUse the following command to deploy the Custom Resource Definitions (CRDs) to the cluster.
kubectl create -f bundle.yamlThese resources will be deployed in the default namespace, and currently, only the Prometheus Operator and the CRDs are deployed.
kubectl get deployments -n defaultTo view and filter the Prometheus Operator Custom Resource Definitions.
kubectl get crds | grep "monitoring.coreos.com"Test the Prometheus Operator with an Application
To test the workflow of the Prometheus Operator, we need a target application.
We are using an application for testing purposes, and you have to ensure that the application should be instrumented with the Prometheus Client Libraries.
For testing purposes, I will deploy this application with three replicas and create a service for this deployment.
Then, I will use the ServiceMonitor Custom Resource to collect the metrics from the service endpoints, basically the deployment's three replica pods.
First, we need to create a Deployment manifest for the application instrumented-app-deploy.yaml
apiVersion: apps/v1
kind: Deployment
metadata:
  name: example-app
spec:
  replicas: 3
  selector:
    matchLabels:
      app: example-app
  template:
    metadata:
      labels:
        app: example-app
    spec:
      containers:
      - name: example-app
        image: fabxc/instrumented_app
        ports:
        - name: web
          containerPort: 8080
This application will expose the metrics at Port 8080, and I am providing three replicas for this application.
To deploy this application, use the following command.
kubectl apply -f instrumented-app-deploy.yamlCheck the Deployment and Pods to ensure the deployment is properly done.
Now, I am creating a service file for this application instrumented-app-svc.yaml
apiVersion: v1
kind: Service
metadata:
  name: example-app
  labels:
    app: example-app
spec:
  selector:
    app: example-app
  ports:
  - name: web
    port: 8080
To deploy this application service, use the following command.
kubectl apply -f instrumented-app-svc.yamlWe need to ensure this application service is running properly.
kubectl get svcCreate Service Monitor Custom Resource
ServiceMonitor Custom Resource is used to collect the metrics from the service endpoints.
Labels play an important role in these configurations, so provide your labels simple and meaningful.
I am going to use the labels of the Service as the Selector of the ServiceMonitor object.
Now, we have to create the ServiceMonitor Custom Resource file service-monitor-cr.yaml
apiVersion: monitoring.coreos.com/v1
kind: ServiceMonitor
metadata:
  name: example-app
  labels:
    team: frontend
spec:
  selector:
    matchLabels:
      app: example-app
  endpoints:
  - port: web
Here, you can see, under the spec section, I have provided the label of the application service app: example-app. This is how ServiceMonitor identifies the service object and its endpoints.
To apply this configuration, use the following command.
kubectl apply -f service-monitor-cr.yamlTo list the ServiceMonitor object.
kubectl get servicesmonitorCreate a Service Account
If you are performing RBAC authorization on your cluster, then first you need to set up the ClusterRole and ClusterRoleBinding with a ServiceAccount.
Create a service account file service-account.yaml
apiVersion: v1
kind: ServiceAccount
metadata:
  name: prometheus-operator-svc-ac
To apply this configuration, use the following command.
kubectl apply -f service-account.yamlTo list the service accounts in the current namespace.
kubectl get serviceaccountCreate ClusterRole
Create a ClusterRole file clusterrole.yaml and provide the necessary permission for the cluster-scoped resources.
apiVersion: rbac.authorization.k8s.io/v1
kind: ClusterRole
metadata:
  name: prometheus
rules:
- apiGroups: [""]
  resources:
  - nodes
  - nodes/metrics
  - services
  - endpoints
  - pods
  verbs: ["get", "list", "watch"]
- apiGroups: [""]
  resources:
  - configmaps
  verbs: ["get"]
- apiGroups:
  - networking.k8s.io
  resources:
  - ingresses
  verbs: ["get", "list", "watch"]
- nonResourceURLs: ["/metrics"]
  verbs: ["get"]
To apply this configuration, use the following command.
kubectl apply -f clusterrole.yamlTo list the cluster roles in the current namespace.
kubectl get clusterrole prometheusCreate ClusterRoleBinding
Create a ClusterRoleBinding file clusterrolebinding.yaml and integrate the information about the ClusterRole and the ServiceAccount.
apiVersion: rbac.authorization.k8s.io/v1
kind: ClusterRoleBinding
metadata:
  name: prometheus
roleRef:
  apiGroup: rbac.authorization.k8s.io
  kind: ClusterRole
  name: prometheus
subjects:
- kind: ServiceAccount
  name: prometheus-operator-svc-ac
  namespace: default
To apply this configuration, use the following command.
kubectl apply -f clusterrolebinding.yamlTo view the details about the ClusterRoleBinding.
kubectl describe clusterrolebinding prometheusIf the configuration is properly done, you can able to see the ClusterRole, ServiceAccount, and Namespace names in the details of the ClusterRoleBinding.
Create a Prometheus Custom Resource
Now, we need to create the Prometheus Custom Resources and also add the information about the ServiceAccount and the ServiceMonitor.
Create a configuration file to deploy the Prometheus Custom Resource Prometheus-cr.yaml
apiVersion: monitoring.coreos.com/v1
kind: Prometheus
metadata:
  name: prometheus
spec:
  serviceAccountName: prometheus-operator-svc-ac
  serviceMonitorSelector:
    matchLabels:
      team: frontend
  resources:
    requests:
      memory: 400Mi
  enableAdminAPI: false
In this configuration, I am providing the value for the spec.serviceMonitorSelector.matchLabels is the label of the ServiceMonitor Object that we created earlier.
This is how the Prometheus grabs the target details with the help of the ServiceMonitor Custom Resource
To apply this configuration, use the following command.
kubectl apply -f prometheus-cr.yamlTo list the Prometheus object.
kubectl get prometheusI want to access Prometheus over the internet, so I am creating a service with nodePort. Create a service file prometheus-cr-svc.yaml
apiVersion: v1
kind: Service
metadata:
  name: prometheus
spec:
  type: NodePort
  ports:
  - name: web
    nodePort: 30900
    port: 9090
    protocol: TCP
    targetPort: web
  selector:
    prometheus: prometheus
To deploy this service, use the following command.
kubectl apply -f prometheus-cr-svc.yamlList the services to ensure they are running and note down the nodePort number.
Open any browser and paste any of the instance's public IPs and the port number, and then you will get this same output.

Here, we can see three Pods have been monitored because I gave three replicas for the application. ServiceMonitor got the endpoint information of the three of them as well, and Prometheus got it from the ServiceMonitor.
If the Pods dont' have service, we can use the PodMonitor Custom Resource to monitor them directly.
Create AlertmanagerConfig Custom Resource
We need Alertmanager to send the notifications to the receiver based on the Prometheus rules.
But before that, we need to create the AlertmanagerConfig Custom Resource with the routing and receiver information.
Create a manifest for the AlertmanagerConfig Object alertmanager-config-cr.yaml
apiVersion: monitoring.coreos.com/v1alpha1
kind: AlertmanagerConfig
metadata:
  name: config-example
  labels:
    alertmanagerConfig: example
spec:
  route:
    groupBy: ['job']
    groupWait: 30s
    groupInterval: 5m
    repeatInterval: 12h
    receiver: 'webhook'
  receivers:
  - name: 'webhook'
    webhookConfigs:
    - url: 'http://example.com/'
To deploy this configuration, use the following command.
kubectl apply -f alertmanager-config-cr.yamlTo list the AlertmanagerConfig object.
kubectl get alertmanagerAlertmanagerConfig contains the configuration information for Alertmanager.
Create Alertmanager Custom Resource
Create a manifest for the Alertmanager Object alertmanager-cr.yaml and add the following contents.
apiVersion: monitoring.coreos.com/v1
kind: Alertmanager
metadata:
  name: example
spec:
  replicas: 3
  alertmanagerConfigSelector:
    matchLabels:
      alertmanagerConfig: example
Here, you can see that spec.alertmanagerConfigSelector pointing to the AlertmanagerConfig Custom Resource labels.
To apply this configuration, use the following command.
kubectl apply -f alertmanager-cr.yamlTo view the Alertmanager Custom Resource.
kubectl get alertmanagerI am creating a service for the Alertmanager Custom Resource to access it over the internet.
Create a service file alertmanager-cr-svc.yaml
apiVersion: v1
kind: Service
metadata:
  name: alertmanager-example
spec:
  type: NodePort
  ports:
  - name: web
    nodePort: 30903
    port: 9093
    protocol: TCP
    targetPort: web
  selector:
    alertmanager: example
To apply this configuration, use the following command.
kubectl apply -f alertmanager-cr-svc.yamlNow, we can access the Alertmanager dashboard over the internet, but before that, ensure the Pod is running properly.
To access the dashboard, we need the nodePort number 30903 and the Public IP of any one of the instances.
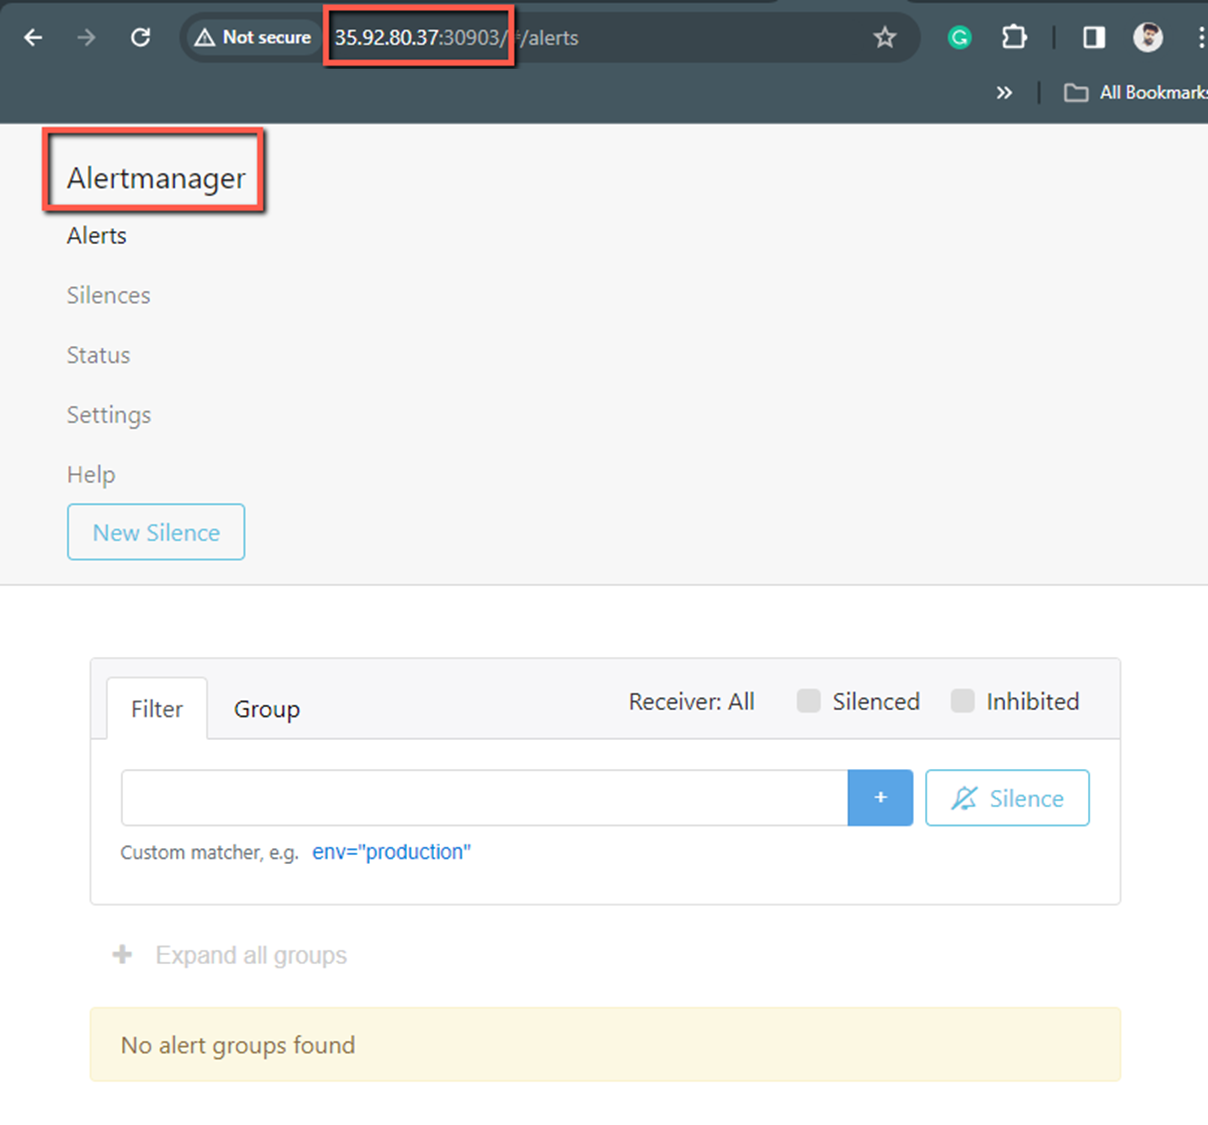
Initially, when we deployed the Prometheus Custom Resource, didn't mention anything about the Alertmanager, so now, we need to make some changes in the existing Prometheus configuration file prometheus-cr.yaml.
apiVersion: monitoring.coreos.com/v1
kind: Prometheus
metadata:
  name: prometheus
spec:
  serviceAccountName: prometheus-operator-svc-ac

  replicas: 2

  alerting:
    alertmanagers:
    - namespace: default
      name: alertmanager-example
      port: web

  serviceMonitorSelector:
    matchLabels:
      team: frontend
  resources:
    requests:
      memory: 400Mi
  enableAdminAPI: false
Now, we have to redeploy this manifest to update the changes, and this modification will not affect the existing setup.
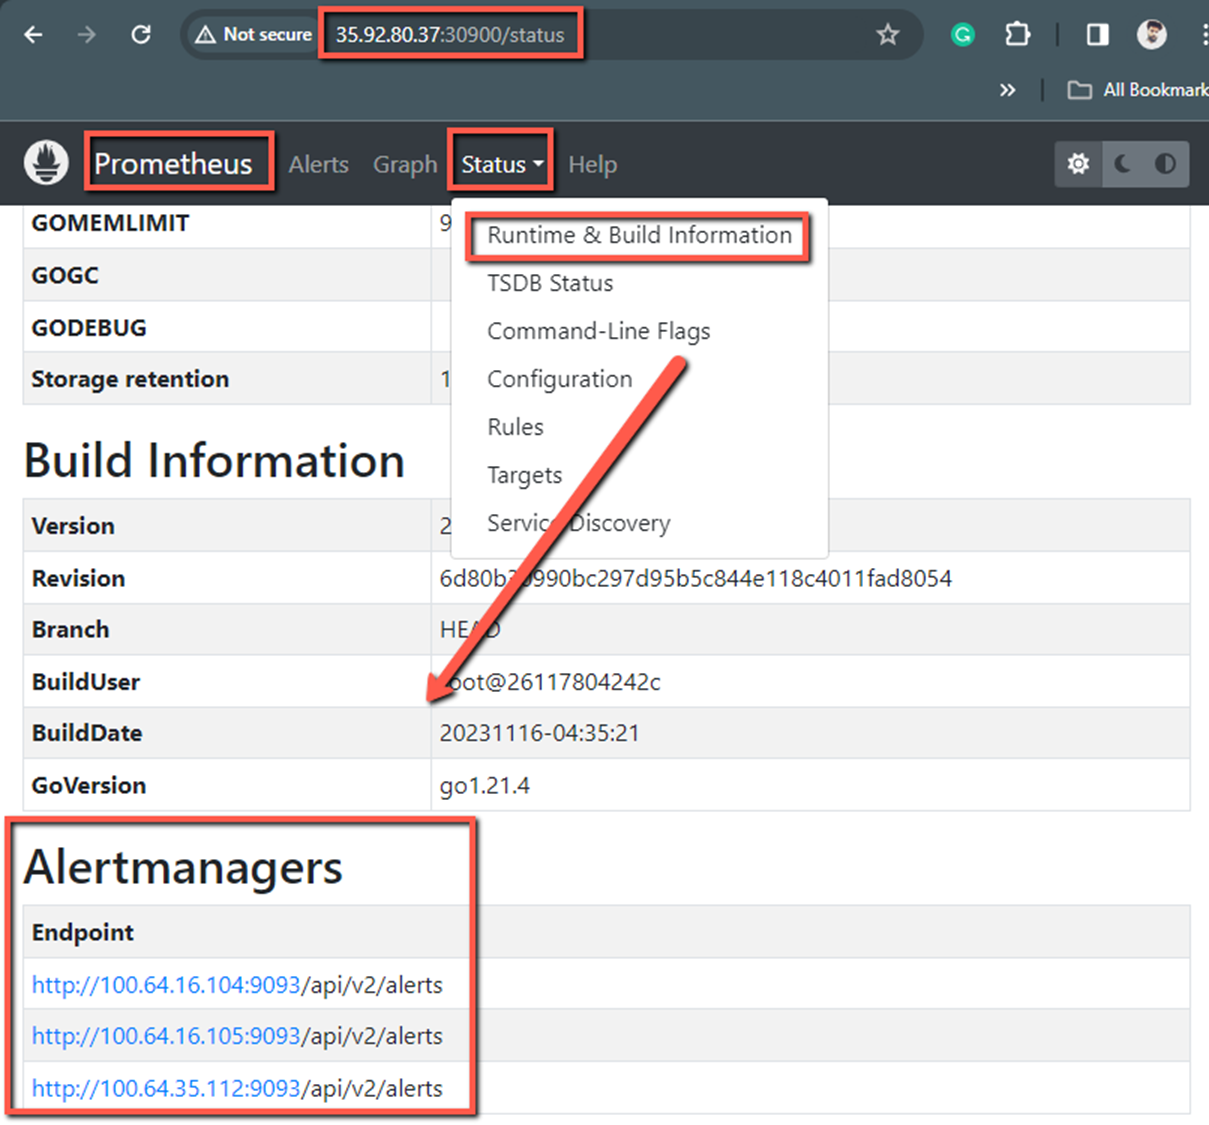
kubectl apply -f prometheus-cr.yamlIf we check the Prometheus dashboard now, we can see the Alertmanager information in the dashboard.
Advantages Of Prometheus Operator
Here are the few advantages of Prometheus Operator.
- If you are fed up with the manual integration of the Prometheus in the Kubernetes, you can use the operators because the setup process is really easy.
- In the manual configuration, you might face some inconsistencies if you are working in multiple clusters, but if you are using operators, then the Custom Resource Definition (CRD) will ensure consistency across the cluster.
- Manual configuration modification is complex if you are required to handle the scaling process in the Prometheus stack, but the operators will simplify the process and automate the job.
- Integrating other components, such as Alertmanager and Grafana, is also easy when compared to manual integration, and you will not be confused about the configurations because the Prometheus manifests are the same as the Kubernetes native objects manifest.
Conclusion
I have tried this setup to learn how to configure the Prometheus Custom Resource. I have also done a test setup to explain the concept, but you can do more in the configuration segment.
Also, try the other Custom Resources such as PodMonitor, Probe, ThanosRuler, etc.
Know about their use cases and implement them if your requirements need them. You can also create your custom resources if you want.
