

In this Kustomize Tutorial, you will learn all the Kustomize concepts and deploy an application using Kustomize on a Kubernetes cluster.
Kustomize Use Case
Before diving into Kustomize, let’s understand the problem with deploying applications using Kubernetes manifests.
Suppose you want to deploy applications to Kubernetes and you have multiple environments i.e. dev, uat, prod etc. In each environment, you might have different configurations for the deployments.
For example, in dev and uat you might not need rolling updates however in prod you might need it. Also, you might want different replicas in each environment, different CPU & memory resources, annotations, etc. Not only that, applications could use properties through Configmaps and Secrets that change for every environment.
Hence, you need to customize the deployments to accommodate the requirements for the respective environment.
The simple solution to this problem is to create three separate directories, one for each environment, and add all the Kubernetes manifest in respective folders.
But it is not a scalable solution. Because when new applications get onboarded or new configuration files get added, it would be hard to manually manage all the YAML files in the folders. This could also lead to configuration drift issues.
You could create scripts to replace configs in the YAML but it would not be a good approach when you have many services.
All these issues could be resolved using Kustomize. Also, one feature that sets it apart from other configuration tools is its tight integration with kubectl, the command-line interface for managing Kubernetes clusters.
In the following topics, we will look at the Kustomize concepts and its benefits in detail. We will also look at a practical example of Kustomize using an Nginx Deployment to show you how it simplifies Kubernetes deployments.
What is Kustomize?
Kustomize is an open-source configuration management tool for Kubernetes.
It allows you to define and manage Kubernetes objects such as deployments, Daemonsets, services, configMaps, etc for multiple environments in a declarative manner without modifying the original YAML files. To put it simply, you have a single source of truth for YAMLs, and you patch required configurations on top of the base YAMLs as per the environment requirements.
Here is what the official documentation says
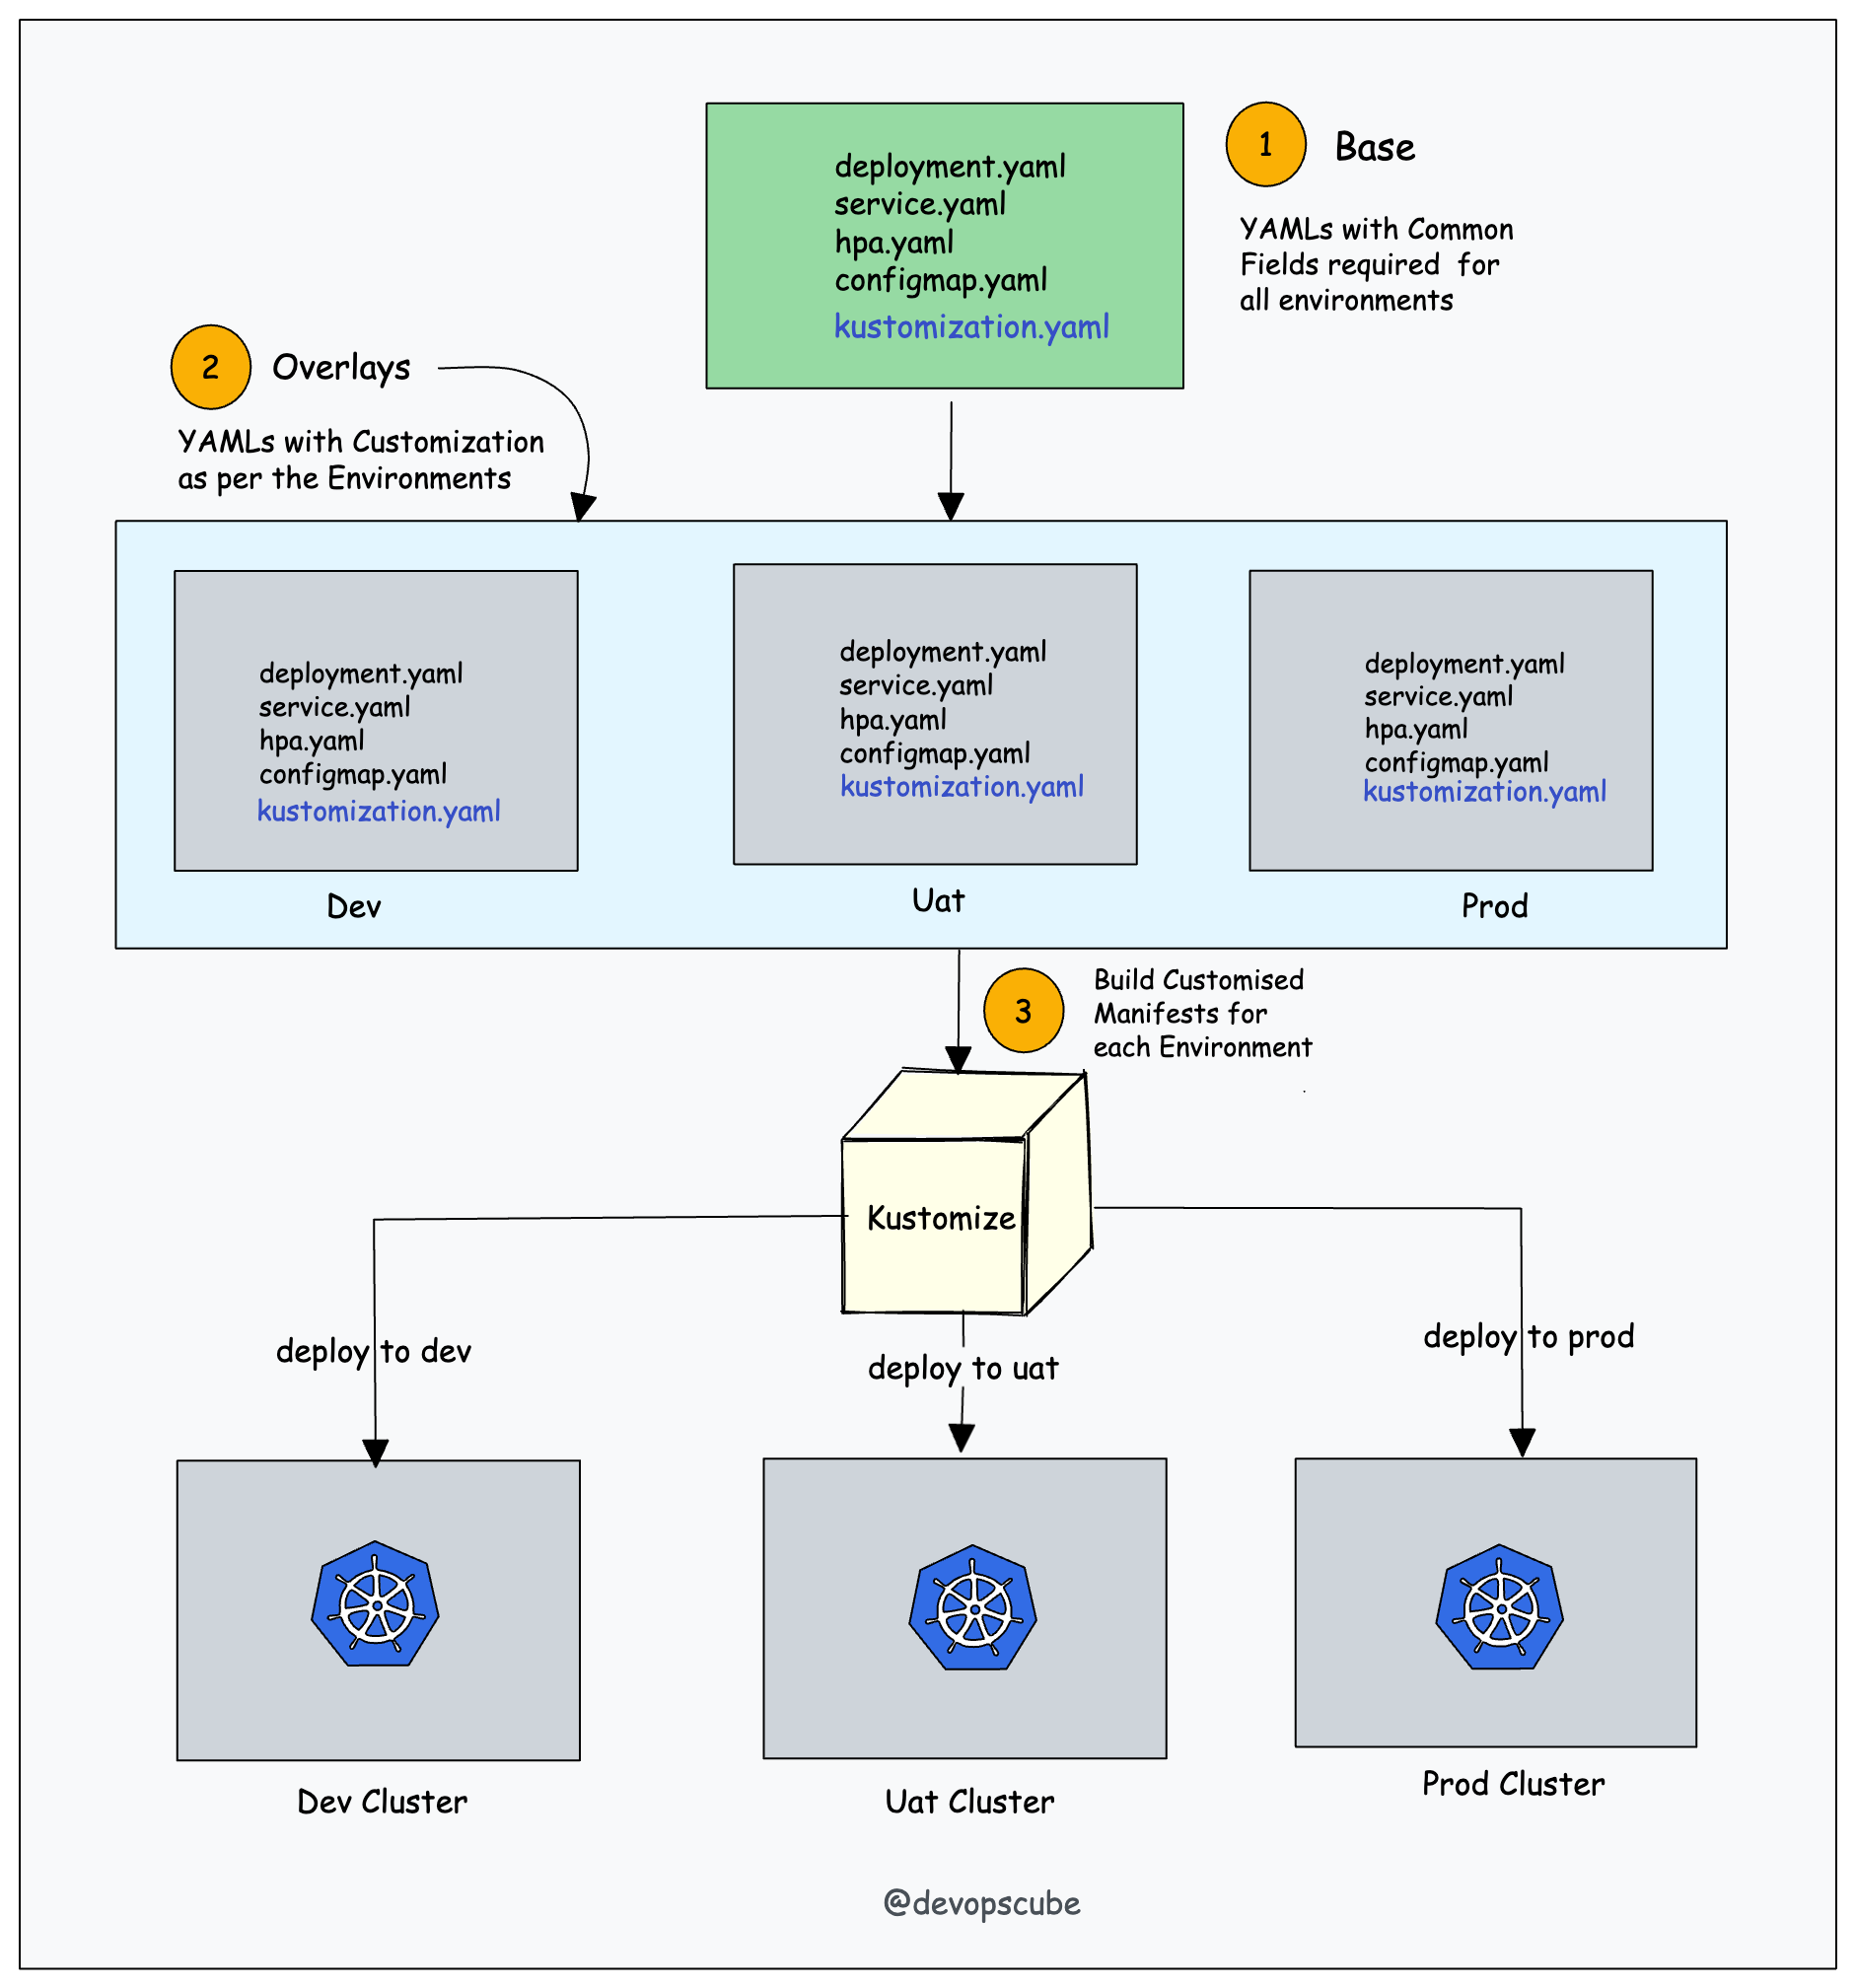
Kustomize has two key concepts, Base and Overlays. With Kustomize we can reuse the base files (common YAMLs) across all environments and overlay (patches) specifications for each of those environments.
Overlaying is the process of creating a customized version of the manifest file (base manifest + overlay manifest = customized manifest file).
All customization specifications are contained within a kustomization.yaml file.
Kustomize Features
The following are the key features of Kustomize
- Acts as a configuration tool with declarative configuration same as Kubernetes YAMLs.
- It can modify resources without altering the original files.
- It can add common labels and annotations to all the resources.
- It can Modify container images based on the environment it is being deployed in.
- Kustomize also ships with
secretGeneratorandconfigMapGeneratorthat use environment files or key-value pairs to create secrets and configMaps.
All these concepts and features will make more sense in the section where I practically show you how to use Kustomize using an nginx deployment.
Install Kustomize
Kustomize is an open-source tool and is available as a standalone binary or as a plugin for kubectl. The installation of Kustomize is very easy.
Kubectl Kustomize
The kustomize module is built into kubectl. You can use customize directly via kubectl. You can verify it using the following command.
kubectl kustomize --helpStandalone Kustomize
The below-mentioned script automatically detects the OS and installs the Kustomize.
curl -s "https://raw.githubusercontent.com/kubernetes-sigs/kustomize/master/hack/install_kustomize.sh" | bashAfter installation, verify it by running the below command. It will show you the latest appropriate version of Kustomize. If it's not showing the version then close your terminal and run the command by opening a fresh terminal.
kustomize versionIf you are still getting bash: kustomize: command not found error then run the below command and check again. This will set the path.
sudo install -o root -g root -m 0755 kustomize /usr/local/bin/kustomizeWe can also install Kustomize using brew and chocolatey on MAC and Windows respectively.
For MAC users:
brew install kustomizeFor Windows users:
choco install kustomizeUnderstanding Kustomize
First, you need to understand the following Key Kustomize concepts.
kustomization.yamlfile- Base and Overlays
- Transformers
- Patches
Let's take a look at each concept.
kustomization.yaml file
The kustomization.yaml file is the main file used by the Kustomize tool.
When you execute Kustomize, it looks for the file named kustomization.yaml. This file contains a list of all of the Kubernetes resources (YAML files) that should be managed by Kustomize. It also contains all the customizations that we want to apply to generate the customized manifest.
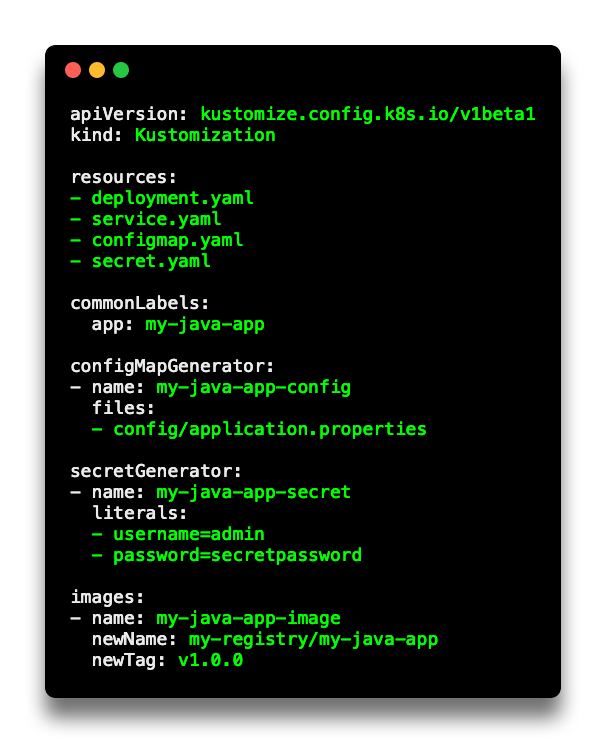
Here is an example kustomization.yaml file. Don't worry about all the configurations. we will learn about all the fields in the following sections.
Base and Overlays
The Base folder represents the config that going to be identical across all the environments. We put all the Kubernetes manifests in the Base. It has a default value that we can overwrite.
On the other side, the Overlays folder allows us to customize the behavior on a per-environment basis. We can create an Overlay for each one of the environments. We specify all the properties and parameters that we want to overwrite & change.

Basically, Kustomize uses patch directive to introduce environment-specific changes on existing Base standard k8s config files without disturbing them. We will look at patches in a bit.
Transformers
As the name indicates, transformers are something that transforms one config into another. Using Transformers, we can transform our base Kubernetes YAML configs. Kustomize has several built-in transformers. Let's see some common transformers:
commonLabel- It adds a label to all Kubernetes resourcesnamePrefix- It adds a common prefix to all resource
namesnameSuffix- It adds a common suffix to all resource
namesNamespace- It adds a common namespace to all resourcescommonAnnotations- It adds an annotation to all resources
Let's see an example. In the below image, we have used commonLabels in kustomization.yaml where label env: dev gets added to the customized deployment.yaml.
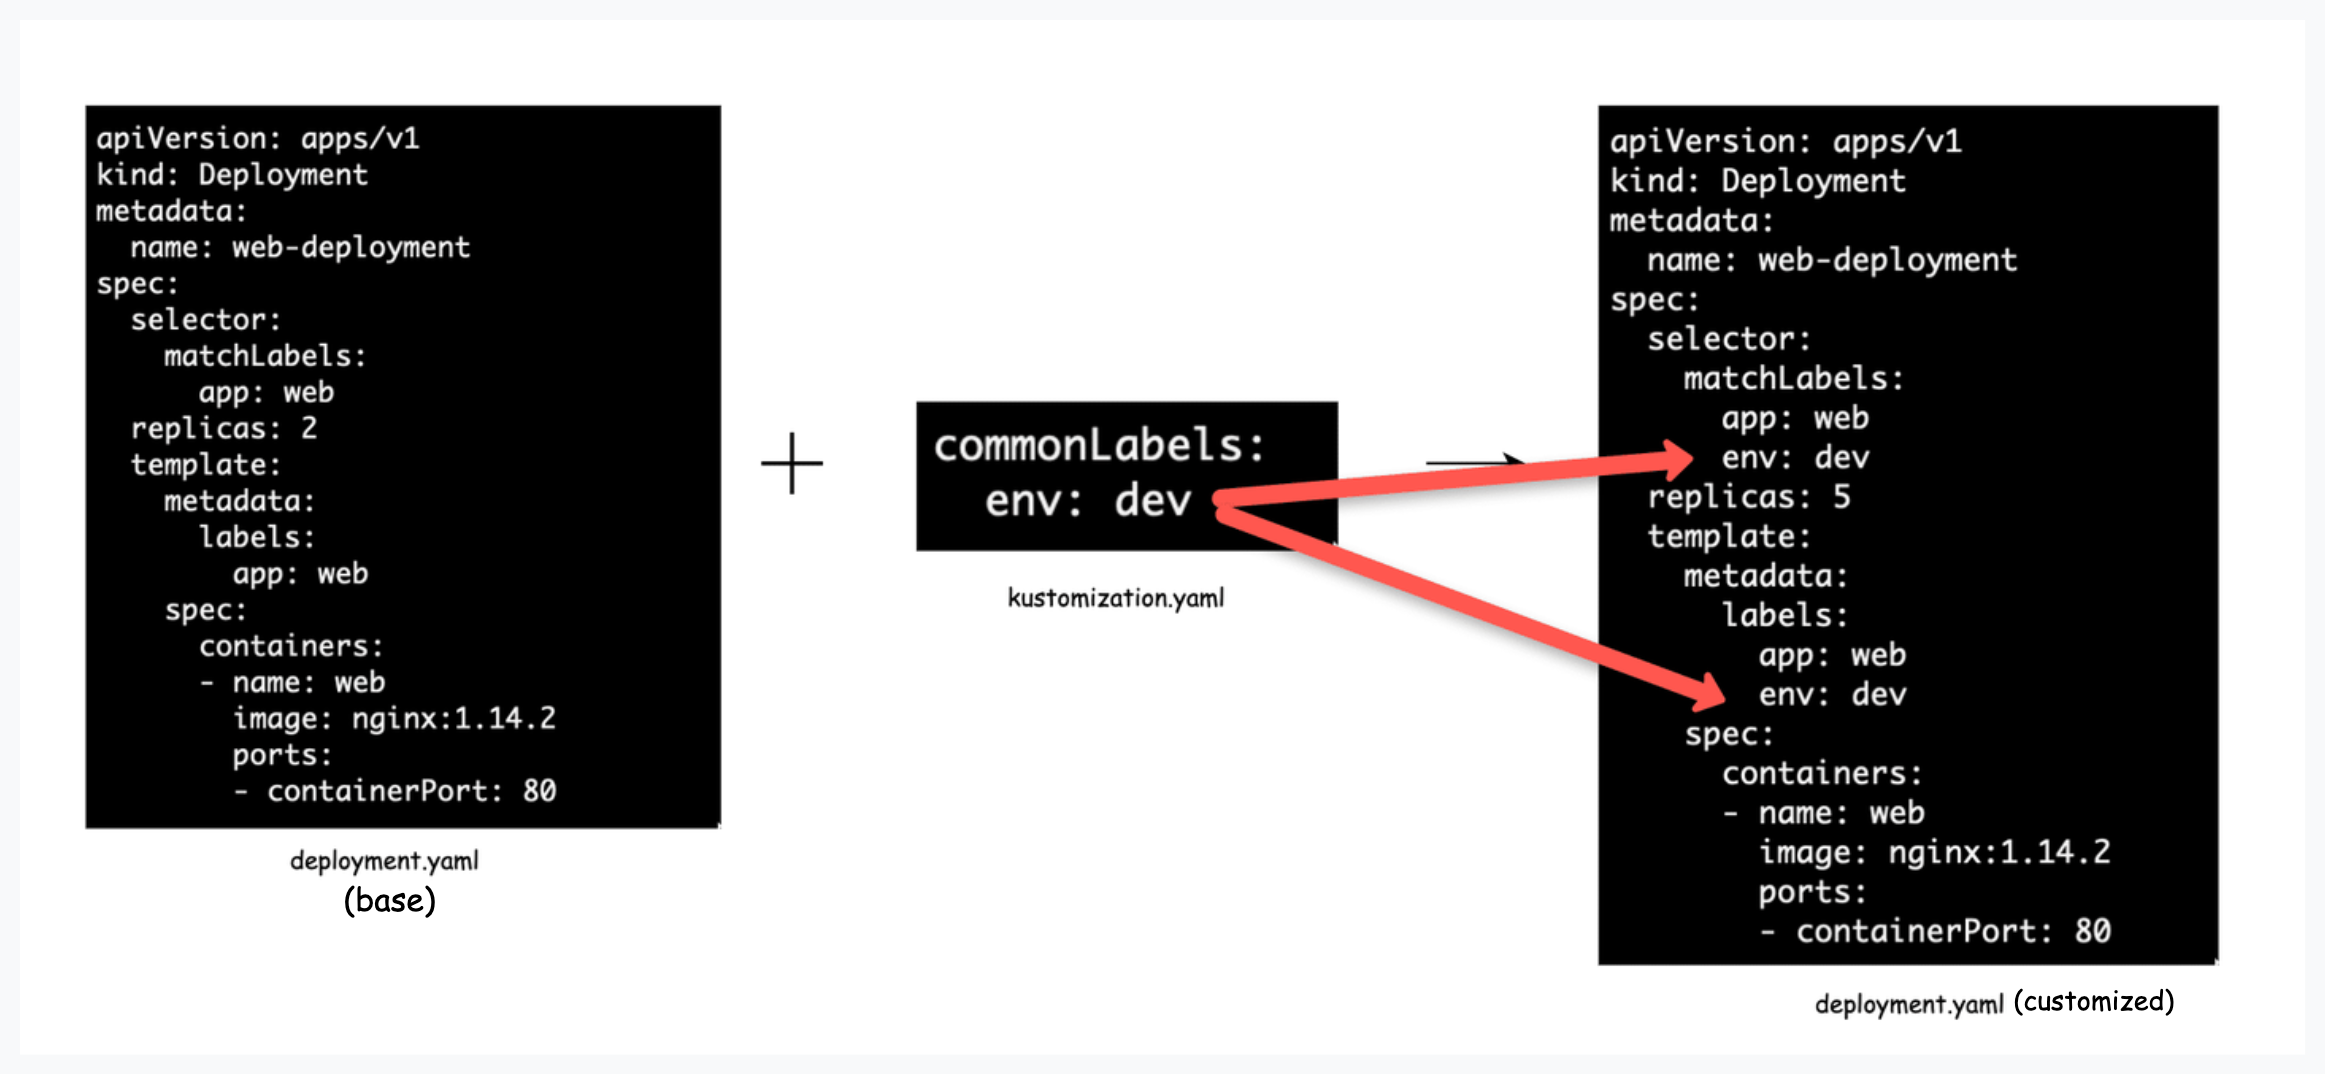
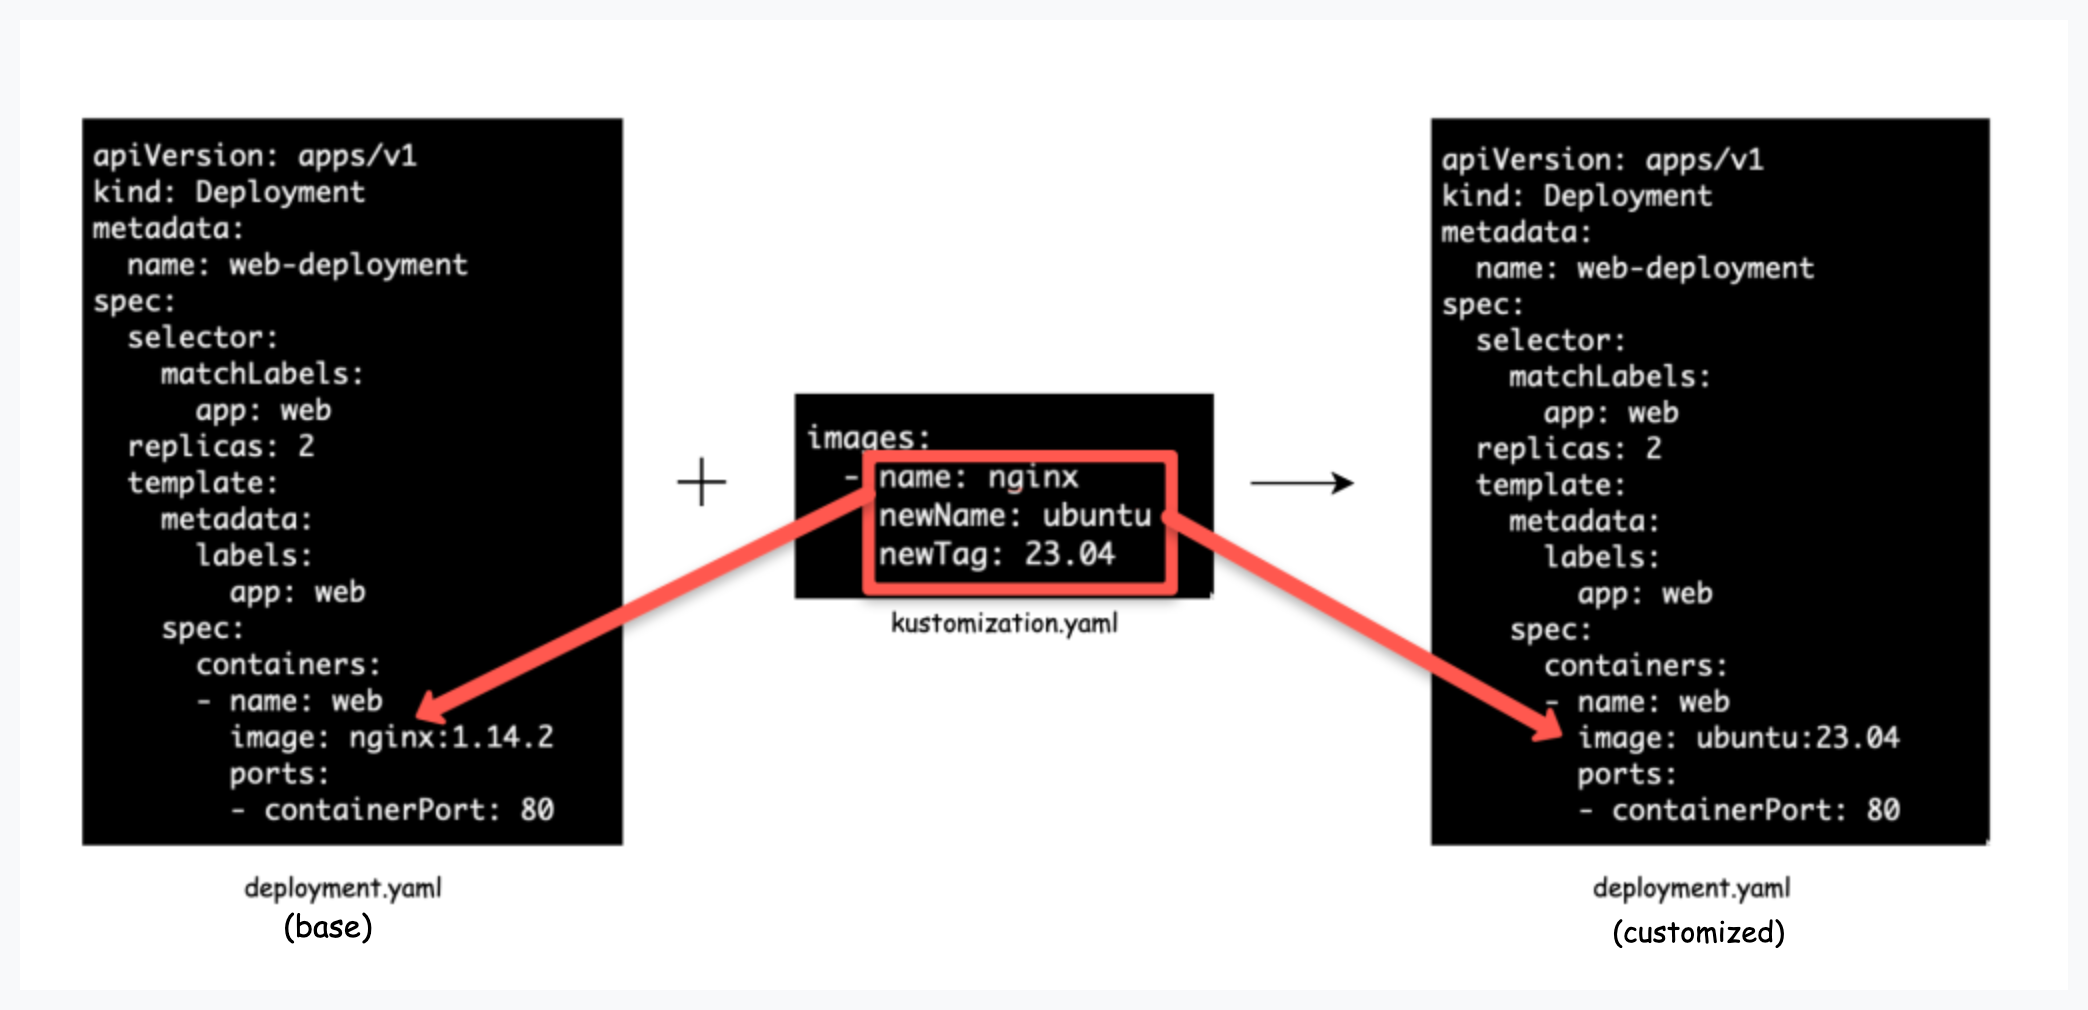
Image Transformer
It allows us to modify an image that a specific deployment is going to use.
In the following example, the image transformer checks the nginx image name as mentioned deployment.yaml and changes it to the new name which is ubuntu in the kustomization.yaml file. We can change the tags as well.
Patches (Overlays)
Patches or overlays provide another method to modify Kubernetes configs. It provides more specific sections to change in the configuration. There are 3 parameters we need to provide:
Operation Type:add or remove or replaceTarget:Resource name which we want to modifyValue:Value name that will either be added or replaced. For the remove operation type, there would not be any value.
There are two ways to define the patch:
- JSON 6902 and
- Stragetic Merge Patching.
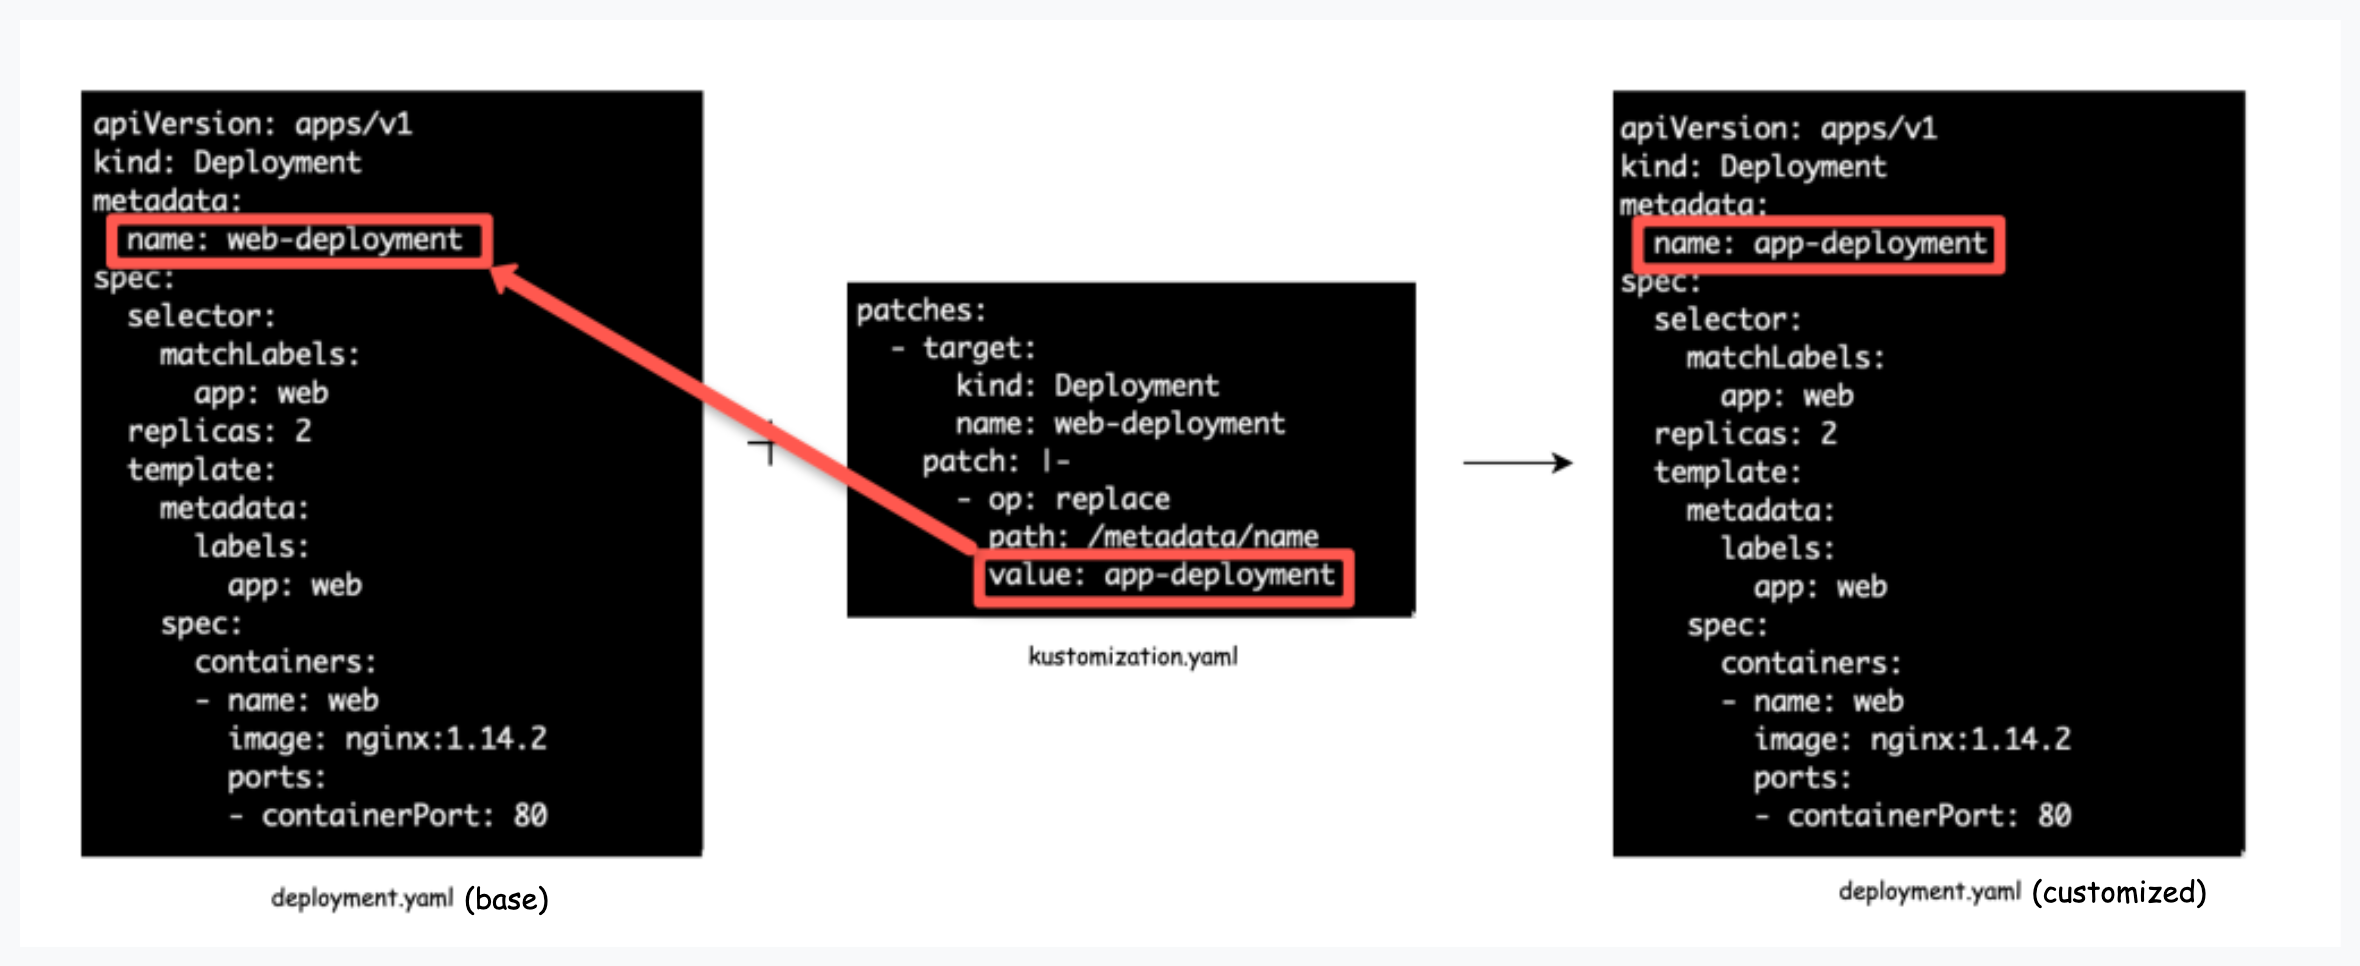
JSON 6902 Patching
In this way, there are two details that we have to provide, the target and the patch details i.e. operation, path, and the new value.
patches:
  - target:
      kind: Deployment
      name: web-deployment
    patch: |-
      - op: replace
        path: /spec/replicas
        value: 5
The following image shows the JSON patching workflow.
Stragetic Merge Patching
In this way, all the patch details are similar to a standard k8s config. It would be the original manifest file, we just add the fields that need to be modified.
Here is an example of inline Stragetic Merge Patching.
patches:
  - patch: |-
      apiVersion: apps/v1
      kind: Deployment
      metadata:
        name: web-deployment
      spec:
        replicas: 5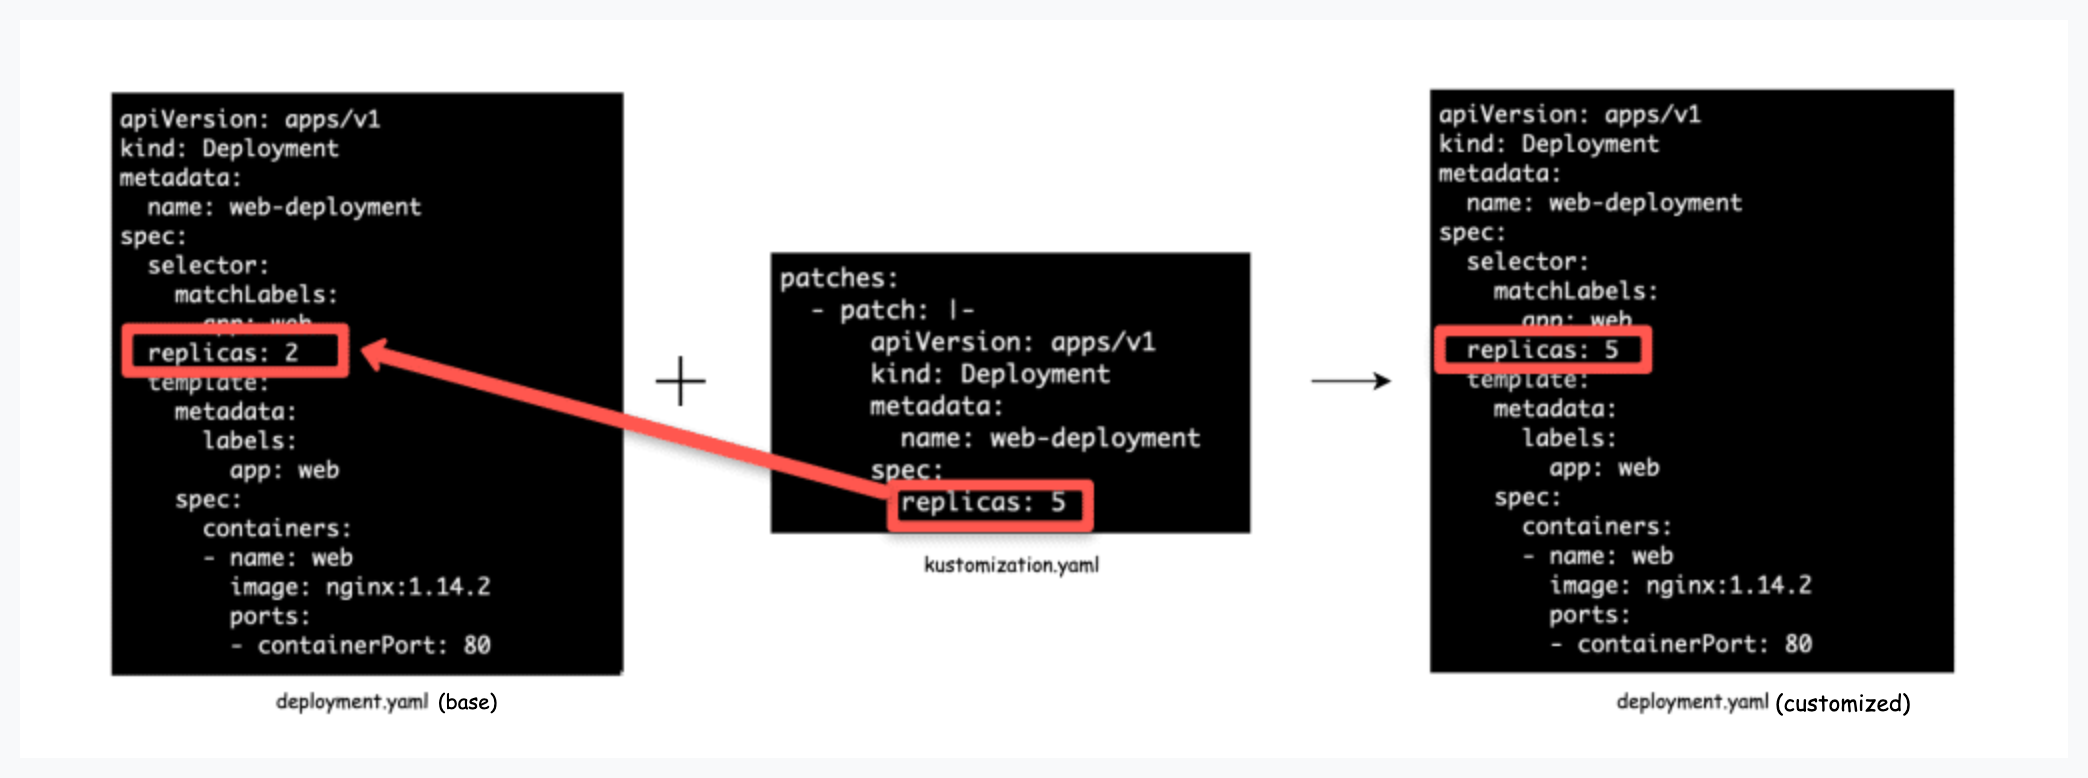
Patch From File
For both types of patching, instead of inline configs, we can use the separate file method. Specify all the patch details in a YAML file and refer it to the kustomization.yaml file under the patches directive.
For example, in kustomization.yaml you need to mention the patch file as follows. You need to specify the relative path of the YAML file.
patches:
- path: replicas.yaml
And we can put the changes in replicas.yaml as given below.
apiVersion: apps/v1
kind: Deployment
metadata:
  name: web-deployment
spec:
  replicas: 5
Now that we have a good understanding of all the underlying Kustomize concepts, let's put our learnings into a hands-on implementation.
Deploy Application Using Kustomize
Let’s see how Kustomize works using a real-world deployment scenario involving different environments.
Let's assume the following scenario.
- Nginx web server needs to be deployed in the dev and prod
- In dev, we need only a deployment with 2 replicas, a Nodeport service, and less memory and CPU resources.
- In prod, we need a deployment with 4 replicas, different CPU and memory limits, a rolling update strategy, and a service without NodePort.
Let's see how we can achieve this using Kustomize.
Here is the directory structure for using Kustomize.
├── kustomize
  ├── base
    │   ├── deployment.yaml
    │   ├── service.yaml
    │   ├── kustomization.yaml
    └ overlays
        ├── dev
        │   ├── deployment-dev.yaml
        |   ├── service-dev.yaml
        │   └── kustomization.yaml
        └── prod
            ├── deployment-prod.yaml
            ├── service-prod.yaml
            └── kustomization.yaml
You can either use the GitHub repo files as a reference or create the respective folders and files using the following commands:
mkdir -p kustomize/base &&
    touch kustomize/base/deployment.yaml \
         kustomize/base/service.yaml \
         kustomize/base/kustomization.yaml &&
    mkdir -p kustomize/overlays/dev &&
    touch kustomize/overlays/dev/deployment-dev.yaml \
         kustomize/overlays/dev/service-dev.yaml \
         kustomize/overlays/dev/kustomization.yaml &&
    mkdir -p kustomize/overlays/prod &&
    touch kustomize/overlays/prod/deployment-prod.yaml \
         kustomize/overlays/prod/service-prod.yaml \
         kustomize/overlays/prod/kustomization.yaml
Let's start with the base folder.
Base Folder
The base folder contains the deployment, service, and kustomization files. In this base folder, we add the deployment and service YAML with all the configs which could be common for all the environments.
base/deployment.yaml
apiVersion: apps/v1
kind: Deployment
metadata:
  name: web-deployment
spec:
  replicas: 1
  selector:
    matchLabels:
      app: web
  template:
    metadata:
      labels:
        app: web
    spec:
      containers:
      - name: nginx
        image: nginx:1.14.2
        ports:
        - containerPort: 80
base/service.yaml
apiVersion: v1
  kind: Service
  metadata:
    name: web-service
  spec:
    selector:
      app: web
    ports:
    - name: http
      port: 80
base/kustomization.yaml
In the below file, we're referring deployment.yaml and service.yaml as resources.
apiVersion: kustomize.config.k8s.io/v1beta1
kind: Kustomization

resources:
- deployment.yaml
- service.yaml
Dev Overlay Folder
Let's define Dev overlays files. We only want to change in deployment.yaml so we will only define it.
deployment-dev.yaml
In dev deployment, we only want to increase the replicas from 1 to 2. You can see we only define the changes, not other things. Kustomize will check the base deployment file and compare it and patch the changes accordingly. That's the beauty of Kustomize.
apiVersion: apps/v1
kind: Deployment
metadata:
  name: web-deployment
spec:
  replicas: 3 # Update the replica count to 3
  template:
    spec:
      containers:
      - name: nginx
        resources:
          limits:
            cpu: "200" # Lower CPU limit to 200m (0.2 CPU cores)
            memory: "256Mi" # Lower memory limit to 256 MiB
          requests:
            cpu: "100" # Lower CPU request to 100m (0.1 CPU cores)
            memory: "128Mi"
service-dev.yaml
In dev, we need the service with a nodeport. So we will create an overlay with the type Nodeport.
apiVersion: v1
kind: Service
metadata:
  name: web-service
spec:
  type: NodePort
kustomization.yaml
We're using Strategic Merge Patching using the separate file method as we discussed earlier in the blog. You can also notice we have defined resources here also, this is why Kustomize needs to know the path of base files.
Note that in older Kustomize versions, bases can be used in place of resources here.
apiVersion: kustomize.config.k8s.io/v1beta1
kind: Kustomization

resources:
- ../../base

patches:
- path: deployment-dev.yaml
- path: service-dev.yaml
Review & Apply Patches
Let's review the patches. We can use the below command to review the patches and check whether everything is correct or not.
kustomize build overlays/devIt will render the below Kubernetes manifest as shown below.
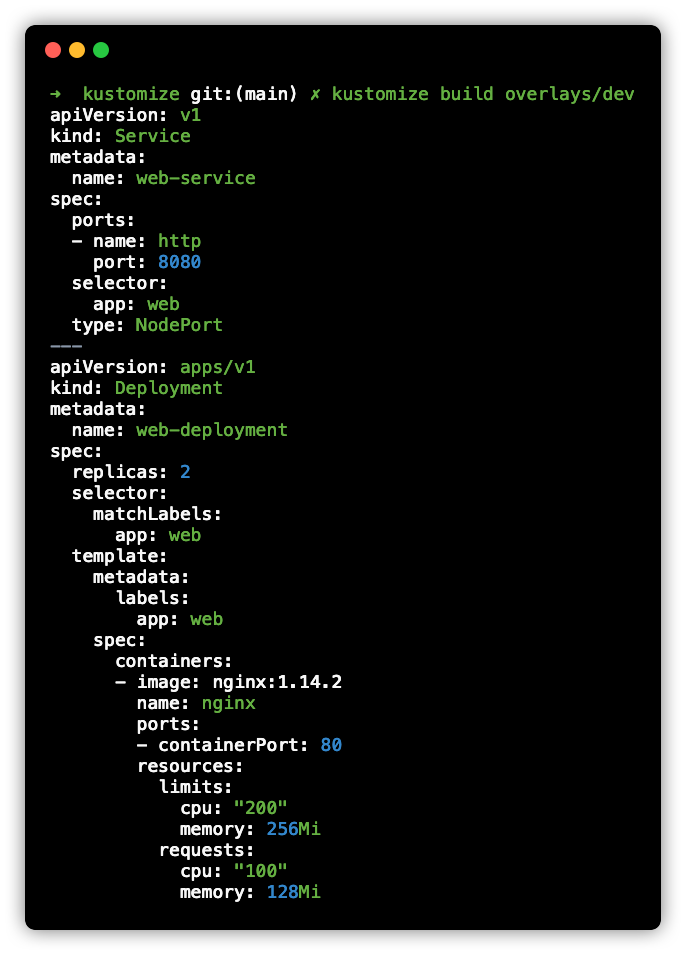
As you can see the number of replicas in deployment increased to 2, and different CPU and memory resources and service type changed to NodePort. Now this is the desired configuration for the dev environment.
We can deploy the customized manifest using the following command.
kustomize build overlays/dev | kubectl apply -f -You can also use the following kubectl command.
kubectl apply -k overlays/devProd Overlay Folder
deployment-prod.yaml
In prod deployment, we're adding the RollingUpdate strategy with 4 replicas of the deployment and different memory and CPU resources.
apiVersion: apps/v1
kind: Deployment
metadata:
  name: web-deployment
spec:
  template:
    replicas: 4 # Update the replica count to 3
    spec:
      containers:
      - name: nginx
        resources:
          limits:
            cpu: "1" # Lower CPU limit to 200m (0.2 CPU cores)
            memory: "1Gi" # Lower memory limit to 256 MiB
          requests:
            cpu: "500" # Lower CPU request to 100m (0.1 CPU cores)
            memory: "512Mi" # Lower memory request to 128 MiB
  strategy:
    type: RollingUpdate
    rollingUpdate:
      maxSurge: 1
      maxUnavailable: 1
service-prod.yaml
We're changing the service type to NodePort.
apiVersion: v1
kind: Service
metadata:
  name: web-service
spec:
  type: NodePort
kustomization.yaml
In the kustomization.yaml I have added the absolute path of both files for patching as we want to make some changes in prod.
apiVersion: kustomize.config.k8s.io/v1beta1
kind: Kustomization

resources:
- ../../base

patches:
- path: deployment-prod.yaml
- path: service-prod.yaml
Run the below command again for reviewing the configuration and patches.
kustomize build overlays/prodAlternatively, you can use Kustomize with the kubectl command as follows.
kubectl kustomize overlays/prodReview & Apply Patches
If everything looks good we can deploy it now by running the below command.
kustomize build overlays/prod | kubectl apply -f -Alternatively, you can use the kubectl command as follows.
kubectl apply -k overlays/prodAfter deploying it, we can check the objects by running the below commands.
kubectl get deployments
kubectl get services
kubectl get pods
Use the following command to view all the objects at once.
kubectl get all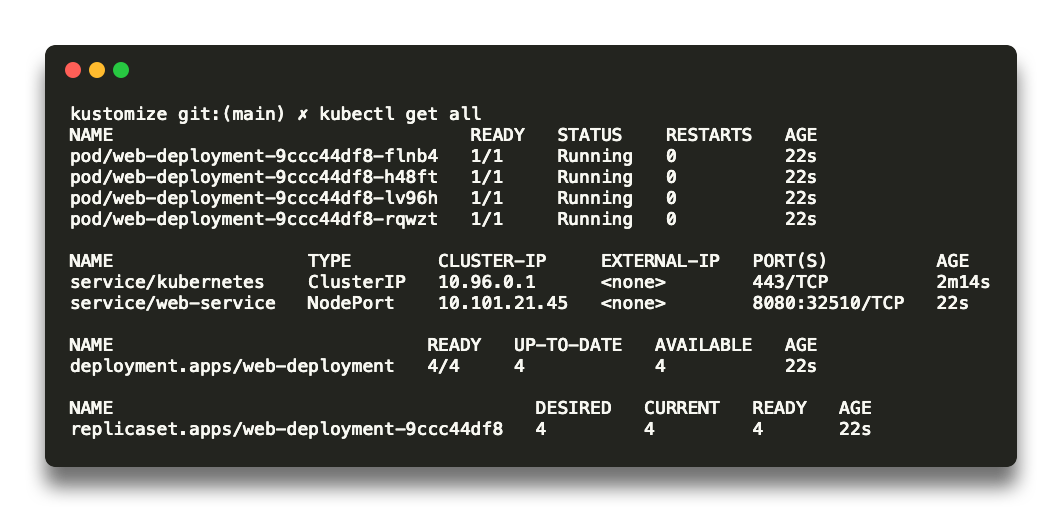
Kustomize Configmap and Secret Generators
Kustomize has the functionality to generate Configmaps and Secrets.
In Kustomization YAML there are two supported fields
- configMapGenerator and
- secretGenerator
Check out the Kuztomize Configmap Generators guide where the use case and workflow are explained practically.
Kustomize Troubleshooting - Common Issues
- Kustomize version should be compatible with the Kubernetes cluster's version as Kustomize might introduce features or changes that aren't supported by older Kubernetes versions.
- If you're using overlays to apply customizations, check if you've properly specified the overlays in your
kustomization.yamlfile. Each overlay must be listed under theresourcesfield with the correct path. Make sure you're runningkustomize buildorkustomize build <overlay-path>to generate the final configuration with the applied changes. - If you're encountering an error message like
"kustomize: command not found"make sure that Kustomize is installed and available in your system's PATH. - Kustomize uses YAML files for defining configurations and customizations. Ensure that your YAML files are properly formatted, indented correctly, and have valid syntax
Benefits of Using Kustomize
Below are the benefits of Kustomize
- Simplified Configuration Management: Kustomize is easy to use and allows you to manage and customize your Kubernetes configurations more easily by enabling you to define your configuration in a structured and modular way.
- Reusability: With Kustomize we can reuse one of the base files across all environments and overlay specifications for each of those environments. This can save you time and effort by allowing you to reuse common configurations rather than having to create them from scratch for each new deployment.
- Version Control: Kustomize allows you to version control your Kubernetes configurations, making it easier to track changes and roll back to previous configurations if necessary.
- Template Free: Kustomize is template free. It expresses the full power of Kubernetes API, with no need to parameterize every single line compared to Helm.
- Kustomize can be run natively from the Kubernetes command line interface.
- Kustomize has built-in transformers to modify resources and It can be extended via a plug-in mechanism.
- Kustomize does not have any templating language so we can use the usual YAML to state our configurations rapidly.
- Kustomize is provided as a standalone Golang package and cli tool so it's easy to integrate with users' tools and workflows.
- We can use Kustomize without installing it if we have kubectl 1.14+ version. kubectl allows us to make declarative changes to our configurations without touching a template.
Kustomize Best Practices
Here are some Kustomize best practices:
- Keeping base resources, overlays, and patches in separate directories helps us to maintain clarity and separation between different configurations.
- While working with Kustomize, it's essential to adhere to general Kubernetes best practices
- Try to keep the common values like namespace, and common metadata in the base file.
- While developing or before pushing to git, run
kubectl kustomize cfg fmt file_namecommand to format the file and set the indentation right. - Before deploying your Kustomize configurations, validate them and perform thorough testing to ensure that your configurations work as expected.
- Integrate Kustomize into your CI/CD (Continuous Integration/Continuous Deployment) pipeline to automate the deployment process.
- Kustomize provides the ability to imperatively update
kustomization.yamlfiles using the edit subcommand. So use the edit command in adding labels, namespaces, etc, and modify images and replicas.
Kustomize vs Helm
Below are some differences:
- Helm provides more advanced features like hooks and release management, making it suitable for complex deployments. Kustomize is simpler and more straightforward.
- Helm has complex templating, while Kustomize has no templating.
- Kustomize doesn't need a separate setup. On the other hand, we need to set up Helm.
- Helm has a large collection of pre-built charts that can be easily shared and reused, while Kustomize allows you to share configurations but lacks a centralized repository.
- Kustomize has an easy learning curve, while Helm has difficulty as it introduces additional concepts like charts and templates.
- Kustomize uses overlays and patches to modify existing configurations, while Helm uses charts to package and manage applications.
Kustomize FAQs
Let’s look at some of the frequently asked Kutomize questions.
How is Kustomize different from Helm?
While both Kustomize and Helm are configuration management tools for Kubernetes, they have different approaches. Kustomize focuses on providing a native and declarative way to manage configurations without using templates. Helm, on the other hand, uses charts and templates to package and deploy applications.
How do I install Kustomize?
Kustomize is distributed as a standalone binary and can be easily installed on various platforms.
curl -s "https://raw.githubusercontent.com/kubernetes-sigs/kustomize/master/hack/install_kustomize.sh" | bashYou can download the binary from the official GitHub repository or use package managers like Homebrew (for macOS/Linux) or Chocolatey (for Windows).
brew install kustomize    //mac
choco install kustomize   //windows
Can Kustomize be used with existing Kubernetes configurations?
Kustomize can be used to manage existing Kubernetes configurations. You can start by creating a Kustomization file in the directory containing your existing YAML files and define overlays to customize the configuration as needed.
Can Kustomize handle secret management?
Kustomize provides support for managing secrets. You can define secret generators in your Kustomization file, which can create secrets dynamically based on the specified rules. This allows you to separate sensitive information from your configuration files.
Is Kustomize compatible with GitOps workflows?
Kustomize is compatible with GitOps workflows. You can version control your base configuration, overlays, and Kustomization files and use tools like Git and CI/CD pipelines to manage and deploy your Kubernetes configurations.
Is Kustomize officially supported by Kubernetes?
Kustomize is an official sub-project of Kubernetes and is maintained by the Kubernetes SIG-CLI (Special Interest Group - Command Line Interface) community. It has gained popularity and is widely used in the Kubernetes ecosystem.
Conclusion
In this Kustomize Tutorial, we have discussed what problem Kustomize solves along with its benefits. Further, we have checked the installation part and some key concepts of Kustomize.
We also learned how to deploy applications on Kubernetes using Kustomize. Then we talked about the Secret/Config Map generator and compared it with Helm.
The main advantage of Kustomize is that it is very easy to start using as it's integrated with kubectl as well.
If you are learning Kubernetes check out the Kubernetes learning roadmap to deepen your Kubernetes knowledge.
