

In this guide, I have added detailed steps to set up Kubernetes cloud controller manager on an AWS kubeadm cluster.
The idea of this setup is to understand the AWS configurations involved in the Cloud Controller manager in a self-hosted kubernetes setup.
If you want to understand how cloud controller manager works, please go through the detailed kubernetes architecture.
Prerequisites
This setup is performed in Ubuntu 22.04 Instance and the instance type is t2.medium.
You need a minimum of two nodes for this setup. (One controller and one worker node).
Also, ensure you have opened up all the required ports for Kubernetes on both nodes.
Let's get started with the setup.
Step 1: Attach IAM Roles
Both controller and worker nodes need IAM roles with required permissions for the cloud controller manager to interact with the AWS APIs.
IAM Policy for the controller node
Create an IAM role with the following permissions and attach it to the controller node
{
    "Version": "2012-10-17",
    "Statement": [
        {
            "Effect": "Allow",
            "Action": [
                "autoscaling:DescribeAutoScalingGroups",
                "autoscaling:DescribeLaunchConfigurations",
                "autoscaling:DescribeTags",
                "ec2:DescribeInstances",
                "ec2:DescribeRegions",
                "ec2:DescribeRouteTables",
                "ec2:DescribeSecurityGroups",
                "ec2:DescribeSubnets",
                "ec2:DescribeVolumes",
                "ec2:DescribeAvailabilityZones",
                "ec2:CreateSecurityGroup",
                "ec2:CreateTags",
                "ec2:CreateVolume",
                "ec2:ModifyInstanceAttribute",
                "ec2:ModifyVolume",
                "ec2:AttachVolume",
                "ec2:AuthorizeSecurityGroupIngress",
                "ec2:CreateRoute",
                "ec2:DeleteRoute",
                "ec2:DeleteSecurityGroup",
                "ec2:DeleteVolume",
                "ec2:DetachVolume",
                "ec2:RevokeSecurityGroupIngress",
                "ec2:DescribeVpcs",
                "elasticloadbalancing:AddTags",
                "elasticloadbalancing:AttachLoadBalancerToSubnets",
                "elasticloadbalancing:ApplySecurityGroupsToLoadBalancer",
                "elasticloadbalancing:CreateLoadBalancer",
                "elasticloadbalancing:CreateLoadBalancerPolicy",
                "elasticloadbalancing:CreateLoadBalancerListeners",
                "elasticloadbalancing:ConfigureHealthCheck",
                "elasticloadbalancing:DeleteLoadBalancer",
                "elasticloadbalancing:DeleteLoadBalancerListeners",
                "elasticloadbalancing:DescribeLoadBalancers",
                "elasticloadbalancing:DescribeLoadBalancerAttributes",
                "elasticloadbalancing:DetachLoadBalancerFromSubnets",
                "elasticloadbalancing:DeregisterInstancesFromLoadBalancer",
                "elasticloadbalancing:ModifyLoadBalancerAttributes",
                "elasticloadbalancing:RegisterInstancesWithLoadBalancer",
                "elasticloadbalancing:SetLoadBalancerPoliciesForBackendServer",
                "elasticloadbalancing:AddTags",
                "elasticloadbalancing:CreateListener",
                "elasticloadbalancing:CreateTargetGroup",
                "elasticloadbalancing:DeleteListener",
                "elasticloadbalancing:DeleteTargetGroup",
                "elasticloadbalancing:DescribeListeners",
                "elasticloadbalancing:DescribeLoadBalancerPolicies",
                "elasticloadbalancing:DescribeTargetGroups",
                "elasticloadbalancing:DescribeTargetHealth",
                "elasticloadbalancing:ModifyListener",
                "elasticloadbalancing:ModifyTargetGroup",
                "elasticloadbalancing:RegisterTargets",
                "elasticloadbalancing:DeregisterTargets",
                "elasticloadbalancing:SetLoadBalancerPoliciesOfListener",
                "iam:CreateServiceLinkedRole",
                "kms:DescribeKey"
            ],
            "Resource": [
                "*"
            ]
        }
    ]
}
IAM Policy for the Worker Nodes
Create an IAM role with the following permissions and attach it to the worker nodes.
{
    "Version": "2012-10-17",
    "Statement": [
        {
            "Effect": "Allow",
            "Action": [
                "ec2:DescribeInstances",
                "ec2:DescribeRegions",
                "ecr:GetAuthorizationToken",
                "ecr:BatchCheckLayerAvailability",
                "ecr:GetDownloadUrlForLayer",
                "ecr:GetRepositoryPolicy",
                "ecr:DescribeRepositories",
                "ecr:ListImages",
                "ecr:BatchGetImage"
            ],
            "Resource": "*"
        }
    ]
}
Step 2: Set Hostname (On All Nodes)
Ensure each node hostname has its own private DNS address. If not, change the hostname using the following command. This is a requirement.
Run the following command on each node (controller and worker).
sudo hostnamectl set-hostname $(curl -s http://169.254.169.254/latest/meta-data/local-hostname)Verify the hostname by executing the hostname command.
ubuntu@node01:~$ hostname
ip-172-31-16-213.us-west-2.compute.internal
Step 3: Install Kubeadm System Utilities
Container Runtime (CRI-O), kubelet, Kubeadm, and kubectl are the important utilities that should be present in each node (controller and worker).
Install utilities using a shell script utilities.sh. It installs kubeadm version 1.30
#!/bin/bash
#
# Common setup for all servers (Control Plane and Nodes)

set -euxo pipefail

# Kubernetes Variable Declaration
KUBERNETES_VERSION="v1.30"
CRIO_VERSION="v1.30"
KUBERNETES_INSTALL_VERSION="1.30.0-1.1"

# Disable swap
sudo swapoff -a

# Keeps the swap off during reboot
(crontab -l 2>/dev/null; echo "@reboot /sbin/swapoff -a") | crontab - || true
sudo apt-get update -y

# Create the .conf file to load the modules at bootup
cat <<EOF | sudo tee /etc/modules-load.d/k8s.conf
overlay
br_netfilter
EOF

sudo modprobe overlay
sudo modprobe br_netfilter

# Sysctl params required by setup, params persist across reboots
cat <<EOF | sudo tee /etc/sysctl.d/k8s.conf
net.bridge.bridge-nf-call-iptables  = 1
net.bridge.bridge-nf-call-ip6tables = 1
net.ipv4.ip_forward                 = 1
EOF

# Apply sysctl params without reboot
sudo sysctl --system

sudo apt-get update -y
sudo apt-get install -y apt-transport-https ca-certificates curl gpg

# Install CRI-O Runtime
sudo apt-get update -y
sudo apt-get install -y software-properties-common curl apt-transport-https ca-certificates

curl -fsSL https://pkgs.k8s.io/addons:/cri-o:/stable:/$CRIO_VERSION/deb/Release.key |
    gpg --dearmor -o /etc/apt/keyrings/cri-o-apt-keyring.gpg

echo "deb [signed-by=/etc/apt/keyrings/cri-o-apt-keyring.gpg] https://pkgs.k8s.io/addons:/cri-o:/stable:/$CRIO_VERSION/deb/ /" |
    tee /etc/apt/sources.list.d/cri-o.list

sudo apt-get update -y
sudo apt-get install -y cri-o

sudo systemctl daemon-reload
sudo systemctl enable crio --now
sudo systemctl start crio.service

echo "CRI runtime installed successfully"

# Install kubelet, kubectl, and kubeadm
curl -fsSL https://pkgs.k8s.io/core:/stable:/$KUBERNETES_VERSION/deb/Release.key |
    gpg --dearmor -o /etc/apt/keyrings/kubernetes-apt-keyring.gpg

echo "deb [signed-by=/etc/apt/keyrings/kubernetes-apt-keyring.gpg] https://pkgs.k8s.io/core:/stable:/$KUBERNETES_VERSION/deb/ /" |
    tee /etc/apt/sources.list.d/kubernetes.list

sudo apt-get update -y
sudo apt-get install -y kubelet="$KUBERNETES_INSTALL_VERSION" kubectl="$KUBERNETES_INSTALL_VERSION" kubeadm="$KUBERNETES_INSTALL_VERSION"

# Prevent automatic updates for kubelet, kubeadm, and kubectl
sudo apt-mark hold kubelet kubeadm kubectl

sudo apt-get update -y

# Install jq, a command-line JSON processor
sudo apt-get install -y jq

# Retrieve the local IP address of the eth0 interface and set it for kubelet
local_ip="$(ip --json addr show eth1 | jq -r '.[0].addr_info[] | select(.family == "inet") | .local')"

# Write the local IP address to the kubelet default configuration file
cat > /etc/default/kubelet << EOF
KUBELET_EXTRA_ARGS=--node-ip=$local_ip
EOF
To run the script, provide execute permission.
chmod +x utilities.shLogin as root and execute the script.
./utilities.shStep 4: Initialize Kubeadm Configuration (Only in Controller)
In this step, we will initialize the control plane with configurations required for the cloud controller manager.
Create configuration file kubeadm.config
apiVersion: kubeadm.k8s.io/v1beta3
kind: ClusterConfiguration
apiServer:
  certSANs:
    - 127.0.0.1
    - 52.38.15.235
  extraArgs:
    bind-address: "0.0.0.0"
    cloud-provider: external
clusterName: kubernetes
scheduler:
  extraArgs:
    bind-address: "0.0.0.0"
controllerManager:
  extraArgs:
    bind-address: "0.0.0.0"
    cloud-provider: external
networking:
  podSubnet: "10.244.0.0/16"
  serviceSubnet: "10.96.0.0/12"
---
apiVersion: kubeadm.k8s.io/v1beta3
kind: InitConfiguration
nodeRegistration:
  name: ip-172-31-21-29.us-west-2.compute.internal
  kubeletExtraArgs:
    cloud-provider: external
In certSANs instead of 52.38.15.235 choose your controller's public IP and change the node registration name to your controller's private DNS (hostname we set in step 2). Modify the pod and service subnet if required.
Initialize the configuration to bootstrap the kubeadm configuration.
kubeadm init --config=kubeadm.configAt the end of the initialization, a token will be generated by the controller to join the workers. This is required to create the controller configuration file.
It would like the following highlighted token. Note down the token and cert hash.
kubeadm join 172.31.21.29:6443 --token wthapw.xgfjvonbiidea4nr --discovery-token-ca-cert-hash sha256:8b2127f960d88432fb35fd7488a501ad189e1a4ab319158d0e01a1db7fec96d7
Step 5: Join the Worker Nodes (Only in Worker Nodes)
Create a configuration file in each worker node kubeadm-join-config.yaml.
---
apiVersion: kubeadm.k8s.io/v1beta3
kind: JoinConfiguration
discovery:
  bootstrapToken:
    token: 30am0s.hleb5xs1dyz4ridc
    apiServerEndpoint: "172.31.21.29:6443"
    caCertHashes:
      - "sha256:8b2127f960d88432fb35fd7488a501ad189e1a4ab319158d0e01a1db7fec96d7"
nodeRegistration:
  name: ip-172-31-18-193.us-west-2.compute.internal
  kubeletExtraArgs:
    cloud-provider: external
Change the token apiServerEndpoint, and caCertHashes values to the intended values that your control plane generated when it initialized. name should be the full hostname of the respective node.
Modify the node registration name to your worker node’s private DNS address.
To join the workers to the controller, use the following command.
kubeadm join --config kubeadm-join-config.yamlModify the intended values of the configuration file and run the kubeadm join command on each worker node to join with the controller node.
Step 6: Tag AWS Resources
Tagging is essential to configure the Cloud Controller Manager because it ensures which AWS resources are used by which cluster.
For example, if a cluster uses AWS Network Load Balancer and now the cluster is being destroyed, the specified NLB also be destroyed and not affect other resources. To tag the resource, the cluster-ID is required
To find the Cluster ID, use the following command.
kubectl config viewThe output would be like this.
apiVersion: v1
clusters:
- cluster:
    certificate-authority-data: DATA+OMITTED
    server: https://172.31.21.29:6443
  name: kubernetes
contexts:
- context:
    cluster: kubernetes
    user: kubernetes-admin
  name: kubernetes-admin@kubernetes
current-context: kubernetes-admin@kubernetes
kind: Config
preferences: {}
users:
- name: kubernetes-admin
  user:
    client-certificate-data: DATA+OMITTED
    client-key-data: DATA+OMITTED
In the clusters section, the value of name is taken as the Cluster ID.
If the AWS resources are managed by one cluster, we can provide the tag key kubernetes.io/cluster/kubernetes and the tag value as owned and if the resources are managed by multiple clusters, the tag key would be the same as kubernetes.io/cluster/kubernetes and the tag value should be mentioned as shared.
Tags should be added to resourecs the controller and worker node consumes, such as VPC, Subnet, EC2 instance, Security Group, etc.
Here is an example.

Step 7: Configure the Cloud Controller Manager
Clone the AWS Cloud Controller repository to the controller plane node where you have the Kubectl access.
git clone https://github.com/kubernetes/cloud-provider-aws.gitNavigate to the base directory. It has all the kubernetes manifests for the cloud controller manager and the Kustomize file.
cd cloud-provider-aws/examples/existing-cluster/baseCreate the daemonset using the following command. -k is for Kustomize.
kubectl create -k .To verify the daemonset is running properly, use the following command.
kubectl get daemonset -n kube-systemTo ensure the CCM pod is running, use the following command.
kubectl get pods -n kube-systemStep 8: Provision Network Load Balancer
To test if the Cloud controller manager is working, we will deploy a sample Nginx deployment and expose it over service type LoadBlancer. The cloud controller manager should be able to create a Network load balancer that routes traffic to the nginx deployment.
Create a deployment file for the Nginx web server using the following YAML. Execute it directly.
cat <<EOF | kubectl apply -f -
apiVersion: apps/v1
kind: Deployment
metadata:
  name: nginx-deployment
spec:
  replicas: 3
  selector:
    matchLabels:
      app: nginx
  template:
    metadata:
      labels:
        app: nginx
    spec:
      containers:
      - name: nginx-container
        image: nginx:latest
        ports:
        - containerPort: 80
EOF
Create a service file to provision a load balancer nginx-service-nlb.yaml. Here the annotation service.beta.kubernetes.io/aws-load-balancer-type: nlb is very important. It tells the cloud controller manager to create a Network Load Balancer. By default, it deploys a classic load balancer.
cat <<EOF | kubectl apply -f -
apiVersion: v1
kind: Service
metadata:
  name: nginx-service
  annotations:
    service.beta.kubernetes.io/aws-load-balancer-type: nlb
spec:
  selector:
    app: nginx
  ports:
    - protocol: TCP
      port: 80
      targetPort: 80
  type: LoadBalancer
EOF
To ensure the deployment is running properly, use the following command.
kubectl get podsTo ensure the service is running properly, use the following command.
kubectl get svcYou should see the load balancer endpoint in the output as highlighted below.
$ kubectl get svc nginx-service
NAME TYPE CLUSTER-IP EXTERNAL-IP PORT(S) AGE
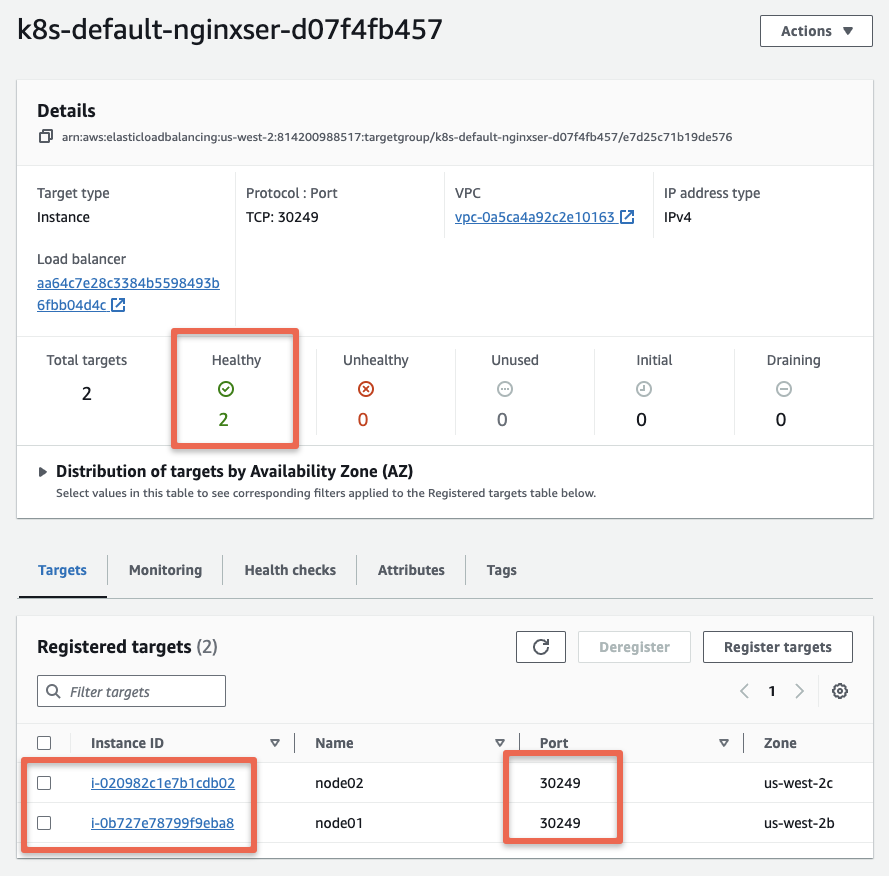
nginx-service LoadBalancer 10.101.171.34 aa64c7e28c3384b5598493b6fbb04d4c-f53de39b06106733.elb.us-west-2.amazonaws.com 80:30249/TCP 39sThe registration process takes a few minutes. If you check the load balancer after a while you should see the worker nodes registered as healthy targets. The service NodePort would be used as a health check port.
Once the nodes are registered to the NLB, you should see the Nginx homepage if you visit the Load balancer URL as shown below.

The following image shows the CCM load balancer traffic workflow to pods.
Possible Errors & Troubleshooting
To find the logs of the CCM pod, first, you need to find the pod name and use the following command
kubectl logs -n kube-system aws-cloud-controller-manager-zwctcFollowing are the errors I have faced in this setup
Error 1: Cloud provider could not be initialized
E1028 08:39:59.394822       1 tags.go:95] Tag "KubernetesCluster" nor "kubernetes.io/cluster/..." not found; Kubernetes may behave unexpectedly.
F1028 08:39:59.394858       1 main.go:106] Cloud provider could not be initialized: could not init cloud provider "aws": AWS cloud failed to find ClusterID
Solution:
Ensure all resources which are used by CCM (controller and worker) should be tagged with the correct cluster-ID.
Example:

Error 2: node has no providerID
E1028 13:25:07.544115 1 node_controller.go:277] Error getting instance metadata for node addresses: error fetching node by provider ID: Invalid format for AWS instance (), and error by node name: could not look up instance ID for node "ip-172-31-30-122": node has no providerID
solution:
Before starting the cluster configuration, ensure all the servers’ hostname is their private DNS address also keep in mind that the configuration files also use private DNS addresses.
Example:
root@ip-172-31-21-29:~# hostname
ip-172-31-21-29.us-west-2.compute.internal
Error 3: couldn't get current server API group list
E1030 06:04:54.829375    9140 memcache.go:265] couldn't get current server API group list: Get "<http://localhost:8080/api?timeout=32s>": dial tcp 127.0.0.1:8080: connect: connection refused
The connection to the server localhost:8080 was refused - did you specify the right host or port?
Solution:
Ensure you have a copy of admin.conf file in your home directory, if not make a copy using cp command
cp /etc/kubernetes/admin.conf ~/.kube/configExample:
root@ip-172-31-21-29:~# ls -l /etc/kubernetes/ ~/.kube/
/etc/kubernetes/:
total 36
-rw------- 1 root root 5648 Oct 30 05:17 admin.conf
-rw------- 1 root root 5676 Oct 30 05:48 controller-manager.conf
-rw------- 1 root root 2112 Oct 30 05:49 kubelet.conf
drwxr-xr-x 3 root root 4096 Oct 30 06:17 manifests
drwxr-xr-x 3 root root 4096 Oct 30 05:17 pki
-rw------- 1 root root 5624 Oct 30 05:17 scheduler.conf

/root/.kube/:
total 12
drwxr-x--- 4 root root 4096 Oct 30 06:07 cache
-rw------- 1 root root 5648 Oct 30 06:07 config
Error 4: error execution phase preflight
[preflight] Running pre-flight checks
error execution phase preflight: [preflight] Some fatal errors occurred:
        [ERROR FileAvailable--etc-kubernetes-kubelet.conf]: /etc/kubernetes/kubelet.conf already exists
        [ERROR Port-10250]: Port 10250 is in use
        [ERROR FileAvailable--etc-kubernetes-pki-ca.crt]: /etc/kubernetes/pki/ca.crt already exists
[preflight] If you know what you are doing, you can make a check non-fatal with `--ignore-preflight-errors=...`
To see the stack trace of this error execute with --v=5 or higher
Solution:
Usually, this error happens when you remove the worker node and try to join again. To resolve this issue, remove the kubelet.conf and ca.crt.
sudo rm -f /etc/kubernetes/kubelet.conf
sudo rm -f /etc/kubernetes/pki/ca.crt
Then join the worker node again using the following command.
kubeadm join --config kubeadm-join-config.yaml --ignore-preflight-errors=Port-10250Conclusion
I have done a high-level setup and tested provisioning the Network load balancer.
Next, I will be testing storage provisioning using the cloud controller manager.
I have added the steps after several trials and errors due to less information in the documentation. If you face any error during the setup, do drop an comment and I will look into it. To explore more, you can refer to the official documentation.
Also, if you are getting started with the Kubeadm cluster for CKA certification, take a look at the detailed kubeadm setup guide.
