


Apache Airflow is an open source workflow orchestration tool used for data, workflows. And many organizations today, run it on Kubernetes for scalability and flexibility.
Also, Apache Airflow 3 is total redesign that expands its capabilities to support complex AI, ML, and near real-time data workloads.
80,000 organizations use Airflow, with over 30% of users running MLOps workloads and 10% using it for GenAI workflows
In this blog we covered Apache Airflow on a Kubernetes and configure it to automatically sync DAGs from GitHub.
At the end of this blog, you will have learned
- What is Apache Airflow
- What is a DAG
- Understand Airflow executors.
- Installation of Apache Airflow on Kubernetes
- Configure GitSync for DAGS & Kubernetes executors.
- Insights of few Airflow Day 2 operations and more..
Lets get started.
What is Apache Airflow?
Apache Airflow is an open source application that helps build and manage complex workflows and data pipelines.
A data pipeline is a series of steps to collect data from sources, process it, and then store it in a storage. These steps include collecting, cleaning, transforming, filtering, and storing data. (ETL Process)
In the data pipeline, each individual step (collecting, cleaning etc) is called a Task. A Task is simply a single unit of work that Airflow executes.
Now, these tasks don't run individually. They need to run in a specific order. Why? Well, the logic is simple. You cant clean data before collecting it, and you can't store data before transforming it.
This is where a DAG (Directed Acyclic Graph) comes in. It is a foundational concept in Data engineering and AI/ML workflows. It is used to define how tasks depend on each other and in what order they should run.
Directed Acyclic Graph (DAG)
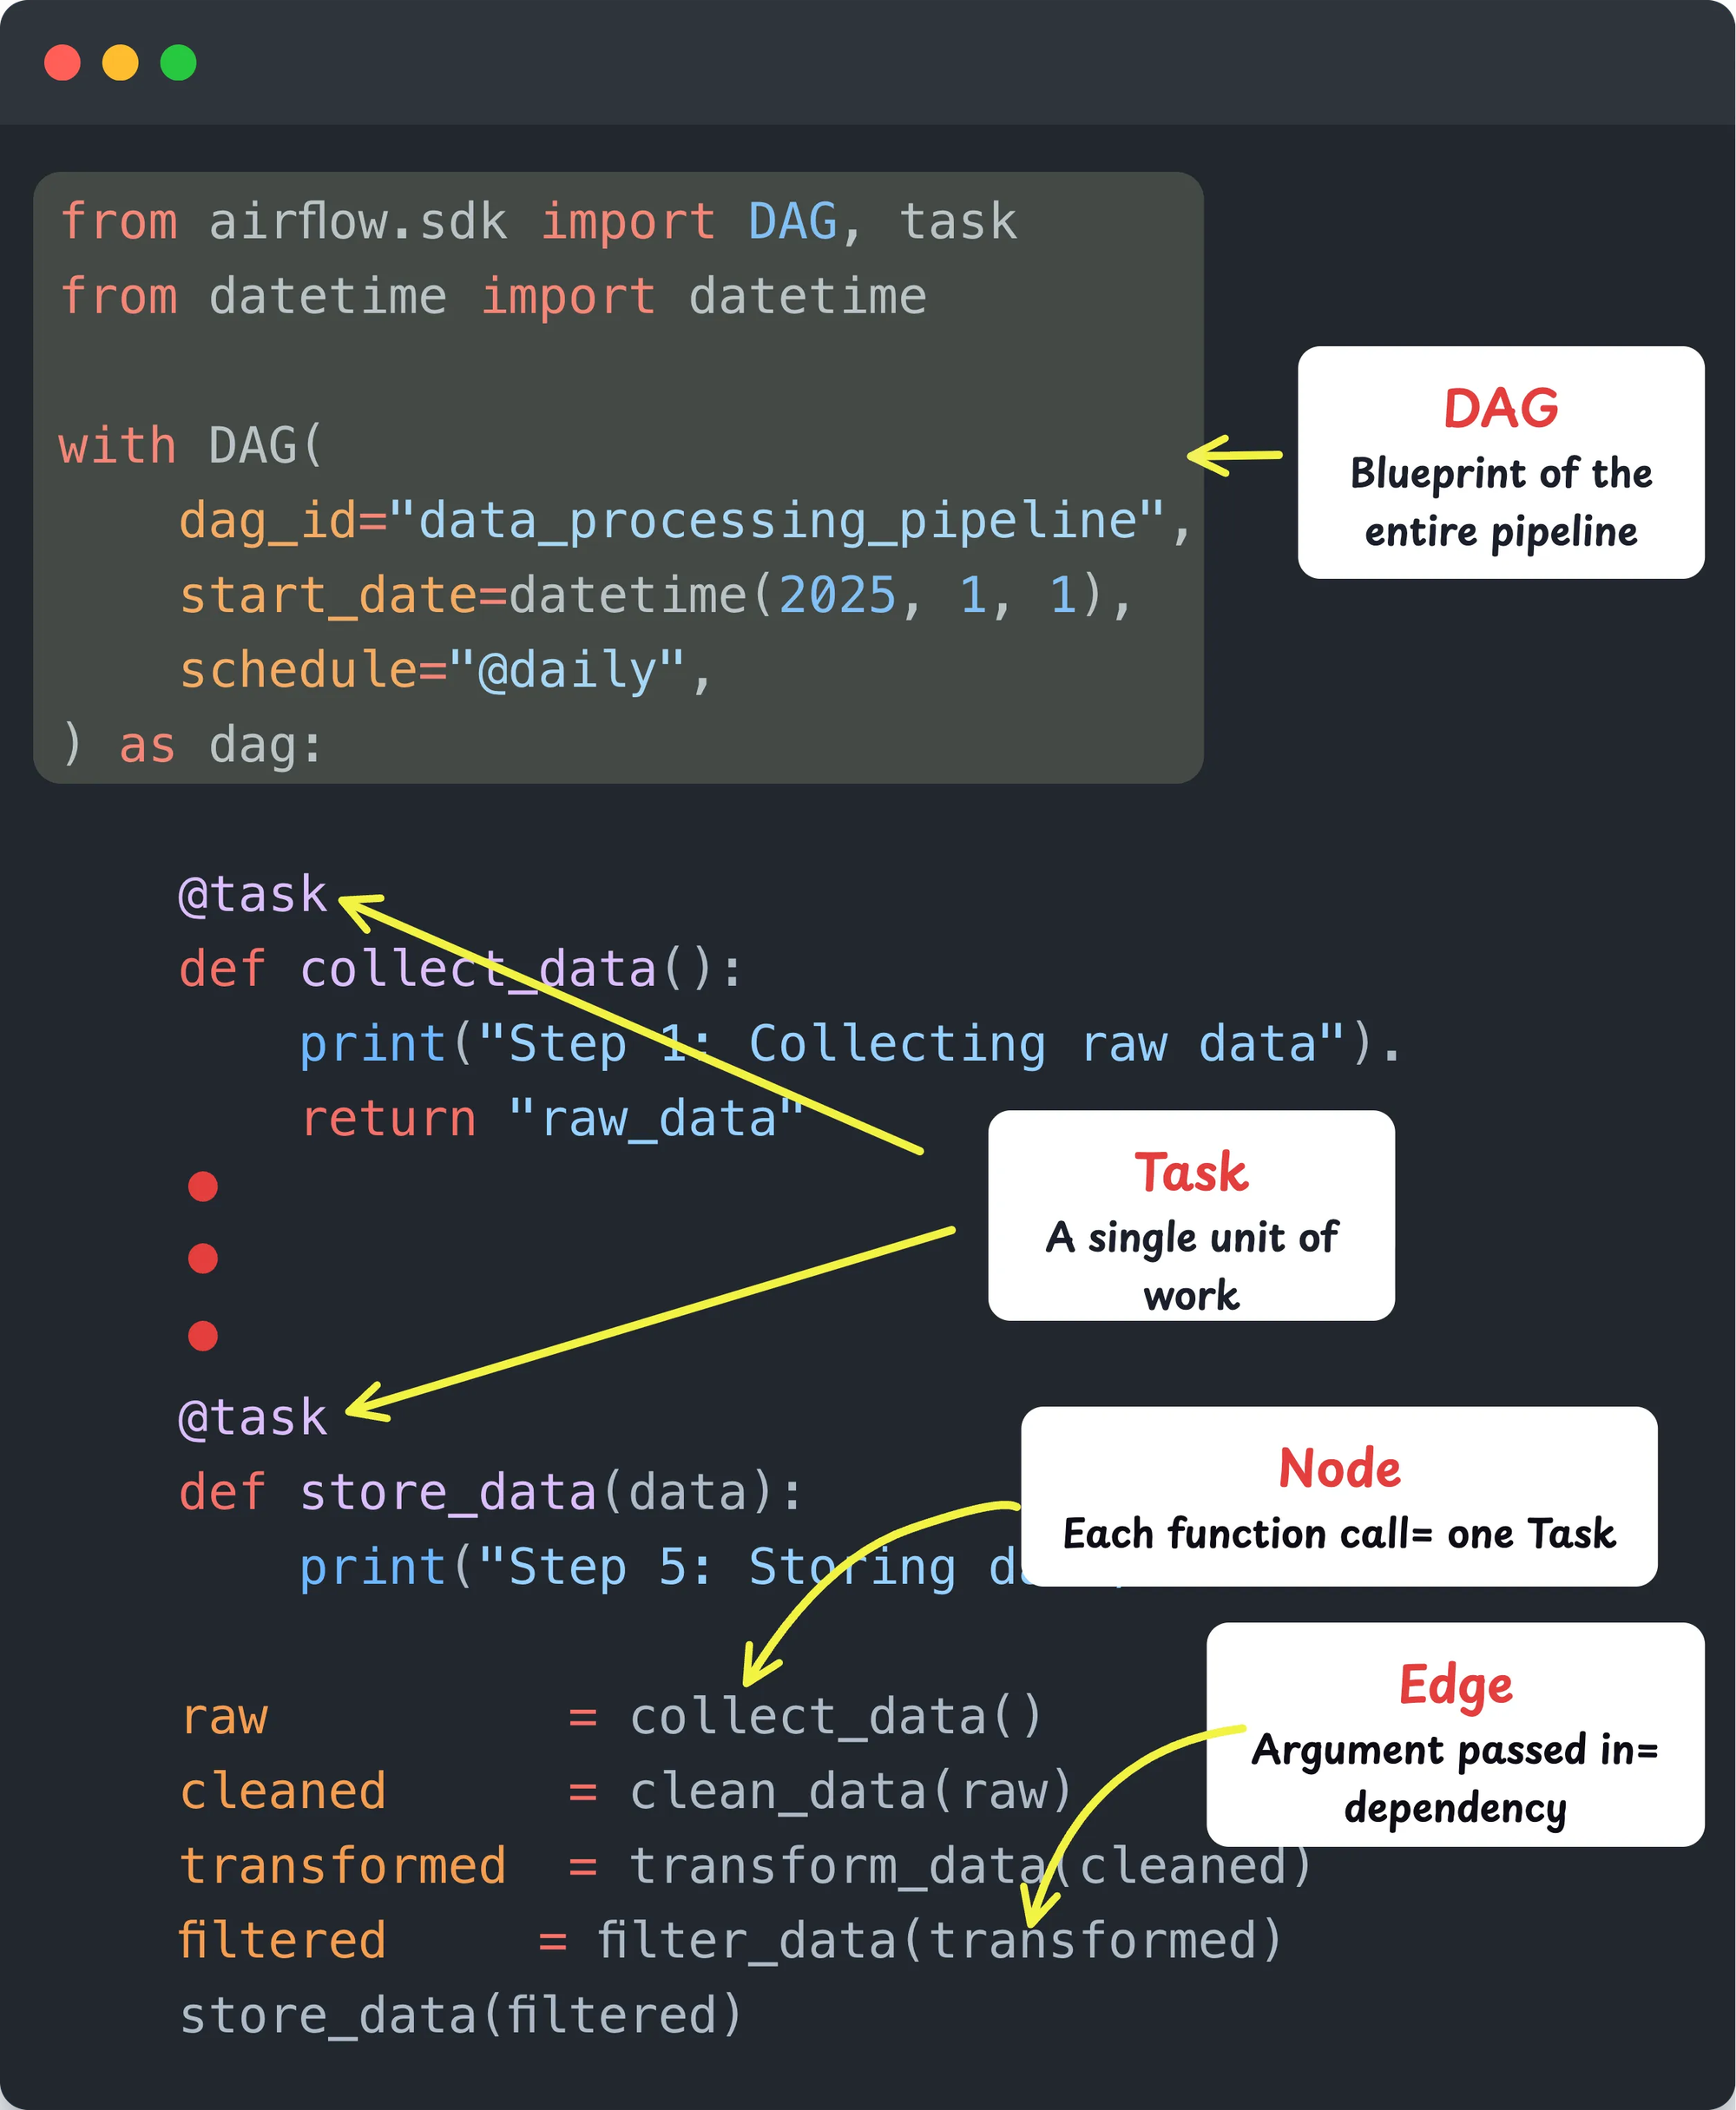
A DAG is basically a definition of your entire pipeline written in Python. It describes all the tasks and the order in which they should run. Think of it as the blueprint of your data pipeline . Here is what DAG means.
- Directed: Tasks flow in one direction (collect, clean, transform and then store)
- Acyclic: No cycles exist. Once a task is completed, the workflow does not go back to a previous step.
- Graph: The pipeline is represented as a graph. Each task is a node and each dependency is an edge. This defines how tasks are connected and which task runs after which.
So in simple terms, a DAG is your pipeline, a Task is each step inside it.
If you have worked with CI/CD pipelines, this is exactly the same concept. One failure stops everything downstream. Airflow applies that exact model to data pipelines.
The following image illustrates how a sample DAG is structured in code. It shows the DAG definition, Tasks, Nodes, and Edges. This is the actual code you write in Airflow to build any pipeline.
Terraform already uses this concept. It internally builds a resource dependency graph (also a DAG) before running
terraform apply. That is how it knows to create the VPC before the subnet.Airflow Executors
So where does this Python code (DAG) actually run?
That is what the Airflow Executor decides. As the name suggests, the Executor determines how and where your DAG gets executed.
Just like Jenkins or GitHub Actions uses agents/runners to execute CI/CD pipelines, Airflow uses Executors.
There are different types of Executors, and you choose one based on where you are running Airflow and how you want to execute your DAGs.
In our case, we will use the KubernetesExecutor. This executor spins up a pod in the Kubernetes cluster for every task in the DAG when you trigger the pipeline.
It is similar to how you select an agent or runner to execute your CI/CD job in Jenkins or GitHub Actions.
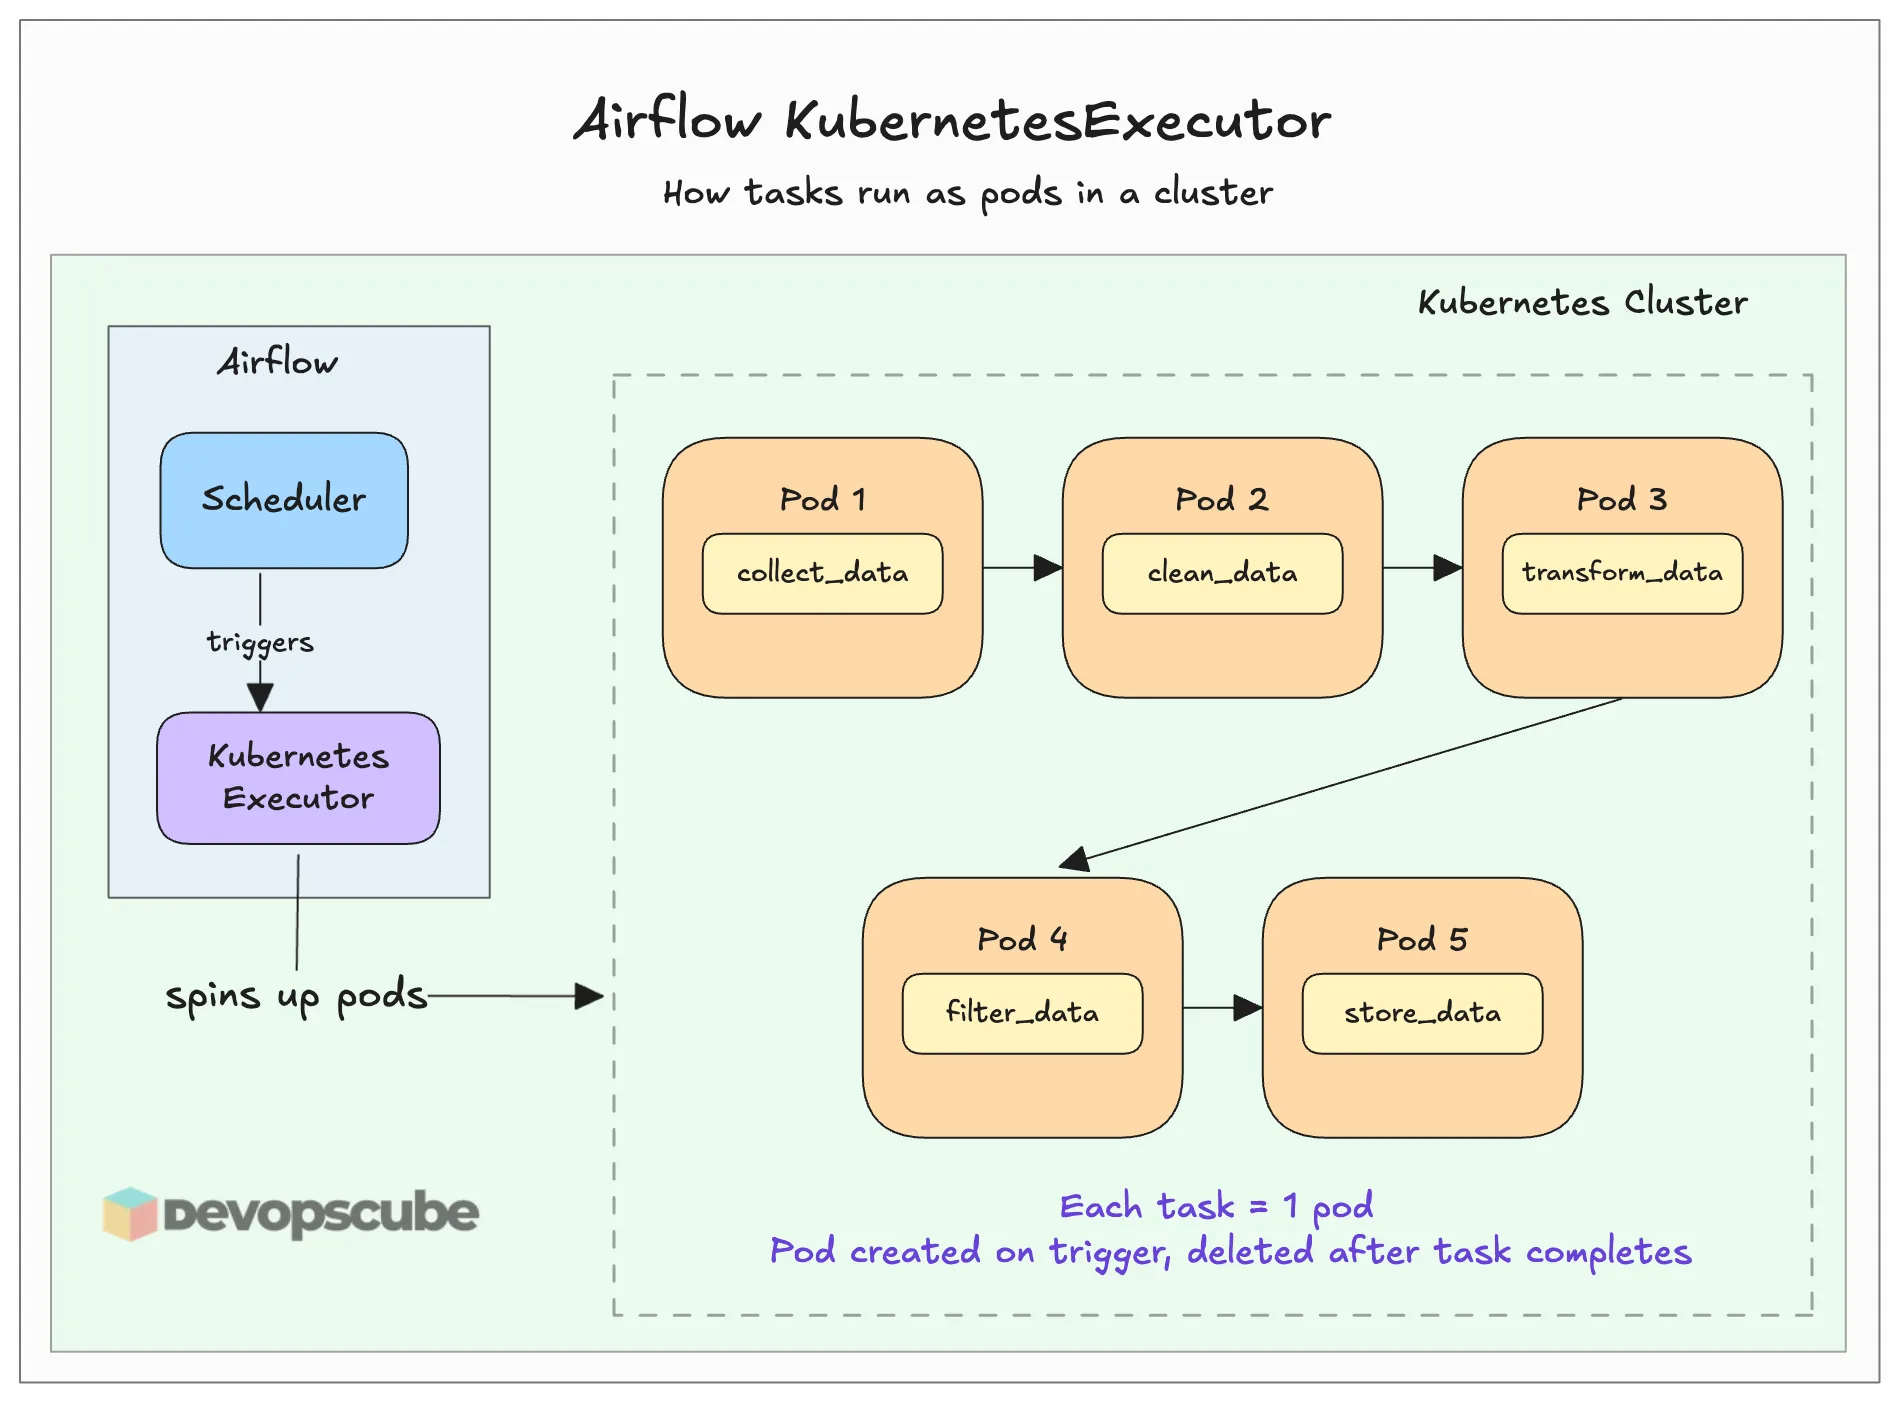
Think of it as the dedicated environment where your DAG tasks actually run. The above image illustrates it better.
There are multiple types of executors available for Airflow. We can choose one according to our needs. Here is a comparison table for the executors.
| Executor Types | Local Executor | Queued / Batch Executors | Containerized Executors |
| Available Executors | LocalExecutor | CeleryExecutor, BatchExecutor, EdgeExecutor | KubernetesExecutor, EcsExecutor |
| Where Tasks Run | Inside scheduler pod | Persistent worker pods | Ephemeral pods / containers |
| Workers Always Running | No | Yes | No |
| Task Isolation | No | No | Yes |
| Startup Speed | Instant | Fast | Slower (pod startup) |
| Scales Horizontally | No | Yes | Yes |
| Cost When Idle | Low | Higher | Low |
| Best For | Dev / small setups | High volume, speed matters | Isolated, on-demand workloads |
Now that you have the fair idea about Airflow, lets get started with he setup.
Prerequisites
To install Airflow on the Kubernetes cluster, we need some requirements.
- EKS cluster with volume provisioners
- Kubectl
- Helm
- GitHub Repository
Once you ensure all the above prerequisites are available, we can start the installation.
Airflow Setup Overview
Before we move to the setup, we need to understand the core components of Airflow.
Here are some of the core components that you should understand.
- Scheduler - This is the component that assigns the tasks to the executors to run jobs.
- Executor - This is the component that actually runs the tasks (Celery, Kubernetes Executor, Edge etc)
- DAG Processor - Gets DAG files from the configured repo.
- Database - Stores data of DAGs, task state, metadata, etc.
The following diagram illustrates the high level overview of running Airflow on Kubernetes.
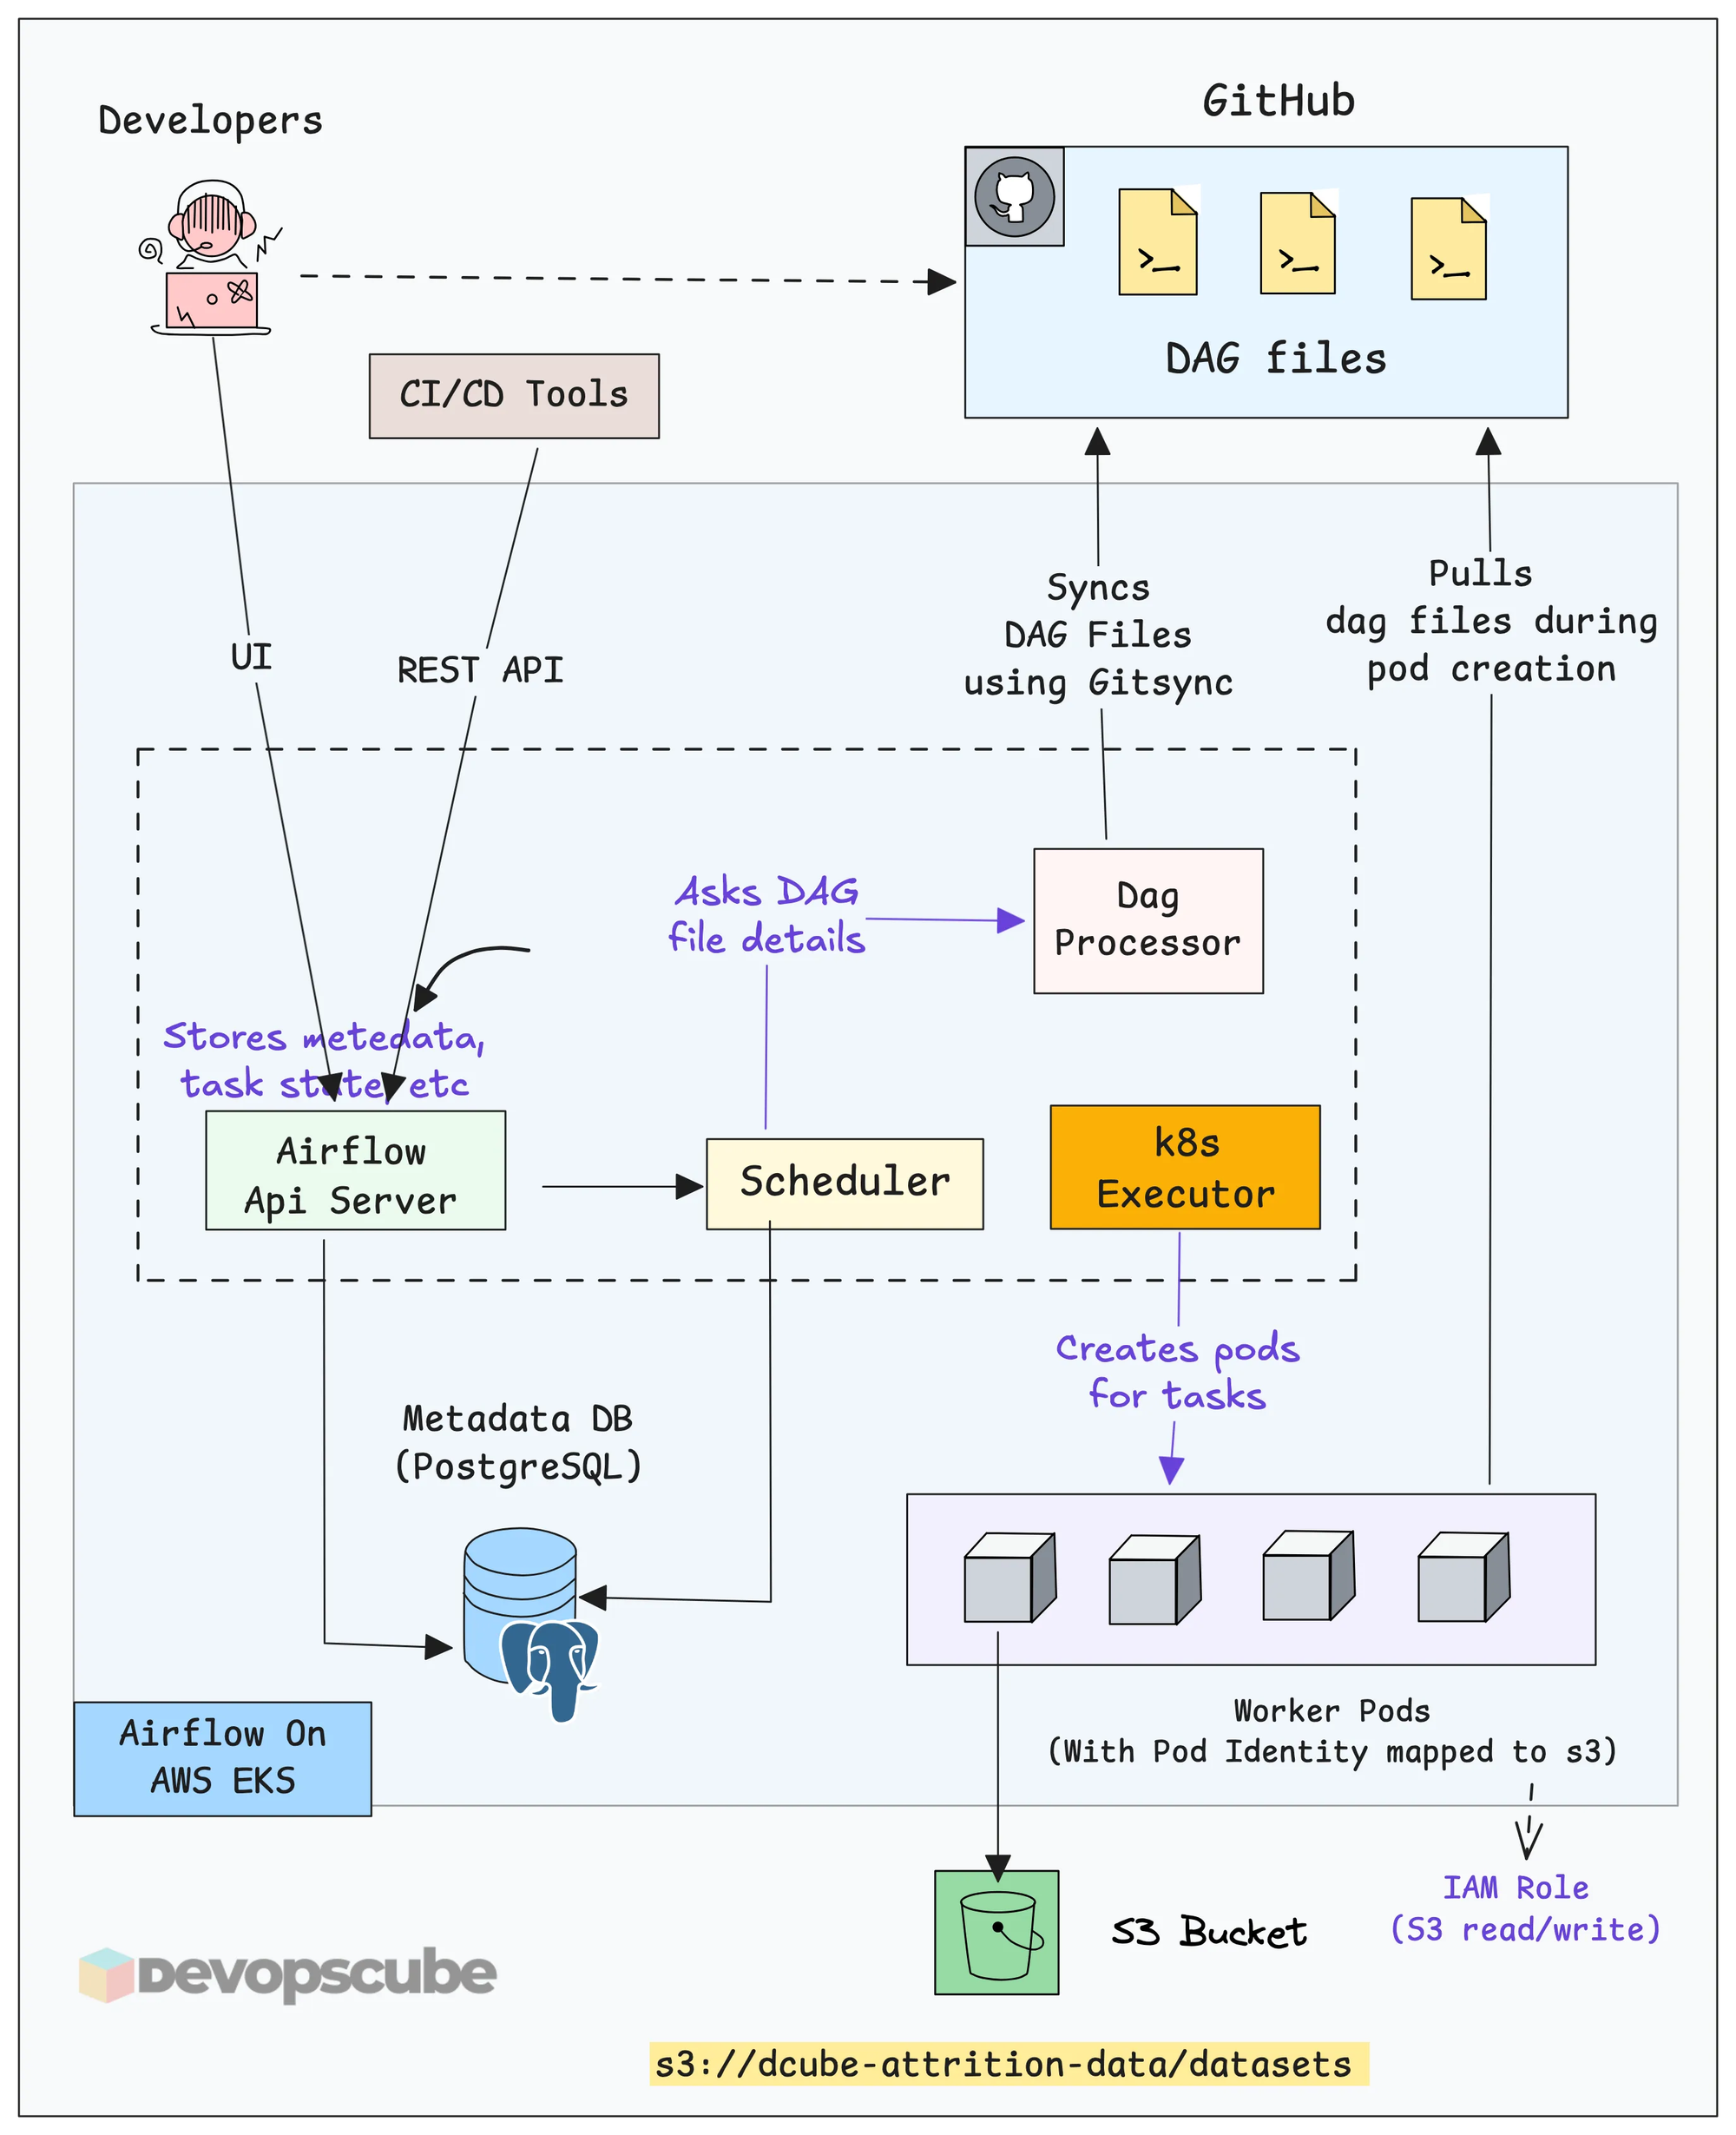
Here is how the overall workflow looks like.
- Developers push DAG files to GitHub through CI/CD. The entire pipeline code lives in Git.
- GitSync keeps Airflow in sync with GitHub. The DAG Processor runs a GitSync sidecar that continuously watches the repo. When a new DAG is pushed, Airflow picks it up automatically.
- The Scheduler reads the DAG and decides what tasks should run and when.
- The Kubernetes Executor creates a separate pod for the task. These are short-lived pods. Once the task is executed, it gets deleted.
- Worker pods execute the data-related tasks defined in the DAG.
Fork the GitHub Repository
Fork the following repository, which has all the files we are going to use.
https://github.com/techiescamp/airflow-setup.gitUse the following command to clone your forked repository.
git clone <your-repo-url>Then move into the airflow-setup folder using the following command.
cd airflow-setupAnd you can see the DAG file and custom values file we are going to use in this guide as shown below.
airflow-setup
    ├── README.md
    ├── dags
    │   └── etl-pipeline.py
    └── helm
        └── custom-values.yaml
Set up Apache Airflow using Helm
We are going to install Apache Airflow using the official Helm chart.
Lets get started.
Add Airflow Helm Repository
To install Airflow using Helm, first we need to add its Helm repository.
Use the following command to add the Airflow Helm repository.
helm repo add apache-airflow https://airflow.apache.orgThen use the following command to verify if the repository is added.
$ helm search repo apache-airflow

NAME                  	CHART VERSION	APP VERSION DESCRIPTION

apache-airflow/airflow	1.20.0       	3.1.8       The official Helm chart to deploy Apache Airflo...
Connecting to Private Git Repositories
In enterprise projects only private Git repositories are used. To access those from Airflow, you need to create a Kubernetes Secret with GitHub credentials.
Run the following command by replacing the values with your GitHub username and token.
kubectl -n airflow create secret generic git-credentials \
  --from-literal=GIT_SYNC_USERNAME=<your-github-username> \
  --from-literal=GIT_SYNC_PASSWORD=<your-github-token> \
  --from-literal=GITSYNC_USERNAME=<your-github-username> \
  --from-literal=GITSYNC_PASSWORD=<your-github-token>
Create Helm Custom Values File
We need to add gitSync configurations to Airflow to sync the DAG files from Github. We also need to configure Airflow to use the KubernetesExecutor because by default it is set to Celery executor.
To do that, we need to customize the Helm values file.
You can find the custom values file custom-values.yaml in the airflow-setup/helm directory as shown below.
executor: KubernetesExecutor

dags:
  gitSync:
    enabled: true
    repo: https://github.com/techiescamp/airflow-setup.git
    branch: main
    subPath: "dags"
    period: 60s
credentialsSecret: git-credentialsIf you need more configuration details, download the default values file using the following command and check it.
helm show values apache-airflow/airflow > values.yamlDeploy Airflow
Now, we are ready to install Airflow on Kubernetes.
Before running the installation command, make sure you are inside the helm folder.
cd helmNow, run the following command to install Airflow using the custom values file.
helm install airflow apache-airflow/airflow -n airflow --create-namespace -f custom-values.yaml
Once the command has run, check whether all the components are properly deployed.
$ kubectl -n airflow get po

NAME                                    READY   STATUS    RESTARTS   AGE
airflow-api-server-8bb48f6b9-7wjvk      1/1     Running   0          5m
airflow-dag-processor-d7686b7b4-zq6fx   3/3     Running   0          5m
airflow-postgresql-0                    1/1     Running   0          5m
airflow-scheduler-594986c799-bwjqp      2/2     Running   0          5m
airflow-statsd-587445b5b-8fcvg          1/1     Running   0          5m
airflow-triggerer-0                     3/3     Running   0          5m
The output ensures that all the Airflow components are running without any issues.
Access Apache Airflow UI
Now, we can open the Airflow UI. For that, we need to perform port forwarding so that we can access from the web browser of the local machine.
Use the following command to port forward Apache Airflow and see the UI.
kubectl -n airflow port-forward svc/airflow-api-server 8080:8080

Forwarding from 127.0.0.1:8080 -> 8080
Forwarding from [::1]:8080 -> 8080
Now, open any of the web browsers and paste the URL of http://localhost:8080
You will be prompted to log in. By default, both the username and password are admin.
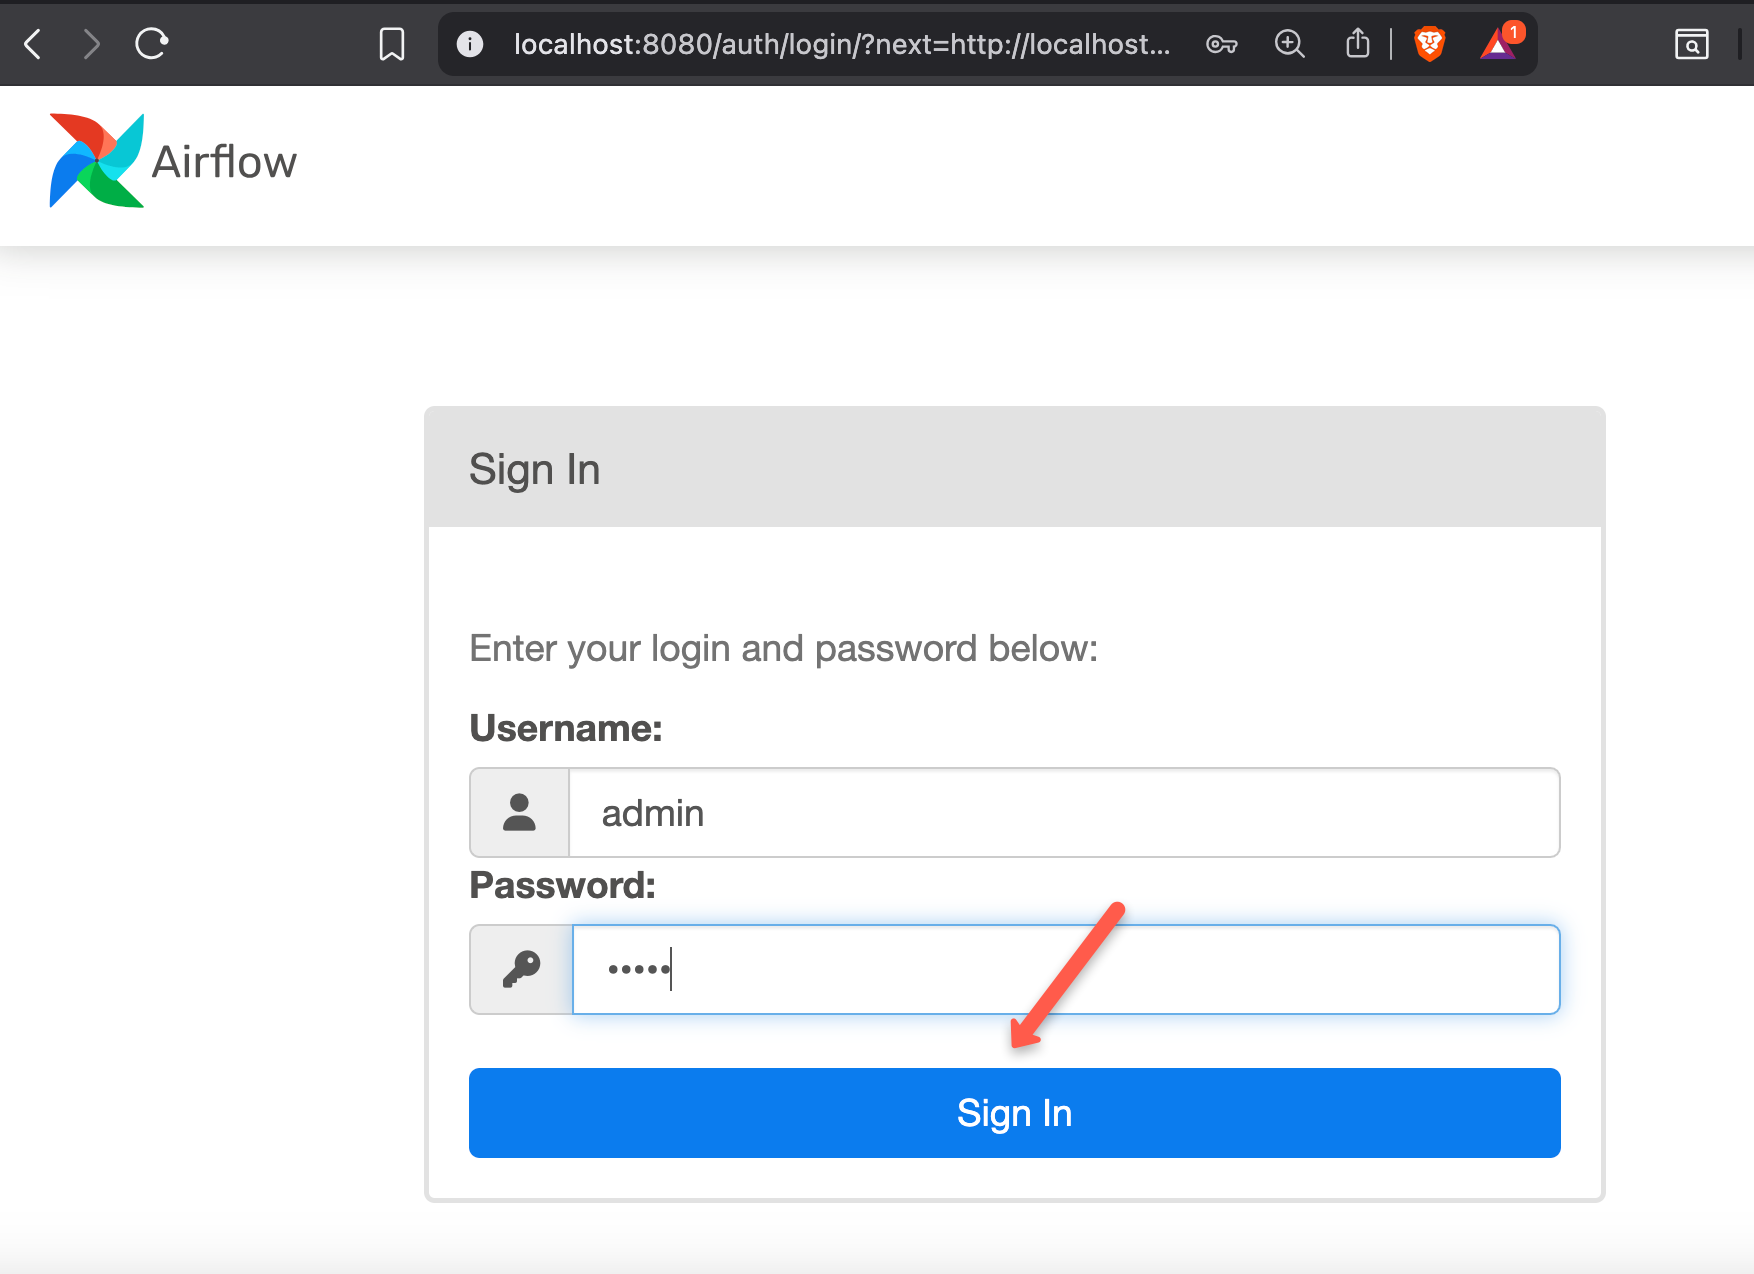
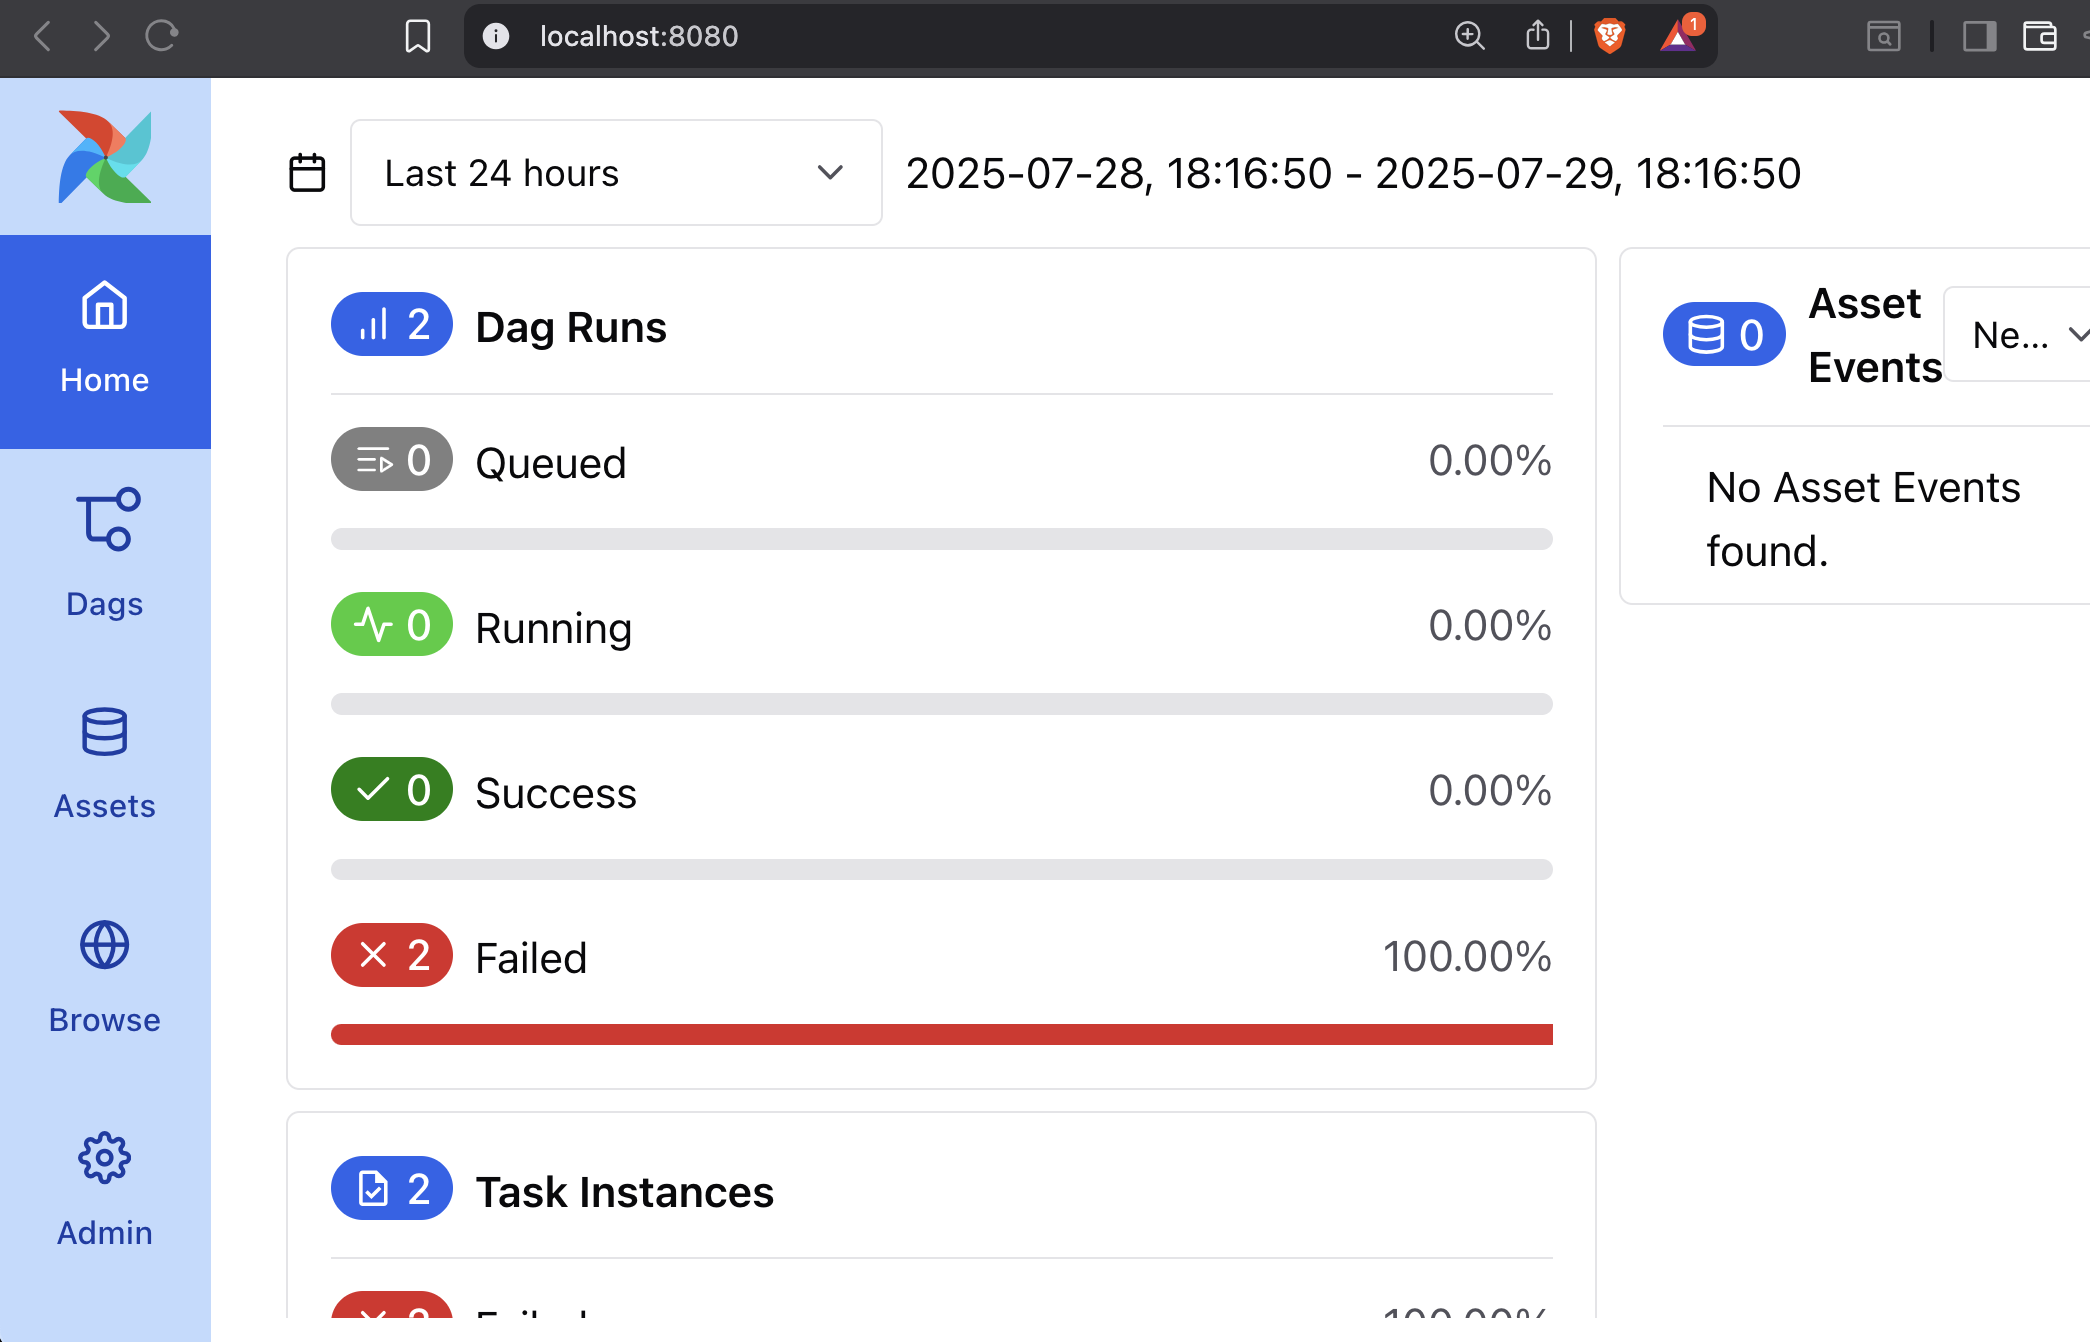
Once you log in, you will see a home page similar to the one below.
Access the DAG
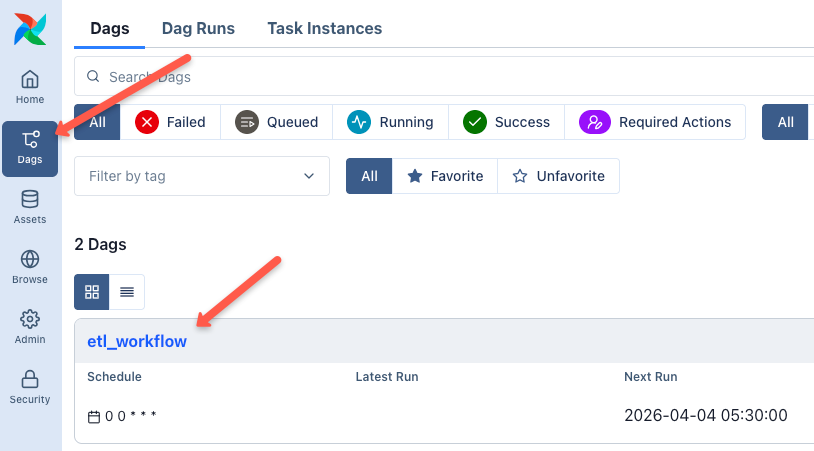
Now, go to the DAGs section in the Airflow UI. You should see the DAG listed there.
Since we configured gitSync with the Github repository through Helm, Airflow automatically syncs the DAG from the repository as shown below.
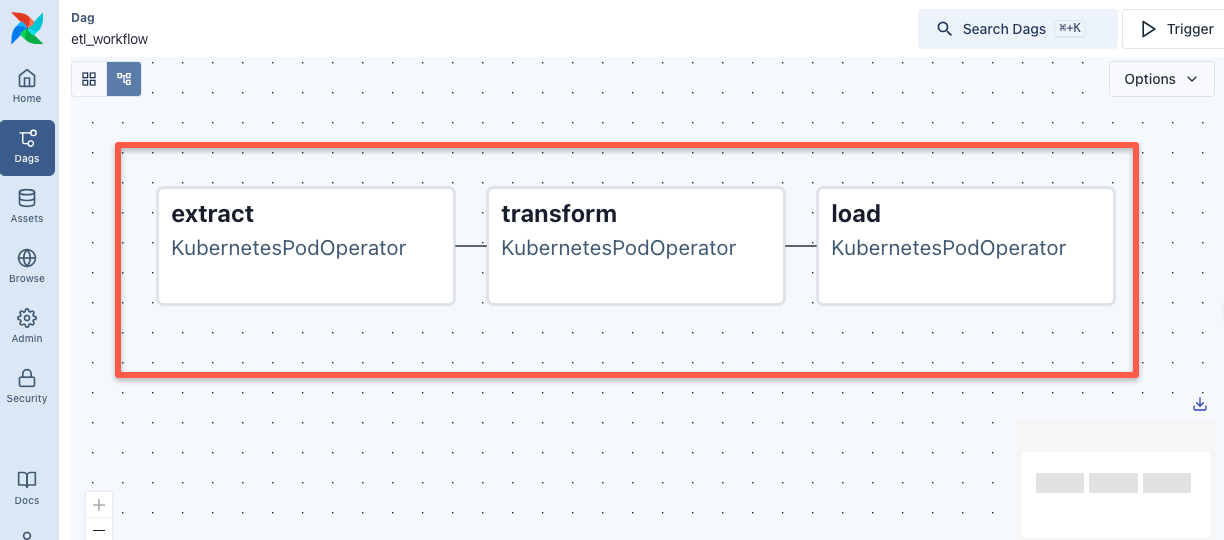
If you click on the DAG and open the Graph View, you can see the defined tasks in order, as shown below.
Trigger the DAG
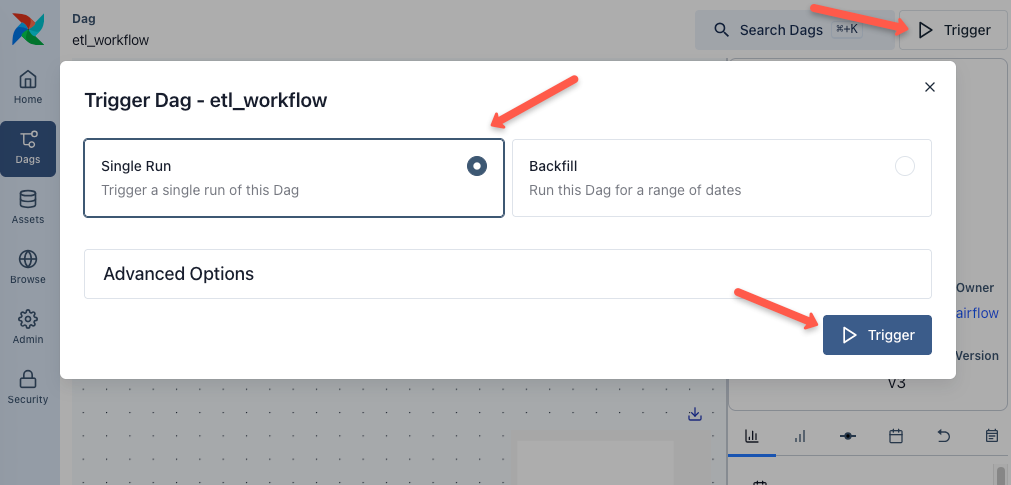
Now, let's trigger the DAG using the Trigger button and select the single run option, and then click the Trigger button as shown below.
It will take a few minutes for the entire pipeline to run. You can check the status of each task, as shown below.
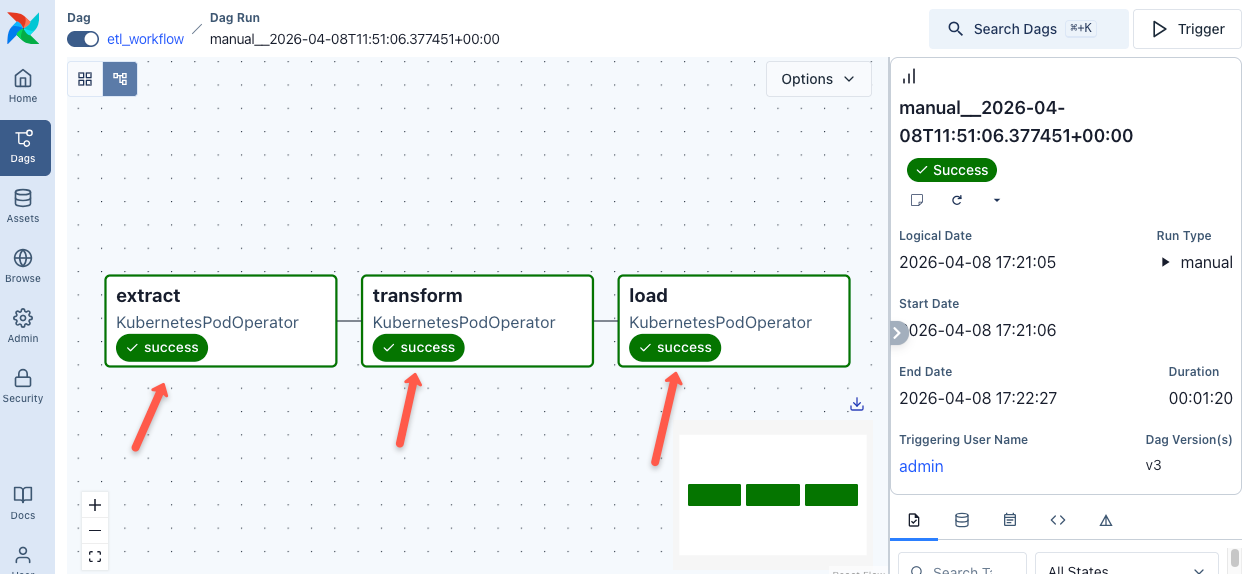
In real-world data and MLOps pipelines, DAGs are not always triggered the same way. There are three common patterns. Scheduled (cron-based), Event-driven (Eg,. on data arrival) and API-triggered for ad-hoc runs from CI/CD pipelines via the Airflow REST API
Also, as we mentioned earlier, we used KubernetesPodOperator for this example, which allows you to run tasks in separate pods with a custom Docker image.
There are also other operators available for different use cases. For example,
- BashOperator
- PythonOperator
- EmailOperator
- and more
You can check all available operators from the official documentation.
Cloning Repo From DAGs
There are use cases where you might want to clone the repo and push to repo from the DAG itself. For example, if you integrate DVC in Airflow, DVC will need push access to repo from the DAG. The following image illustrates this use case.
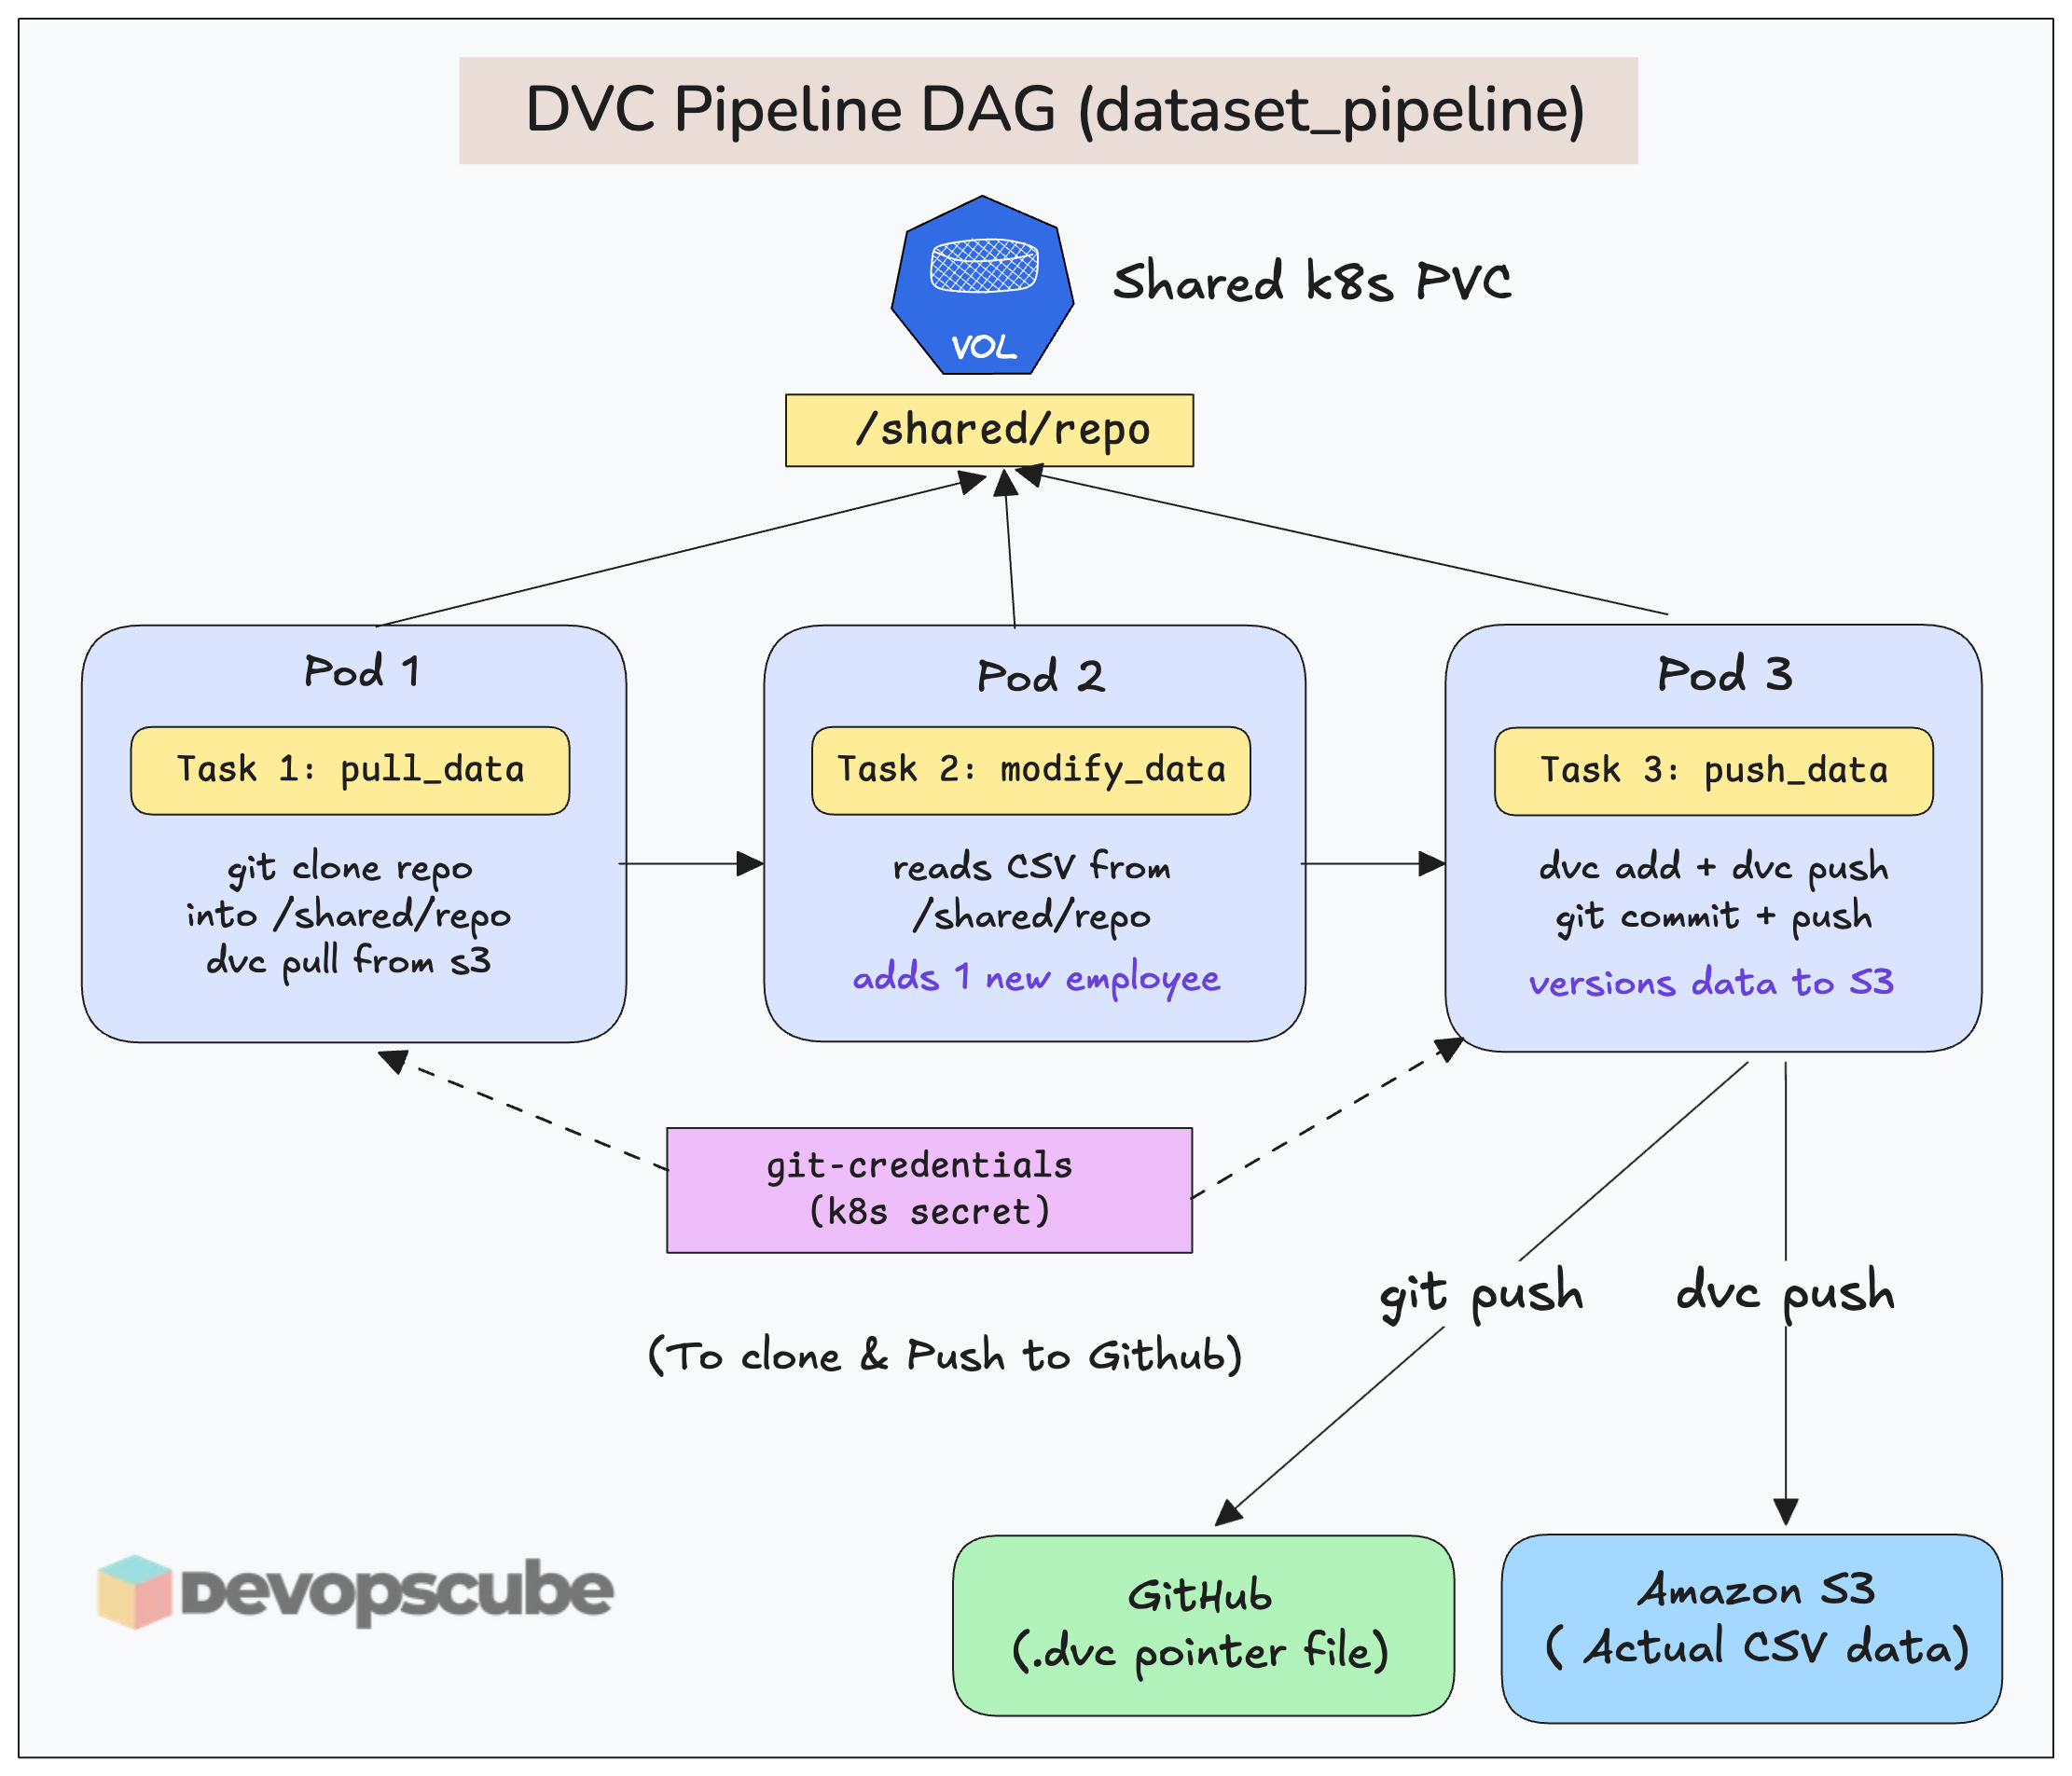
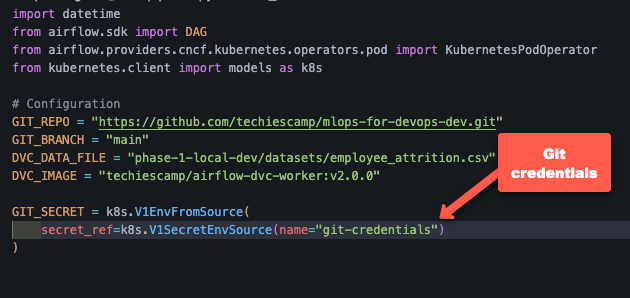
For that, in the DAG (using KubernetesPodOperator), you need to mount the Git secret into the worker pod as environment variables.
Here is a code example.
Clean Up
If you no longer need the Airflow setup, run the following commands to uninstall it.
helm uninstall airflow -n airflowThe PVCs created by the Helm deployment will be persistent. Use the following command to remove all.
kubectl delete pvc --all -n airflowTroubleshooting Airflow on K8s
Following are some of the issues you may face with Airflow on Kubernetes.
OOMKills for tasks
OOMKill is a common problem with Airflow worker pods. It happens when a container exceeds its allocated memory, and Kubenretes terminates it to protect node stability.
It can happen due to the following reasons.
- Memory-heavy code or data processing
- Incorrect request and limit resource configurations.
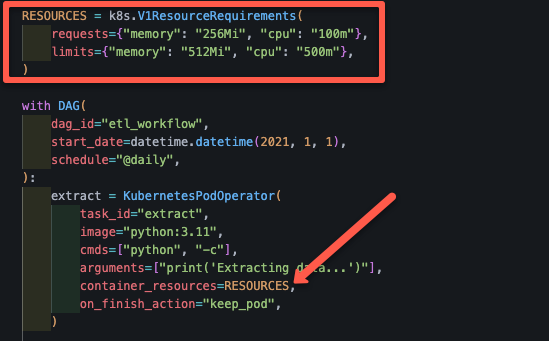
To fix this, set the memory request and limit for your tasks. If you are using KubernetesExecutor, you can set memory request and limit for each tasks in the DAG file itself.
For exampple, the following code snippet shows how we used the memory request and limit in the DAG file we used.
DAGs are Not Showing in UI
You have created a DAG file and synced the Git repo to Airflow, but it's not showing in the UI.
This may be caused by the following reasons:
- Check if the DAG directory you specified in GitSync is correct.
- Check the DAG file for any syntax issues and that the DAG object is specified in the file.
Using Multiple Repositories for DAGS
GitSync does not support multiple repos. You have to keep all dags inside a single repo and reads DAGs from a single folder.
But what if I want to use DAG's from multiple repositories?
Well, you can use Git Submodules that lets you embed multiple repos inside one repo.
For example,
main-airflow-repo/
 ├── dags/
 │    ├── team-a/   (submodule repo A)
 │    ├── team-b/   (submodule repo B)
 │    ├── ml/       (submodule repo C)
This way, GitSync pulls only main-airflow-repo. But inside it you already have multiple repos configured using a .gitmodules file.
Airflow Monitoring & Observability
Airflow deployment comes with a metrics exporter pod named statsd.
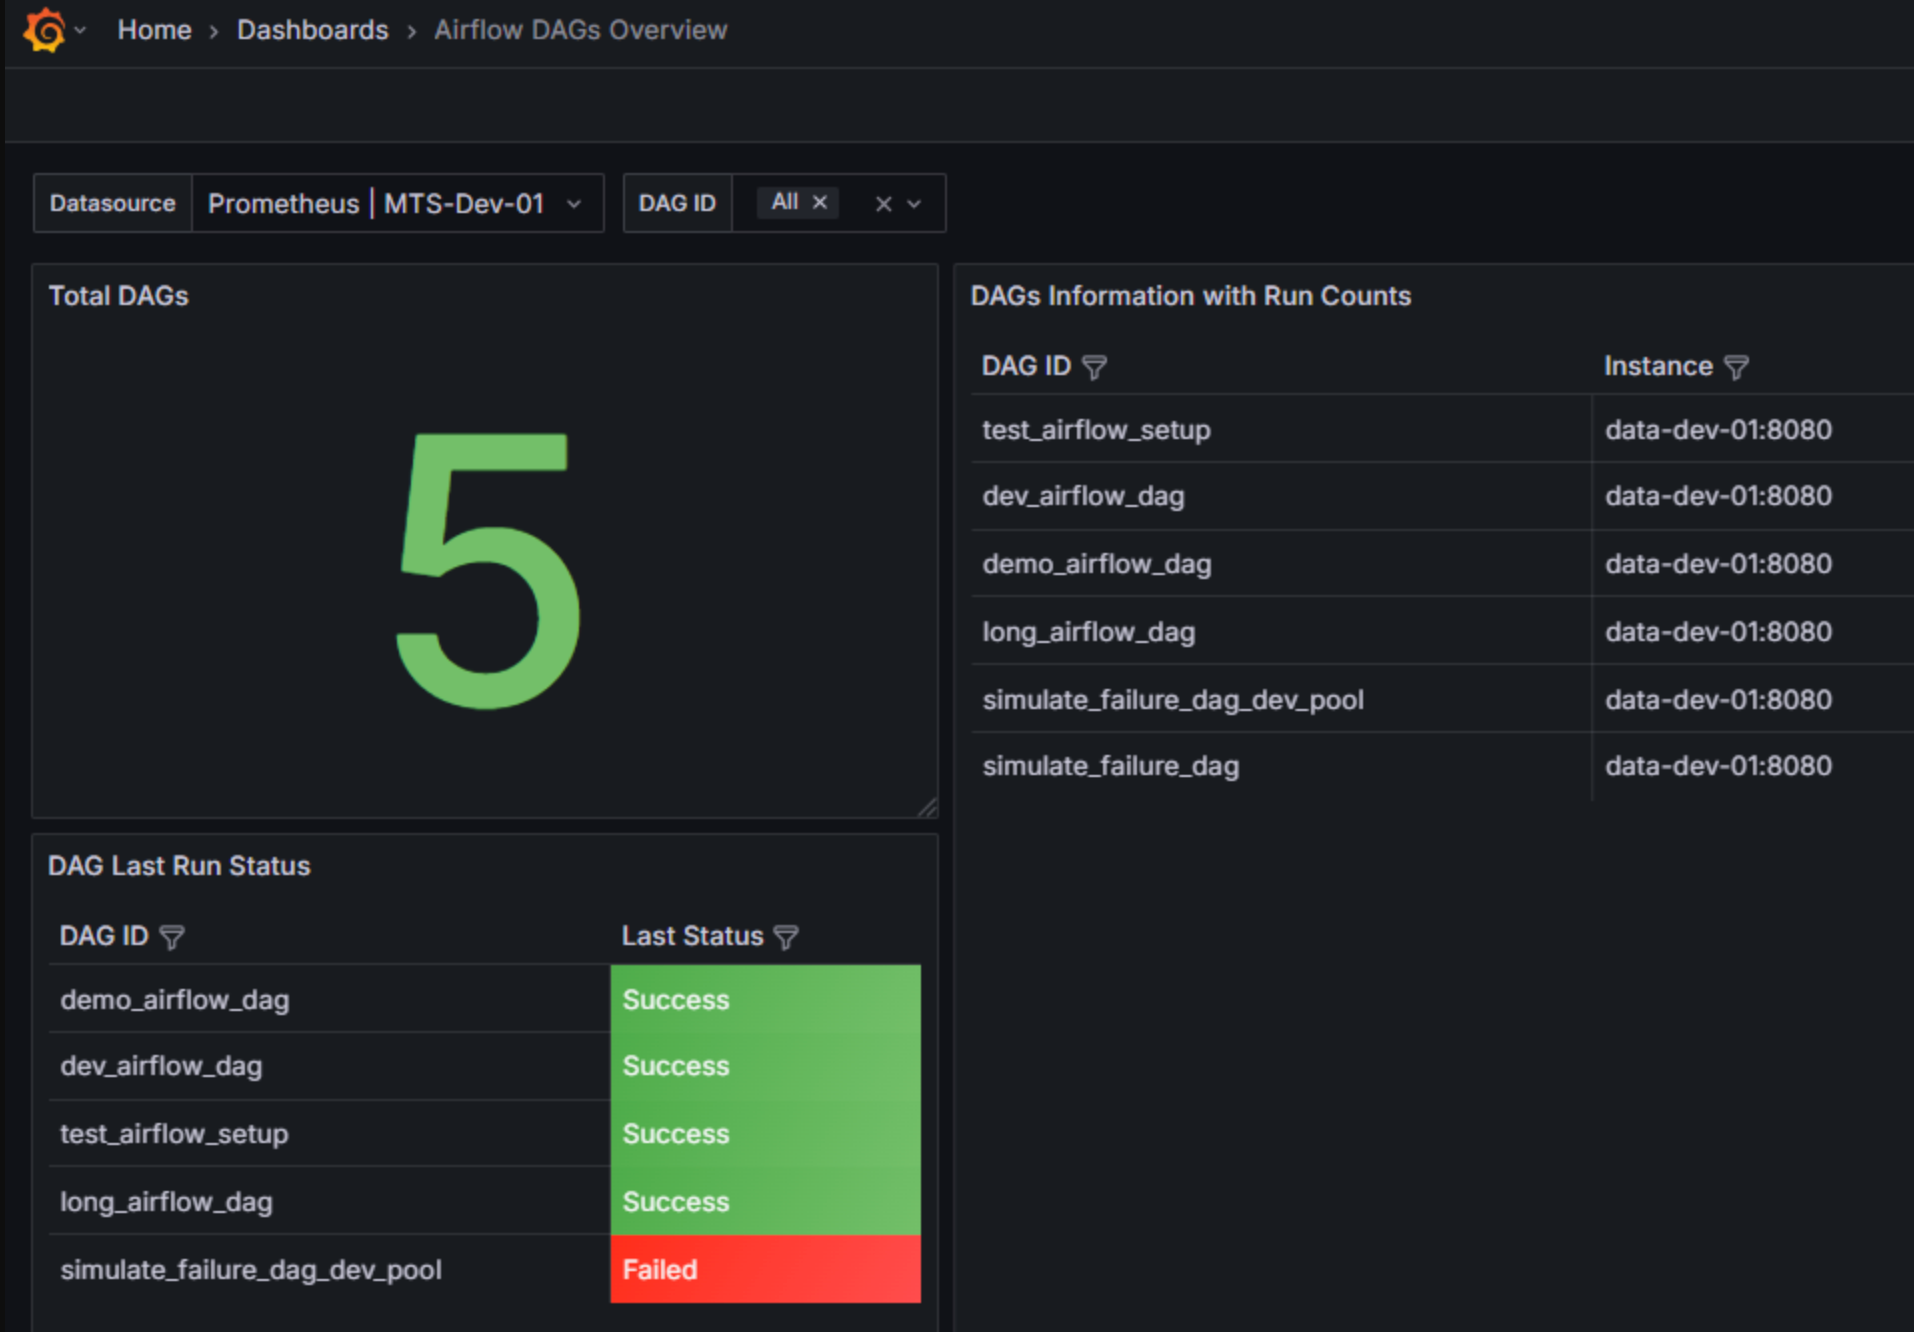
The statsd pod collects metrics from the Airflow pods and exposes them. We can use Prometheus to scrape the metrics and use Grafana to visualize it as a dashboard.
Here is an example Grafana template.
Reducing Costs With Spot Instances
If you want to save costs on Airflow executors on cloud, you can make use of spot instances.
You can add spot instance to the Kubernetes cluster and use nodeSelector, taints + tolerations to schedule the executor pods on it.
Also, keep in mind that, spot nodes can disappear anytime. This means Pods get killed immediately. So, if you plan to use spot instances, you must design for failure.
Production Hardening & Readiness
The following are some of the production hardening tips for Airflow.
- External Metadata Databases: Don't use the default PostgreSQL database, use managed databases like AWS RDS for production environment.
- Enable TLS for secure communication: Configure Ingress controller with TLS certificate to make the communication between user and Airflow secure.
- Configure SSO for user management: Replace the default login with SSO by integrating OAuth2 or OIDC.
- Use private repos to store DAGs: DAGs have the logic of your project, so keep it secure in a private repository and use the SSH method to authenticate private git repos.
- Secret Management: In a production environment, credentials and API keys are not stored in Kubernetes Secrets. Use external Secret Management tools like HashiCorp Vault or Secret Managers of the cloud platform you are running in (eg, AWS Secrets Manager).
- Accessing Cloud Resources: Use cloud-native identity mechanisms to access cloud resources from worker pod. For example, in AWS, you can use IAM Roles for Service Accounts (IRSA) or Pod Identity to associate an IAM role with a Kubernetes service account. The worker pods use this service account to access resources like S3 without storing credentials inside the container.
Here is a quick production checklist for Airflow
- Is persistence enabled for logs?
- Are resource limits set on all DAGs?
- Are you using a Private Registry for custom images?
- Is RBAC configured for the Airflow UI?
Conclusion
When it comes to MLOPS, Airflow is a key tool used by many organizations. As Devops engineers, understanding Airflow infrastructure foundations can help in design and operate data & ML pipelines in actual projects.
This blog covered the installation and configuration of Apache Airflow on a Kubernetes cluster with GitSync & Kubernetes executor.
Also, we focussed specifically on Airflow Kubernetes deployment, its management and some Day 2 operations. We have used Airflow for ETL process. We are yet to explore it for MLOPS and GenAI workflows.
Over to you!
Are you planning to use Airflow in any of your project? What is your use case?
Drop your insights in the comments below.