

In this guide, you will learn about Kubernetes Swap, how it works, and how to enable it in a Kubernetes cluster and use it with pods.
In this guide, you will learn about the following.
- How Kubernetes swap works
- Swap real world use cases
- Hands-on example to enable swap and test it.
What is Kubernetes Swap?
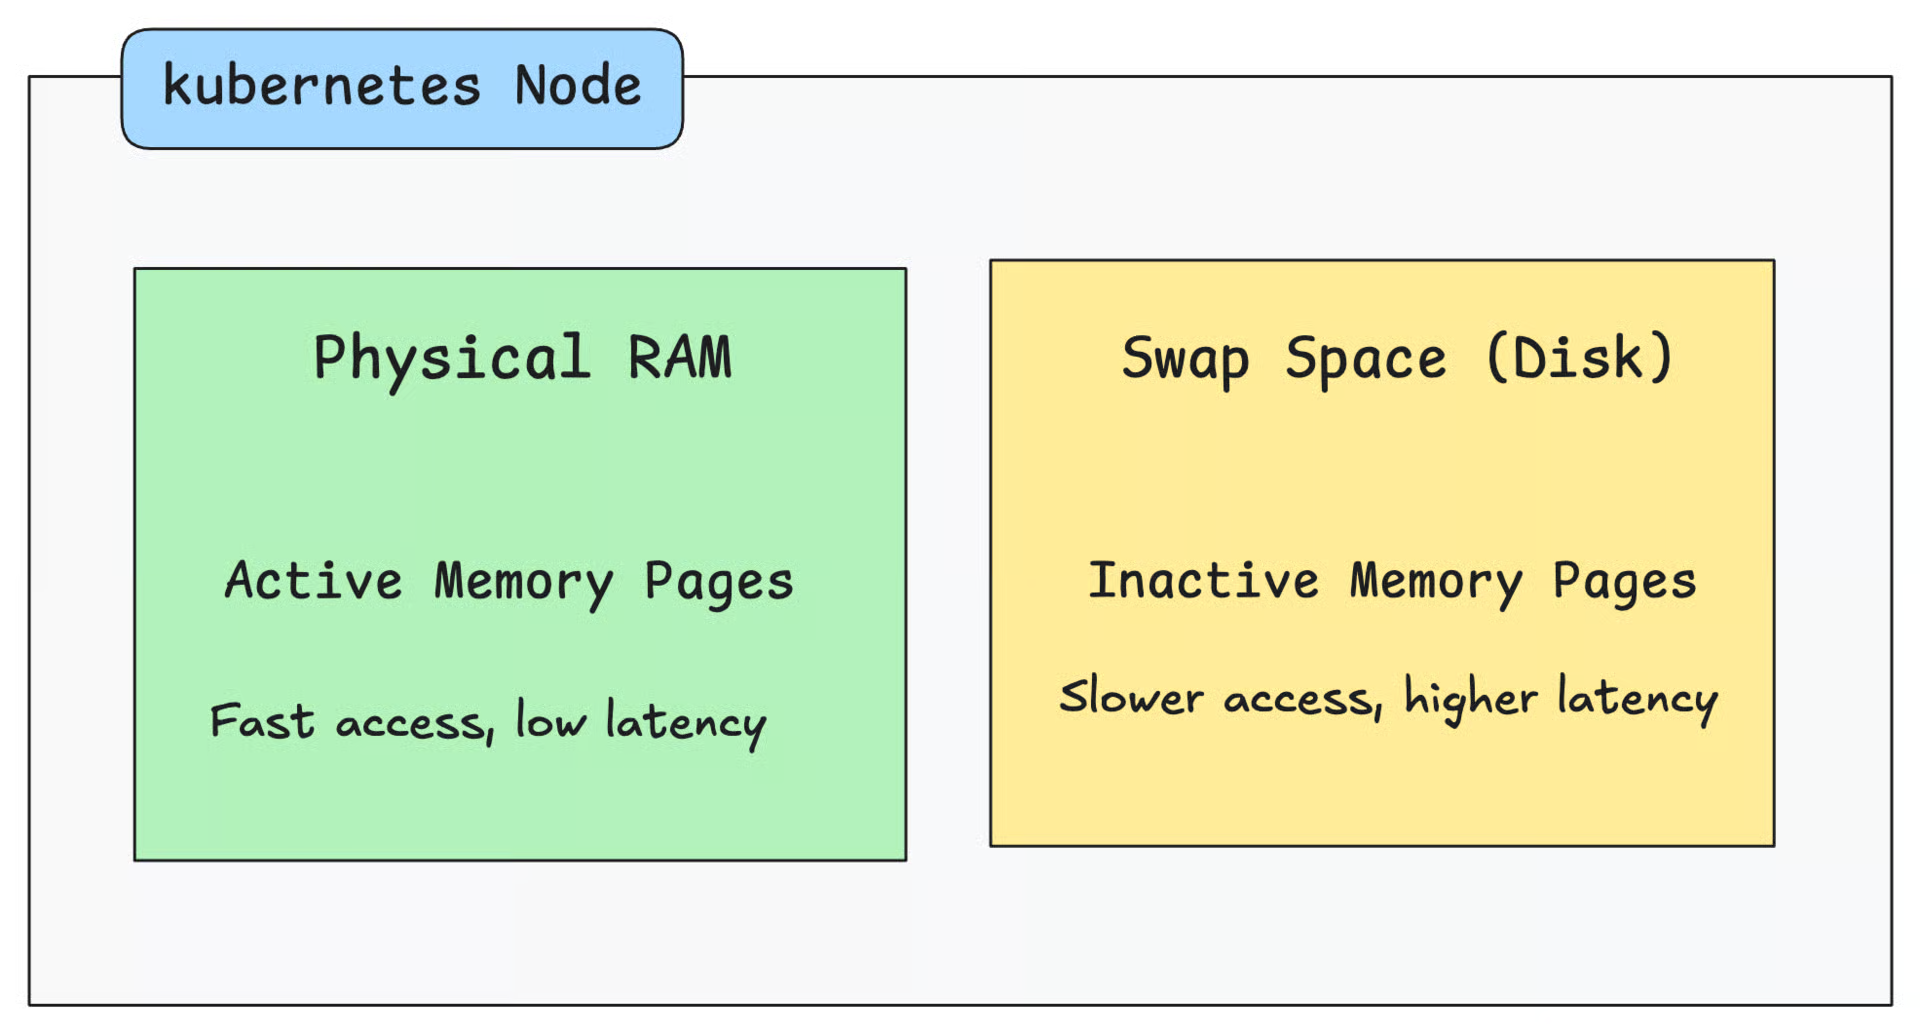
When you deploy a pod in Kubernetes, each node uses its physical RAM to run containers.
If a node runs out of memory, Kubernetes may start killing Pods (OOMKilled) to keep the node stable, even if some of those Pods haven't crossed their own memory limits.
To prevent this, Kubernetes provides the option to enable swap memory on nodes.
It is built on top of the Linux swap functionality, but Kubernetes adds its own control through the kubelet and container runtime to manage how pods use it.
Historically, Kubernetes required swap to be disabled on all nodes (kubelet wouldn't start with swap enabled).
However, Kubernetes now has support (in beta as of version 1.34) to allow using swap on nodes.
Use Case
The key use case for swap is for apps with large memory footprint but low active usage.
For example, tools like Jenkins or SonarQube run on the Java Virtual Machine (JVM), which reserves a large amount of memory when it starts. Even if the app doesn’t fully use that memory, the space stays allocated.
In such cases, swap can help by moving the unused or old parts of memory (like inactive Java objects) to disk.
Another example is applications that may occasionally experience short-term spikes. It can use swap as a safety buffer instead of being OOMKilled.
For example, batch processing jobs, report generation systems, or data import/export operations.
On resource-limited nodes (like edge devices or small VMs), swap provides a bit of extra breathing room for workloads when physical memory runs out.
Even legacy Java-based apps such as Apache Tomcat, WebLogic, or JBoss can benefit from swap in the same way.
How Kubernetes Swap Works?
Below is an overall workflow of how Kubernetes Swap works.
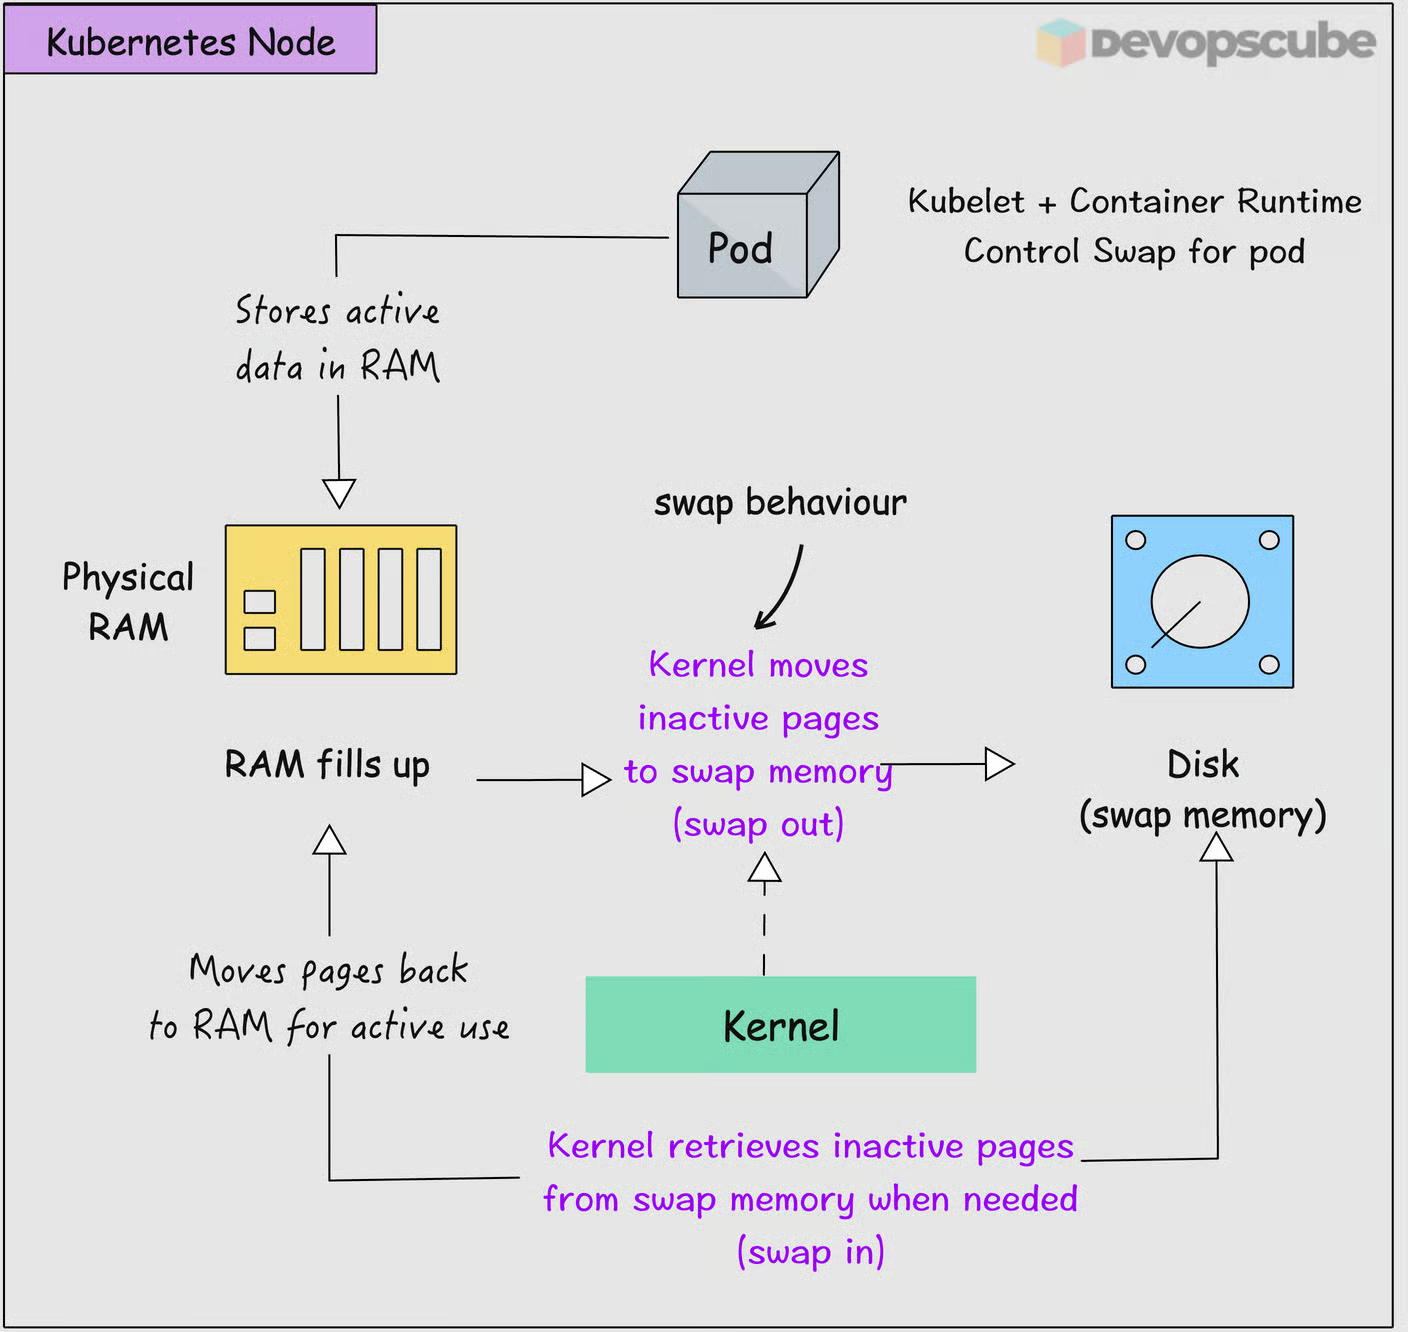
When a node’s physical memory (RAM) is full, the kernel moves less-used memory pages (blocks of memory) to swap space on disk.
This helps prevent the system from crashing due to OOM (Out Of Memory) errors by providing a temporary buffer.
Swap also comes with a trade-off. The disk I/O is much slower than RAM, so performance can drop when the system starts using swap.
This way, swap activity doesn't compete with system or application I/O.
Also, since swap can hold plain data pages, it is advisable to encrypt swap to reduce security risks.
Another key thing to note is that the Kubernetes scheduler ignores swap when deploying workloads. This means the scheduler only deploys pods based on requests/limits, not swap.
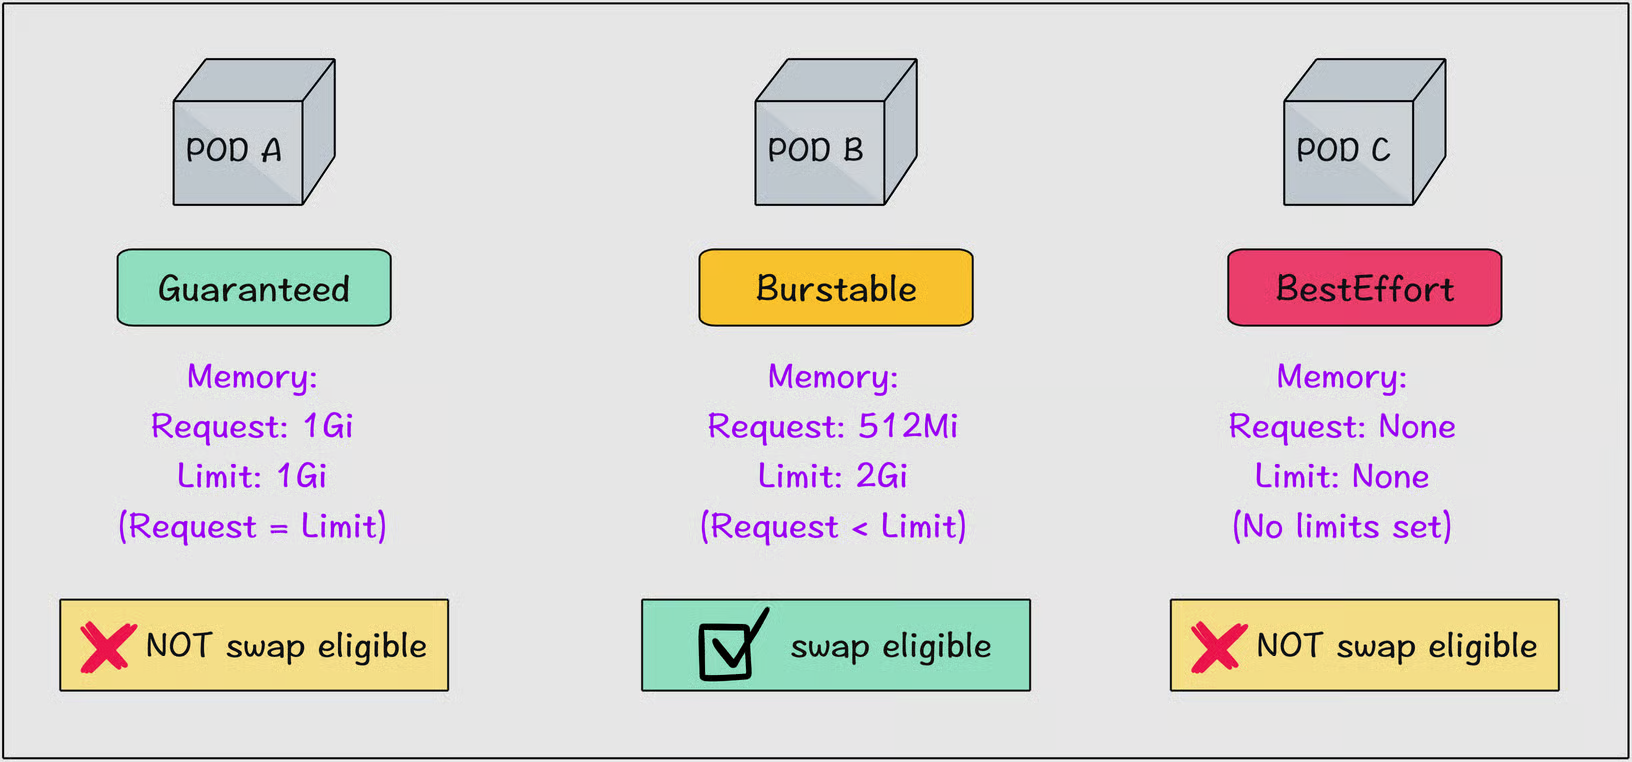
Pod QoS Classes & Swap Eligibility
When swap is enabled in Kubernetes, whether a pod can use swap depends on its QoS class.
Guaranteed pods and BestEffort pods cannot use swap (they are prohibited).
Burstable pods are the only ones allowed swap using the calculation given below.
How is Swap Memory Allocated for Pods?
A pod cannot use all swap memory because there is a swap limit on the pods.
Swap memory for each pod is allocated using the formula below.
containerSwapLimit = (containerMemoryRequest / nodeTotalMemory) × totalPodsSwapAvailable
For example, lets say your node has 2GB RAM, 2GB swap memory, and the pod request is 512MiB, then the total swap memory the pod can use is ~512MiB.
Lets look at another example involving two Burstable pods.
Let’s say a a node has 4 GB of RAM and 2 GB of swap space.
Now there are two Burstable pods. Pod A requests 1 GB and Pod B requests 2 GB.
Pod A swap = (1 GB / 4 GB) × 2 GB = 0.5 GB
Pod B swap = (2 GB / 4 GB) × 2 GB = 1 GB
Together they use 1.5 GB of swap, leaving 0.5 GB of swap unused.
Swap & Memory Limit
Even when swap is enabled on a node, a pod can never use more memory than its defined memory.limit specified in resource spec.
Here is what happens.
The memory limit in the pod spec defines the total memory (RAM + swap) the container can use.
Once a container crosses that limit, the kubelet will OOMKill (Out-Of-Memory kill) the container even if there is unused swap space.
Swap does not extend or bypass the limit.
How to Enable Swap in Kubernetes?
There is no built-in way to enable swap in Kubernetes. You must manually enable swap on each worker node where you want to use it.
Now, lets look at how to enable it.
I am using a two node cluster, and I am going to enable swap on node01.
$ kubectl get no

NAME           STATUS   ROLES    AGE   VERSION
controlplane   Ready    <none>   45m   v1.33.2
node01         Ready    <none>   45m   v1.33.2
First, ssh into node01.
ssh node01To enable it, the nodes should be Linux-based, and the cgroup should be version 2.
To check the cgroup version, run the following command.
stat -fc %T /sys/fs/cgroup
If the output is cgroup2fs as shown below, then it's version 2.
$ stat -fc %T /sys/fs/cgroup

cgroup2fs
Then run the following commands to create a swap file and enable it.
sudo fallocate -l 2G /swapfile
sudo chmod 600 /swapfile
sudo mkswap /swapfile
sudo swapon /swapfile
free -h
You will get the following output as below a 2GB swap memory is created.
$ free -h

       total        used        free      shared  buff/cache   available
Mem:   3.7Gi       576Mi       1.2Gi       2.0Mi       2.0Gi       3.0Gi
Swap:  2.0Gi          0B       2.0Gi
Then open the kubelet config file.
sudo vi /var/lib/kubelet/config.yaml/etc/kubernetes.And, add the following line to it.
failSwapOn: false
memorySwap:
  swapBehavior: LimitedSwap
Save and close the config file and restart kubelet.
sudo systemctl daemon-reload

sudo systemctl restart kubelet
Now, come out of the node and run the following command to check if swap is enabled.
kubectl get nodes -o go-template='{{range .items}}{{.metadata.name}}: {{if .status.nodeInfo.swap.capacity}}{{.status.nodeInfo.swap.capacity}}{{else}}<unknown>{{end}}{{"\n"}}{{end}}'If it is enabled for node01, you will get the following output.
controlplane: <unknown>
node01: 2147479552
You also use the following top command to check the swap memory usage.
kubectl top nodes --show-swapKubectl version 1.34 or aboveYou will get the output as shown below.
NAME          CPU(cores)  CPU(%)  MEMORY(bytes)  MEMORY(%) SWAP(bytes)   SWAP(%)

controlplane  70m         3%      762Mi        64%         <unknown>     <unknown>
node01        77m         4%      940Mi           52%         0Mi           0%
Hands-On Example
Let’s create a memory stress pod to see what happens when the nodes memory reaches the limit.
I am testing this on a node with 2GB RAM.
Given below are the current usage and available memory of the node.
$ free -h

        total        used        free      shared  buff/cache   available

Mem:    1.9Gi       917Mi       128Mi       3.3Mi       1.1Gi       1.0Gi
Swap:   2.0Gi        12Mi       2.0Gi
You can see it has it has 1Gi memory left, so i am going to create a stress pod which can create stress upto 1Gi to check memory swaping.
apiVersion: v1
kind: Pod
metadata:
  name: swap-demo
spec:
  restartPolicy: Never
  nodeSelector:
    kubernetes.io/hostname: swap-test-7vutqmvu9-pokx3
  containers:
  - name: stress
    image: alpine:3.20
    command: ["sh","-c"]
    args:
      - |
        set -e
        apk add --no-cache stress-ng >/dev/null
        echo "Before:"; free -h
        stress-ng --vm 1 --vm-bytes 1000M --vm-keep --timeout 90s --metrics-brief
        echo "After:"; free -h; sleep 20
    resources:
      requests:
        memory: "512Mi"
      limits:
        memory: "1000Mi"
Change the nodeSelector, if your nodes name is different.
Apply the above manifest and wait until it starts running.
Once it starts running, SSH into node01 and run the following command to check the memory usage.
free -hYou will get the following output.
$ free -h

        total        used        free      shared  buff/cache   available
Mem:    1.9Gi       1.7Gi        73Mi       6.7Mi       266Mi       184Mi
Swap:   2.0Gi       343Mi       1.7Gi
As you can see, some data from RAM has been moved to swap (inactive pages). Almost 343 MiB used.
As the system was low on RAM, the kernel started using swap space to offload inactive memory pages.
This prevents the pod from being OOMKilled because of insufficient memory.
Identifying Nodes With Swap
You might not need all the nodes to be swap enabled. So, how do we find nodes with swap?
For this, Kubernetes provides a way to detect hardware features and system configuration using the node feature discovery (NFD) addon.
If you don't have NFD installed, run the following command.
helm install -n node-feature-discovery --create-namespace nfd oci://registry.k8s.io/nfd/charts/node-feature-discovery --version 0.18.1When you enable swap, kubernetes add feature.node.kubernetes.io/memory-swap=true label to the nodes.
Now, if you want to schedule pods only on swap-enabled nodes, you can use the nodeSelector feature with this label as shown below.
nodeSelector:
  feature.node.kubernetes.io/memory-swap: "true"
Monitoring swap
If you are enabling swap, you must monitor its usage. This way, you can perform tests to understand how it behaves under actual load.
When you enable swap, Kubernetes provides metrics that you can monitor using tools like Prometheus. Following are the key metrics that provide observability for swap.
node_memory_SwapCached_bytesnode_memory_SwapTotal_bytesnode_memory_SwapFree_bytes
Also, machine_swap_bytes shows the swap capacity of the node.
This way, cluster operators can see how much swap is being used. This observability helps in understanding performance impacts and making decisions.
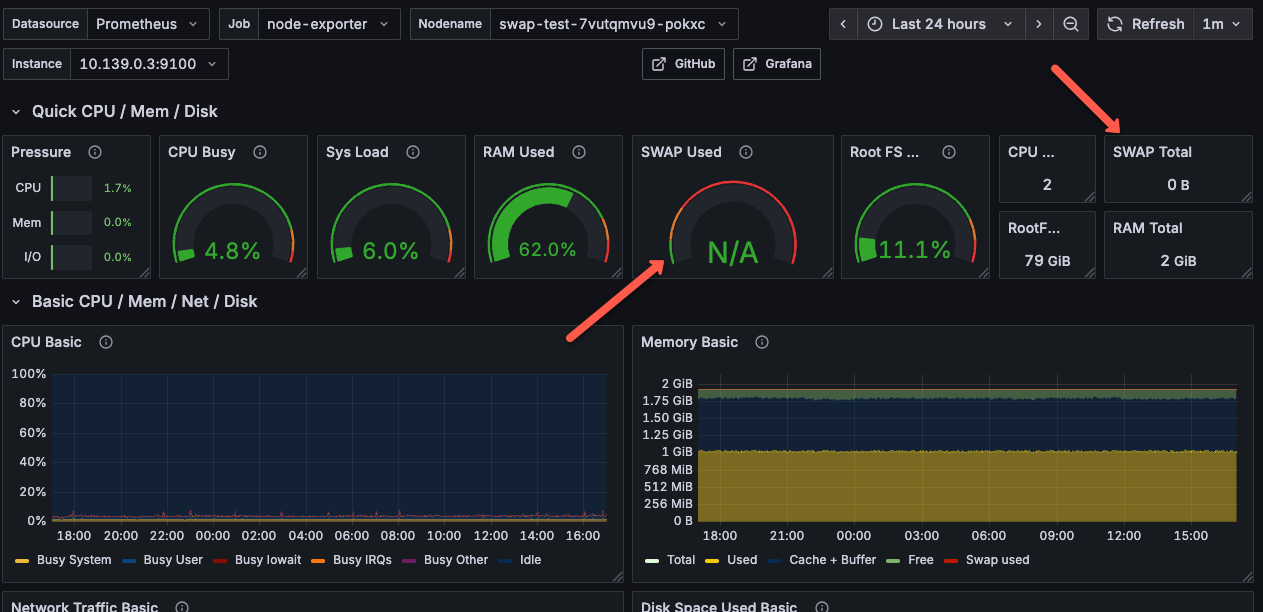
I have already deployed Prometheus on my cluster, and given below is an example of a Grafana dashboard, showing how swap memory will be shown in it.
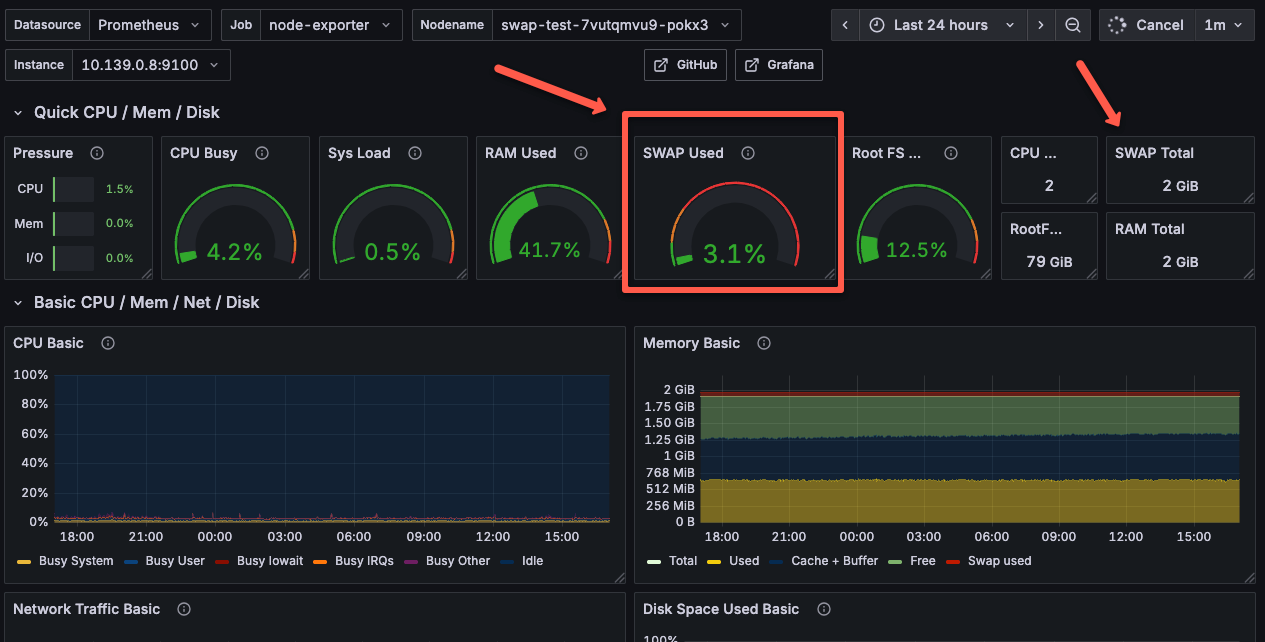
And, if the node doesn't have swap enabled, it will show as not applicable as shown below.
Conclusion
In this guide, you have learned about Kubernetes Swap, how it works, how to enable Kubernetes Swap in a Kubernetes cluster, and tried it in a hands-on section.
While this feature helps in a few use cases, you need to test it and configure it in a way that doesn't affect your workloads in the cluster.
Also, the following are the scenarios where you should not use swap for workloads.
- Do not use swap for apps that require predictable performance. For example, databases, real‐time APIs, microservices etc
- If the node storage is slow, do not enable swap. It can make things worse.
Over to you.
Give the swap feature and try and let us know if you face any issues.