

In this DevOps project, you will learn how to deploy Jenkins on an AWS Autoscaling group with an Application Load Balancer and EFS filesystem for Jenkins' data directory.
We aim to implement the following concepts in the project.
- Immutable Infrastructure
- Infrastructure as Code (Provisioning & Configuration Management)
- External Config/Secret management
Tools & Services Used
For this Jenkins HA project, I have used the following DevOps Tools
- GitHub: Repository to store IaC
- Packer: To build Jenkins Controller and agent AMIs
- Ansible: To configure Jenkins controller and agent during the AMI building process
- Terraform: To provision AWS resources
- Python Boto3: To retrieve SSH public key from AWS parameter store.
Following are the AWS services used.
- IAM: To create IAM Role/Instance Profile for Jenkins Controller and Agent Nodes.
- EFS: To store Jenkins data
- AWS Parameter Store: To store SSH private and public keys as secrets to configure agents.
- Autoscaling Group: To deploy the Jenkins controller
- Application Load Balancer: To have a static DNS endpoint for the Jenkins controller instance running in the autoscaling group.
Prerequisites
To deploy this setup, you need to ensure that the following components are installed and properly configured on your workstation (laptop) or the server that you use for development.
- Hashicorp Packer
- Terraform
- Ansible
- AWS CLI, configured with default region as us-west-2 and AWS credentials that have admin access to the AWS account.
We will be using the default VPC in the us-west-2 (Oregon) region. There will be four default subnets. We will be using three subnets from the following three availability zones:
- us-west-2a
- us-west-2b
- us-west-2c
Ensure you have an existing key pair in your AWS account for the Oregon region. We will use it with instances to enable SSH access.
Free AWS Credits: Apply for AWS POC Credits to get $300 in free credits. This way you can spin up big servers for POC without inquiring any costs.
Project Architecture
Here is the high-level project architecture.
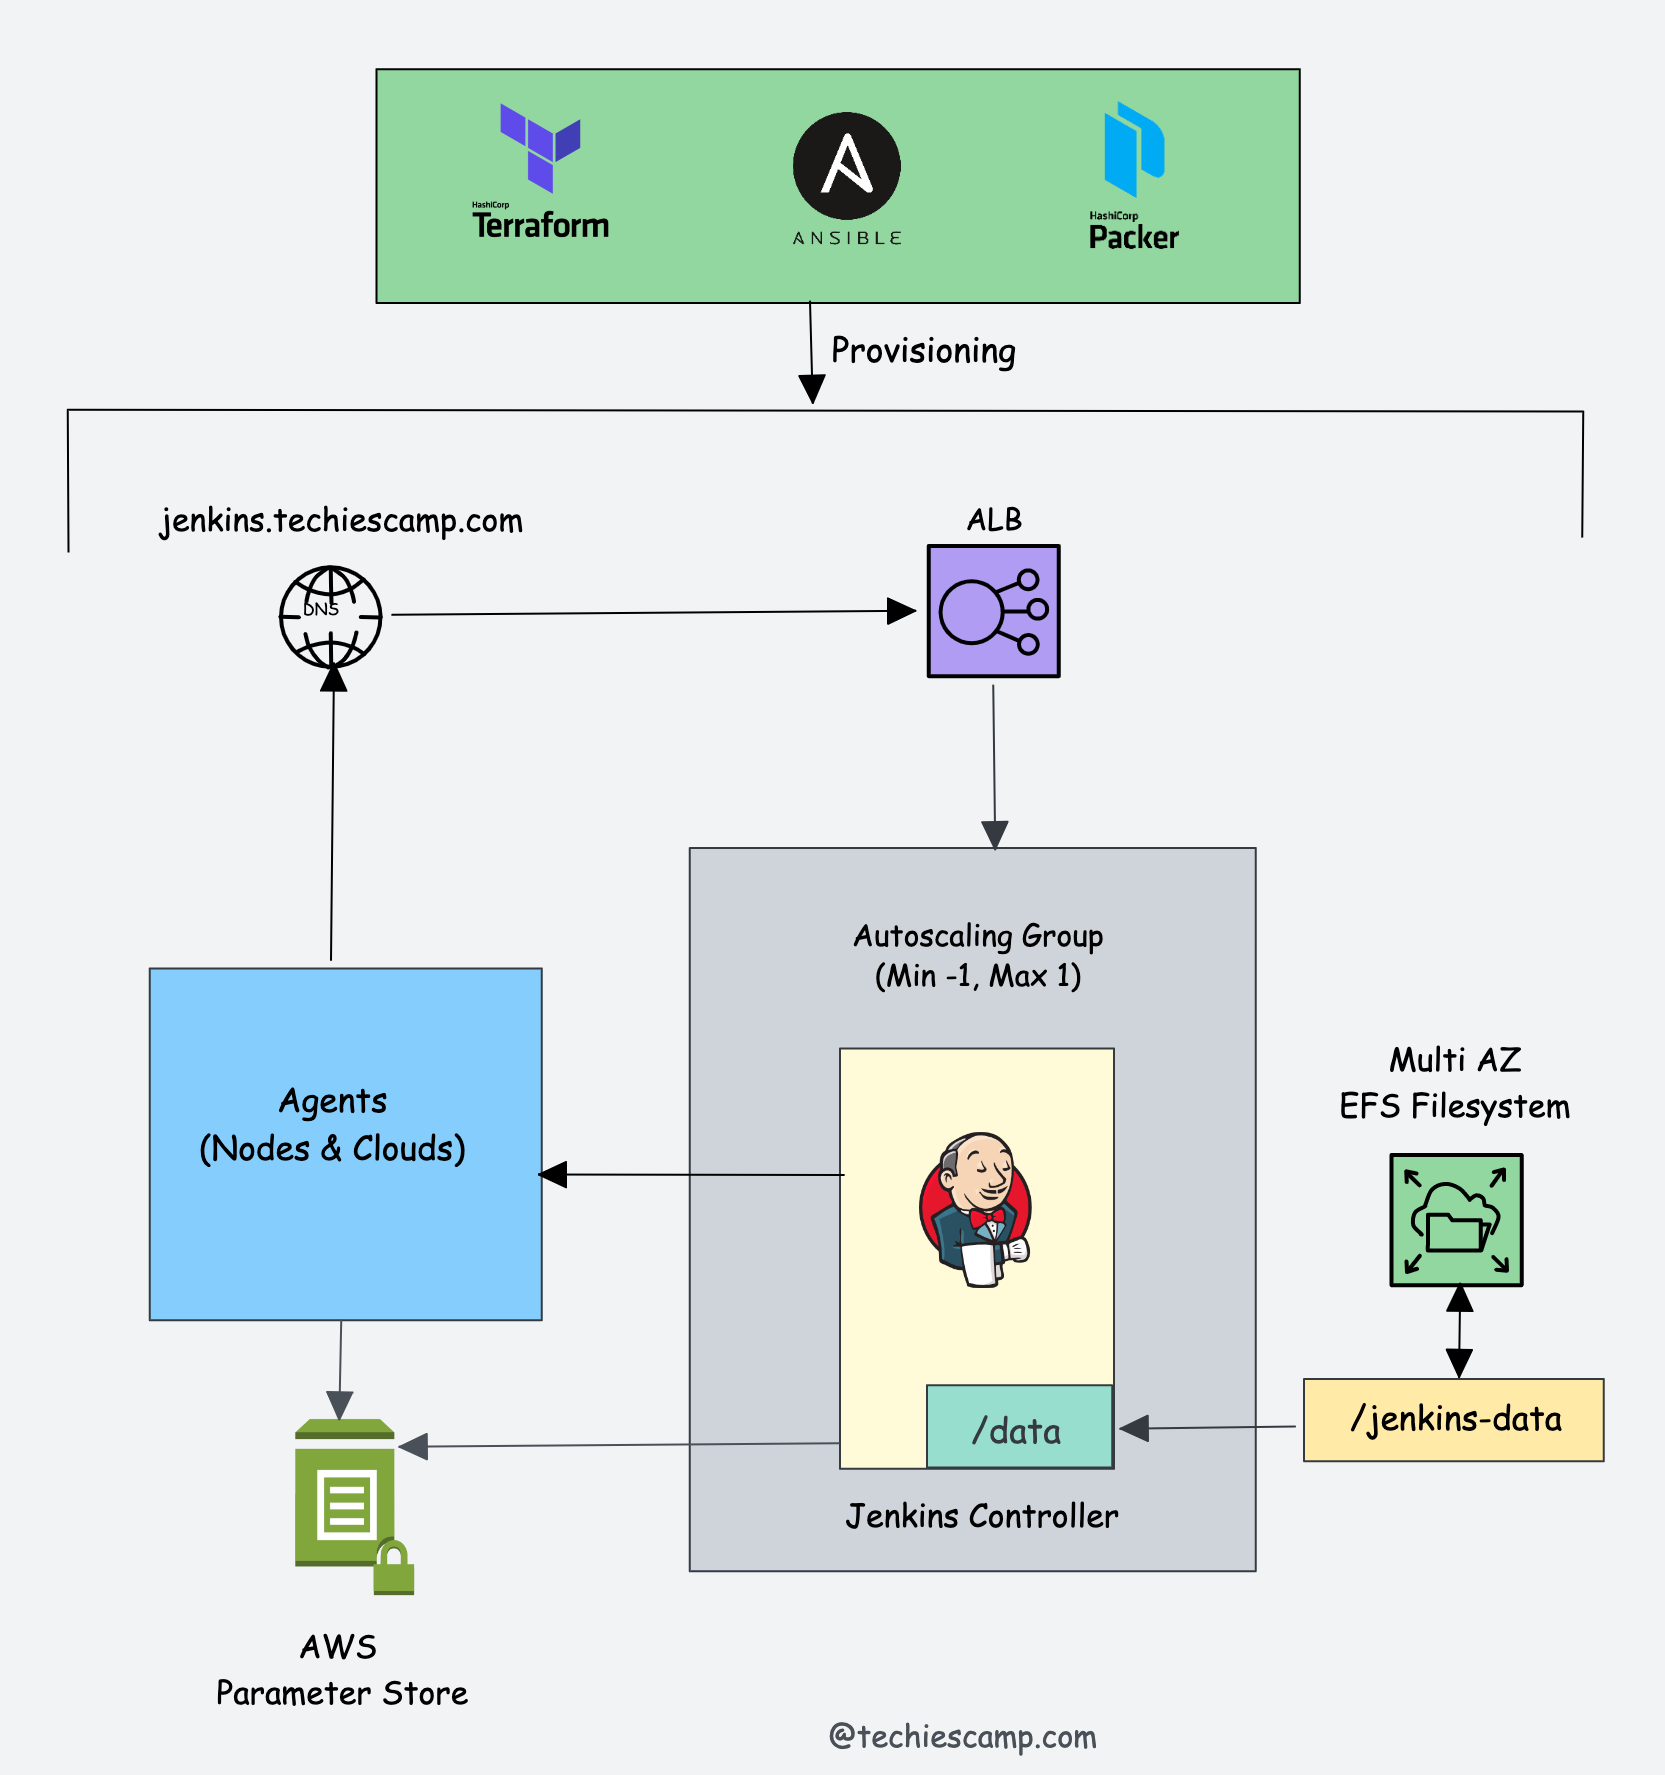
Here is the whole project workflow.
- To begin with, we will use the default VPC in the us-west-2 (Oregon) region to deploy all the necessary services.
- Once we have the VPC/Subnet details, our first step will be to provision EFS storage using Terraform that spans all three availability zones. This will ensure that the Jenkins controller instance can mount the EFS filesystem from any of the three availability zones.
- After setting up EFS storage, create an SSH key pair and upload it to the AWS Parameter Store. This enables secure connections between controller and agent nodes. Avoid storing system credentials locally for better security practices.
- Next, use Packer and Ansible roles to build the controller and agent AMIs, including the necessary applications and configurations. After building the AMIs, deploy them using Terraform.
- We will use Terraform to deploy the controller AMI in an auto-scaling group with minimum, maximum, and desired values set to 1. This configuration ensures we avoid running multiple instances of the Jenkins controller, which could cause inconsistencies in Jenkins files and configurations. Additionally, we will deploy an ALB with a target group pointing to the Jenkins auto-scaling group.
- After deploying the Jenkins controller, we will use Terraform to deploy an agent server.
- Lastly, we will validate the Jenkins controller and agent setup with the necessary configurations, ensuring that our Jenkins setup functions as expected.
Project IaC Code
All the IaC Code for this setup is hosted in the DevOps Projects Github repository.
Clone the repository to your workstation or you can fork it and clone it.
git clone https://github.com/techiescamp/devops-projectsAll the automation script for this project is present it 01-jenkins-setup folder.
In this folder, you'll find the following folders and files.
.
├── ansible
│   ├── jenkins-agent.yaml
│   ├── jenkins-controller.yaml
│   ├── roles
│   └── scripts
├── jenkins-agent.pkr.hcl
├── jenkins-controller.pkr.hcl
└── terraform
    ├── efs
    ├── iam
    ├── lb-asg
    ├── agent
    ├── modules
      ├── ec2
      ├── efs
      ├── iam
      └── lb-asg
Here is the structure of the IaC code:
jenkins-controller.pkr.hclandjenkins-agent.pkr.hclare Packer configuration files, which internally call the Ansible playbook inside theansiblefolder.- The
ansiblefolder contains the roles that the playbook uses. - The core Terraform provisioning logic is located in modules under the
modulesfolder. To provision resources, we use separate Terraform configuration files that call the modules with custom variables.
Now let's get started with the setup.
Important Note: Throughout the entire project setup, consider the "01-jenkins-setup" folder as the working directory.
Project Video Walkthrough
I have created a video on the entire setup.
You can use the video demonstration for reference and this blog documentation for executing the commands.
Add SSH key Pair to AWS Parameter Store
We will use SSH authentication for both the Jenkins controller and agent, storing the SSH keys securely in the AWS Parameter Store.
First, you need to create an ssh key pair using the following command. It will create a private (id_rsa) and public key (id_rsa.pub).
ssh-keygenNow you need to create two parameters of type "Secure String" in the following paths.
/devops-tools/jenkins/id_rsa
/devops-tools/jenkins/id_rsa.pub
The demo for creating the secrets is shown below.
Create Jenkins IAM Role Using Terraform
First, we need to create an IAM role. We will use this role with the Jenkins agent, as it needs to access the SSH public key during the image-building process.
When using Jenkins in actual projects, you might need to add more permissions to manage AWS resources from Jenkins agents. For instance, to provision EC2 instances using Jenkins jobs, the agents should have a role with permission to create EC2 servers.
Note: Since we are using this for a personal project, we store the Terraform state files locally. However, in a real-world project with multiple developers, it is recommended to manage the state file in remote storage, such as S3, and use DynamoDB locks to avoid conflicts..
CD into terraform/iam folder
cd terraform/iamInitialize terraform and apply the configuration using the following commands.
terraform init
terraform plan
terraform apply --auto-approve
It creates a role named jenkins-role. You can verify the IAM policy and role from the AWS console.
Create EFS Using Terraform
Next, we need to provision EFS storage.
Step 1: CD into terraform/efs folder
cd terraform/efs You will find a main.tf file with the following content. Replace the VPC and subnet IDs highlighted in bold with your VPC and subnet IDs from the us-west-2 region (Oregon).
provider "aws" {
  region = "us-west-2"
}

module "efs_module" {
  source = "../modules/efs"
  vpc_id     = "vpc-0a5ca4a92c2e10163"
  subnet_ids = ["subnet-058a7514ba8adbb07", "subnet-0dbcd1ac168414927", "subnet-032f5077729435858"]
}
Let's provision the EFS storage.
Step 2: Initialize Terraform
terraform initStep 3: Execute the plan and verify the configuration.
terraform planStep 4: Apply the configuration
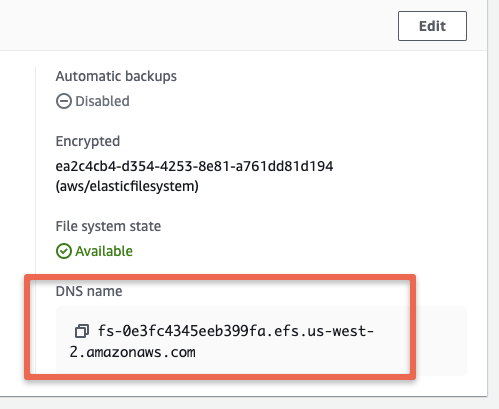
terraform apply --auto-approveYou can validate the provisioned EFS from the AWS console.
In the next step, when building the Jenkins controller image, we will use the DNS endpoint of EFS.
Build Jenkins Controller AMI
With the Jenkins IAM role and EFS set up, we can now build the Jenkins controller AMI using Packer and Ansible.
Ensure your current directory is 01-jenkins-setup.
Execute the jenkins-controller.pkr.hcl Packer configuration file with the EFS DNS endpoint. Replace the DNS in the following command with your EFS DNS endpoint:
packer build -var "efs_mount_point=fs-0e3fc4345eeb399fa.efs.us-west-2.amazonaws.com" jenkins-controller.pkr.hclUpon successful execution, you will see the registered Jenkins-controller AMI ID in the output.
Build Jenkins Agent AMI
In the Jenkins Agent Ansible role, we have tasks to install tools like Terraform, Ansible, boto3, Java, etc.
Additionally, there is a task with Python boto3 to retrieve the public key we uploaded to the AWS Parameter Store and add it to the SSH authorized_keys file. You can find the python script under ansible/scripts folder.
As we pass the jenkins-instance-profile with the Packer configuration, it can access the public key from the Parameter Store.
Execute the jenkins-agent.pkr.hcl Packer configuration. In this step, pass the /devops-tools/jenkins/id_rsa.pub path from the AWS Parameter Store as a variable.
packer build -var "public_key_path=/devops-tools/jenkins/id_rsa.pub" jenkins-agent.pkr.hclUpon successful execution, you will see the registered jenkins-agent AMI id in the output.
Deploy Jenkins Autoscaling Group With Load Balancer
To deploy the autoscaling group with the AWS load balancer, cd into the terraform/lb-asg folder.
cd terraform/lb-asgHere you will find the main.tf file that calls the lb-asg module. You need to replace the parameters highlighted in bold
- Replace subnet IDs with your subnet IDs
- Replace techiescamp with your ssh key pair name.
- Replace AMI Id ami-011269e155315bf83 with the AMI id of your Jenkins controller AMI Id
- Replace vpc-0a5ca4a92c2e10163 VPC Id with your VPC Id.
module "lb-asg" {
  source = "../modules/lb-asg"
  subnets = ["subnet-058a7514ba8adbb07", "subnet-0dbcd1ac168414927", "subnet-032f5077729435858"]
  ami_id = "ami-011269e155315bf83"
  instance_type ="t2.small"
  key_name = "techiescamp"
  environment = "dev"
  vpc_id = "vpc-0a5ca4a92c2e10163"
}
Now initialize terraform
terraform initExecute the plan and then apply the configurations.
terraform plan
terraform apply --auto-approve
After the Terraform execution is complete, you can verify the auto-scaling group and load balancer from the AWS console.
Under target groups, you should see the Jenkins-controller instances registered as a target.
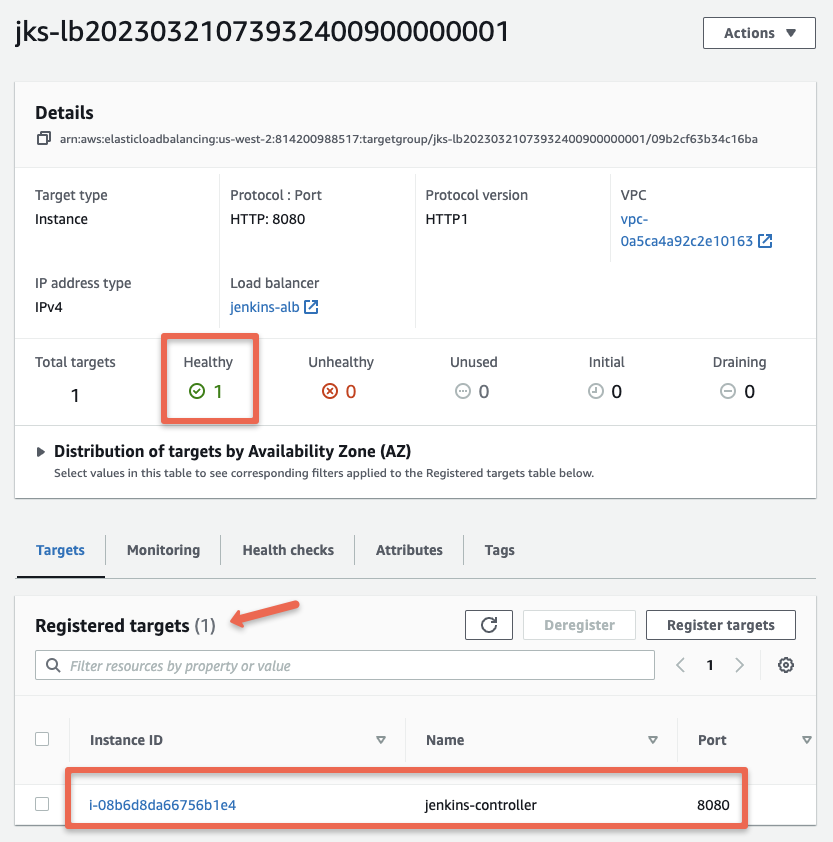
If you open the jenkins-alb load balancer, you can get the DNS name of the load balancer
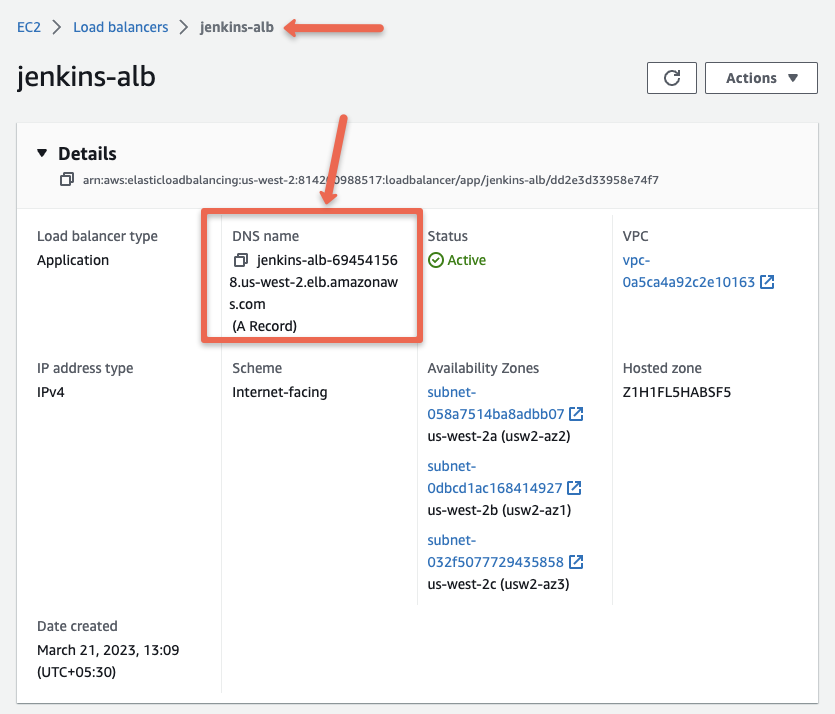
If you access the load balancer DNS you should see the Unlock Jenkins page as shown below.
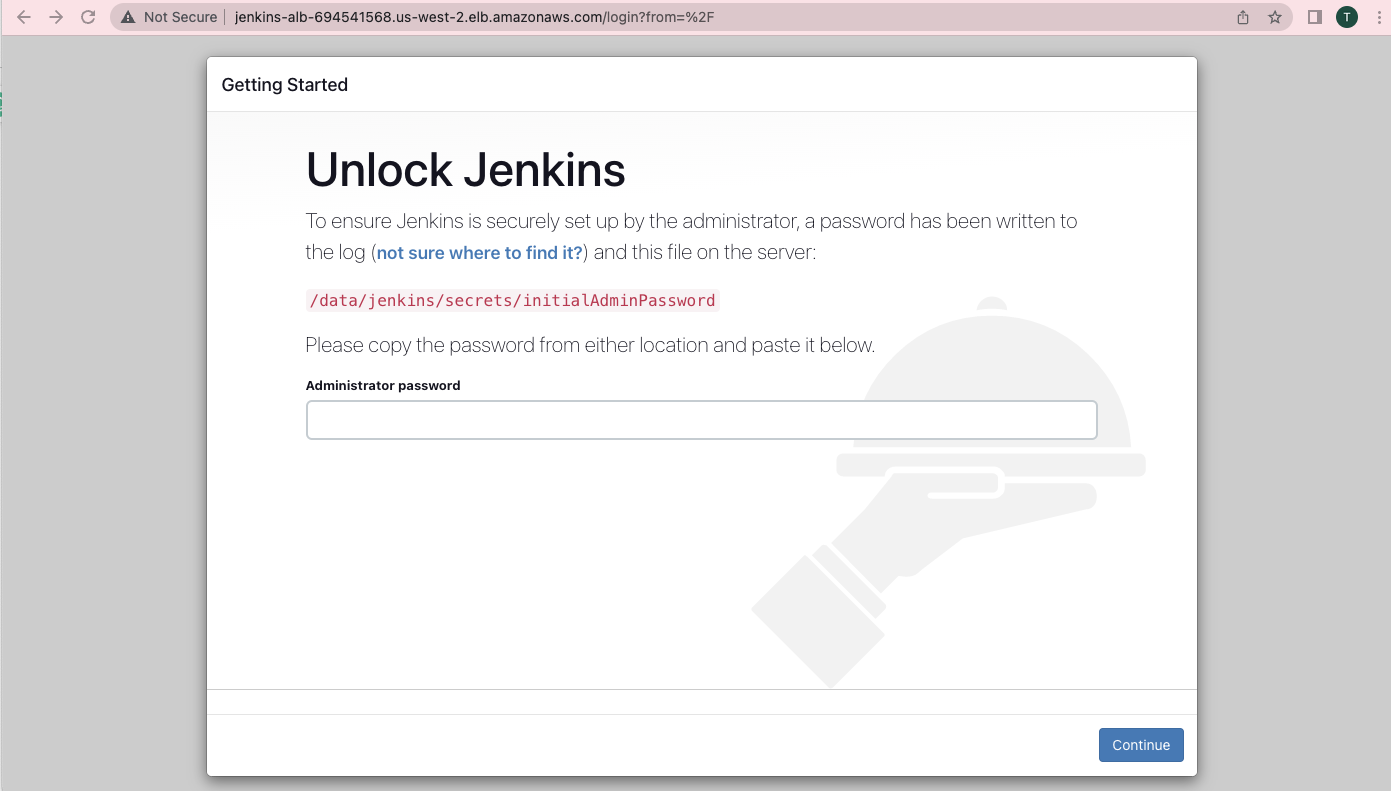
To unlock Jenkins, log in to the Jenkins controller instance using the private key and get the default password from the /data/jenkins/secrets/initialAdminPassword file. This is a one-time activity.
You can get the public IP of the Jenkins-controller instance using the following CLI command:
aws ec2 describe-instances --filter "Name=tag:Name,Values=jenkins-controller" --query 'Reservations[].Instances[?State.Name==`running`].PublicIpAddress' --output textLogin to the server and get the admin password.
sudo cat /data/jenkins/secrets/initialAdminPasswordAfter unlocking Jenkins, follow the standard steps to configure the Jenkins controller.
Provision Jenkins Agent
To provision Jenkins agent, cd into terraform/agent folder.
In the main.tf file, replace the values highlighted in bold.
- Replace subnet IDs with your subnet IDs
- Replace techiescamp with your ssh key pair name.
- Replace AMI Id ami-047fe714e6e0ac977 with the AMI id of your Jenkins agent AMI Id
- If you want more than one Jenkins agent, you can replace the instance_count number with the required number of agents.
module "ec2_instance" {
  source = "../modules/ec2"

  instance_name      = "jenkins-agent"
  ami_id             = "ami-047fe714e6e0ac977"
  instance_type      = "t2.small"
  key_name           = "techiescamp"
  subnet_ids         = ["subnet-058a7514ba8adbb07", "subnet-0dbcd1ac168414927", "subnet-032f5077729435858"]
  instance_count     = 1
}
Execute the following commands to provision the agent node.
terraform init
terraform plan
terraform apply --auto-approve
Configure Agent Node With Controller
To connect the Jenkins Agent node with the controller, choose the SSH method.
In our case, the SSH keys for configuration are stored in the AWS Parameter Store. Additionally, the agent AMI contains the public key added to authorized keys during the image-building process itself.
Therefore, all you need to do is add the private key to the Jenkins controller. This is a one-time task.
Then, configure the agent with the Agent IP address. It will be automatically connected, and you won't have to do any configuration on the agent.
You can refer to this Jenkins Agent Setup Guide if you haven’t configured an SSH agent before.
Teardown Resources
If you are using this setup for learning purposes, be sure to clean up the resources to avoid getting billed by AWS.
To clean up all project resources, execute terraform destroy from the respective Terraform folder.
terraform destroyTo deregister the AMIs, use the following AWS CLI commands
aws ec2 describe-images --filters "Name=name,Values=jenkins-controller,jenkins-agent" --query 'Images[*].ImageId' --output text | tr '\t' '\n' | xargs -I {} aws ec2 deregister-image --image-id {}To delete the parameter store values, use the following command.
aws ssm delete-parameter --name /devops-tools/jenkins/id_rsa
aws ssm delete-parameter --name /devops-tools/jenkins/id_rsa.pub
Jenkins Real World Setup
Note: In actual projects, the entire Jenkins implementation would typically be in the private network with private DNS and SSL. User authentication would be based on LDAP or a single sign-on system, such as Okta.
If you want to implement this setup in a real-world project scenario, you will need to do the following:
- Create a VPC with three public subnets and three private subnets.
- Set up client-to-site VPN to connect to instances & services in private subnets.
- Deploy EFS with the private subnet as mount targets. Allow inbound access only from the private subnet CIDR ranges.
- Deploy a Load Balancer in the public subnet with SSL termination.
- Deploy the Auto-scaling group in the private subnet. Allow traffic on port 8080 only from the public subnet ranges.
- Set up monitoring and logging for the Jenkins infrastructure using Cloudwatch.
- Every project that deals with data needs point-in-time backups. You can Perform EFS backup using AWS Backup service or the EFS-to-EFS backup solution