
![Consul Service Discovery Example Using Nginx [Practical Guide]](https://storage.ghost.io/c/5f/2f/5f2f4d20-2abf-4534-8d40-7aa233aedd43/content/images/size/w2000/format/webp/2025/03/service-discovery-1.png)
In this blog, you will learn about the consul service discovery concept practically by setting up Nginx service discovery using Hashicorp Consul.
Service discovery is a concept that every DevOps engineer should know. Primarily in microservices, service discovery plays a key role.
Also, to learn Kubernetes, knowledge of service discovery is a prerequisite because the Kubernetes architecture includes a service discovery component called etcd.
Setup Prerequisites
Before starting the setup, you will need the following:
- You need four Ubuntu servers. You can use Vagrant or cloud servers for the setup.
- Consul Server
- Load Balancer
- Two Backends for Load Balancer
- If you are using cloud servers, allow the required ports in the security group. Check this link for the required ports for Consul.
Setup Architecture
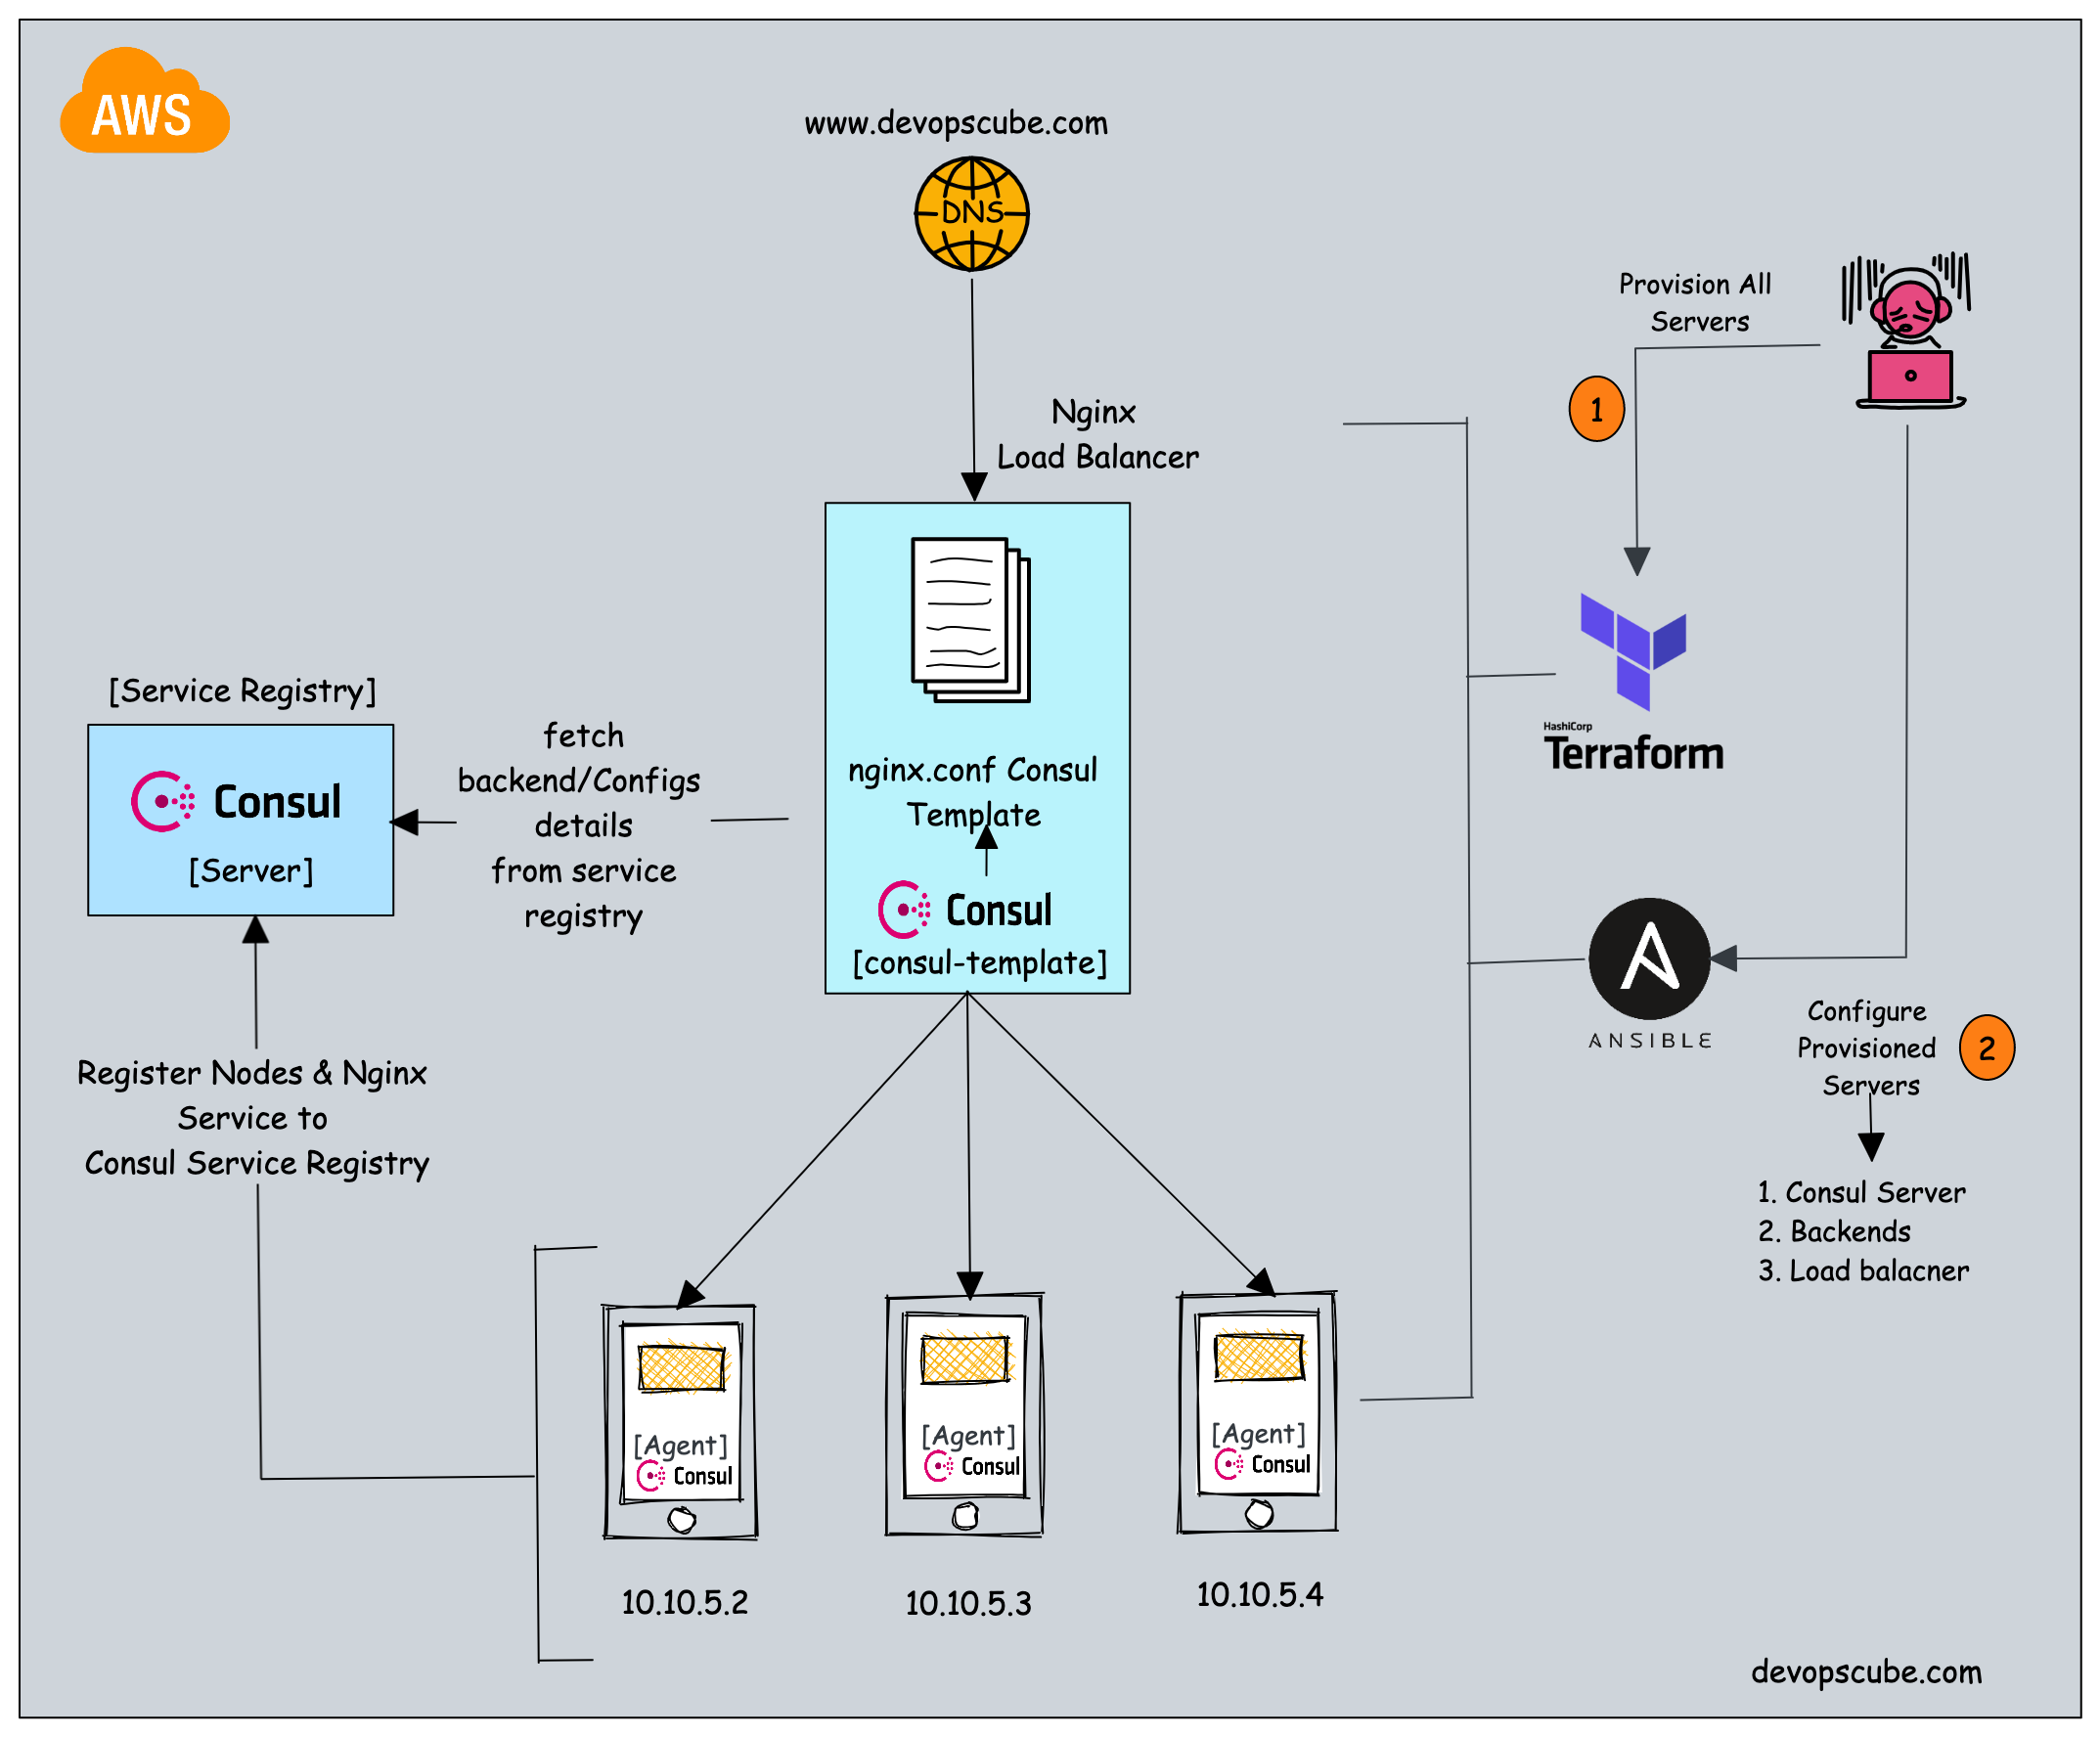
Setup Consul Server
We will be running a single-node Consul server for this setup. For production use cases, the consul should run a cluster with a minimum of three nodes.
Step 1: Log in to the consul server node and update the apt cache.
sudo apt-get update -yStep 2: Go to the downloads page and get the installation command or execute the following commands to install consul.
wget -O- https://apt.releases.hashicorp.com/gpg | gpg --dearmor | sudo tee /usr/share/keyrings/hashicorp-archive-keyring.gpg

echo "deb [signed-by=/usr/share/keyrings/hashicorp-archive-keyring.gpg] https://apt.releases.hashicorp.com $(lsb_release -cs) main" | sudo tee /etc/apt/sources.list.d/hashicorp.list

sudo apt update && sudo apt install consul
Step 3: Verify the installation by checking the consul version.
consul --versionStep 4: All the consul server configs are present in the /etc/consul.d folder. Let's move the default consul.hcl config file to a file named consul.hcl.back
sudo mv /etc/consul.d/consul.hcl /etc/consul.d/consul.hcl.backStep 5: Create a new file named consul.hcl
sudo vi /etc/consul.d/consul.hclAdd the following content and save the file. You can create your own encrypted key using the command consul keygen and replace the highlighted one.
"bind_addr" = "0.0.0.0"
"client_addr" = "0.0.0.0"
"data_dir" = "/var/consul"
"encrypt" = "ZENZNrsXU336Uma+S4XUj9sxvICj32N7XdEzrbYbRpY="
"datacenter" = "dc1"
"ui" = true
"server" = true
"log_level" = "INFO"
Here is the explanation for the configuration.
- bind_addr: This specifies the IP address bound to all available network interfaces.
- client_addr: This specifies the IP address on which the Consul API should listen.
- data_dir: This specifies the directory in which the Consul should store its data.
- encrypt: This specifies the encryption key to use to encrypt communications between Consul agents. This key is used to encrypt all network traffic between Consul agents and must be kept secret.
- datacenter: This specifies the datacenter name for this Consul agent. A data center is a logical grouping of consul agent nodes within a network.
- ui: This enables the built-in Consul UI, which provides a web-based interface for interacting with Consul.
- server: This specifies that this server should run as a Consul server. Because the consul agent is also of the same binary. In agents, we specify the server as false.
- log_level: This sets the logging level for the Consul agent. In this case, only logs with a level of "INFO" or higher will be displayed.
Step 6: Start the consul server in the background using the following command. We are using the -dev flag to specify that we are running a single server in dev mode.
sudo nohup consul agent -dev -config-dir /etc/consul.d/ &You can verify the consul server status using the following command.
consul membersStep 6: If you visit the <server IP:8500> you should be able to access the consul dashboard.
http://<server-ip-address-server>:8500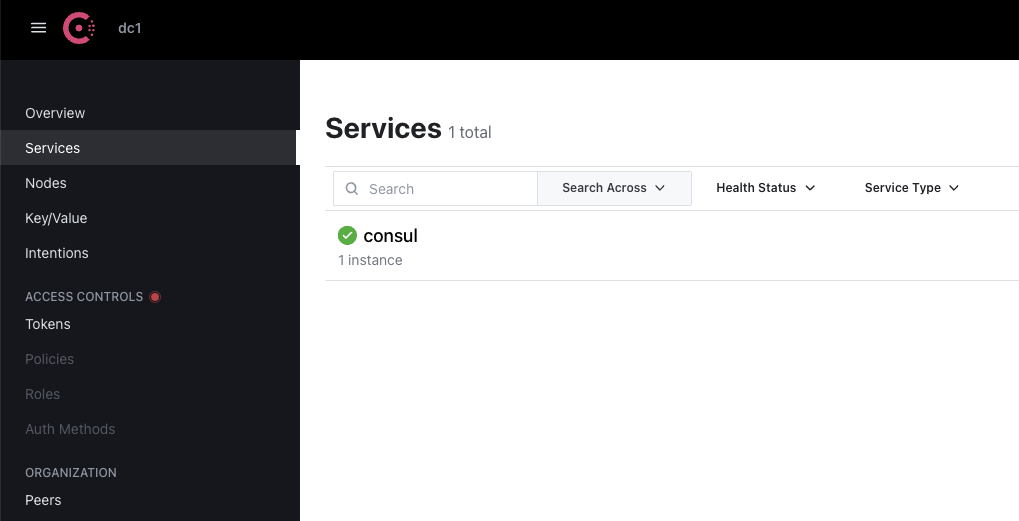
Set up Backend Servers
Now that we have the consul server, we can configure the Nignx backend servers and register the node and Nginx service to the consul server (Service registry).
We need to set up Nginx and the consul agent in all the backend nodes. The consul agent is responsible for connecting to the consul server and registering the server details and Nginx service details.
Do the below configuration in both backend servers.
Step 1: Log in to the backend instances and update the package information.
sudo apt-get update -yStep 2: Install Nginx in both instances by running the command.
sudo apt install nginx -yStep 2: Once Nginx is installed, we need to go to the default HTML location and edit the index.html file in both servers to differentiate the servers.
Use the following command to go to the directory and edit the file.
cd /var/www/html

sudo vi index.html
Copy the below HTML file to the index.html file. On the second server, replace SERVER-01 with SERVER-02 in the HTML file to differentiate between the two backend servers.
<!DOCTYPE html>
<html>
<head>
	<title>Backend Server </title>
</head>
<body>
	<h1>This is Backend SERVER-01</h1>
</body>
</html>
Step 3: Install consul as an agent in the servers. To install consul run the following commands.
wget -O- https://apt.releases.hashicorp.com/gpg | gpg --dearmor | sudo tee /usr/share/keyrings/hashicorp-archive-keyring.gpg

echo "deb [signed-by=/usr/share/keyrings/hashicorp-archive-keyring.gpg] https://apt.releases.hashicorp.com $(lsb_release -cs) main" | sudo tee /etc/apt/sources.list.d/hashicorp.list

sudo apt update && sudo apt install consul
Add check if it is installed properly by running the following command.
consul -versionStep 4: We need to replace the default consul configuration file config.hcl inside the location /etc/consul.d with our consul.hcl file.
Rename the default file and create a new file using the following commands.
sudo mv /etc/consul.d/consul.hcl /etc/consul.d/consul.hcl.back

sudo vi /etc/consul.d/consul.hcl
Add the following contents to the file. If you have used a different encrypt key in the server, you need to replace it with your encrypt key. Also, replace 34.222.141.217 with your consul server IP address.
"server" = false
"datacenter" = "dc1"
"data_dir" = "/var/consul"
"encrypt" = "ZENZNrsXU336Uma+S4XUj9sxvICj32N7XdEzrbYbRpY="
"log_level" = "INFO"
"enable_script_checks" = true
"enable_syslog" = true
"leave_on_terminate" = true
"start_join" = ["34.222.141.217"]
The above configuration is used by the consul agent to register the node information to the consul server.
Step 5: Now we need to create a backend.hcl config file in /etc/consul.d directory to register the Nginx service and health check URLs with the consul server. So that the consul server will constantly monitor the Nginx service health.
sudo vi /etc/consul.d/backend.hclAdd the following contents to the file and save it.
"service" = {
  "Name" = "backend"
  "Port" = 80
  "check" = {
    "args" = ["curl", "localhost"]
    "interval" = "3s"
  }
}
This file registers your backend servers to the consul server.
Now you can validate the configs by running the following command.
consul validate /etc/consul.dStep 6: After completing every configuration start the consul agent using the command.
sudo nohup consul agent -config-dir /etc/consul.d/ &Now check if is working by visiting your consul UI. If the backend shows in your UI as shown in the gif image, it means the backend has registered itself successfully.

Setup Load-Balancer
The next step is to configure the Load Balancer that updates its backend server details from the consul server (service registry).
To fetch the backend server details we will use consul-template binary. It is responsible for making API calls to the consul server and getting the backend server details. It then substitutes the values using a template and generates the loadbalancer.conf file used by Nginx.Step 1: Log in to the load-balancer server. Update the package information and install unzip.
sudo apt-get update -y
sudo apt-get install unzip -y
Step 2: Install Nginx using the following command.
sudo apt install nginx -yStep 2: Now download the consul-template binary using the command given below.
sudo curl -L  https://releases.hashicorp.com/consul-template/0.30.0/consul-template_0.30.0_linux_amd64.zip -o /opt/consul-template.zip

sudo unzip /opt/consul-template.zip -d  /usr/local/bin/
Verify the installation by checking the version.
consul-template --versionStep 3: Create a file named load-balancer.conf.ctmpl inside the location /etc/nginx/conf.d
sudo vi /etc/nginx/conf.d/load-balancer.conf.ctmplCopy the following contents to the file. Here the block highlighted in bold is the go template that iterates over the backend service in the consul server and gets all the IP addresses of registered backends.
upstream backend {
 {{- range service "backend" }}
  server {{ .Address }}:{{ .Port }};
 {{- end }}
}

server {
   listen 80;

   location / {
      proxy_pass http://backend;
   }
}
Step 4: Now create a consul-template.hcl file in the same location. consul-template uses this config file to get details about the consul server IP, and the destination to copy the substituted load-balancer.conf file.
sudo vi /etc/nginx/conf.d/consul-template.hclAdd the following contents to the file. Replace 34.222.141.217 with your consul server IP. The source file is the consul template file with the go template and the destination file is the rendered Nginx configuration from the template.
consul {
 address = "34.222.141.217:8500"

 retry {
   enabled  = true
   attempts = 12
   backoff  = "250ms"
 }
}
template {
 source      = "/etc/nginx/conf.d/load-balancer.conf.ctmpl"
 destination = "/etc/nginx/conf.d/load-balancer.conf"
 perms       = 0600
 command = "service nginx reload"
}
Step 5: Now disable the default server configuration by deleting the default file, using the command.
sudo rm /etc/nginx/sites-enabled/defaultWe need to remove this file to avoid conflict with the server configuration because this file contains the default server configuration.
Restart Nginx to make the changes, and run the following command to restart Nginx.
sudo systemctl restart nginxStep 6: After finishing the configurations start the consul agent template using the command. Consul Template starts a daemon that continuously monitors the Consul server key/value store for changes.
sudo nohup consul-template -config=/etc/nginx/conf.d/consul-template.hcl &After successful execution, you will find a load-balancer.conf file with backend values updated as shown below. The server IPs were retrieved by the consul template from the consul server.
upstream backend {
  server 172.31.30.119:80;
  server 172.31.31.173:80;
}

server {
   listen 80;

   location / {
      proxy_pass http://backend;
   }
}
Now if you try accessing the load balancer IP, it will show the custom HTML of the backend server. If you refresh the page, it will show the HTML page of the second server as the default algorithm is round-robin.
Testing Service Discovery
Now that everything is set up and running, test it by watching what happens when you stop one of your backend servers.
Stop one of the backend servers. The Consul server will mark the stopped backend as unhealthy and the health check will fail.
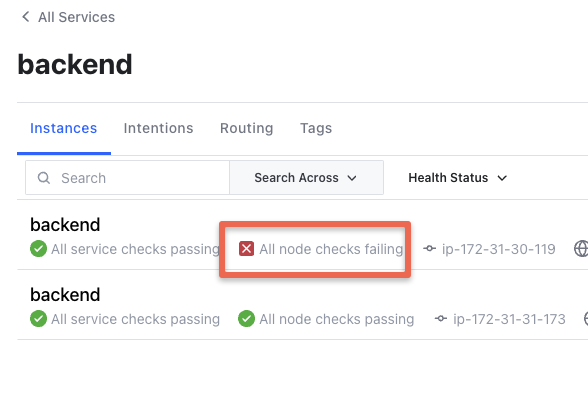
The Consul template sends an immediate signal that one of the servers is down, and it automatically creates a new configuration file with only one server.
The consul template running in the load-balancer node notices the failed backend as it continuously monitors the key values in the consul server.
It then updates /etc/nginx/conf.d/load-balancer.conf with just one backend IP and gracefully reloads the Nginx service.
This workflow ensures that only health backends are always updated in the Nginx load-balancer.conf file.
Automating the Setup
The automation (IaC) code for this project using Terraform and Ansible on AWS is hosted in the DevOps Projects Github repository.
You can use that code to automate the whole setup explained in his guide.
