


In this tutorial, you will learn to setup Kubernetes Kind Cluster, deploy apps, and configure Ingress, LoadBalancer & PVs for local development and testing.
We are going to look at:
- Install and set up the Kind cluster
- Deploying an example Nginx app and exposing it with NodePort
- Implementing LoadBalancer on Kind with MetalLB
- Implementing Ingress with kind
- Persistent volumes in Kind
- Enabling feature gate on Kind
Overall, we will look at everything you need to develop and test apps on Kubernetes in your local workstation using kind.
What is Kind Cluster?
Kind is a tool that is used to create a portable and lightweight Kubernetes cluster. It is the best choice for testing general use cases because it is easy to deploy and delete.
Kind runs on Docker. Meaning, when you create a Kind Cluster, Docker containers are created and act as cluster nodes.
In the backend, Kind used Kubeadm to bootstrap the cluster.
Also, the Kind cluster will not get deleted even after system restarts, and if you are using Docker Desktop, you can pause the containers using Docker Desktop dashboard.
Setup Prerequisites
Before going further, make sure you have the following prerequisites.
Follow the steps below to set up a Kind cluster in your system.
Step 1: Install Kind
Before creating the cluster, you need to install Kind on your system.
Run the following commands based on your OS.
For Linux:
[ $(uname -m) = x86_64 ] && curl -Lo ./kind https://kind.sigs.k8s.io/dl/v0.29.0/kind-linux-amd64

[ $(uname -m) = aarch64 ] && curl -Lo ./kind https://kind.sigs.k8s.io/dl/v0.29.0/kind-linux-arm64

chmod +x ./kind

sudo mv ./kind /usr/local/bin/kind
For Mac:
brew install kindFor Windows PowerShell:
curl.exe -Lo kind-windows-amd64.exe https://kind.sigs.k8s.io/dl/v0.29.0/kind-windows-amd64

Move-Item .\kind-windows-amd64.exe c:\some-dir-in-your-PATH\kind.exe
Step 2: Create Kind Cluster
To create a Kind cluster, you need a YAML config file. Create a YAML file kind-cluster.yaml and copy the following content.
kind: Cluster
apiVersion: kind.x-k8s.io/v1alpha4
name: multi-node-cluster
nodes:
  - role: control-plane
    image: kindest/node:v1.33.0
    extraPortMappings:
      - containerPort: 30000
        hostPort: 30000
        protocol: TCP
      - containerPort: 31000
        hostPort: 31000
        protocol: TCP
      - containerPort: 32000
        hostPort: 32000
        protocol: TCP
      - containerPort: 80
        hostPort: 80
        protocol: TCP
      - containerPort: 443
        hostPort: 443
        protocol: TCP
  - role: worker
    image: kindest/node:v1.33.0
  - role: worker
    image: kindest/node:v1.33.0
This config file will create a three node cluster, 1 control plane, and two worker nodes.
Under the nodes block, you can see the following:
- role - here we specify if the node is control plane or worker.
- image - This is an optional, even without this field, we can use the config file. Use this field if you need a specific Kubernetes version.
- extraPortMappings - Under this block, we have to list the ports that will be needed to expose the workloads outside the cluster as
NodePorts.
We are using ports 80 and 443 inside the extraPortMappings for Ingress.
Run the following command to create a Kind cluster with the configurations in the YAML file.
kind create cluster --config kind-cluster.yamlOnce it is created, you can see the following output.
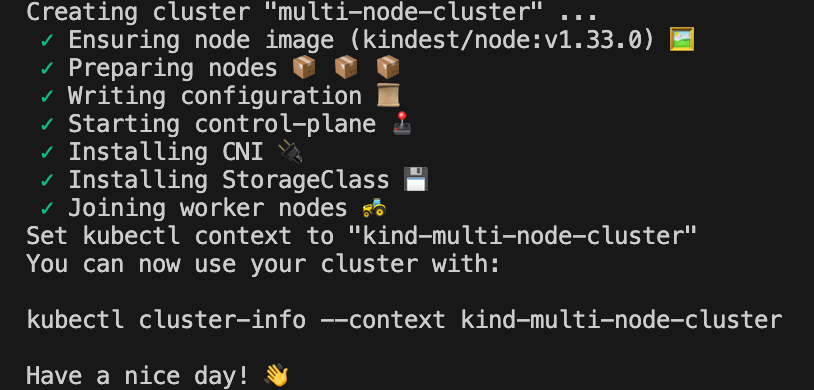
The cluster context will be added to kubeconfig file automatically, run the following to verify if kubectl can access the cluster.
kubectl get noYou can see the nodes of the Kind cluster.

Testing Kind Cluster
For testing the cluster, we are going to do the following:
- Create a simple Nginx on the cluster and expose it using NodePort.
- Expose the application using LoadBalancer
- Expose service using Ingress
In this section, you will deploy an Nginx application in the Kind cluster and expose it using NodePort.
Deploy a simple Nginx on the Kind Cluster
To deploy the application, create a YAML file deploy.yaml and copy the following content.
apiVersion: apps/v1
kind: Deployment
metadata:
  name: nginx-deployment
spec:
  replicas: 1
  selector:
    matchLabels:
      app: nginx-demo
  template:
    metadata:
      labels:
        app: nginx-demo
    spec:
      containers:
        - name: nginx
          image: nginx:latest
          ports:
            - containerPort: 80
This file will create a Nginx deployment. Run the following command to deploy it.
kubectl apply -f deploy.yamlThen, run the following command to verify if the pod is created.
kubectl get poExpose the Application using NodePort
Before exposing using NodePort, you should know that we can only use the NodePorts that are specified during cluster creation.
According to our config file, the NodePorts we specified are 30000, 31000, and 32000.
We are going to expose the application using NodePort 32000 , for that, create a YAML file nodeport-svc.yaml and copy the following content.
apiVersion: v1
kind: Service
metadata:
  name: nginx-nodeport
spec:
  type: NodePort
  selector:
    app: nginx-demo
  ports:
    - name: http
      port: 80
      targetPort: 80
      nodePort: 32000
Run the following command to create it.
kubectl apply -f nodeport-svc.yamlThen run the following command to check if the service is created.
kubectl get svcYou will get the following output.
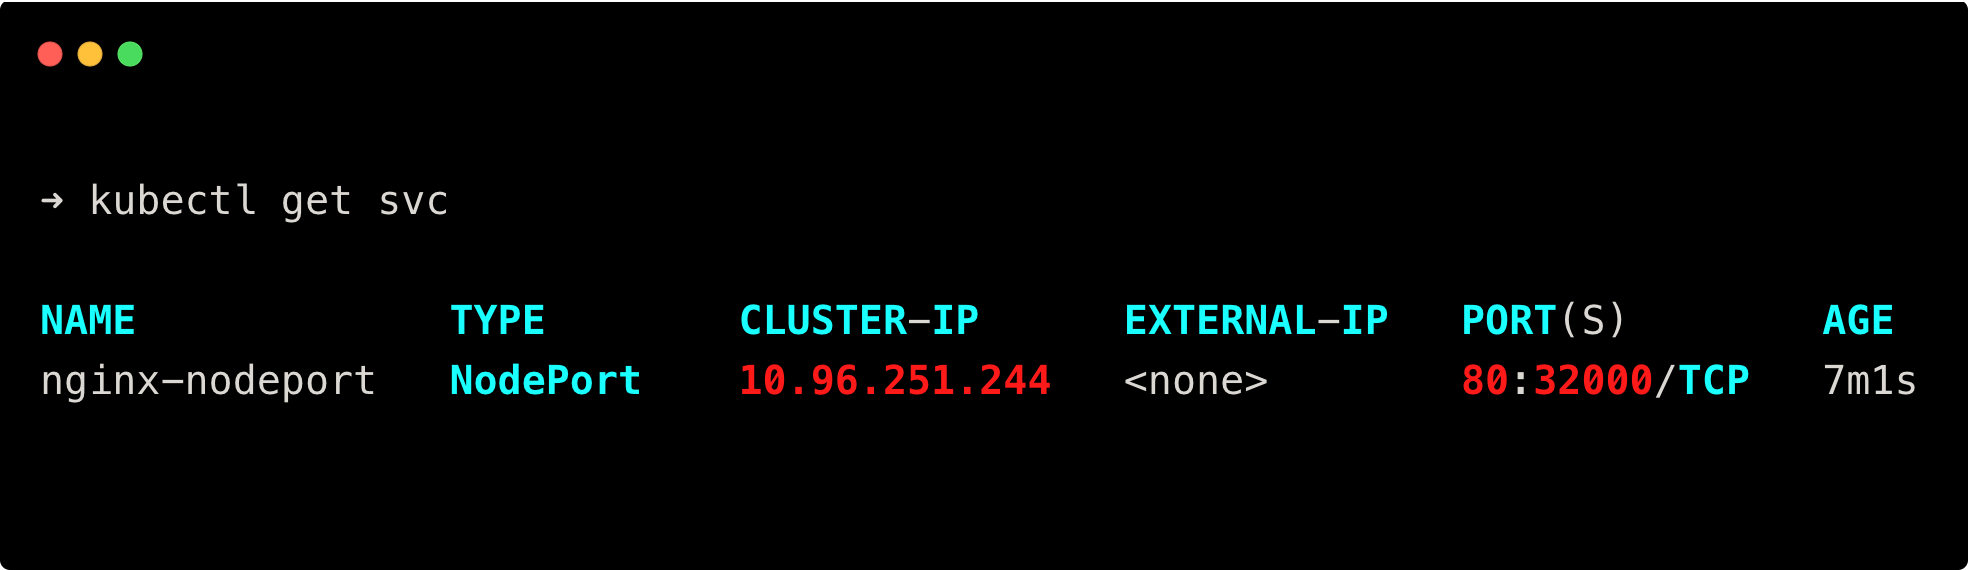
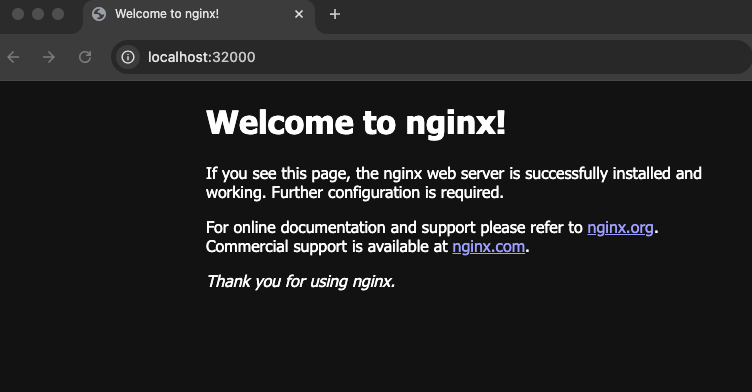
Now, use the URL localhost:32000 to get the Nginx webpage in the browser.
Expose applications in Kind Cluster using LoadBalancer
To expose the application using LoadBalancer on a Kind cluster, you can either use MetalLB or the cloud provider Kind.
For this setup, we will be using MetalLB. It will act as a software load balancer and assigns a IP address form your local IP pool assigned in your system.
Install and Configure MetalLB
MetalLB is a LoadBalancer for Kubernetes clusters that are running on a local system.
To install MetalLB in the cluster, run the following command.
kubectl apply -f https://raw.githubusercontent.com/metallb/metallb/v0.15.2/config/manifests/metallb-native.yamlOnce it's installed, run the following command to get the Kind clusters CIDR range.
docker network inspect kind | jq -r '.[0].IPAM.Config[].Subnet'You will get both IPv4 and IPv6 subnets as showb below.
fc00:f853:ccd:e793::/64
172.18.0.0/16
From that use the IPv4 range 172.18.0.0/16.
Now, create an IP pool for MetalLB with a range from the Kind clusters CIDR, the external IP assigned to the service type LoadBalancer will be taken from this pool.
Create a YAML file metallb-pool.yaml and copy the following content.
172.18.0.100 - 172.18.0.200 if your CIDR range is other than 172.18.0.0/16On Linux/macOS execute
ip addr show and look for something like en0 entries. On Windows run
ipconfig and check IPv4 Address + Subnet MaskapiVersion: metallb.io/v1beta1
kind: IPAddressPool
metadata:
name: lb-pool
namespace: metallb-system
spec:
addresses:
- 172.18.0.100 - 172.18.0.200
---
apiVersion: metallb.io/v1beta1
kind: L2Advertisement
metadata:
name: l2
namespace: metallb-system
spec:
ipAddressPools:
- lb-pool
Run the following command to create the IP pool.
kubectl apply -f metallb-pool.yaml
Expose Application using LoadBalancer
We are going to expose the same Nginx application using a service type LoadBalancer.
Create a YAML file lb-svc.yaml and copy the following content.
apiVersion: v1
kind: Service
metadata:
  name: nginx-lb
spec:
  type: LoadBalancer
  selector:
    app: nginx-demo
  ports:
    - name: http
      port: 80
      targetPort: 80
      nodePort: 31000
We must specify the NodePort we specified during cluster creation because, if it assigns a random nodeport, we cannot access it outside the cluster.
Run the following command to create the service.
kubectl apply -f lb-svc.yamlNow, run the following command to check the service, if an external IP is assigned.
kubectl get svcYou will get the following output.
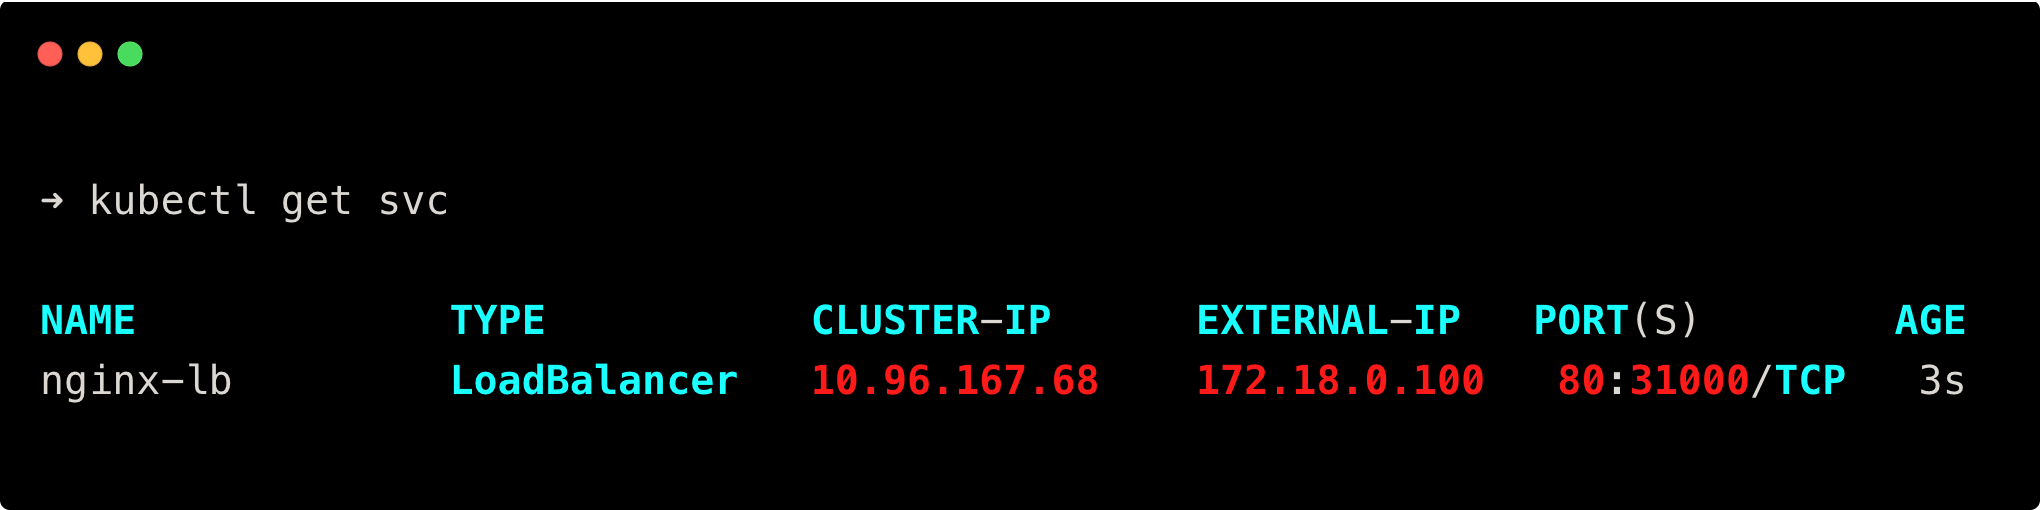
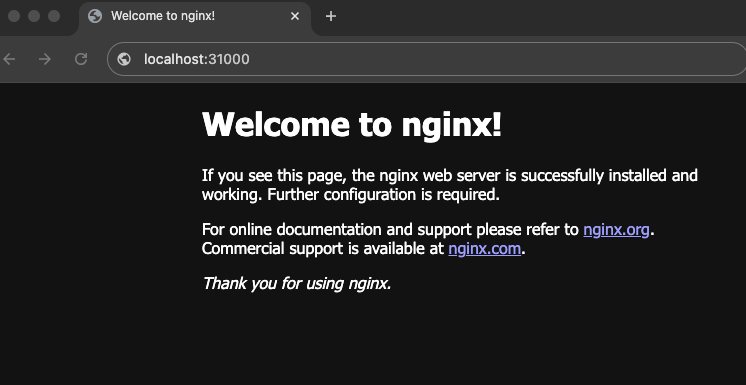
If the external IP is assigned, try accessing it on the browser using the URL localhost:31000.
Expose Services in Kind Cluster using Ingress
To expose a service in a Kind cluster using Ingress, first you should make sure that you have created the cluster with ports 80 and 443 inside the extraPortMappings.
Install the Ingress controller by running the following commands.
kubectl apply -f https://kind.sigs.k8s.io/examples/ingress/deploy-ingress-nginx.yaml

kubectl wait --namespace ingress-nginx \
  --for=condition=ready pod \
  --selector=app.kubernetes.io/component=controller \
  --timeout=90s
Now, create a service type ClusterIP for the same Nginx application to map ingress to that service.
Create a YAML file service.yaml and copy the following content.
apiVersion: v1
kind: Service
metadata:
  name: nginx-svc
spec:
  type: ClusterIP
  selector:
    app: nginx-demo
  ports:
    - name: http
      port: 80
      targetPort: 80
Then, run the following command to create the service.
kubectl apply -f service.yamlNow, create an Ingress object for the service.
Create a YAML file ingress.yaml and copy the following content.
apiVersion: networking.k8s.io/v1
kind: Ingress
metadata:
  name: nginx-ingress
spec:
  ingressClassName: nginx
  rules:
  - http:
      paths:
      - path: /
        pathType: Prefix
        backend:
          service:
            name: nginx-svc
            port:
              number: 80
Then, run the following command to create the Ingress object.
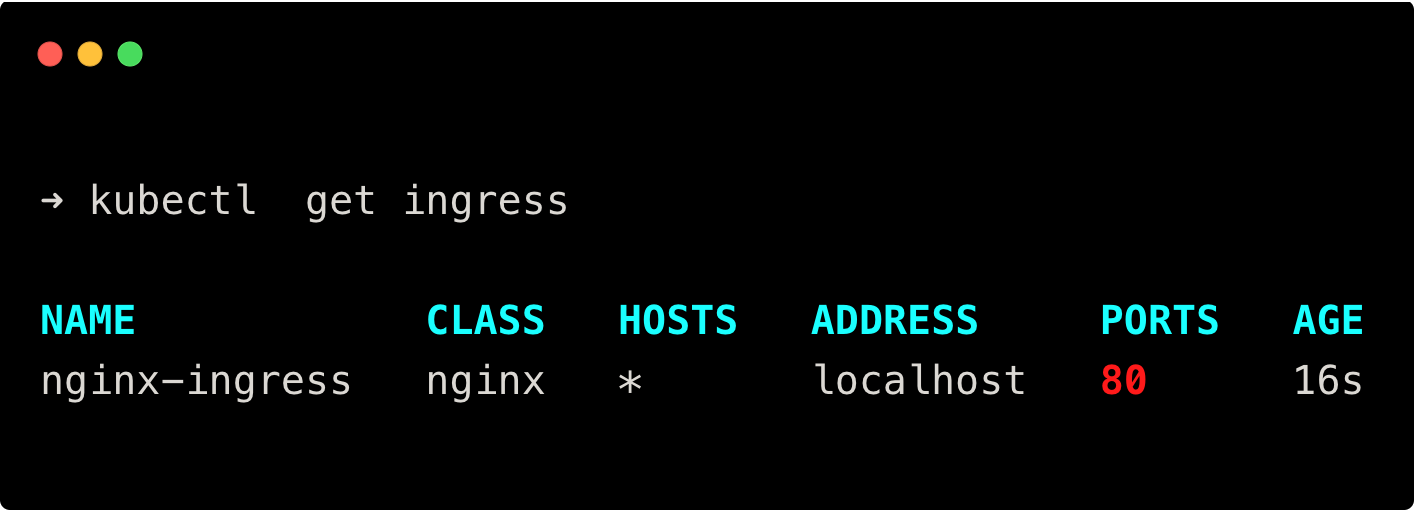
kubectl apply -f ingress.yamlRun the following command to check if the ingress is created.
kubectl get ingressYou will get the following output.
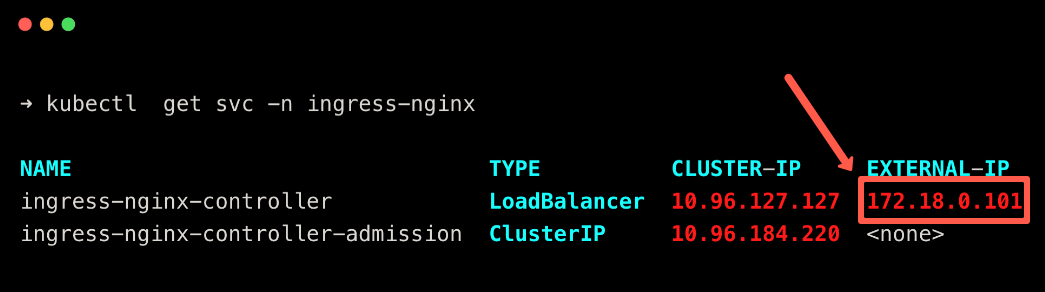
To access it on the web, you need the Ingress controller IP. Run the following command to get the IP assigned to the Ingress controller by MetalLB.
kubectl get svc -n ingress-nginxYou can see the IP as shown below.
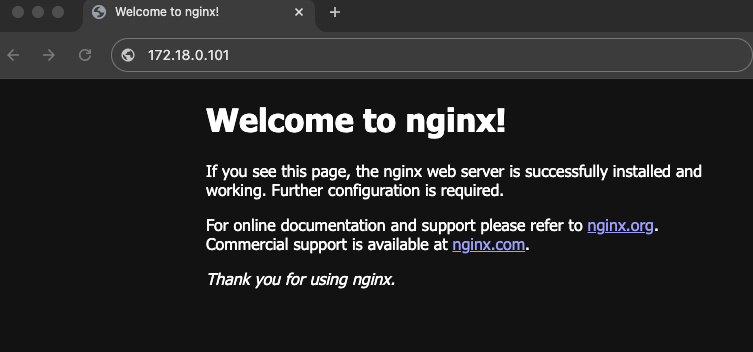
Use the IP on the browser, and you will get the following output.
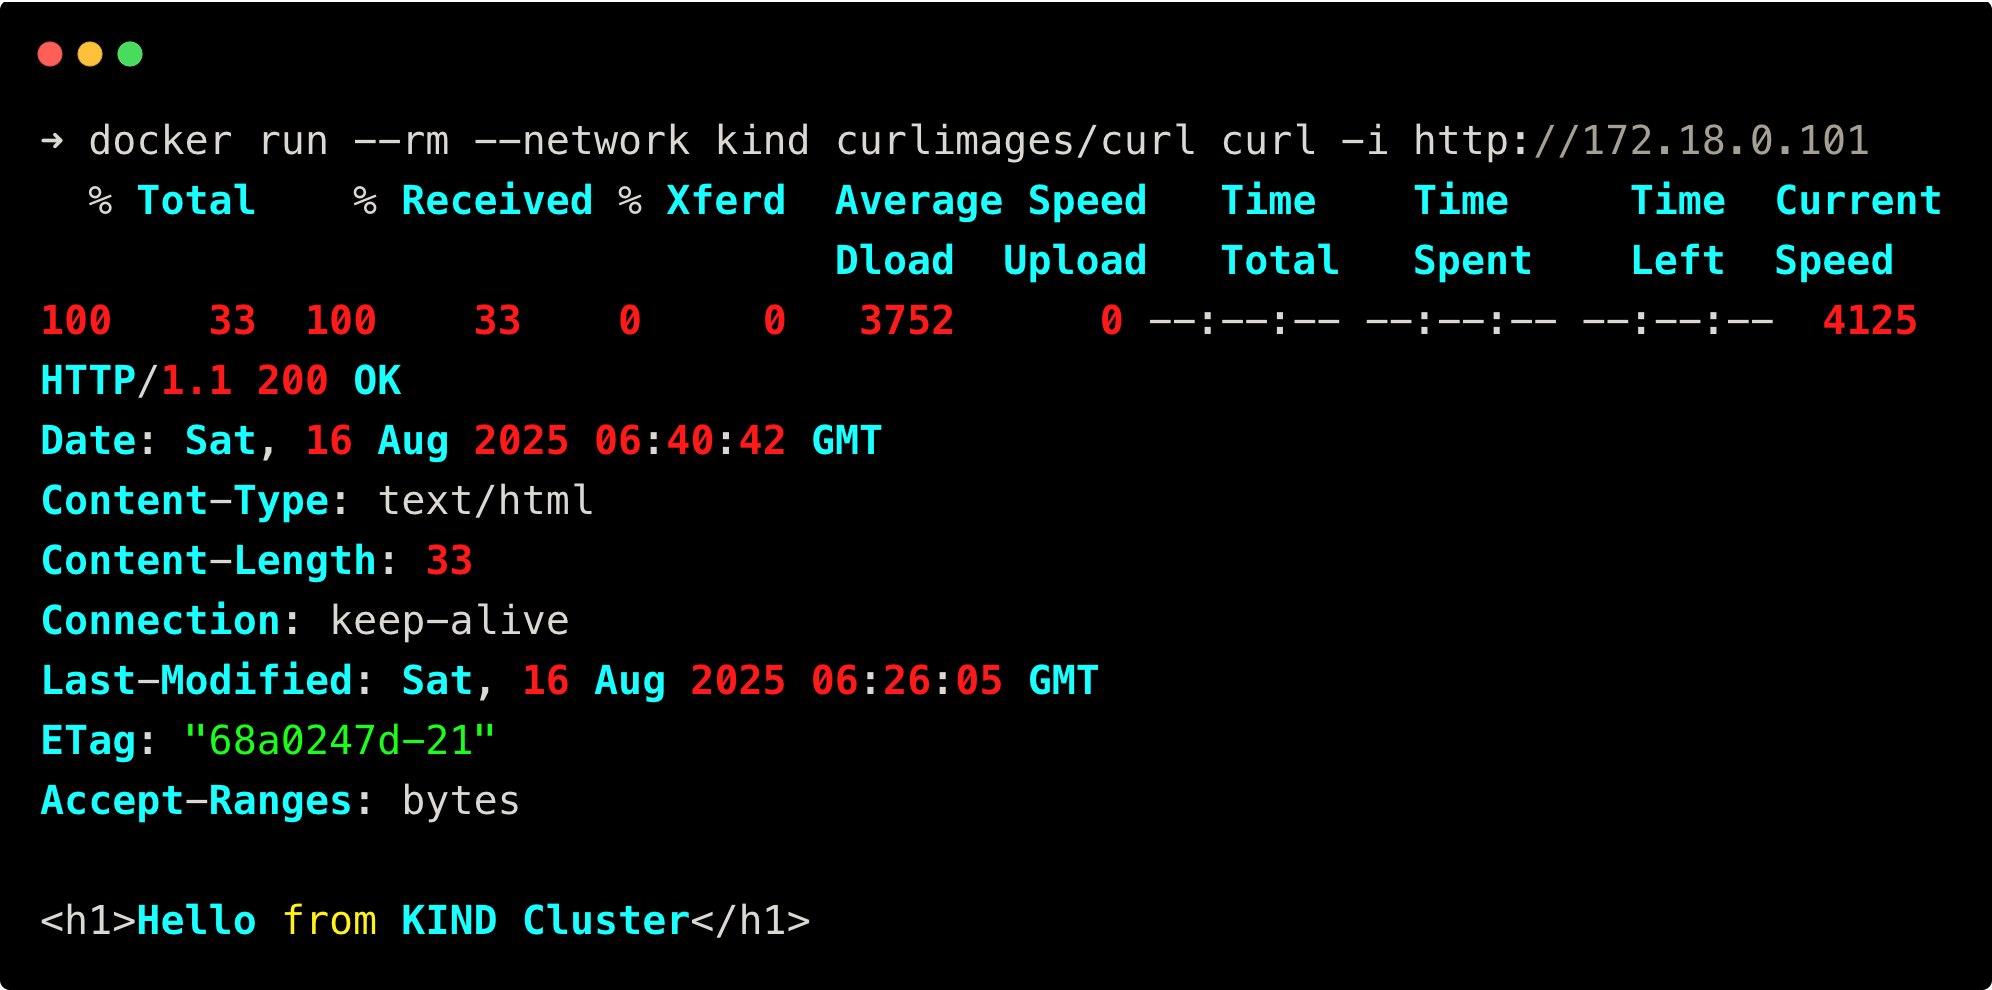
Unlike Linux, in Mac and Windows, the Docker containers runs in a Linux VM by the Docker desktop. Because of this, the container is not exposed to the host system, and you cannot access it using IP.
So, we are going to create a temporary Docker container and use curl to check the exposed application.
docker run --rm --network kind curlimages/curl curl -i http://172.18.0.101You will get the following output.
Using Persistent Volume in Kind
Now, let's see how we can use Persistent Volume in Kind cluster.
For PV, the Kind cluster uses the local-path-provisioner by default.
Let's deploy a MySQL StatefulSet with PVC.
Create a YAML file mysql.yaml and copy the following content.
apiVersion: apps/v1
kind: StatefulSet
metadata:
  name: mysql
spec:
  serviceName: "mysql"
  replicas: 1
  selector:
    matchLabels:
      app: mysql
  template:
    metadata:
      labels:
        app: mysql
    spec:
      containers:
      - name: mysql
        image: mysql:latest
        env:
        - name: MYSQL_ROOT_PASSWORD
          value: rootpass
        ports:
        - containerPort: 3306
        volumeMounts:
        - name: mysql-data
          mountPath: /var/lib/mysql
  volumeClaimTemplates:
  - metadata:
      name: mysql-data
    spec:
      accessModes: ["ReadWriteOnce"]
      resources:
        requests:
          storage: 2Gi
Run the following command to deploy the StatefulSet.
kubectl apply -f mysql.yamlThen, run the following command to check if the StatefulSet pod and volume are created.
kubectl get po, pvc, pvYou will get the following output.

Enabling Feature Gates in Kind
To enable feature gates in the Kind cluster, you need to add the featureGates paramter with the required featureGates.
For example, in the following cluster config, I have enabled the ImageVolume feature gate.
kind: Cluster
apiVersion: kind.x-k8s.io/v1alpha4
name: multi-node-cluster
featureGates:
  ImageVolume: true
This will be helpful for you to test new features of Kubernetes.
For detailed information, refer to our blog about Mounting OCI Image as Volume in Kubernetes Pods where we have enabled the feature gate.
Kind Cluster Management
Below are some of the important commands that will be useful when using the Kind cluster.
Load Image into Kind
To use a container image you have built locally in a Kubernetes cluster, first you need to push it to an image registry. From there, it pulls the image during deployment.
But in Kind, we can load container images directly, which removes the need for image registries.
Below is the command to load images into Kind.
kind load docker-image <image:tag> --name <cluster-name>Export Logs
Kind has a command that exports all available logs in the cluster to your desired location without exec into the container nodes.
Below is the command to export logs from Kind.
kind export logs --name <cluster-name> <path-to-save>This exports all logs such as container logs, pod logs, kubelet logs, journal logs and even the container images in the cluster.
Clean up
If you no longer need the Kind cluster, run the following command.
kind delete cluster --name multi-node-clusterIf your Kind cluster name is not multi-node-cluster, update the cluster's name before running the above command.
Conclusion
In this guide, you have learned about creating a Kind cluster and deploying an application, exposing the application using NodePort, LoadBalancer, and Ingress.
Also, you have learned about mounting a persistent volume and enabling feature gates on Kind cluster.
I hope you have found this guide a useful one for running test workload in a simple way using a Kind cluster.
