

In real DevOps projects, you do not just build an image and push it to a registry. The image needs to pass through several quality and security gates first.
In this hands-on guide, I will walk you through a complete, production-grade Docker image build and promotion pipeline using GitHub Actions just like how it is done in real enterprise environments.
Here is what is covered in this blog.
- Automating a Java application build and Dockerization with GitHub Actions
- Managing container registry credentials securely with GitHub Secrets
- Promoting images through dev, stage and prod registries
- Signing the final container image using Cosign
- Build caching, image tagging strategy, registry architecture, and more..
Setup Prerequisites
The following are the prerequisites for this guide.
- GitHub Repository
- Three Container Repositories ( Dev, Stage and Prod) - Docker Hub is used in this guide
- Basic knowledge of how GitHub Actions works
- Cosign installed in your local system to create keys.
Image Promotion Workflow
Given below is complete workflow of the image promotion workflow we are going to do.
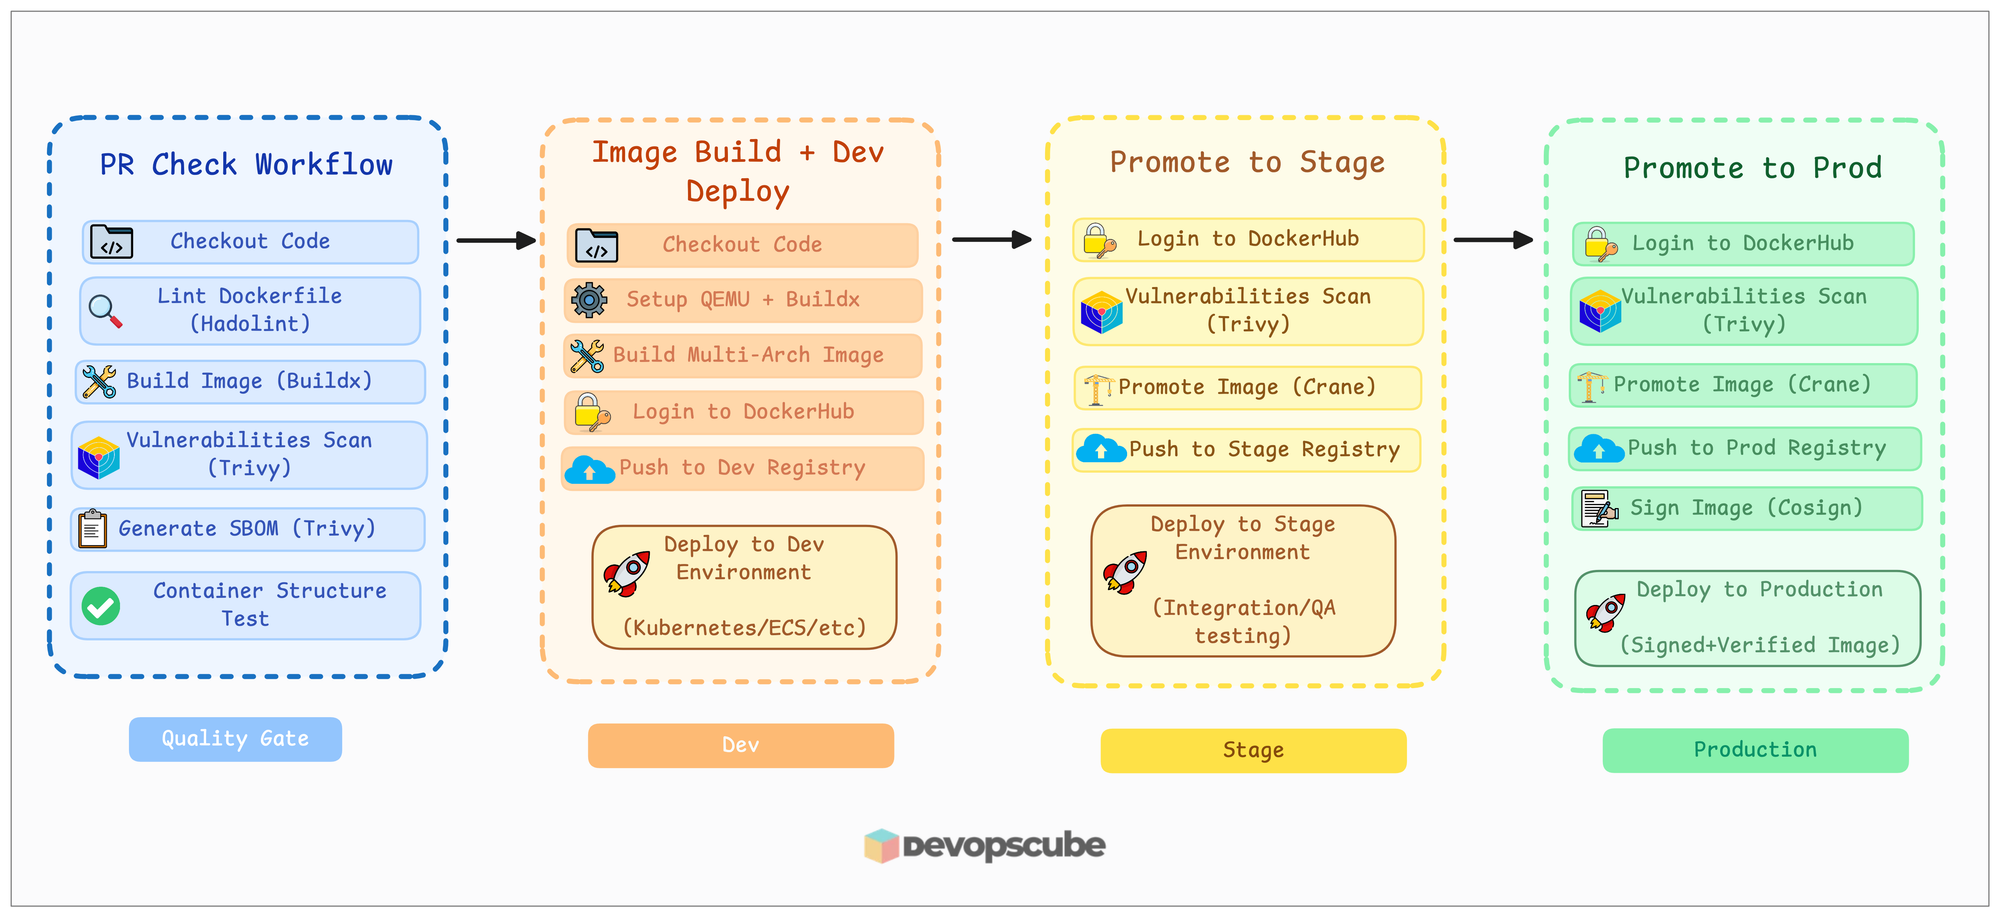
We won't be deploying in this guide, just to show what happens in each environment, deployment is also shown in the image.
In our project, we used three image repositories dev, stage, and prod. But the number of repositories may vary based on the projectm, there will be more repositories for each environment.
And if you have multiple micro services, you have to create registries for each service for each environment.
An example structure is given below.
registry.company.com/
├── dev/
├── stage/
├── release/
└── prod/
Project Directory Structure
I have pushed all the necessary files for this guide to our GitHub repository, including a simple Spring Boot Java application code.
Fork and clone the repository to your system.
Use the following command to clone it to your system.
git clone https://github.com/techiescamp/docker-image-pipeline.gitThen move into the docker-image-pipeline folder.
cd docker-image-pipelineYou will see the following directory structure.
.
├── .github
│   └── workflows
│        ├── pr-checks.yaml
│        ├── image-build-pipeline.yaml
│        ├── promote-to-stage.yaml
│        └── promote-to-prod.yaml
├── java-app
│    └── <pom and other application files>
├── Dockerfile
├── README.md
└── tests
    └── container-structure-test.yaml
You can see four workflow files inside the directory .github/workflows and also, you will see 4 branches:
- Main
- Release-<commit-id>
- Develop
- Feature (cr-161)
During the hands-on section, we will start from the Feature branch.
In the next sections, we will look into the Dockerfile.
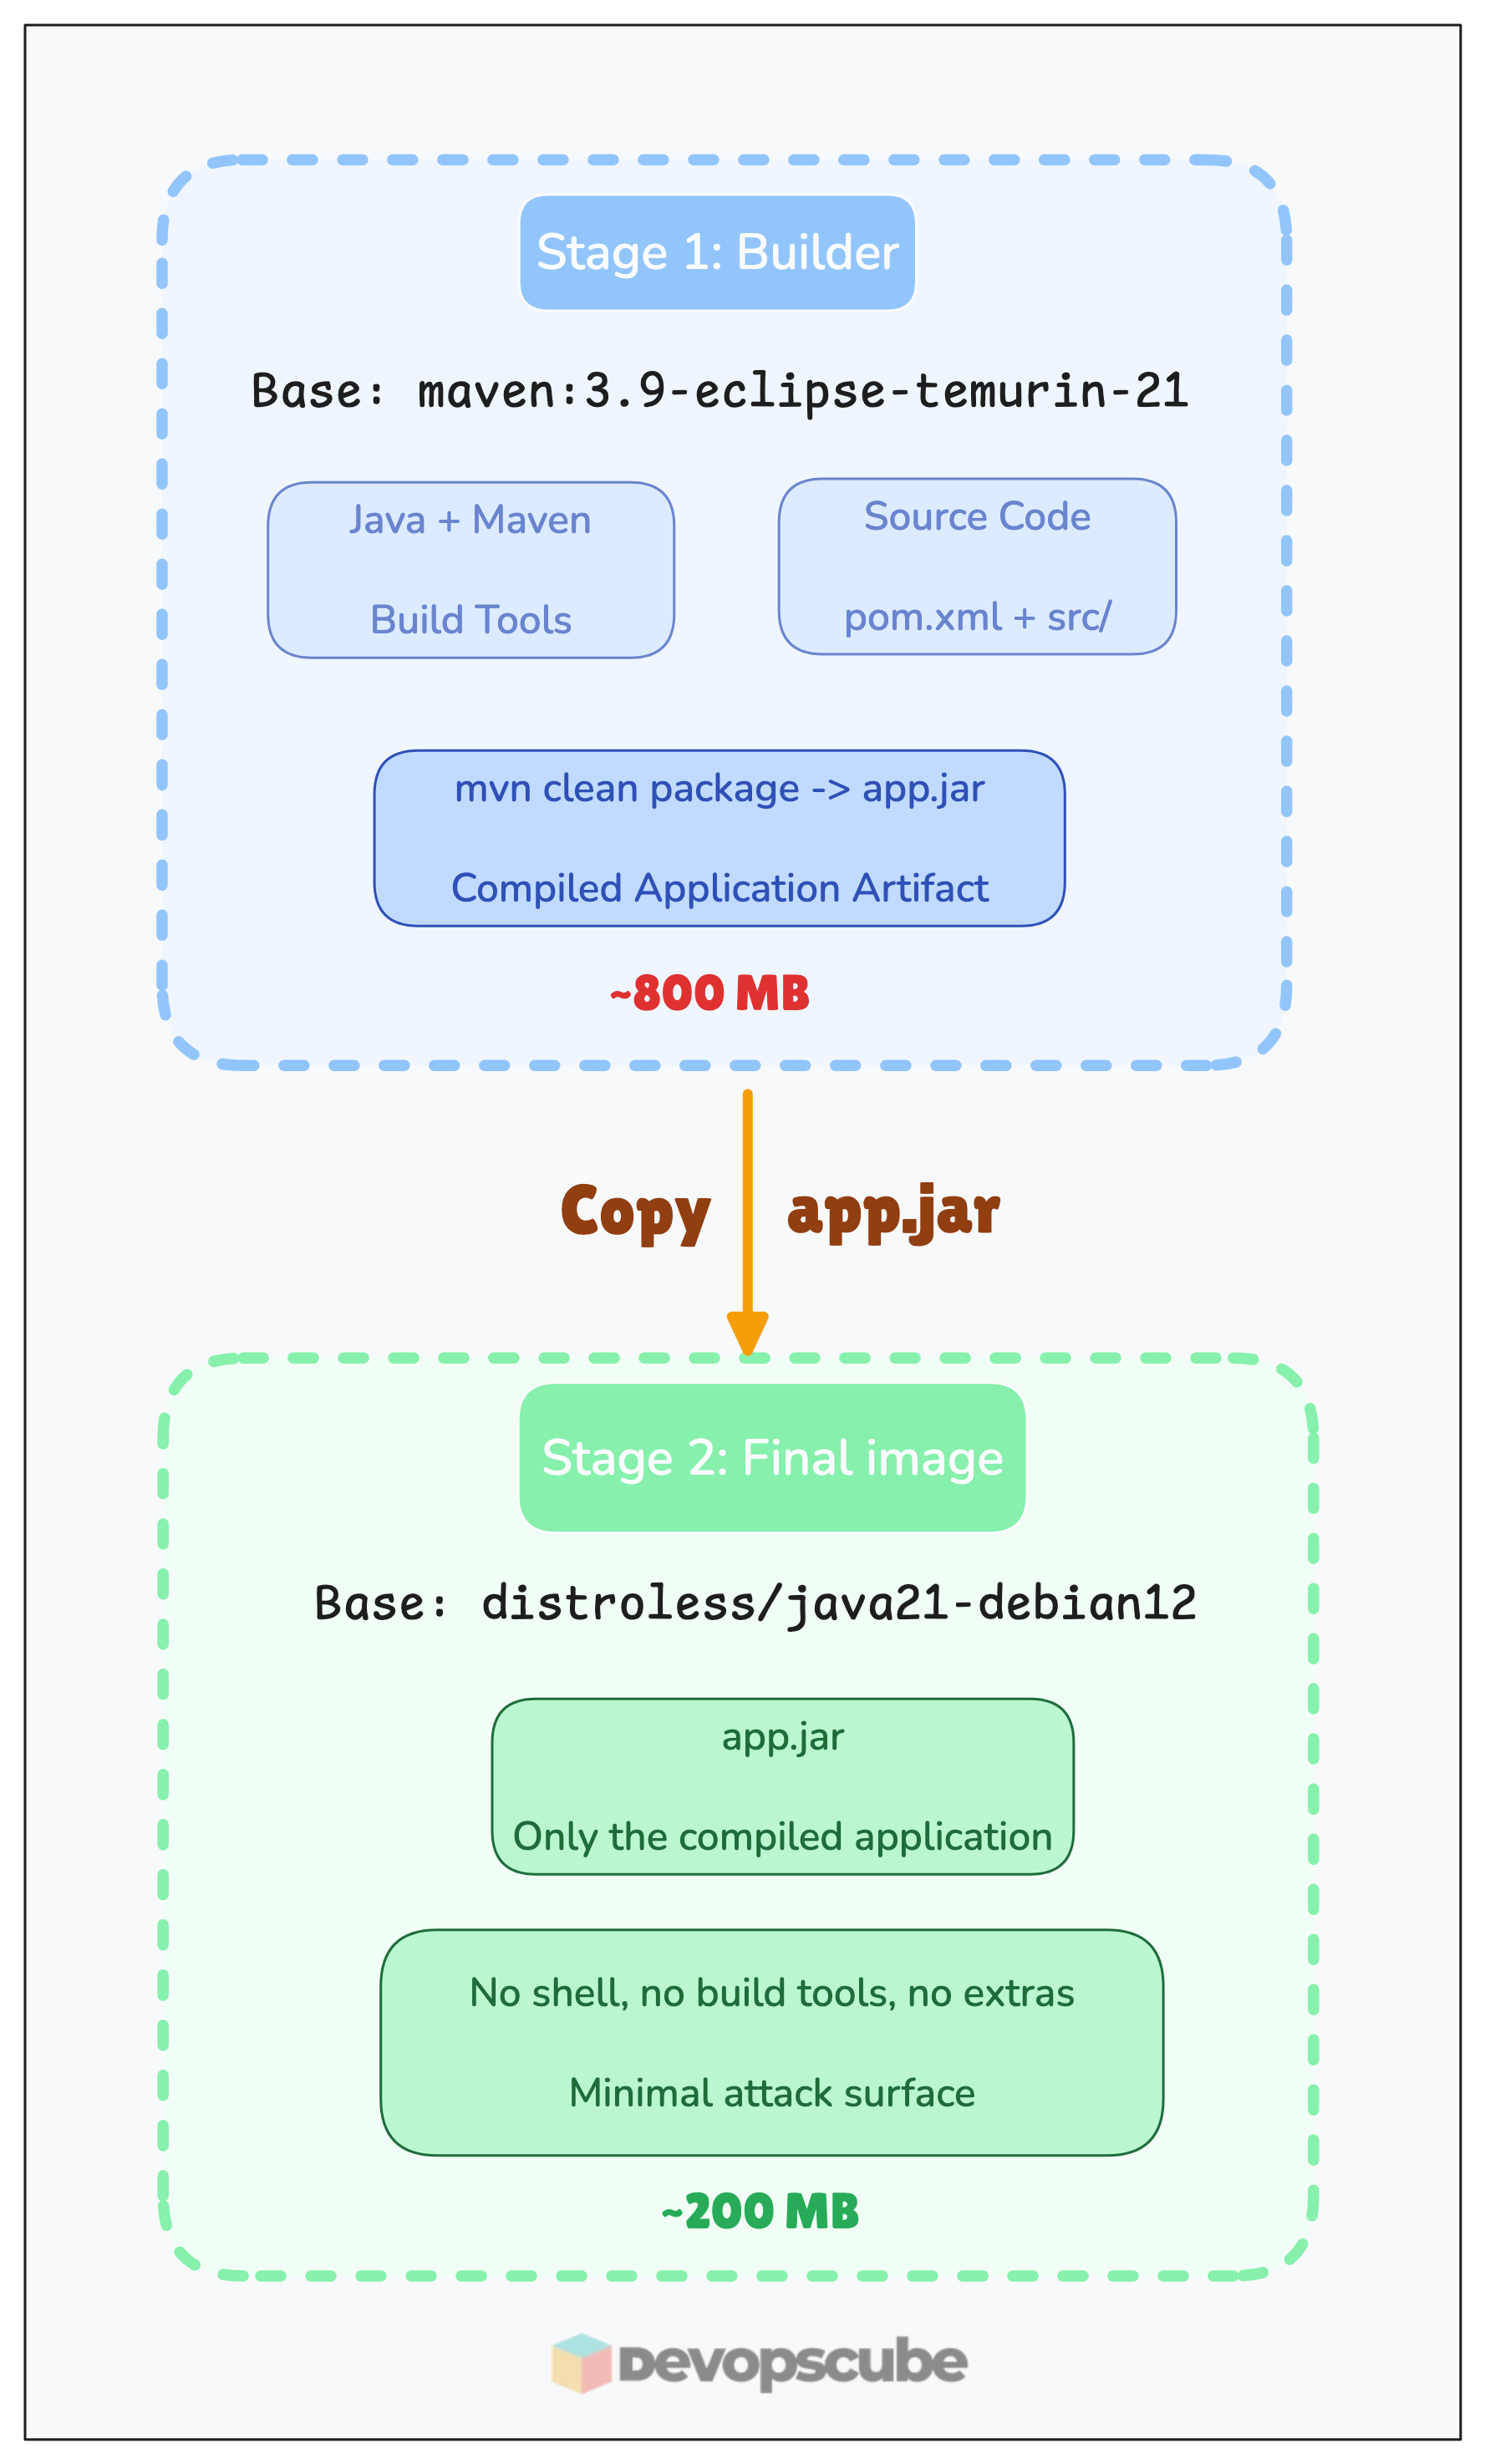
Dockerfile
Below is the Dockerfile, which we will be using to build and Dockerize the Java application.
FROM maven:3.9-eclipse-temurin-21 AS builder

WORKDIR /build

COPY java-app/pom.xml .
RUN mvn -B -e dependency:go-offline

COPY java-app/src ./src
RUN mvn -B clean package -DskipTests

FROM gcr.io/distroless/java21-debian12

WORKDIR /app

COPY --from=builder /build/target/*.jar app.jar

EXPOSE 8080

CMD ["app.jar"]
This is a multi-stage Dockerfile, which builds the application in the first stage and keeps only the required files to run the application in the final image.
The Dockerfile uses the maven:3.9-eclipse-temurin-21 image as the base image for the build stage, which contains Java and Maven to build the application.
First, it sets a working directory /build, and then it copies the source code and uses Maven to build the application Jar file.
And in the second and final stage, we use the gcr.io/distroless/java21-debian12 image as the base image, and it will be the base image of the final Docker image.
But be cautious, if you are using a distroless image, you cannot enter the container for debugging.
Then it copies the Jar file from the previous build location to the working directory /app and exposes the port 8080.
This distroless image already has an entrypoint that runs java -jar, so we just need to give the file name app.jar in CMD.
In the next section, we will see about creating GitHub secrets with DockerHub credentials and Cosign keys.
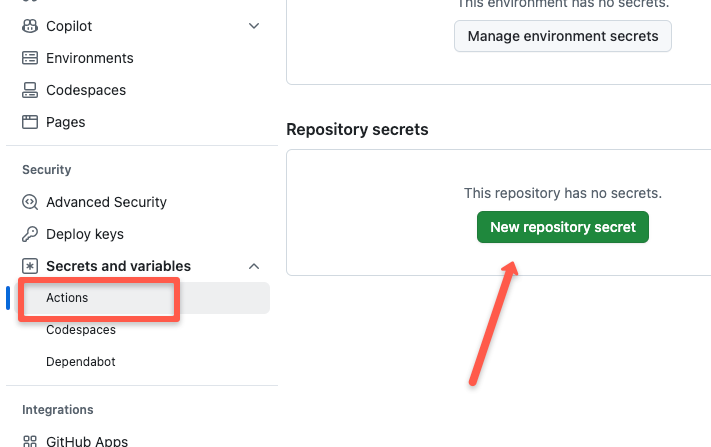
Create GitHub Secrets
Before triggering the workflow, you need to save two things as GitHub Secrets:
- DockerHub credentials
- Cosign private key and password
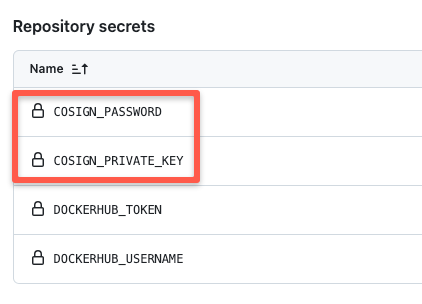
To create GitHub Secrets, go to Settings -> Secrets and Variables -> Actions and click the New repository secret as shown below.
Save Docker Credentials
Create two secrets to save Docker credentials, which will be used in the image build workflow.
Create secretes as DOCKERHUB_USERNAME for username and DOCKERHUB_TOKEN for password.
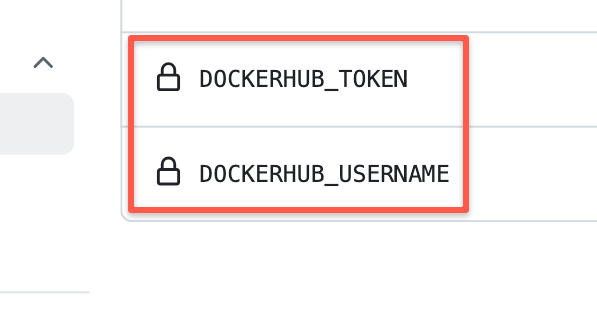
This will be used in the workflows to sign into the registry.
Save Cosign Private Key and Password
First, create a Cosign Private key from your local, use the following command.
cosign generate-key-pair
It will ask you to give a password for the private key, which is required to use the private key during the signing process.
Once you specify the password, it creates two key files cosign.key and cosign.pub.
Copy the content of cosign.key and save it as COSIGN_PRIVATE_KEY and save the password as COSIGN_PASSWORD.
Now that the credentials, key, and password are saved, let's trigger the workflows in the next section.
How to build and promote a Docker Image using GitHub Actions?
We will be using four types of workflow files for this build and promotion workflow, the files are:
- pr-checks.yaml
- image-build-pipeline.yaml
- promote-to-stage.yaml
- promote-to-prod.yaml
Let's start triggering the workflows one by one.
Trigger PR Workflow
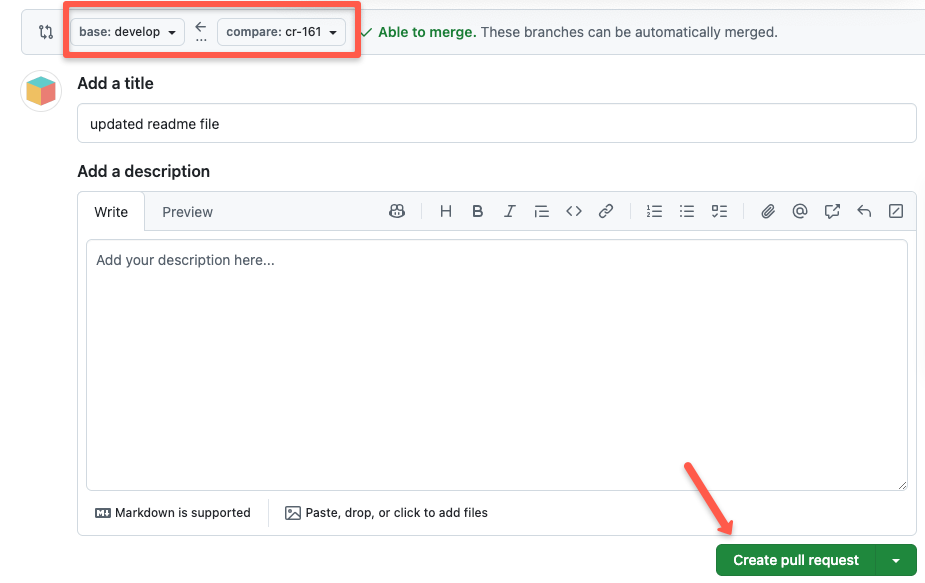
The PR workflow is pr-checks.yaml gets triggered automatically when you raise a PR to the Develop branch.
To trigger the workflow, modify the container repository URL with your repository URL in the image-build-pipeline.yaml and promote-to-prod.yaml workflow files in the Feature(cr-161) branch and raise a PR to the Develop branch.Since my workflow file has the correct URL, I will just update the README file and raise the PR.
Once the PR is raised to Develop, go to Actions, and you can see a new job is triggered.
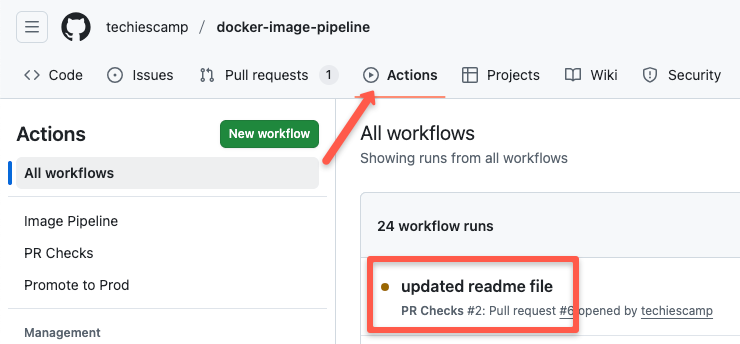
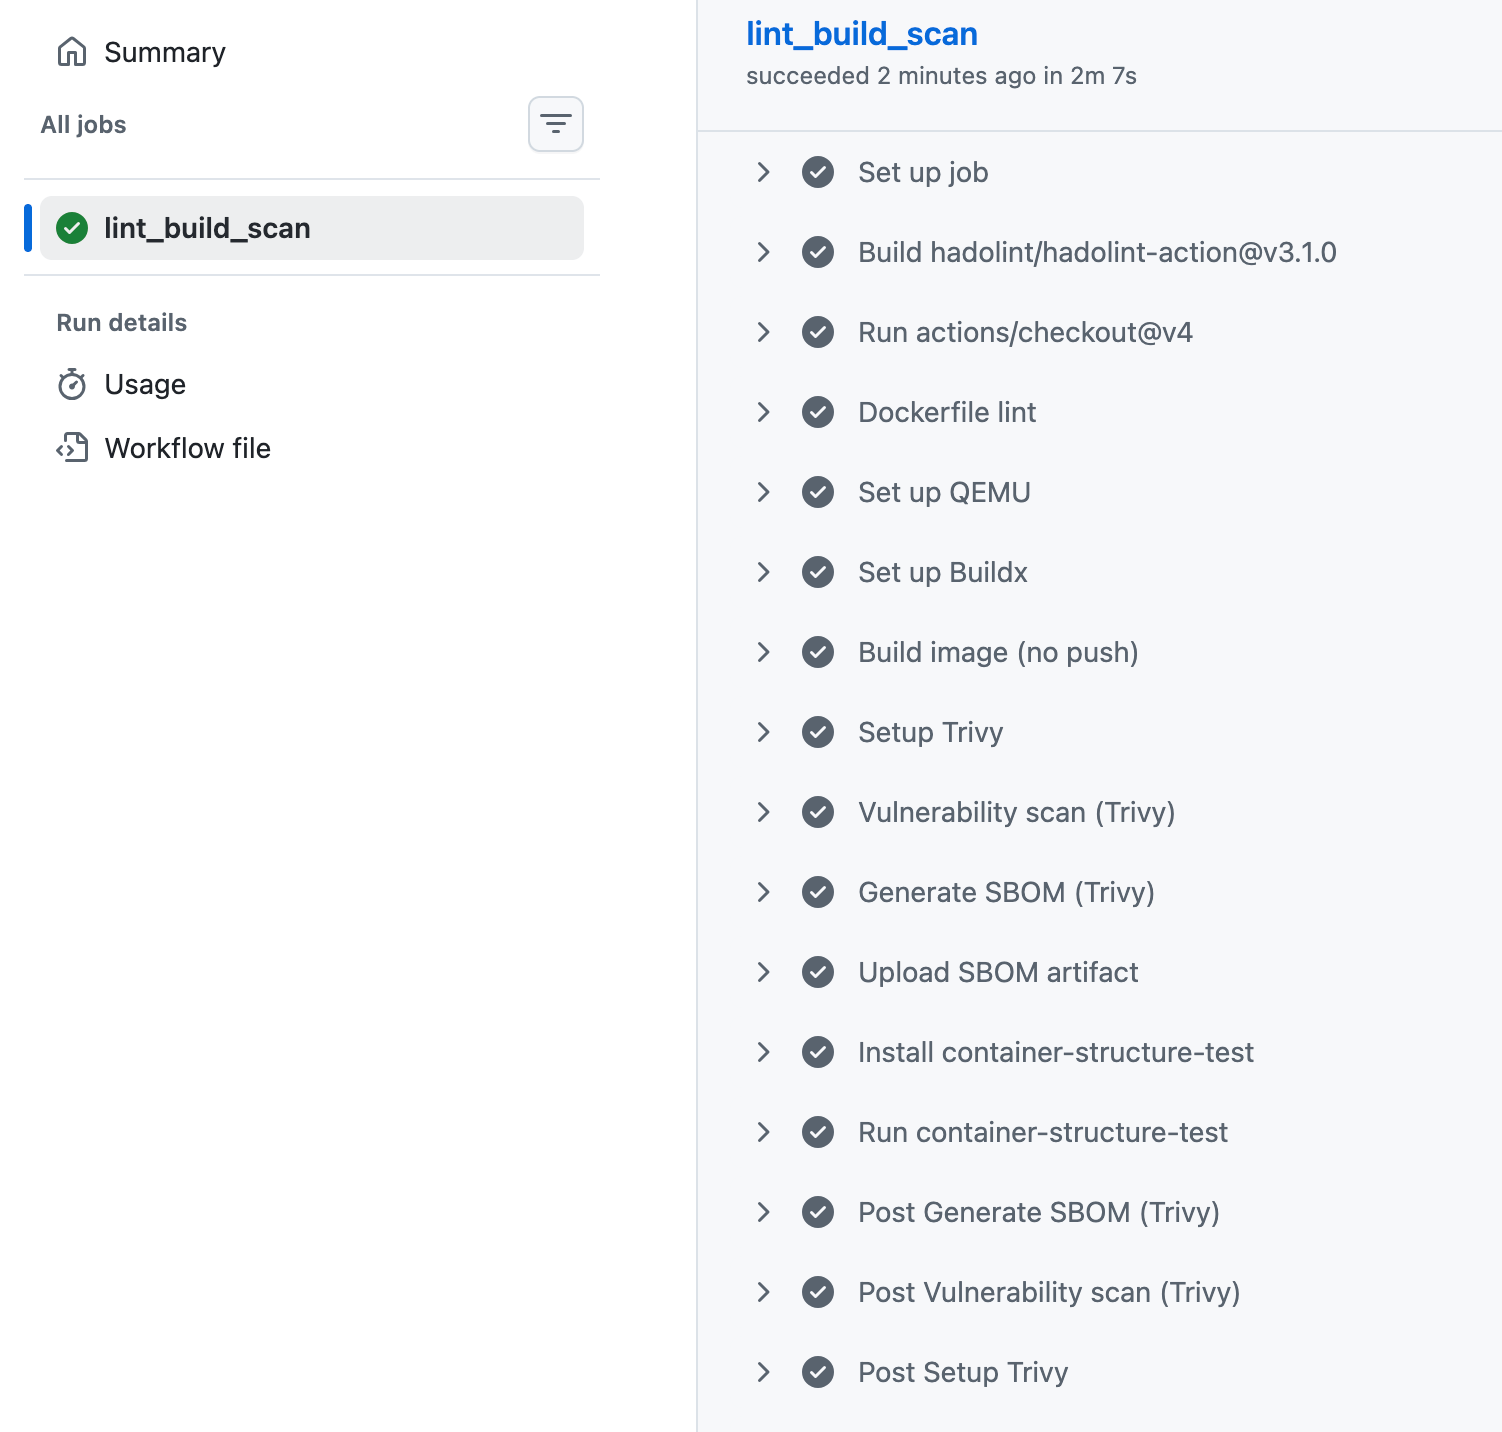
If the job is successful, you will see the status of the job as shown below.
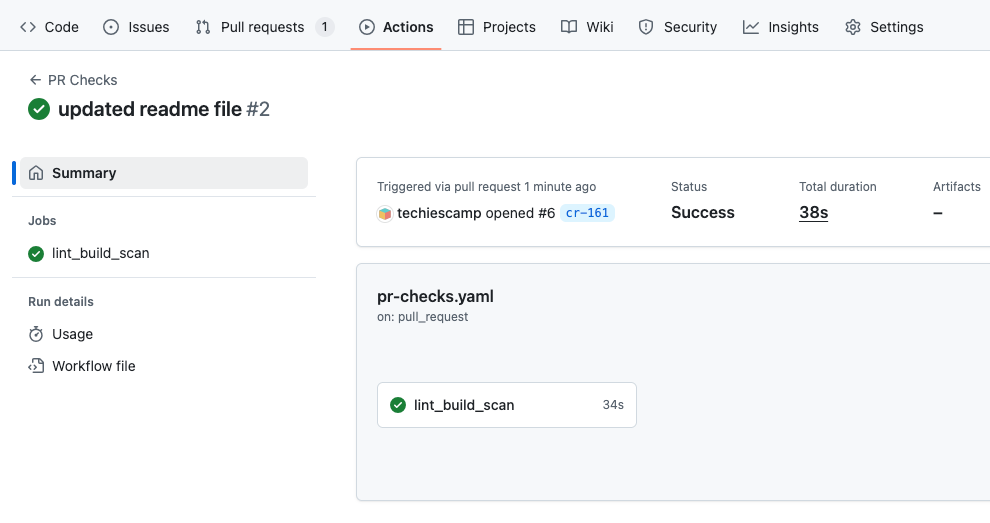
If you click the job, you can see the steps run in the job and its details.
Once the PR workflow run has been completed, you can get the SBOM report from the workflow link.
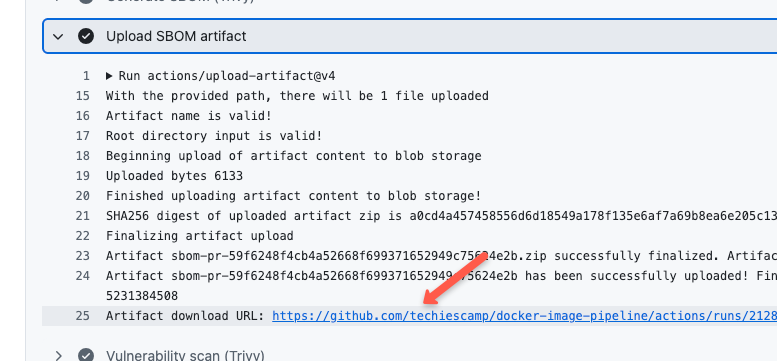
Click the link to download the SBOM report.
Let's move on to the image-building and pushing stage.
Trigger Image Build Workflow
The next stage is to trigger the image-building workflow image-build-pipeline.yaml.
This will be triggered automatically, when the PR is merged to the Develop branch.
First, go to the Pull Request menu,
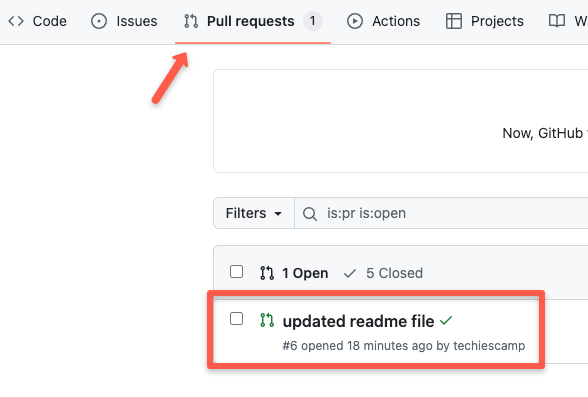
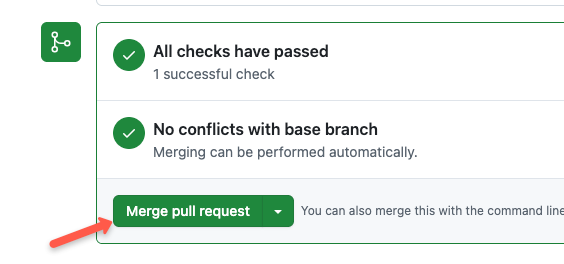
And, merge the PR.
Refresh the page, and you will see a new job is triggered.
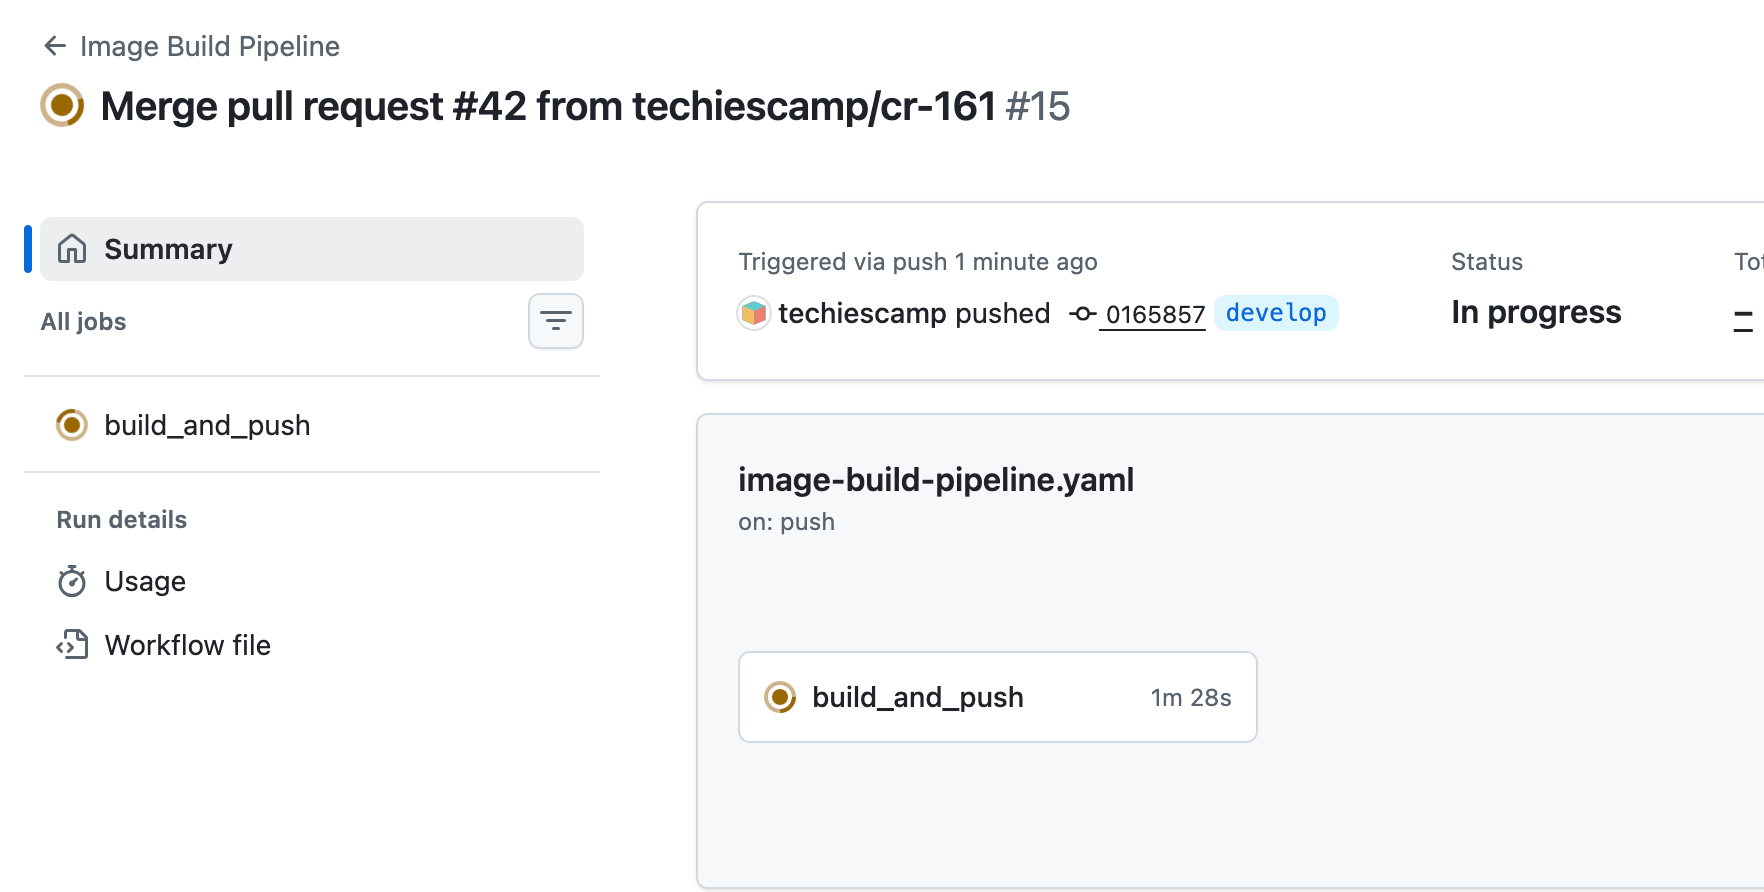
Select the job, and you will see the steps run in this job.
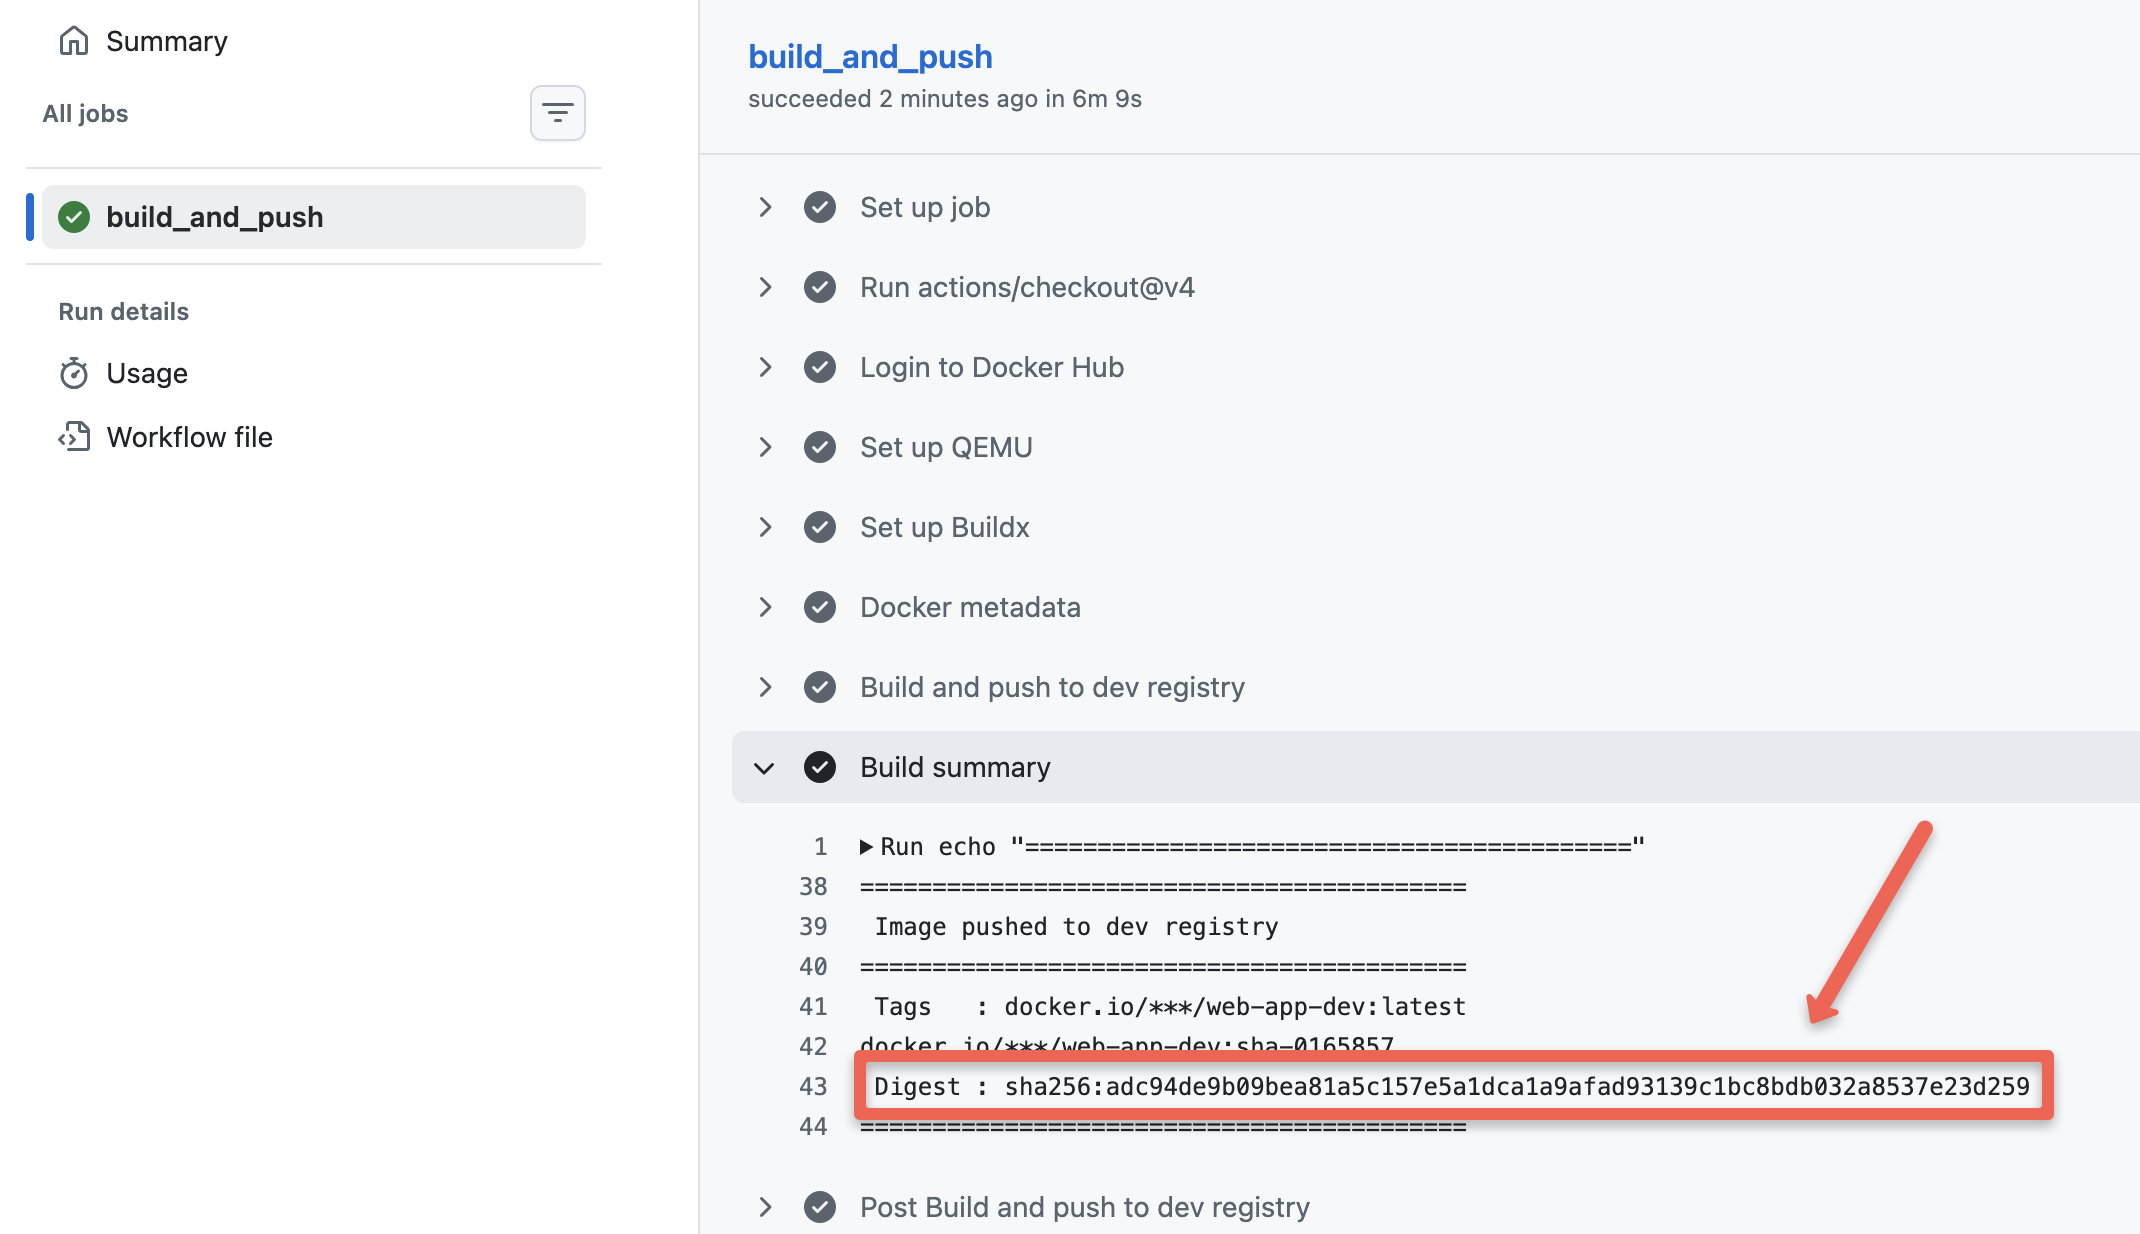
Make sure to save the SHA ID of the image, it is required to trigger the next workflow.Now, check your dev container registry, you will see two image tags as shown below.

Now, the image has been built and pushed to the stage repository, let's move on to the image promotion stage to stage.
Trigger Image Promotion Workflow to Stage
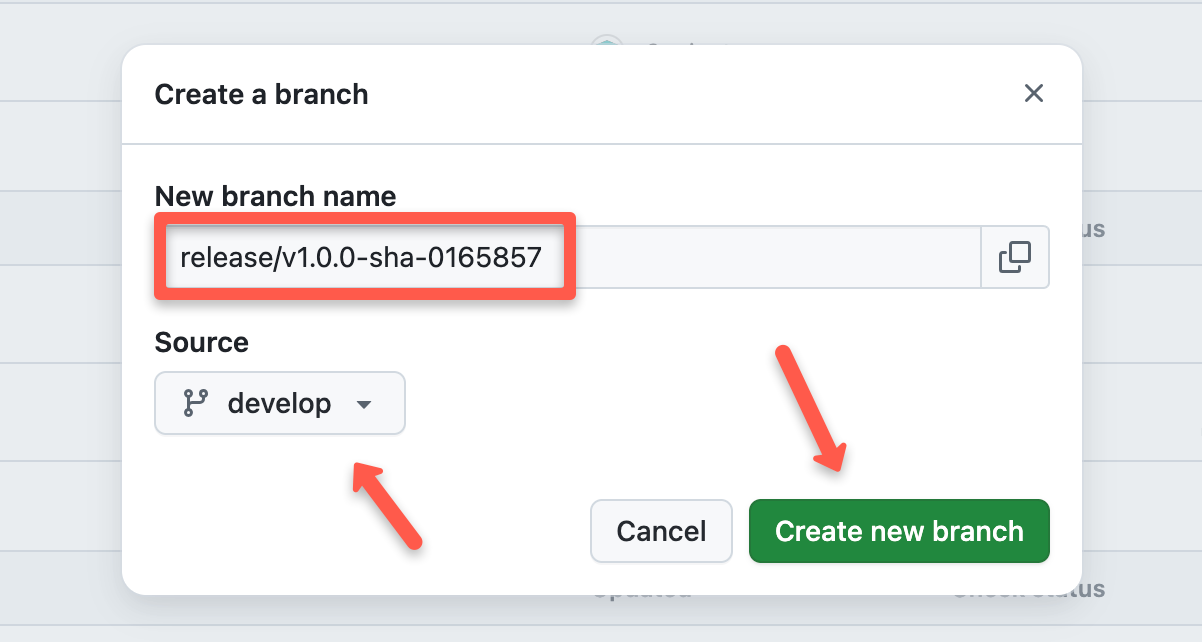
The image promotion workflow promote-to-stage.yaml will not be triggered automatically,first, we need to create a release branch with the commit ID for the previous build.
For example, my previous commit ID is 0165857, the my release branch name will be release/v1.0.0-sha-0165857.
The image promotion workflow promote-to-stage.yaml will not be triggered automatically, we need to push the changes to the main branch and trigger it manually.
Create a new branch from the develop branch, give the name, and press create.
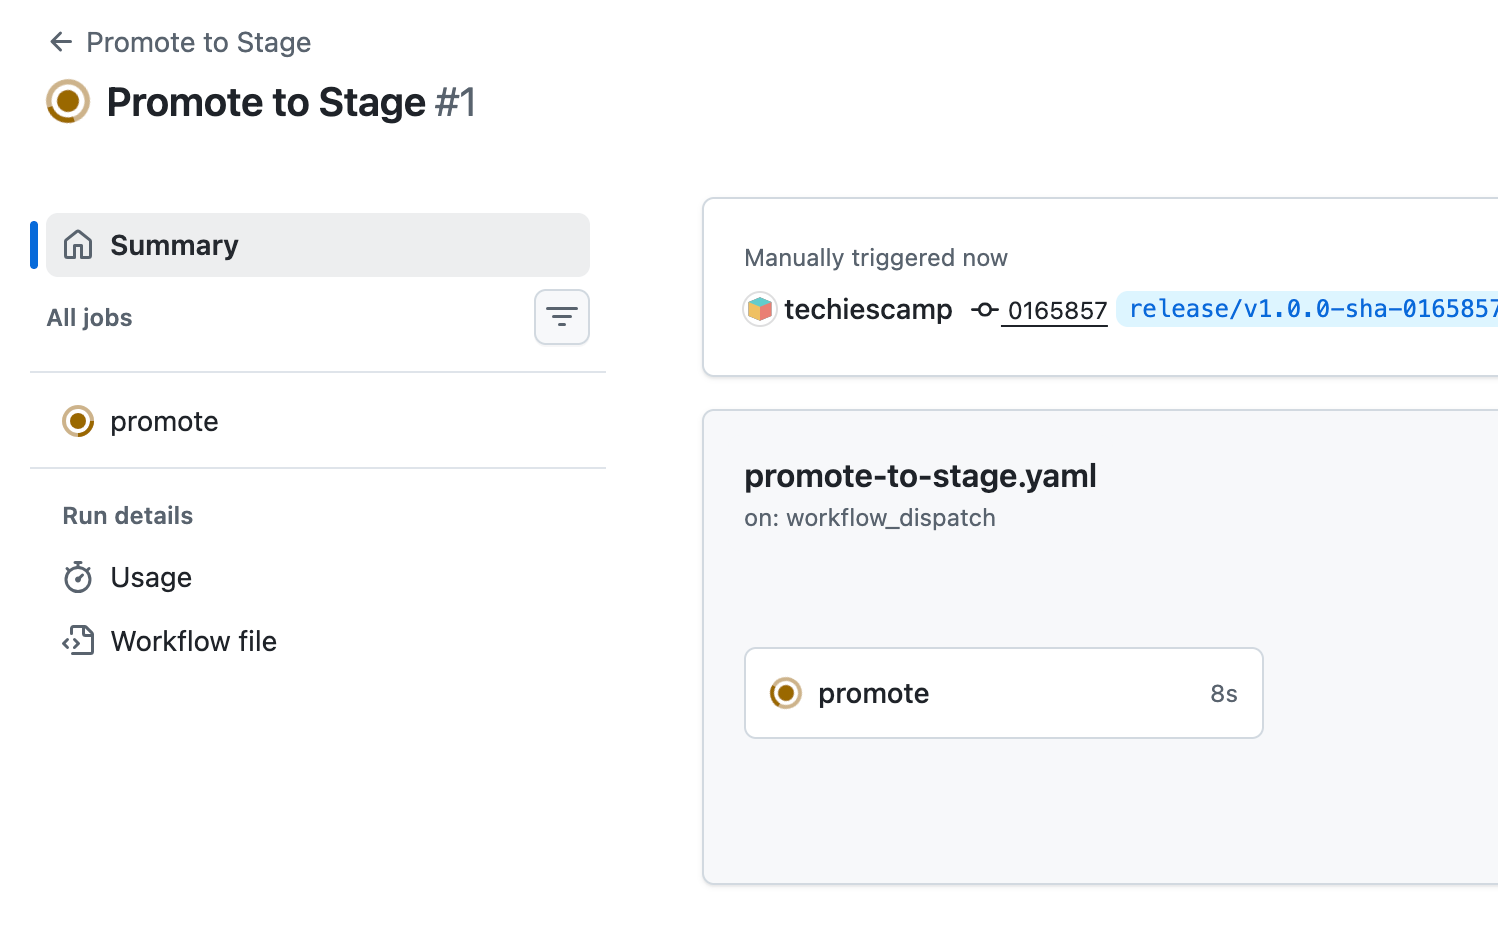
Then, go to the Actions menu, select the promotion to stage workflow file, and click the Run workflow toggle key.
It will ask for the image's SHA ID, which you want to promote. Once you enter the ID, click the Run workflow button to start the job.
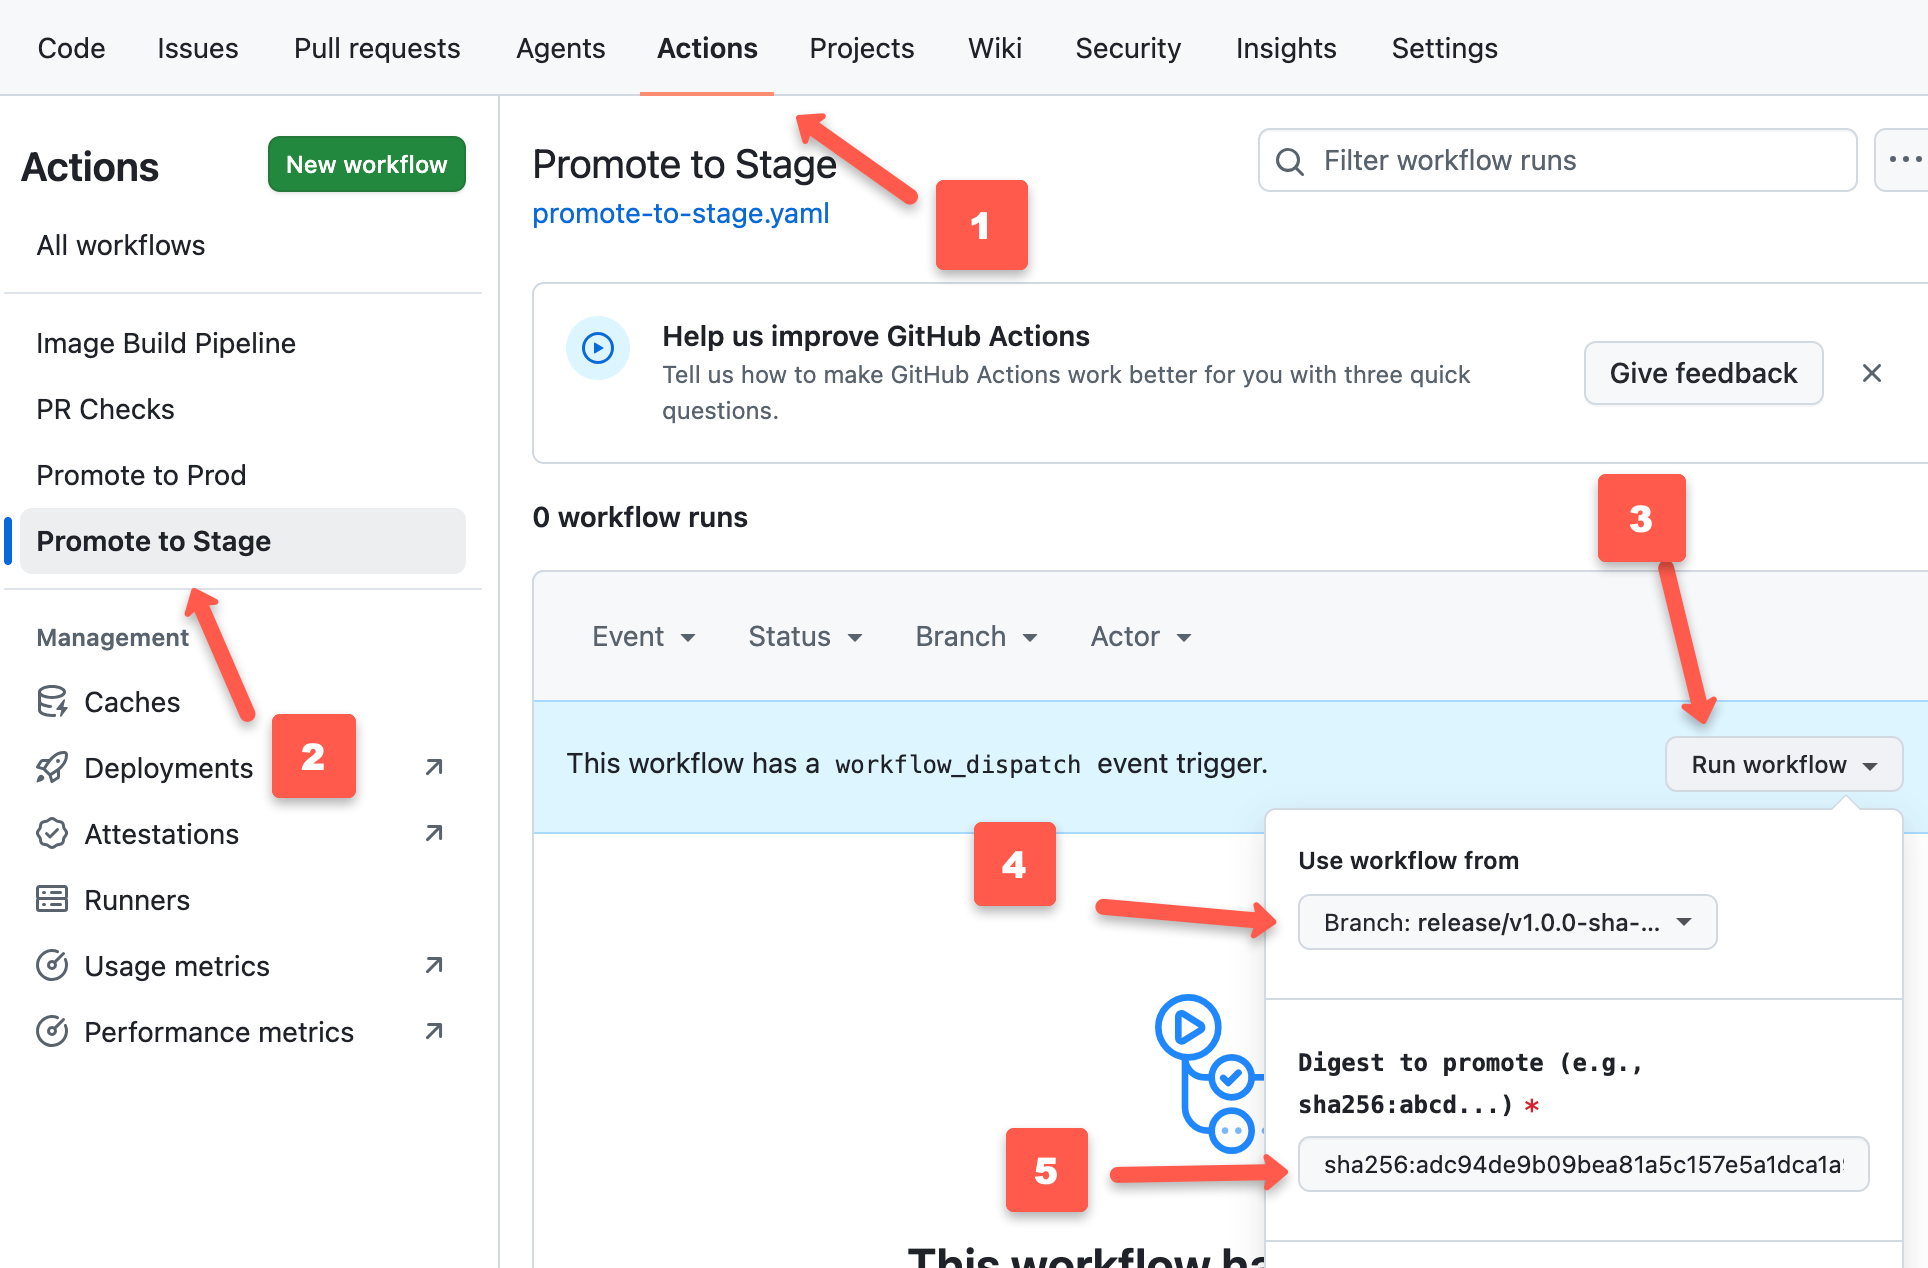
This will trigger the promotion workflow for stage.
Below are the steps runned by the stage promotion workflow.
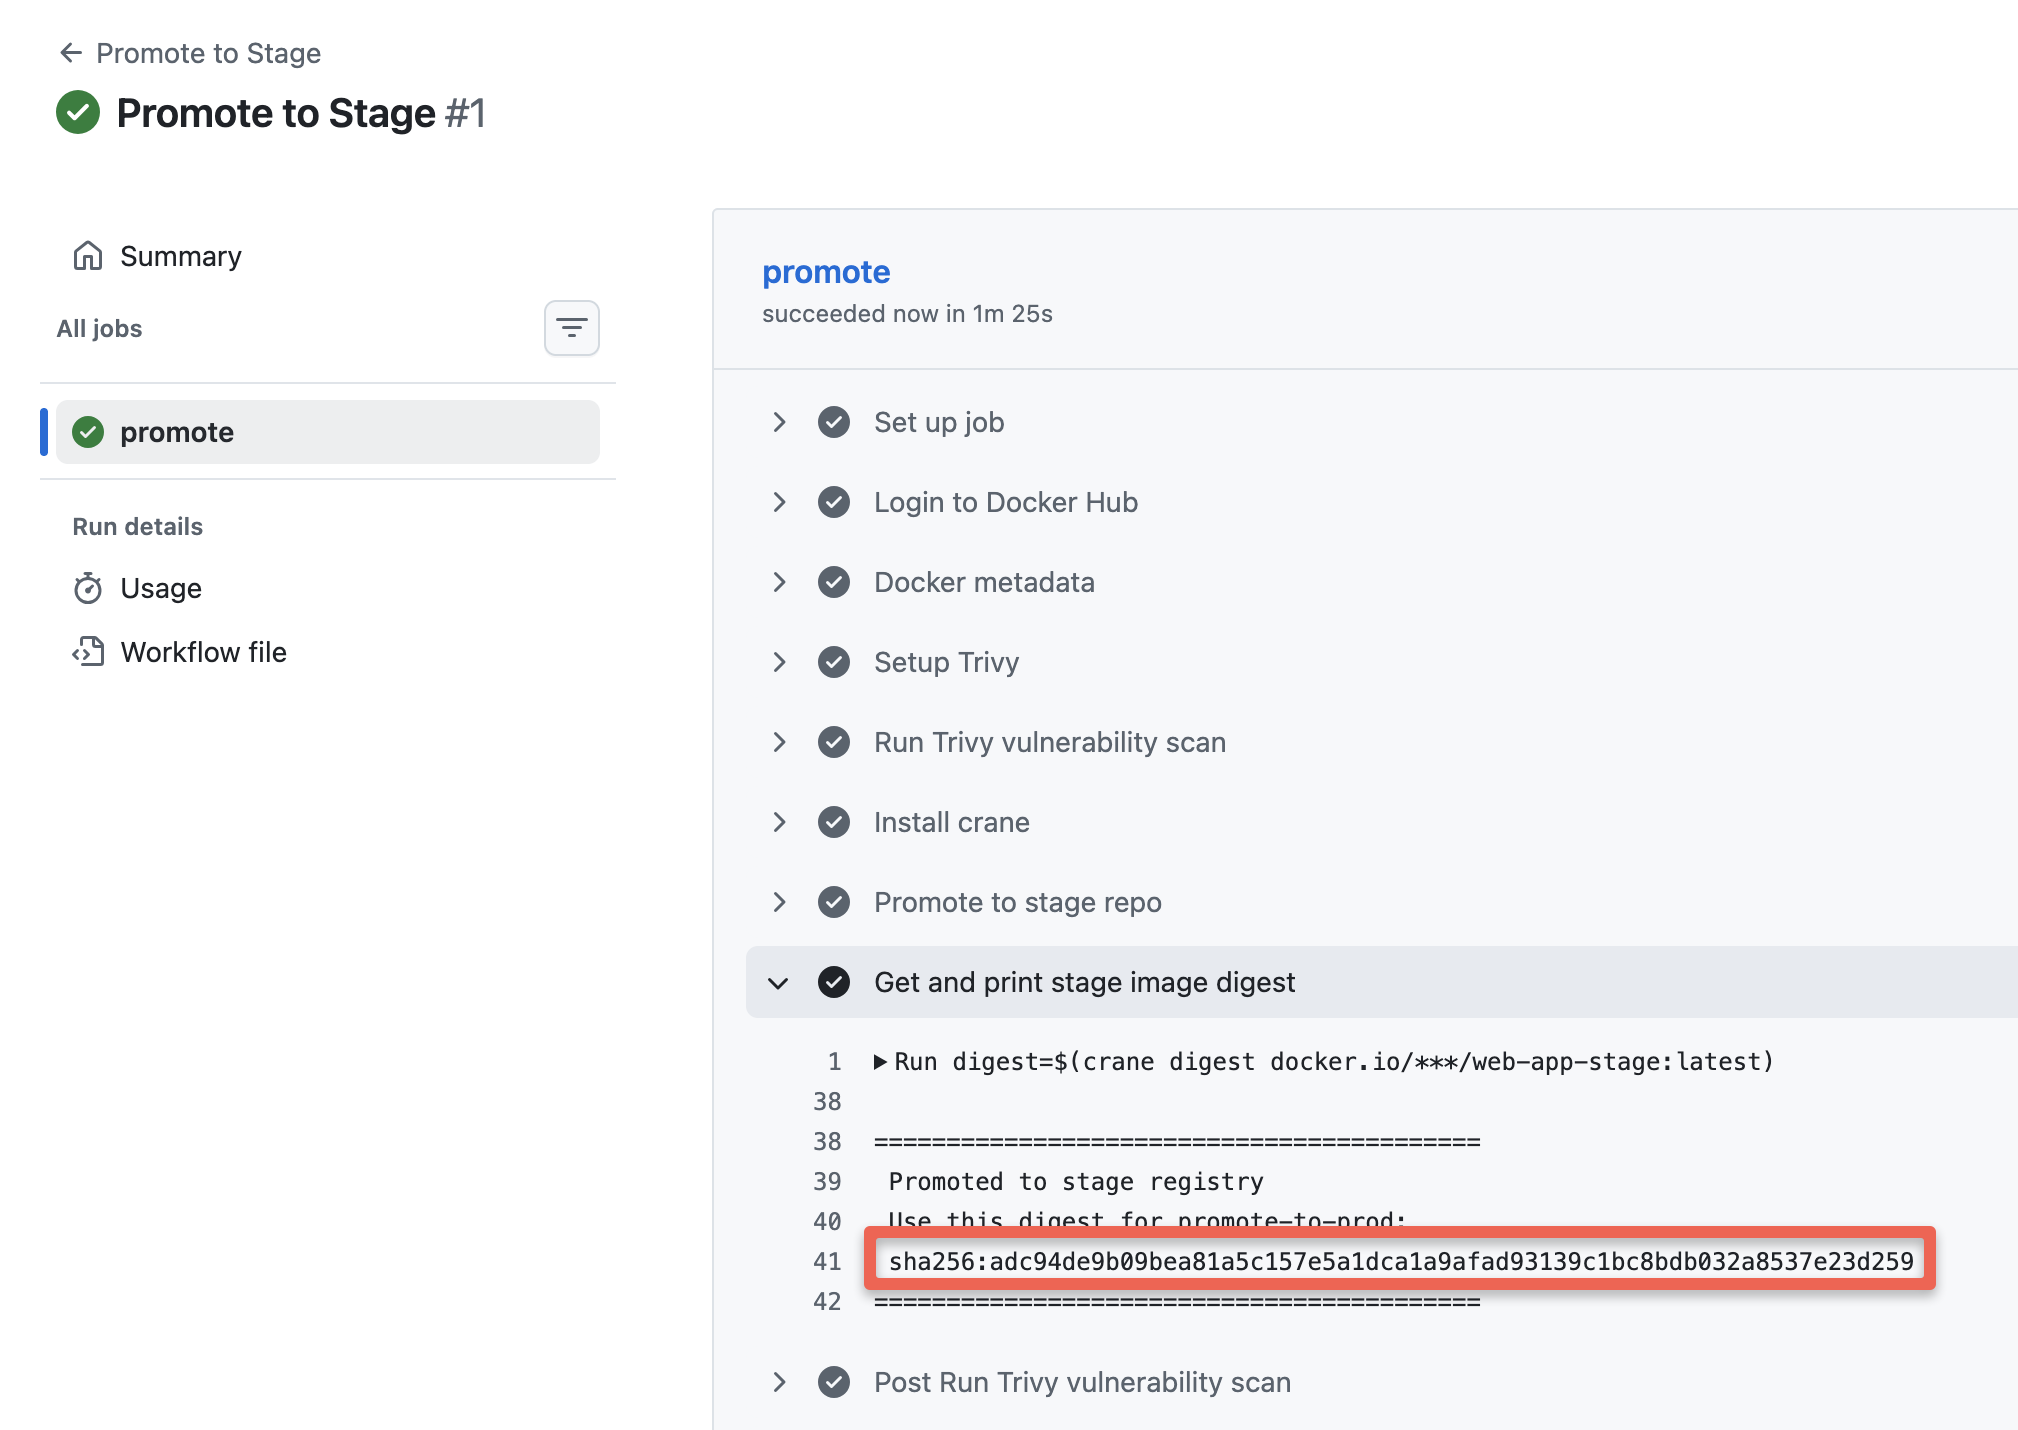
Copy the SHA ID, it is required for the promotion to prod.
Now, check your stage container registry, you will see two image tags as shown below.
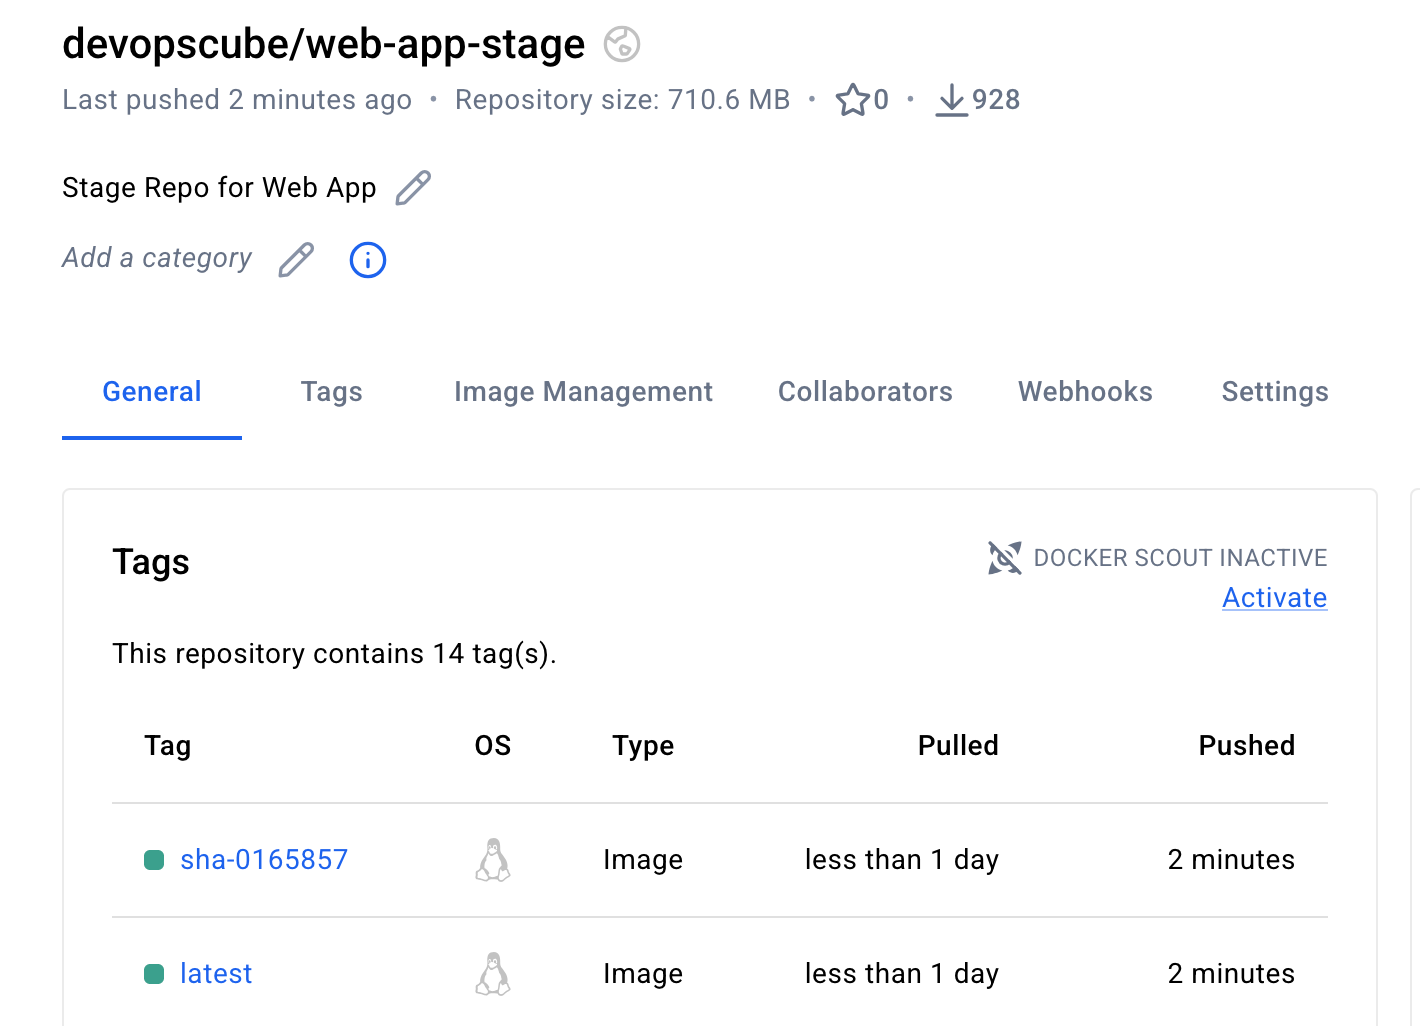
Now, the image has been promoted to the stage repository, let's move on to the image promotion stage to prod
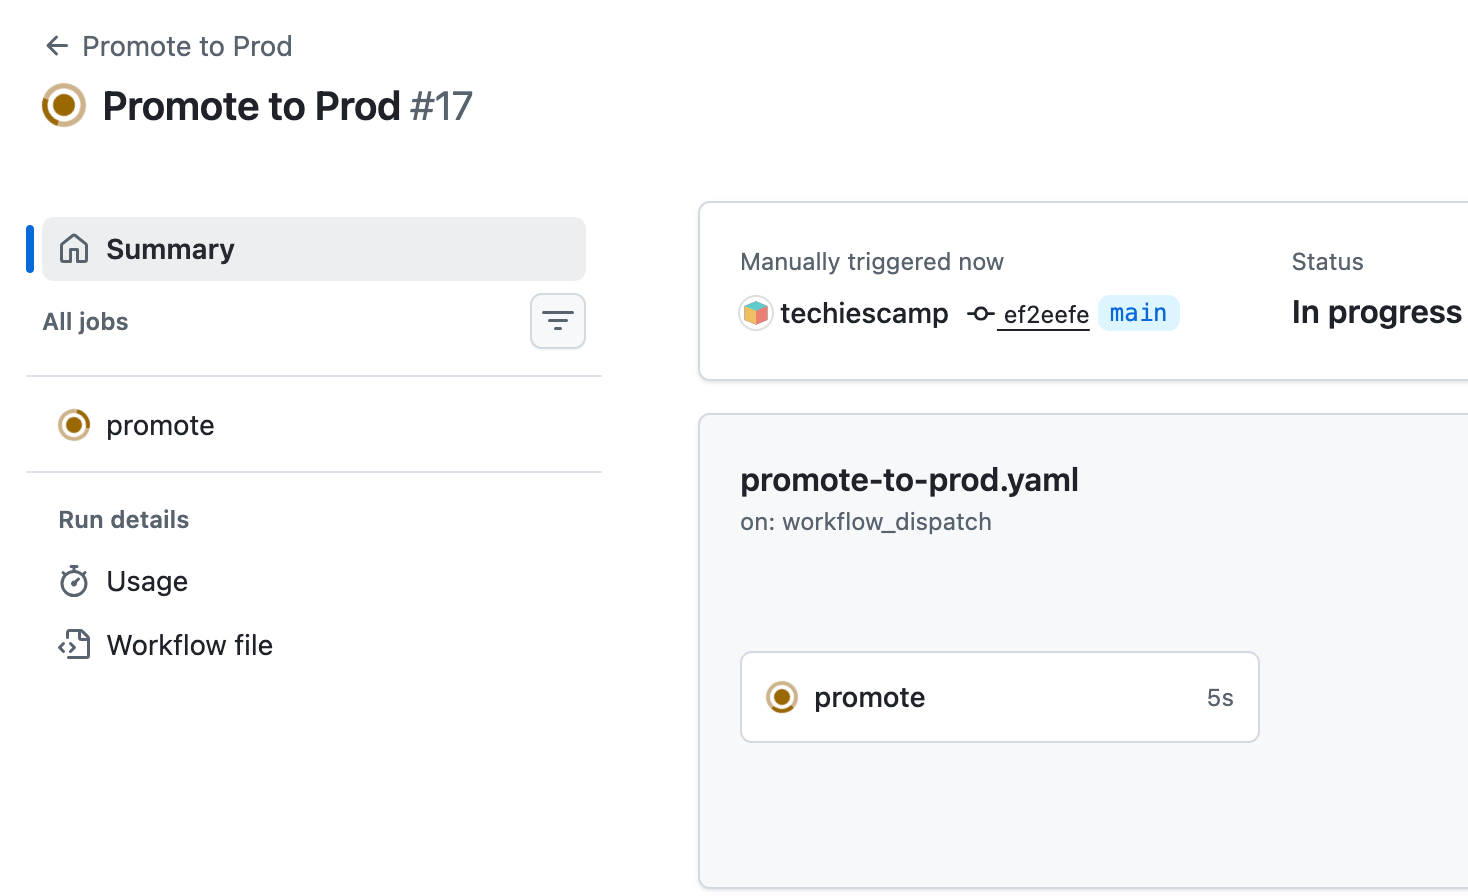
Trigger Image Promotion Workflow to Prod
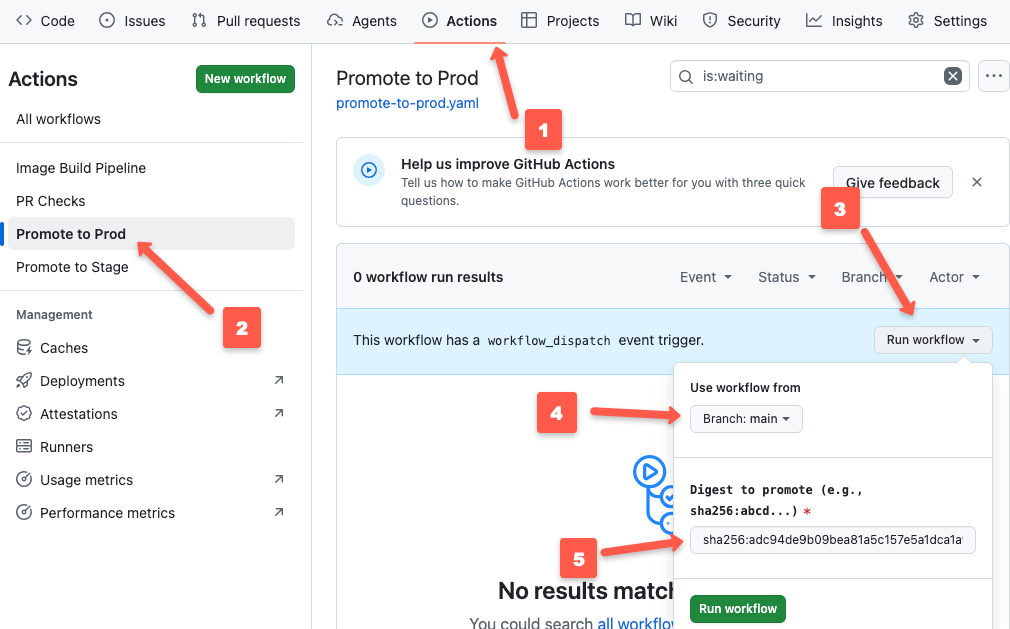
Same like the previous step, the image promotion to pord workflow promote-to-prod.yaml will not be triggered automatically, we need to push the changes to the main branch and trigger it manually.
During the trigger, it will ask for the Docker image's SHA ID, which we got from the previous job.
First, push the code changes to the main branch from the release branch.
Then, go to the Actions menu, select the promotion workflow file, and click the Run workflow toggle key, to select the branch and enter the SHA ID.
It will ask for the image's SHA ID, which you want to promote. Once you enter the ID, click the Run workflow button to start the job.
Refresh the page and you can see a new job is triggered.
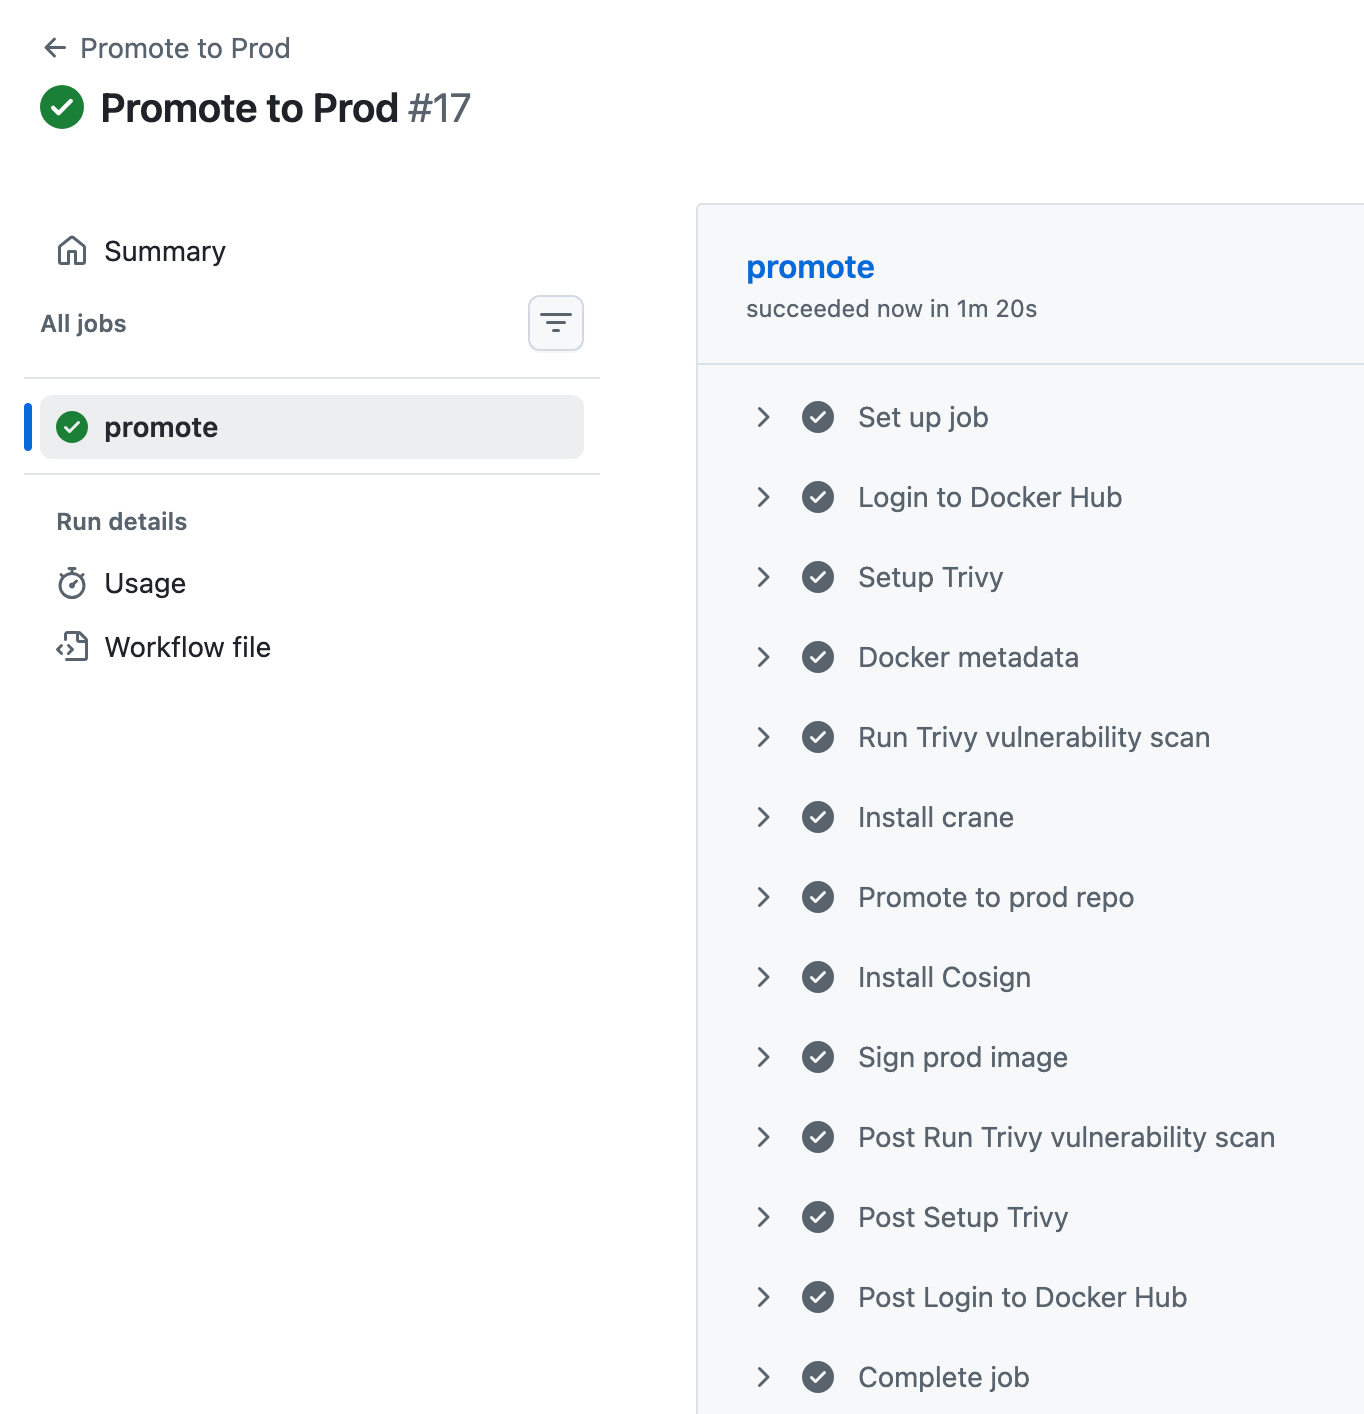
Select the job, and you can see the steps run in it.
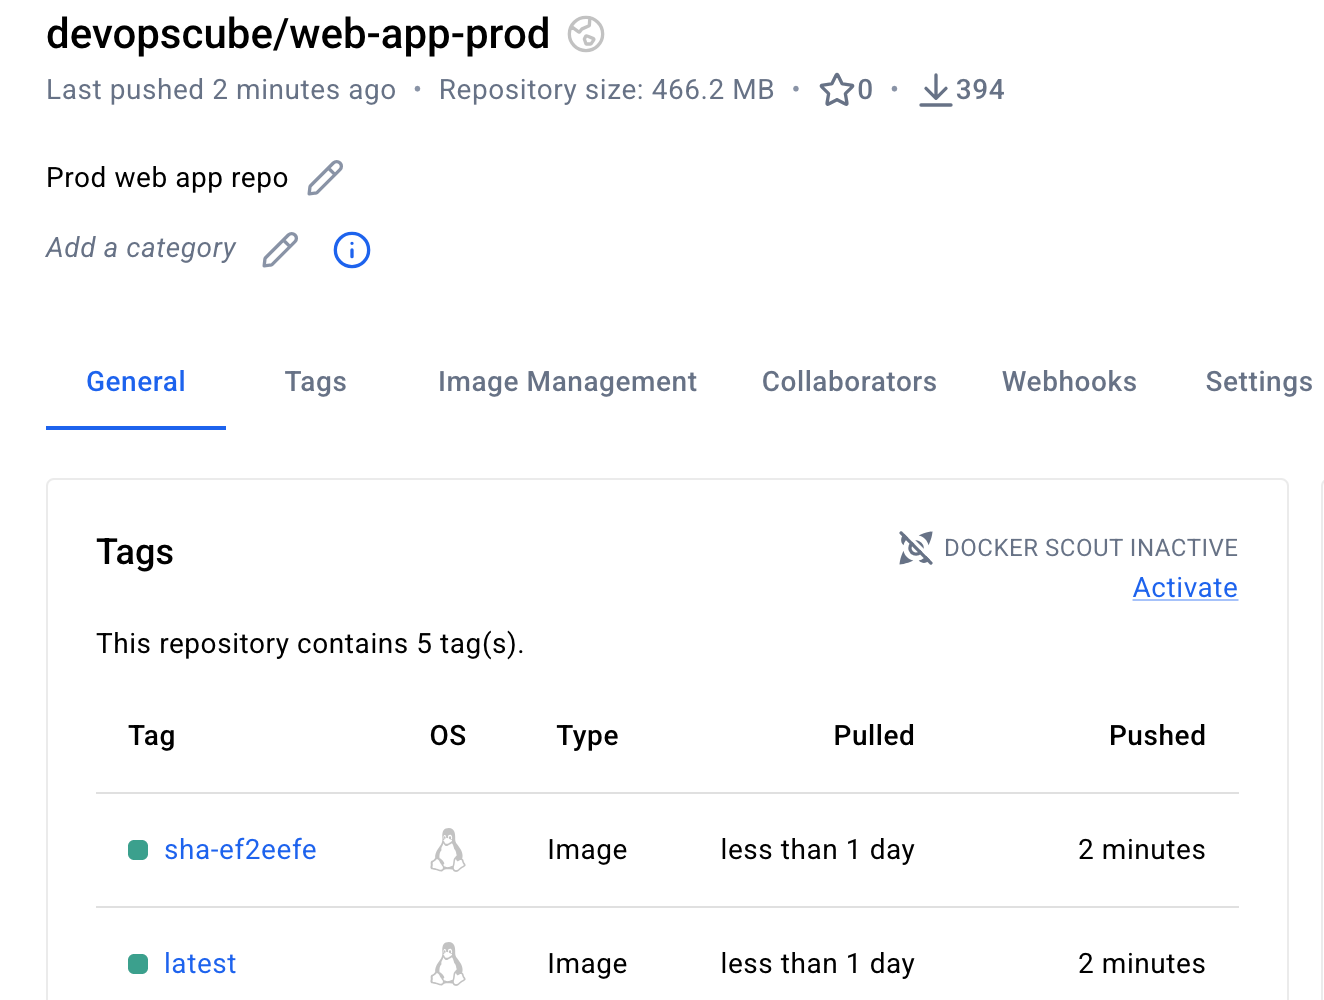
Now, go to your prod repository, and you can see two images that are the same as in the staging repo, as shown below.
Now, you can verify if the images are signed using the public Cosign key in our local environment, use the following command.
cosign verify --key cosign.pub <registry-name>/<image-name>:<tag>
This will verify if the image has not changed after signing.
And, on the deployment side, especially in Kubernetes, you can use tools like Kyverno to set policies to set certain standards, for example, block images without a valid signed key.
Build Caching
Caching is the process of reusing stored files between builds to save build time.
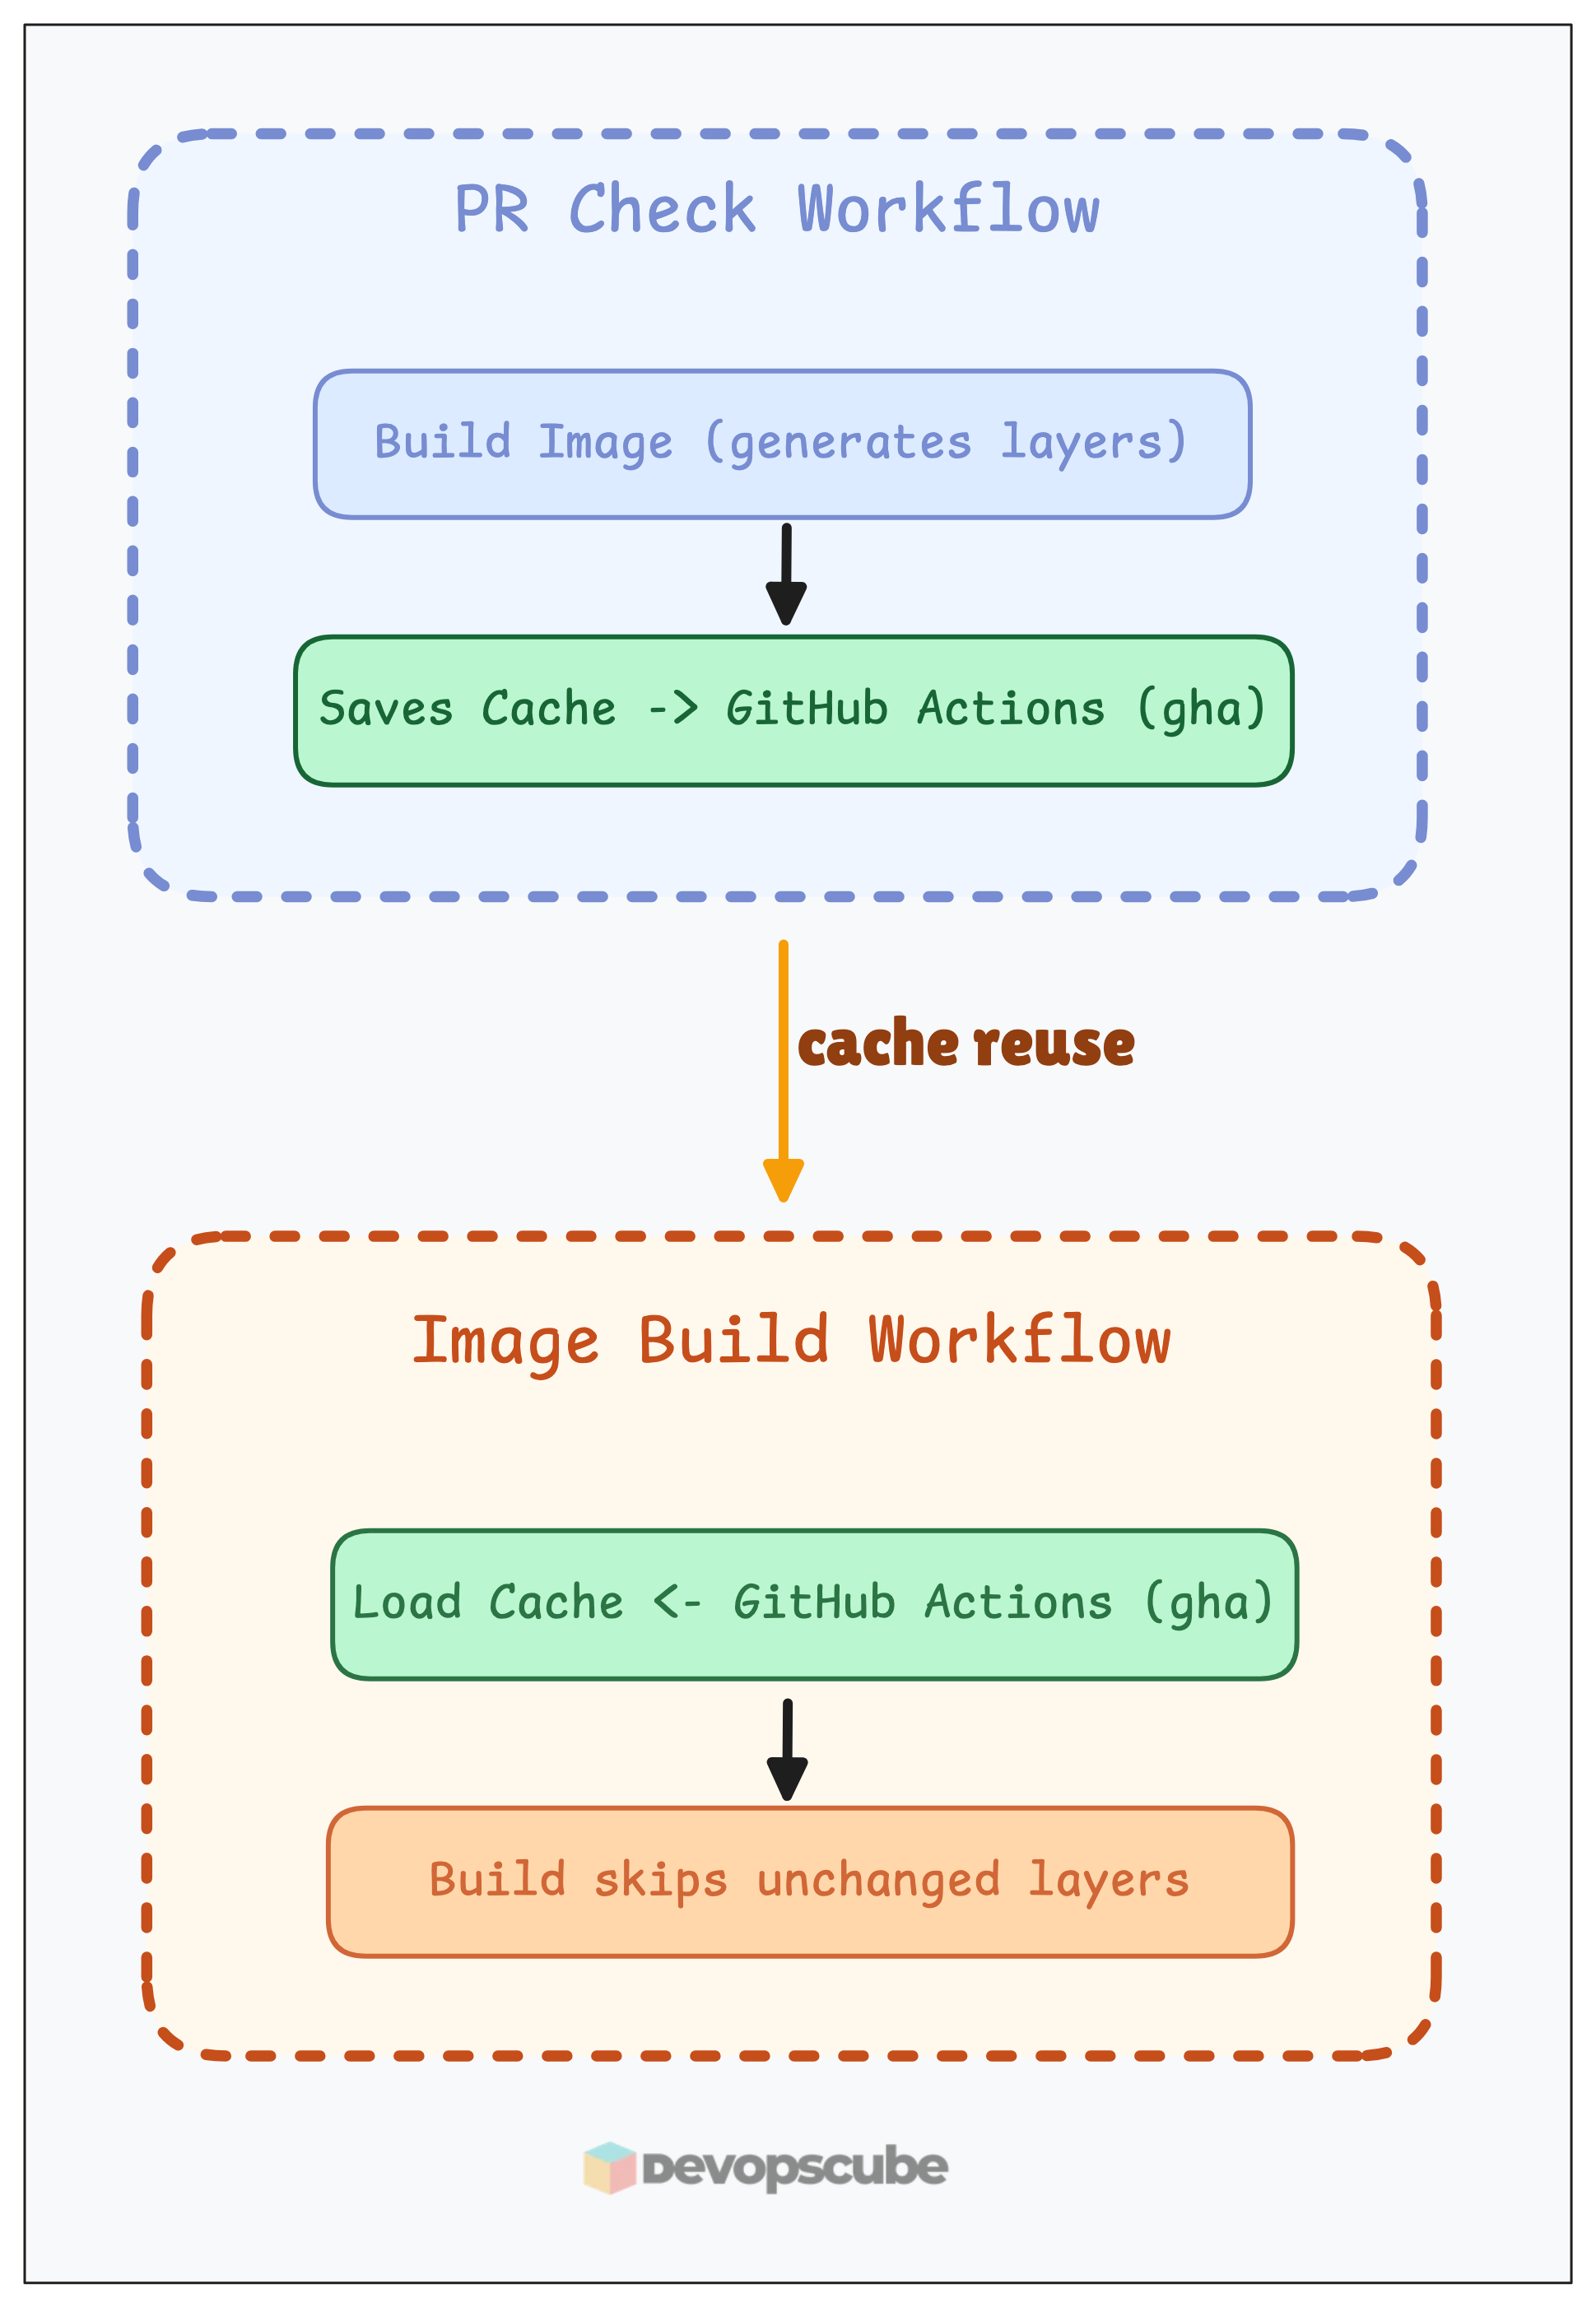
In the above workflow files, we have configured caching for the image build step as shown below.
cache-from: type=gha,scope=java
cache-to: type=gha,scope=java,mode=max
In our example, we are saving the cache in GitHub Actions itself using the type=gha argument.
We use the cache saved during PR check-in in the image building workflow to save the build time.
Observability Layer
Setting up observability to check the health of the CI/CD pipeline is very important.
Without proper visibility, you may not know whether there are resource constraints in the runner, builds are queuing up, which build is wasting time, or taking more time, etc.
Below are the key things to track:
- Build queue depth and wait times - To identify if you need more runners
- Success/failure rates per service - To identify builds with issues
- Average build duration trends - To find the time taken for builds
- Cache hit ratios - To check if caching is working
Still, we are using GitHub Actions, and we will get basic information about the runs in the Actions tab itself.
For further in-depth information, configure Prometheus and Grafana for monitoring the workflow and exporting metrics to them.
Reusable Workflows
In this example, we have kept every workflow file inside the same repository, it is fine for small projects.
But think, if you have more than 100+, what will you do?
Maintaining more workflow files that have the same steps is a waste of time and difficult to manage.
That is where reusable workflows help you.
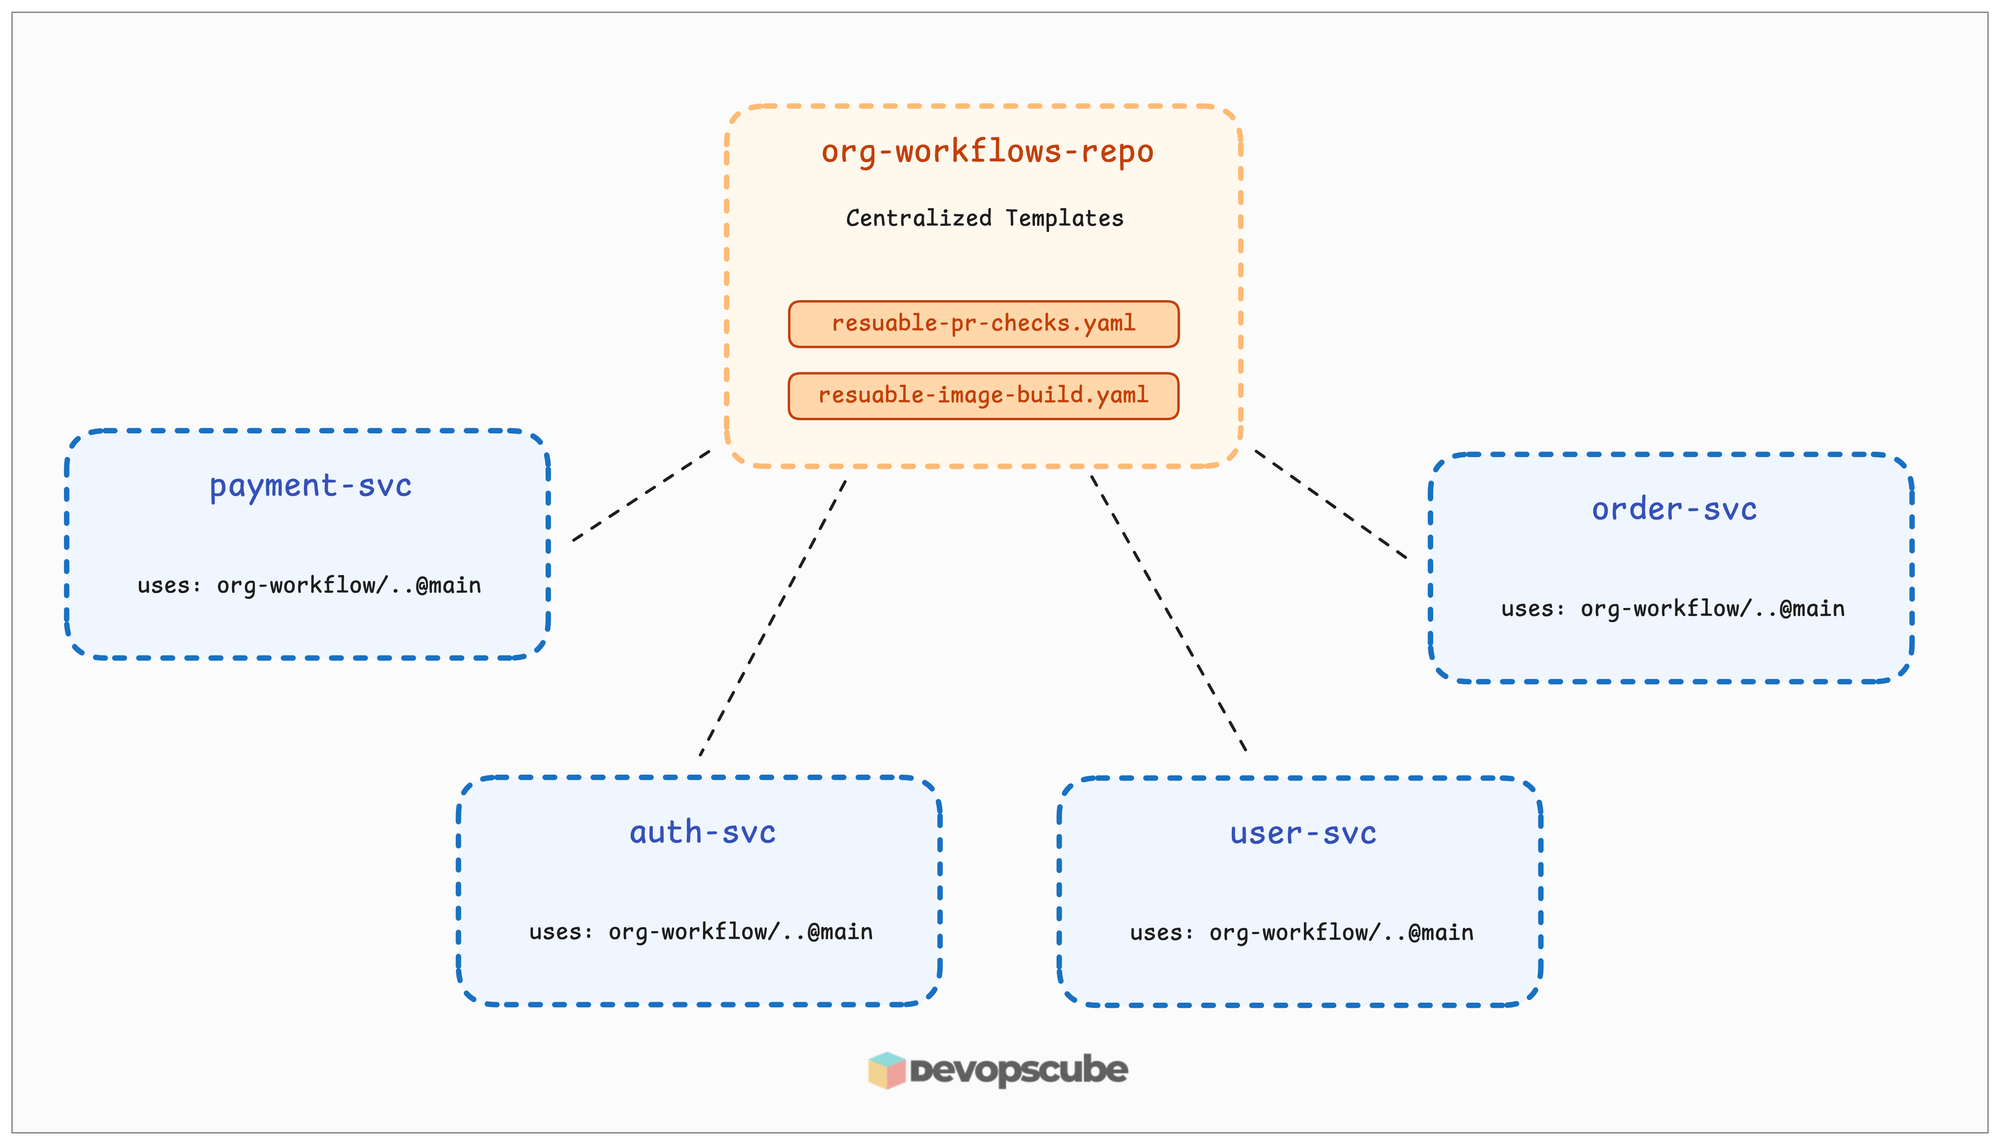
A reusable workflow is like a template for jobs and steps that can be reused across multiple repositories and projects.
Instead of defining the same steps separately in each repository, we can create centralized, reusable workflows in a repository and use them from there.
An example of how reusable workflows are called is given below.
jobs:
  pr-checks:
    uses: your-org/org-workflows-repo/.github/workflows/reusable-pr-checks.yml@main
    with:
      config-path: .github/reusable-pr-checks.yaml
    secrets: inherit
Conclusion
In this guide, you have learned about the complete workflow of how a Java application is built and Dockerized using GitHub Actions with most of the image security best practices.
Not just Java applications, all language applications are built using the same format, just the application build and Dockerfile will differ based on the application language.
Also, we have gone through how an image is built and promoted from a dev to the prod image registry.
Not only that, but we have also signed the image at the end to give proof that the image has not changed after the promotion.
If you have any doubts about this guide, drop a comment.
We will help you to clear it!
