


In this guide, you will learn how to deploy a machine learning model on a Kubernetes cluster using KServe model serving.
Here is what we will cover in this guide.
- What is Kserve?
- Deploying KServe on Kubernetes
- Deploying a sample scikit-learn ML model using KServe
- Test the deployed model using its inferencing endpoint.
We have given a simple model so you can concentrate on the Kubernetes and KServe deployment concepts.
Anyone can try this guide without AI/Ml background.
What is KServe?
When we train a machine learning model, the next step is to serve it so others can use it for predictions.
Serving means loading the trained model, running it inside an inference server, and exposing an endpoint for apps or users to send requests and get results.
You cannot deploy an ML model on Kubernetes the same way you deploy regular workloads. Models need an inference server that handles prediction requests. KServe makes this process simple.
KServe is an open-source ML model serving tool for Kubernetes, which helps you serve your ML models on a Kubernetes cluster with minimal effort.
You can deploy Kserve in two modes.
- Knative (default mode): This mode reqires Knative components and this is particularly good for advanced setups.
- RawDeployment mode: If you plan to deploy your models in a simple setup RawDeployment is the best option.
In this guide, we will focus on the Kserver installation using the RawDeployment mode and show you how to serve a simple ML model on Kubernetes.
Kserve Model Serving Workflow
To get started with Kserve, we are going to use the following Kserve workflow to serve a model.
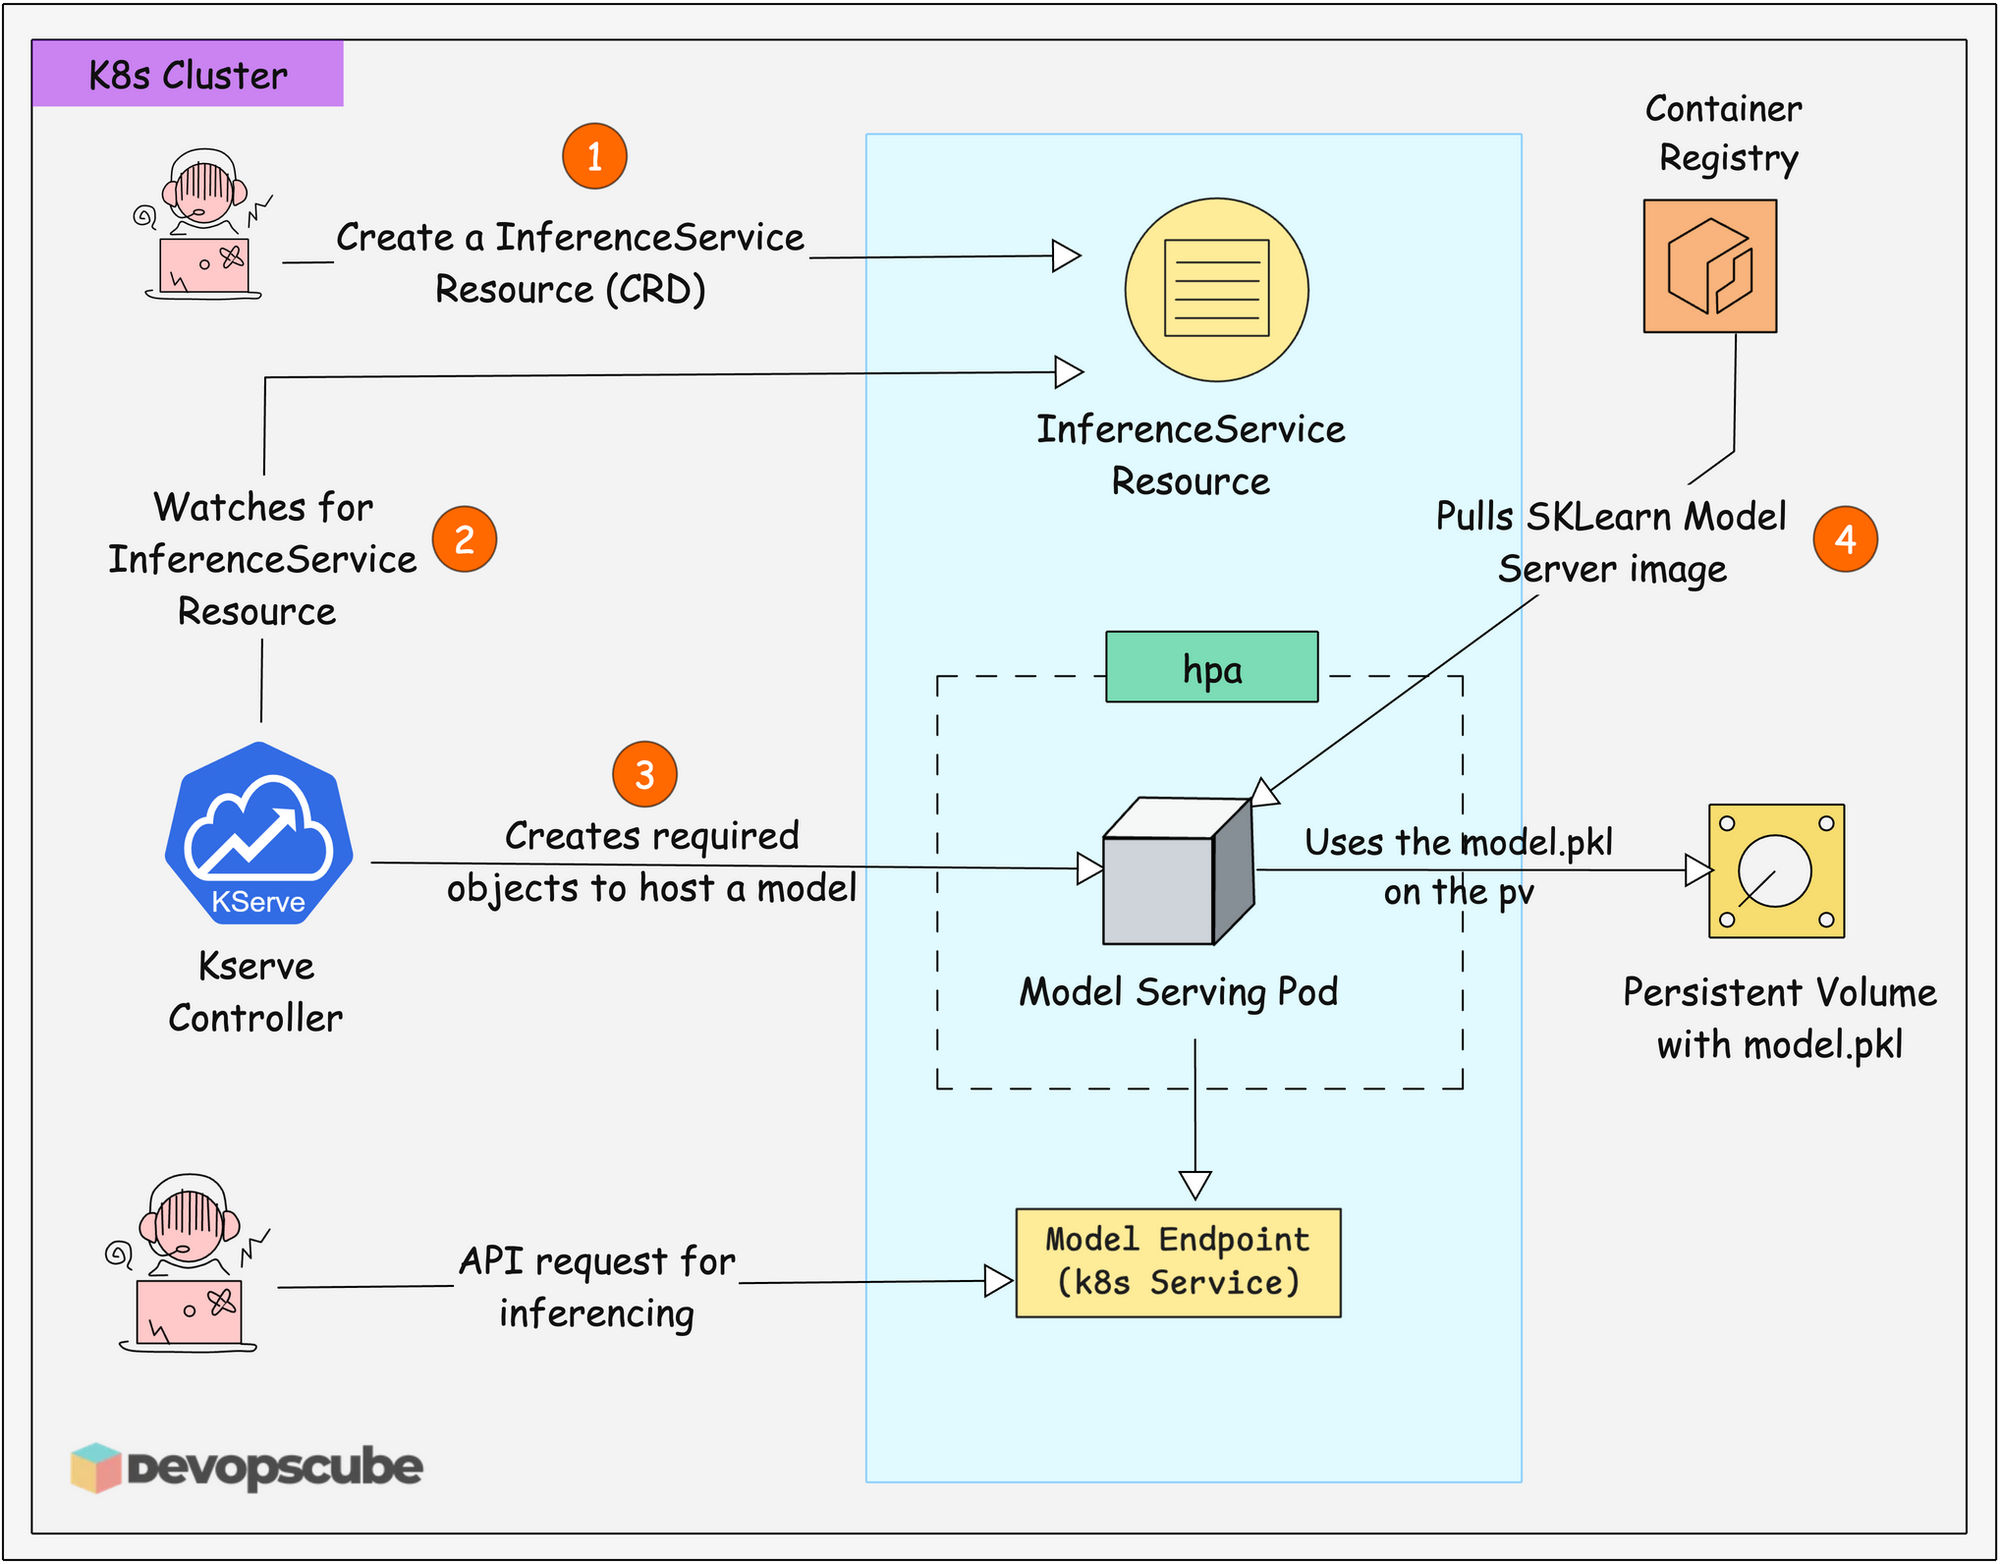
Here is how in works.
- The KServe controller running in the Kubernetes cluster continuously looks for
InferenceServiceresources that are created. - When a user creates the
InferenceServiceresource, KServe detects it and creates the following required objects.- A Deployment with a Pod to run the model server.
- A Service to expose the Pod as an endpoint.
- HPA to scale up/down based on load.
- The Pod then pulls a SKlearn model server image from the container registry. This image contains the libraries to serving the model.
- The pod then uses the PVC URI to access the model.pkl file.
- As explained in second point, KServe automatically exposes a Kubernetes Service endpoint. This becomes the URL where clients can send API requests for predictions.
- Finally, you or an app can send data to the Model Endpoint for inferencing.
In Kserver, you can store your model in following ways:
- It can be stored in an object storage like AWS S3 or Azure Blob Storage.
- Store it as a container image.
- Store it in your clusters Persistent Volume.
For other storage options, refer the offical documentation.
ML Model Details & Context
For this setup,
We will use a sample model that is a scikit-learn text classification pipeline that categorizes words into three types.
- Animals (label: 0)
- Birds (label: 1)
- Plants (label: 2)
You give a word to the model and it tells you whether that word represents an animal, bird, or plant. This is a common type of machine learning problem called supervised learning classification.
model.pkl file is already included in the GitHub repository, so you don't need to create or train any model yourself.This model is provided purely for learning purposes to demonstrate KServe deployment concepts.
Setup Prerequisites
Following are the pre-requisites to follow this setup.
Lets get started.
Install KServe in Kubernetes
Follow the steps below to install KServe on your Cluster.
Step 1: Install Cert Manager
Let's start with installing Cert Manager, which is essential for creating and managing TLS certificates for KServe.
You refer to the official site for the latest version.
Run the following command to install Cert Manager. All the components gets deployed in the cert-manager namespace.
kubectl apply -f https://github.com/cert-manager/cert-manager/releases/download/v1.19.0/cert-manager.yamlEnsure all the three cert-manager components are in running state.
kubectl get po -n cert-managerStep 2: Install KServe CRDs
Once the Cert Manager is installed, install KServe.
First, start by installing the required CRDs of KServe using helm.
To install the CRDs, run the following command. It also creates the kserve namespace where the kserve controller will be deployed.
helm install kserve-crd oci://ghcr.io/kserve/charts/kserve-crd --version v0.16.0 -n kserve --create-namespaceNow, verify the kserver CRD's
kubectl get crds | grep kserveStep 3: Deploy KServe Controller
Now run the following command to install the KServe controller.
helm install kserve oci://ghcr.io/kserve/charts/kserve --version v0.16.0 \
 --set kserve.controller.deploymentMode=Standard \
 -n kserve
In the above command, you can see a flag that specifies the deployment mode to Standard.
Verify if kserve contoller is in running state. The controller pod runs kube-rbac-proxy and the controller containers.
$ kubectl get po -n kserve

NAME                                        READY   STATUS    RESTARTS   AGE
kserve-controller-manager-59d84566d-grswq   2/2     Running   0          103s
Now that the setup is done, let's move on to the model deployment.
KServe Sample Project Repository
All the files and model we are going to use in this guide are from our GitHub repository.
Run the following command to clone the repository.
git clone https://github.com/devopscube/predictor-model.gitYou can see the following directory structure.
predictor-model
    ├── Dockerfile
    ├── README.md
    ├── inference.yaml
    ├── job.yaml
    └── model
└── model.pkl- Dockerfile - For dockerizing the model.
- inference.yaml - Manifest file to create a kubernetes resource that hosts the model on Kubernetes using KServe.
- job.yaml - Manifest that create a PVC and a job that copies the model into the PVC.
CD into the predictor-model directory and follow the steps below.
cd predictor-modelDeploy a Sample ML Model with KServe
Follow the steps given below to deploy the model.
Step 1: Dockerize the Model (Optional)
If you dont want to build your own image, use our
devopscube/predictor-model:1.0 image to follow the tutorial.The Dockerfile used to Dockerize the model is given below.
FROM alpine:latest
WORKDIR /app
COPY model/ ./model/
Here is the Dockerfile explanation.
- The Dockerfile uses the
alpine:latestas the base image. - It sets the
/appdirectory as the work directory and copies the model directory and the model file inside it to the/appdirectory.
Now, run the following command to dockerize the model.
docker build -t devopscube/predictor-model:1.0 .
Once it's built, run the following command to push the image to the registry.
docker push devopscube/predictor-model:1.0Another Kubernete native ML feature called imageVolumes let you package models as contianer image and mount as volumes in Pods.
Step 2: Store the Model in PVC
To copy the model into a PV, we are going to create a PVC and a job that copies the model to the PVC
Here is the job.yaml with PVC manifest.
apiVersion: v1
kind: PersistentVolumeClaim
metadata:
  name: predictor-model-pvc
spec:
  accessModes:
  - ReadWriteOnce
  resources:
    requests:
      storage: 5Gi
---
apiVersion: batch/v1
kind: Job
metadata:
  name: predictor-model-copy-job
spec:
  ttlSecondsAfterFinished: 10
  backoffLimit: 1
  template:
    spec:
      restartPolicy: OnFailure
      containers:
      - name: model-writer
        image: devopscube/predictor-model:1.0
        command: [ "/bin/sh", "-c" ]
        args:
        - |
          echo ">>> Copying model to PVC...";
          cp -r /app/model/* /mnt/models/;
          echo ">>> Verifying contents in PVC...";
          ls -lh /mnt/models;
          echo ">>> Verification complete. Job finished.";
        volumeMounts:
        - name: model-storage
          mountPath: /mnt/models
      volumes:
      - name: model-storage
        persistentVolumeClaim:
          claimName: predictor-model-pvc
This file creates a PVC, a Job that copies the model into a PV, and the pod gets deleted after 10 seconds once the job is completed.
Run the following to apply the manifest
kubeclt apply -f job.yamlIf you check the logs of the pod you will get the following output.
$ kubectl logs job/predictor-model-copy-job

>>> Copying model to PVC...
>>> Verifying contents in PVC...
total 4K
-rw-r--r--    1 root     root        1.7K Sep 16 06:57 model.pkl
>>> Verification complete. Job finished.Step 3: Deploy InferenceService Resource
To deploy the model, we are going to apply the inference.yaml file to create KServe's inference resource on the cluster.
apiVersion: serving.kserve.io/v1beta1
kind: InferenceService
metadata:
  name: model
spec:
  predictor:
    sklearn:
      storageUri: pvc://predictor-model-pvc
      resources:
        requests:
          cpu: 500m
          memory: 1Gi
In the above manifest,
- The
spec.predictorsection defines how the model will be served - Since the model we are using is based on scikit-learn, we are using sklearn framework.
storageUri: pvc://predictor-model-pvcmeans the model files are stored on a Persistent Volume Claim (PVC) named "predictor-model-pvc".
sklearn predictor block, KServe knows that we want to use the built-in SKLearn model server image.KServe will pull the default
kserve/sklearnserver:<version> and run the model in it.Run the following command to apply the inference service manifest.
kubectl apply -f inference.yamlThen run the following command to check if the related objects are created by the inferenceService object.
kubectl get po,svc,hpa,inferenceserviceYou will get the following output.
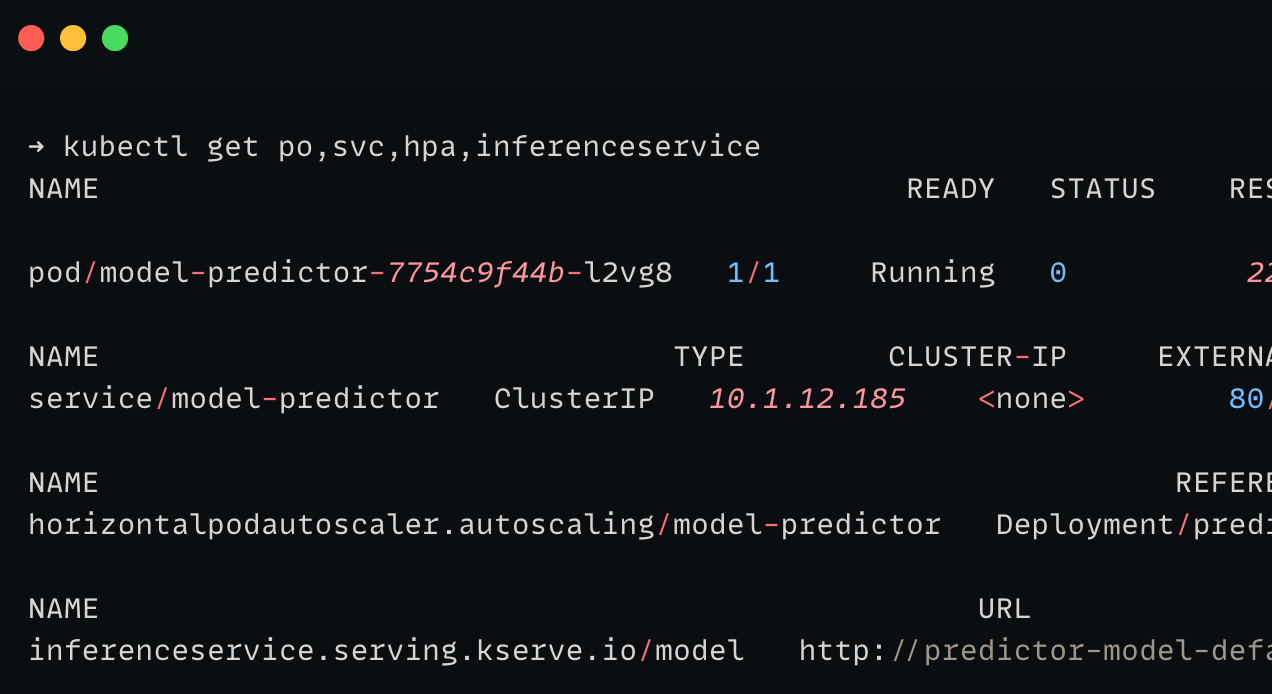
The internal endpoint will be:
http://model-predictor.default.svc.cluster.local/v1/models/model:predictIn the above endpoint:
- model-predictor.default.svc.cluster.local - Internal DNS of the service attached to the pod.
- v1/models/ - API version
- model - Name of the inference service
- predict - It's a standard endpoint for predictor models.
Test the KServe Inference Endpoint
To test the model, we are going to port forward the deployment service and send a request to it using curl.
Run the following command to port-forward the service.
kubectl port-forward service/model-predictor 8000:80Then, run the following command to send the request for prediction.
curl -X POST \
     -H "Content-Type: application/json" \
     -d '{
           "instances": [
             "sparrow",
             "elephant",
             "sunflower"
           ]
         }' \
     "http://localhost:8000/v1/models/model:predict"
You will get the following output.
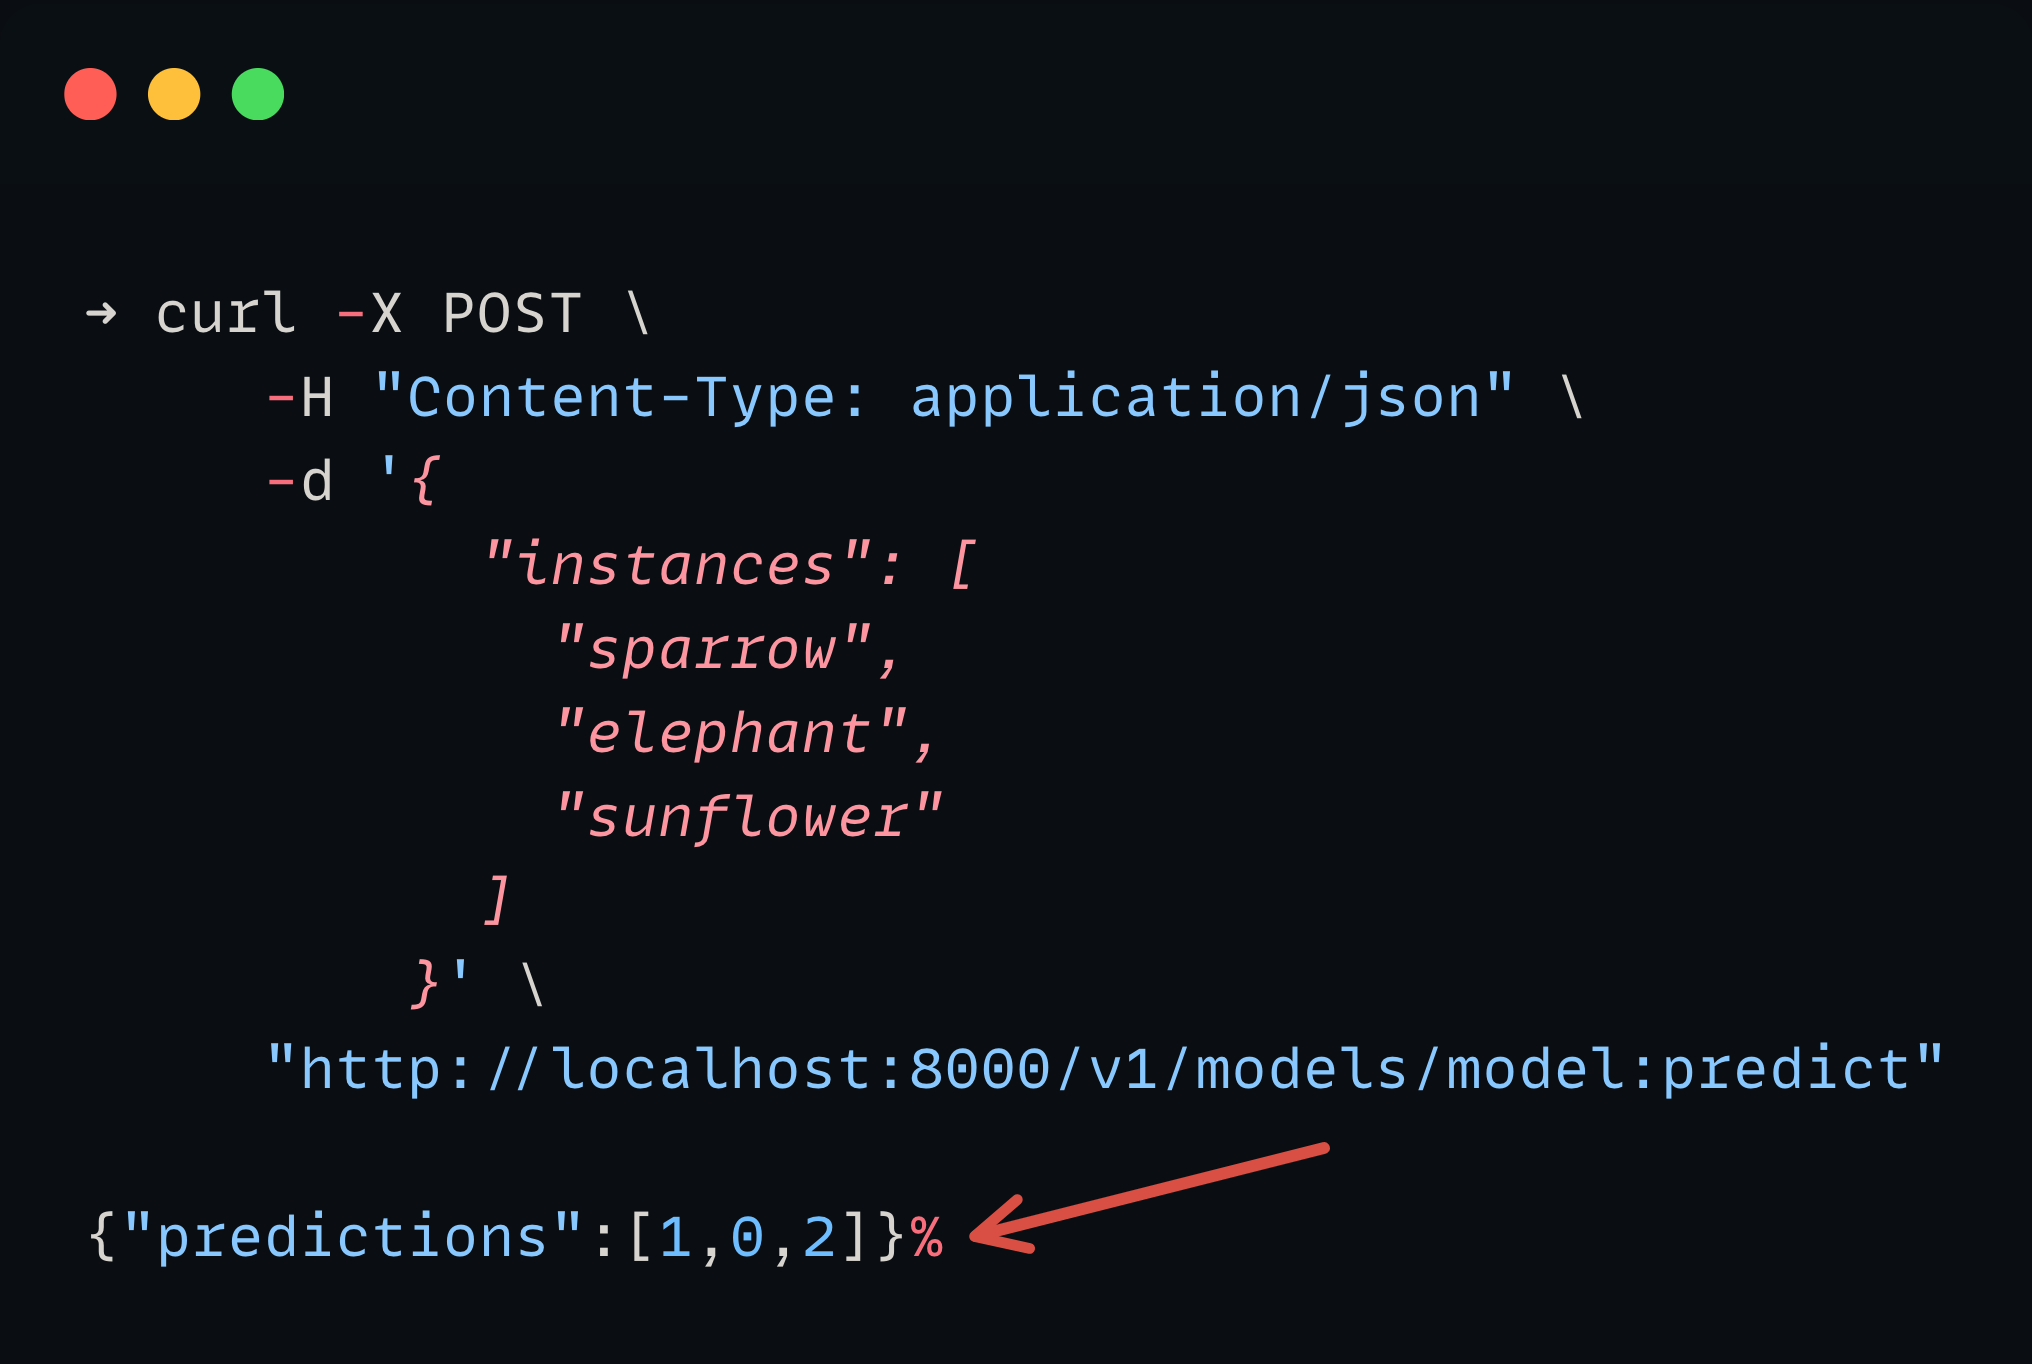
In the prediction model, 0 is for animal, 1 is for bird, and 2 is for the plant.
And the predictor output is correct based on the input.
Thats it!
You have deployed a model using Kserver and made a inference request!
Kserve FAQ's
Following are some of the frequently asked questions about Kserve.
What is the difference between KServe RawDeployment and Knative mode?
RawDeployment is lightweight and easier deployment option for beginners. While, Knative mode supports advanced use cases with autoscaling and networking functionalities.
How can I test a deployed KServe model?
The easiest way is to port-forward the inference service and send test requests with curl or a program to the inference endpoint.
Can I deploy models other than scikit-learn with KServe?
Yes. KServe supports TensorFlow, PyTorch, XGBoost, ONNX, and more.
What should I do if my KServe pod is stuck in Pending state?
Check PVC storage, node CPU and memory, and controller logs. Ensure at least 1 GB memory is available while deploying simple models.
Is KServe used by companies in production?
Yes. Companies like Bloomberg, IBM, Red Hat, Gojek, and Cisco use KServe in their production environments.
Conclusion
You have just taken your first step into MLOps. The practice of deploying and maintaining machine learning system.
In summary, you have learned how to serve ML models using KServe and how to check if the model is served successfully by sending a curl request to it.
Give it a try and if you have any doubts or face any issues, drop a comment below. We will help you out.
Also, if you want to know more about AI/ML features of Kubernetes, refer the Kubernetes AI/ML features blog.