In this article, I will guide you to set up a simple CI work-flow for a Java spring based applications. This is just a getting started guide.
For the demo, I will be using a minimal spring pet clinic web app from Github. It has a minimal in-memory DB, so you don’t have to do a complex setup. You can just build and deploy the app.
You can have a look at the pet clinic web app source code from here
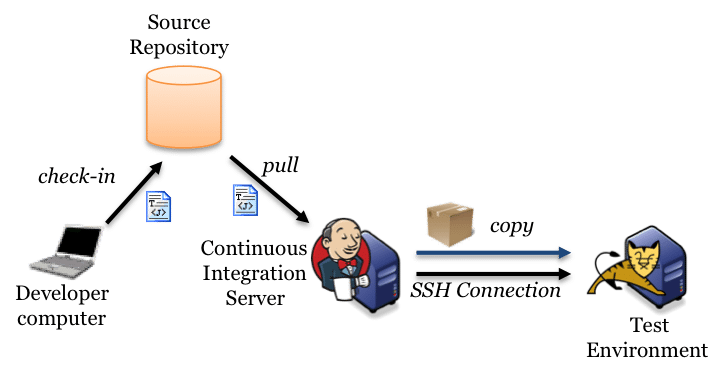
Java Continuos Integration with Jenkins
To set up Continuos Integration work flow for a Java application, you need the following.
1. A version control system – we will use Git and Github.
2. A Continous Integration tool – We will use Jenkins
3. A build tool – We will use maven.
Setting Up a Github Repository
First, you need to set up a Github Repository for your project. So that you can push your local code to remote Github repository. If you are not familiar with Github, you can create one account from here. Github Account
Covering Github concepts here is out of the scope of this article. If you are new to Github, you can make use of this tutorial. Github Tutorial
As I mentioned earlier, I will be using a spring pet clinic web app for this demo. So I have created a Github repo for the same. You can get that code from here. Spring Demo App
Setting Up Jenkins
I am setting up a Jenkins server using the official Jenkins docker image.If you don’t have any idea about docker, I highly recommend you to try it out.
It is not mandatory to setup Jenkins using docker, you can also manually configure it on a server.
To run a docker Jenkins container, you just have to execute the following command on a docker host. Just replace /home/ec2-user/jenkins_home with a folder from your host machine. By doing this, all the Jenkins jobs and configuration will persist in you host even if you delete the container.
sudo docker run -p 8080:8080 -p 50000:50000 -v /home/ec2-user/jenkins_home:/var/jenkins_home jenkins &
You can access the Jenkins UI on port
Now, we have a Jenkins server up and running.
Configuring Maven
Since we are using maven as a build tool, we need to configure maven on Jenkins. To do this, go to manage jenkins–>configure system.
Under configure system, you will see an option for maven. click add maven option, give it a name(arbitrary) and save it.
Install Git Plugin
To integrate Jenkins with Github or any Git-based version control system, you need git plugin to be installed on jenkins server.
To do this, go to manage jenkins–>manage plugins–> available tab.
Search for git in the filter search box at the top.
Select Github Authentication Plugin and click “Install without restart” option.
Click restart jenkins option at the bottom when it is installing the plugin.
Integrating Github Petclinic Repo with Jenkins
Now we have all the required plugins and tools for the GitHub Integration. Next step is to create a job where you will have the option to integrate the Petclinic repo with Jenkins.
Follow the steps given below.
1. From the Jenkins home page, click “create a job” option.
2. Give your job a name, eg: petclinic-job and select maven project option.
3. click ok.
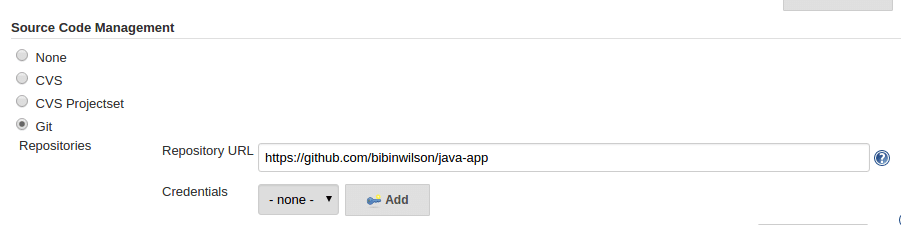
4. In the next page, Under “source code management” option, select git and enter your GitHub repository URL. eg: https://github.com/bibinwilson/java-app as shown below.
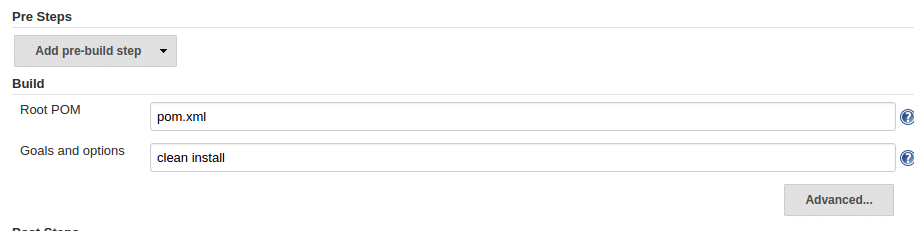
5. Under Build option –> Goals and options, enter “clean install” and save it.
Triggering the build
Now. we have all the integrations in place. We just have to trigger the build.
To do this, click build now option at the left.
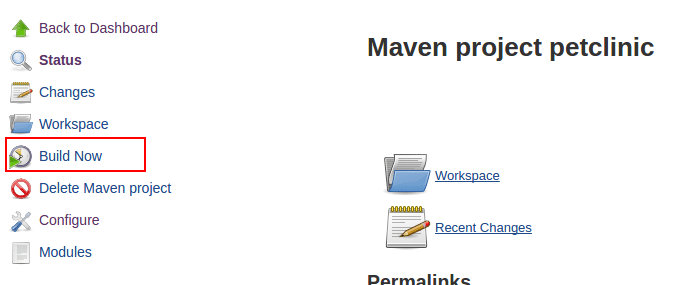
You can see the status of the build process on the left.
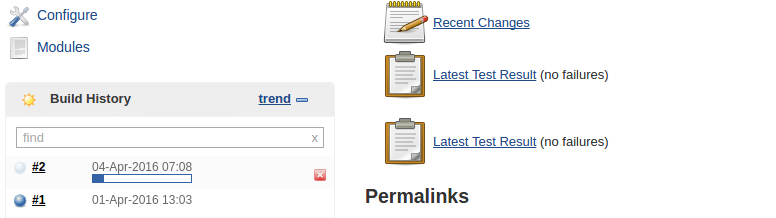
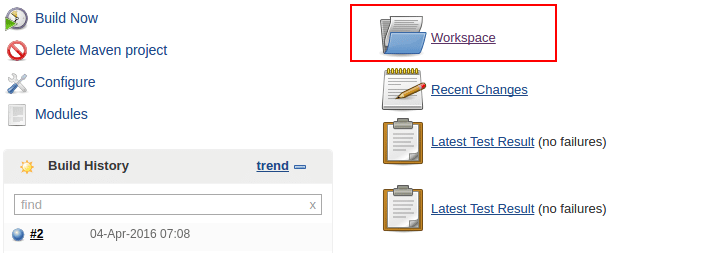
If you click on the job, you can see the process happening at the backend. If the build succeeds, you can find the build war file in the workspace –> target folder.
Conclusion
In this guide, I have covered all the steps for Java Continuos Integration with Jenkins.
Next steps would be,
- Pushing the packaged applications to a package repository like Nexus or Artifactory.
- Deploying the applications using a deploy tool or a configuration management tool like chef.
I will be covering the above-mentioned things in future articles. Leave a comment if you have any suggestions or queries.


1 comment
I was looking for the follow up tutorials.
Can you please provide the link?
Next steps would be,
Pushing the packaged applications to a package repository like Nexus or Artifactory.
Deploying the applications using a deploy tool or a configuration management tool like chef.