


In this step by step guide, we will look in to Argo CD Image Updater and how to use it with AWS ECR.
At the end of this guide, you will learn:
- About Argo CD Image Updater
- How it works
- How to install and configure it for EKS + ECR
- Testing Image Updater with a simple Flask application
- Available update strategies and annotations
What is Argo CD Image Updater?
Argo CD Image Updater is an additional tool in Argo CD that helps to automate the process of updating new container images on applications managed by Argo CD.
Image Updater supports popular container registries like AWS ECR, Docker Hub, GCR, etc, and can even access their private repositories with proper authentication.
Using Argo CD Image Updater is simple, you just have to install Image Updater and specify the annotation on the application manifest file, which we will see about later in this blog.
Image Updater only works with applications that are in Helm or Kustomize, not any other deployment format like plain YAML.
How does Argo CD Image Updater work?
The Image Updater continuously monitors the configured container registry for new images. When it detects a new tag that matches the allowed version rules, it updates the application using one of two write-back methods.
- Argo CD mode: This mode directly patches the application resource inside Argo CD.
- Git mode: This mode commits the change to the Git repository, and Argo CD syncs it from there.
Once updated, Argo CD rolls out a new pod with the latest image. If auto-sync is enabled, this happens automatically. Or else, you need to trigger a manual sync.
The workflow of the Argo CD Image Updater with ECR registry is shown in the below image.

Here is how it works.
- The Argo CD Image Updater will be always monitoring the configured image registry for new images.
- When a user pushes a new image to the registry with the configured version, Image Updater detects it and updates it to the application deployment files in Argo CD.
- Once the new image tag has been updated, Argo CD will automatically rollout the application pod with the new version of the image.
Setup Prerequisites
Below are the prerequisites for this setup
- EKS cluster
- Pod Identity Association enabled on the cluster
- AWS ECR Registry
- AWS CLI
- kubectl
- Argo CD installed on the cluster
- Helm
Install Argo CD Image Updater on Kubernetes
For the Image Updater to access the ECR registry, the default installation is not enough. We have to create a custom script and mount it in the Image Updater deployment.
The custom script contains the command to login to ECR registry.
We have already created every file and kept it in our GitHub repo, fork it and clone it to your local.
Run the following command to clone it.
git clone https://github.com/devopscube/argocd-image-updater.gitCD into the argocd-image-updater folder.
cd argocd-image-updaterYou can see the following folder structure.
argocd-image-updater
    ├── README.md
    ├── app
    │   ├── Dockerfile
    │   └── app.py
    ├── flask-app
    │   ├── Chart.yaml
    │   ├── templates
    │   │   ├── deployment.yaml
    │   │   └── service.yaml
    │   └── values.yaml
    └── manifest
        ├── application.yaml
        └── values.yaml
Lets get started with the setup.
Step1: Create Pod Identity Association
First, let's create a pod identity association for the Argo CD Image Updater service account, which is required for it to monitor and update new images from ECR.
Run the following command to create a trust policy JSON file.
cat <<EOF > trust-policy.json
{
  "Version": "2012-10-17",
  "Statement": [
    {
      "Effect": "Allow",
      "Principal": {
        "Service": "pods.eks.amazonaws.com"
      },
      "Action": [
        "sts:AssumeRole",
        "sts:TagSession"
      ]
    }
  ]
}
EOF
Then, create a role with the trust policy from the trust-policy.json file
aws iam create-role \
    --role-name ecr-auth-role \
    --assume-role-policy-document file://trust-policy.json
We are going to use the AmazonEC2ContainerRegistryReadOnly policy, which has every permission Image Updater needs.
Run the following command to attach the container registry read-only policy to the role.
aws iam attach-role-policy \
    --role-name ecr-auth-role \
    --policy-arn arn:aws:iam::aws:policy/AmazonEC2ContainerRegistryReadOnly
Then, save the ARN of the role as an environment variable, which will be useful in the next step.
ROLE_ARN=$(aws iam get-role --role-name ecr-auth-role --query 'Role.Arn' --output text)
Now, update your cluster name in the command below and run it.
eksctl create podidentityassociation \
    --cluster <cluster-name> \
    --namespace argocd \
    --service-account-name argocd-image-updater \
    --role-arn $ROLE_ARN
Step 2: Deploy Argo CD Image Updater
We will be using the offical argocd-image-updater helm chart for the installation.
You can download and modify the official Helm values file using the following command.
helm show values argo/argocd-image-updater > values.yamlOr you can use the custom values file inside the manifest folder as values.yaml.
I am using the custom values file.
Open the values file and update your AWS account ID in it. If your ECR is in a different region, change that as well.
config:
  registries:
    - name: ECR
      api_url: https://<account-id>.dkr.ecr.us-west-2.amazonaws.com
      prefix: <account-id>.dkr.ecr.us-west-2.amazonaws.com
      ping: yes
      insecure: no
      credentials: ext:/scripts/login.sh
      credsexpire: 6h

authScripts:
  enabled: true
  scripts:
      login.sh: |
        #!/bin/sh
        aws ecr --region "us-west-2" get-authorization-token --output text --query 'authorizationData[].authorizationToken' | base64 -d
In this, registries and authScripts are default configuration is available in the Image Updater, which we can use to specify the image registry it has to monitor and the authentication script.
Also, it refreshes the authentication token every 6 hours.
The best method for installing Image Updater is to install it on the same namespace as Argo CD, so the Image Updater can make use of the Argo CD ServiceAccount for permissions.
By installing it in the same namespace, you can simply use the Image Updater by using annotations on the manifest file.
To deploy the Argo CD Image Updater, run the following Helm install command with the custom values file from the root directory.
helm install argocd-image-updater argo/argocd-image-updater -n argocd -f manifest/values.yamlThen, run the following command to check if the Image Updater is installed.
kubectl get po -n argocd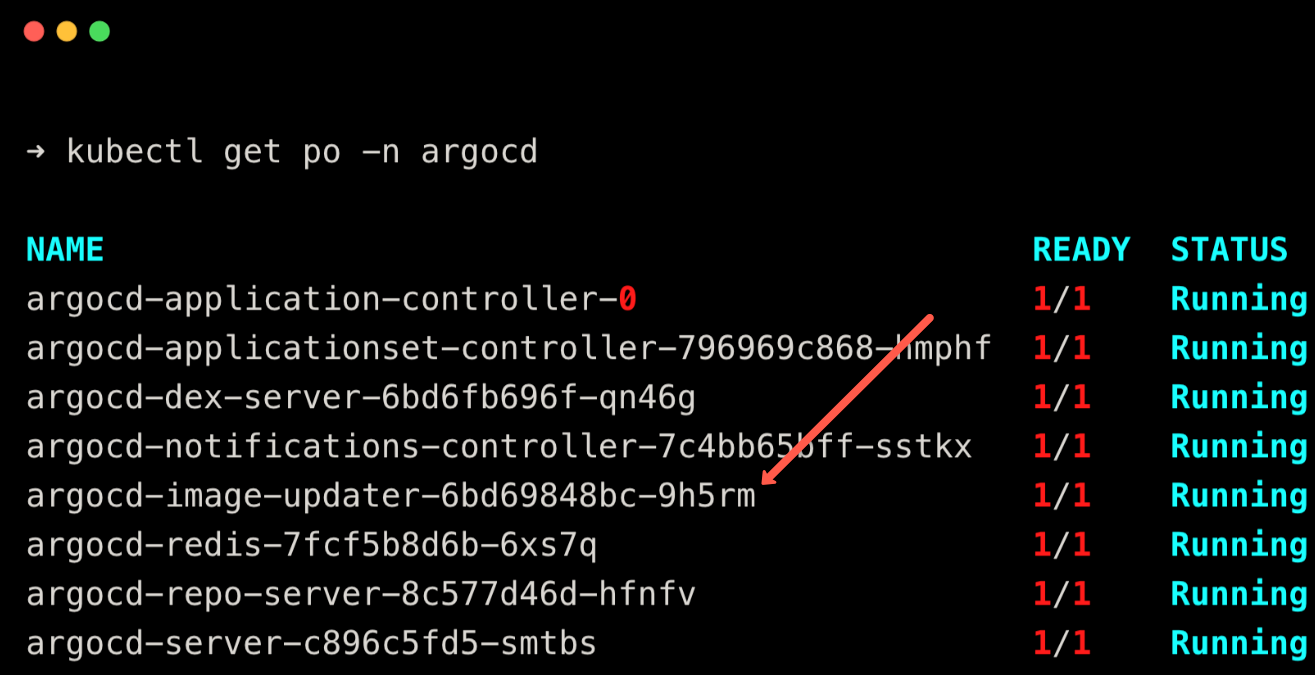
You can also install Image Updater on another namespace, but for that, you need to create a new account with the API key and ServiceAccount, which will be used to connect Image Updater with Argo CD.
You can check the official document for Image updater installation on other namespaces.
Step 3: Test Argo CD Image Updater
To test the Image Updater, we are going to do the following.
- First, create an image with a simple Python Flask application and push it to ECR
- Create an application on Argo CD with the Image Updater annotations
- Push a new image to ECR to check if the Image Updater to rolling out the new image
Create a Python Flask Docker Image
You can find a Python file for a Flask application and a Dockerfile to dockerize it inside the app folder.
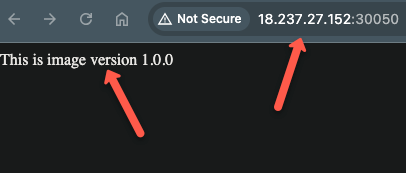
The Flask application is a simple one that says "This is image version 1.0.0".
flask-app in ECRGo inside the app folder and run the following command to dockerize the application.
Update the registry URL before running the command.
docker build -t <registry-url>:1.0.0 .Once the build is completed, run the following command to push it to ECR.
docker push <registry-url>:1.0.0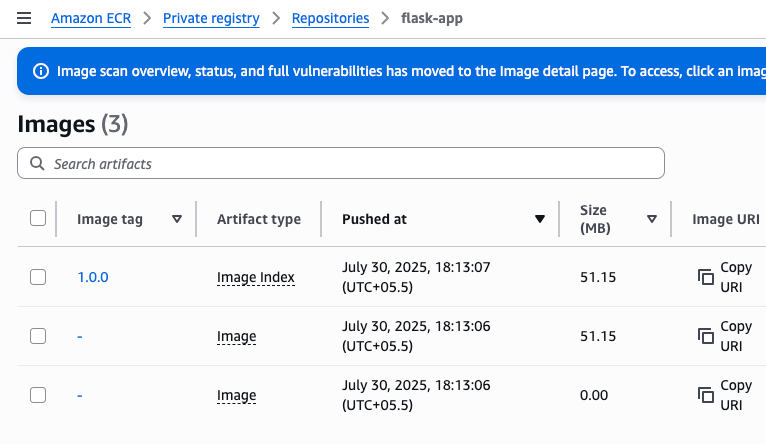
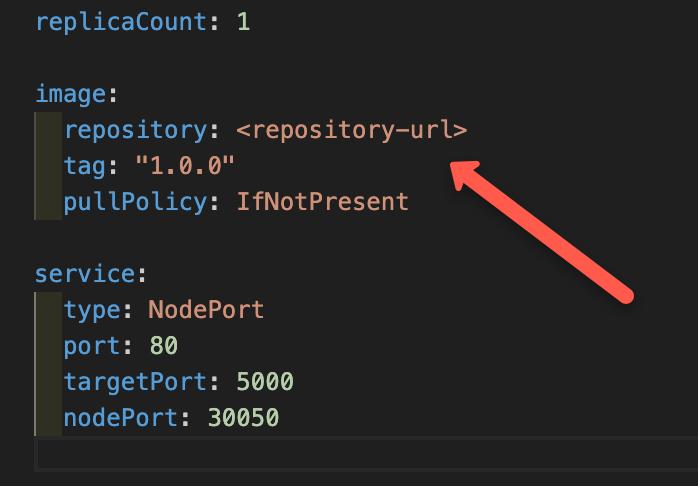
Modify Helm Values File
We are going to use Helm to deploy the application, since only Helm and Kustomize work with the Image Updater.
You can find the Helm charts inside flask-app folder.
Open the values.yaml file ,update your image registry URL, and then push it to your repository.
Create an Application on Argo CD
To create an application, you can find the manifest file inside the manifest folder as application.yaml.
apiVersion: argoproj.io/v1alpha1
kind: Application
metadata:
  name: flask-app
  namespace: argocd
  annotations:
    argocd-image-updater.argoproj.io/image-list: <account-id>.dkr.ecr.us-west-2.amazonaws.com/flask-app:~1.0
    argocd-image-updater.argoproj.io/write-back-method: argocd
    argocd-image-updater.argoproj.io/update-strategy: newest-build
  finalizers:
    - resources-finalizer.argocd.argoproj.io
spec:
  project: default
  source:
    repoURL: https://github.com/devopscube/argocd-image-updater.git
    targetRevision: main
    path: flask-app
  destination:
    server: https://kubernetes.default.svc
    namespace: default
  syncPolicy:
    automated:
      prune: true
      selfHeal: true
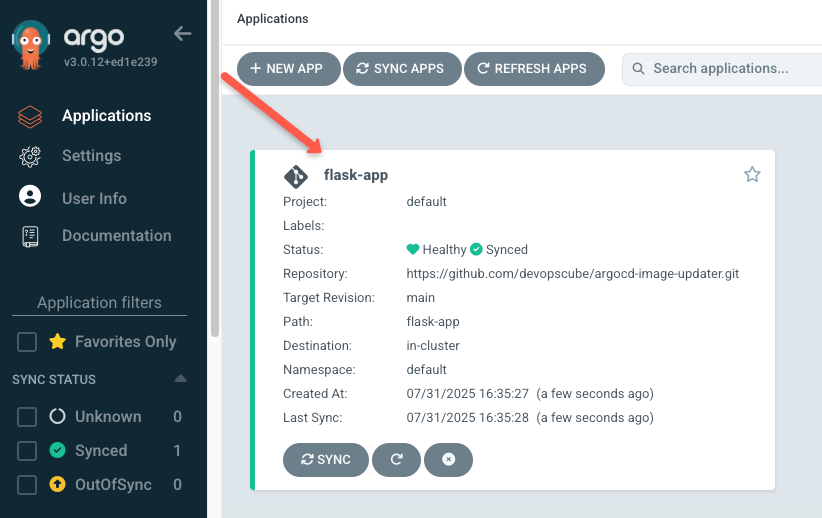
The application resource will be created on the Argo CD namespace, and the Flask application will be deployed on the default namespace.
  annotations:
    argocd-image-updater.argoproj.io/image-list: <account-id>.dkr.ecr.us-west-2.amazonaws.com/flask-app:~1.0
    argocd-image-updater.argoproj.io/write-back-method: argocd
    argocd-image-updater.argoproj.io/update-strategy: newest-build
The annotations enable the Argo CD Image Updater to monitor the specified registry and update new images.
What the annotations for:
argocd-image-updater.argoproj.io/image-list - for specifying the registry URL Image Updater needs to monitor.
At the end, the tag is given as ~1.0 , which means it will update the images that are tagged as 1.0.1, 1.0.2, 1.0.3,....
For example, if we specify the allowed version as ~1.0 in the annotation, the Image Updater will automatically update the image that is pushed with tags like 1.0.1, 1.0.2,...
Image Updater will not update the images with tags other than the version specified in the configuration, in our case it is ~1.0, so it will not update the images with tags 2.0.0, 1.2.0, etc.
argocd-image-updater.argoproj.io/write-back-method - specify the write-back method need to use.
We are going to use the argocd write-back method, and there is also a git method.
We will look into write-back methods in detail later in this blog.
argocd-image-updater.argoproj.io/update-strategy - specify how new images need to be updated.
We are going to use the newest-build update strategy. Apart from this, there are three more strategies that we will see about later in this blog.
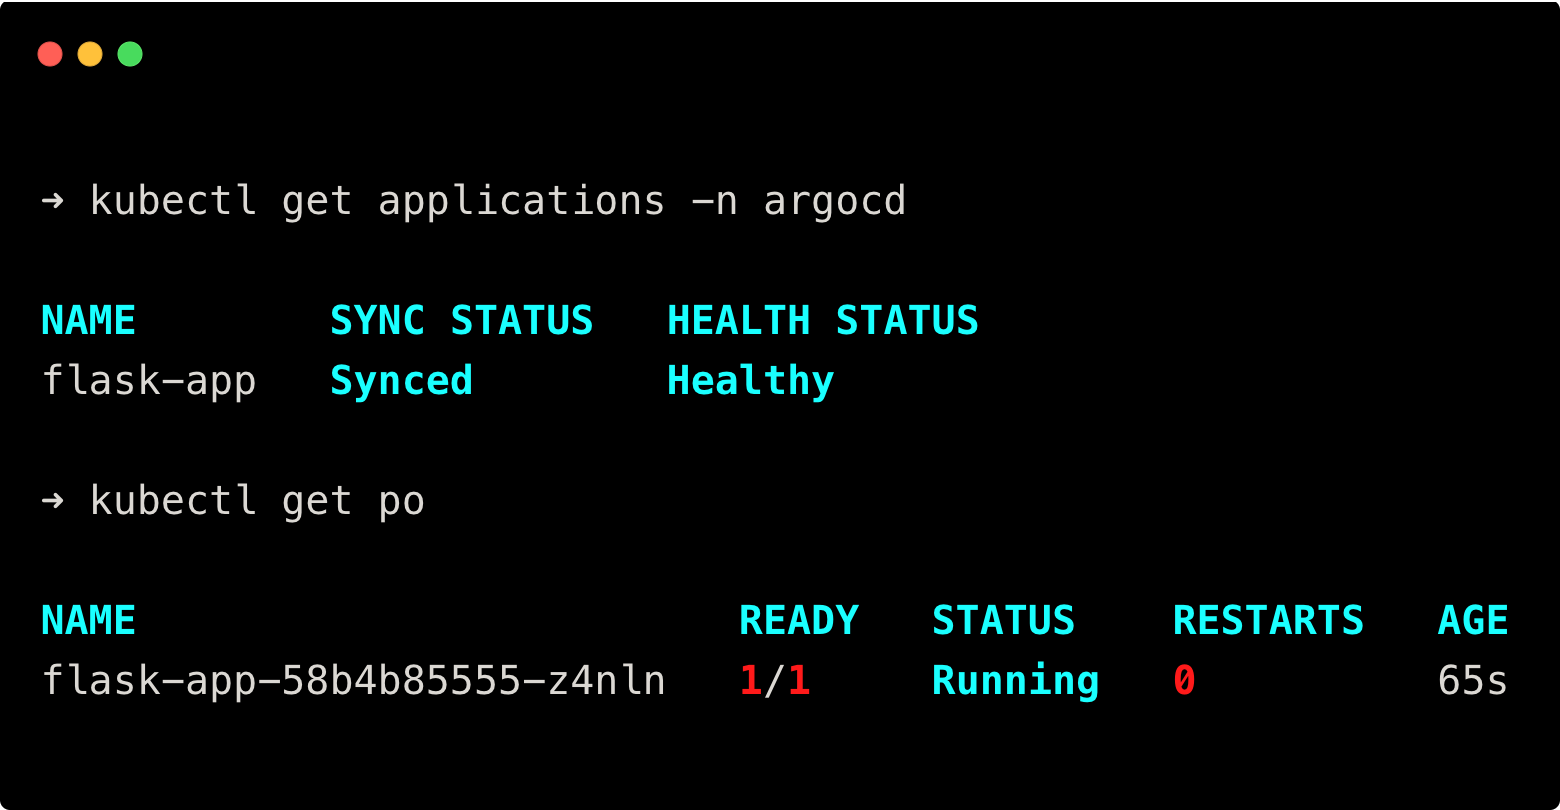
Now, run the following command from the root directory to deploy the application.
kubectl apply -f manifest/application.yamlThen run the following commands to check if your application resource and Flask application are created.
kubectl get applications -n argocd

kubectl get po
You will get the following output.
Also, in the Argo CD UI, you can see the following.
Since the Flask application will be exposed using NodePort 30050, you can check the application on a browser using the URL <your-node-ip>:30050 as shown below.
Upload New Image to ECR
Now, we are going to check what the Argo CD Image updater does when a new image is pushed to ECR.
To update the new image, just do the Create a Python Flask Docker Image step again.
The only thing you need to change is the tag in the Docker build and push command, as below.
docker build -t <registry-url>:1.0.2 .

docker push <registry-url>:1.0.2 .
Also, change the message inside the Flask application file /app/app.py as shown below.
from flask import Flask

app = Flask(__name__)

@app.route('/')
def version():
    return "This is image version 1.0.2"

if __name__ == '__main__':
    app.run(host='0.0.0.0', port=5000)
You can see I have changed the message from This is image version 1.0.0 to This is image version 1.0.2
Then, build the new image from the same directory where the Dockerfile is and push it to ECR.
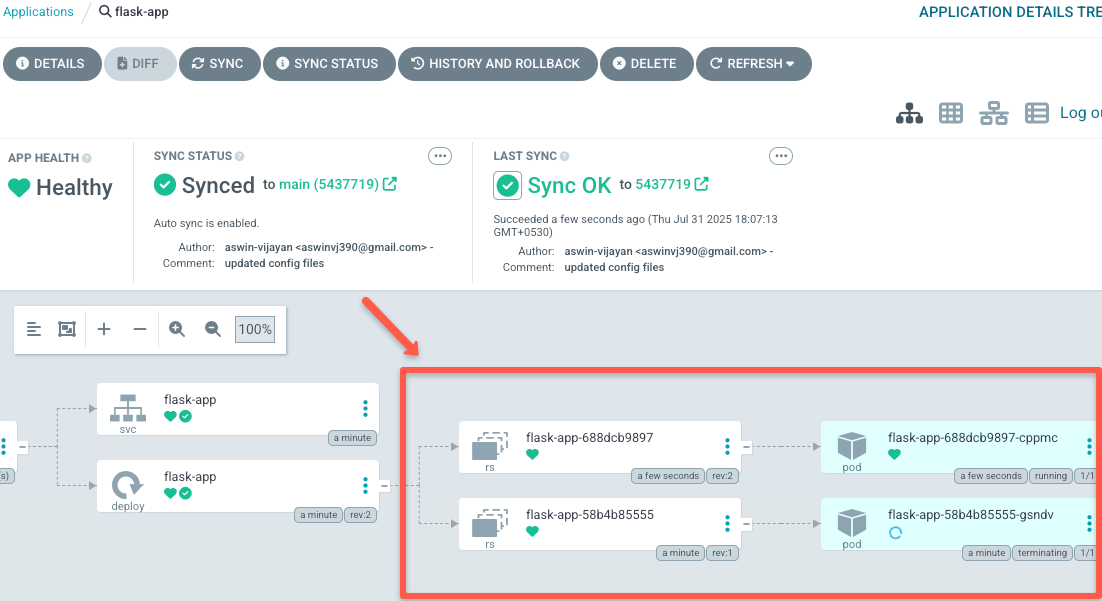
Once the new image tag is updated, you can see the Pod with the old version get terminated and a Pod with the new version comes up as shown below
And refresh the flask application, you can see the message changed as shown below.
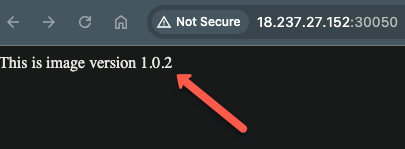
This is how the Image Updater continually monitors and updates the image to the application.
Clean Up
If you no longer need the Argo CD Image Updater setup, run the following commands.
Run the following command to delete the application.
kubectl delete -f manifest/application.yamlRun the following command to uninstall the Image Updater.
helm delete argocd-image-updater -n argocdTo delete the pod identity association, update your cluster name in the command below and run it.
eksctl delete podidentityassociation \
  --cluster <cluster-name> \
  --namespace argocd \
  --service-account-name argocd-image-updater
And finally, delete the role created by running the following commands.
aws iam list-attached-role-policies \
  --role-name ecr-auth-role \
  --query 'AttachedPolicies[*].PolicyArn' \
  --output text | \
  xargs -n 1 -I {} aws iam detach-role-policy \
    --role-name ecr-auth-role \
    --policy-arn {}

aws iam delete-role --role-name ecr-auth-role
Image Update Strategies
Image Updater has multiple update strategies, which are used to update the image. The available update strategies are listed below:
semver
This strategy updates the tag which has the highest allowed version according to the configuration.
For example, let's say you have configured to allow version 1.0, and your repository has image tags as 1.0.2, 1.0.3, and 1.0.4.
While using this strategy, it updates the tag 1.0.4 because it is the highest allowed version available on the registry.
newest-build
This strategy updates the latest created image tag.
For example, you have pushed the image in the order 1.0.1, 1.0.4, 1.0.3.
While using this strategy, it updates the tag 1.0.3 because it is the latest pushed tag.
name
This strategy is used when a tag is in alphabetical letters and it updates the tag with the highest letter.
For example, you have tags as dev, stage, and prod.
While using this strategy, it updates the tag stage because it has the highest alphabetical letter 'S'.
digest
This strategy updates the latest mutable image tag.
For example, you have already pushed an image with tag 1.0.4 and again you pushed the image with the same tag it becomes a mutable image.
Your repo has tags such as 1.0.1, 1.0.4, and 1.0.6, in this 1.0.4 is a mutable image.
While using this strategy, it updates the tag 1.0.4 because it is the latest pushed mutable image tag.
Image Updater Annotations
You need to use annotations of Image Updater on your application's manifest file to monitor and update by Image Updater.
Make sure to use the prefix argocd-image-updater.argoproj.io/ before every annotation.
Some of the commonly used annotations are given below:
image-list
This is the mandatory annotation, here you have to specify your image repository with your preferred tag version.
For example, if my image repository is image/dev and the preferred tag version is 1.0, then my annotation will be:
argocd-image-updater.argoproj.io/image-list: image/dev:~1.0You can also use an alias for this annotation as given below.
argocd-image-updater.argoproj.io/image-list: nginx=image/dev:~1.0update-strategy
This annotation is used to specify the update strategy we see in the above feature.
For example, if you are using the newest-build update-strategy your annotation will be:
argocd-image-updater.argoproj.io/update-strategy: newest-buildallow-tags
This annotation is used when you want to update images with two or more tag versions.
For example, if you want to update images within the tag range 1.1 and 2.1, then your annotation will be:
argocd-image-updater.argoproj.io/allow-tags: 1\.1\.[0-9]+|2\.1\.[0-9]+ignore-tags
This annotation is used when you don't want to update a specific tag version.
For example, if the ignored image tag is 1.0, then Image Updater will not update the tag version that comes under the 1.0 version such as 1.0.1, 1.0.2, 1.0.3, ... these tag versions will be ignored.
pull-secret
With this annotation, you can specify the credentials of your private image repository stored as a secret in Kubernetes.
For example, I have stored the credentials of my private image repository as a secret in Kubernetes named docker-cred then my annotation will be:
argocd-image-updater.argoproj.io/pull-secret: docker-credwrite-back-method
Image Updater has two types of write-back methods argocd and git
argocd
This method directly modifies the application resource on Argo CD. Once it's updated, Argo CD rolls out the application pod with the new image tag.
The annotation used to specify this method is:
argocd-image-updater.argoproj.io/write-back-method: argocdgit
This method creates a file named .argocd-source-<app-name>.yaml in GitHub and writes the parameters that have changed in the file.
Then Argo CD notices the change in GitHub and updates the application pod.
The annotation used to specify this method is:
argocd-image-updater.argoproj.io/write-back-method: gitFor detailed information on the write-back method, refer to the official documentation.
Conclusion
You have installed Argo CD Image Updater, connected it to ECR, deployed a sample Flask app, and verified automatic tag updates and rollouts.
Also you learned common annotations and strategies to fine‑tune updates.
I hope this blog gives you an understanding of Argo CD Image Updater. For more information and edge cases, refer to the official documentation.