In this blog, you will learn to integrate AWS Secrets Manager secrets into the EKS cluster using Secrets Store CSI Driver.
Keeping the Secrets secure on Kubernetes is an important task, whether it's an API key, TLS certificate, or authentication credentials. This is where Secrets Store CSI Driver comes in.
What is Secrets Store CSI Driver?
Secrets Store CSI Driver is a Kubernetes driver deployed as a DaemonSet. It integrates secrets stored in external secrets management tools and mounts secrets on pods as a volume.
It uses the Container Storage Interface (CSI) to interact with secret providers like Azure Key Vault, HashiCorp Vault, AWS Secrets Manager, and others.
It is primarily used when you want to securely use sensitive data like API keys, passwords, or certificates in your Kubernetes applications without exposing them in Kubernetes Secrets or ConfigMaps.
Secrets Store CSI Driver Workflow
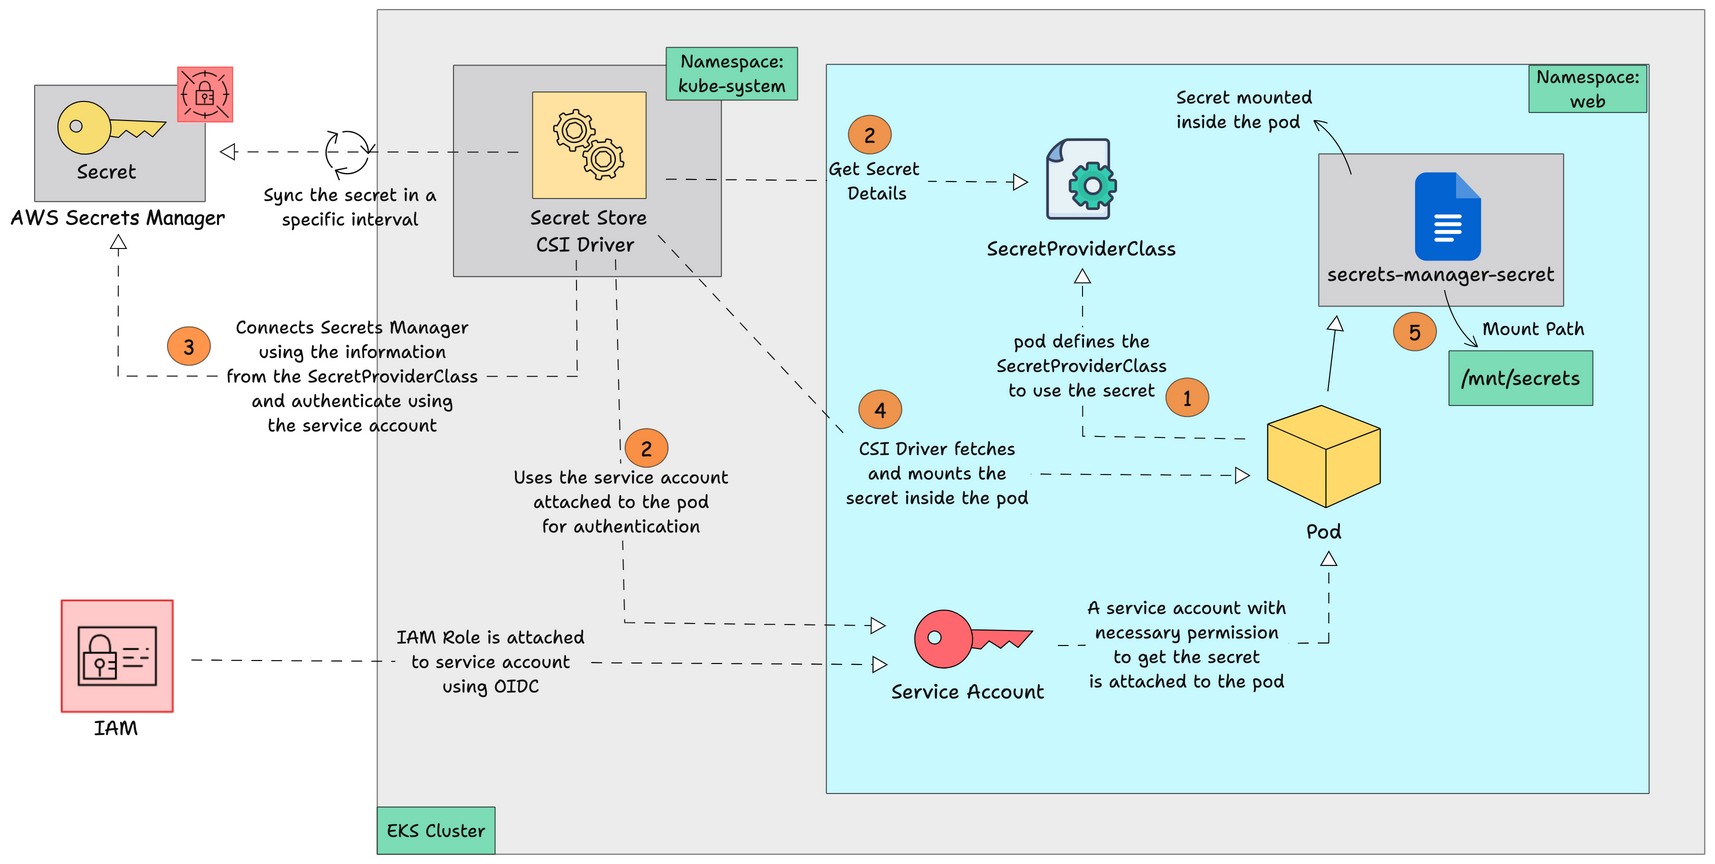
Below is the diagrammatic workflow of the Secret Stores CSI Driver, which gets secrets from the AWS Secrets Manager and mounts them in a pod.

Here is how it works.
- The pod initiates the process by defining the
SecretProviderClassobject and uses a service account with the necessary permissions to authenticate Secrets Manager. - The
SecretProviderClassobject contains the details of the secret stored in secrets manager.. - The CSI driver uses the secret details on
SecretProviderClassto fetch the secret from the external secret store and mounts it inside the pod as a file.
Setup Prerequisites
The prerequisites for the setup are given below.
- kubectl
- eksctl
- AWS CLI with access to IAM and EKS
- EKS cluster with OIDC assigned to it
- Helm
Secrets Store CSI Driver Setup on EKS
If you are ready with the prerequisites, follow the steps below to set up a Secrets Store CSI Driver on EKS.
Step 1: Create an IAM Policy
We need an IAM policy to access the secrets in secrets manager through the pods service account.
Create a policy with permission to get secrets from the External Secrets, this policy will only contain read permission.
Use the policy command to create a JSON file with permission for the policy.
cat << EOF > policy.json
{
    "Version": "2012-10-17",
    "Statement": [
        {
            "Sid": "AllowAccessToSecretsManager",
            "Effect": "Allow",
            "Action": [
                "secretsmanager:GetSecretValue",
                "secretsmanager:DescribeSecret"
            ],
            "Resource": "arn:aws:secretsmanager:$Region:$Account-ID:secret:$Secret-Name"
        }
    ]
}
EOF
Update the region, account ID, and secret name before running the above command.
This policy gives read-only permission to the specific secret you specify on the policy.
Note: If you want to give permission for all the secrets on a region, use '*' instead of a specific secret name.
For example: "arn:aws:secretsmanager:$Region:$Account-ID:secret:*"
Also, giving permissions to all secrets is not a recommended practice, especially in production environments.
Run the following command to create the policy with the policy.json file.
aws iam create-policy \
    --policy-name SecretStoreCSIDriverPolicy \
    --policy-document file://policy.json
Once the policy is created, run the following command to get the policy's ARN and save it as a variable.
export POLICY_ARN=$(aws iam list-policies --query "Policies[?PolicyName=='SecretStoreCSIDriverPolicy'].Arn" --output text)Now, run the following command to check if the ARN is saved as a variable.
echo $POLICY_ARNThis command will show the policy’s ARN.
Step 2: Install CSI Driver and AWS Provider
The next step is to install the Secrets Store CSI Driver and AWS provider for the CSI Driver using Helm.
Run the following command to add the helm repo of Secrets Store CSI Driver on your system.
helm repo add secrets-store-csi-driver https://kubernetes-sigs.github.io/secrets-store-csi-driver/chartsBefore installing the CSI Driver, download the values.yaml file and enable secret auto-rotation because, by default, the secret auto-rotation is disabled.
Download the values.yaml using the following command.
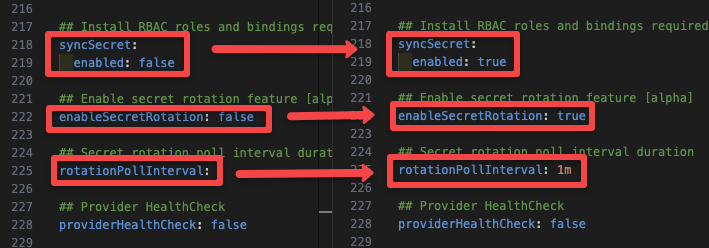
helm show values secrets-store-csi-driver/secrets-store-csi-driver > value.yamlNow enable the following, as shown in the image below.

As shown in the above image enable syncSecret to save secrets as Kubernetes secrets when a pod defines it. It is an optional parameter. By default the CSI driver mounts the secrets as volumes in pods.
With syncSecret the Kubernetes secret will only be available when the pod is deployed. Once the pod is deleted, the secret will also be deleted from the cluster.
The enableSecretRotation option syncs the secret on external secrets with the mounted secret whenever the secret is updated on the external secrets manager.
The rotationPollInterval option is the time interval for syncing the secret with the external secret and secret in the cluster, we have set the time to 1 minute which means it will sync the secret every 1 minute.
By default, the poll interval is 2 minutes, if you don't specify a poll interval, it will sync every 2 minutes, and this option will only available if you enable enableSecretRotation.
Then, run the following command to install the CSI Driver using Helm.
helm install -n kube-system csi-secrets-store secrets-store-csi-driver/secrets-store-csi-driver --values values.yaml Now, to install the AWS provider for the CSI Driver, add the helm repo for the AWS provider on your system using the following command.
helm repo add aws-secrets-manager https://aws.github.io/secrets-store-csi-driver-provider-awsRun the following command to install the AWS provider using Helm.
helm install -n kube-system secrets-provider-aws aws-secrets-manager/secrets-store-csi-driver-provider-awsOr you can also install the AWS provider using YAML and run the following command to install the AWS provider using YAML.
kubectl apply -f https://raw.githubusercontent.com/aws/secrets-store-csi-driver-provider-aws/main/deployment/aws-provider-installer.yamlStep 3: Create a Service Account
Now, create a Service Account using a namespace where you want to use the secret.
Before creating the service account, make sure your EKS cluster has OIDC associated with it, if not, run the following command to enable OIDC for your cluster.
eksctl utils associate-iam-oidc-provider --cluster $Cluster-Name --approveI am going to create a service account on the namespace web; this is where I am going to use the secret.
If you want to create a namespace, run the following command.
kubectl create ns webReplace the namespace name if needed.
Now, run the following command to create a service account with the policy you created on step 1.
eksctl create iamserviceaccount \
--cluster=$Cluster-name \
--namespace=web \
--name=csi-sa \
--attach-policy-arn $POLICY_ARN \
--approve
Update the cluster name before running the above command. Also, change the namespace if you are using another namespace.
You don't have to worry about creating an IAM role and attaching the policy to the role, OIDC will take care of it automatically.
When you run the command, OIDC will create a role for the policy and link it to the service account.
Step 4: Create a SecretProviderClass
The next step is to create a SecretProviderClass. Think of this as a connection between a pod and the CSI driver.
SecretProviderClass has the details of the secret that it needs to fetch and where it should be mounted.
Whenever a pod defines the SecretProviderClass to use the secret, the CSI driver fetches the secret from the external secret store and mounts it inside the pod as a file.
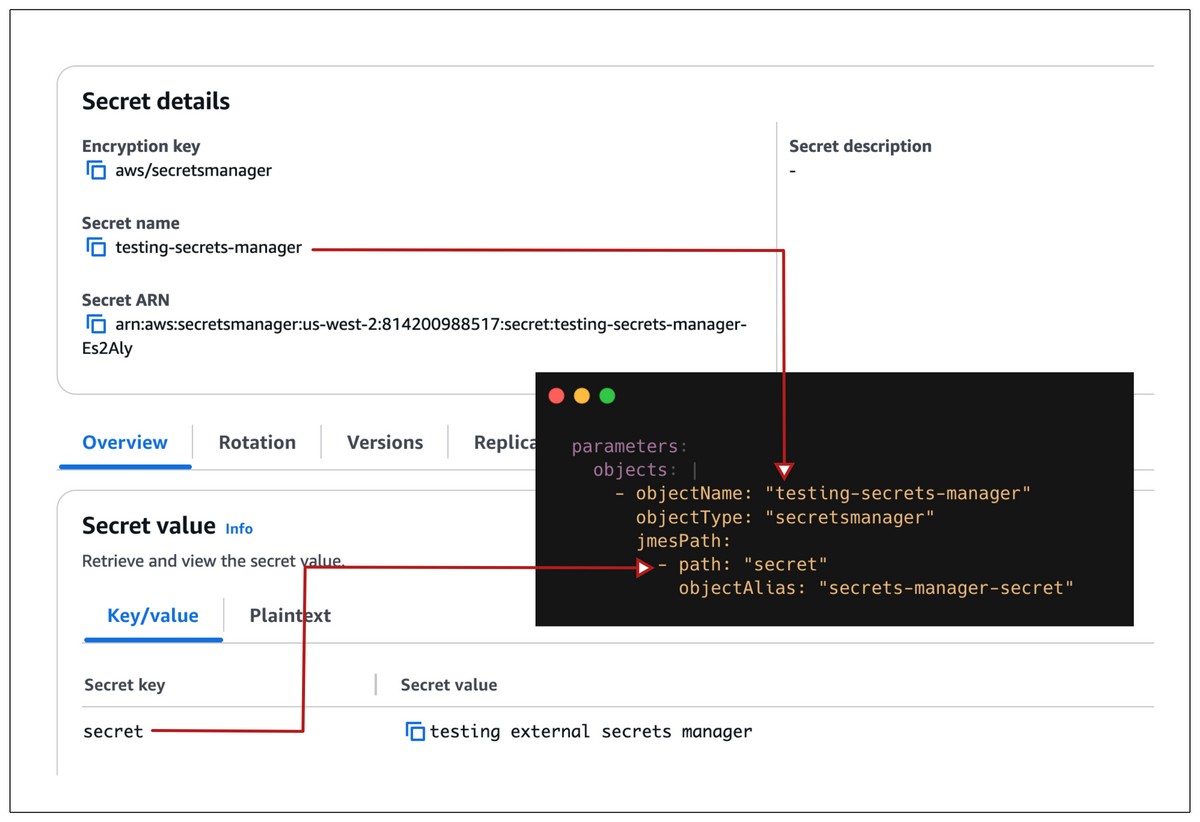
The secret that is stored on my AWS Secrets Manager is given below.

The above image shows how the secret details are specified in the SecretProviderClass manifest file.
Create a file secret-class.yaml and copy the below content.
apiVersion: secrets-store.csi.x-k8s.io/v1
kind: SecretProviderClass
metadata:
  name: external-secrets
  namespace: web
spec:
  provider: aws
  parameters:
    objects: |
      - objectName: "testing-secrets-manager"
        objectType: "secretsmanager"
        jmesPath:
          - path: "secret"
            objectAlias: "secrets-manager-secret"
  secretObjects:
    - secretName: external-secrets
      type: Opaque
      data:
        - objectName: "secrets-manager-secret"
          key: "secret"
Change the namespace if you are using another namespace.
In the above file:
The provider is selected as AWS because I am using AWS cloud, if you are using any other cloud specify that as provider.
The objectName is the name of the secret stored in the Secret Manager that you want to use.
The objectType is specified as secretsmanager because I am fetching secrets from AWS Secrets Manager.
jmesPath is a query language which is used to filter and transfer JSON data. In our case it fetched the specified secret from the secrets manager and mount it in the pod.
Under the jmespath, path is the name of the secret key on secrets manager which you want to fetch and objectAlias is the name of the file where the fetched secret value will be mounted inside the pod.
And you can see the secretObjects block, it will only work if you enable syncSecret in step 2.
It is the block that creates a Kubernetes secret of the external secret.
Run the following command to create the SecretProviderClass.
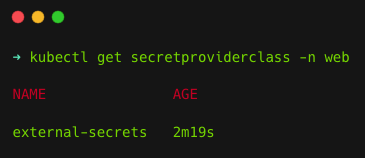
kubectl apply -f secret-class.yamlThen run the following command to verify if it's created.
kubectl get secretproviderclass -n webYou will get an output as shown below.

Step 5: Test Mounting the Secret on a Pod
Now that the setup has been completed, test the setup by mounting the secret on a pod as volume to check if it's fetching and mounting the secret on the pod.
Create a file deploy.yaml and copy the below content.
apiVersion: apps/v1
kind: Deployment
metadata:
  name: csi-secret-app
  namespace: web
spec:
  replicas: 1
  selector:
    matchLabels:
      app: web-app
  template:
    metadata:
      labels:
        app: web-app
    spec:
      serviceAccountName: csi-sa
      containers:
        - name: app-container
          image: nginx:latest
          volumeMounts:
            - name: secrets-store
              mountPath: "/mnt/secrets"
              readOnly: true
      volumes:
        - name: secrets-store
          csi:
            driver: secrets-store.csi.k8s.io
            readOnly: true
            volumeAttributes:
              secretProviderClass: external-secrets
This file creates a deployment with 1 replica on the web namespace and mounts the secret as volume.
If you notice, the volumes definition in the pod manifest tells the CSI driver to use the secretProviderClass external-secrets to get the information about the secret.
When the pod is created, Kubelet makes a NodePublishVolume call to the CSI driver, which tells the CSI driver to fetch the secret using the secret information in the specified secretProviderClass and use the service account csi-sa for authentication.
If you are wondering what NodePublishVolume call is, it is a function of CSI that makes sure that the volume is mounted in the requested node for the requested pod to access.
Run the following command to apply the manifest file.
kubectl apply -f deploy.yamlOnce the pod is up and running, verify if the secret is mounted in the pod using the below exec command.
kubectl exec -n web csi-secret-app-68454658fd-gzd55 -- cat /mnt/secrets/secrets-manager-secretReplace csi-secret-app-68454658fd-gzd55 with your pod names.
If everything is okay, you can see your secret below.

You can see the secret is saved inside the mounted file secrets-manager-secret, which you specified on the SecretProviderClass.
testing external secrets manager is the secret value I stored inside my SecretsManager.
If you enable the syncSecret step and specify secretObjects on the SecretProviderClass manifest file, you can also see a secret created on the same namespace, so run the following command to list it.
kubectl get secret -n webStep 6: Cleanup
If you no longer need to use the setup and want to clean it up, run the following commands.
Delete the SecretProviderClass and Service Account using the following commands.
kubectl delete SecretProviderClass external-secrets -n web

kubectl delete sa csi-sa
To delete the helm deployment of CSI Driver and the AWS provider, run the following command.
helm delete -n kube-system secrets-provider-aws

helm delete -n kube-system csi-secrets-store
Finally, delete the namespace using the following command.
kubectl delete ns webReal-World Use Cases
Given below are a few real-world use cases of Secrets Store CSI drivers.
- Microservices applications will have separate databases for each service, they use secrets store CSI driver to get the secret from a central secret manager and mount it in the deployments.
- Secrets Store CSI drivers also have the feature to store secrets as Kubernetes secrets, which will be useful for managing TLS/SSL certificates for Ingress controllers.
- The automatic Secret Rotation feature makes sure secrets are updated without manual intervention.
- It plays a major role in the CI/CD pipeline by mounting the secret on pipeline pods, which can be authentication credentials for Docker registered, Cloud platform, etc.
Best Practices
The best practices for Secret Store CSI driver are given below.
- Install the driver on the kube-system namespace so that only the cluster admin can access it.
- Use RBAC to restrict users from modifying or accessing the SecretProviderClassPodStatus CRD resources, make sure only the cluster admin can access it.
Because it has information about where the secrets are mounted. - Always apply the least privilege principle for the service account, only give permission that they need.
For example, only provide permission to read the specific secret you need, not all the secrets in the External Secrets. - Always keep the driver version up to date.
- Enable encryption for secrets. For example, in AWS Secrets Manager, use the KMS feature to encrypt the secrets.
Conclusion
In this blog, we have seen about setting up Secrets Store CSI Driver on the AWS EKS cluster and using it to get the secrets from AWS Secrets Manager and mount it on a pod.
We have also seen how to check if the secrets are mounted correctly and how to use commands to clean up the setup once they are no longer needed.
If you want to learn about similar tools, take a look at the following blogs:
Kubernetes External secrets operator is used to fetch secrets from the AWS Secrets Manager.


