


In this guide, you will learn about setting up Kubernetes Agent Sandbox on an AWS EKS cluster and the key use cases Kubernetes Agent Sandbox is built for.
Use Case
To better understand Agent Sandbox, I will walk you through two real-world use cases.
The first one is deploying a Kubernetes troubleshooting agent that checks, identifies, and fixes issues in the cluster.
The agent application consists of a frontend, backend, and PostgreSQL. In this setup, only the AI agent backend runs inside a Sandbox instead of as a regular Kubernetes workload.
The second use case is running untrusted code generated by an LLM or given by a user. We will use the Agent Sandboxes Python SDK to run untrusted code inside the sandbox.
The sample code runs a few security checks to verify the restrictions on running in an agent sandbox.
Setup Prerequisites
Below are the prerequisites you need before going into the hands-on part.
- AWS EKS Cluster
- Kubernetes cluster with gVisor configured
- Pod identity and EBS CSI driver add-on enabled on the EKS cluster
- kubectl
- AWS CLI configured with permissions for IAM and EKS
- Python 3+ installed locally
Clone GitHub Repository
All files we use in the upcoming sections are pushed to our GitHub repository.
Clone the repository and move into the repository agent-sandbox folder using the following commands.
git clone https://github.com/techiescamp/kubernetes-ai-projects.git

cd kubernetes-ai-projects/agent-sandbox
You will see the following files inside the agent-sandbox folder.
agent-sandbox/
  ├── ai-agent-sandbox
  │    ├── manifests/
  │    │   ├── 00-namespace.yaml
  │    │   ├── 01-serviceaccount.yaml
  │    │   ├── 02-rbac.yaml
  │    │   ├── 03-configmap.yaml
  │    │   ├── 04-postgres.yaml
  │    │   ├── 05-backend-template.yaml
  │    │   ├── 06-backend-warmpool.yaml
  │    │   ├── 07-backend-claim.yaml
  │    │   ├── 08-backend-service.yaml
  │    │   ├── 09-frontend-deployment.yaml
  │    │   ├── 10-frontend-service.yaml
  │    │   └── 11-networkpolicy.yaml
  │    ├── scripts/
  │    │   └── setup-pod-identity.sh
  │    └── kustomization.yaml
  │
  ├── python-sdk
  │     ├── python-template.yaml
  │     ├── python-warmpool.yaml
  │     ├── rbac.yaml
  │     ├── sandbox.py
  │     └── untrusted-code.py
  │
  └── sandbox-router.yaml
We will look into what each file is for in the steps where it is used.
Let's start with the setup.
Install Agent Sandbox Controller and Sandbox Router
Here, we will install the Agent Sandbox Controller, which manages the entire sandbox lifecycle, and the Sandbox Router, which lets us connect to the sandboxes.
Verify gvisor RuntimeClass
The agent sandbox requires a sandboxed container runtime. So before you get started, ensure you have the gVisor RuntimeClass created.
$ kubectl get runtimeclass gvisor

NAME     HANDLER   AGE

gvisor   runsc     6s
If there is a runtime, you are good to go. If not, create a runtime class.
Let's start the installation steps.
Install Agent Sandbox Controller
Let's start by finding the latest version of Agent Sandbox and saving it as an environment variable.
VERSION=$(curl -s https://api.github.com/repos/kubernetes-sigs/agent-sandbox/releases/latest | jq -r '.tag_name')Then run the following commands to install the controller.
kubectl apply -f https://github.com/kubernetes-sigs/agent-sandbox/releases/download/$VERSION/sandbox.yaml

kubectl apply -f https://github.com/kubernetes-sigs/agent-sandbox/releases/download/$VERSION/extensions.yaml
Once installed, run the following command to verify if the controller pod is up and running.
$ kubectl -n agent-sandbox-system get pods

NAME                                       READY   STATUS    RESTARTS   AGE
agent-sandbox-controller-8b8ccff57-rcpf4   1/1     Running   0          24s
Install Sandbox Router
First, create a secret for the router authentication token, which is required to connect to the router.
kubectl create secret generic sandbox-router-auth \
  --namespace agent-sandbox-system \
  --from-literal=auth-token="$(openssl rand -hex 32)"
Then, run the following command to get the token from the secret.
kubectl -n agent-sandbox-system get secret sandbox-router-auth -o jsonpath='{.data.auth-token}' | base64 -dKeep the token safe; we will use it in the upcoming hands-on section.
Now, deploy the Sandbox Router using the sandbox-router.yaml manifest in the cloned repositories agent-sandbox folder.
Use the following command to apply it.
kubectl apply -f sandbox-router.yaml
This will create the router deployment and service in the agent-sandbox-system namespace.
Run the following command to verify if it's up and running.
$ kubectl get pods -n agent-sandbox-system -l app=sandbox-router

NAME                                        READY   STATUS    RESTARTS   AGE

sandbox-router-deployment-67d79f44d-hglsn   1/1     Running   0          1m
Running AI Agent inside Agent Sandbox
Here, we will deploy a Kubernetes troubleshooting agent, consisting of a frontend, agent backend, and PostgreSQL.
The image below shows a high-level overview of what we will set up.
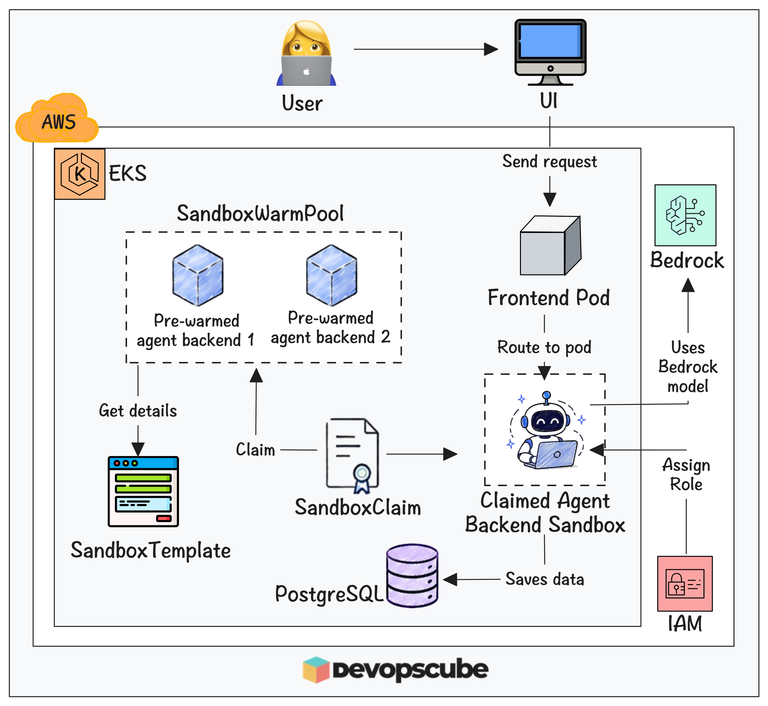
As you can see, only the AI Agent backend will be running inside a sandbox.
And the agent uses models from AWS Bedrock through EKS pod identity.
As mentioned, we will run only the agent backend inside the sandbox. So, instead of a single deployment, we will use three Agent Sandbox resources.
The splits are:
backend-template.yaml- Creates the SandboxTemplate for the workloadbackend-warmpool.yaml- Creates pre-warmed sandboxes using the details from the template.backend-claim.yaml- Claims one of the sandboxes from the SandboxWarmpool and becomes its manager.
The podTemplate in SandboxTemplate is an exact copy of the template.spec in a deployment. You can see the comparisons in the following image.
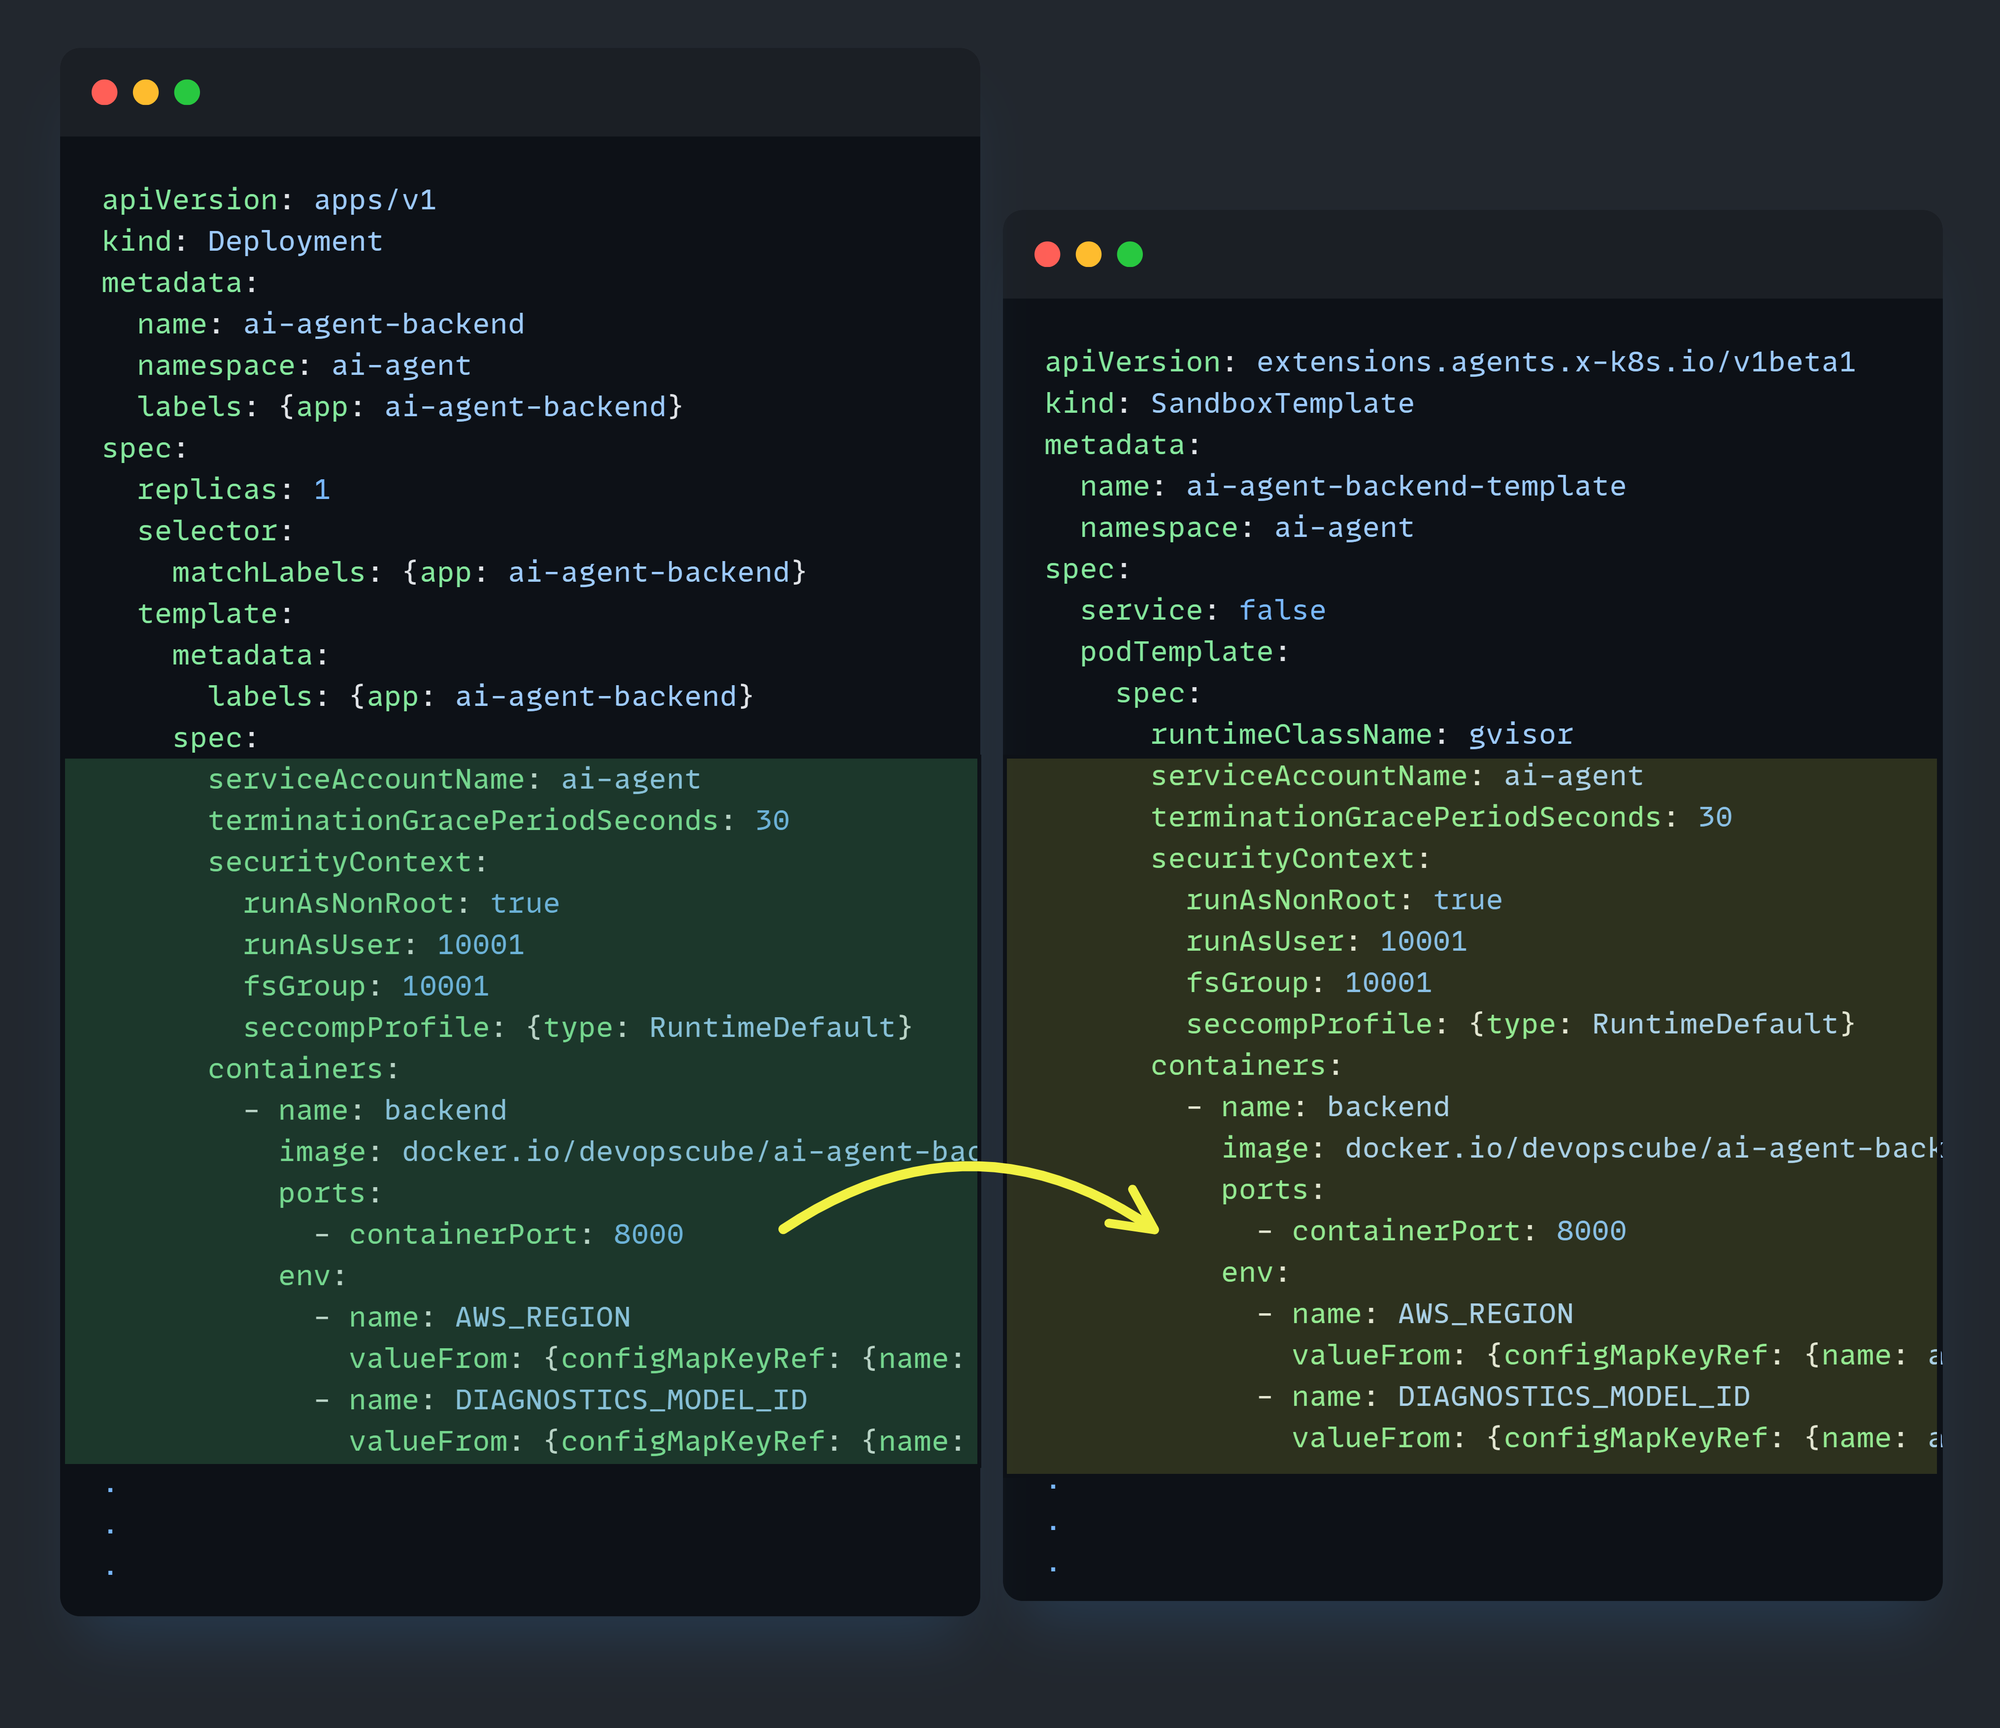
You can see an additional field, runtimeClassName, added to the pod template spec. It is used to specify running the sandbox using the gVisor runtime.
If you don't specify the gVisor runtime, the default runtime, runc, will be used.
Let's deploy the AI agent in the sandbox.
For this section, move into the ai-agent-sandbox folder
cd ai-agent-sandboxAnd you will see the following folder structure.
ai-agent-sandbox
    ├── main.py
    ├── manifests/
    │   ├── 00-namespace.yaml
    │   ├── 01-serviceaccount.yaml
    │   ├── 02-rbac.yaml
    │   ├── 03-configmap.yaml
    │   ├── 04-postgres.yaml
    │   ├── 05-backend-template.yaml
    │   ├── 06-backend-warmpool.yaml
    │   ├── 07-backend-claim.yaml
    │   ├── 08-backend-service.yaml
    │   ├── 09-frontend-deployment.yaml
    │   ├── 10-frontend-service.yaml
    │   └── 11-networkpolicy.yaml
    ├── scripts/
    │   └── setup-pod-identity.sh
    └── kustomization.yaml
Let's start with creating an EKS Pod Identity association.
Step1: Create Pod Identity Association
To make the Pod Identity Association process simple, we have created a shell script that does the following:
- Role and policy for the agent to access the model from Bedrock
- The role will be attached to the agent's service account via pod identity mapping.
You can find the script setup-pod-identity.sh inside the ai-agent-sandbox/scripts folder.
Run the following commands from the ai-agent-sandbox folder to make the script executable and run it.
chmod +x scripts/setup-pod-identity.sh

./scripts/setup-pod-identity.sh create
Once the script has finished running, check the pod identity association using the following command.
aws eks list-pod-identity-associations \
  --cluster-name <CLUSTER_NAME> \
  --namespace ai-agent \
  --service-account ai-agent \
  --region <REGION>
If the association succeeds, you will see similar output.
{
    "associations": [
        {
            "clusterName": "eks-cluster",
            "namespace": "ai-agent",
            "serviceAccount": "ai-agent",
            "associationArn": "arn:aws:eks:us-west-2:72853664276:podidentityassociation/gvisor-demo/a-nzleiytjyt2dbetjh",
            "associationId": "a-nzleiytjyt2dbetjh"
        }
    ]
}
Step 2: Update the Kustomize File
Now, let's update the Kustomize file before deploying the agent.
You can find the kustomization.yaml file inside the ai-agent-sandbox folder.
Open it and update the following.
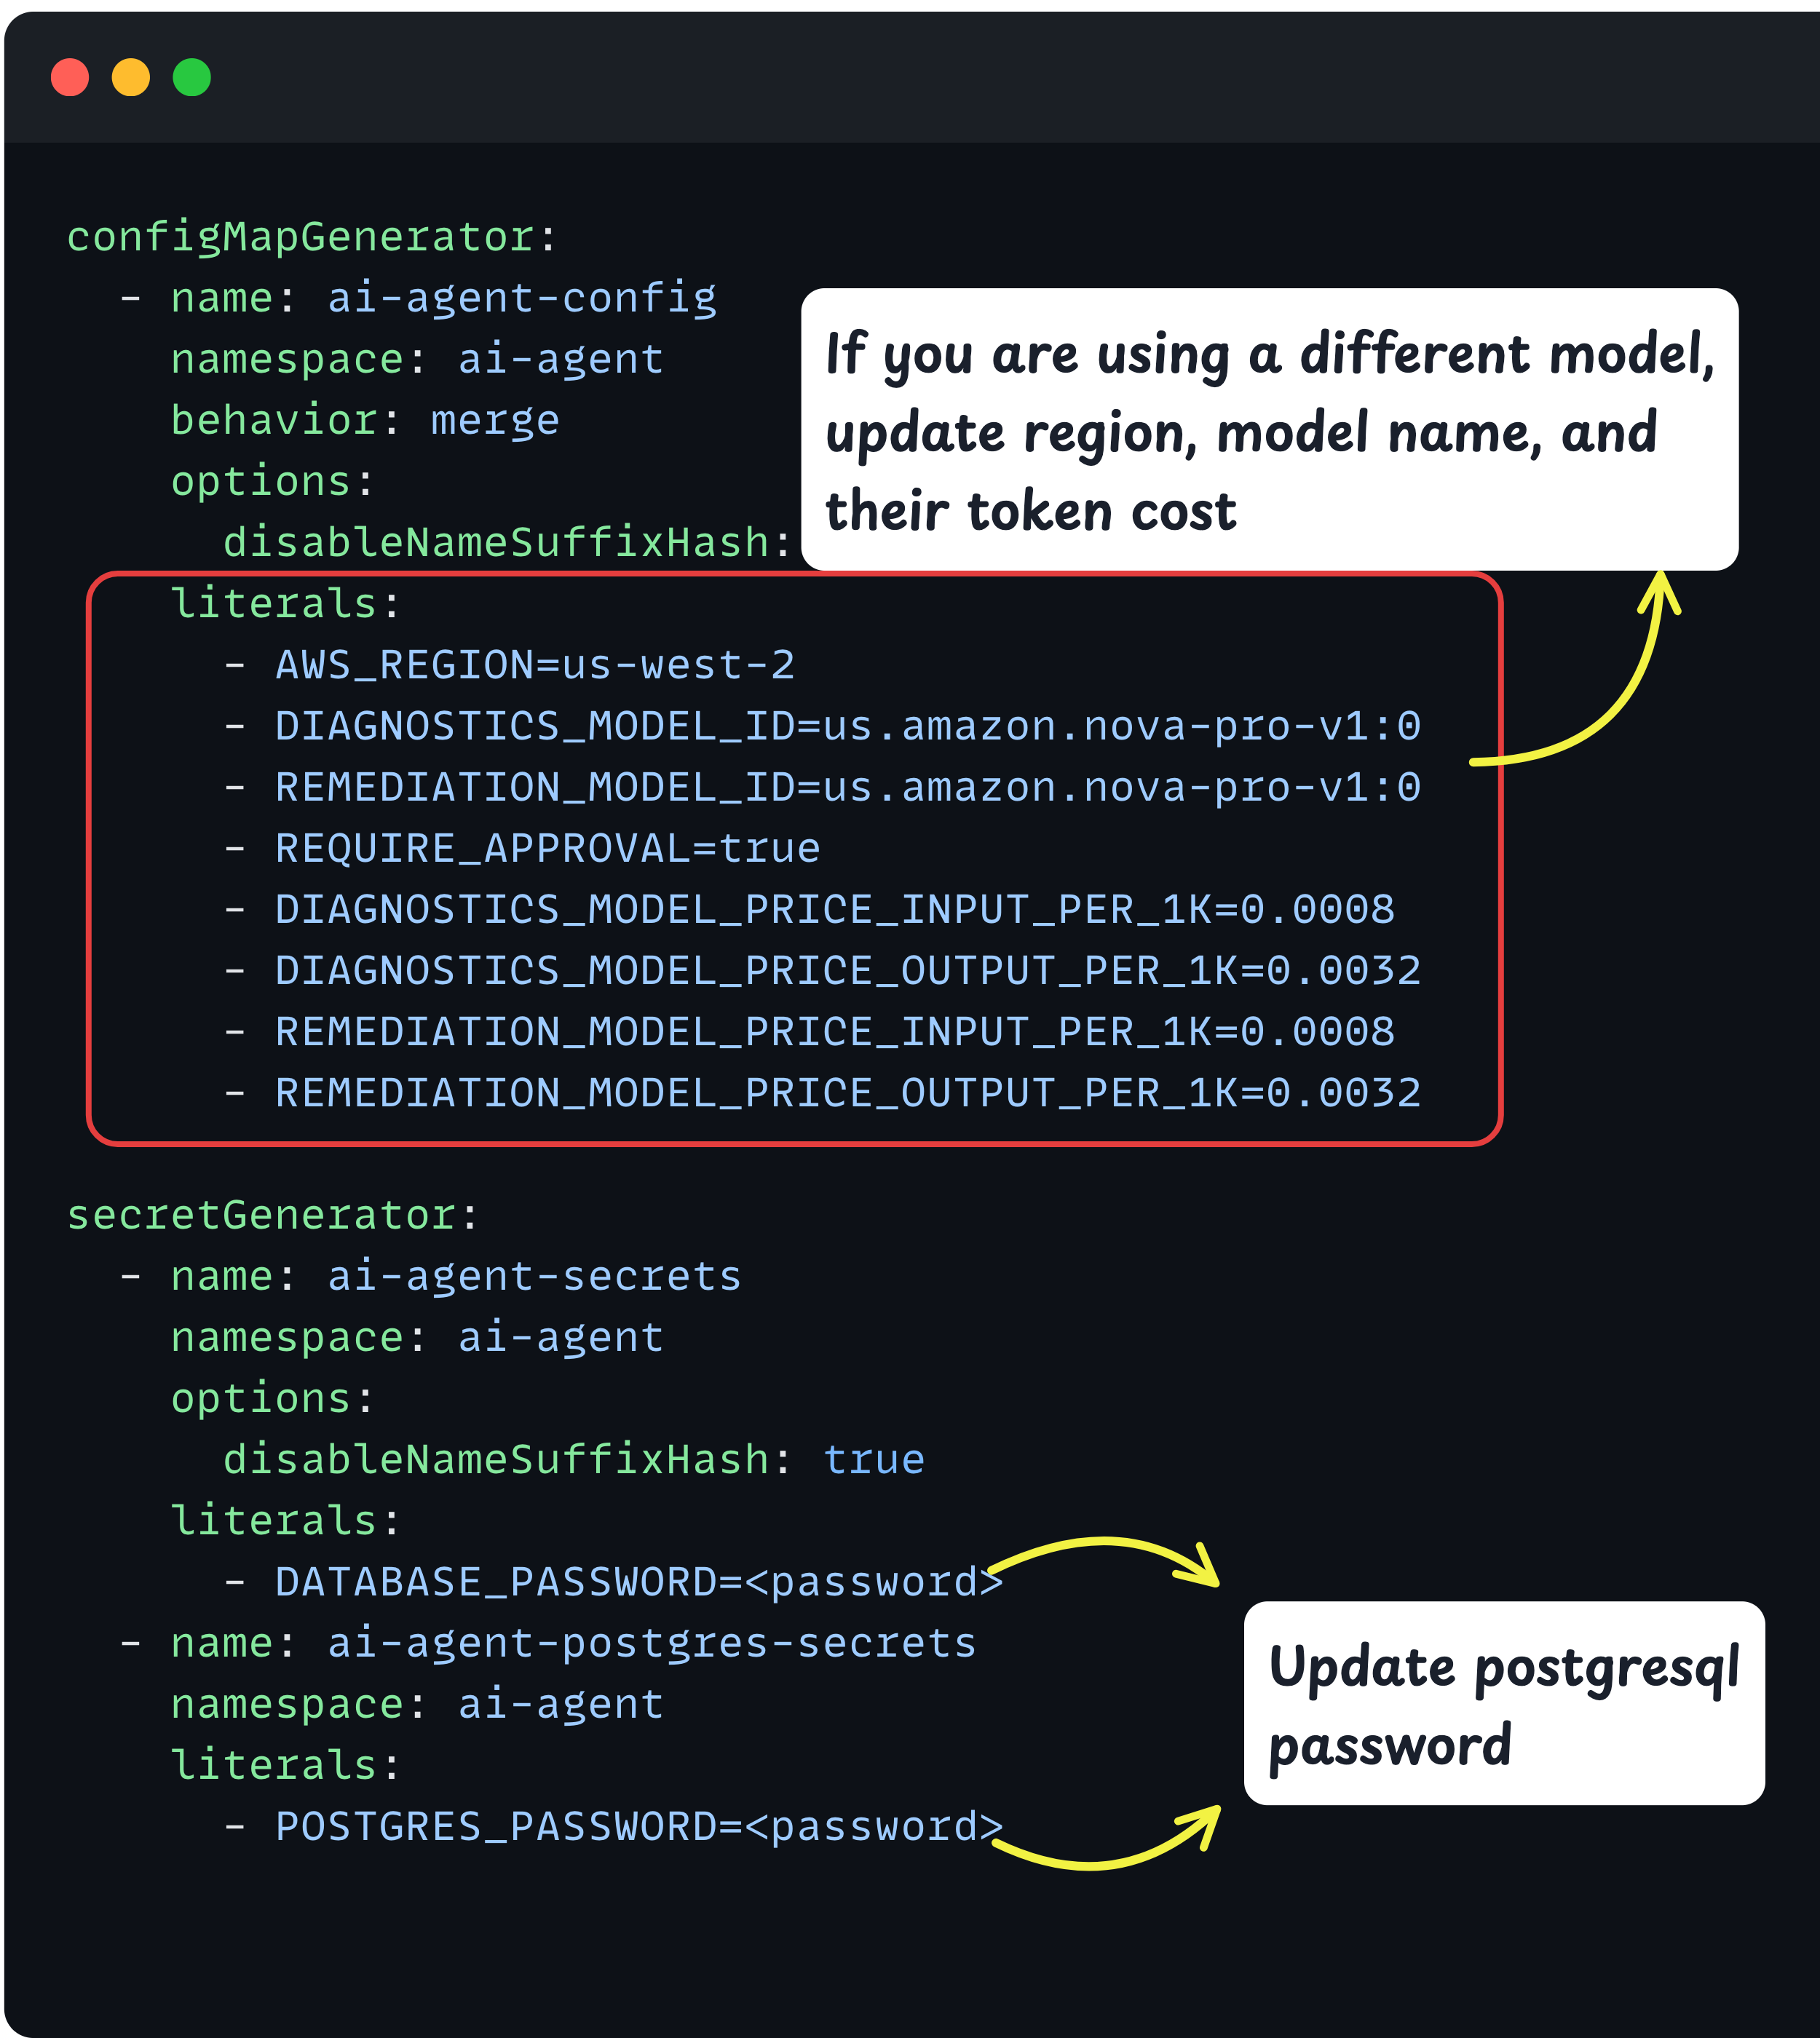
Here:
- Under the configMapGenerator block, update the region, model name, and their token cost if you are using a different model.
- Then, under the secretGenerator block, update the PostgreSQL password.
Step 3: Deploy the AI Agent
To deploy the agent, let's apply the Kustomization.yaml file.
kubectl patch storageclass <storage-class-name> -p '{"metadata": {"annotations":{"storageclass.kubernetes.io/is-default-class":"true"}}}'Run the following command from inside the ai-agent-sandbox folder
kubectl apply -k .Then run the following command to verify if its created.
$ kubectl get po -n ai-agent
NAME                                 READY   STATUS    RESTARTS   AGE
ai-agent-backend-pool-tnvjr          1/1     Running   0          5m
ai-agent-backend-pool-vkndt          1/1     Running   0          5m
ai-agent-backend-pool-z28vr          1/1     Running   0          5m
ai-agent-frontend-67f5474bbb-r62hp   1/1     Running   0          6m
ai-agent-postgres-0                  1/1     Running   0          6m
You may think there are three backend pods, but that's not what is happening here.
When you create a claim, one pod from the warm pool is transferred to the claim, and the warm pool creates a new pod to maintain the described replica count.
Two are the pre-warmed pods, and the other is the pod claimed by the sandbox claim.
$ kubectl get sandboxclaim -n ai-agent

NAME                     READY   SANDBOX                       REASON              AGE
ai-agent-backend-claim   True    ai-agent-backend-pool-tnvjr   DependenciesReady   25m
You can see the ai-agent-backend-pool-tnvjr is the functioning backend pod.
Step 4: Access the UI
To access the UI, we will port-forward the frontend service and access it through that port.
Use the following command to port-forward the service.
kubectl -n ai-agent port-forward svc/ai-agent-frontend 3000:3000Once it starts port-forwarding on port 3000, you can access the UI at the URL http://localhost:3000 as shown below.
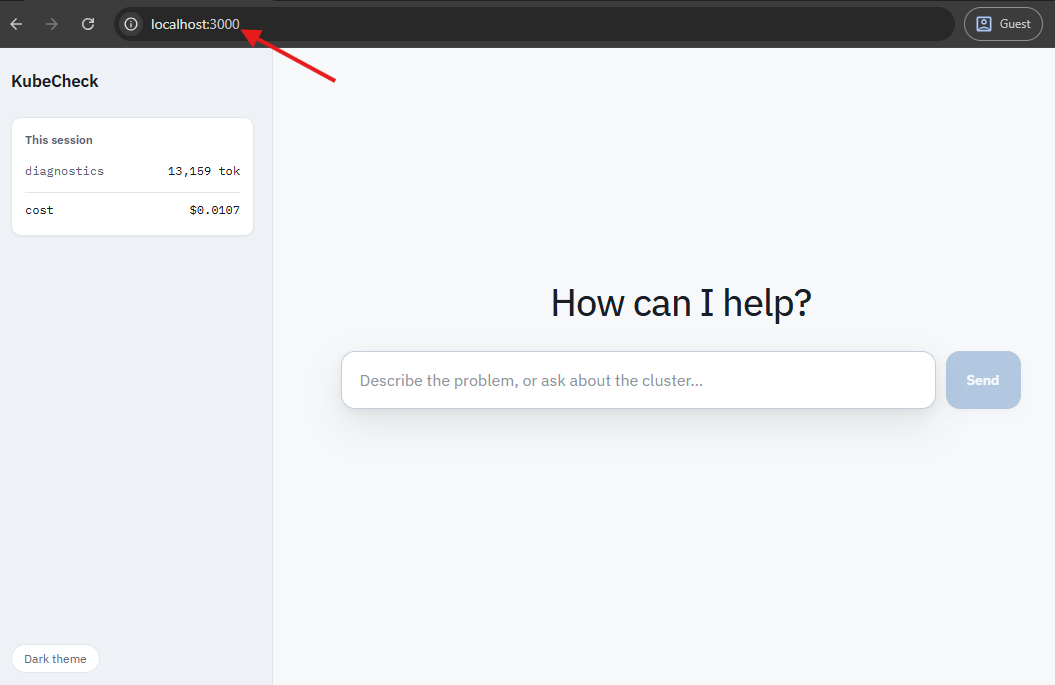
Here, the sandbox router doesn't need to communicate with the agent pod because the frontend can reach the backend using the internal service URL, like any normal frontend and backend.
Now, the agent is up and running. Next, we will test the agent with a troubleshooting task.
Step 5: Testing the Agent
To test the agent, we'll deploy a pod with a nodeSelector that doesn't match any node and ask the agent to troubleshoot it.
Start by deploying the pod using the following command.
cat <<EOF | kubectl apply -f -
apiVersion: v1
kind: Pod
metadata:
  name: web-service
spec:
  containers:
  - image: nginx
    name: web-service
  nodeSelector:
    type: web
EOF
You can see the pod is pending.
kubectl get po

NAME          READY   STATUS    RESTARTS   AGE
web-service   0/1     Pending   0          78s
Now, let's ask the agent to fix it.
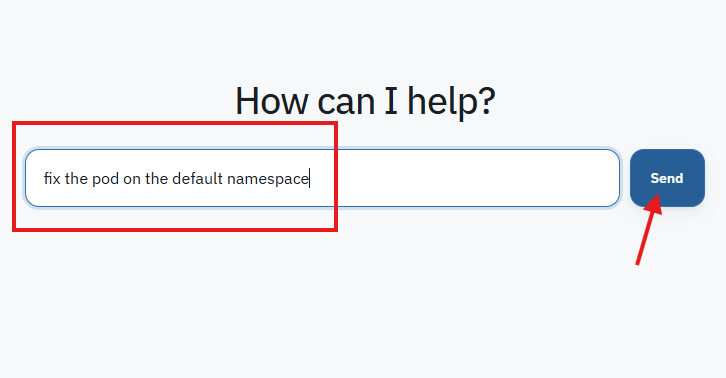
The agent reviews the issue, proposes a fix, and asks for your approval to apply it.
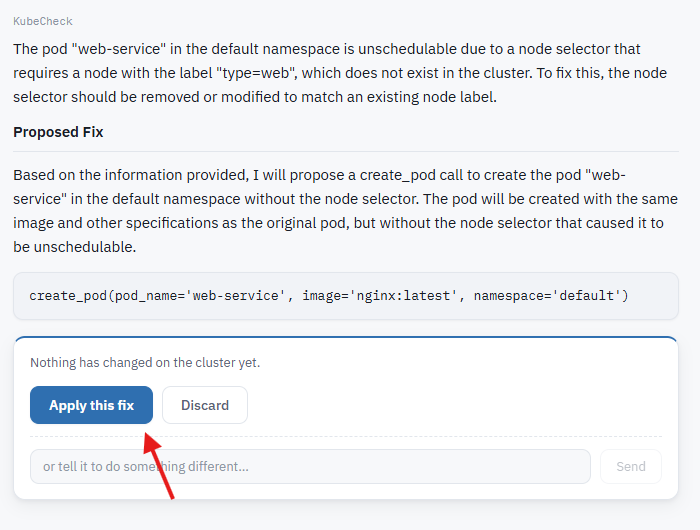
After you give approval, if the issue is fixed, you will get a similar output.
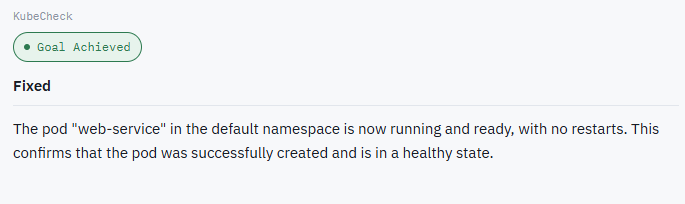
Once it is fixed, you can see the pod is running.
$ kubectl get po

NAME          READY   STATUS    RESTARTS   AGE
web-service   1/1     Running   0          30s
Running Untrusted Code on a Sandbox
This is the second use case we will work on the Agent Sandbox.
In this section, we will run Python code in the sandbox using the k8s-agent-sandbox SDK.
For this section, move into the agent-sandbox\python-sdk folder.
Assuming you are in the ai-agent-sandbox folder, run the following command to move into the python-sdk folder.
cd ../python-sdkYou can see the following files.
python-sdk
   ├── python-template.yaml
   ├── python-warmpool.yaml
   ├── rbac.yaml
   ├── sandbox.py
   └── untrusted-code.py
In here:
- The python-template.yaml manifest creates the Sandbox template.
- The python-warmpool.yaml manifest creates the Sandbox warmpool.
- The rbac.yaml manifest creates the service account, role, and role binding for the client.
- The sandbox.py is the main script that uses the Python SDK to claim a Sandbox from the warmpool.
- The untrusted-code.py is the test code that runs inside the sandbox.
These are sample Python scripts showing how code runs inside the sandbox.
The following image gives you a better understanding of what happens.
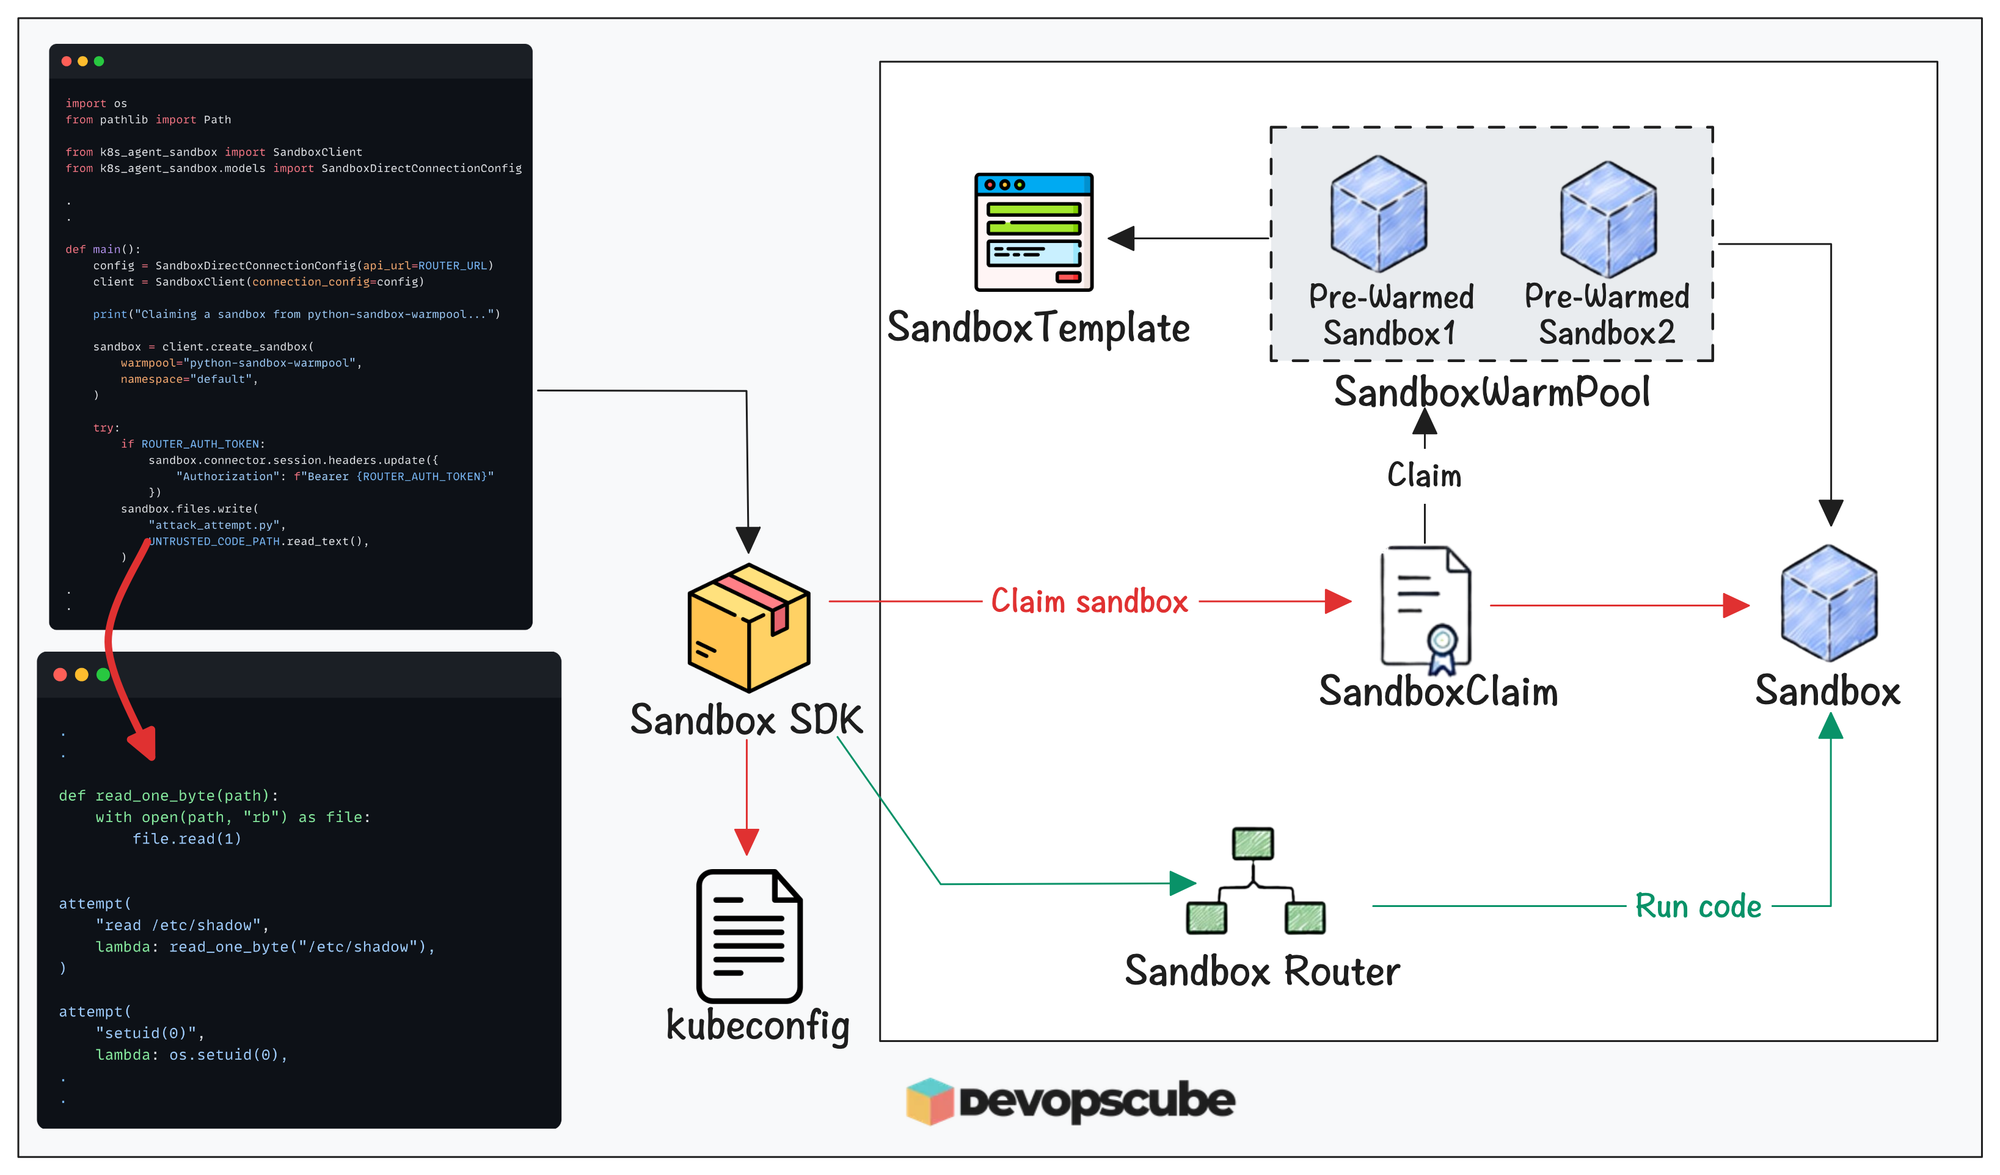
The SDK uses the main Python code to create the Sandbox, which uses the local kubeconfig file to communicate with the Kubernetes cluster.
The test code runs inside the sandbox, and the SDK uses the sandbox router to execute it there.
The test Python code does four security tests.
- Tries to read
/etc/shadow - Tries to become a root user
- Tries to read the service account token from the pod
- Starts a test process to get the details of the process running on the node
Here, Pod Security prevents the first three; gVisor's isolation prevents the last, keeping the test process from seeing information about processes on the node. It can only see the process in the sandbox.
Let's start by exposing the sandbox router through port forwarding.
Since gVisor doesn't allow direct connections to the sandboxed pod, we need to use the sandbox router to route requests to the pod.
You may have another question here. Previously, it was mentioned that the SDK uses a local kubeconfig file to access the cluster; why do we need the router?
Yes, it does, but only to create or claim a sandbox through the Kubernetes API; the sandbox router sends file execution and commands to the sandbox.
Run the following command to port forward the router service.
kubectl -n agent-sandbox-system port-forward svc/sandbox-router-svc 8080:8080Then, open the python-sdk folder in a different terminal and create a virtual environment.
python3 -m venv venv

source venv/bin/activate
Once it is created, install the k8s-agent-sandbox SDK using pip.
pip install k8s-agent-sandboxThen, apply the three manifests inside the python-sdk folder. Since you are inside the python-sdk folder, run the following command to apply all three.
kubectl apply -f .This will create the sandbox template, sandbox warm pool, service account, cluster role, and cluster role binding.
$ kubectl get sandboxwarmpool,sandboxtemplate

NAME                                                                 AGE
sandboxtemplate.extensions.agents.x-k8s.io/python-runtime-template   1m

NAME                                                               READY DESIRED   AGE
sandboxwarmpool.extensions.agents.x-k8s.io/python-sandbox-warmpool 2     2         1m
Before running the Python code, save the router token as an environment variable to authenticate through the router.
If you forgot the router token, run the following command to get it.
kubectl -n agent-sandbox-system get secret sandbox-router-auth -o jsonpath='{.data.auth-token}' | base64 -dThen save the token as an environment variable using the following command.
export ROUTER_AUTH_TOKEN=<your-token>Make sure you provide the correct token. Otherwise, you will get the following error message.
Failed to communicate with the sandboxOnce the token is saved, run the Python code using the following command.
python3 sandbox.pyThis will claim a sandbox from the specified warm pool and run the script in it.
$ kubectl get sandbox,sandboxclaim,po

NAME                     READY   SANDBOX                         REASON              AGE
sandbox-claim-012dafce   True    python-sandbox-warmpool-mtpvj   DependenciesReady   8s

NAME                                                    READY   REASON              AGE
python-sandbox-warmpool-mtpvj   True    DependenciesReady   4h55m

NAME                            READY   STATUS    RESTARTS   AGE
python-sandbox-warmpool-mtpvj   1/1     Running   0          4h56m
While it runs, you will see the following outputs in your terminal.
Claiming a sandbox from python-sandbox-warmpool...
Claim:   sandbox-claim-012dafce
Sandbox: python-sandbox-warmpool-mtpvj
Pod:     python-sandbox-warmpool-mtpvj

Starting the 45-second isolation test.
On the node, run:
sudo ps -eo pid,args | grep '[s]andbox-isolation-probe-8f2e1c'

--- stdout ---
[read /etc/shadow] blocked: PermissionError: [Errno 13] Permission denied: '/etc/shadow'
[setuid(0)] blocked: PermissionError: [Errno 1] Operation not permitted
[read ServiceAccount token] blocked: FileNotFoundError: [Errno 2] No such file or directory: '/var/run/secrets/kubernetes.io/serviceaccount/token'

--- Host process visibility check ---
Starting sandbox-isolation-probe-8f2e1c for 45 seconds
Probe PID inside sandbox: 3
Host process visibility check completed

exit_code=0
Terminating the sandbox claim...
Once it is completed, the sandbox and its claim will be deleted.
$ kubectl get po

NAME                            READY   STATUS        RESTARTS   AGE
python-sandbox-warmpool-mtpvj   1/1     Terminating   0          4h56m
Scheduled Deletion
Let's look at one of Agent Sandbox's features: scheduled deletion.
Here we will make use of two fields in the Sandbox manifest. They are:
shutdownPolicy- Defines what to do when the time is reached, like Retain or Delete.shutdownTime- Sets the date and time when the shutdownPolicy should run.
You can see how the two fields are specified inside the manifest below.
date -u -d "+5 minutes" +%Y-%m-%dT%H:%M:%SZApply it to create a sandbox that will be available for only 5 minutes.
cat <<EOF | kubectl apply -f -
apiVersion: agents.x-k8s.io/v1beta1
kind: Sandbox
metadata:
  name: scheduled-delete-demo
spec:
  shutdownPolicy: Delete
  shutdownTime: "$(date -u -v+5M '+%Y-%m-%dT%H:%M:%SZ')"
  podTemplate:
    spec:
      runtimeClassName: gvisor
      containers:
        - name: workspace
          image: alpine:3.20
          command: ["sleep", "3600"]
EOFThen run the following watch command to check the pod getting deleted after 5 minutes in real time.
kubectl get po -w

NAME                            READY   STATUS       RESTARTS   AGE
scheduled-delete-demo           1/1     Running      0          18s
scheduled-delete-demo           1/1     Terminating  0          4m55s
You can see the sandbox is deleted after 5 minutes. If you want the time to increase, just change the -v+5M part in the expression.
For example, -v+1H for 1 hour, -v+1d for 1 day, and -v+1w for 1 week.
Hibernate and Resume a Sandbox
Sometimes you don't want to delete the sandbox, but you also don't want the agent pods running idle or the session data being lost.
In such cases, we can use the agent sandbox Hibernation and Resume feature.
First, create a Sandbox.
cat <<'EOF' | kubectl apply -f -
apiVersion: agents.x-k8s.io/v1beta1
kind: Sandbox
metadata:
  name: suspend-resume-demo
spec:
  podTemplate:
    spec:
      runtimeClassName: gvisor
      containers:
        - name: workspace
          image: alpine:3.20
          command: ["sleep", "3600"]
          volumeMounts:
            - name: workspace
              mountPath: /workspace

  volumeClaimTemplates:
    - metadata:
        name: workspace
      spec:
        accessModes:
          - ReadWriteOnce
        resources:
          requests:
            storage: 1Gi
EOF
Then run the following command to check the sandbox and pod status.
$ kubectl get sandbox,po

NAME                                             READY   REASON              AGE
sandbox.agents.x-k8s.io/suspend-resume-demo      True    DependenciesReady   5m58s

NAME                                READY   STATUS    RESTARTS   AGE
pod/suspend-resume-demo             1/1     Running   0          5m59s
Once it starts running, create a sample file inside the volume mount to check if the data persists after pause and resume.
kubectl exec suspend-resume-demo -- \
  sh -c 'echo "This data survived suspend and resume" > /workspace/test.txt'
Then, change the sandbox's operatingMode to Suspended using the following command.
kubectl patch sandbox suspend-resume-demo \
  --type=merge \
  -p '{"spec":{"operatingMode":"Suspended"}}'
Again, check the pod and sandbox status.
kubectl get sandbox,po
NAME                                          READY   REASON              AGE
sandbox.agents.x-k8s.io/suspend-resume-demo   False   SandboxSuspended    8m33s

NAME                                READY   STATUS        RESTARTS   AGE
pod/suspend-resume-demo             1/1     Terminating   0          8m34s
You can see the sandbox's Ready status has been changed to False and the pod is terminating.
When deleting it, the cache and data will be deleted if there is no PV, so to keep the data persistent, you need to mount a PV to the correct path where the agent saves the data.
Now, let's resume the sandbox again using the following command.
kubectl patch sandbox suspend-resume-demo \
  --type=merge \
  -p '{"spec":{"operatingMode":"Running"}}'
Again, check the resources.
$ kubectl get sandbox,po

NAME                                          READY   REASON              AGE
sandbox.agents.x-k8s.io/suspend-resume-demo   True    DependenciesReady   13m

NAME                                READY   STATUS    RESTARTS   AGE
pod/suspend-resume-demo             1/1     Running   0          13s
You can see a new pod created, and the sandbox Ready status is changed to True.
Now, let's check the txt file inside the volume mount again.
kubectl exec suspend-resume-demo -- cat /workspace/test.txtYou will get the following output.
This data survived suspend and resumeThis proves the data is persisted.
Clean Up Agent Sandbox Setup
If you no longer need the setup, run the following commands one by one to clean it up.
First, delete the following namespace. This will delete all resources inside it.
kubectl delete ns agent-sandbox-system --force

kubectl delete ns ai-agent --force
Next, delete the pod identity and RBAC using the same script we used to create it.
./setup-pod-identity.sh cleanupConclusion
In summary, you have set up Kubernetes Agent Sandbox on top of a gVisor-configured EKS cluster.
With Agent Sandbox and gVisor, you can run AI agents securely and efficiently in the cluster.
You can also use it as a safe place to test your code.
Hope you find this guide informative.
Give your feedback in the comments.