


In this hands-on guide, you will implement node autoscaling in an EKS cluster using Cluster Autoscaler.
By default, when you deploy an EKS cluster, node auto-scaling is not enabled.
This means that even if you enable the Horizontal Pod Autoscaler (HPA), pods may enter a pending state when node resources are exhausted. To run the pending pods, you need to scale the underlying nodes.
This is where Cluster Autoscaler comes into play. It automatically adjusts the number of nodes in your cluster to meet resource demands.
By the end of this guide, you will:
- Understand what the Cluster Autoscaler is.
- Learn how it works behind the scenes with AWS
- Set up Cluster Autoscaler on Amazon EKS with hands-on experience
- Explore different scenarios to test scaling based on the Autoscaler
What is a Cluster Autoscaler?
Cluster Autoscaler is a tool designed to automatically scale Kubernetes cluster nodes based on workloads. It is maintained by the Kubernetes community.
It supports almost all cloud platforms and managed Kubernetes services, such as EKS, AKS, GKE, etc...
When you deploy the Cluster Autoscaler, it continuously monitors the API server for unscheduled Pods and automatically adds nodes to the cluster to provide resources for them.
Additionally, it scales down nodes when the cluster has more resources than needed.
As you may know, cloud-based Kubernetes implementations typically include node groups to manage worker nodes efficiently.
If there are multiple node groups present, the Cluster Autoscaler scales nodes using the node groups that match the specified expander strategy on the deployment.
There are six expander strategies available. They are:
- least-waste - Select the node group that leaves the least amount of unused CPU and memory used after scaling.
- random - This is the default expander when no expander is specified, and it is used when there is no problem scaling any node type.
- most-pods - This expander scales the node group, which can schedule most pods.
- least-nodes - Select this to scale the node group, which can schedule pods with minimum nodes.
- price - Scales the node group whose cost is low, check here for more details.
- priority - Select the node group that was assigned by the user in the configuration file.
--expander flag, which we will explore in detail in the hands-on sectionWe can deploy EKS Cluster Autoscaler using two methods:
- Auto-Discovery method (Recommended) - Automatically discovers all node groups' autoscaling groups with the required tags and scales them as needed.
- Manual method - You have to specify the node groups autoscaling groups minimum capacity, maximum capacity, and name.
How does EKS Cluster Autoscaler work?
The workflow diagram of AWS EKS Cluster Autoscaler is given below.
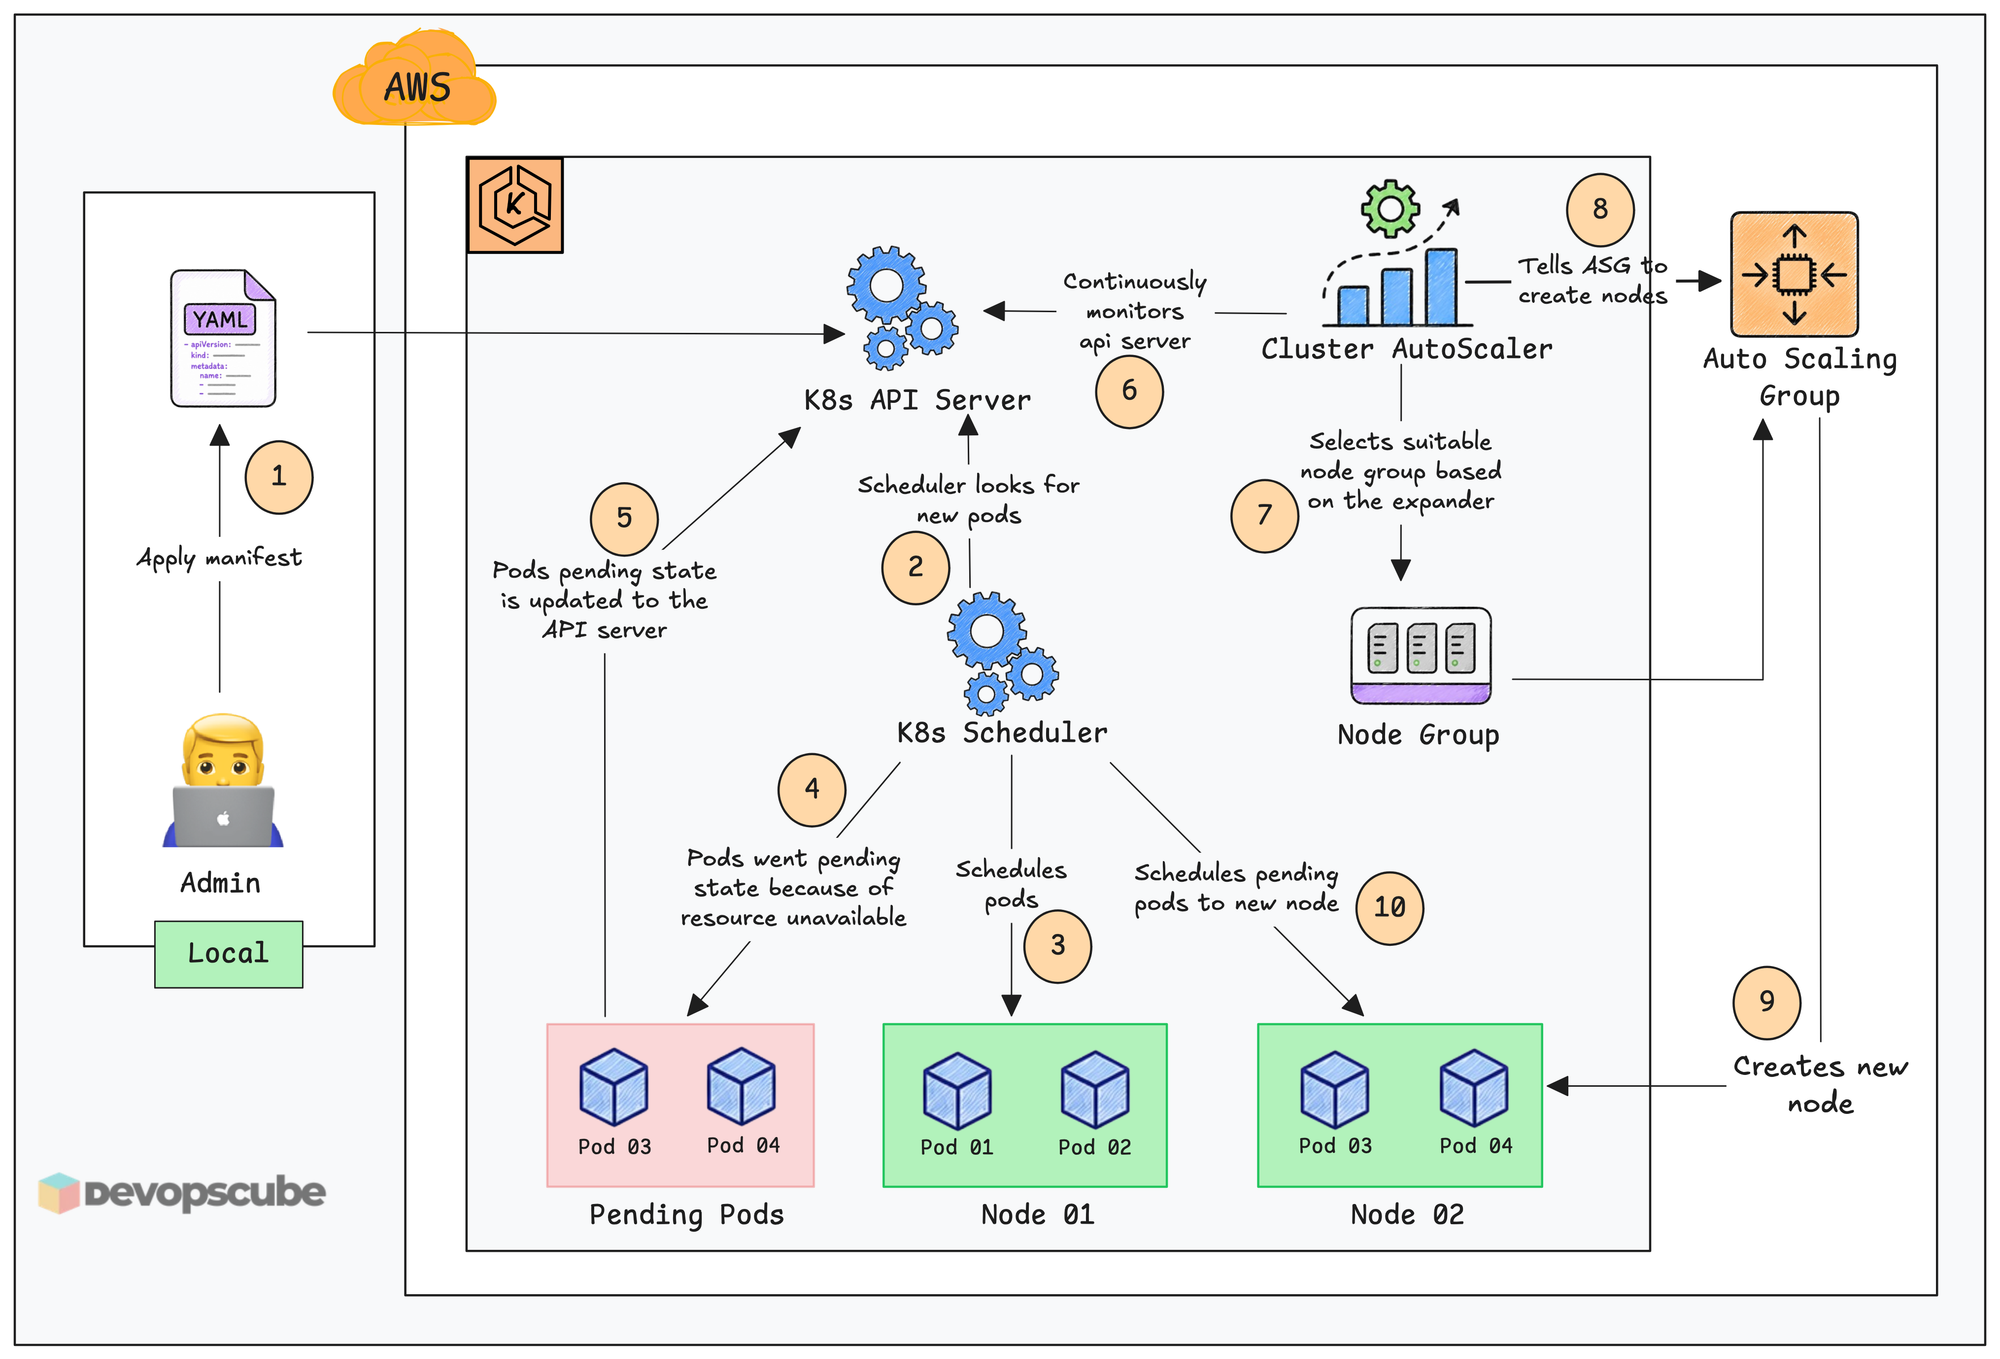
Here is how the EKS Cluster Autoscaler works.
- A manifest is applied to create a deployment on the cluster.
- The Scheduler watches the API Server for new pods and assigns them to nodes.
- The Pods are scheduled on nodes until resources are exhausted. Any remaining Pods that cannot be scheduled due to insufficient resources go into a Pending state.
- The API server updates the status of the pending Pods, along with the reason (e.g., insufficient CPU or memory).
- The Cluster Autoscaler, which continuously monitors the API server, detects that pods are in a pending state due to resource unavailability.
- The Autoscaler analyzes the resource requirements and selects the most suitable node group based on the configured expander strategy.
- Then, it gets the EC2 Auto Scaling Group associated with the node group and uses AWS APIs to request that the ASG scale nodes.
- Once the EC2 Auto Scaling group creates the required nodes, the Scheduler schedules pods onto the new nodes.
- If workloads decrease (e.g., a job finishes or a deployment is scaled down), some nodes may no longer be needed.
- A node is eligible for removal if it has been underutilized for a set time (default: 10 minutes). Once a node is identified for removal, the Cluster Autoscaler requests that the AWS Auto Scaling Group (ASG) terminate it.
Setup Prerequisites
The prerequisites required for this setup are listed below.
- EKS Cluster
- AWS CLI
- Kubectl
- eksctl
- Permission to create IAM Role and Policy
- Pod Identity agent plugin is enabled on the cluster
Set up Cluster Autoscaler on EKS Cluster
Let's set up a Cluster Autoscaler on the EKS cluster, we will use the auto-discovery method for this setup.
For the auto-discovery method to work, ASGs must have the following tags.
- k8s.io/cluster-autoscaler/enabled
- k8s.io/cluster-autoscaler/<cluster-name>
EKS Cluster Autoscaler uses these to automatically find the ASGs.
These tags might not apply when you create a node group using Terraform or a CLI command, make sure the node groups ASG has these tags.
To check whether the node group's ASGs have the mentioned tag, run the following command to list all ASGs in your AWS account.
aws autoscaling describe-auto-scaling-groups --query "AutoScalingGroups[*].AutoScalingGroupName" --output tableThen, run the following command to check the tags assigned to the specific ASG.
aws autoscaling describe-auto-scaling-groups --auto-scaling-group-names <asg-name> --query "AutoScalingGroups[*].Tags" --output tableUpdate the ASG name in the above command to the node group ASG you want to check the tags for; the node group ASG will have the node group name.
For example, if your node group name is ng-spot, then your ASG name will be eks-ng-spot-62ca5663-d8f9-a974-10c3-e0ca52223c7c.
Now, follow the steps below, one by one, to set up the Cluster Autoscaler on the EKS cluster.
Step 1: Create an IAM Policy
Let's start by creating an IAM policy for the Cluster Autoscaler that grants permissions to scale nodes and other required permissions.
First, run the following command to create a JSON file with the required permissions.
cat <<EoF > ca-policy.json
{
    "Version": "2012-10-17",
    "Statement": [
        {
            "Action": [
                "autoscaling:DescribeAutoScalingGroups",
                "autoscaling:DescribeAutoScalingInstances",
                "autoscaling:DescribeLaunchConfigurations",
                "autoscaling:DescribeTags",
                "autoscaling:SetDesiredCapacity",
                "autoscaling:TerminateInstanceInAutoScalingGroup",
                "ec2:DescribeLaunchTemplateVersions"
            ],
            "Resource": "*",
            "Effect": "Allow"
        }
    ]
}
EoF
Then, run the following command to create the IAM policy with the permissions listed on ca-policy.json.
aws iam create-policy   \
  --policy-name ca-policy \
  --policy-document file://ca-policy.json
Now, run the following command to save the ARN of the policy as a variable, which will be helpful in the next step.
export POLICY_ARN=$(aws iam list-policies --query "Policies[?PolicyName=='ca-policy'].Arn" --output text)Run the following command to check if the ARN is saved as a variable.
echo $POLICY_ARNIf it shows the ARN, move on to the next step.
Step 2: Create an IAM Role
Once the policy is created, create an IAM role and attach the policy to the role.
Start by creating a JSON file that contains the trust policy for the role.
cat <<EoF > trust-policy.json
{
    "Version": "2012-10-17",
    "Statement": [
      {
        "Effect": "Allow",
        "Principal": {
          "Service": "pods.eks.amazonaws.com"
        },
        "Action": [
          "sts:AssumeRole",
          "sts:TagSession"
        ]
      }
    ]
}
EoF
Then, run the following command to create the IAM role with the role trust policy on trust-policy.json.
aws iam create-role \
    --role-name  ca-role \
    --assume-role-policy-document file://trust-policy.json
Now, run the following command to attach the policy to the role.
aws iam attach-role-policy \
    --role-name ca-role \
    --policy-arn $POLICY_ARN
Once role creation and policy attachment are complete, run the following command to save the role's ARN as a variable.
export ROLE_ARN=$(aws iam get-role --role-name ca-role --query "Role.Arn" --output text)Run the following command to check if the ARN is saved as a variable.
echo $ROLE_ARNIf it shows the ARN, move on to the next step.
Step 3: Assign the IAM Role to the Service Account
The next step is to assign the IAM role to the Cluster Autoscaler service account using Pod Identity to provide scaling permission.
Since we already know the Cluster Autoscaler service account, lets create a pod identity mapping for it.
Before assigning the role, check if Pod Identity is enabled on your cluster by running the following command.
aws eks list-addons --cluster-name <CLUSTER NAME>Specify your cluster name in the above command.
If Pod Identity is enabled on your cluster, you can see it in the output as shown below.
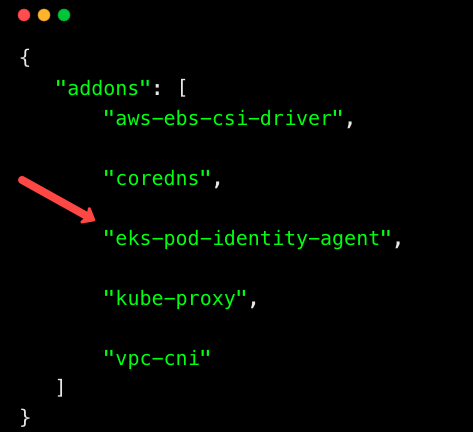
If it's not listed, Pod Identity is not enabled on your cluster. Run the following command to enable Pod Identity on your cluster.
aws eks create-addon --cluster-name <CLUSTER NAME> --addon-name eks-pod-identity-agentOnce enabled, run the following command to assign the IAM role to the Cluster Autoscaler's service account using Pod Identity.
eksctl create podidentityassociation \
    --cluster <CLUSTER NAME> \
    --namespace kube-system \
    --service-account-name cluster-autoscaler \
    --role-arn $ROLE_ARN
cluster-autoscaler Is the Cluster Autoscaler's service account.
This role will be used by the Cluster Autoscaler controller to communicate with the EC2 Auto Scaling Group.
Step 4: Download and Modify Cluster Autoscaler YAML
Now, download the Cluster Autoscaler deployment YAML and modify it.
Run the following command to download the YAML file.
wget https://raw.githubusercontent.com/kubernetes/autoscaler/master/cluster-autoscaler/cloudprovider/aws/examples/cluster-autoscaler-autodiscover.yamlModify the following in the manifest file:
- In the deployment section, change the container image version to match your EKS cluster version. For example, if your cluster version is 1.30.x, specify the container version as v1.30.0.
- Specify your cluster name in the command section
--node-group-auto-discovery=asg:tag=k8s.io/cluster-autoscaler/enabled,k8s.io/cluster-autoscaler/<YOUR CLUSTER NAME>.
The modified deployment part will look like this:
apiVersion: apps/v1
kind: Deployment
metadata:
  name: cluster-autoscaler
  namespace: kube-system
  labels:
    app: cluster-autoscaler
spec:
  replicas: 1
  selector:
    matchLabels:
      app: cluster-autoscaler
  template:
    metadata:
      labels:
        app: cluster-autoscaler
      annotations:
        prometheus.io/scrape: 'true'
        prometheus.io/port: '8085'
    spec:
      priorityClassName: system-cluster-critical
      securityContext:
        runAsNonRoot: true
        runAsUser: 65534
        fsGroup: 65534
        seccompProfile:
          type: RuntimeDefault
      serviceAccountName: cluster-autoscaler
      containers:
        - image: registry.k8s.io/autoscaling/cluster-autoscaler:v1.30.0
          name: cluster-autoscaler
          resources:
            limits:
              cpu: 100m
              memory: 600Mi
            requests:
              cpu: 100m
              memory: 600Mi
          command:
            - ./cluster-autoscaler
            - --v=4
            - --stderrthreshold=info
            - --cloud-provider=aws
            - --skip-nodes-with-local-storage=false
            - --expander=least-waste
            - --node-group-auto-discovery=asg:tag=k8s.io/cluster-autoscaler/enabled,k8s.io/cluster-autoscaler/eks-spot-cluster
          volumeMounts:
            - name: ssl-certs
              mountPath: /etc/ssl/certs/ca-certificates.crt # /etc/ssl/certs/ca-bundle.crt for Amazon Linux Worker Nodes
              readOnly: true
          imagePullPolicy: "Always"
          securityContext:
            allowPrivilegeEscalation: false
            capabilities:
              drop:
                - ALL
            readOnlyRootFilesystem: true
      volumes:
        - name: ssl-certs
          hostPath:
            path: "/etc/ssl/certs/ca-bundle.crt"
You can see I have changed the container version based on my cluster version and specified my cluster name in the command section.
You can also change the expander command to random, most-pods, least-waste, priority as per your requirements.
If you want to run the Cluster Autoscaler in manual mode, remove the command:
--node-group-auto-discovery=asg:tag=k8s.io/cluster-autoscaler/enabled,k8s.io/cluster-autoscaler/eks-spot-cluster from the above manifest file and use the:
--nodes=1:4:eks-ng-spot-16ca48b9-1524-ecf0-3c0d-572a204ffa86 to specify the nodes groups ASG manually.
The above command structure is --nodes=<ASG-min>:<ASG-max>:<ASG name>, in the command you have to specify the node groups ASG's min capacity, maximum capacity and it's name.Below are some of the additional commands that you can use to modify the default configurations.
- --scale-down-delay-after-add - Once the node is added, the scale down should not start until the specified time. By default, it is 10 minutes.
- --scale-down-unneeded-time - How long a node must stay underutilized before it is removed. Default time is 10 minutes.
- --scale-down-delay-after-failure - If a scale-down fails, wait until a specific time to retry again. Default is 3 minutes.
Once the mentioned changes are made, then run the following command to deploy the Cluster Autoscaler and other required resources.
kubectl apply -f cluster-autoscaler-autodiscover.yamlYou can see a Cluster Autoscaler controller pod created in the kube-system namespace.
$ kubectl get po -n kube-system | grep cluster-autoscaler

cluster-autoscaler-6d8cc87985-z8bgb    1/1     Running   1    16s
Once the deployment is up, run the following command to annotate the deployment.
kubectl -n kube-system annotate deployment.apps/cluster-autoscaler cluster-autoscaler.kubernetes.io/safe-to-evict="false"This annotation will prevent the Cluster Autoscaler pods from being evicted during scaling.
Testing Cluster Autoscaler
The Cluster Autoscaler setup is ready. Let's check if it's working properly.
To check, create a deploy.yaml file and copy the below content:
apiVersion: apps/v1
kind: Deployment
metadata:
  name: nginx-app
spec:
  replicas: 4
  selector:
    matchLabels:
      app: nginx-app
  template:
    metadata:
      labels:
        app: nginx-app
    spec:
      containers:
      - name: app
        image: nginx
        resources:
          requests:
            memory: "1Gi"
            cpu: "500m"
This manifest file will create a deployment with 4 replicas and set the resource request to 1Gi Memory and 500m CPU.
Currently, my cluster has 1 node of type t3.medium, which has 2 CPU and 4GB of Memory. Set the resource request based on your node type, which makes the nodes scale.
Apply the manifest file using the following command.
kubectl apply -f deploy.yamlList the pods using the below command.
kubectl get poYou can see that two pods are running and two are pending because of insufficient resources.
$ kubectl get po

NAME                         READY   STATUS    RESTARTS   AGE
nginx-app-789bd55986-76jvs   1/1     Running   0          49s
nginx-app-789bd55986-89x6k   1/1     Running   0          49s
nginx-app-789bd55986-frbq9   0/1     Pending   0          49s
nginx-app-789bd55986-hkmfp   0/1     Pending   0          49s
Now, the total resource limit has exceeded the node capacity, triggering the Cluster Autoscaler to add nodes as needed.
$ kubectl get no

NAME                                          STATUS     ROLES    AGE   VERSION
ip-172-31-16-26.us-west-2.compute.internal    NotReady   <none>   8s    v1.30.8-eks-aeac579
ip-172-31-39-172.us-west-2.compute.internal   Ready      <none>   43m   v1.30.8-eks-aeac579
You can see that the scale-up is triggered, and a new node is created.
The trigger will happen within 10-30 seconds, and the node will be up and running within 1 minute.
$ kubectl get po

NAME                         READY   STATUS    RESTARTS   AGE
nginx-app-789bd55986-76jvs   1/1     Running   0          89s
nginx-app-789bd55986-89x6k   1/1     Running   0          89s
nginx-app-789bd55986-frbq9   1/1     Running   0          89s
nginx-app-789bd55986-hkmfp   1/1     Running   0          89s

$ kubectl get no

NAME                                          STATUS     ROLES    AGE   VERSION
ip-172-31-16-26.us-west-2.compute.internal    Ready   <none>   8s    v1.30.8-eks-aeac579
ip-172-31-39-172.us-west-2.compute.internal   Ready      <none>   43m   v1.30.8-eks-aeac579
You can see that a new node has been created according to the resource requirements, and all the pods are up and running.
Now, delete the deployment using the following command to see the scale-down process.
kubectl delete -f deploy.yamlThe unused nodes will be terminated after 10 minutes; this is the default node scale-down time.
$ kubectl get no

NAME                                          STATUS                    ROLES    AGE   VERSION
ip-172-31-16-26.us-west-2.compute.internal    Ready                    <none>   12m    v1.30.8-eks-aeac579
ip-172-31-39-172.us-west-2.compute.internal   Ready,SchedulingDisabled      <none>   55m   v1.30.8-eks-aeac579
Common Issues and Troubleshooting
Below are some common issues when using Cluster Autoscaler and their troubleshooting steps.
Check Logs
Always start troubleshooting by checking the Cluster Autoscaler logs. Most issues related to the Cluster Autoscaler are visible on its pod.
Run the following command to get the logs.
kubectl logs deployment/cluster-autoscaler -n kube-systemCluster Autoscaler does not detect Node Group Nodes
Let's say you have multiple node groups, and the Cluster Autoscaler is running, but it doesn't detect the nodes in the node group.
The following things may be the issue:
- The Cluster Autoscaler doesn't have the required permissions.
- The ASGs of the node groups have incorrect tags.
- Only in auto-discovery mode will the node groups be automatically detected by the Cluster Autoscaler. If you are using manual mode, you have to specify each node group using the
--nodesflag.
Pod Stuck in Pending State
If your pod has been stuck in a pending state for more than 10 minutes, and the nodes are not scaling up even though the Cluster Autoscaler is running.
This may be caused by various reasons:
- The Cluster Autoscaler doesn't have the required permission to trigger scaling.
- The node group size limit has been reached.
- The pods may have taints to deploy on specific nodes.
Nodes not Scaling Down
If your nodes are underutilized and still not scaling down, this may be caused by:
- The node group's minimum node limit has been reached.
- A node might have pods that cannot be evicted.
Cluster Autoscaler Pod gets evicted
If your Cluster Autoscaler pod is getting evicted, you have to add the cluster-autoscaler.kubernetes.io/safe-to-evict="false" annotation to your Cluster Autoscaler deployment.
Run the following command to add the annotation to the Cluster Autoscaler deployment.
kubectl -n kube-system annotate deployment.apps/cluster-autoscaler cluster-autoscaler.kubernetes.io/safe-to-evict="false"Then, restart the deployment to apply the changes.
kubectl rollout restart deploy cluster-autoscaler -n kube-systemBest Practises
Given below are some of the best practices for Cluster Autoscaler:
- Always specify resource requests and limits for your pods so that the Cluster Autoscaler can scale based on the requirements.
- You can use taints and tolerations to schedule some pods on specific nodes.
- Use the scale-down commands to adjust the scale-down time based on your workload. (eg. --scale-down-unneeded-time=2m).
- Use HPA with the Cluster Autoscaler, which ensures HPA has enough nodes to scale pods.
Conclusion
In this guide, you learned about Kubernetes Cluster Autoscaler, its functionality, and how to set it up on an Amazon EKS cluster.
You also explored testing the setup, customization options, best practices, and troubleshooting common issues.
For more advanced scaling strategies, especially for workloads requiring different EC2 instance types and smarter scaling decisions, consider exploring EKS Karpenter.
