This article guides you to set up Jenkins build inside a Docker container using Docker-based Jenkins build agents.
The resource utilization of the Jenkins agents is very less if you do not have builds happening continuously. It is better to use ephemeral Docker containers as Jenkins agents for better resource utilization in this scenario.
As you know, spinning up a new container takes less than a minute; every build spins up a new container, builds the project, and is destroyed. This way, you can reduce the number of static Jenkins build VMs.
Docker Containers as Build Agents/Slaves
In this guide, I will walk you through the steps for configuring Docker Containers as build agents.
I assume that you have a Jenkins server up and running. If you do not have one, follow this tutorial. How to setup Jenkins 2
If you want docker based Jenkins setup, you can follow this tutorial -> Setup Jenkins On a Docker container
Let's Implement It
Configure a Docker Host With Remote API [Important]
The first thing we should do is set up a docker host. Jenkins server will connect to this host for spinning up the build agent containers. I am going to use the Centos server as my docker host. You can use any OS which supports Docker.
Jenkins master connects to the docker host using REST APIs. So we need to enable the remote API for our docker host.
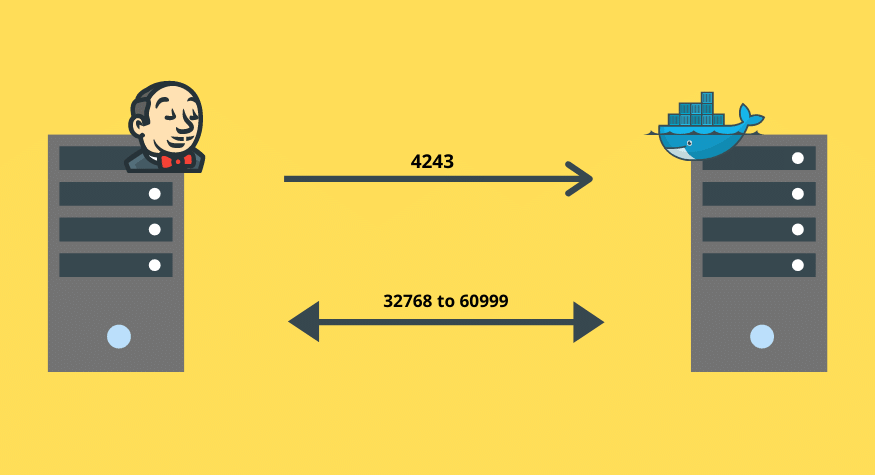
Make sure the following ports are enabled in your server firewall to accept connections from Jenkins master.
| Docker Remote API port | 4243 |
| Docker Hostport Range | 32768 to 60999 |
32768 to 60999 is used by Docker to assign a host port for Jenkins to connect to the container. Without this connection, the build slave would go in a pending state.
Lets get started,
Step 1: Spin up a VM, and install docker on it. You can follow the official documentation for installing docker. based on the Linux distribution you use. Make sure the docker service is up and running.
Step 2: Log in to the server and open the docker service file /lib/systemd/system/docker.service. Search for ExecStart and replace that line with the following.
ExecStart=/usr/bin/dockerd -H tcp://0.0.0.0:4243 -H unix:///var/run/docker.sockStep 3: Reload and restart docker service.
sudo systemctl daemon-reload
sudo service docker restart
Step 4: Validate API by executing the following curl commands. Replace 54.221.134.7 with your host IP.
curl http://localhost:4243/version
curl http://54.221.134.7:4243/version
Check the docker remote API article for a detailed explanation of Docker API.
Once you enabled and tested the API, you can now start building the docker slave image.
Create a Jenkins Agent Docker Image
I have created a Jenkins docker image for maven. You can use this image or use its Dockerfile as a reference for creating your own.
If you are creating the image on your own, its image should contain the following minimum configurations to act as a slave.
sshdservice running on port 22.- Jenkins user with password.
- All the required application dependencies for the build. For example, for a java maven project, you need to have git, java, and maven installed on the image.
Make sure the sshd service is running and can be logged into the containers using a username and password. Otherwise, Jenkins will not be able to start the build process.
Configure Jenkins Server With Docker Plugin
Step 1: Head over to Jenkins Dashboard --> Manage Jenkins --> Manage Plugins.
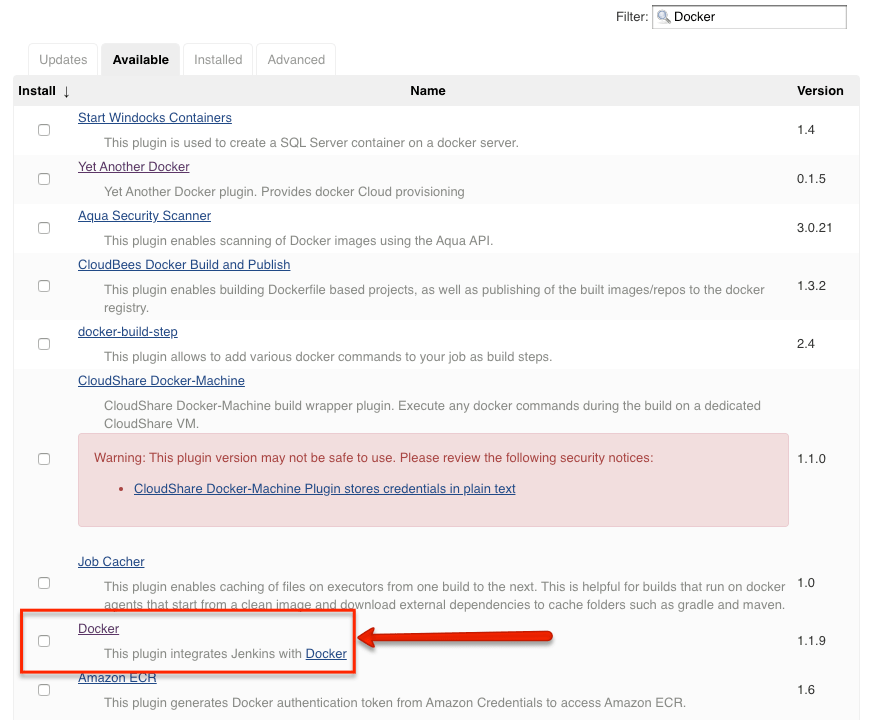
Step 2: Under the Available tab, search for "Docker" and install the docker cloud plugin and restart Jenkins. Here is the official plugin site. Make sure you install the right plugin as shown below.
Step 3: Once installed, head over to Jenkins Dashboard --> Manage Jenkins --> Configure system.
Step 4: Under "Configure System", there will be a section named "cloud" at the last. There you can fill out the docker host parameters for spinning up the slaves.
Step 5: Under docker, you need to fill out the details as shown in the image below.
tcp://10.128.0.3:4243 You can use the "Test connection" to test if Jenkins is able to connect to the Docker host.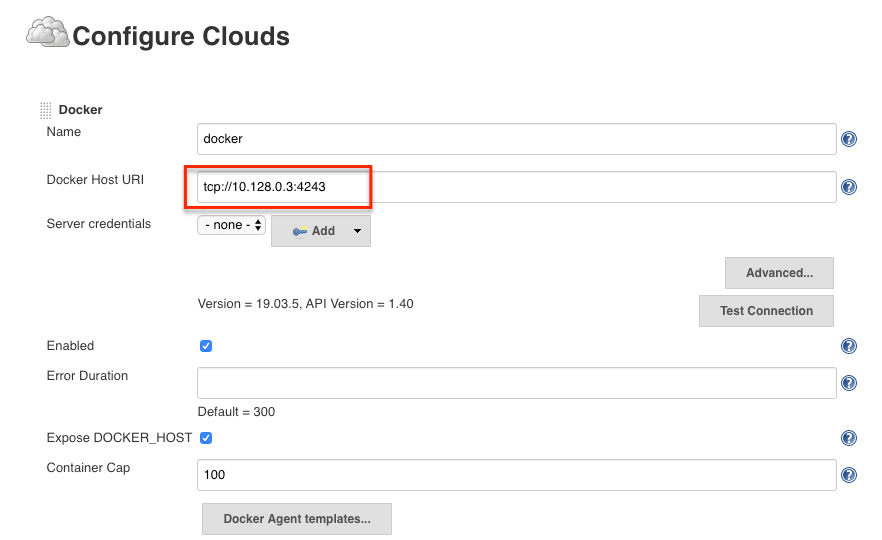
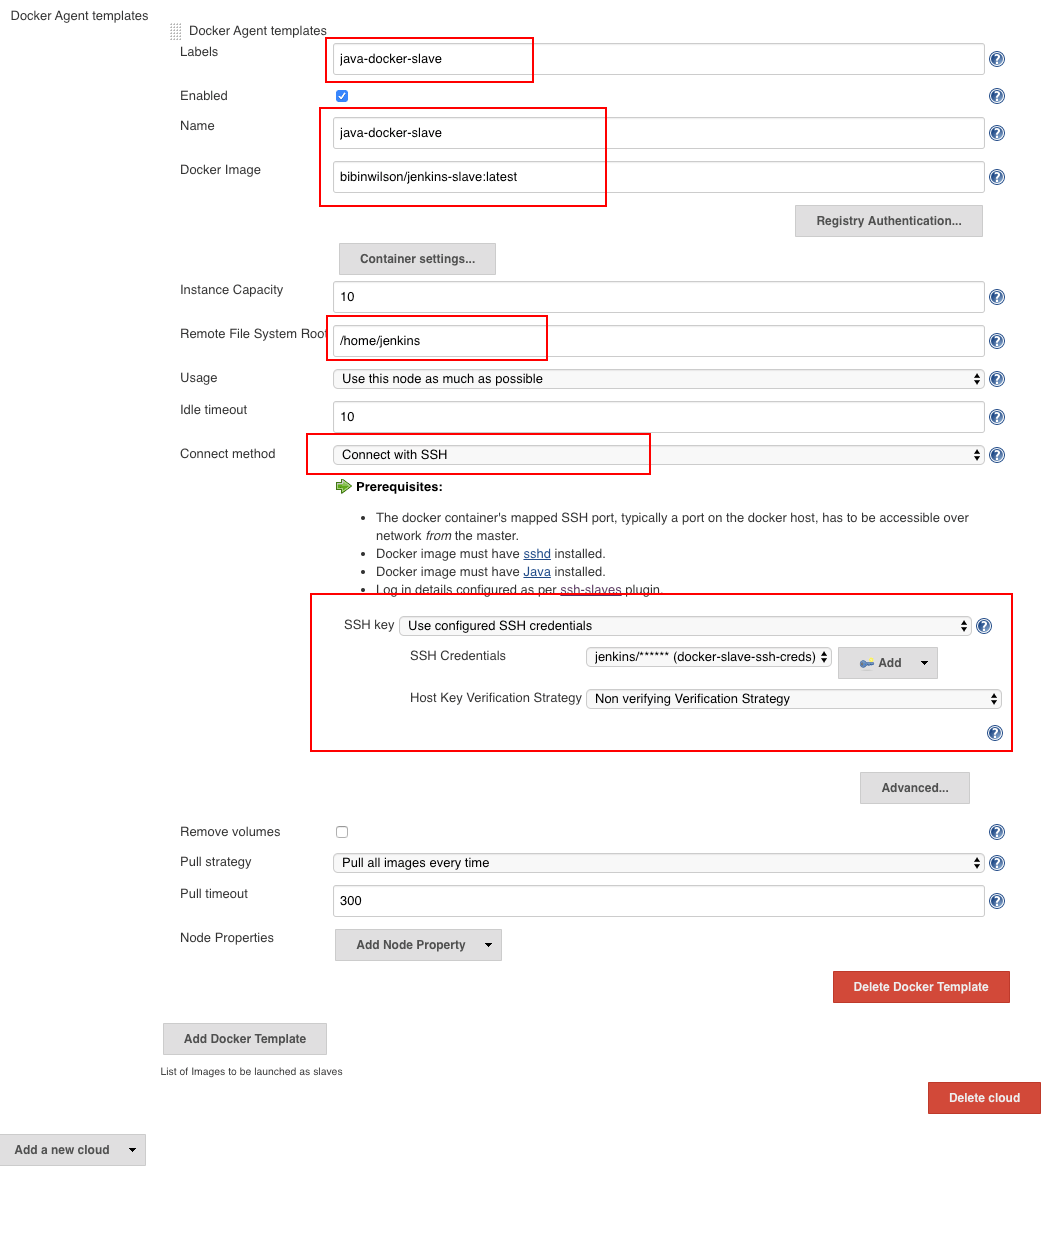
Step 6: Now, from "Docker Agent Template" dropdown, click the "Add Docker template" and fill in the details based on the explanation and the image given below and save the configuration.
- Labels - Identification for the docker host. It will be used in the Job configuration. Here we use
java-docker-slave - Name: Name of the docker template. Here we use the same name as label ie, java-docker-slave
- Docker Image -
bibinwilson/jenkins-slave:latestor the image that you created for the slave. - Remote Filing System Root - Home folder for the user you have created. In our case, it's /home/jenkins
- Credentials - click add and enter the SSH username and password that you have created for the docker image. Leave the rest of the configuration as shown in the image below and click save. If you are using my Docker image, the user will be
jenkins& password is alsojenkins.
You can also use JNLP-based slave agents. For this, the configurations need a little change as shown below. Primarily the docker image name and the connect method.
TCP port for inbound agents). Also, the Jenkins master firewall should be able to accept this connection form the docker host.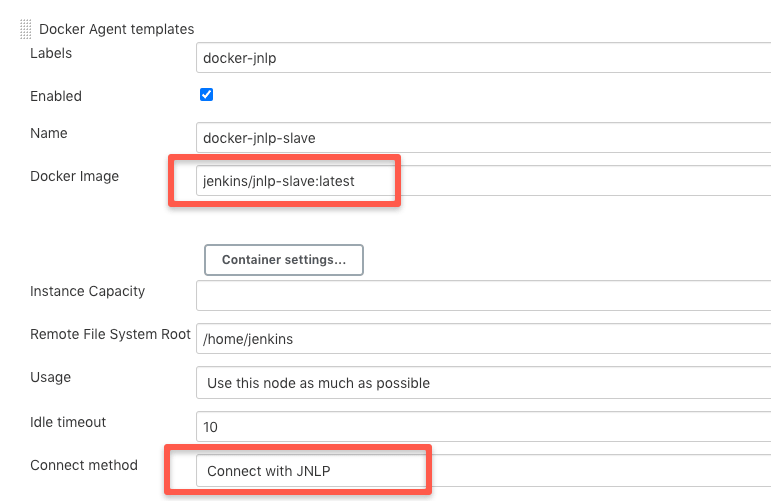
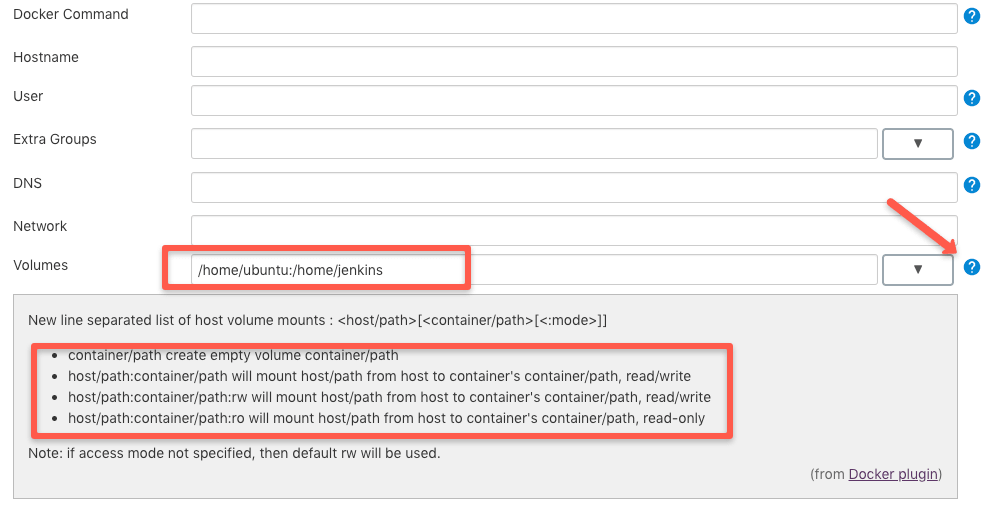
By default, the workspace will not be persisted in the host. However, if you want the workspace to be persistent, add a host volume path under container settings.
For example, if you want the workspace to be available at /home/ubuntu, you can add the volume path as shown below. /home/jenkins is the path inside the container.
/home/ubuntu:/home/jenkinsTowards the right of the Volumes option, if you click the question mark, it will show you additional volume options as shown below.
Building Docker Images using Docker Agents
There are use cases where you have to build Docker images in the CI process.
You can achieve that using Docker based Jenkins agent as well.
If you are planning to run docker in docker for your CI process, you can mount the host docker.sock as volume to execute docker commands.
Check out my article on running docker in docker to know how to run docker in docker.
Test Jenkins Build Inside a Docker container
Now that you have the slave configurations ready, we will test the docker agent plugin using a freestyle job.
- Create a freestyle job, select "
Restrict where this project can be run" option and select the docker host as a slave using the label. - Add a shell build step which echoes a simple "
Hello World"
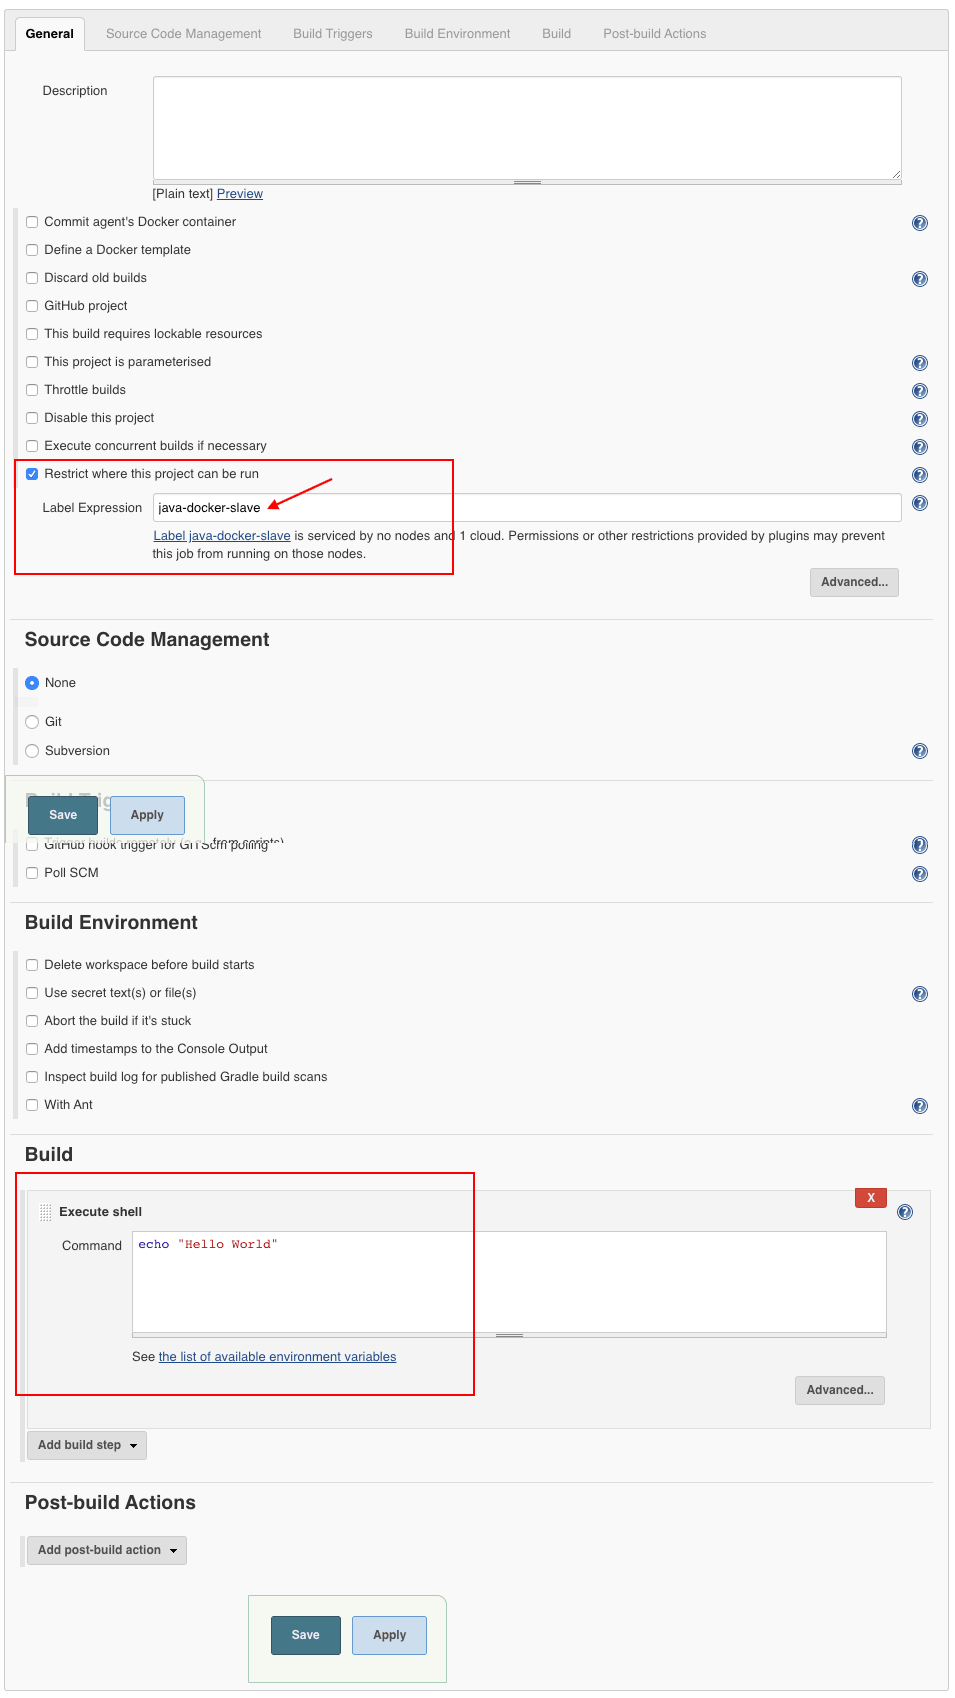
If you have done all the configurations right, Jenkins will spin up a container, builds the project, and destroys the container once the build is done.
First, you will see a pending notification as Jenkins tries to deploy a container on run time and establishes an SSH connection. After a few seconds, your job will start building.

You can check the build logs in your jobs console output as shown below.

Also, you can check out the video explaining the whole process.
Possible Errors:
- Jenkins is not able to deploy containers on the host:- Please make sure you have proper connectivity to the docker host on API port.
- Jenkins builds goes in the pending state forever:- Make sure you have Docker host ports (32768 to 60999) access from Jenkins master to docker host.
- JNLP slaves go into the pending state: Make sure you have enabled the JNLP port in the Jenkins global security configuration.
Conclusion
In this article, I walked you through the process of setting up dynamic Jenkins Docker agents
If you want to build Jenkins inside a Docker container, and you don't have a Kubernetes setup, this is the best option.
If you have a Kubernetes setup, then you consider setting up the agents on Kubernetes. You can check my blog on Kubernetes based Jenkins build agents to for more details.
It can be further customized to fit your specific use cases.
Please let me know your thoughts in the comment section. Also, don't forget to share this article :)

