

In this guide, we will walk you through the steps to install Jenkins on the latest Ubuntu server and use all recommended configurations in 10 easy steps.
Jenkins 2.x has lots of great functionalities that will make the CI pipeline smooth using the pipeline as code and reusable with shared libraries.
Also, we have added the steps to install Jenkins using Docker on the Ubuntu server.
Install Jenkins on Ubuntu With Recommended Configurations
Follow the steps given below to install and configure Jenkins 2 on a ubuntu server.
Note: Centos/Rehat users follow this tutorial Install jenkins on centos/Redhat
Step 1: Log in to the server and update the package list.
sudo apt -y updateStep 2: Jenkins needs the Java runtime as it is based on Java. Install open JDK 11 package using the following command.
sudo apt install default-jdk -yStep 3: Add the Jenkins Debian repo.
sudo wget -O /usr/share/keyrings/jenkins-keyring.asc \
  https://pkg.jenkins.io/debian-stable/jenkins.io-2023.key
echo deb [signed-by=/usr/share/keyrings/jenkins-keyring.asc] \
https://pkg.jenkins.io/debian-stable binary/ | sudo tee \
/etc/apt/sources.list.d/jenkins.list > /dev/nullStep 4: Update the package list again.
sudo apt update -yStep 5: Install the latest LTS Jenkins.
Note: You can check the official Jenkins ubuntu package repo for more information on the latest versions
sudo apt-get install jenkins -yStep 6: Start the Jenkins service & enable it for starting during bootup.
sudo systemctl start jenkins sudo systemctl enable jenkinsYou can check the status of the Jenkins service using the following command.
sudo systemctl status jenkinsStep 7: Now you will be able to access the Jenkins server on port 8080 using the IP address as shown below.
Note: You can also run Jenkins on port 80. Check this Jenkins guide to change access port
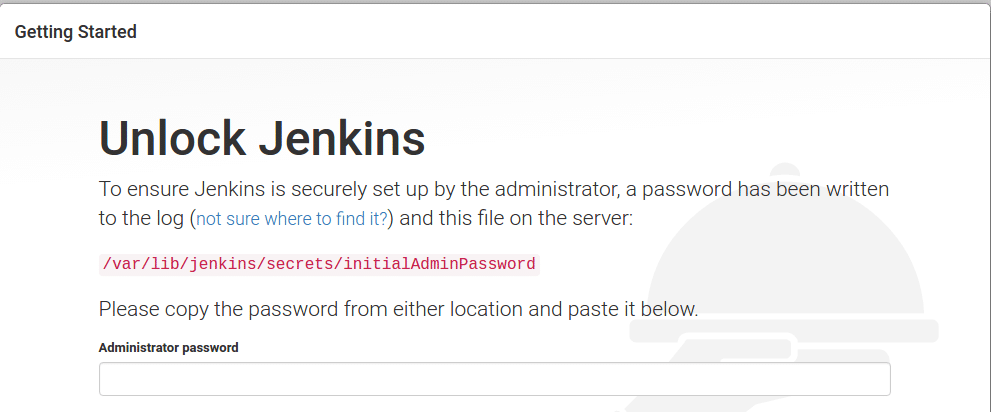
Step 8: As you can see in the above image, you need to provide the administrative password. You can get the password using the following command.
sudo cat /var/lib/jenkins/secrets/initialAdminPasswordCopy the password and click continue.
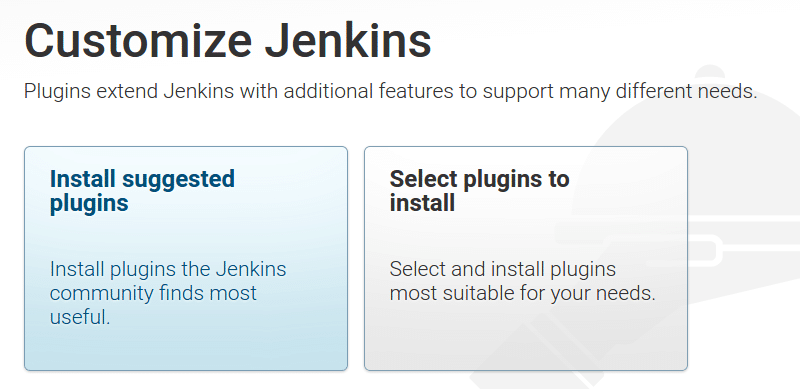
Step 9: Next, you will be asked to configure plugins as shown below. Select the "Install Suggested Plugins" option. This will install all the required plugins for building your projects. It will take a few minutes to install the plugins.
Step 10: Once installed, You need to create a user with a password and click "save and finish"

Click "Start Using Jenkins" and it will take you to the Jenkins Dashboard. Log in using the username and password that you have given in step 8.
That's it! Now you have a fully functional Jenkins server up and running. Consider setting up Jenkins backup using the backup plugin.
Install Jenkins on Ubuntu Using war file
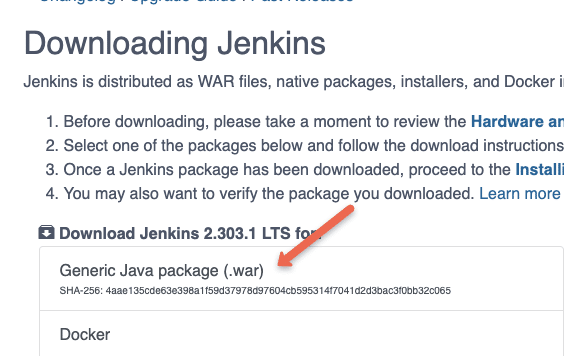
There are situations where you cannot access the ubuntu public repo. In this case, you can opt for Jenkins installation using the java war file.
Head over to the Jenkins downloads page. There you will find a link to download the war file as shown below.
Jenkins Agent Setup on Ubuntu
Next, you need to configure a distributed master-slave setup wherein you will have active master and slave agents for building the projects.
Follow the Jenkins master-agent setup guide to configure a Jenkins agent
If you are looking for a cloud Docker agent, follow the Docker-based Jenkins build agents guide.
SSL for Jenkins URL
If you are setting up a Jenkins server for a project, consider setting up SSL for the Jenkins server URL.
Follow the Jenkins SSL setup guide to configure SSL.
Jenkins Key Configurations on Ubuntu
Here are some key configurations and file locations in Jenkins that you should know.
Note: The recommended approach is to mount the Jenkins data folder to an additional data disk for production setup. This way, you don't lose any Jenkins data if the server crashes.
| Jenkins Data Location | /var/lib/jenkins |
| Jenkins main configuration file | /var/lib/jenkins/config.xml |
| Jenkins Jobs folder | /var/lib/jenkins/jobs |
Setting up Jenkins Using Docker on Ubuntu
If you are a docker user, you can run Jenkins on a docker container.
Refer docker installation document to install the latest edition of docker.
Execute the following command to deploy Jenkins on Docker
docker run -p 8080:8080 -p 50000:50000 --name jenkins jenkinsci/jenkins:latestThe above command won't persist any changes if the container crashes. So it is better to mount a host volume to the container to hold all the Jenkins configurations.
Here is the command to deploy the Jenkins container with the host volume mount.
docker run -p 8080:8080 -p 50000:50000 -v /home/ubuntu:/var/jenkins_home jenkinsci/jenkins:latestSetting up Ubuntu Based Jenkins on Kubernetes
You can run Jenkins on Kubernetes using the ubuntu based docker image for Jenkins.
Follow our Jenkins deployment on kubernetes guide.
Consider using a kubernetes persistent volume to mount the data directly to avoid data loss if the Jenkins pod restarts.
Jenkins Installation FAQ's
Can we install Jenkins in Ubuntu?
Yes. We can install Jenkins on Ubuntu. You can choose to install a specific version or the latest available version from the apt repository.
How do I know if Jenkins is installed in Ubuntu?
You can check if Jenkins is installed in Ubuntu by executing the command apt-cache policy jenkins
Also, you can list the installed Jenkins package using dpkg -l | grep jenkinsUbuntu
Conclusion
In this guide, you have learned to install Jenkins on an Ubuntu server using different methods.
After the installation, make sure you back up the Jenkins data folder before making any major changes to the configurations. For some reason, if you break Jenkins, you can easily restore it from the backup files.
