

In this Jenkins tutorial, I explained the detailed steps to set up Jenkins controller and scale Jenkins build agents on Kubernetes pods using the Jenkins Kubernetes plugin
In another post, I explained how to set up Docker-based Jenkins agents.
If you have a Kubernetes cluster in your environment, running Jenkins agents on the Kubernetes pods will give you good build isolation for different application versions.
Also, an ephemeral Kubernetes pod-based Jenkins agent is a great way to reduce the cost of the CI environment, as Jenkins agents are spun up only if there is a build request.
How Do Jenkins Kubernetes Pod Agents Work?
Before getting into the implementation, let's understand how this setup works.
The following image shows the high-level workflow.
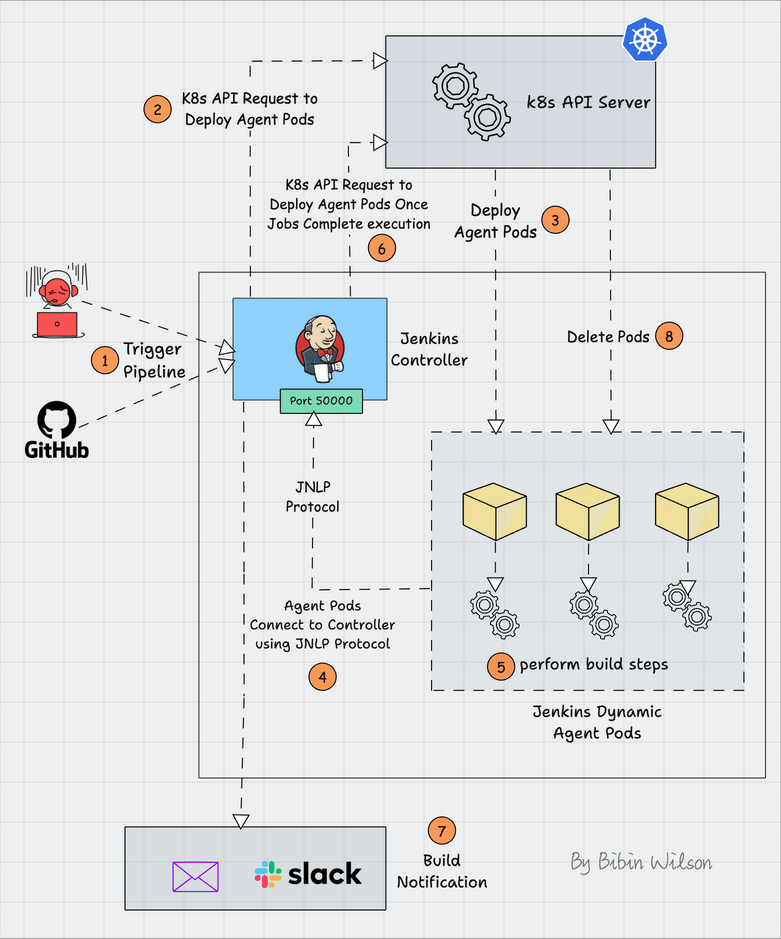
- Whenever you trigger a Jenkins job, the Jenkins Kubernetes plugin will make an API call to create a Kubernetes agent pod.
- Then, the Jenkins agent pod is deployed in Kubernetes with a few environment variables containing the Jenkins server details and secrets.
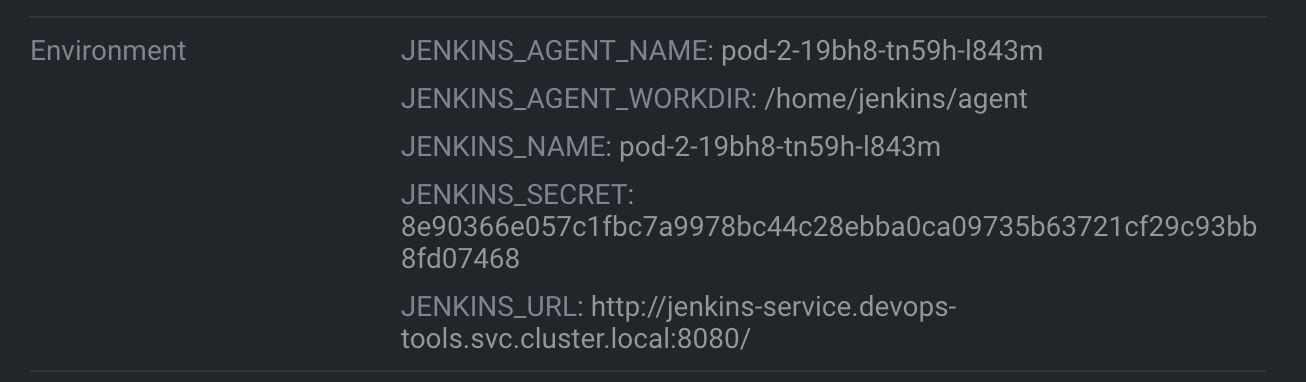
- When the agent pod comes up, it uses the details in its environment variables and talks back to Jenkins using the JNLP method. The following images show the environment variables of the agent pod.
All the build steps from the Jenkinsfile run on that pod. Once the build is complete, the pod will be terminated automatically. However, there are also options to retain the build pod.
The Jenkins Kubernetes plugin handles all the communication from Jenkins to the Kubernetes cluster.
Also, as long as your Kubernetes cluster scales, you can scale your Jenkins build agents without issues.
Setting Up Jenkins Build Pods On Kubernetes
To work on this setup, we need the following.
- A working Kubernetes cluster.
- Kubernetes admin user to create Kubernetes deployments and service accounts
- A running Jenkins controller
Also, I am considering two scenarios here.
- Jenkins controller running inside the Kubernetes cluster.
- Jenkins controller running outside the Kubernetes cluster.
We will look at both scenarios and their configurations.
Overfall, here is what we are going to do.
- Create a namespace
devops-tools - Create a Kubernetes service account named
jenkins-adminwith permissions to manage pods indevops-toolsnamespace. Jenkins will use this service account to deploy the agent pods. (Both internal & external Jenkins) - Deploy Jenkins in
devops-toolsnamespace with thejenkins-adminservice account. (If you don't have an existing Jenkins) - Configure the Kubernetes Jenkins Plugin so that Jenkins can interact with the Kubernetes cluster and deploy build agents.
Setting Up Kubernetes Namespace & Service Account
Let's get started with the setup.
Step 1: Create a namespace called devops-tools
kubectl create namespace devops-toolsStep 2: Save the following manifest as service-account.yaml. It contains the role and role-binding for the service account with all the permission to manage pods in the devops-tools namespace.
apiVersion: v1
kind: ServiceAccount
metadata:
  name: jenkins-admin
  namespace: devops-tools
---
apiVersion: rbac.authorization.k8s.io/v1
kind: Role
metadata:
  name: jenkins
  namespace: devops-tools
  labels:
    "app.kubernetes.io/name": 'jenkins'
rules:
- apiGroups: [""]
  resources: ["pods"]
  verbs: ["create","delete","get","list","patch","update","watch"]
- apiGroups: [""]
  resources: ["pods/exec"]
  verbs: ["create","delete","get","list","patch","update","watch"]
- apiGroups: [""]
  resources: ["pods/log"]
  verbs: ["get","list","watch"]
- apiGroups: [""]
  resources: ["secrets"]
  verbs: ["get"]
---
apiVersion: rbac.authorization.k8s.io/v1
kind: RoleBinding
metadata:
  name: jenkins-role-binding
  namespace: devops-tools
roleRef:
  apiGroup: rbac.authorization.k8s.io
  kind: Role
  name: jenkins
subjects:
- kind: ServiceAccount
  name: jenkins-admin
  namespace: devops-tools
Create the service account.
kubectl apply -f service-account.yamlThe next step is to create a Secret, which creates a token for the service account.
Create a YAML file secret.yaml and copy the below contents into it
apiVersion: v1
kind: Secret
metadata:
  name: sa-token-secret
  namespace: devops-tools
  annotations:
    kubernetes.io/service-account.name: jenkins-admin
type: kubernetes.io/service-account-token
Create the secret
kubectl apply -f secret.yamlThis creates a secret and links it with the service account using the annotation.
Jenkins Controller Setup in Kubernetes
In this setup, we will have both the Jenkins controller and agents deploying in the same Kubernetes cluster.
We will set up the Jenkins controller server on the Kubernetes cluster.
Save the following manifest as deployment.yaml. This manifest contains persistent volume claim, deployment, and service definitions.
Also, if you are using a local cluster, create a persistent volume before running the below manifest.
# Persistent Volume Claim
apiVersion: v1
kind: PersistentVolumeClaim
metadata:
  name: jenkins-pv-claim
  namespace: devops-tools
spec:
  accessModes:
    - ReadWriteOnce
  resources:
    requests:
      storage: 50Gi

# Deployment Config
---
apiVersion: apps/v1
kind: Deployment
metadata:
  name: jenkins-deployment
  namespace: devops-tools
spec:
  replicas: 1
  selector:
    matchLabels:
      app: jenkins
  template:
    metadata:
      labels:
        app: jenkins
    spec:
      serviceAccountName: jenkins-admin
      securityContext:
            fsGroup: 1000
            runAsUser: 1000
      containers:
        - name: jenkins
          image: jenkins/jenkins:lts
          resources:
            limits:
              memory: "2Gi"
              cpu: "1000m"
            requests:
              memory: "500Mi"
              cpu: "500m"
          ports:
            - name: httpport
              containerPort: 8080
            - name: jnlpport
              containerPort: 50000
          livenessProbe:
            httpGet:
              path: "/login"
              port: 8080
            initialDelaySeconds: 90
            periodSeconds: 10
            timeoutSeconds: 5
            failureThreshold: 5
          readinessProbe:
            httpGet:
              path: "/login"
              port: 8080
            initialDelaySeconds: 60
            periodSeconds: 10
            timeoutSeconds: 5
            failureThreshold: 3
          volumeMounts:
            - name: jenkins-data
              mountPath: /var/jenkins_home
      volumes:
        - name: jenkins-data
          persistentVolumeClaim:
              claimName: jenkins-pv-claim

# Service Config
---
apiVersion: v1
kind: Service
metadata:
  name: jenkins-service
  namespace: devops-tools
  annotations:
      prometheus.io/scrape: 'true'
      prometheus.io/path:   /
      prometheus.io/port:   '8080'
spec:
  selector:
    app: jenkins
  type: NodePort
  ports:
    - name: httpport
      port: 8080
      targetPort: 8080
      nodePort: 32000
    - name: jnlpport
      port: 50000
      targetPort: 50000
Create the deployment.
kubectl apply -f deployment.yamlAfter a couple of minutes, the Jenkins deployment will be up, and you will be able to access any Kubernetes node on the port 32000
Step 4: Access the Jenkins dashboard over the node port and unlock it using the password from the pod logs. Install the suggested plugins and create a Jenkins user.
Please follow the Jenkins on Kubernetes blog if you have any doubts.
Jenkins Kubernetes Plugin Configuration
Jenkins Kubernetes plugin is required to set up Kubernetes-based build agents. Let's configure the plugin.
Step 1: Install Jenkins Kubernetes Plugin
Go to Manage Jenkins –> Manage Plugins, search for the Kubernetes Plugin in the available tab, and install it. The following Gif video shows the plugin installation process.
Step 2: Create a Kubernetes Cloud Configuration
Once installed, go to Manage Jenkins –> Clouds
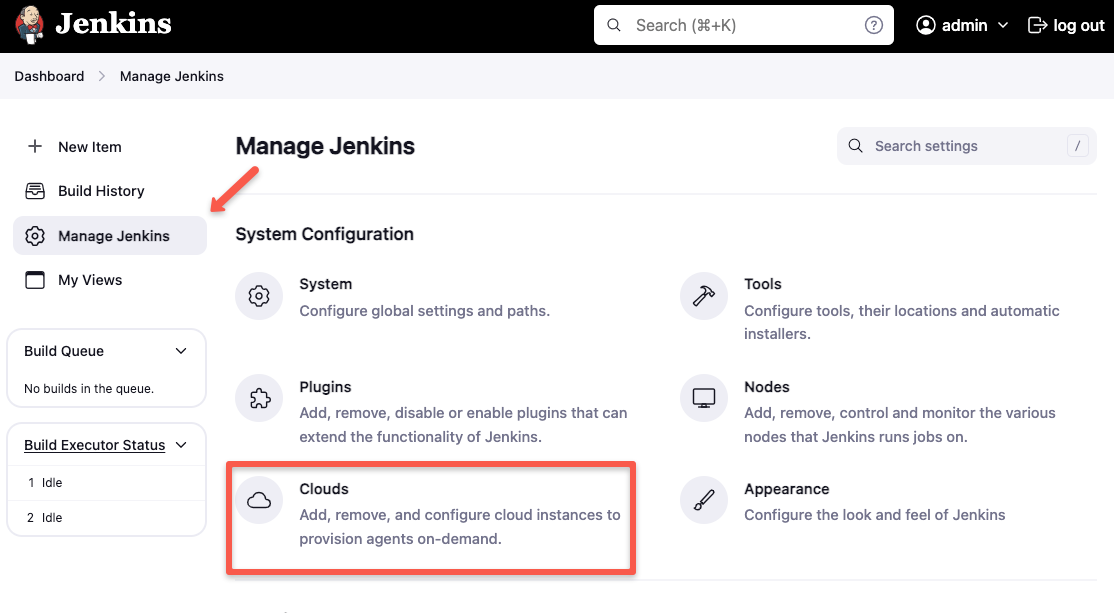
Click New Cloud
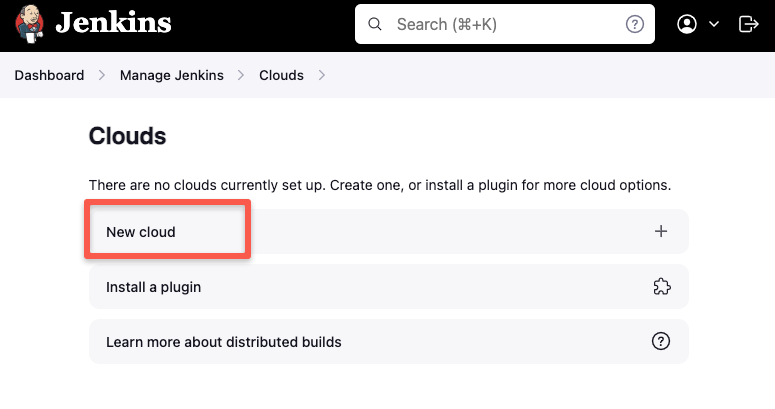
Give a name and select Kubernetes.
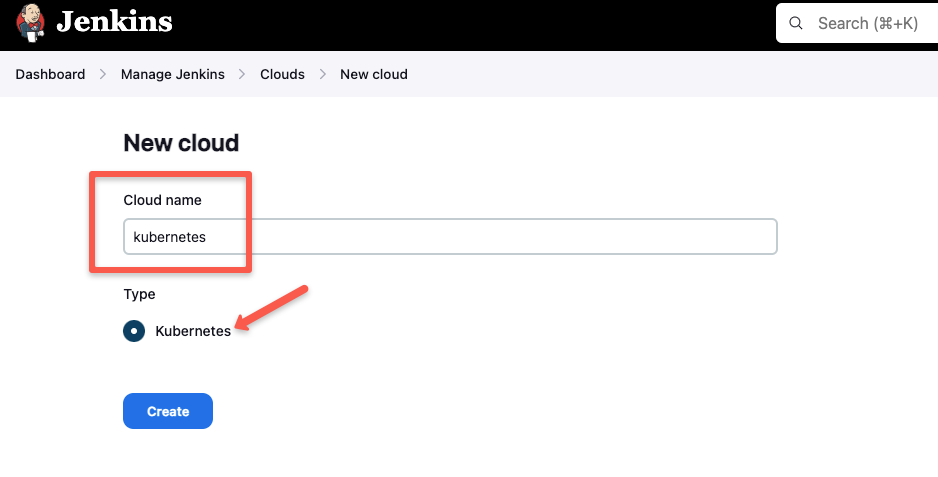
Click Create and move on to the next step
Step 3: Configure Jenkins Kubernetes Cloud
Here we have two scenarios.
- Jenkins server running inside the same Kubernetes cluster
- The Jenkins server is running outside the Kubernetes cluster.
Let's look at configurations for both scenarios.
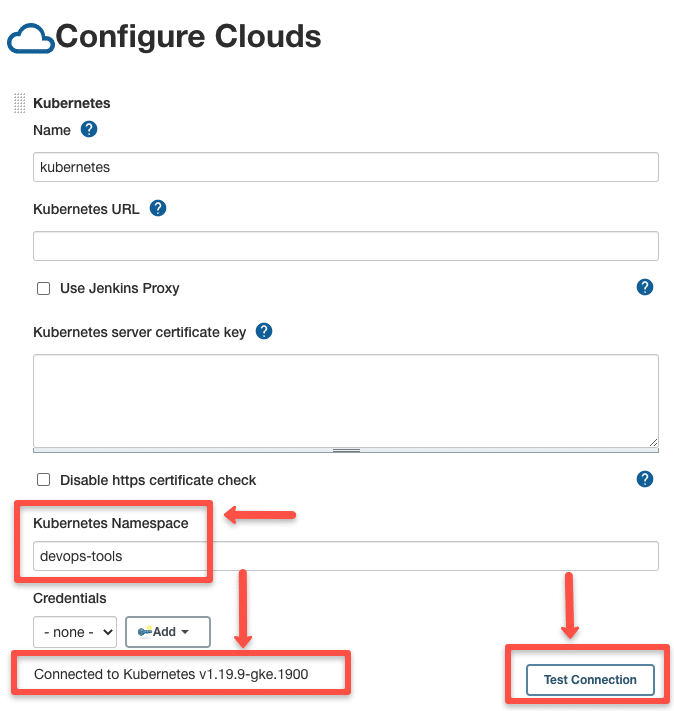
Jenkins server running inside the same Kubernetes cluster
Since we have Jenkins inside the Kubernetes cluster with a service account to deploy the agent pods, we don't have to mention the Kubernetes URL or certificate key.
However, to validate the connection using the service account, use the Test Connection button as shown below. It should show a connected message if the Jenkins pod can connect to the Kubernetes API Server.
Jenkins server running Outside the Kubernetes cluster
If your Jenkins server is running outside the Kubernetes cluster, you need to specify the following.
- Kubernetes URL: This is the Kubernetes API Server endpoint. If it is https enabled, use the https URL.
- Kubernetes Server Certificate key: If you have a Kubernetes Cluster CA certificate, you can add it for secure connectivity. You can get the certificate from the pod location
/var/run/secrets/kubernetes.io/serviceaccount/ca.crt.If you do not have the certificate, you can enable the "disable https certificate check" option. - Credentials: For Jenkins to communicate with the Kubernetes cluster, we need a service account token with permission to deploy pods in the
devops-toolsnamespace.
We have created the service account and assigned a secret token to the devops-tools namespace. We need to get the token from the secret.
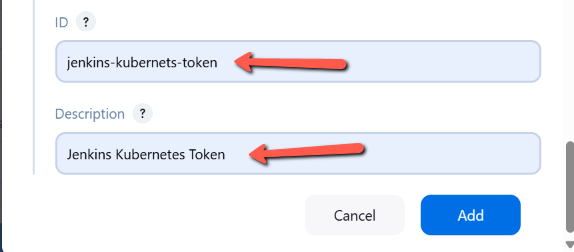
Execute the following commands to retrieve the secret name from the service account.
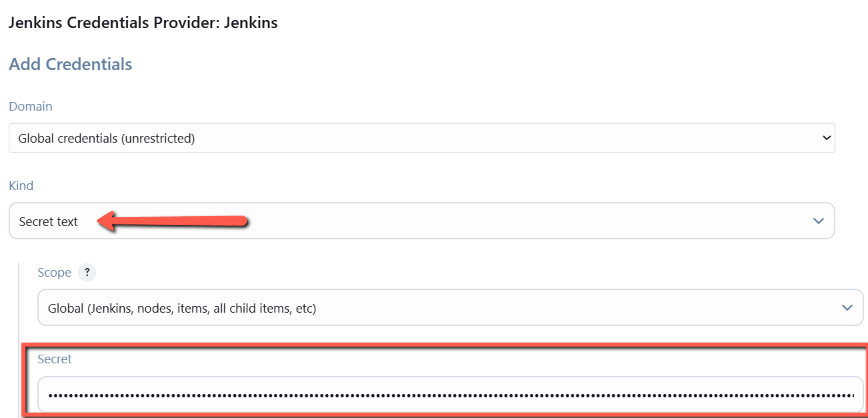
kubectl get secret sa-token-secret -n devops-tools -o jsonpath='{.data.token}' | base64 --decodeNow click the Add button under credentials and create a credential type "Secret text". Enter the service account token in the secret box and add other details as shown below. Finally, save the credential.
The Kubernetes cloud configuration would look like the following.

After filling in all the details, you can test the connection to validate the Kubernetes cluster connectivity.
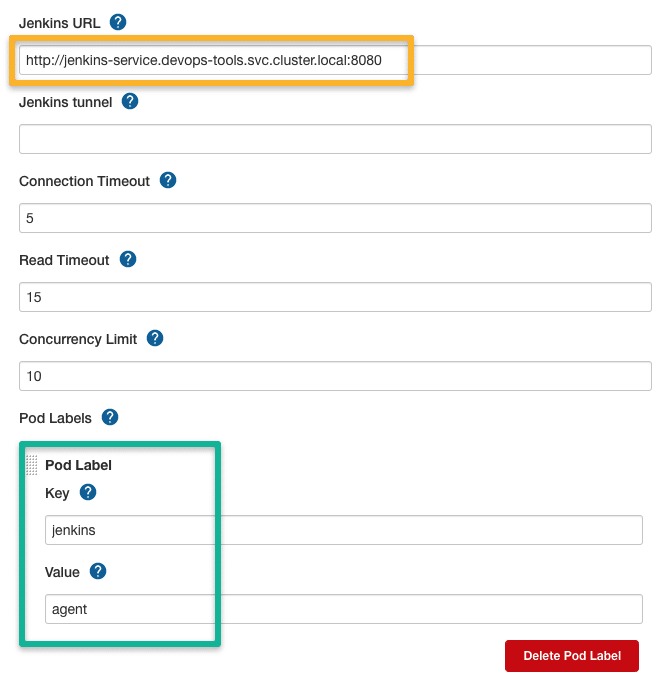
Step 4: Configure the Jenkins URL Details
For the Jenkins Controller running inside the cluster, you can use the Kubernetes cluster's service endpoint as the Jenkins URL because agent pods can connect to the cluster via internal service DNS.
The URL is derived using the following syntax.
http://<service-name>.<namespace>.svc.cluster.local:8080In our case, the service DNS will be,
http://jenkins-service.devops-tools.svc.cluster.local:8080Also, add the POD label, which can be used to group the containers that can be used for billing or custom build dashboards.
Step 5: Create POD and Container Template
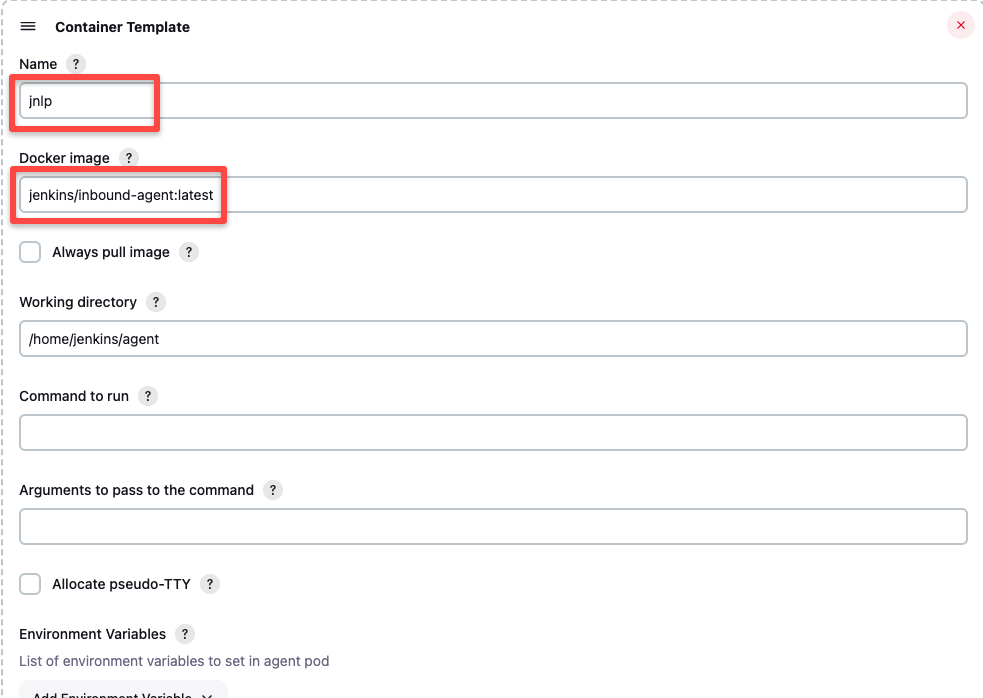
Next, you must add the POD template with the details, as shown in the image below. The label kubeagent will be used as an identifier to pick this pod as the build agent. Next, we must add a container template with the Docker image details.

The next configuration is the container template. If you don't add a container template, the Jenkins Kubernetes plugin will use the default JNLP image from the Docker hub to spin up the agents. ie, jenkins/inbound-agent
If you are on the corporate network and don't have access to the Docker hub, you will have to build your own jnlp image and override the default with the same name as shown below, assuming jenkins/inbound-agent:latest is the custom jnlp image.
Ensure that you remove the sleep and 9999999 default argument from the container template.
We can add multiple container templates to the POD template and use them in the pipeline. I have explained that in the next section with Jenkinsfile examples.
This is the base minimum configuration required for the agent to work. Later in the pipeline examples, I will explain a few use cases for volumes and other options.
Now save all the configurations, and let's test if we can build a job with a pod agent.
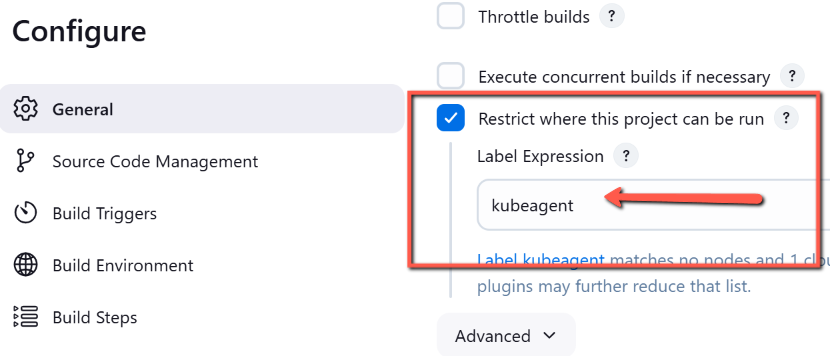
Step 6: Go to Jenkins home --> New Item and create a freestyle project.
In the job description, add the label kubeagent as shown below. It is the label we assigned to the pod template. This way, Jenkins knows which pod template to use for the agent container.
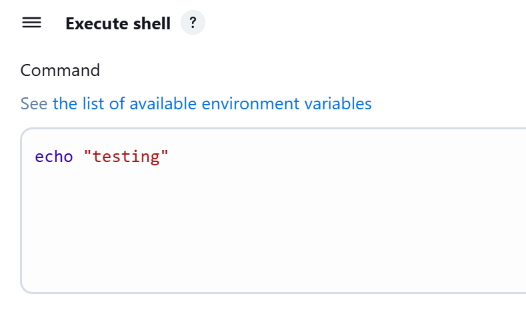
Add a shell build step with an echo command to validate the job as shown below.
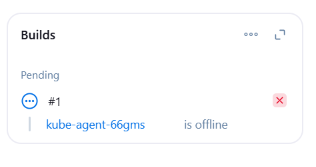
Now, save the job configuration and click "Build Now"
You should see a pending agent in the job build history below.
You will see a successful build in a couple of minutes. If you check the logs, the executed shell will be shown.

Jenkinsfile With Pod Template
Whatever we have seen till now is to understand and validate the Kubernetes Jenkins plugin setup.
When it comes to actual project pipelines, it is better to have the POD templates in the Jenkinsfile
Here is what you should know about the POD template.
- By default, the plugin uses a JNLP container image to connect to the Jenkins server. You can override with a custom JNLP image provided you give the name
jnlpin the container template. - You can have multiple container templates in a single pod template. Then, each container can be used in different pipeline stages.
POD_LABELwill assign a random build label to the pod when the build is triggered. You cannot give any other names other thanPOD_LABEL
Here is an example Jenkinsfile with a POD template.
podTemplate {
    node(POD_LABEL) {
        stage('Run shell') {
            sh 'echo hello world'
        }
    }
}
Building the above Jenkinsfile in a pipeline job will use the default JNLP image and execute the commands in the "Run Shell" stage. When I say default, the plugin will use the JNLP image from the docker hub if you don't specify any.
Now, you can use your own jnlp image using a containerTemplate with all necessary build tools and use them in the pipeline as given below.
Here, instead of jenkins/inbound-agent:latest, you will have your own image.
podTemplate(containers: [
    containerTemplate(
        name: 'jnlp',
        image: 'jenkins/inbound-agent:latest'
        )
  ]) {

    node(POD_LABEL) {
        stage('Get a Maven project') {
            container('jnlp') {
                stage('Shell Execution') {
                    sh '''
                    echo "Hello! I am executing shell"
                    '''
                }
            }
        }

    }
}
Multi Container Pod Template
You can use multiple container templates in a single POD template.
Here is a use case of this setup.
Let's say you want to set up a single build pipeline that builds both Java and Python projects. In this case, you can use two container templates in the build stages.
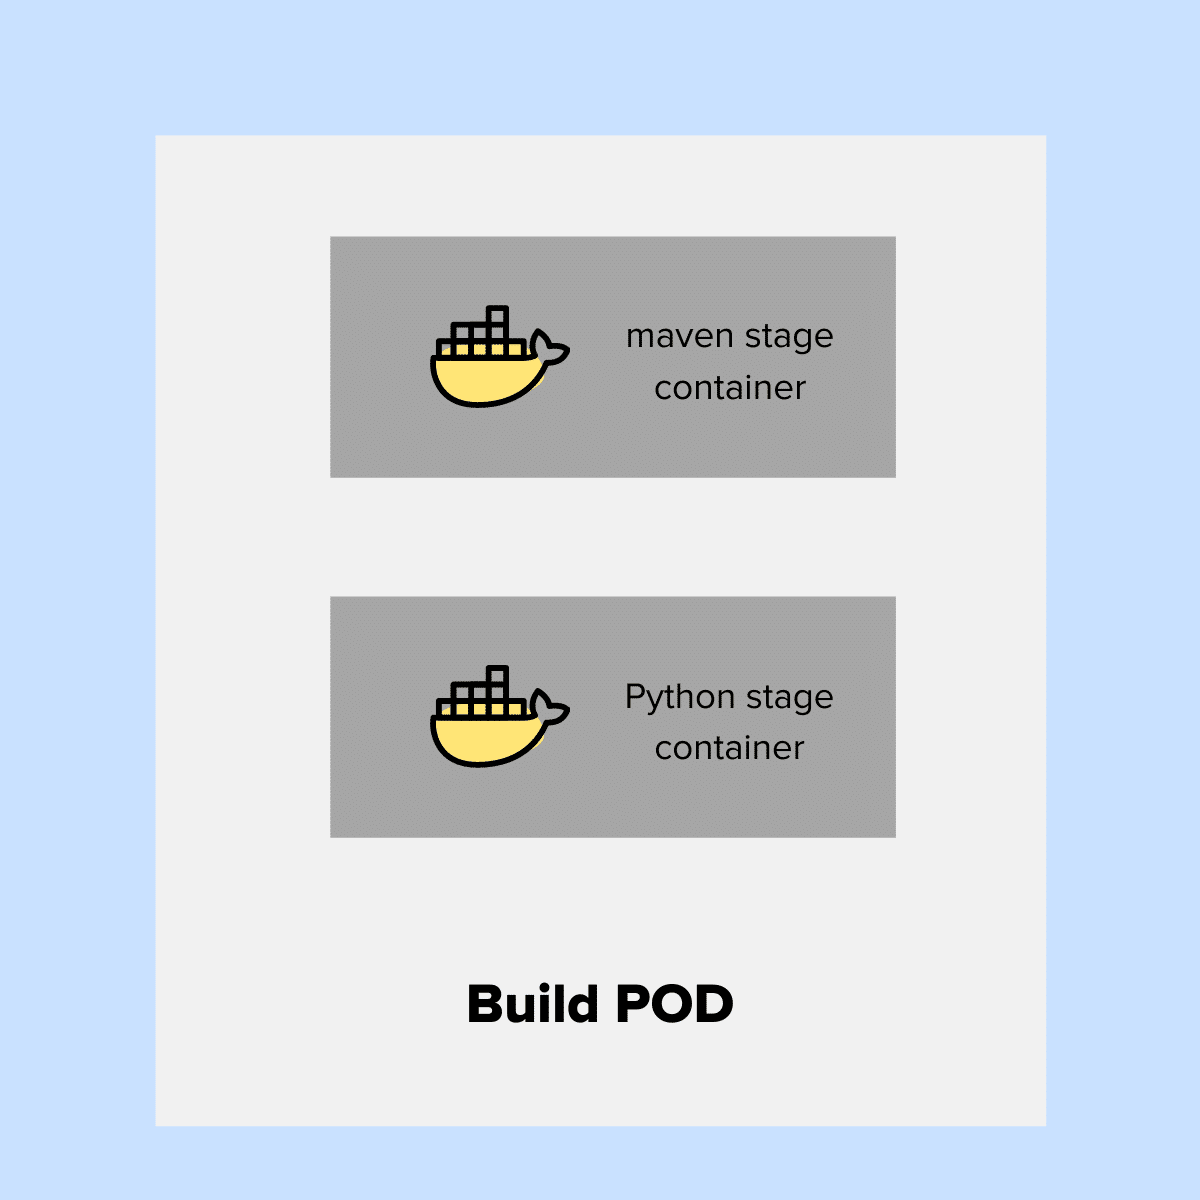
In the following example, in two separate stages, we are calling two different containers specified in the pod template.
One container contains all the maven dependencies for Java build, and another contains Python build dependencies.
podTemplate(containers: [
    containerTemplate(
        name: 'maven',
        image: 'maven:3.8.1-jdk-8',
        command: 'sleep',
        args: '30d'
        ),
    containerTemplate(
        name: 'python',
        image: 'python:latest',
        command: 'sleep',
        args: '30d')
  ]) {

    node(POD_LABEL) {
        stage('Get a Maven project') {
            git 'https://github.com/spring-projects/spring-petclinic.git'
            container('maven') {
                stage('Build a Maven project') {
                    sh '''
                    echo "maven build"
                    '''
                }
            }
        }

        stage('Get a Python Project') {
            git url: 'https://github.com/hashicorp/terraform.git', branch: 'main'
            container('python') {
                stage('Build a Go project') {
                    sh '''
                    echo "Go Build"
                    '''
                }
            }
        }

    }
}
You can try building the above Jenkinsfile using the pipeline job.
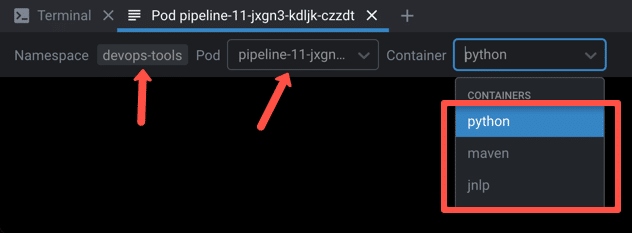
While building the above pipeline, if you check the Kubernetes pods, you will see three containers in the build agent pod, as shown below.
Using Shared Persistent Volumes With Jenkins Docker Agent Pods
It is better to attach a shared persistent volume to the build container to speed up the build process.
For example, if you take a Java application, it has many Maven package dependencies.
When you build the Java apps, it downloads dependencies added in the pom.xml from the remote maven repository the first time, and it creates a local .m2 cache directory where the dependent packages are cached.
The .m2 cache is impossible in Docker agent-based builds as it gets destroyed after the build.
To solve this issue, we can create a persistent volume for the maven cache and attach it to the agent pod via the container template.
To demonstrate this, first, let's create a PVC
apiVersion: v1
kind: PersistentVolumeClaim
metadata:
  name: maven-repo-storage
  namespace: devops-tools
spec:
  accessModes:
    - ReadWriteOnce
  resources:
    requests:
      storage: 50Gi
Here is an example Jenkinsfile with a POD template that uses the maven-repo-storage persistent volume.
podTemplate(containers: [
  containerTemplate(
      name: 'maven',
      image: 'maven:latest',
      command: 'sleep',
      args: '99d'
      )
  ],

  volumes: [
  persistentVolumeClaim(
      mountPath: '/root/.m2/repository',
      claimName: 'maven-repo-storage',
      readOnly: false
      )
  ])

{
  node(POD_LABEL) {
    stage('Build Petclinic Java App') {
      git url: 'https://github.com/spring-projects/spring-petclinic.git', branch: 'main'
      container('maven') {
        sh 'mvn -B -ntp clean package -DskipTests'
      }
    }
  }
}
Building Docker Images On Kubernetes Cluster
If you are using Docker to deploy applications, you can integrate your CI Docker build pipeline with Kubernetes agents.
There are a few ways to run Docker on Docker for build use cases. However, since Kubernetes removed Docker runtimes, it is better to use alternative solutions.
For now, the best way to build docker images on the Kubernetes cluster is using Kaniko
Refer building docker image using kaniko to learn more about kaniko build pipeline using Jenkins pipeline.
Conclusion
If you are using Jenkins & Kubernetes, you should definitely try out the container-based agents.
Scaling your Jenkins agents on Kubernetes helps you avoid the administrative overhead associated with static build VMs. Even though dynamic VM build options are available, each build could take a long time compared to dynamic container agents.
You don't have to worry about running out of resources for Jenkins builds.
Do give it a try, and let me know if you face any issues.
Also, check out my comprehensive list of Jenkins tutorials for beginners