

In this step-by-step guide, you will learn to configure AWS Load Balancer Controller on EKS with detailed workflows and configurations.
What is AWS Load Balancer Controller?
The AWS Load Balancer Controller is a Kubernetes controller that manages AWS Elastic Load Balancers for a Kubernetes cluster.
It automatically provisions Application Load Balancers (ALBs) when you create Kubernetes Ingress resources.
Also, it provisions dedicated Network Load Balancers (NLBs) when you create Kubernetes Service resources of type LoadBalancer.
In short, it is used for exposing Kubernetes services to external traffic using,
- Ingress resources via ALB's and
- LoadBalancer services using (NLB's)
The following diagram shows how the workflow of AWS Load Balancer controller.
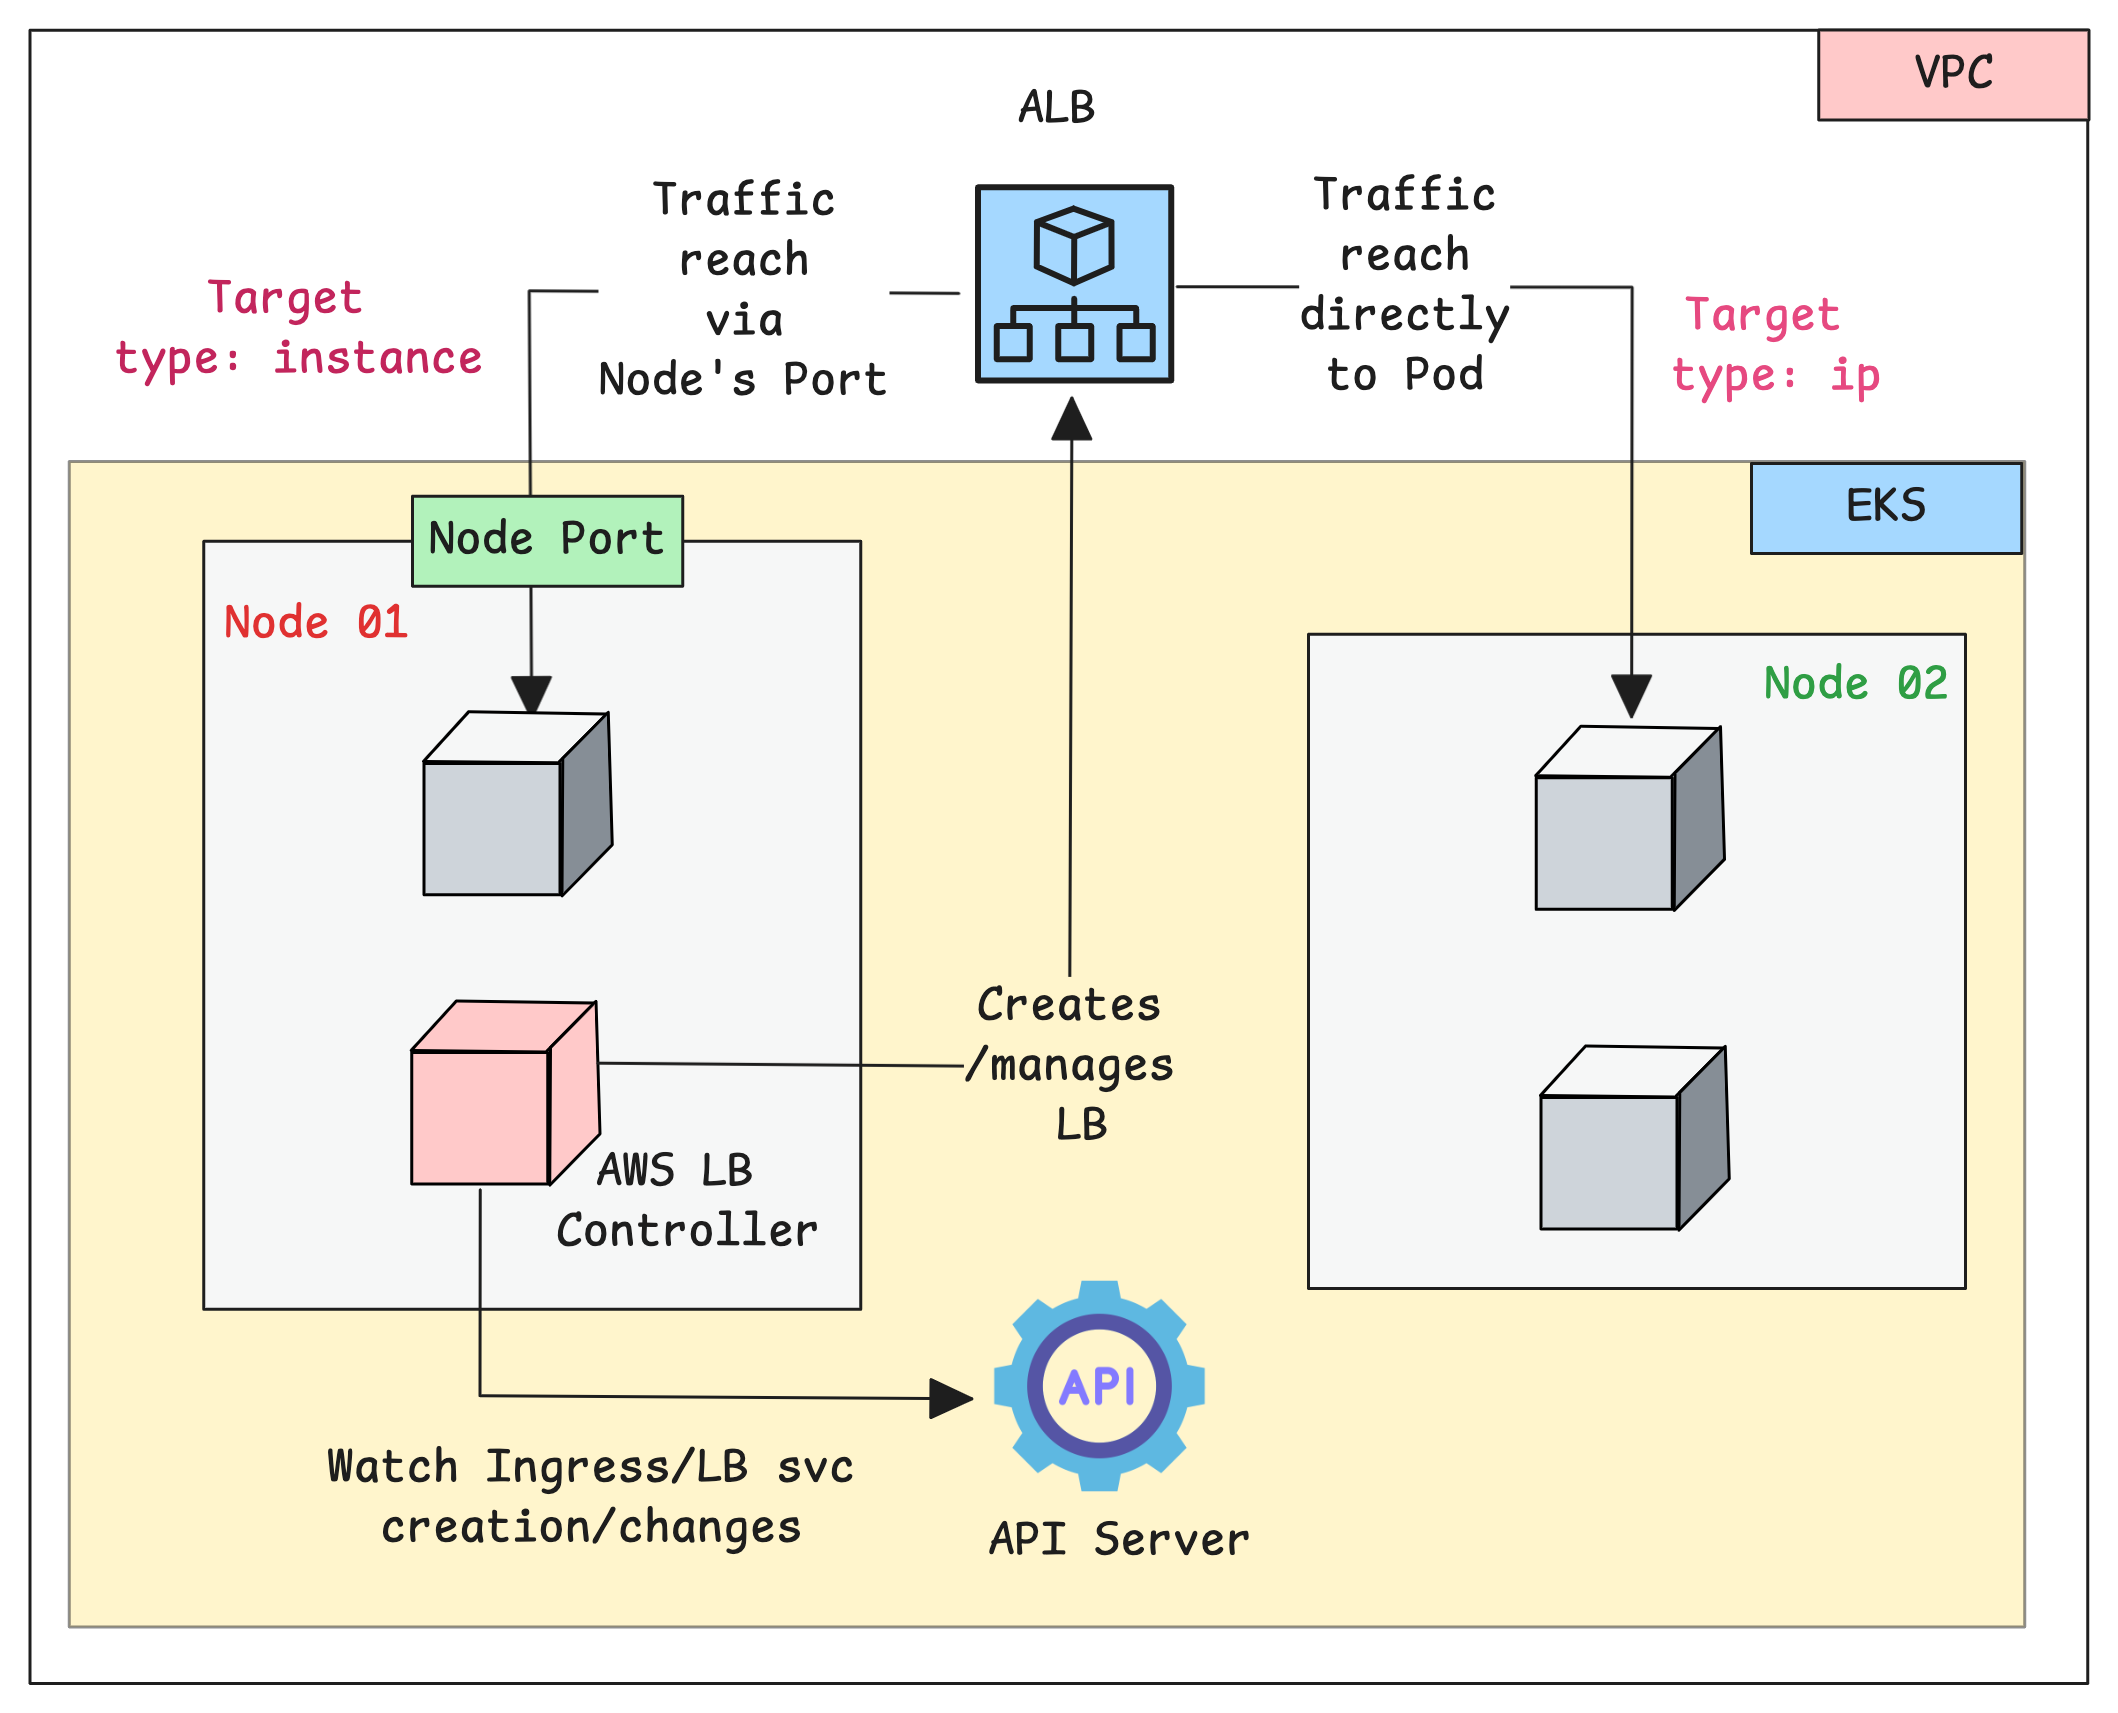
The Controller operates through a continuous monitoring and reconciliation process.
Here is how it works.
- The controller runs as a deployment inside the EKS cluster with required IAM permissions to create/manage AWS load balancers.
- The Controller Pod continuously monitors the Services and Ingress objects.
- When you create an ingress object, the controller detects it and will provision an Application Load Balancer
- Also, when you create a service type LoadBalancer, the controller detects it and will provision a Network Load Balancer.
The load balancer to pod traffic has supported modes.
- Instance Mode (default): In this mode, the traffic from the load balancers to the pods are routed via Nodeport.
- IP Mode: In this mode, the controller registers pod IPs directly as targets in the load balancer's target groups. This removes the need for the NodePort.
Setup Prerequisites
The Following are the prerequisites for this setup.
- AWS CLI should be installed on your local system with the required privileges.
- EKSCTL should be on your local system
- The Pod Identity Agent addon should be available on the EKS cluster.
- Amazon VPC CNI should be available in the EKS cluster (CNI will be available in the cluster by default)
- Kubectl should be on your local system
- Helm should be on your local system
Subnet Configuration
As we discussed, the primary job of the controllers is to manage ALB and NLB for EKS clusters.
For the controller to know which subnets in the VPC it can use to create load balancers, you need to tag those subnets.
Here are the tags that you need to add
kubernetes.io/role/elb = 1: Tag added to public subnets where you are planning to create internet-facing ALBs or NLBs.kubernetes.io/role/internal-elb = 1: Tag Added to private subnets where you are planning to create internal ALBs or NLBs.
This way you decide which subnets are allowed for ALB/NLB creation. It provides good security and network isolation.
For the examples used in this guide, we are using public subnets.
The following AWS CLI comand is used to add these tags to the subnets that belong to the EKS cluster. Replace <your-cluster-name> with your EKS cluster name.
export CLUSTER_NAME=<your-cluster-name>

SUBNET_IDS=$(aws eks describe-cluster --name $CLUSTER_NAME --query "cluster.resourcesVpcConfig.subnetIds" --output text | tr '\t' ' ')
SUBNET_IDS_ARRAY=($(echo $SUBNET_IDS))for subnet in "${SUBNET_IDS_ARRAY[@]}"; do
aws ec2 create-tags --resources "$subnet" --tags Key=kubernetes.io/role/elb,Value="1"
doneEnsure the subnets are tagged by validating it from the console as shown below.
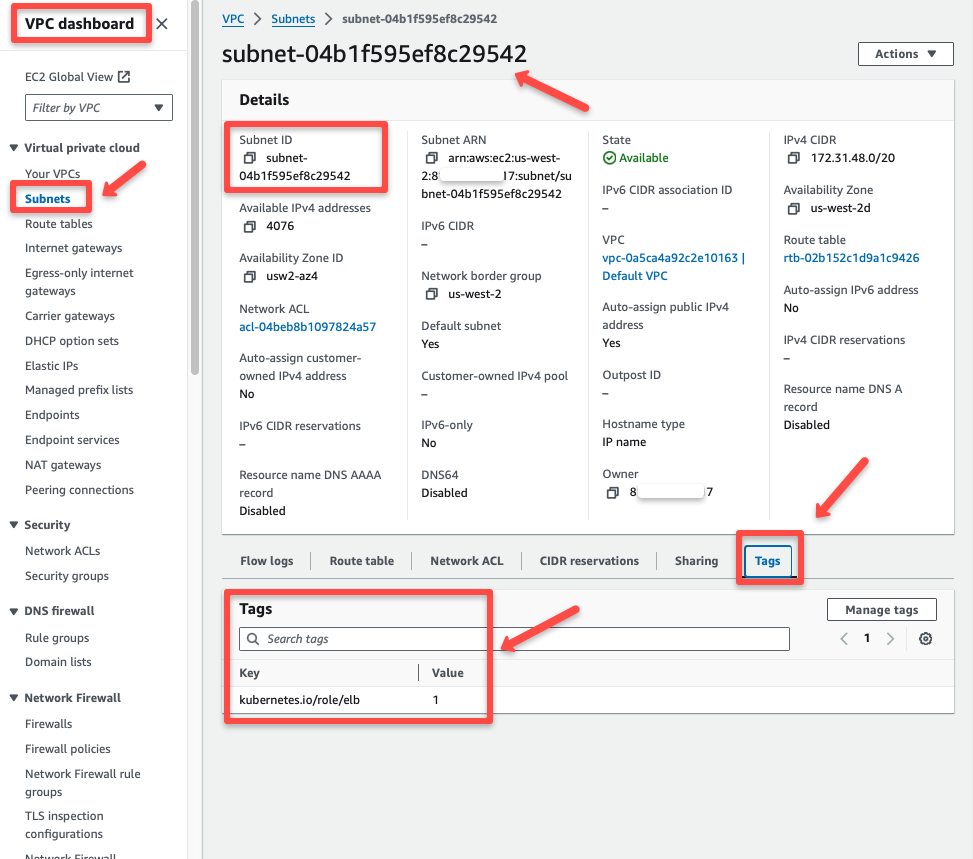
alb.ingress.kubernetes.io/subnetsStep-by-Step Controller Installation
Follow the steps given below for the complete controller setup.
Step 1: Create an IAM Policy for the Load Balancer Controller
The AWS Load Balancer Controller will run as Pods inside the EKS cluster, and these controller Pods needs IAM permissions to access AWS Services.
Download the IAM Policy JSON file from the official repo.
curl -o iam-policy.json https://raw.githubusercontent.com/kubernetes-sigs/aws-load-balancer-controller/v2.14.0/docs/install/iam_policy.json
Create an IAM Policy using the iam-policy.json file.
export POLICY_NAME=AWSLoadBalancerControllerIAMPolicyaws iam create-policy \
--policy-name ${POLICY_NAME} \
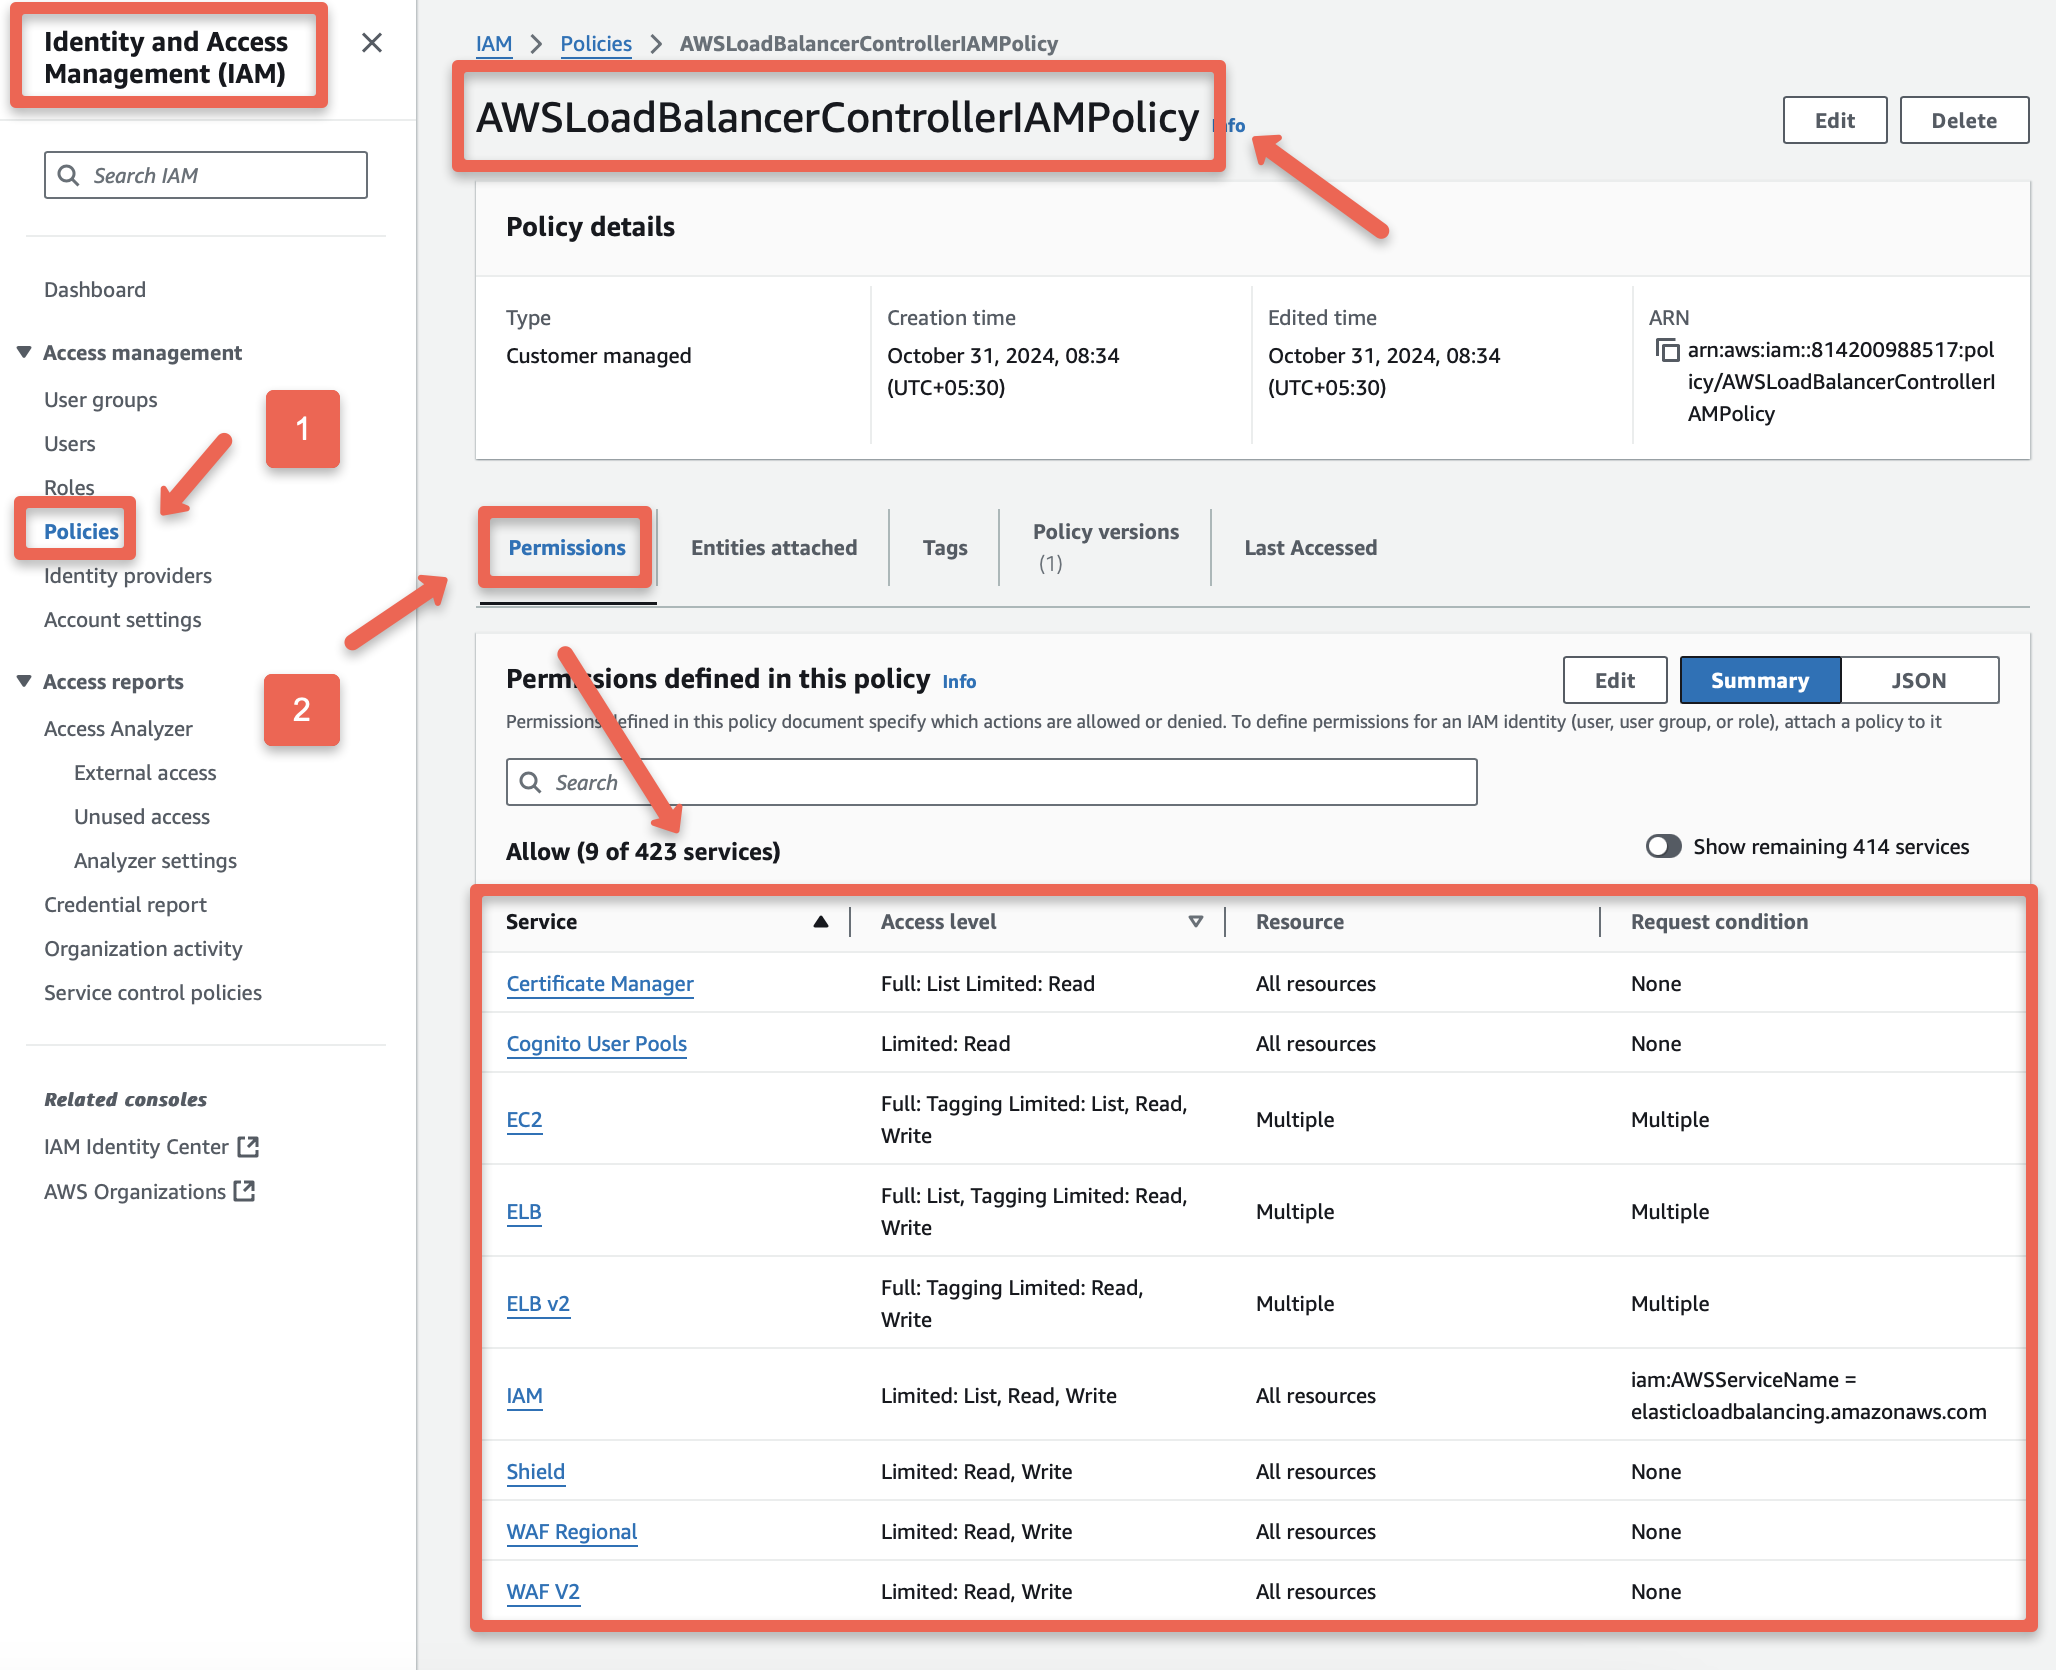
--policy-document file://iam-policy.jsonTo ensure the creation of the IAM Policy and verify the permissions, we can use the AWS Console and shown below.
Now, store the ARN of the created IAM Policy in POLICY_ARN variable using the following command for the upcoming configuration.
export POLICY_ARN=$(aws iam list-policies --query "Policies[?PolicyName=='${POLICY_NAME}'].Arn" --output text)Step 2: Create IAM Role (Trust Policy for Pod Identity)
The IAM Policy with all the required permissions is ready. Next, we will create an IAM Role and attach that policy to it.
Start by creating a Trust Policy JSON file, which defines who is allowed to use this role. A trust policy allows specific AWS services or entities to use the role securely.
In this case, the trust policy will allow only the Pod Identity Agent to assume this IAM Role.
cat <<EOF > trust-policy.json
{
"Version": "2012-10-17",
"Statement": [
{
"Effect": "Allow",
"Principal": {
"Service": "pods.eks.amazonaws.com"
},
"Action": [
"sts:AssumeRole",
"sts:TagSession"
]
}
]
}
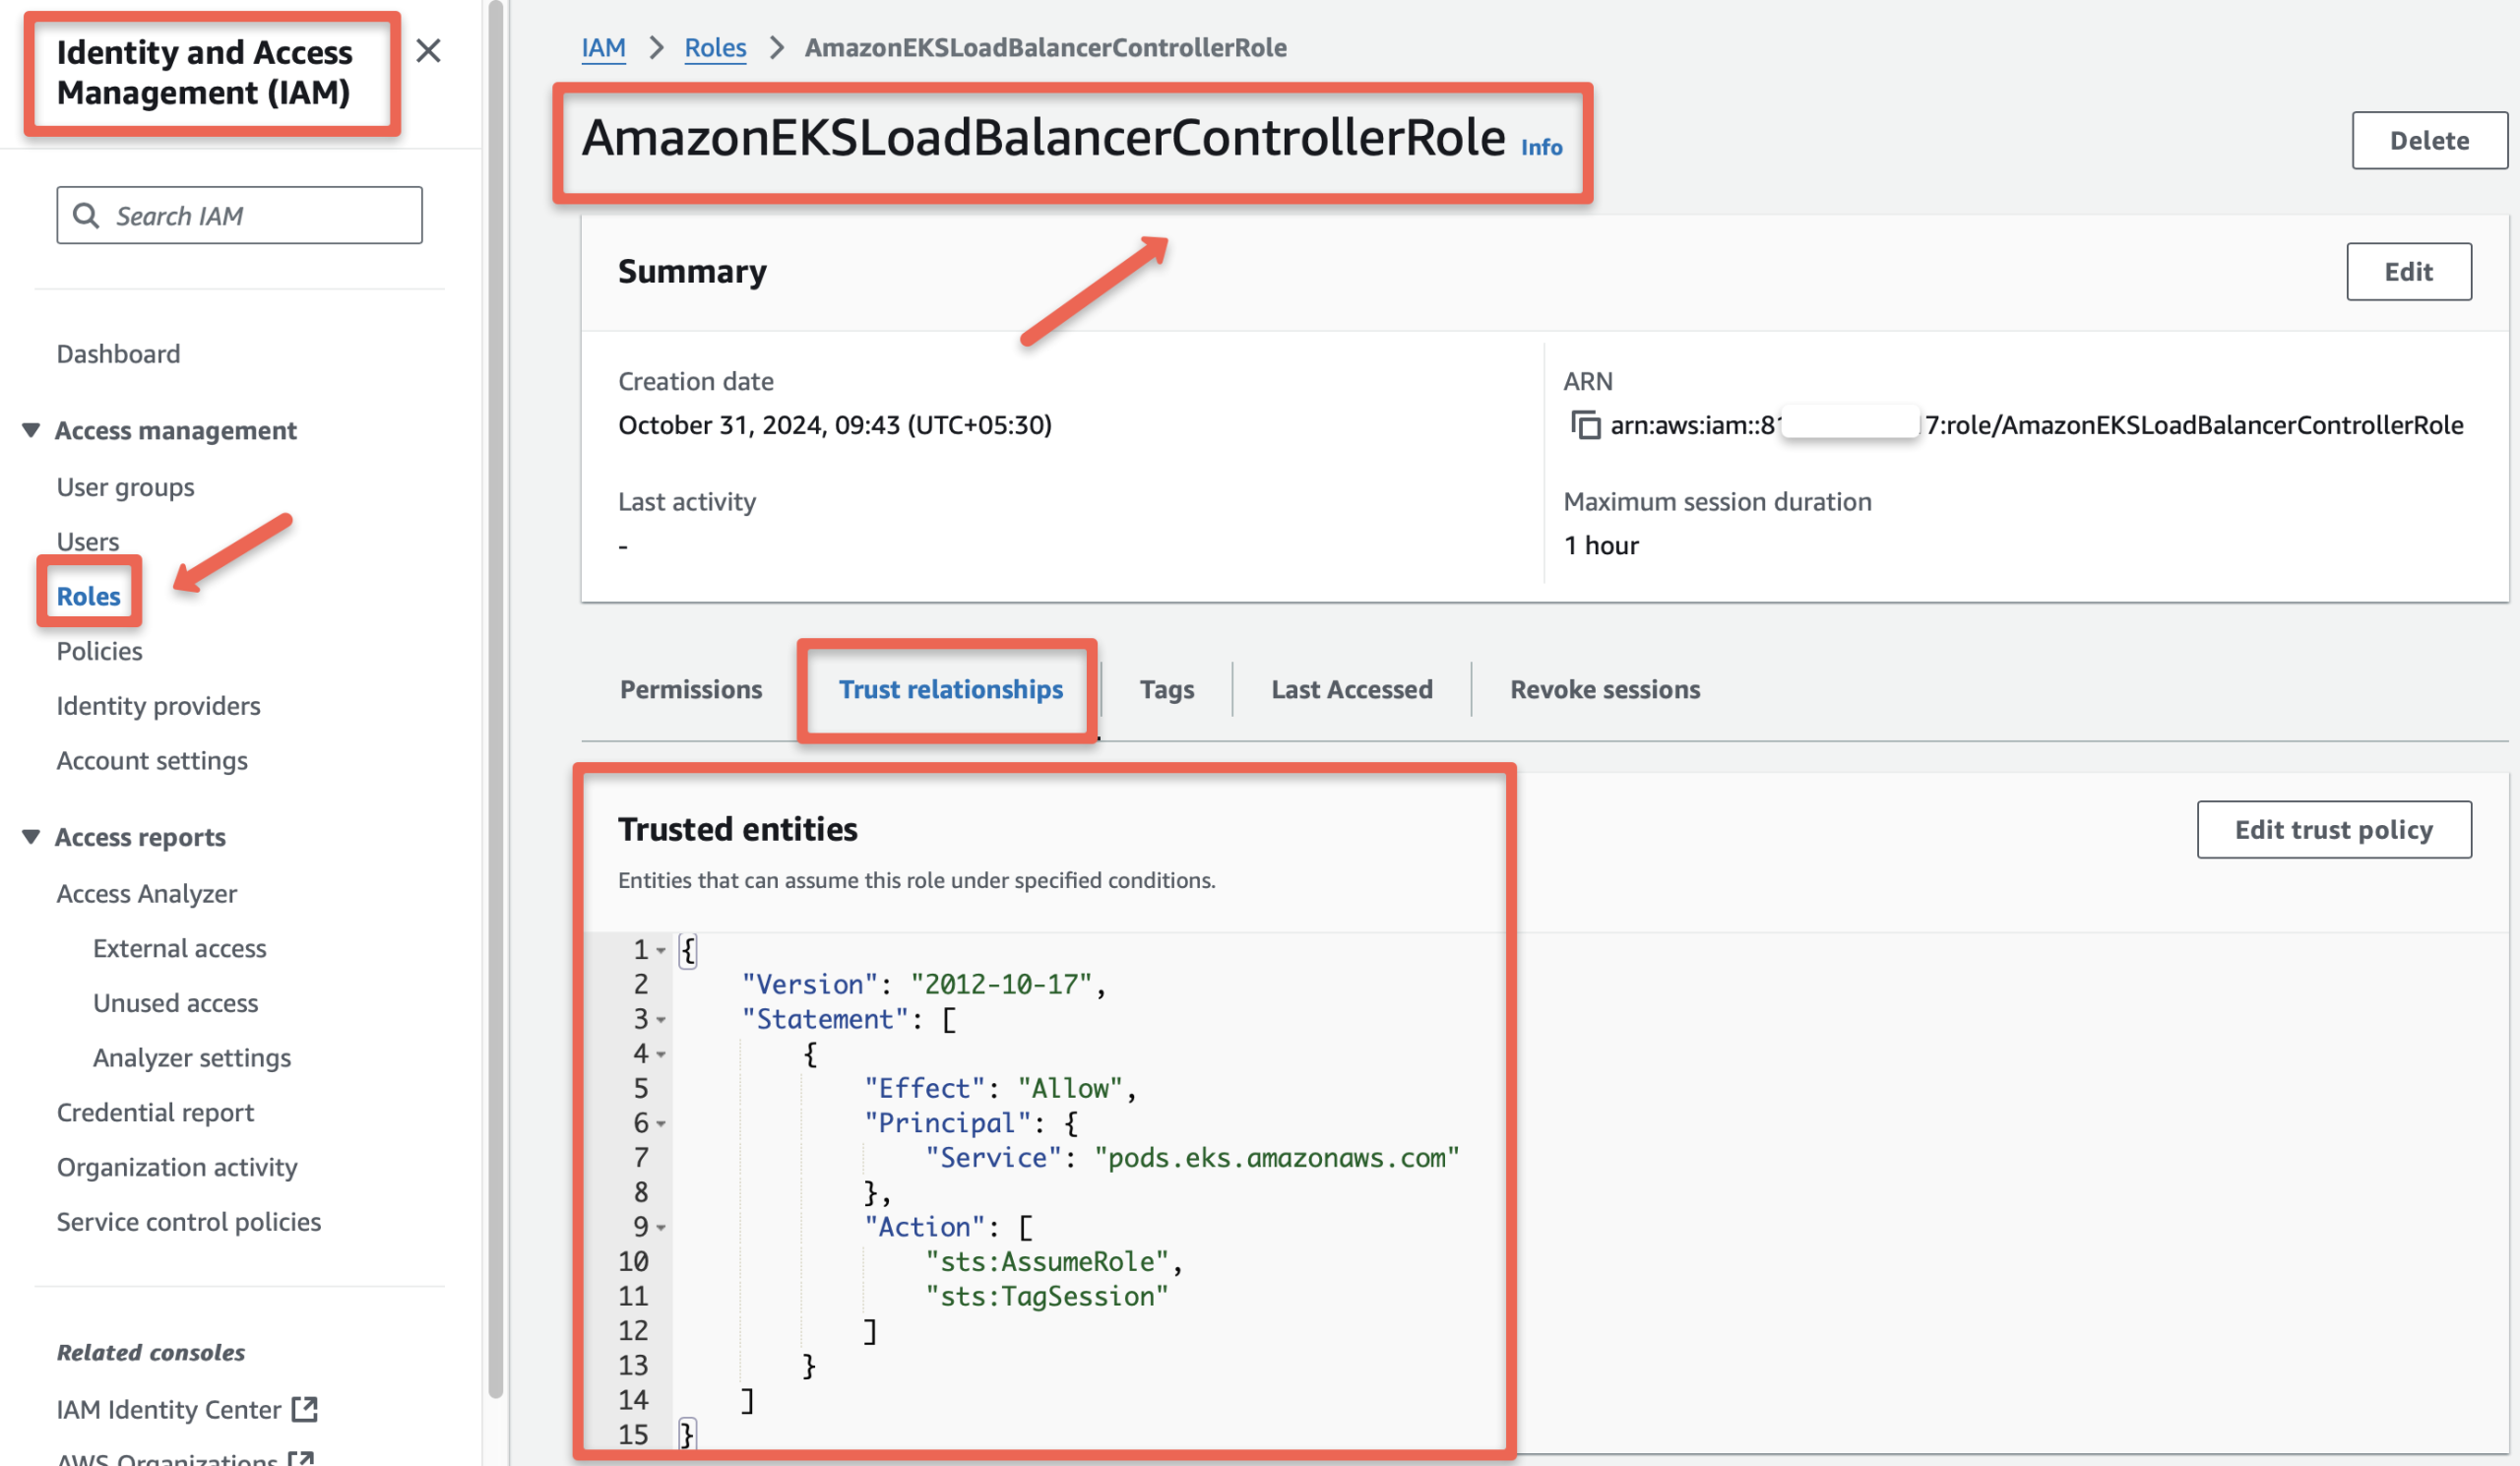
EOFCreate an IAM Role AmazonEKSLoadBalancerControllerRole with the Trust Policy
aws iam create-role \
--role-name AmazonEKSLoadBalancerControllerRole \
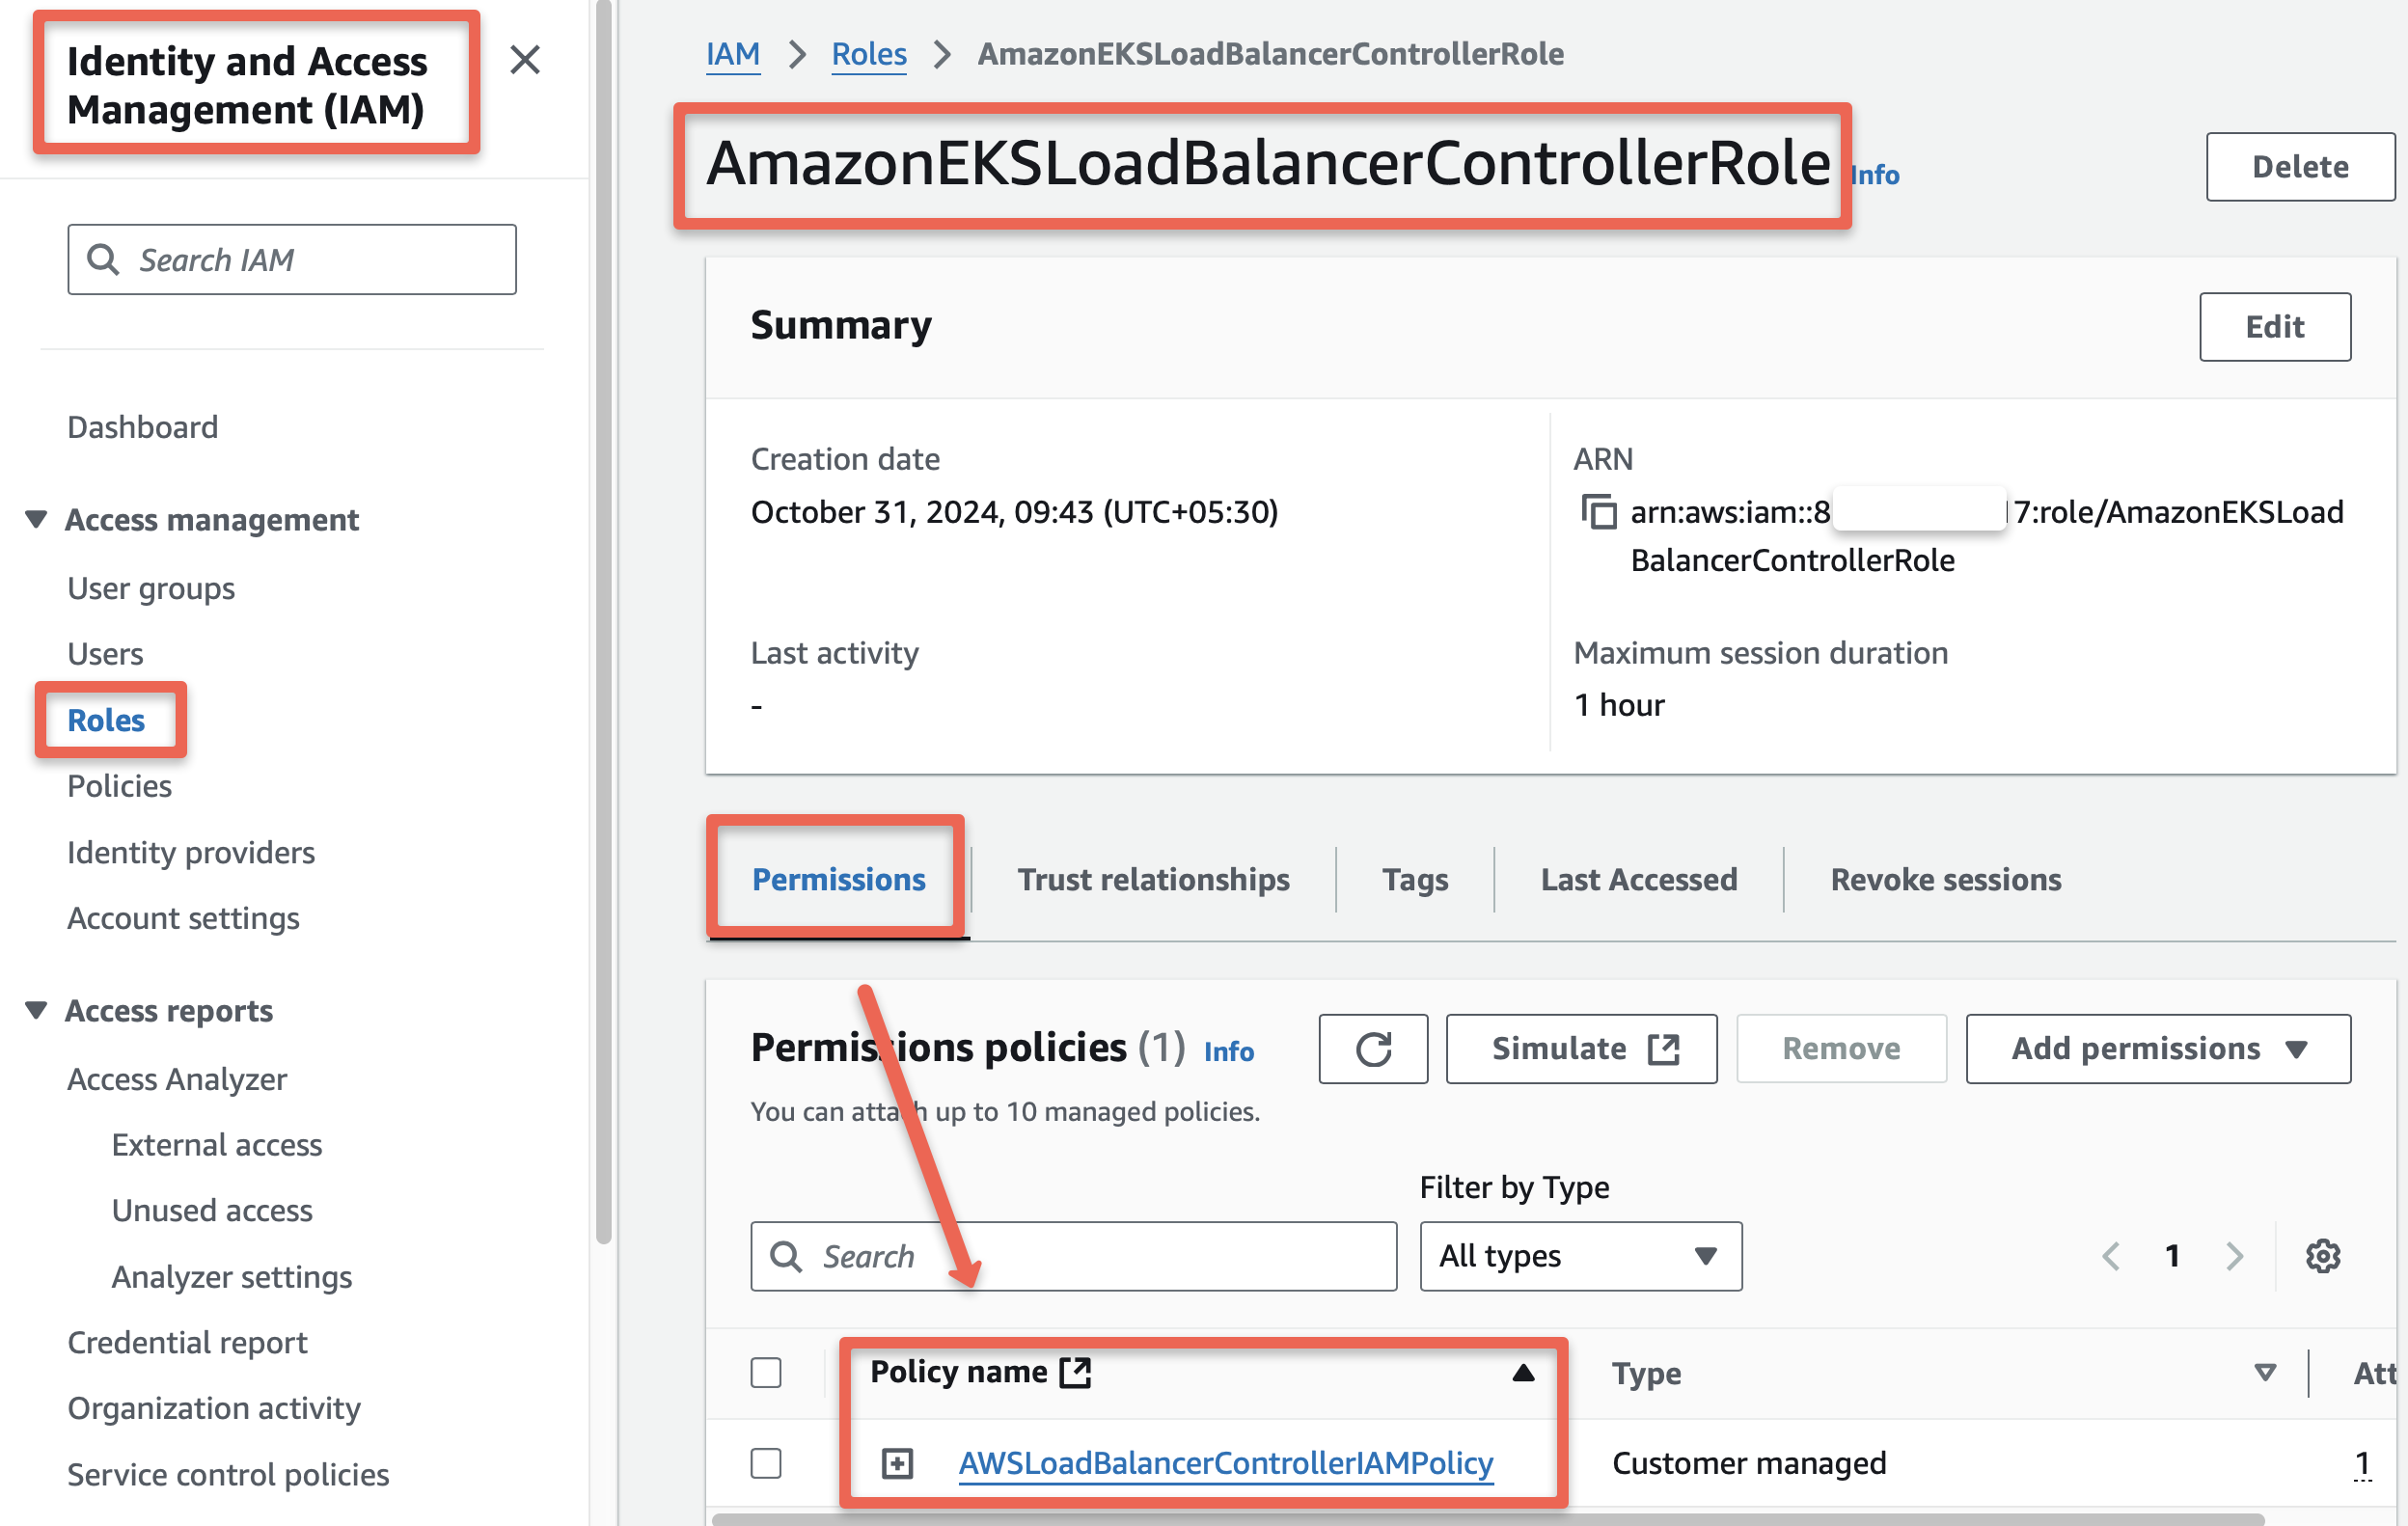
--assume-role-policy-document file://"trust-policy.json"Verify the IAM Role AmazonEKSLoadBalancerControllerRole is created, and the Trust Policy is properly attached.
Attach IAM Policy AWSLoadBalancerControllerIAMPolicy with the IAM Role AmazonEKSLoadBalancerControllerRole using the folling command .
export ROLE_NAME=AmazonEKSLoadBalancerControllerRoleaws iam attach-role-policy \
--policy-arn ${POLICY_ARN} \
--role-name ${ROLE_NAME}The IAM dashboard will help ensure the attachment of the Role and the Policy.
Use the following command to store the Role ARN as an environment variable for the upcoming configuration.
export ROLE_ARN=$(aws iam get-role --role-name $ROLE_NAME --query "Role.Arn" --output text)Step 4: Create Service Account & Pod Identity Association
In Step 2, we created a trust policy for the Pod Identity Agent. This agent runs inside the EKS cluster and is responsible for providing IAM permissions to Pods through their Service Accounts.
To enable this, we need to bind the IAM Role that we created to a Kubernetes Service Account using a Pod Identity Association.
Before creating this association, we will first create a Service Account for the AWS Load Balancer Controller in the EKS cluster.
Run the following commands to create the Service Account:
export SERVICE_ACCOUNT=aws-load-balancer-controller
export NAMESPACE=kube-system
export REGION=us-west-2
cat >lbc-sa.yaml <<EOF
apiVersion: v1
kind: ServiceAccount
metadata:
labels:
app.kubernetes.io/component: controller
app.kubernetes.io/name: aws-load-balancer-controller
name: ${SERVICE_ACCOUNT}
namespace: ${NAMESPACE}
EOFkubectl apply -f lbc-sa.yamlTo list the available Service Accounts in the kube-system Namespace.
kubectl -n kube-system get sa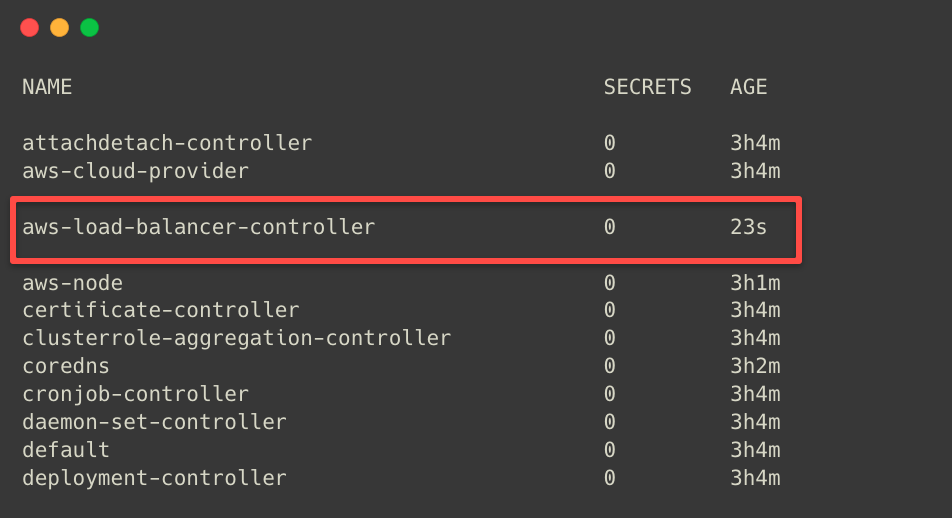
Before performing the Pod Identity Association, we need to create the Cluster name as an environment variable and ensure that the Pod Identity Agent is present in the cluster.
To list the available EKS clusters in a specific region.
aws eks list-clusters --region ${REGION}To create a cluster name as an environment variable. Change "eks-spot-cluster" with your cluster name.
export CLUSTER_NAME=eks-spot-clusterTo list the available addons in the cluster.
aws eks list-addons --cluster-name $CLUSTER_NAME
Use the following command if the Pod Identity Agent is unavailable in the cluster.
aws eks create-addon --cluster-name $CLUSTER_NAME --addon-name eks-pod-identity-agentThe Service Account is ready; we can perform the Pod Identity Association.
eksctl create podidentityassociation \
    --cluster $CLUSTER_NAME \
    --namespace $NAMESPACE \
    --service-account-name $SERVICE_ACCOUNT \
    --role-arn $ROLE_ARN
After the successful association, we can list the Pod Identity Associations.
aws eks list-pod-identity-associations --cluster-name $CLUSTER_NAME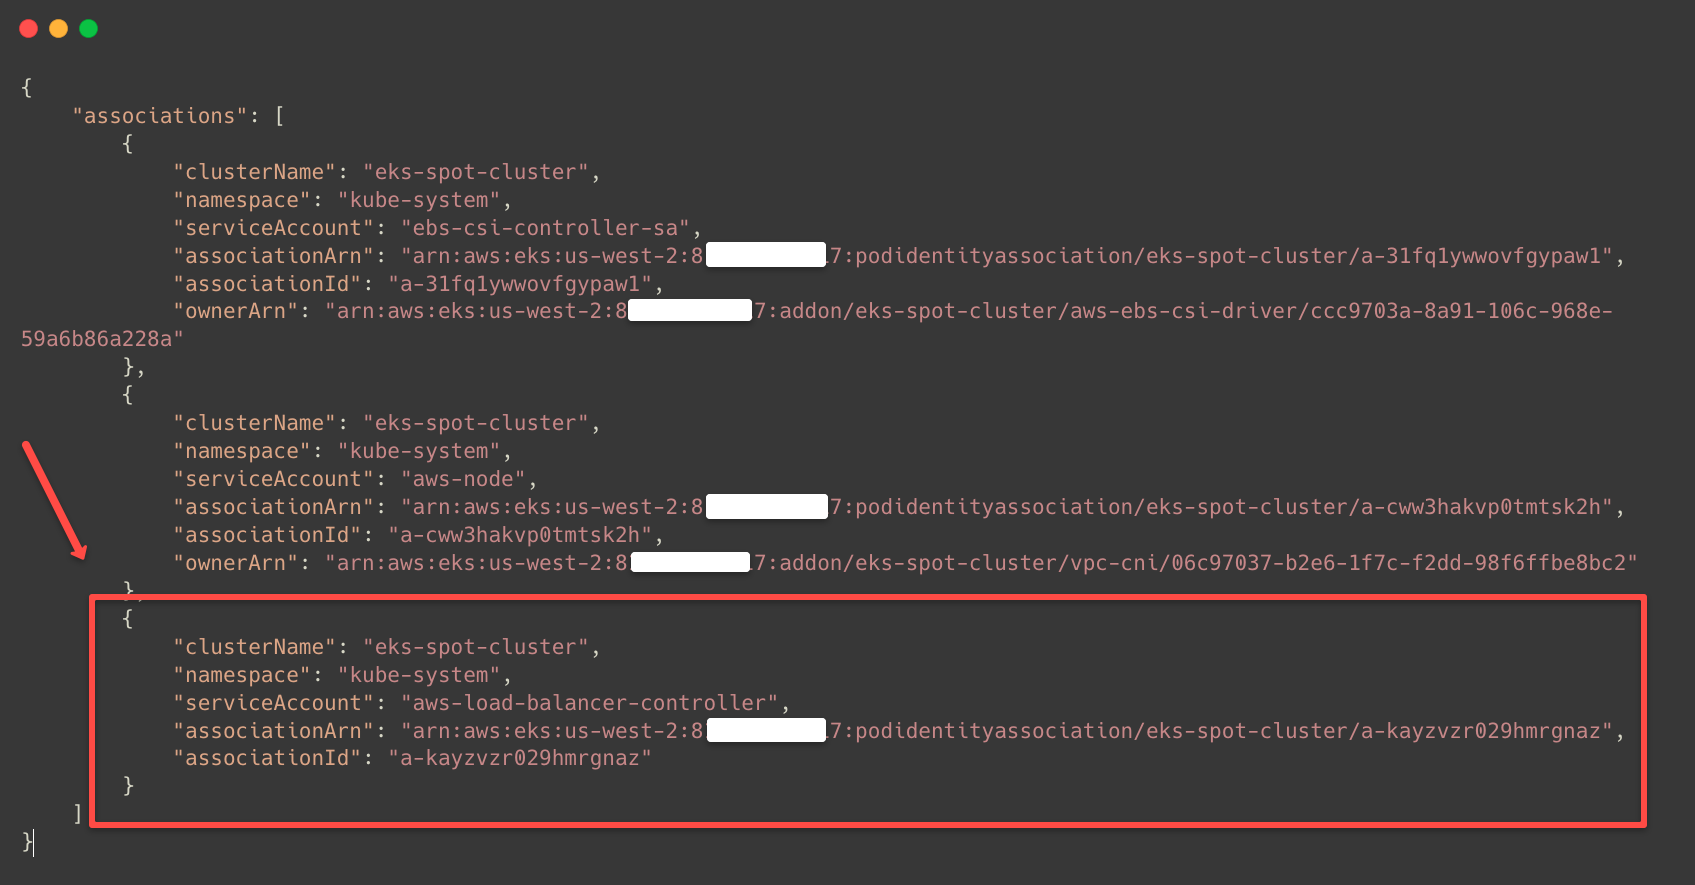
This ensures the Pod Identity Association is properly done to the AWS Load Balancer Controller Service Account.
Step 5: Install Controller with Helm Chart
First, we have to add the aws-load-balancer-controller Helm chart using the following command.
helm repo add eks https://aws.github.io/eks-chartsUpdate the Helm repository.
helm repo update eksInstall the AWS Load Balancer Controller.
helm install aws-load-balancer-controller eks/aws-load-balancer-controller \
  -n kube-system \
  --set clusterName=${CLUSTER_NAME} \
  --set serviceAccount.create=false \
  --set serviceAccount.name=aws-load-balancer-controller
Step 6: Verify Deployment & CRDs
To check whether the Load Balancer Controller has been deployed, use the following command.
kubectl -n kube-system get all -l app.kubernetes.io/name=aws-load-balancer-controller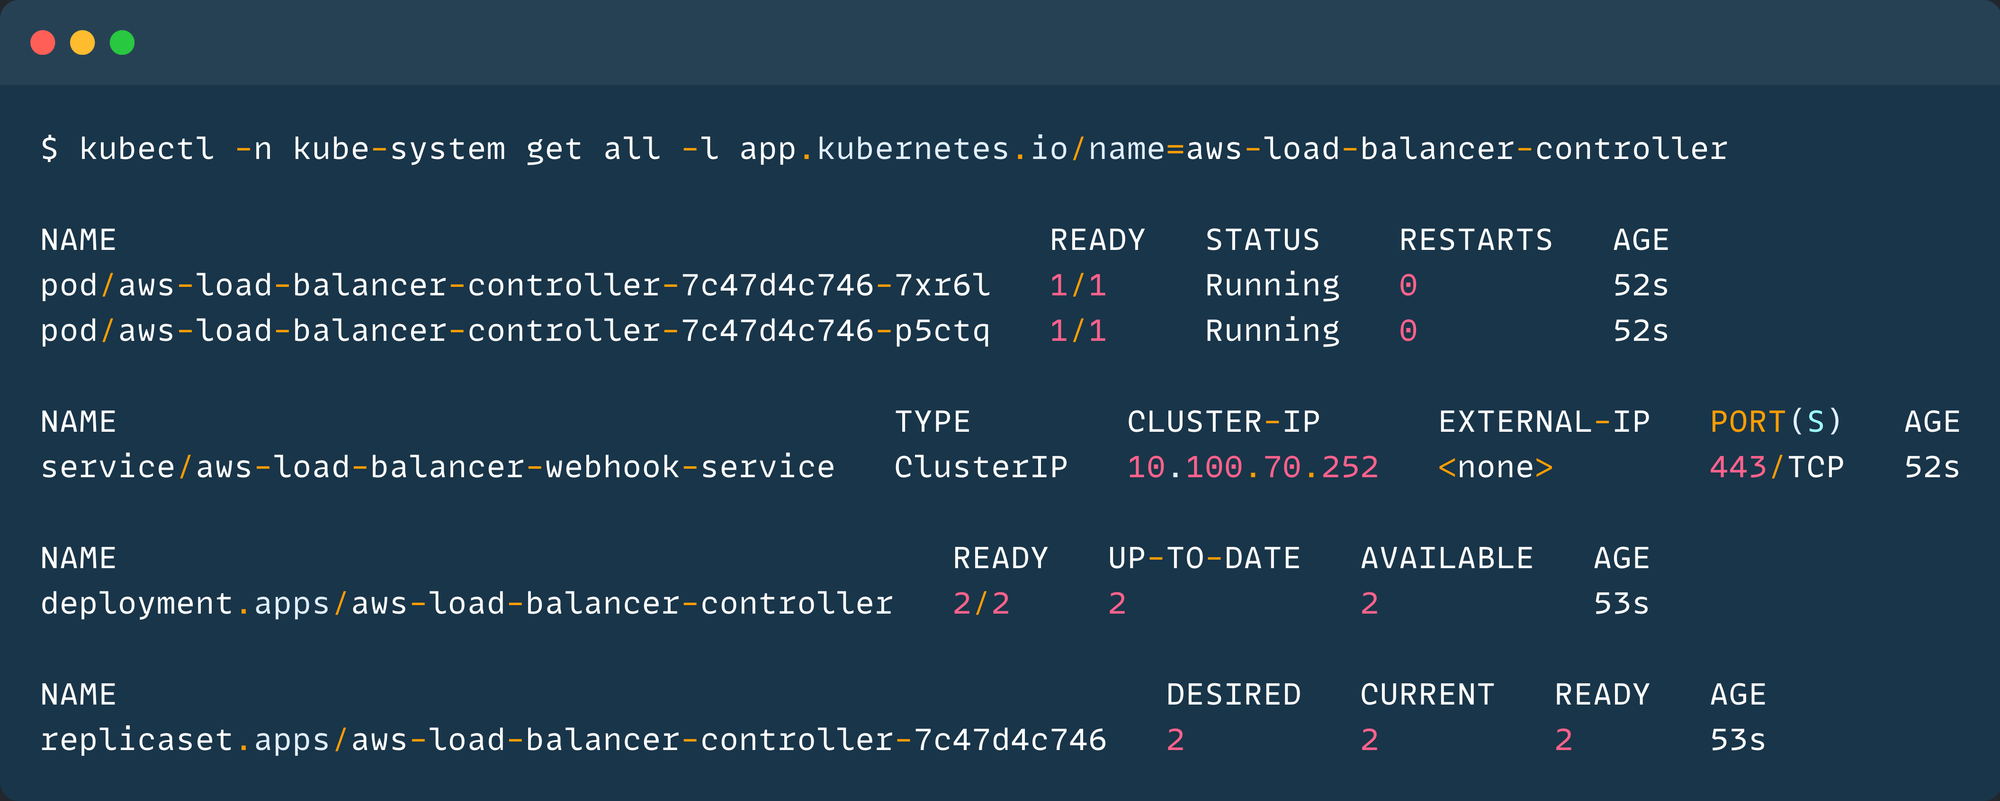
Custom Resource Definitions also be created during the installation.
kubectl get crds | grep -iE "elbv2"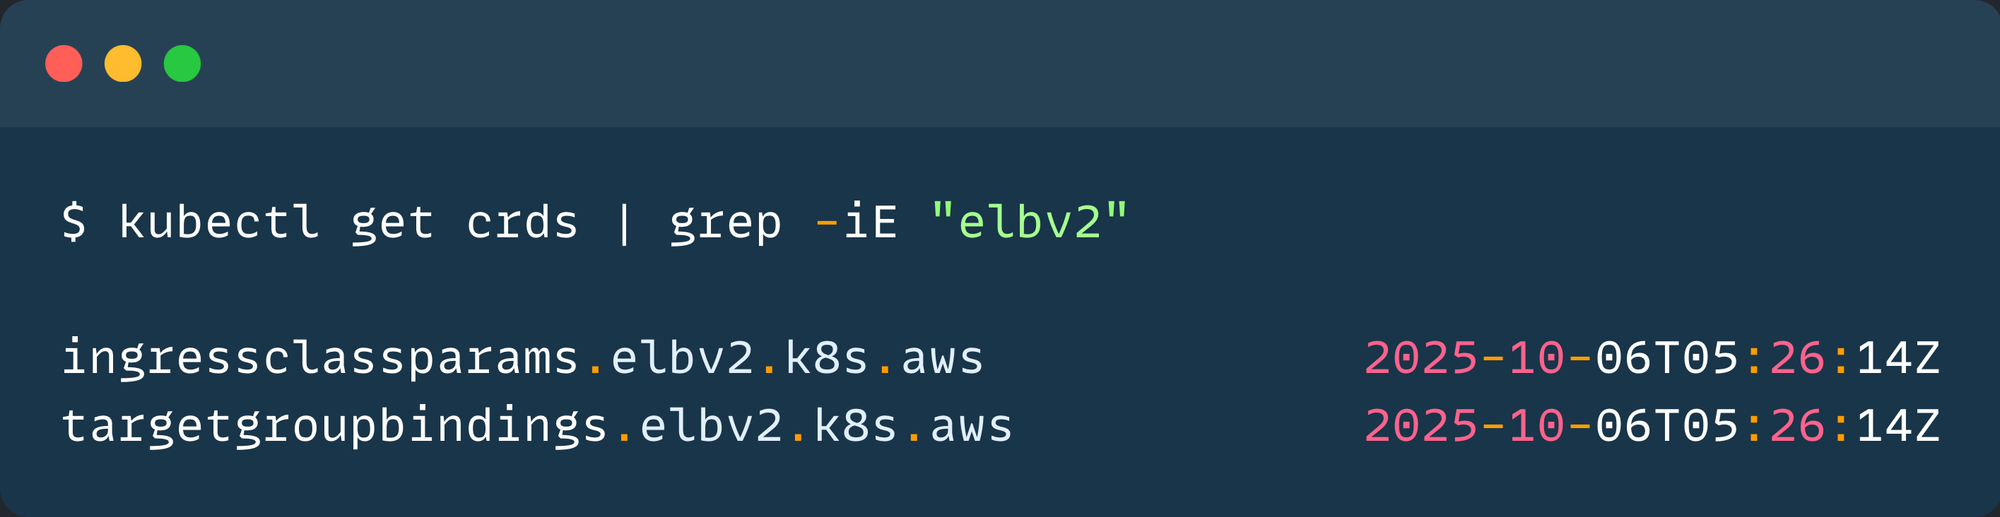
The following are the two CRDs used by the LB controller
ingressClassParams- Adds optional configurations for the IngressClass.targetgroupbindings- Attach an existing Target Group to the Kubernetes Service to route the traffic.
Also, there will be a default ingress class created during the controller installation. Validate it using the following command.
kubectl get ingressclass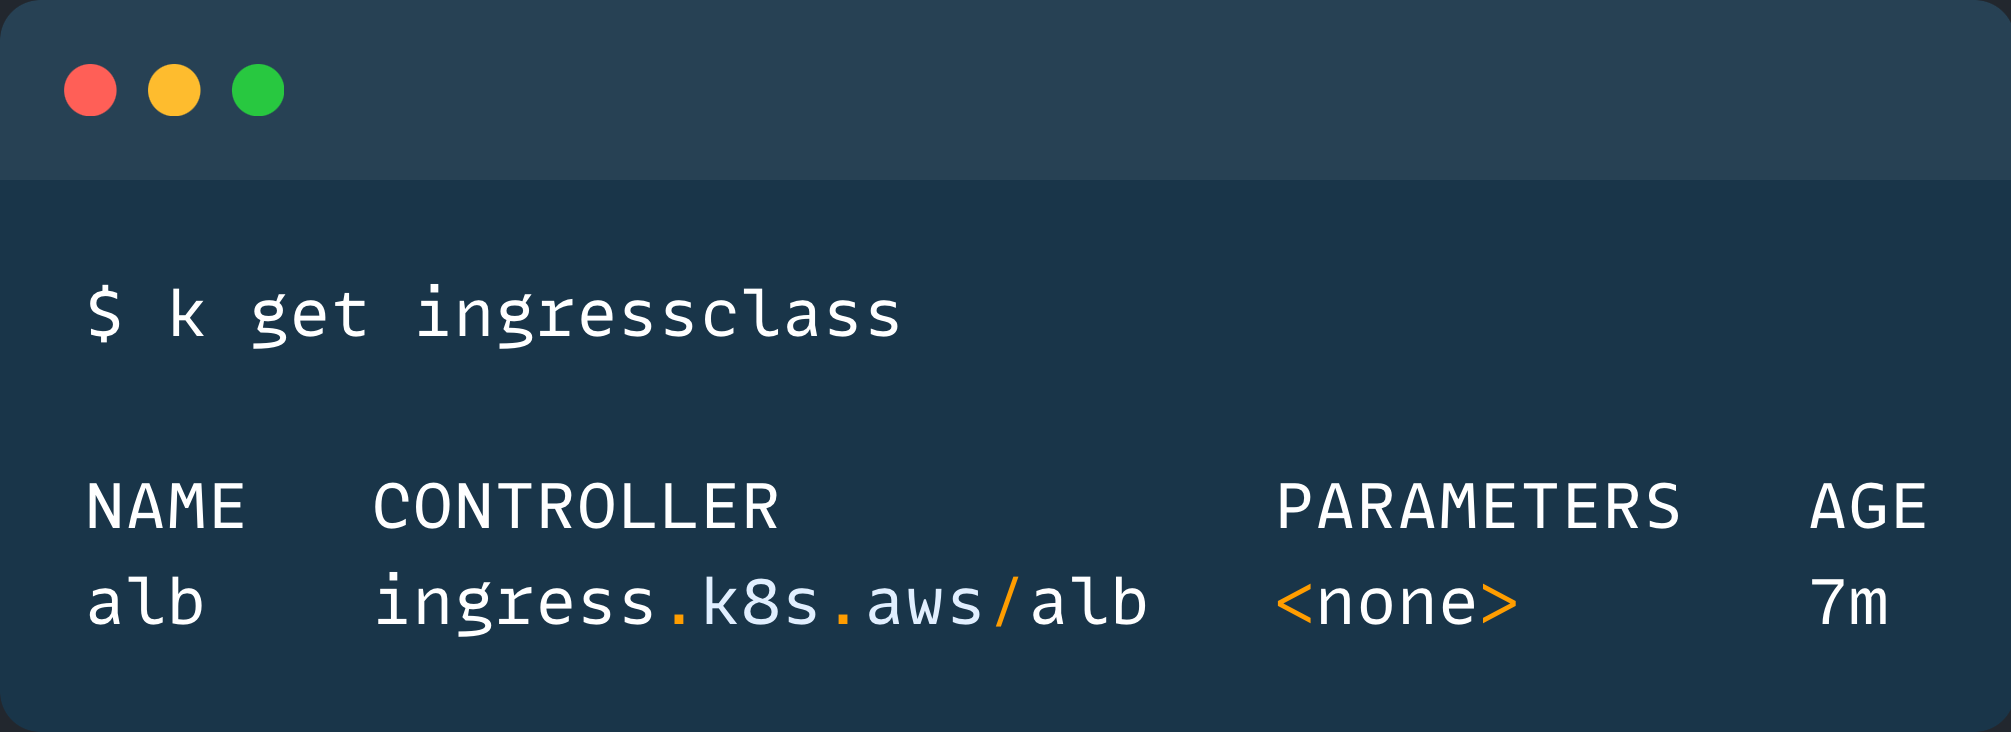
Now, the setup is completed, we can test it by exposing a demo application using Ingress.
Expose an App with Ingress (ALB)
I am deploying an Nginx Deployment object with three replicas for testing purposes.
cat >nginx-deployment.yaml <<EOF
apiVersion: apps/v1
kind: Deployment
metadata:
  labels:
    app: nginx-deployment
  name: nginx-deployment
spec:
  replicas: 3
  selector:
    matchLabels:
      app: nginx-deployment
  template:
    metadata:
      labels:
        app: nginx-deployment
    spec:
      containers:
      - image: nginx
        name: nginx
        ports:
        - containerPort: 80
---
apiVersion: v1
kind: Service
metadata:
  labels:
    app: nginx-deployment
  name: nginx-svc
spec:
  ports:
  - port: 80
    protocol: TCP
    targetPort: 80
  selector:
    app: nginx-deployment
EOF
kubectl apply -f nginx-deployment.yamlTo list the Pods and Services in the current Namespace.
kubectl get po,svc -o wide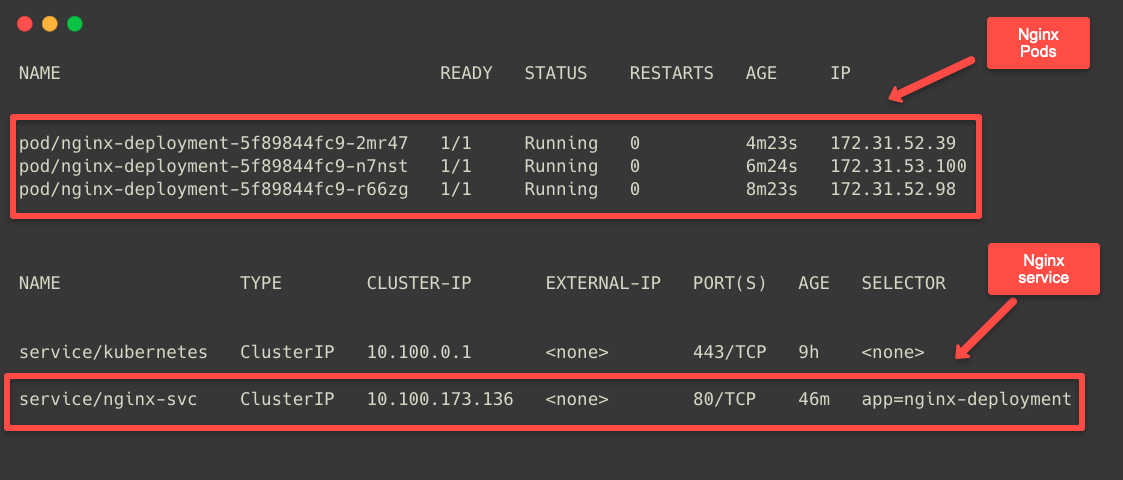
The Service name and the Port number are required to create the Ingress object.
Now, we can create an Ingress object to route the external traffic to the Nginx Pod.
cat << EOF > ingress.yaml
apiVersion: networking.k8s.io/v1
kind: Ingress
metadata:
  name: nginx-ingress
  namespace: default
  annotations:
    alb.ingress.kubernetes.io/scheme: internet-facing
    alb.ingress.kubernetes.io/target-type: ip
spec:
  ingressClassName: alb
  rules:
    - http:
        paths:
          - path: /
            pathType: Prefix
            backend:
              service:
                name: nginx-svc
                port:
                  number: 80
EOF
To create the Public Load Balancer, the scheme value should be internet-facing.
The target type should be ip, because the application's Service type is ClusterIP (Internal Communication)
This means that the LB will directly use the Pod IP addresses to route the traffic.
To apply the configuration, use the following command.
kubectl apply -f ingress.yamlThe Application Load Balancer will be provisioned when deploying the Ingress object.
To check this, we can describe the Ingress.
kubectl describe ingress nginx-ingress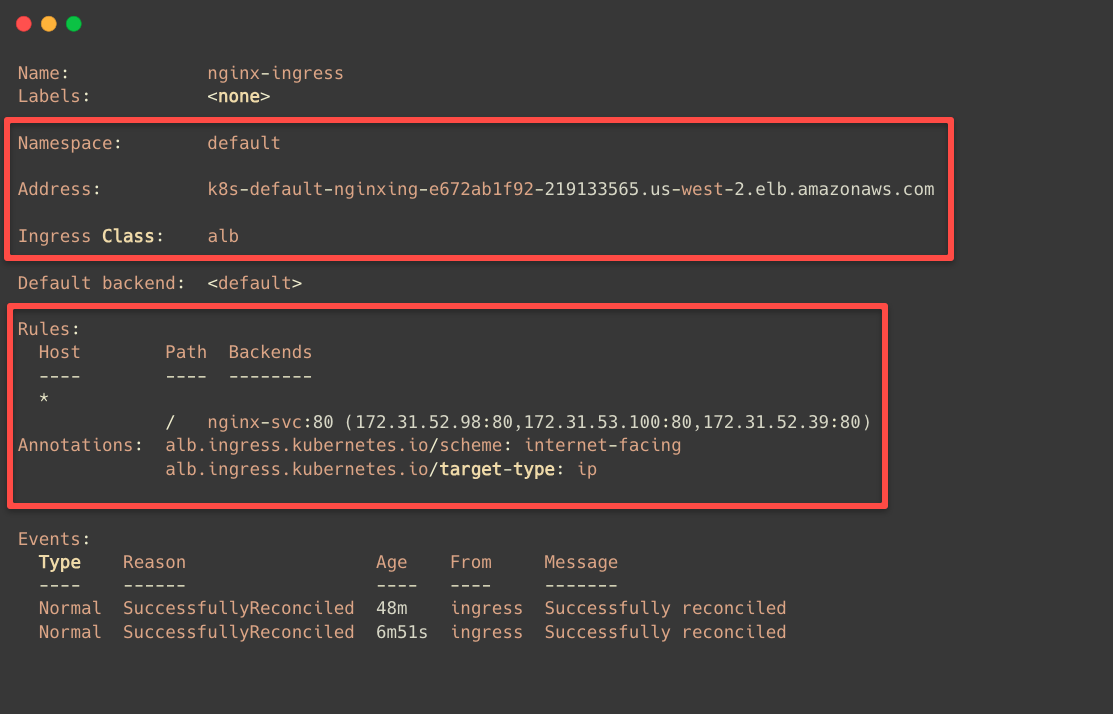
In the Backends section of the configuration, we can see that all three Pod IPs are mapped.
We can ensure the Application Load Balancer is provisioned by using the AWS Console.
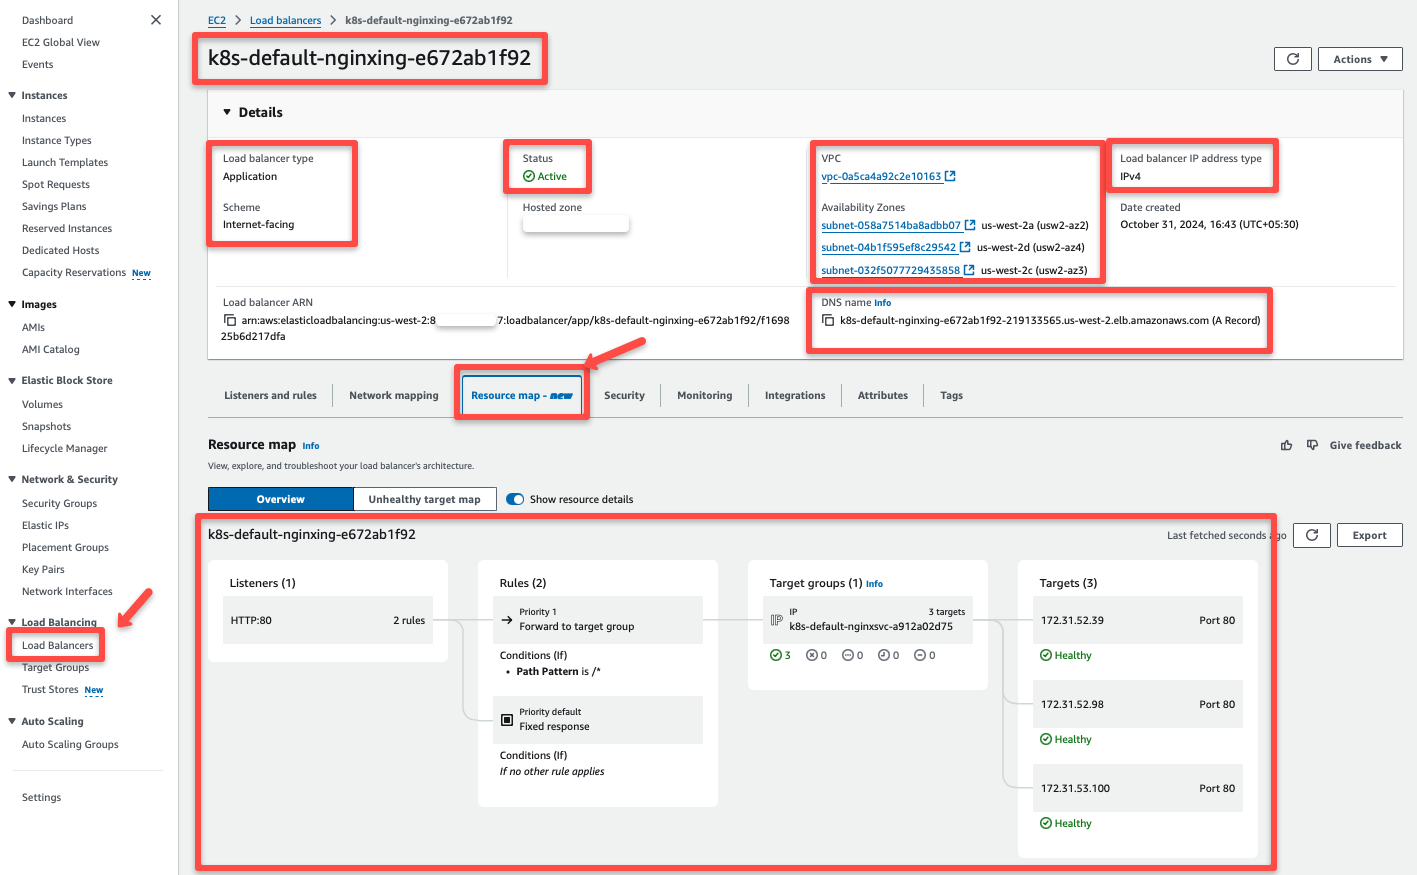
The resource map section of the Application Load Balancer clearly shows how the traffic flows.
When request come through the Load Balancer, it goes to the target group and routes to the Pod's IP addresses.
But, what if we have more than one Ingress objects but want to utilize a single Load Balancer.
Share One ALB with Ingress Groups
The Ingress Group feature allow to use one Load Balancer for multiple Ingress resources.
The following diagram explains how we can use a single Load Balancer for two set of applications.
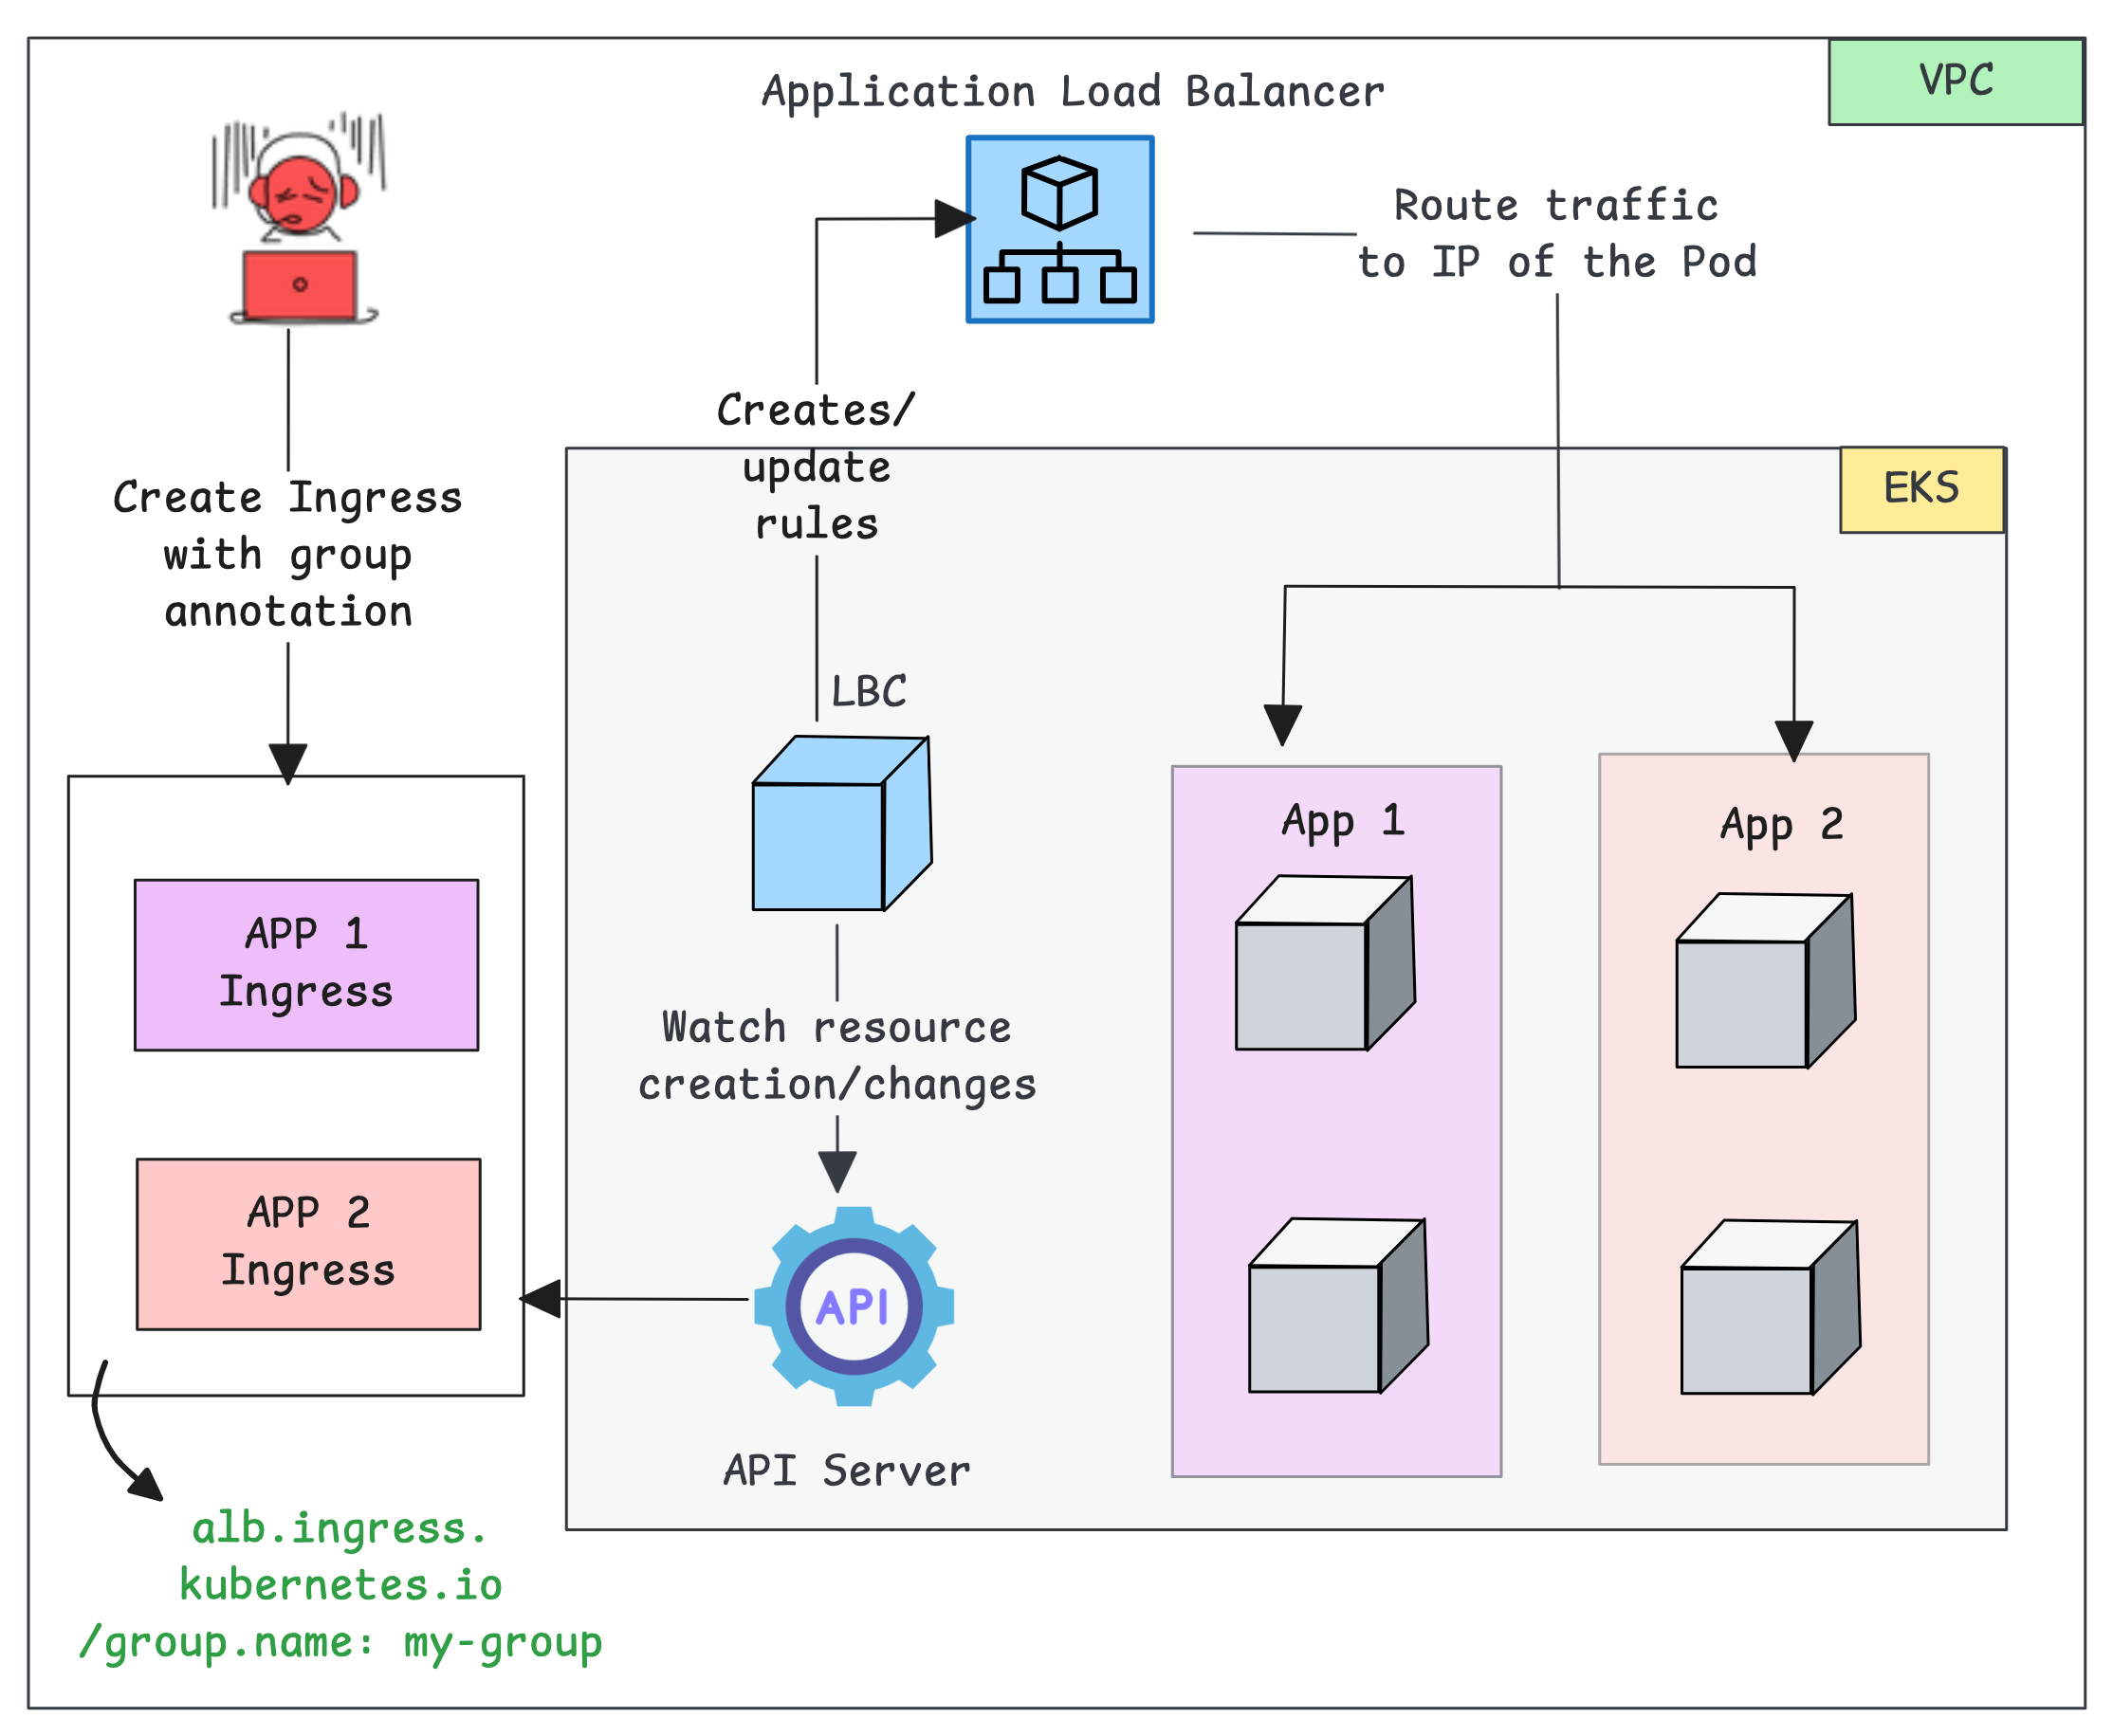
The above diagram explains
- If you create multiple Ingress objects with same value for the group annotation, Load Balancer controller knows that they have to bind together for single Load Balancer.
- When it creates the Load Balancer, it add multiple targets based on the host names that we provided on each Ingress.
- This is how, when traffic comes to Load Balancer, it goes to the correct destination.
To create an Ingress Group, add this annotation to a new or existing Ingress object.
metadata.annotations.alb.ingress.kubernetes.io/group.name
This annotation tells the AWS Load Balancer Controller to group the specific ingress resources.
For demo, creating two different deployments in two different namespaces and, this time, providing the Service type as NodePort
cat << 'EOF' > group-demo-deployment.yaml
apiVersion: v1
kind: Namespace
metadata:
  name: app1
---
apiVersion: apps/v1
kind: Deployment
metadata:
  name: app1
  namespace: app1
spec:
  replicas: 2
  selector:
    matchLabels:
      app: app1
  template:
    metadata:
      labels:
        app: app1
    spec:
      containers:
      - name: app1
        image: nginx
        ports:
        - containerPort: 80
---
apiVersion: v1
kind: Service
metadata:
  name: app1
  namespace: app1
spec:
  selector:
    app: app1
  ports:
    - protocol: TCP
      port: 80
      targetPort: 80
  type: NodePort
---
apiVersion: v1
kind: Namespace
metadata:
  name: app2
---
apiVersion: apps/v1
kind: Deployment
metadata:
  name: app2
  namespace: app2
spec:
  replicas: 2
  selector:
    matchLabels:
      app: app2
  template:
    metadata:
      labels:
        app: app2
    spec:
      containers:
      - name: app2
        image: httpd
        ports:
        - containerPort: 80
---
apiVersion: v1
kind: Service
metadata:
  name: app2
  namespace: app2
spec:
  selector:
    app: app2
  ports:
    - protocol: TCP
      port: 80
      targetPort: 80
  type: NodePort
EOF
kubectl apply -f group-demo-deployment.yamlUse the following command to list the Pods, Deployments, and Services.
kubectl -n app1 get po,deploy,svc
kubectl -n app2 get po,deploy,svc
On the above deployment, the service type is Node Port so when we create Ingress, we need to set the target type as "instance"
Create Ingress objects for each Namespace.
cat << EOF > group-ingress.yaml
apiVersion: networking.k8s.io/v1
kind: Ingress
metadata:
  name: nginx-ingress
  namespace: app1
  annotations:
    alb.ingress.kubernetes.io/group.name: common-ingress-group
    alb.ingress.kubernetes.io/scheme: internet-facing
    alb.ingress.kubernetes.io/target-type: instance
spec:
  ingressClassName: alb
  rules:
    - host: app1.techiescamp.com
      http:
        paths:
          - path: /
            pathType: Prefix
            backend:
              service:
                name: app1
                port:
                  number: 80
---
apiVersion: networking.k8s.io/v1
kind: Ingress
metadata:
  name: httpd-ingress
  namespace: app2
  annotations:
    alb.ingress.kubernetes.io/group.name: common-ingress-group
    alb.ingress.kubernetes.io/scheme: internet-facing
    alb.ingress.kubernetes.io/target-type: instance
spec:
  ingressClassName: alb
  rules:
    - host: app2.techiescamp.com
      http:
        paths:
          - path: /
            pathType: Prefix
            backend:
              service:
                name: app2
                port:
                  number: 80
EOF
To route the traffic between Pods, we use the domain names.
For the App1 Deployment app1.techiescamp.com and the App2 Deployment app2.techiescamp.com
kubectl apply -f group-ingress.yamlTo list the Ingress object.
kubectl -n app1 get ingress
kubectl -n app2 get ingress
Normally, if we create multiple Ingress objects, the controller creates seperate ALB for each one which is expensive and unnecessary.
With Ingress grouping, we can combine those ingress objects so they share a single load balancer.
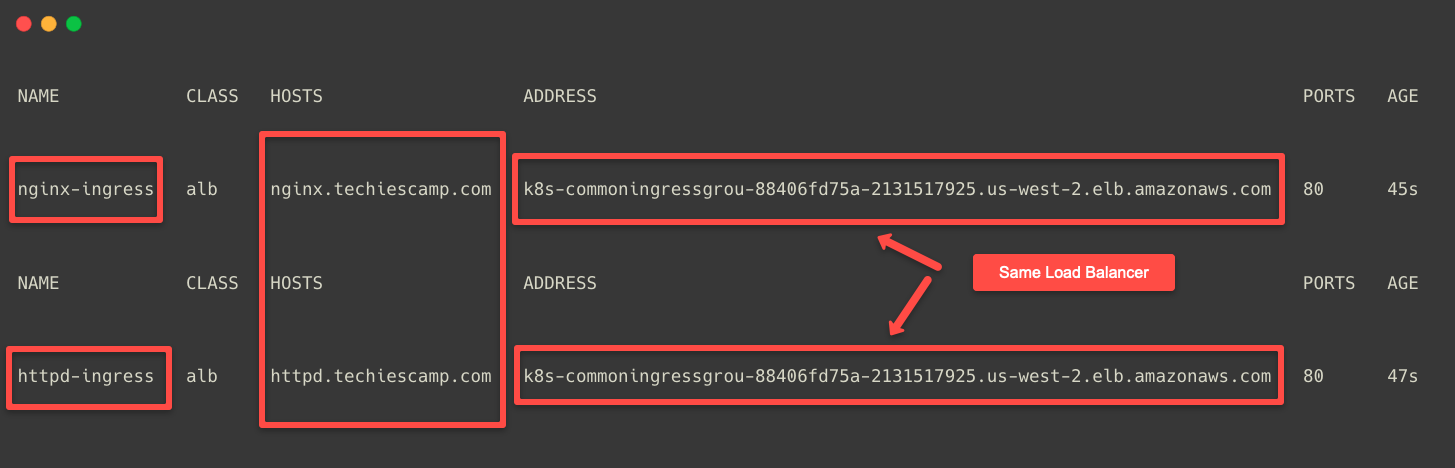
Here, we can see that the DNS name of the Load Balancer is the same for both Ingress objects.
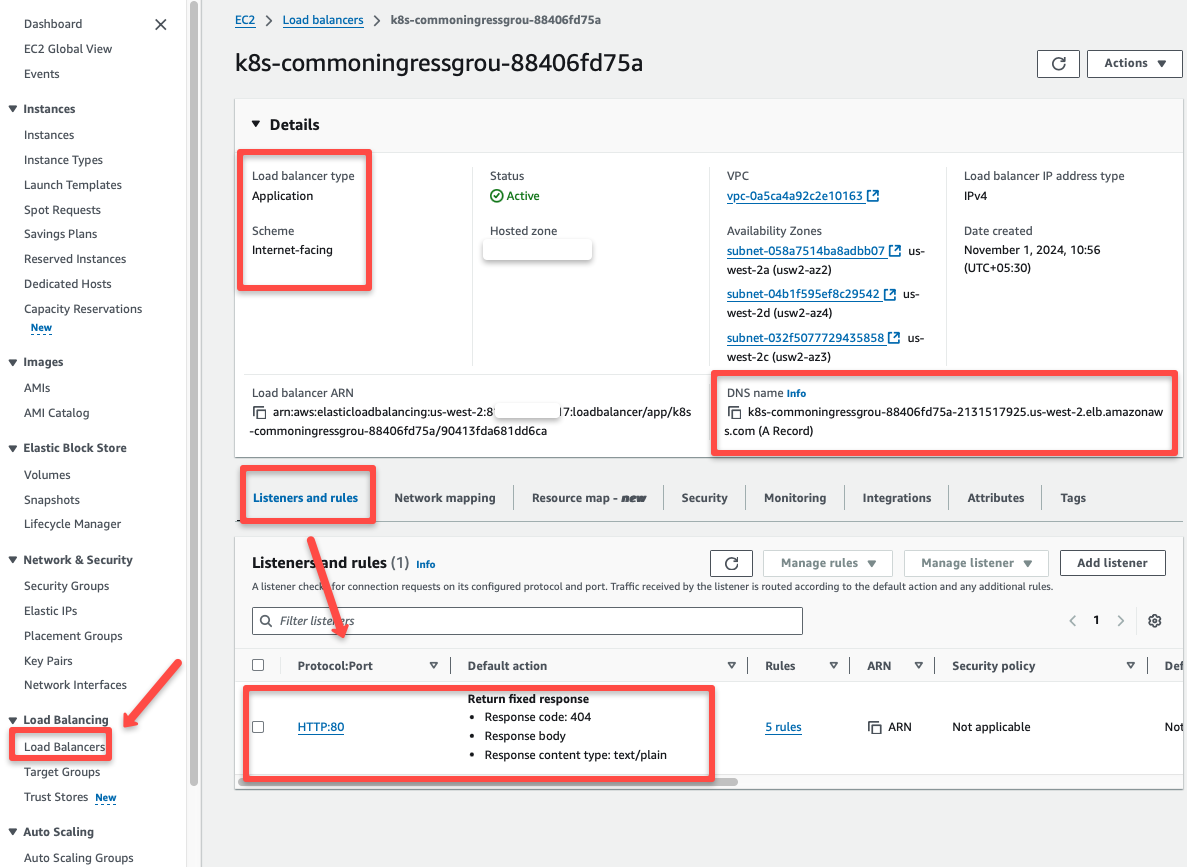
The number of the target groups is based on the number of Ingress objects.
The traffic route to these Target groups is based on the hostnames we provided in the Ingress object, which we can view in the AWS console.
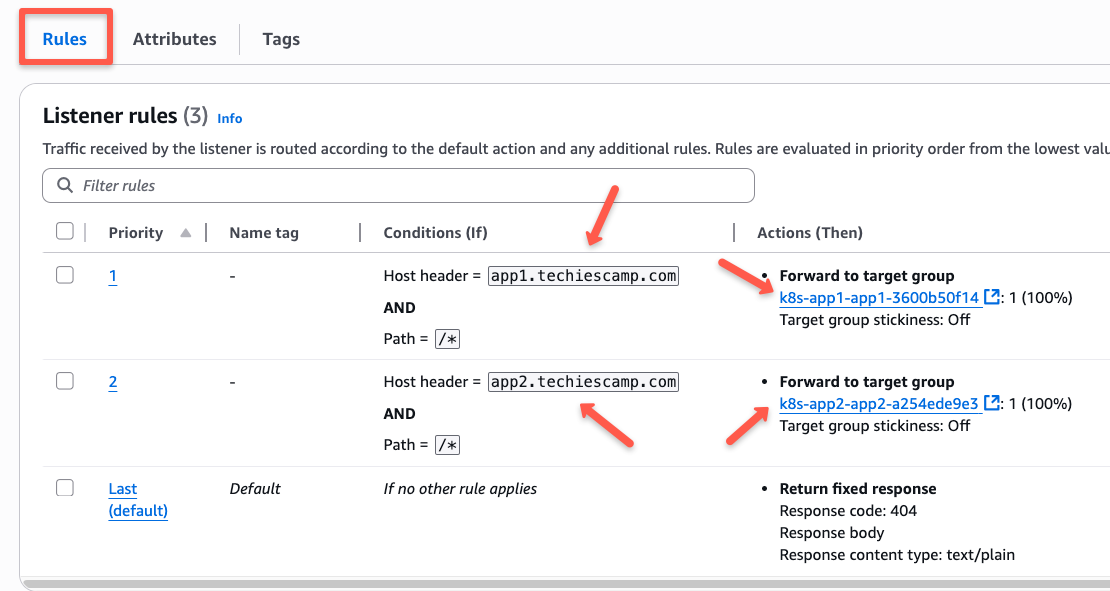
We can use the resource map section to see detailed traffic routing information.
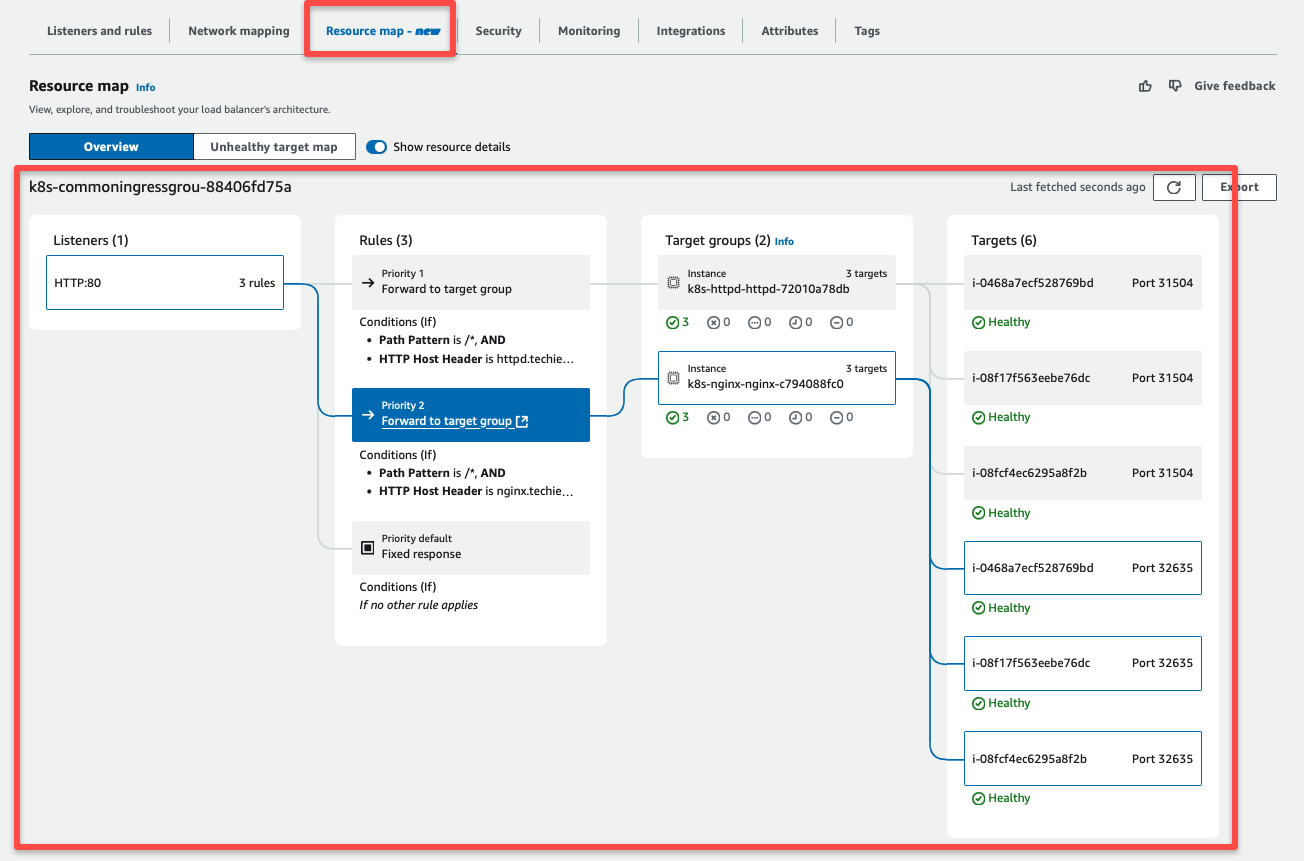
External traffic from the Load Balancer is send to the Target groups based on the Hostname.
The EKS Nodes are linked to these Target groups, so traffic goes to the correct NodePort that connects to the Service.
From there, the traffic is routed on to the Pod.
To test the traffic routing practically, we have to map the host names to the IP address of the Application Load Balancer.
To get the Application Load Balancer DNS.
ALB_DNS=$(kubectl -n nginx get ingress nginx-ingress -o jsonpath='{.status.loadBalancer.ingress[0].hostname}')To get the IP address of the ALB.
dig +short ${ALB_DNS}Add the IP addresses to the /etc/hosts file with the host names.
vim /etc/hosts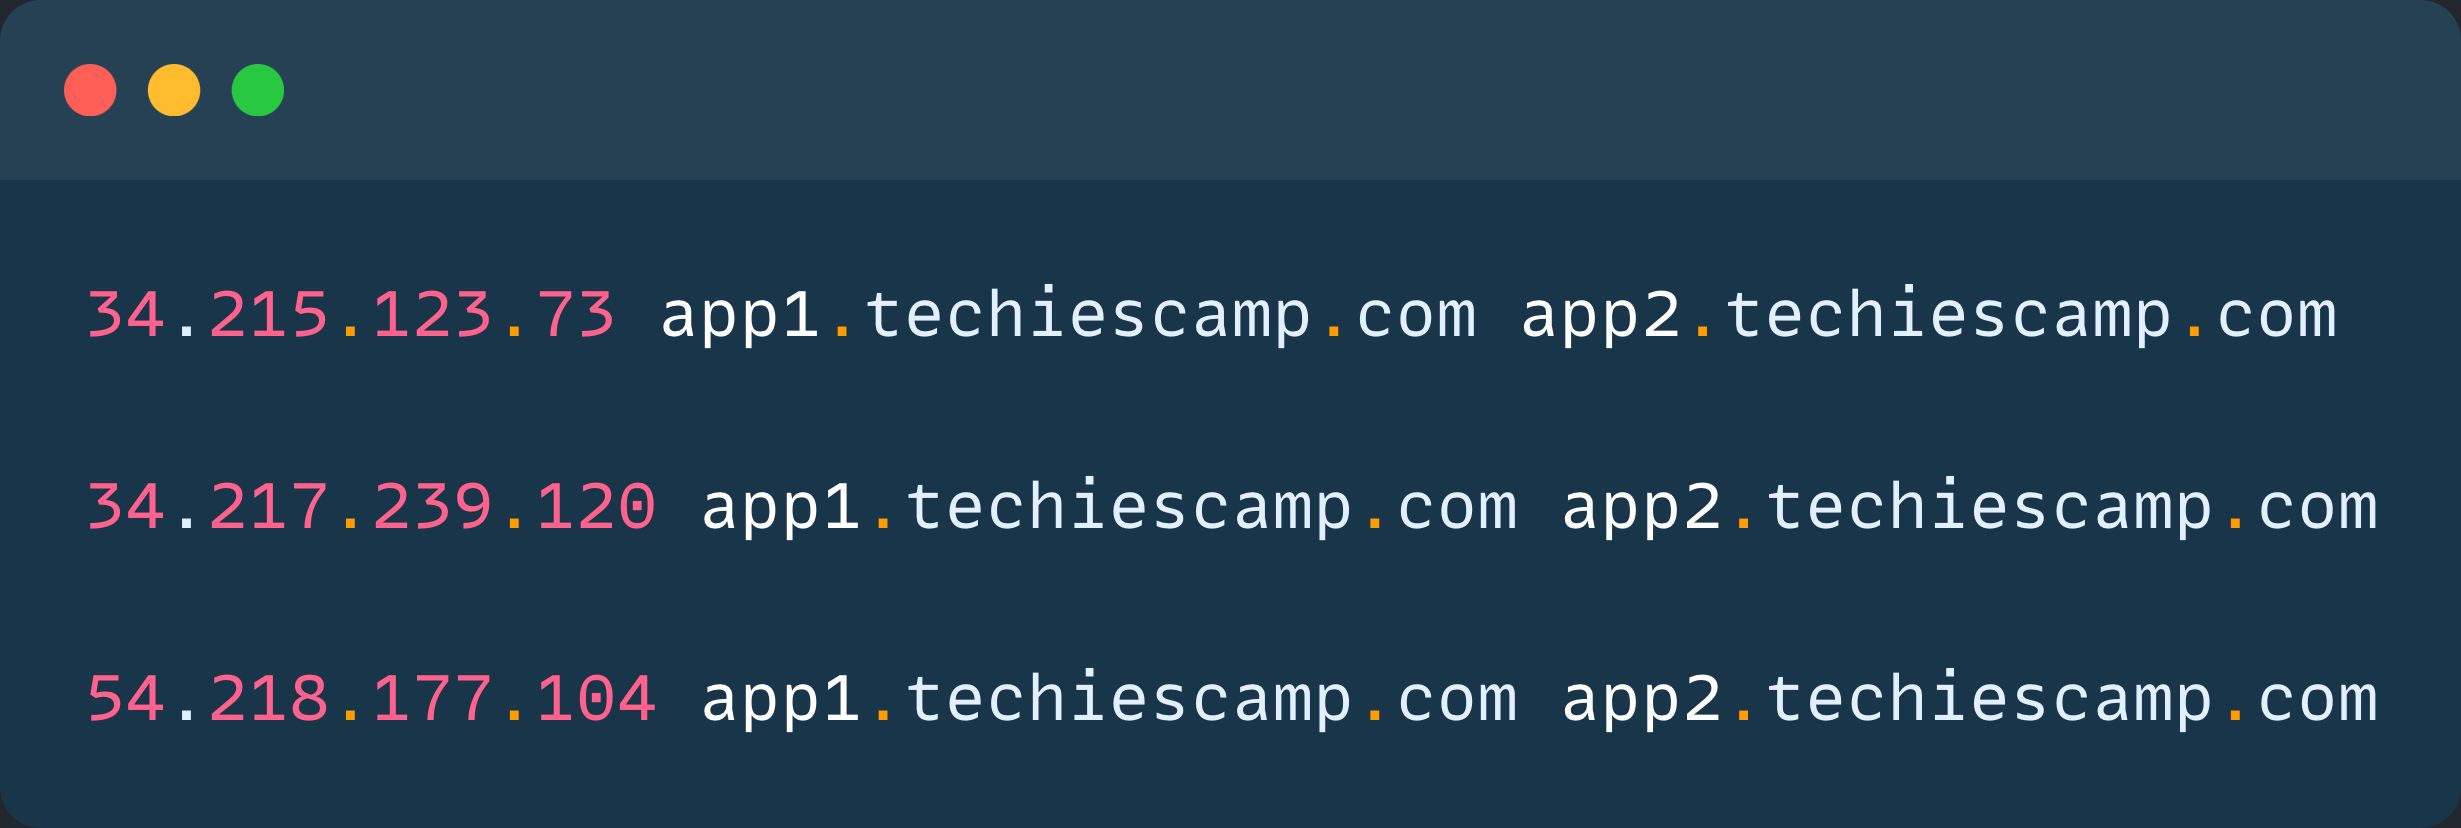
Save and exit.
The configurations are done; we can use the host names over the browser to get the output.
First, let's check with http://app1.techiescamp.com

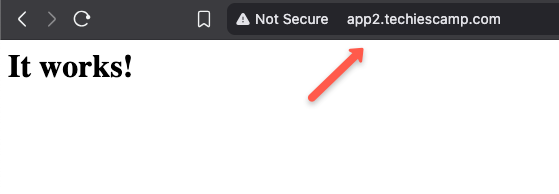
Now, we can check with the other hostname http://app2.techiescamp.com
Now, we know that how we can use a single LB for multiple ingress objects.
In the next section, we can learn how we can properly use multiple Load Balancers for different environments.
Manage Multiple ALBs with IngressClassParams
We can run multiple Load Balancers using the AWS Load Balancer Controller.
By default, each ingress object gets its own ALB, unless we use the group annotation.
To manage seperate ALB for different environments, like "dev" and "prod", we can use different Ingress Classes, and each has its own class parameters.
IngressClasses and IngressClassParams are the two CRDs of the AWS LB controller.
What actually does is,
- Can create IngressClasses (e.g.,
alb-devandalb-prod) instead of the default (alb) one. - Attach IngressClassParams to each to set of things such as, scheme, IP address type, namespace selector, tags, ingress group and other LB attributes.
Let us do a hands on of this.
Assume we have two namespaces, dev and prod.
We will create its own Ingress configurations for each one so both gets its own isolated Load Balancers.
cat << EOF > ingress-class-params.yaml
apiVersion: elbv2.k8s.aws/v1beta1
kind: IngressClassParams
metadata:
  name: dev-class-params
spec:
  namespaceSelector:
    matchLabels:
      kubernetes.io/metadata.name: dev
  scheme: internet-facing
  ipAddressType: ipv4
  loadBalancerAttributes:
  - key: deletion_protection.enabled
    value: "false"
  - key: idle_timeout.timeout_seconds
    value: "120"

---
apiVersion: elbv2.k8s.aws/v1beta1
kind: IngressClassParams
metadata:
  name: prod-class-params
spec:
  namespaceSelector:
    matchLabels:
      kubernetes.io/metadata.name: prod
  scheme: internet-facing
  ipAddressType: ipv4
  loadBalancerAttributes:
  - key: deletion_protection.enabled
    value: "true"
  - key: idle_timeout.timeout_seconds
    value: "160"
EOF
You can refer to this official documentation to know the list of Load Balancer attributes.
kubectl apply -f ingress-class-params.yamlTo list the Ingress Class Params, use the following command.
kubectl get ingressclassparams.elbv2.k8s.aws
Now, we can create the Ingress Class objects with these Ingress Class Params.
cat << EOF > ingress-class.yaml
apiVersion: networking.k8s.io/v1
kind: IngressClass
metadata:
  name: dev-ingress-class
spec:
  controller: ingress.k8s.aws/alb
  parameters:
    apiGroup: elbv2.k8s.aws
    kind: IngressClassParams
    name: dev-class-params

---
apiVersion: networking.k8s.io/v1
kind: IngressClass
metadata:
  name: prod-ingress-class
spec:
  controller: ingress.k8s.aws/alb
  parameters:
    apiGroup: elbv2.k8s.aws
    kind: IngressClassParams
    name: prod-class-params
EOF
kubectl apply -f ingress-class.yamlTo list the deployed Ingress Class, use the following command.
kubectl get ingressclass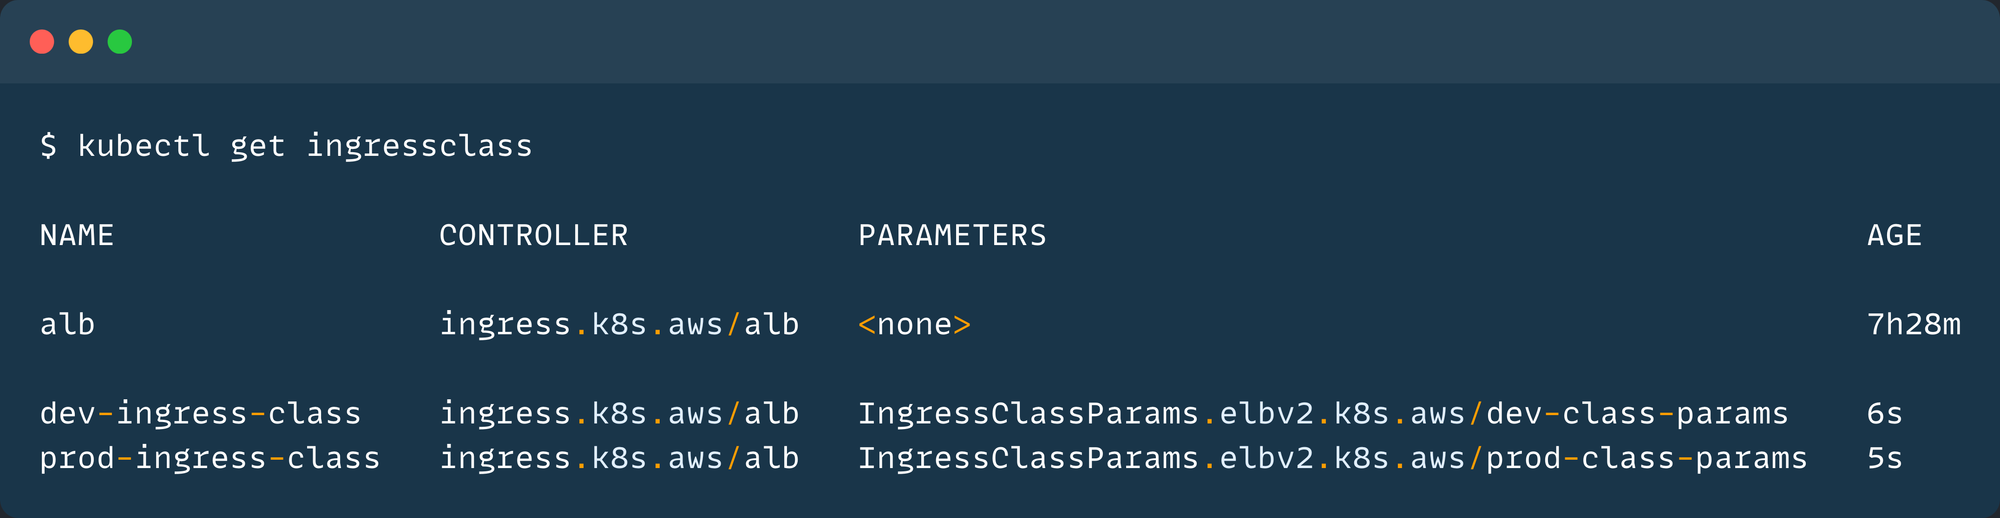
The Ingress Classes are ready, so we can create Ingress objects with these Ingress Classes.
cat << EOF > custom-ingress.yaml
apiVersion: networking.k8s.io/v1
kind: Ingress
metadata:
  name: dev-ingress
  namespace: dev
  annotations:
    alb.ingress.kubernetes.io/target-type: instance
spec:
  ingressClassName: dev-ingress-class
  rules:
    - host: dev.techiescamp.com
      http:
        paths:
          - path: /
            pathType: Prefix
            backend:
              service:
                name: dev
                port:
                  number: 80
---
apiVersion: networking.k8s.io/v1
kind: Ingress
metadata:
  name: prod-ingress
  namespace: prod
  annotations:
    alb.ingress.kubernetes.io/target-type: ip
spec:
  ingressClassName: prod-ingress-class
  rules:
    - host: prod.techiescamp.com
      http:
        paths:
          - path: /
            pathType: Prefix
            backend:
              service:
                name: prod
                port:
                  number: 80
EOF
Here, you can see that the spec.ingressClassName is replaced with custom Ingress Classes for each Ingress.
On the next section, we can see that how the AWS LBC works with the CNIs.
Using Other CNIs (Calico/Cilium) with AWS Load Balancer Controller
EKS uses VPC CNI by default, but we can use other CNIs such as Calico, Cilium, and Antrea.
If we use Calico, it creates an overlay network that is not part of the VPC. Because of this, a ClusterIP Service cannot reached by the AWS Load Balancer.
Instead if we use a NodePort service, we can still be able to route the traffic to Pods.
The LB sends the traffic to Node's VPC IP, and the node route the traffic through the NodePort to the Pod.
Note: AWS Load Balancer Controller replaced the old ALB Ingress Controller.
ALB Ingress Controller support only the Application Load Balancer but the AWS Load Balancer Controller can able to provision Application/Network Load Balancer.
If you want to migrate from the ALB Ingress Controller to the AWS Load Balancer Controler, you can follow this official documentation.Possible Errors
Error: failed to fetch VPC ID from instance metadata
This error occurs when the AWS Load Balancer Controller tries to fetch the VPC ID using the AWS Metadata Service.
The default hop limit for IMDSv2 is 1, but the controller pod runs inside the cluster as a Pod.
So, then update the hop limit of the worker nodes of the EKS cluster using the parameter of http_put_response_hop_limit
aws ec2 modify-instance-metadata-options \
  --instance-id i-0abcd1234efgh5678 \
  --http-put-response-hop-limit 2
Change the instance ID with yours.
After you modify the settings of the nodes, restart the controller.
Conclusion
This will give you a high-level overview of the AWS Load Balancer controller and how we can utilize the resource of a Load Balancer with multiple Ingress Objects.
The annotations allow you to do more, so if you want to know more about the Load Balancer Controller, please visit the official documentation.
To perform the blue-green deployment with the AWS Load Balancer controller, refer to this official Documentation.
If you want to automate the Blue Green, you can use it with Argo Rollouts.
In the upcoming blog post, I will explain how to manually and automatically configure the DNS record on Route53 for Service Objects and create and attach TLS certificates through the AWS Certificate Manager.
