

In this blog, I have explained detailed steps to run Docker containers as non-root user by creating a custom user in the Dockerfile.
What is a Non-Root User?
A non-root user is a standard user with limited permissions on system resources. They have no privileges other than the permissions given to them.
For example, unlike a root user, a non-root user cannot create, modify, or delete files and folders in another user's home directory once they have permission on their home directory.
By default, the non-root users cannot use sudo , but can be configured to use sudo for specific commands.
Running Applications with Non-Root User
Before we look at the hands-on example, let's understand the requirements and configurations for running applications inside the container using a non-root user.
When we say applications, it could be Java, Node.js, Ruby, Python, etc
One key thing to remember is the non-root user should have access to the application code and related files. It is similar to running an application as a non-root user in a Linux system.
For example, let's say you want to run a Java application in a Docker container and the Java application code and related configurations will be placed in the /app directory.
In this case, the non-root user you create should have the necessary read/write permissions to the app directly.
The non-root user will not have any other privileged access to system-related files unless you specifically add permissions.
Now that we understand the basics, let's look at a practical hands-on example of creating a Docker image with a non-root user.
Create a Docker Image with a Non-Root User
To demonstrate non-root users, we will create a Nginx Docker image from scratch.
We will create a Dockerfile with a custom non-root user and add the necessary permissions for that user to run the Nginx service in the container.
Create a Dockerfile and copy the below Dockerfile content
FROM nginx:alpine

RUN addgroup -g 1001 -S nginxgroup && adduser -u 1001 -S -G nginxgroup nginxuser

RUN mkdir -p /var/run/nginx /var/cache/nginx/client_temp /var/cache/nginx/proxy_temp /var/cache/nginx/fastcgi_temp /var/cache/nginx/scgi_temp /var/cache/nginx/uwsgi_temp \
    && chown -R nginxuser:nginxgroup /run /var/cache/nginx /var/run/nginx /var/log/nginx /etc/nginx /usr/share/nginx/html

RUN sed -i 's/listen       80;/listen       8080;/g' /etc/nginx/conf.d/default.conf
RUN sed -i 's/\/var\/run\/nginx.pid/\/var\/run\/nginx\/nginx.pid/g' /etc/nginx/nginx.conf

USER nginxuser

EXPOSE 8080

CMD ["nginx", "-g", "daemon off;"]
Let's understand this Dockerfile and the key configurations involved in creating a non-root user.
- This Dockerfile uses nginx as the base image.
- It creates a group
nginxgroupwith GID1001and a usernginxuserwith UID1001and give the non-root user ownership of Nginx directories. Creating user and group with IDs is particularly useful when you run this image on Kubernetes. By explicitly setting the UID and GID in the Docker image, you can align these IDs with thesecurityContextsettings in Kubernetes. - Then, it creates the required temporary directories for Nginx and assigns them to the non-root user so that Nginx can write its data on the required directories.
- For example, the
/var/cache/nginx/client_tempdirectory stores temporary HTTP request data sent and received by Nginx./var/run/nginxwill hold the PID created by Nignx during its startup (explained in step 6) . - The SED command changes Nginx to listen on port
8080because the ports below1024are privileged ports, which means only users with root permission can use them by default. - During startup, Nginx writes its PID to
/var/rundirectory by default. The second SED command changes the PID file location to/var/run/nginxbecause the non-root user has no permission on the/var/rundirectory. By creating and changing/var/run/nginxdirectory permission to a non-root user, Nginx can save the PID file in it. - Then, it switches the user to a non-root user
nginxuserbecause if we don't switch to the non-user, it will run as a root user by default. - And it exposes port
8080for external access. - Finally, the
CMDcommand tells Docker to start Nginx in the foreground. Itdaemon offkeeps Nginx running and makes sure it doesn’t go into the background, which would cause the container to stop.
Now, use the following command to build the Docker image.
docker build -t nginx-non-root:1.0.0 .Note: Assigning a specific ID to user and group is typically helpful if you want to run this container in Kubernetes as non root user usingsecurityContext.
Also, there are ways like setcap to make use of privileged ports by non-root users by assigning theCAP_NET_BIND_SERVICEcapability to an executable, but it is not recomended due to security concerns.
Run Docker Container as non-root User
Now that the image is built, we will run the container and test it to see if it is running as a non-user user.
Use the below command to run the Docker image in a container.
docker run -d -p 8080:8080 nginx-non-root:1.0.0Run the following command to check if the container is running
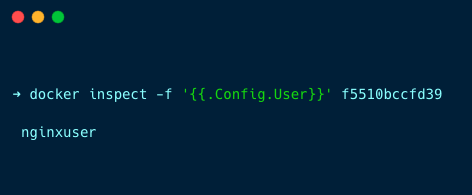
docker psIf your container is running, check the current user using the docker inspect command
docker inspect -f '{{.Config.User}}' f5510bccfd39Replace f5510bccfd39 with your Docker container ID.
This command will show you the current user of the container
Or you can also use the exec command to access the shell of the container
docker exec -it f5510bccfd39Then use the whoami command to check the current user as shown below
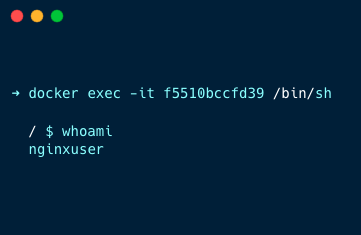
You can see the container is running as a non-root user nginxuser
Now, If you want to run the non-root container as a root user, run the following command
For this, we will run the Docker image in a container in interactive mode
docker run -u 0 -it nginx-non-root:1.0.0 /bin/shThe -u 0 option tells the container to run as the root user, 0 is the UID of the root user.
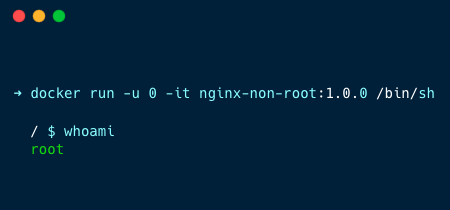
UID 0 (User ID 0) is reserved for the root user, who is the superuser or administrator with full access to all commands and files on the system
Conclusion
In this blog, you have learned about non-root user and how to create a non-root user for an application.
This is particularly useful when using these image to run a Kubernetes pod.
If you are using Kunernetes and you wan to run Pods as non root users, you can specify the user used in the Dockerfile under securityContext runAsUser parameter.
We have published a detailed guide on running Kubernetes Pods as Non-Root User.
