

In this tutorial, you will learn how to mount an AWS S3 bucket to an EC2 instance with practical examples.
Mounting an S3 bucket to an EC2 instance is a practical way to share data, configurations, and large datasets without constantly downloading them.
For example, ML teams often store datasets in S3 and access them directly from EC2 for machine learning or analytics. Similarly, it is frequently used in ETL pipelines.
In this guide, we will use Mountpoint for Amazon S3 for this use case.
Mountpoint for the Amazon S3
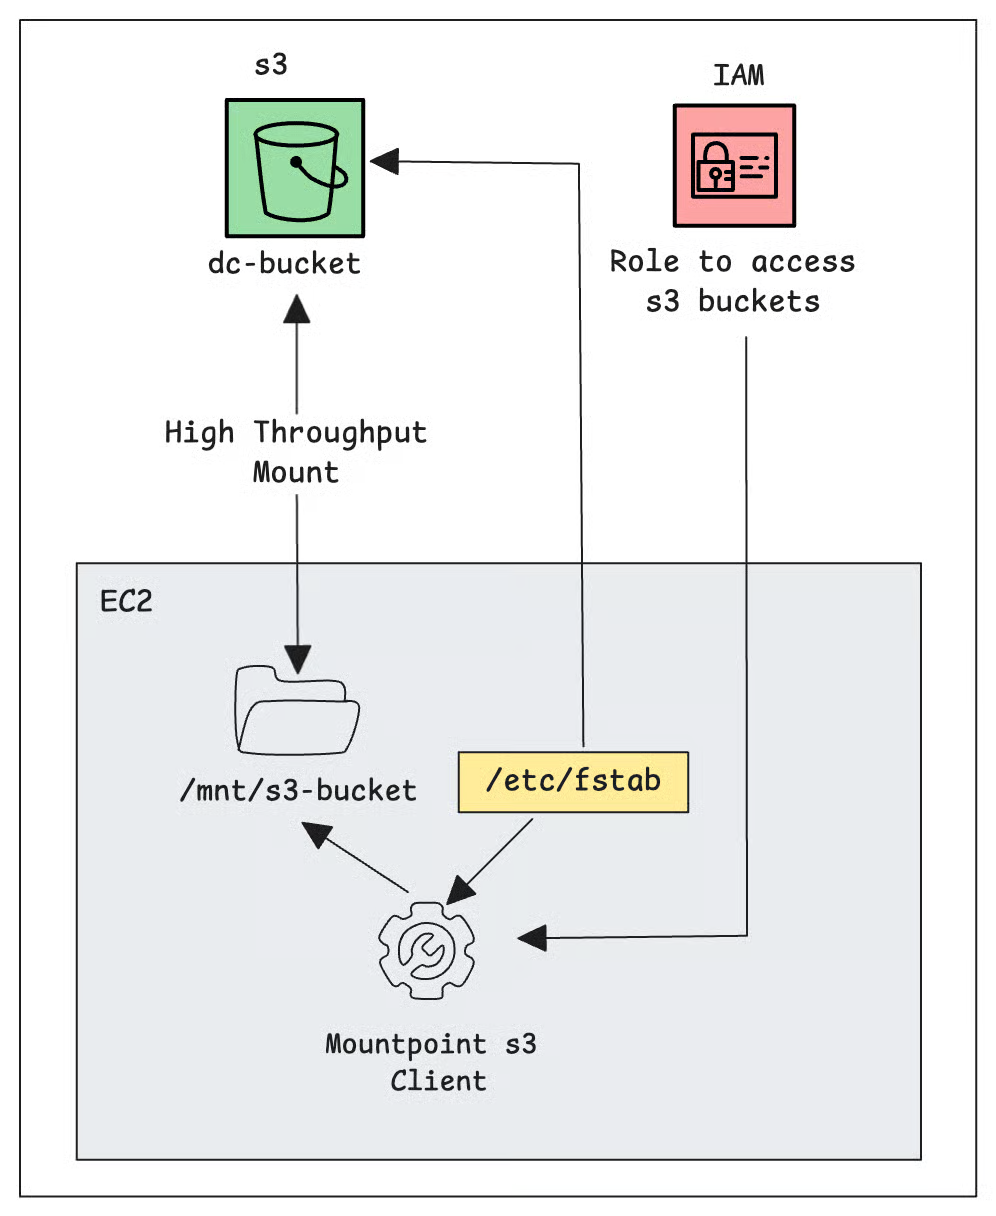
Mountpoint for Amazon S3 is a high-throughput, open-source file client that allows your applications to connect to Amazon S3 buckets and access S3 objects as if they were files in a local file system.
In short, here is what it does.
It acts as an intermediary, translating standard file system operations (like open, read, write, list directory) from your applications into S3 API calls (like GET, PUT, LIST → REST based API over HTTPS).
Here is a sample ec2 s3 mount workflow.
Prerequisites
Below are the prerequisites for this setup.
- An S3 bucket
- EC2 instance
- AWS CLI installed with permission to create IAM Roles.
Now, lets get started with the setup.
Install Mountpoint for Amazon S3
Follow the steps below to install Mountpoint for Amazon S3.
The following steps are for Ubuntu. For other Linux distributions, refer to the official documentation.
Step 1: Download the Mountpoint Package
Run the following command to download the Mountpoint package.
wget https://s3.amazonaws.com/mountpoint-s3-release/latest/x86_64/mount-s3.deb
Step 2: Install Mountpoint
Run the following command to install Mountpoint.
sudo apt-get install -y ./mount-s3.deb
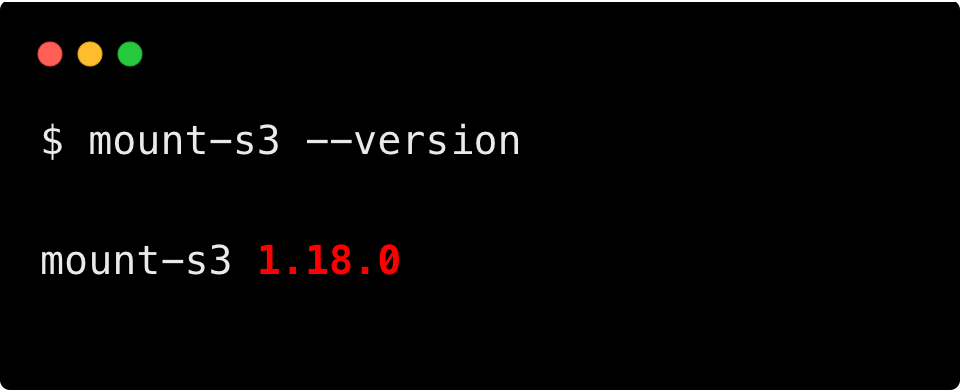
Step 3: Verify the Installation
To verify if the Mountpoint for Amazon S3 is installed, run the following command.
mount-s3 --versionYou will get an output as follows:
Create IAM Role and Attach to EC2
To allow EC2 to access the S3 bucket, we need to create an IAM role with the necessary permissions. This role will then be attached to the EC2 instance.
We will be creating a role for the bucket mounts through the AWS CLI. Follow the steps given below.
Step 1: Create Policy
Run the following command to create a mountpoint-s3-policy.json file with the permission to read, write, and delete.
cat <<EOF > mountpoint-s3-policy.json
{
    "Version": "2012-10-17",
    "Statement": [
        {
            "Effect": "Allow",
            "Action": [
                "s3:ListBucket"
            ],
            "Resource": "arn:aws:s3:::<bucket-name>"
        },
        {
            "Effect": "Allow",
            "Action": [
                "s3:GetObject",
                "s3:PutObject",
                "s3:DeleteObject"
            ],
            "Resource": "arn:aws:s3:::<bucket-name>/*"
        }
    ]
}
EOF
Then, run the following command to create a policy with the JSON file.
aws iam create-policy \
    --policy-name s3-mount-policy \
    --policy-document file://mountpoint-s3-policy.json
After running this command, you will get the ARN of the newly created policy in the output. Note the ARN, you will need it in another step.
Step 2:Create Role
Run the following command to create a mountpoint-s3-trustpolicy.json
Since we will be attaching it to an EC2 instance, let's create trustpolicy based on it.
cat <<EOF > mountpoint-s3-trustpolicy.json
{
  "Version": "2012-10-17",
  "Statement": [
    {
      "Effect": "Allow",
      "Principal": {
        "Service": "ec2.amazonaws.com"
      },
      "Action": "sts:AssumeRole"
    }
  ]
}
EOF
Then, run the following command to create a role with the JSON file.
aws iam create-role \
    --role-name s3-mount-role \
    --assume-role-policy-document file://mountpoint-s3-trustpolicy.json
This will create and give the ARN of the newly created role in the output.
Step 3: Attach the Policy to the Role
The policy and the role have been created, let's attach the policy to the role.
aws iam attach-role-policy \
    --role-name s3-mount-role \
    --policy-arn <YOUR_POLICY_ARN>
Step 4: Create an Instance Profile
And the final step is to create an instance profile, so that your can attach the role to the EC2 instance.
Run the following command to create an instance profile.
aws iam create-instance-profile \
    --instance-profile-name s3-mount-instance-profile
Now, attach the role to the instance profile using the following command.
aws iam add-role-to-instance-profile \
    --instance-profile-name s3-mount-instance-profile \
--role-name s3-mount-roleMount S3 Bucket on EC2 Instance
In the following steps, I will show you how to mount an S3 bucket on the EC2 instance.
Execute all the steps from within the ec2 instance.
Step 1: Create a Mount Directory
To create a mount directory, run the following command.
sudo mkdir /mnt/dcmountYou can choose any directory name you want.
Step 2: Mount the S3 Bucket
Once the directory is created, mount the S3 bucket to the directory we created in the previous step.
sudo mount-s3 <bucket-name> /mnt/dcmountOnce it's mounted and the bucket is not empty, you can view the files and folders in the bucket within the mount directory.
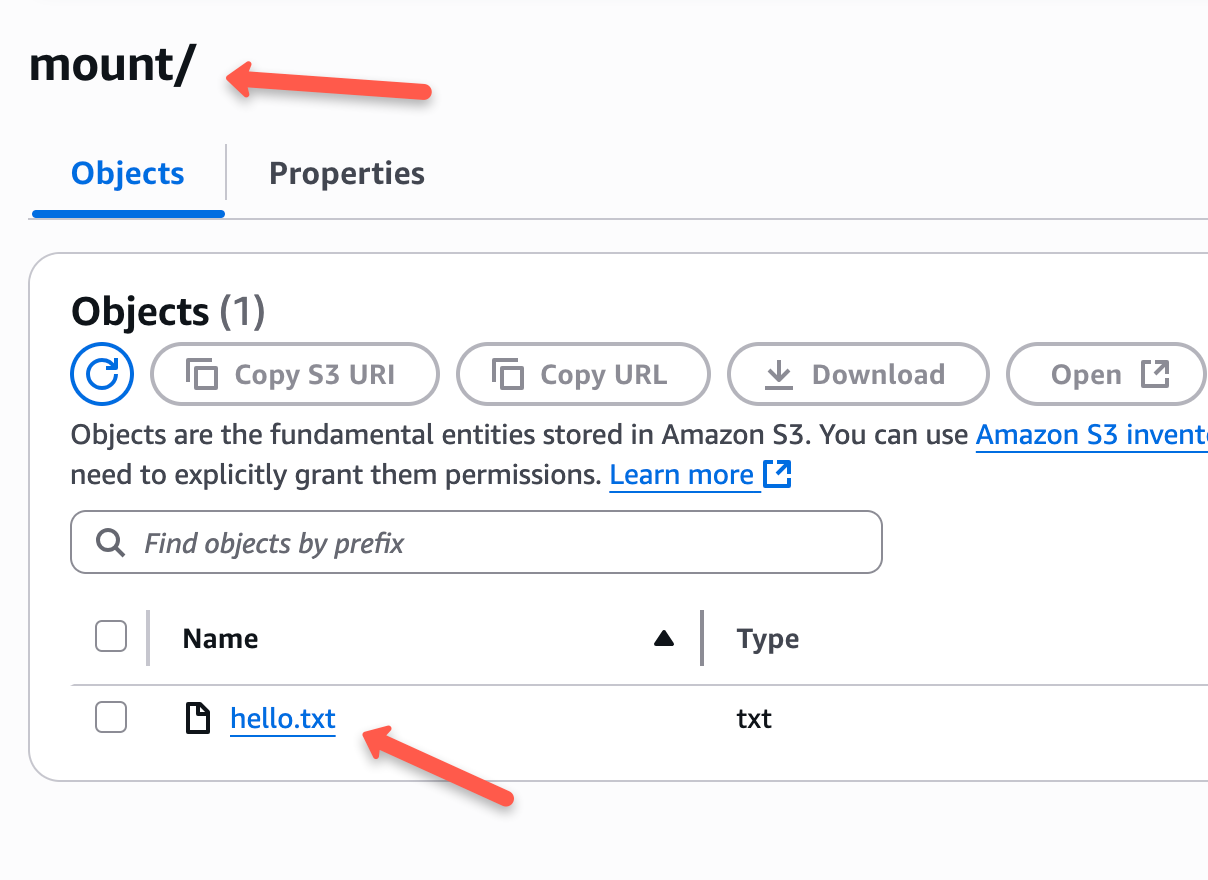
Step 3: Test the s3 Mount
Let's test the mount by creating a folder inside the mounted directory and creating a file inside that folder.
To create a new folder, run the following command.
sudo mkdir /mnt/dcmount/mountNow, create a file inside the newly created folder.
sudo touch /mnt/dcmount/mount/hello.txtCheck the S3 bucket, you can find a new folder and a file inside it as shown below.
If you no longer want the mount, run the following command.
sudo umount /mnt/dcmountMount S3 with EC2 fstab (Persistent Mounts)
But first, what is fstab?
The fstab (short for file systems table) is a file in Linux and Unix systems that tells the system which storage devices or filesystems to mount automatically when the server starts up.
It is the common method used to mount volumes in EC2 to persist EBS or EFS volume mounts during reboots. It’s located at /etc/fstab
Mountpoint for Amazon S3 now supports automatic mounting of S3 buckets using the standard Linux fstab file.
This makes it easier to set up persistent mounts for your S3 buckets on EC2 instances.
By adding a simple entry to fstab, your S3 buckets will mount automatically whenever the instance boots, just like local drives or network file systems like EBS or NFS.
The best part is that this approach follows familiar Linux system admin practices, making mount management more consistent and centralized.
You can follow the steps below to test it yourself.
Open the fstab file:
sudo vi /etc/fstabCreate a mount directory for the bucket using the following command:
sudo mkdir -p /mnt/s3-bucketAdd the following line to the fstab file and save it. In this example, dcmount is the S3 bucket name, and /mnt/s3-bucket is the local mount path. Make sure to replace these with your actual bucket name and desired mount location:
s3://dcmount/ /mnt/s3-bucket mount-s3 _netdev,nosuid,nodev,nofail,rw 0 0Now test the mount using the following command:
sudo mount -aOn a successful mount, you will get the following message.
bucket dcmount is mounted at /mnt/s3-bucketAutomating with EC2 User Data Script
In real-world scenarios, you'll often want to automate the fstab entry using EC2 user data scripts. This is especially important since most deployments use pre-configured AMIs, and instances are launched as part of an automated pipeline.
Here's a simple, tested shell script you can use in your EC2 user data to add the fstab entry at launch time.
#!/bin/bash

S3_BUCKET_NAME="dcmount"
MOUNT_POINT="/mnt/s3-bucket"
FSTAB_ENTRY="s3://${S3_BUCKET_NAME}/  ${MOUNT_POINT}  mount-s3   _netdev,nosuid,nodev,nofail,rw 0 0"

sudo mkdir -p "${MOUNT_POINT}"

if ! grep -q "s3://${S3_BUCKET_NAME}.*${MOUNT_POINT}" /etc/fstab; then
  echo "Adding S3 mount to /etc/fstab"
  echo "${FSTAB_ENTRY}" | sudo tee -a /etc/fstab
else
  echo "S3 mount entry already exists in /etc/fstab"
fi
FAQ
Can I mount multiple S3 buckets to the same EC2 instance?
Yes, you can mount multiple s3 buckets by repeating the mount commands with different directories inside ec2.
Is Mountpoint for S3 free to use?
Yes, it is an open-source client developed by AWS. However, standard S3 request and data transfer costs apply.
How is this different from s3fs-fuse?
Mountpoint for S3 provides higher throughput and is optimized for AWS workloads compared to s3fs-fuse.
Does the S3 mount persist after EC2 reboot?
No, not by default. You must configure it with fstab or EC2 user data for persistence as explained in the blog.
Conclusion
In this hands-on guide, we looked at two key methods to mount an S3 bucket on an EC2 instance. Manual mounting and automatic mounting using fstab.
This approach is widely used in real-world deployments, especially in data pipelines and analytics.
Try it out and let us know your experience in the comments!
